
Новини
Reporting: YES, this is a spammer
SPAM ALERT
According to me, this user is NOT a Scale Modeler and his profile should be DELETED.
SPAM ALERT
Please help usVerify this user and негов posts and agree or disagree with this user being a spammer: Go to vote page
2 April, 03:42


")
I enjoyed this kit. Tasks to be aware of: Remove the "ceiling" portion of the glass. It will help the side windows fit better. Test fit the interior and trim the perimeter to keep from splitting your cab halves apart. Be aware of rivets being in the way of the cab running lights. The mirrors a VERY fiddly. They take lots of patience. Wait to check cab to frame alignment before installing front tires/axle.
")
2 April, 02:45


добави нов фотоалбум.
7 снимки
Album of Many things. 
1:35
The top Carriage is nearing completion. God I love German engineering!


Проект: Flak 36
Scratchbuilt
4 27 March, 21:07
Nice Zundapp 👍 Looking forward to see your progress in your Dio.
When you can, I trully recomend buying a cheap airbrush and a small compressor. I'm sure, you will like using it 😉
I say cheap becouse to begin airbrushing nowadays there are lot's of cheap airbrushes that work just fine, if you take care of them.
1 27 March, 22:09
Can I just add, yeah you're right, it probably has been a long long time since I have promised i would pick up an airbrush but honestly bud. At the moment I just want to continue brush painting. I want to work on the skill considering I've only just got back into modeling with a year worth of experience. But when I get a chance at making the correct changes to my desk, I will install such a airbrush. 😁 By the way. Glad you like the Zundapp, it isn't finished...yet, I will be adding small foliage details after the diorama is put together. Still got a long way to go. But that is exactly the point. I ain't rushing this.
27 March, 22:48
Yap n.p. I understand. Take all the time you need and enjoy it. That's what matters 😉
1 27 March, 22:53
добави нов фотоалбум.
16 снимки
The red Vega
1:48
A bit dramatic?
This is how the Vega would mess up the hairstyles of museum visitors :)


23 1 April, 14:57
After a few self-inflicted mishaps, the model of this famous Vega was finally finished.
Many thanks to Jacqueline in Switzerland for her help!
1 April, 15:10
Looks better than the one in the NASM (I've seen her there...). Congrats!
1 April, 15:36
As usual: great job! I like your definition of gloss ("scaled down") 🙂. I do the same to avoid the toy effect. I hope to see more golden age birds in the same manner🙂
1 April, 19:05
добави нов фотоалбум.
21 снимки
The Goblin as it might look in a museum
1:48
The little Goblin won the gold medal for 1:48 aircraft in the Master class in the Euro Model Expo 2025 contest.


Проект: McDonnell XF-85 Goblin

126 11 March, 09:32
WOW, WOW and a couple of extra WOW's!
Amazing result Frank. Without doubt the best Golblin model I've ever seen.
I bet Halberd Models would love to use your photos for their marketing.
1 11 March, 09:44
It looks so weird but very nicely done - superb craftmanship 😆
1 11 March, 10:21
Very well built and finished. I wonder how they ever thought this would be a viable fighter.
1 11 March, 11:42

Thank you very much mates!
I added two new pictures with the protection bow and securing fabric belt. I added also dust pigments to the wheels what I forgot before.
11 March, 18:26
Outstanding work in traditional Bughunter style! And done, in what I find, an unbelievable time frame 👍
2 11 March, 18:31
Alec K said it for me. There's nothing to add. 👏👏👏👏👏👏👏👏👏
Actually I have something to add - great photos! 👍
1 11 March, 19:04
What a wonderful feedback - Thank you very much to each of you 👍
gorby - your guess was right! It will appear on the Facebook page of Halberd Models 🙂
Yes Alec, I've been working on it all day - 24 hours a day! And because there wasn't enough time, I added the night. 😎 Joking aside, yes I spend a lot of time. And this winter was very warm here without snow/ice, so my airbrush sessions was not blocked by the iced roof window.
2 11 March, 21:43
Of course I had to come over and check out the glamour photos. Beautiful build and wonderful photography, as always. Such a cool build of a really unique subject
1 12 March, 01:15
The photos are well done to show off this stunning and unique build.
1 12 March, 01:38
Frank, you did a great job! I have no choice but to agree with the previous posts. And frankly, when your name appears on a project, we know in advance what kind of result we can expect 😉
Congratulations on the successful completion of this interesting model!
1 12 March, 10:47
Oh boy... I hope I can get my special hobby somewhere near this... a real stunner
1 12 March, 11:34
Excellent work as usual. I still think this is an ugly plane though. Whoever designed it must have been on a bad trip.
2 12 March, 13:34
Another big Thank you all for your kind words!
@Skyhiker The design was made under strict requirements: it had to fit into the bomb bay of the B-36! Therefore folded wings were a must, the multiple control surfaces at the tail as well and of course the hook is the visible area of the pilot. It also needs actuators for the wing and hook, four guns with ammunition and fuel, all of which need space in the short fuselage - so there was no other way than this egg design. The design was good enough to achieve good performance figures - the "only" problem was the strong turbulence from the mother plane, so it was assumed that a normal pilot would not be able to hook on back.
4 12 March, 14:05
That's one of the reasons it's one of my favourite aircraft. It's remarkable they managed to fit so much into such a small aircraft. I think it's an amazing design.
1 12 March, 15:08
gorby, the unique design and the look (together with the carrier) invited me to buy and tackle this kit.
If anyone would like to see this model live - this weekend is your chance! I will be showing it, along with others, at my club's exhibition in Ergolding here:
11. Bayerische Modellbautage (15. and 16. March, Ergolding DE)
It would be nice to see you there!
1 13 March, 17:53
Thank you Bernhard! Coming from a master like you this means a lot!
Do you want to see it on the EME in Lingen?
14 March, 21:50
I absolutely love it. It is such an odd subject but you certainly did it justice.
1 14 March, 22:48
Thank you very much mates!
The little Goblin aroused a certain amount of interest at the exhibition today so it will travel with me to the EME 😉
2 15 March, 19:42
Thanks mates!
Yes Tom, this little jet will be there!
After coming home from our exhibition this evening, I decided to leave my models packed up for the EME in Lingen.
2 16 March, 19:40
It looks like I was the first one who finished the 1:48 version of the kit, so this model is now also on the Facebook page of Halberd Models, together with link to Scalemates 👍 And I got a very very kind feedback. Thanks to the folks at Halberd Models for creating this kit!
3 17 March, 21:37
That is very cool Frank!! First one. And you've set the bar extremely high!!
1 18 March, 09:14
Kyle, I hope, it will generate more interest and I'm sure some more will follow, may be more in 1:32.
1 18 March, 18:08
I am following along with a 1/32 build on our forum at the moment!! Also very neat to follow along with.
1 18 March, 20:48
Thank you very much for your lovely comments!
Michael, perhaps you weren't expecting such a topic from my bench, but I have broadened my interests a little 🙂
1 21 March, 18:33
How did I miss this one before? Amazing result bughunter! Your work with intricate tiny details always makes me green with envy. I get fumble fingers trying to put things like tiny PE buckles on and you make it look easy.
1 21 March, 20:26
Thank you John four your comment!
It's clear that you can easily overlook a jet project if you only expect biplanes from me 😉
21 March, 21:21
After a great weekend at the Euro Model Expo in Lingen, I'm now back home after a long trip.
The little Goblin won the gold medal for 1:48 aircraft in the Master class in the Euro Model Expo 2025 contest. 🙂
4 31 March, 17:15
Many thanks to you all for these kind words!
@Tim Many thanks for the visit to my booth, the discussions and the opportunity to explain my models. It was a pleasure!
1 31 March, 19:59
TBH - no remotely surprising Mr Bug, all your work is stellar! Well done, Sir
1 1 April, 00:33
That one actually existed, and it looks amazingly like an Egg kit. Very nicely done, I like it! Thanks for showing it.
1 1 April, 08:13
I had the opportunity to see the model live in Lingen last weekend. It is a piece of jewelry and it can even fly! 🙂
1 1 April, 08:18
Dang, major fomo here… congratulations on the recognition, it is certainly deserved 👍
1 1 April, 12:01
Well deserved award, Frank! 👍
Agrippa 😄 that leads to the question of what would an egg plane kit of this already egg shaped plane look like?
3 1 April, 12:14
OMG mates, your overwhelming feedback leaves me speechless! Thank you very much to everyone ❤️️
@John and Agrippa: an egg of an egg - does its end as ball? 😄
1 1 April, 14:41
Frank, congratulations! And I wish you this award! Without any doubt, it is well deserved.
1 April, 15:50
добави нов фотоалбум.
30 снимки
Special Hobby | No. SH48017 | 1:48 | Gloster E.28/39 Pioneer (Squirt) "First British Jet"
1:48
WORK IN PROGRESS. UPDATED: 18/3/24...


Проект: Gloster E.28/39

29 27 August 2024, 11:16
Hi Mr D 👋 yeah it's a cute airframe! Especially when you sit it next to a same scale F-14! Hahaha. Thanks for your compliment and interest 👍
8 October 2024, 15:40
I built this kit not long after I returned to modelling. It was a bit of a painful experience and I haven't gone near Special Hobby since. 😄
No doubt you'll make a much better job of yours.
12 November 2024, 10:40
Hi Gorby and Denis 🙂 Thanks for stopping by with comments and info. @gorby, yes this is the first Special Hobby kit I've attempted. I'm not confident I will accomplish what you kindly say. Nevertheless (with your talent) it's very kind of you to even suggest - I'm chuffed! @Denis, I'll definitely follow your advice, metal finish (not yellow) it is for the wheel wells. Thanks also to those who've liked 🙂 👍
13 November 2024, 11:27
Going through your photos and noticed you had do, a lot of repair work before moving forward. However your end result is outstanding.
1 18 March, 18:57
That will be an important piece of history for your collection 👍 And you managed a crude kit. I would never have thought of using cable ties 🙂
1 18 March, 19:21
Can really see the crossover from I.C to Jet power on this model, Great build Neil.....a very important historical aircraft 👍👍👍
1 22 March, 21:41


добави нов фотоалбум.


10 17 March, 03:26
I suppose it will be a week or two before all the parts are here...
2 18 March, 16:56
I'm still waiting on the correct seats and cockpit details... Looks like I have to scratch build details for the wheel wells!
1 23 March, 21:17
Just got the IAF F-15I Ra'am decals from Cartograph!!! Things are coming together!!!
1 24 March, 00:16
Мне пришлось купить декали, катапультные кресла и антенные конвертеры F-15I. Детали F-15I были куплены в IsraDecal.
26 March, 20:18
добави нов фотоалбум.


38 23 March, 23:26
Hello all, thank you for your kind words, @Roy, I used DEF Model Movie Collection No.2 Jolly Rogers 1978, but only for the vertical stabs and national insignia. Nothing wrong with them, they are quite nice but the original Cartograf's ones were of superior quality.
1 29 March, 12:21
добави нов фотоалбум.


36 31 March, 14:36
Very cool that you achieved this splendid result with the raised panel lines of this older Italeri kit. 👍
1 31 March, 15:41
@ Patrick Hagelstein Thank you! I engraved mold lines on some upper areas of the fuselage and made it blend with the raised panel lines in better.
1 1 April, 06:08
Neat! And I love the subject (on my queue too).
Shrike, Standard, Harm and Maverick: for SEAD it has them all!
Good job!
1 April, 17:35
Love it. I'm fond of this old Italeri kit despite (or maybe because of) it's simplicity and have enjoyed every one of the 3 I've built. I've 4 more in the stash and you've given me great inspiration and ideas for them.
1 April, 18:22


добави нов фотоалбум.


2 1 April, 22:48
добави нов фотоалбум.


19 23 August 2024, 05:55
One question I'm asking myself: do I want to build the RHD option? That would be pretty cool but it won't fit into my project of the Silver Corvette Collection. Good, that I have this kit twice. So I can build one silver and the other one in another color with RHD and fitting license plate.
Take a look (if you want) into my review - kitreviewsonline.de/..25-von-revell-07714/ - sorry, only available in German.
23 August 2024, 05:59
Curious that both RHD & LHD are available.
I've only seen one LHD C8 in the UK
23 August 2024, 08:56
Don't forget that other countries are also RHD including Japan, Hong Kong, and Singapore.
23 August 2024, 10:06
Yeah George, I was thinking that but would GM actually export Corvettes to those countries as well as India, Australia & New Zealand?
23 August 2024, 14:14
Christian, I read your review, and what did I see? The Revell now CAN make wheels, like the original ones- what a progression!
So, I'm curious for the build!
1 23 August 2024, 16:58
Thank you for your feedback and Information! While I wrote the review I was wondering that the Corvette never had RHD. I didn't do more research and believed my source.
I'd like tl see see some numbers how much Corvette were sold in RHD countries. Have to look that up. I think it should be a lot. Why else they gave this option to the costumer now? I think the japanese market could be the most interessting one.
23 August 2024, 17:58
4 months ago I started? Where did the time went? Nevertheless: yesterday I sat on this to check the status and sorted the parts for the planned color for painting. Not more.
5 February, 05:32
I painted the part the last days. I want to paint the interior with red accents. After painting the affected areas I see how small some of the spots are. How I'm supposed to cover it up is still a little mystery to me.
The body is fillered, wet sanded and ready to get painted 🙂
By the way: did you know, that the German instructions only offer some black on another black on a different shade of black *lol* collored interior? The instructions for the US issue offers you that blue interior. Strange.... I added two picture for you guys (and girls) 😉
6 March, 06:24
Who knows :/
On the weekend I finished the chassis. The wheel arches are mounted too. But befor that, I wanted toshow this exquisite engine. There are a lot of details and parts. Sadly, the engine will be hidden in the rear and only the top will be visible. It should be worth it, to build the powerplant seperatly and put it near the model kit for display.
11 March, 06:28
Just to confirm, you have painted the interior accents. Were there no interior decals with the kit?
18 March, 11:29
Your suggestion is right. The German issue doesn't have any colored decals for the interior (except speakers and switches). I added a picture of the decal sheet. Number 18 and 19 are for the dashboard / bezel cover on top somehow. But nothing for the seat, sidepanels, dashboard or middle console.
18 March, 15:31


добави нов фотоалбум.
7 снимки
AH-1W Super Cobra Build Log
1:72
All assembled and ready for priming


Проект: AH-1W SuperCobra


 1+
1+ 4 31 March, 15:16


добави нов фотоалбум.
65 снимки
The calm before the storm (Eve of TET 1968)
1:35


Проект: Vietnamwar_gb2024
Scratchbuilt
58 1 September 2024, 18:19
looking forward to seeing more of this project👍.my uncle(5th SF) was in country just after TET and one of the few things he ever... spoke of more than once, was about riding on top of a M113 that rolled over a mine
12 October 2024, 18:07
Thank you Mona, that must have been a terrifying experience. The idea would be a fortified position in the Mekong Delta. I'm planning to build a sandback bunker and a piece of ricefield. The M113's will be stationary in a defensive position. Soldiers will be relaxed not knowing what is coming. But the layout is still evolving. Haven't decide the size of the groundwork yet. I'll be starting the diorama base soon... Will be continued 😉
13 October 2024, 08:21
Thank you Neuling, Spanjaard and Kim! I'm starting the diobase this week!
5 November 2024, 10:35
Looking good Mathias. Lovely work on the M113's. What did you use as the 50 cal casings?
5 November 2024, 12:09
Thanks Mr James, I used simply the copper of an electric wire. An idea I got from lasercreationworld. It is a bit too narrow, but the overal impression works I think.
5 November 2024, 20:17
Very nice looking vehicles, above all the interior; also the entire scene - I'm very curious about this diorama.
13 November 2024, 10:40
Thx Rui and Thomas E.! I hope it turns out as I am imagening it!
13 November 2024, 15:24
you may find this helpful (I hope so 🙂): data.opendevelopment..tnam-.compressed.pdf (5.11.2024)
12 January, 13:30
Good "gardening" work then Mathias,
you will have all my comprehension!🤗
15 January, 15:32
I'm experimenting with a thermoplastic called Worbla. This leaf was manually made. Next try is to lasercut it. If this is possible, the possibilities will be endless!!
16 January, 09:52
I've not heard of Worbla before. This is an interesting video about using it:
Youtube Video
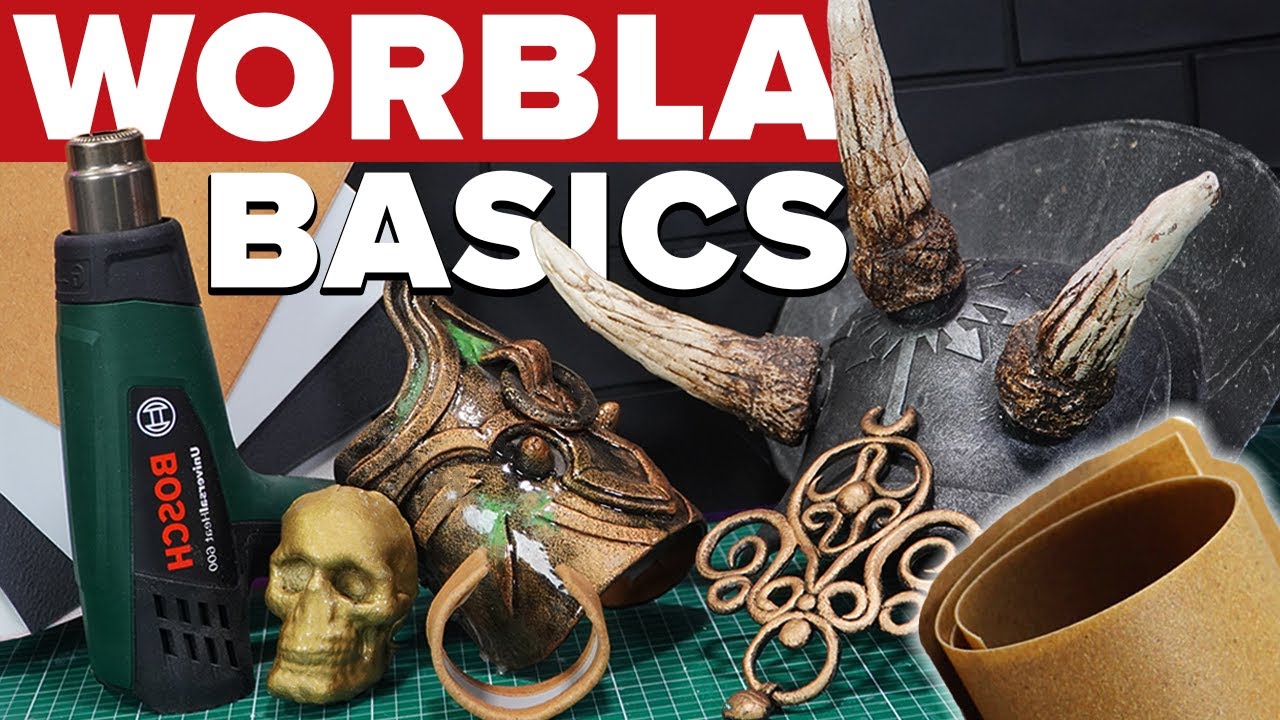
3 16 January, 11:17
I used it for my other artwork: instagram.com/artrop..gsh=OWh4c2Jyd2Vqamgy
Thx!
1 16 January, 12:02
OMG - I'm so glad I saw this. The M113s are simply stunning! The Dio is really shaping up to be a killer as well - don't know how you havent\'t gone crazy building the palm leaves, but wow!!!!
1 February, 14:53
@CaptGPF, thanks man! I cheated a bit on the palmleaves. I lasercutter the leafs in a thermoplast sheet, but there is still a lot of finalising to do offcourse. I don't think this method has been tried before... Also thank you Rui!
1 February, 21:53
cheated? i certainly disagree. you did a great use of what you have at hand. why should you buy the same stuff as aftermarket if you can make your own? 😉 great job
1 1 February, 22:21
Totally agree with Spanjaard - it's not cheating if you make it yourself. Making kits doesn't mean you have to suffer if a more efficient way can be used!
2 February, 16:10
Thanks for the approval guys! Very excited to see the end result
2 February, 18:44
Looking excellent so far. The palm trees are the most realistically modelled ones I've seen.
20 February, 17:07
добави нов фотоалбум.
54 снимки
Bf 109 E-1
1:48
Won the gold medal in the Aircraft 1:48 beginner category at Euro Model Expo ??


Проект: Messerschmitt Bf 109 E-1


47 26 May 2024, 18:26
Made some progress on the Wingsy Kits Bf 109 E-1. It is really a lovely kit, very nice to build.
19 July 2024, 06:05
Slow progress over the past weeks, but I now managed to finalize most of the airframe and rescribe the typical panel lines on the rear fuselage upper and lower spine.
21 October 2024, 16:32
Started the preshading. One needs a quiet day and move slowly along.
12 November 2024, 11:15
Finished with the preshading 😊 I did the blue areas with H56 Intermediate Blue and the rest with H65 RLM70
16 November 2024, 11:49
добави нов фотоалбум.
166 снимки
JAS-39C Czech Air Force no. 9234 - Centennial - WIP
1:48
I started making the trim (mirror shields) on the front of the cab overlay. The Italeri kit ignores this part, so I had ...


Проект: JAS-39C Czech Air Force


 2+
2+ 85 27 November 2023, 19:59
Welcome Robert, nice to see you again at my model build. 🙂
It will again be a plane with a special paint job.
27 November 2023, 20:12
Robert, you've come at the right time. I started airing my show today. 😉
27 November 2023, 22:15
Welcome, Rando. I'm glad you're here. You're not wrong, the plane will be in Czech colors. 😄
27 November 2023, 22:19
Nice and following this build! I heard that the panellines of this Italeri kit are a bit soft or a bit deep, are they? It looks, well, acceptable.
28 November 2023, 14:25
Mark, it's true that the plastic of this kit is a bit softer than the standard kit, but it's nothing terrible. Also, the panel lines are a bit thicker (compared to Tamiya or Eduard kits), but again, not entirely bad. The kit does have a few minor shape flaws as well, but overall it's pretty good and with a little effort you can build a nice JAS-39 model from it.
I will describe the kit's faults and how to fix them, including modifications to the "C" version (the kit represents the original "A" version), as the model is built.
28 November 2023, 18:50
I'm preparing the hull for its closure. I've glued the assembled engine and cockpit to the left half of the fuselage.
3 December 2023, 11:33
Looking great! Taking a seat for sure 👍
Vloudila se ti tam čeština, pics 13-16. Jen v případě že to nebylo úmyslně 😉
3 December 2023, 14:24
Hello, Alec! There's always room for you at my place. 🙂
Thank you for letting me know. It was my fault. The texts are already in English.
3 December 2023, 15:03
I haven't put much together yet. The fuselage halves can be glued together without any problems, they fit together well and the panel lines follow each other. The glued joints are gapless, just sand them lightly. When gluing the fuselage tip, care must be taken to ensure that it is turned correctly. If the tip is glued to the fuselage with the bottom side up, it will not follow the shape of the fuselage correctly when viewed from the side.
If there are any problems during construction, I will point them out.
4 December 2023, 12:56
Work on the model continues. The first problems are appearing. It was necessary to modify the joints between the upper and lower half of the wings and also the joint between the fuselage and the wings. The use of putty and sanding is unavoidable.
5 December 2023, 22:55
Little progress today. I glued the wings to the fuselage and started prepping the other parts.
6 December 2023, 23:45
Rando, thank you for the compliments. 🙂
The technique of extending the fuselage by gluing struts from inside the fuselage is nothing new. I have been using it successfully for many years. In my opinion, this technique is better than gluing the wings to the fuselage without extending the fuselage and then repairing by filling large gaps with putty and sanding.
7 December 2023, 10:40
I'm continuing with modifications to fix some bugs in the model and rebuild it to version "C".
11 December 2023, 00:30
I sanded and puttyed the model. And I got to the point where it was hard to recognize the places that still needed to be repaired. So tomorrow (time permitting) it's surfacer's turn. I'll take some pictures tomorrow.
12 December 2023, 21:37
Hi Alec, I use Surfacer 500. After finishing minor finishing work and sanding the Surfacer, I spray Base white 1000 (both are Gunze) on top.
I then spray the camouflage paints on top of that prepared surface.
14 December 2023, 08:38
Most of the errors are already corrected after sealing. Now I will add some small details on the surface of the aircraft. I'll have to scratch most of them.
15 December 2023, 21:31
Not much time to work on the model this week. But some progress was made on the model after all.
23 December 2023, 23:44
When I looking the photos I found minor differences in the details on the underside of the rear fuselage. The model will need to be modified.
30 December 2023, 23:50
Beautiful work! Thank you for sharing all of this tremendous research detail - very fascinating. I have this same kit on my "to-do" shelf, so I'll be looking over your shoulder for tips and ideas.
6 January 2024, 13:48
Christian, welcome aboard! I'm glad you're interested in my project.
When you look over my shoulder, make sure you don't make the same mistakes I did. I've just discovered that my inattention has caused the flare hole to be too far forward. I'm working on correcting that mistake right now.
And I remind you that the modifications described are only for Czech Gripen. For other users' aircraft these details may differ.
7 January 2024, 10:48
Another one to join to the observation, as I will have to do it at some point aswell . Is it the Front Noise need to be replaced by the quick boost?
7 January 2024, 10:54
Welcome Vintagemodeler! I hope that in the course of building my model you will find inspiration for building your Gripen.
I'm very sorry, but my English skills are not perfect and I don't understand your question. Could you elaborate on your question a bit?
Thank you.
8 January 2024, 08:43
Yes mr! I cant believe how you did those amazing scratch! i just mean if front noise looks good, as few people told me that it need the QUICKBOOST upgrade part, i get it for mig 29 and Su-27, but didnt get it for JAS-39 yet, as i didnt saw that much difference.
kind regards
9 January 2024, 11:21
")
Vintagemodeler + Mark D, thanks for the explanation.
I think the QUICKBOOST nose is not necessary. According to the drawing, the nose from the kit has a good shape matching the drawing. The bad shape of the nose is elsewhere. The top of the nose needs to be corrected. The windshield in the kit rests on a raised area that is not on the real model. However, this can easily be corrected with a little putty.
A clear description of the basic modifications to the Italeri kit can be found here: kits.kitreview.com/jas39agripenreviewrw_1.htm
9 January 2024, 22:44
Moving the flare launcher to the correct position is done. I will fix minor errors after spraying the model with Surfacer.
9 January 2024, 23:06
Vintagemodeler, thanks you!
I agree, the article clearly describes the modifications of Italeri's biggest faults. But since this article was published (2005) many JAS-39s have been upgraded (some machines more than once) and the appearance of some details on Gripen aircraft has changed. When building a particular machine, it's good to have not only a drawing, but also photos of the particular machine.
12 January 2024, 23:03
I'm continuing to restore the lines between the panels. It's slow going, but the lines being restored are increasing.
12 January 2024, 23:04
Thank you Alec!
Vintagemodelerer, the quality of the Italeri kit (considering the time of release) is somewhat half-hearted. But with some effort it can be used to build a nice model. I've already made most of the modifications. Once I finish restoring the panel lines, the model building will go faster.
14 January 2024, 19:51
It's been a while since I looked at this one, Ludvik; it is progressing nicely. Your work is exceptional; the attention to detail is beyond my imagination. I love watching what you have done.
16 January 2024, 10:48
Jennifer, thank you for your kind post. I'm just trying to build my models as best I can and it's great fun for me too.
17 January 2024, 20:21
Oh, two Saab at once - no wonder that I nearly missed it! Nicely done too.
17 January 2024, 20:24
Yes, I'm building two Gripens at the same time. Both aircraft have a large number of the same parts and the same basic grey paint. It makes my job easier.
17 January 2024, 21:32
Italeri kit contains only one additional tank. But I need two tanks. That's why I decided to make them. To make both tanks the same, I made two.
18 January 2024, 09:39
Hi, Alec!
There are resin tank castings that can be purchased as separate accessories. However, their price, along with the cost of shipping, is high. It's much more than half the price of the Gripen kit I bought from Italeri. So I decided to make the additional tanks myself.
The choice of how to make the tanks was simple. Making the moulds and then casting the tanks is quite laborious. In addition, I do not have a vacuum pump, so air bubbles would form in the castings. I also don't have a 3D printer and I don't know how to model in 3D software.
Therefore, I figured that making tanks out of paper was the easiest way for me to make them at home.
I think paper is an underrated raw material in plastic modeling. With a little knowledge and skill, you can make various accessories (e.g. additional fuel tanks) out of paper. And as a bonus for the work involved, paper add-on tanks are very light and don't put unnecessary strain on the landing gear. 😄
24 January 2024, 11:21
I agree, all good points. For what it's worth, here are my few observations regarding casting from personal experience: for a small job like the tanks, you really don't need a vacuum pump (nor, and IMHO more importantly, a pressure tank). Yes, you will likely get some bubbles in the resulting cast, but those can be fixed relatively easily 👍
26 January 2024, 14:02
Alec, I also have experience with making parts from cast resin.You are right that bubbles can be fixed fairly easily with putty. But for making 2 tanks I find casting unnecessarily laborious.
29 January 2024, 10:03
I'm continuing to build the Gripen. I finished restoring the lines between the panels and added more details to the fuselage.
29 January 2024, 10:04
I'm continuing to fix the minor surface errors that surfacer showed. I've also started riveting.
31 January 2024, 12:49
Love the super detailing - as well as the extensive riveting work. Are you planning to rivet the wings as well? I will need to use your trick of using wires to pull the wings up to close the gaps on the next build. The Italeri kit is a good foundation for the Gripen, but it is sorely lacking in details - I'm glad to see you putting that into the kit.
6 February 2024, 17:07
@CaptGPF
Thank you for your comment. I'm really glad that my ideas will serve someone else.
I don't plan to rivet the wings. None of the photos (that I have) or the drawing show any rivet lines on the wing surfaces. Except for a few rivets on the leading and trailing edges of the wings. And I have already made these few rivets on the wings. If there are any rivets on the wing surfaces, they are ground in with the surface and not visible under the camouflage paint.
On the other hand, I'm considering removing the rivets from the Gripen Kitty Hawk wings (Kitty Hawk made the rivets marked all over the wing surfaces).
I will definitely do some weathering on the wings though. It's very visible on all Czech machines.
6 February 2024, 21:33
I have little time to build models lately. So at least in one short spare moment I made an experiment with tinting the transparent cockpit covers.
7 February 2024, 07:50
Hi Ludvik! This build turns out t be another "crazy" build ... your view for details is amazing. Do you spend more time on research or building? I´m not sure 😉 again something spectacular is going to come here. Keep going (❁´◡`❁)
7 February 2024, 08:05
Wow, your tinted canopies are looking great! I once used a mix with Alclad (on a egg plane) and nearly ruined the clear plastic as it was dull matt afterwards 🙁
7 February 2024, 08:55
Thomas, at the moment my lack of free time doesn't allow me to pursue modelling as much as I would like 🙁. It's just a transitional period and I hope it will end soon.
As far as research is concerned, I have a database on my computer with information, drawings and photos of aircraft, literature ..., for all the aircraft that interest me and I would like to build models of them. And I am constantly adding to this database. So the moment I start building a model, I simply open the appropriate folder in the database and draw from the information I have stored there.
In some cases, for example, when I was building the MI-24, I was lucky enough to work with a guy who works in an aircraft repair shop as a mechanic, and he would take pictures of various details of the helicopter's structural elements and email them to me, according to my instructions.
I am now using similar friendly help in building both Gripens.
7 February 2024, 22:51
Bughunter, the procedure I used, I found on the website of a Czech modeller. With long-term testing of different color types from different manufacturers, it achieved the best results with metallic Gunze paints (MC series) and Gunze Mr. Leveling Thinner. The procedure is simple. I mixed gold (MC219 - brass) and brown (H017) into about 1 ml of diluent. From each colour to just a small drop (on the tip of the brush). Metallic paint does a partial transparency effect based on your point of view. From a certain angle, the cabin appears opaque, and from a different angle, you can see right through it. And that little bit of brown puts a slight damper on it.
The original instructions recommend the metallic colour MC215 - copper, but the author used this on American machines. According to the photos, the Gripen cabins are toned to a tawny colour and this is better matched by the golden hue of brass combined with brown. The precise dilution ratio is not critical, but he wants to test it. The important thing is to spray gradually a few thin layers (just to dust lightly) and spray the next layer of paint until the previous one has dried. With a thick layer, diluted metallic paint makes irregular spots.
And if it doesn't work, just wipe off the paint with a soft cloth dipped in thinner and start over.
8 February 2024, 00:43
That is impressive, tinted canopies. Thank you for sharing the technique.
8 February 2024, 00:49
Jennifer, it was my first attempt at a tinted canopy. I found a tutorial online and decided to give tinting a try. I did a few experiments on pieces of clear plastic first so I wouldn't ruin my canopy if it didn't work out. During these experiments, I tried different shades of metallic paints and chose the best combination of colors based on the results.
8 February 2024, 21:47
Gripen got a smart white coat (primer). Once the cockpit equipment is completed, it will be the turn of spraying camouflage colours.
9 February 2024, 20:39
Have you dipped the canopy in for example Alclad Aqua Gloss? It helps for transparency.
9 February 2024, 21:53
I read on Finescale modeler that you could get a golden tint using a mix of transparent smoke + transparent yellow diluted down with thinner.
10 February 2024, 07:23
@Mark D
The canopy in the photo of the partially assembled model is not the final solution. I'm still experimenting with tinting the cockpit canopy. The goal is a canopy that will be transparent from a certain angle and partially act as a mirror from another angle. I'm well on my way, but it still needs to be fine-tuned.
@CaptGPF
There are more ways to colour the canopy, of course. Using transparent paints is probably the easiest way. But it doesn't achieve the mirror effect described above. To give you a better idea, I have included a picture of the cockpit canopy from several different angles.
10 February 2024, 10:58
I had good results with holo nail powder:
Starting Pic 24
Fat Amy WIP | Album by halohead (1:48)
10 February 2024, 16:23
@CaptGPF
A very thin layer of metallic paint takes care of the angled transparency effect.
@Daniel
Thank you for the illustrative example. Your canopy looks great.
11 February 2024, 19:57
I'm continuing work on the cockpit. I am gradually adding more details to it.
12 February 2024, 23:30
The "box" at the rear cockpit wall had to be modified. After correcting its dimensions and location, I added a few cables to the rear of the cockpit. More cables will follow shortly.
13 February 2024, 22:29
Jennifer, thank you! I hope the cockpit will look even better with the addition of more "cables" and the scope slide. 😉
14 February 2024, 08:59
I wasn't in the mood for the delicate work of adding wiring today. So I busied myself with fixing a badly shaped engine nozzle.
14 February 2024, 23:05
The cockpit cables are in place. I glued a few more PE parts to the fuselage and now I will prepare the model for spraying.
16 February 2024, 23:05
The cables look amazing, Ludvik; your attention to detail pays off.
17 February 2024, 01:18
Jennifer, thank you for the compliments. 🙂 I appreciate it.
17 February 2024, 08:53
I prepared the model for spraying with camouflage paints.
17 February 2024, 22:33
Thank you, Daniel! My speed is only temporary. Soon I will start making smaller parts and the model building will slow down. 🙁
I have started applying decals to the painted model. So far I have only managed to apply the decals with the special anniversary coloring.
19 February 2024, 21:44
The colour scheme of the in-line machines in a combination of two grey colours with little visible markings is practical for military purposes, but somewhat boring. It's good that there are aircraft with special paint! 😄
19 February 2024, 22:47
Due to the extraordinary activities that took place during the day, I only got to the model briefly today. In those few minutes I only managed to glue a few decals. I added the national emblems and a few small labels. I will add photos later, when all decals are on the model.
21 February 2024, 17:46
Robert, from the first moment I saw the pictures of this Gripen in the attractive anniversary livery, I knew I would eventually build one. When the decals for this machine appeared on the market, I didn't hesitate a moment and bought them immediately. And now the moment has come when I am fulfilling my resolution.
21 February 2024, 18:03
I "painted" the cockpit canopy with strips cut from painted decal paper.
25 February 2024, 22:25
Jennifer, thank you for your compliment. 🙂
The work on the baldachin will continue. I've only finished the outer part. I'm still working on the inside of the canopy. The inner frame, cross brace, rear view mirrors and the "collar" in the front need to be completed.
29 February 2024, 11:13
Great idea. I have always wondered why there is not a product to just stick to canopies instead of painting them for the frames.
29 February 2024, 11:56
Thanks for the tips on the canopy - I have an AH-64D in the queue and was wondering how to achieve the same effects you just taught us! thank you, Sensei! 🙇♂️
29 February 2024, 16:12
Ludvik, your macro is merciless! I guess in real size it will look better.
29 February 2024, 19:35
I'm so glad you found my tutorial on painting canopy frames helpful. 🙂
Since masking the canopy, spraying the frame and a thin strip of gasket is laborious and the result is not always 100%, I was looking for another method that would be easier and less laborious. Using decals met my requirements. The application is simple and the results are accurate. And when layering the decals, even a very thin line of gasket can be easily created. And the use of decals also eliminates the laborious cleaning of paint that occasionally runs under the mask.
29 February 2024, 21:04
I painted the auxiliary tanks this afternoon. Like the plane, the tanks have a special paint job.
3 March 2024, 00:15
Jennifer, thank you for your kind words. 🙂
I worked on the hangers today. For the middle hanger under the fuselage I used a part from the Italeri kit, but first I modified it slightly, sanded it, made new joints and added rivets. For the underwing hangers and rocket adapters I used Kitty Hawk parts. These were left over from an earlier Gripen 9241 build where I replaced them with castings from CMK. For the wing hangers, I replaced the plastic pins with wire ones so I could accurately glue the hangers to the wing. For one thing, the plastic pins were large in diameter and would not fit into the holes in the wings, but more importantly, the wire pins served me well when spraying the hangers and then applying the decals.
The fewer stencils on the aircraft, the more there are on the hangers. I applied 54 decals on all five hangers combined (5234 did not have a forward fuselage hanger when it carried the annual livery). And I still haven't glued the decals on the rocket adapters.
4 March 2024, 22:19
Frank, I was intrigued by this machine from the first moment I saw it. The combination of the dark grey motif on the upper surfaces of the wings and fuselage with the red, blue and white accessories on the vertical tailplane and canards is (at least to me) very attractive. Although I find the special colour scheme of Czech tiger-themed machines very successful, this annual livery was a very pleasant change for me. As soon as I found out that there was a decal set for this livery, I knew I would definitely build this aircraft. 😄
This week unfortunately my work obligations did not give me free time to work on the model. I only managed to apply decals for the AIM-120 rocket adapters.
I also ordered a set of AIM-9 rockets from Eduard. The rockets in the Italeri kit are inaccurate and modifying them would basically amount to making new rockets.
10 March 2024, 11:13
After a short break, I continue working on the model. Gripen has all decals applied and repainted with clear coat. Now it's time to work on illustrating the operational wear and surface contamination.
11 March 2024, 21:56
Today I did weathering and minor surface damage to the aircraft.
... and I also glued all the racks.
13 March 2024, 23:56
Hi, Thomas.
I'm so glad you like the weathering. I did a little experiment. Instead of traditional oils, I used Agama patina powder. I was pleasantly surprised. The powders work very well. Unlike oils, using patination powders is easy, fast and accurate. And if something goes wrong, the applied patina can simply be washed off with a cloth or cotton swab dipped in clean water (with a little detergent if necessary). 😉
14 March 2024, 12:27
I'm sure I won't get to work on the Gripen today. So at least I took two photos of the Gripen in daylight with the auxiliary tanks temporarily installed. I like the result, the painted add-on tanks nicely complement the special anniversary livery of the aircraft. 🙂
14 March 2024, 14:11
Alec, Guy and Jennifer, thank you so much for your kind posts. It is a great support for me to continue working on the model. 🙂
15 March 2024, 11:16
Michael, thank you.
All decals used on this kit are from Czech manufacturer of modelling accessories JBr Decals. I think he did his job perfectly.
15 March 2024, 12:09
I'm kind of running out of free time lately. Every time I think I'm finally going to get around to building a model, something creeps in. So at least I bought a few accessories for my models, including a set of Sidewinders rockets from Eduard. The ones in the Italeri kit didn't work out so well. 🙁
22 March 2024, 10:45
Thanks for the nice look at Eduard's Sidewinders, I'm going to have to buy some for my Hasegawa jets that have none eventually. Glad to know they come with a jig too! And I hear ya on the free time thing, my Mosquito probably would have been done weeks ago
22 March 2024, 12:23
Rando, if you are concerned with the various suspension armaments, check out Eduard's site. Eduard offers quite a wide range of rockets, bombs and other armaments in various scales.
23 March 2024, 21:54
I spent time this afternoon making the main landing gear legs. I also finished the nozzle.
24 March 2024, 00:00
I have modified the appearance of the landing gear wheels and am continuing work on the landing gear legs.
27 March 2024, 07:05
Landing gear looks awesome, Ludviku! When finished, your model should stand on a mirror surface!
1 April 2024, 09:32
Thank you, Robert. I've only finished the front landing gear leg so far. I started with it because it's the most complicated. Filling the "tubes" on the main landing gear legs will go faster. Compared to the front landing gear, they are almost wiring free.
Building the finished model on a mirror base is a good idea. However, I have a slightly different solution. The model will be placed in my display case of finished models on a glass shelf that is approximately eye level (of an adult). If you lean slightly forward, you can see the bottom of the aircraft with the armament and landing gear due to the glass shelf.
1 April 2024, 10:20
After a break I resume building the model again. I'm adding hydraulic and electrical wiring to the main landing gear legs.
23 April 2024, 23:18
Was your break due to a visit of the Mosonshow?
Your lastest work on the model parts looks nice!
24 April 2024, 13:23
Bughunter, thank you for your kind contribution.
My break was due to a much less fun thing than attending the Mosonshow. A colleague and I have rented a space where we have offices. At this point, our lease is up. We had to find a new place and prepare to move. We already have the offices, now we have to move in and get everything ready to work in them. So there will be more breaks.
24 April 2024, 22:29
After this afternoon, both landing gear legs of the main landing gear are complete.
25 April 2024, 21:08
OMG this is so satisfying to watch!! Great model, you are super talented 👍🏼
25 April 2024, 21:17
The first part of the wiring and hydraulics in the main landing gear shafts is in place.
28 April 2024, 21:41
After a forced break, I'm back and resuming work on the Gripen. 🙂
17 May 2024, 20:01
In May last year, Gripen had an accident. During careless handling, the model fell off my desk. Several small parts broke off and the glued joint on the underside of the nose cracked. This accident threw me for a loop and I had to take some time to get back in the mood to continue building the Gripen.
And now it was time for me to continue building.
22 March, 22:57
Ah, bad luck. Glad you got your mojo back and bringing this beauty to the finish line 👍
23 March, 12:03
DuperScale and Alec, thank you for your support. As they say, everything takes its time. Yes, the successful repair has given me my mojo back. 🙂
The home straight is in sight, but there are still a few details to finish. I'm looking forward to finishing the colorful "bird" and putting it in the display case. In my opinion it is one of the most beautiful Czech Gripens.
23 March, 12:25
I think everyone here has had their fair share of accidents - my worst one was when my cat decided to play with my A-10 and send it "flying" into the ground!
That repair looks fantastic! I can't even tell where it was damaged! It's great to seeing you recover from this mishap, especially after the beautiful work you put into it!
23 March, 17:24
CaptGPF, thank you for your kind words.
The aftermath of the crash has been repaired, but I still need to finish highlighting the lines and shading the panels on the repaired bow.
2 23 March, 23:10
добави нов фотоалбум.


13 29 December 2024, 16:55
It's just the begining
Plans are for all Zumbach fighters - Model Maker decals
5 March, 17:54


добави нов фотоалбум.
50 снимки
Sukhoi Su-27UBM (WIP)
1:48
Painting the irregular blue lines


Проект: Sukhoi Su-27UBM Flanker


 6+
6+ 49 20 October 2024, 20:49
Ó Ricardo achas mesmo que essas decals 3d têm bom aspecto ? Na foto não acho.
20 October 2024, 20:56
those 3D decals look good, but the details in the original cockpit look just amazing!
20 October 2024, 21:19
@Jorge, têm sim... o problema é que o cockpit tem o detalhes ainda mais definido, é mesmo lindo, o sacana...
@Spanjaard, the details in the cockpit are more crisp than the details on the decals... it breaks my heart! 🙁
@Desert Marlin, yup, quite. :\
21 October 2024, 13:21
You might leave a comment on the 3d decal page so people know what they're getting in to.
21 October 2024, 22:47
@Ben, with GWH this is always the case, I had to do the same thing with my F-15 some years ago; Eduard has done it better, because they always have parts with details and parts that are flat, for this purpose
21 October 2024, 22:51
Nice work on the line. I've never done that but definitely will give it a try sometime now that I see how well it works. I wonder if I dare use my non imbedding polishing compound or if I should get the hobby stuff.
1 12 January, 02:22
Thanks; I only use the traditional Tamiya compounds, they work for me, so I'm not changing 🙂
1 12 January, 02:23
Hello Nathan; thank you, I delayed these builds a little during Christmas time and New Year, I hope I can pick up the pace now, again 🙂
18 January, 01:34
Ricardo. Esses grampos todos para colar o avião ? Isso é da Revell ou quê ? Mais essa carlinga com riscos por limpar........mais uma boa bo......sta de kit sim senhor. Louvo-te o trabalho mas por 20 paus compro o da revell 😁😁😁
21 January, 19:46
That really is a lot of clamps! The canopy came out great! This mold line they put in the top of the glass seems to be pretty common for all the 4th generation fighter aircraft. You make it look great!
1 21 January, 20:08
Caro @Jorge, the clamp is to hold the temporary canopy in place while the white glue sets, no biggie; the glass seam is a pain, but solved in 5 minutes of careful sanding and polish 🙂
1 21 January, 23:14
Oh Ricardo não são esses grampos são os outros..... Ou montaste isso mal ou o kit é mau 😁😁😁😁
23 January, 15:16
@Jorge, os outros foram para assegurar que encaixava tudo bem e apertadinho: os encaixes não são maus, mas também não são Tamiya!
1 23 January, 16:50
Thank you @Brontax3000; the plane is really nice, but prepare for a lengthy build
2 14 March, 22:17
добави нов фотоалбум.
10 снимки
Focke-Wolf Fw 190F-8 (WIP)
1:72
Paint RLM74 (Hataka C313), RLM75 (Hataka C007) and RLM76 (Hataka C038)


Проект: Focke-Wolf Fw 190F-8


 2+
2+ 11 6 February, 20:28


Hiya, My albums (not my wall) reflowed in a completely different order this week. They've not been recently changed, amended, added to, commented on, etc by me to action this. Yet earlier this week they just all changed. I can of course rectify (by refreshing amending each individually to get them back in the album order I want. As I understood it, albums flowed as time of creation uploaded and wall as most recently amended, or commented on). So please accept my apologies in advance for making some older albums appear again. Did anyone else have this happen? I also note that comments have been deleted for some of my older albums completely. Again I never actioned this either, so apologies if anyone thought I deleted their kind comments.
1 April, 19:49
I cannot answer your question, but I noticed that "Projects" and "Album" switched its positions in header. This makes sense as projects are part of collections (if collections are switched on in Settings).
In the Album tab there are no filter or search criteria. I never use this tab and use the projects with the filter criteria (e.g. completed in 2024) if I'm looking for specific project/album and have all album attached to that project.
Technically Scalemates is a database. In a database you have typically no order of elements - but you can find elements quickly with specific properties. It may happen with another database version in the background that elements come out in other order. But the data are not wrong and nothing is lost - if I ask a specific question (query I got a right answer).
Just my thoughts.
If I look into my album I see the newest on top but all others are in a happy mix of new and older albums. They are also not alphabetically sorted, may be the ones found by the database first comes first, as are no other criteria set.
1 1 April, 20:42
Thanks and hello bughunter 👍 you're very kind to add your thoughts and explanations. I noticed that also and I do utilise collections, attach projects and albums too yes. I was dismayed that comments for at least four older albums had all been deleted (not by me) and I wouldn't want others who'd been kind enough to offer feedback and advice on my modelling journey think I'd rudely deleted their feedback. 🙂 Which I did not 👍 anyway enough from me! I'll get off the feed! Thanks again for your advice 🙂
1 April, 21:09


добави нов фотоалбум.


24 6 February, 16:02
Dark steel chips, rust and dirt are left to do. I made a lot of mistakes but I learned a lot, or at least I keep telling me that 😄
14 March, 20:11


/bg/search.php?q=*&page=newsfeed&fkSECTION[]=Newsfeed
search-solr.php?lang=bg
35
35
/bg/search.php?q=*&page=newsfeed&fkSECTION[]=Newsfeed
35
todo