Hasegawa F-2A Viper Zero - WIP


Коментари
1 4 May 2019, 22:36
On to my next project! This one will be an in-flight build, and I will be entering this one in my IPMS club's next theme contest, which is "Japanese", which can be anything built and used by Japan.
Love this color scheme, so I am looking forward to this build!
4 May 2019, 22:39
Nice! Man I wish i could get back the plane mojo! I really want to do one of these! Good luck!
9 May 2019, 10:37
I am in Michael! Nice to see you picked this one. These Mitsubishis are seldomly seen.
9 May 2019, 11:52
Welcome James, Nathan, Konrad, Jos, David, Holger, Maciej, Murad, and Bryn!
David, I hope you will get back your plane mojo some day... Miss our buddy builds!
Murad, I am actually doing one of the less crazy tailart... I am doing the one the reminds me of VF-84 with the skull and crossbones style markings. 🙂
11 May 2019, 05:30
So things have progressed very quickly with this build. This kit is quite nice, everything fits very well except, and this may be my fault, the forward fuselage top and bottom join. I actually glued the cockpit to the top part of the fuselage and I think I probably should have done so to the bottom, but I had some gaps between the joins that I had to fill. To add insult to injury, the nose is molded as part of the upper and lower fuselages instead of a separate cone. This is usually not a major issue, but with the lightning strips on the nosecone, it was very difficult to sand the join and retain the strips. There also may have been a slight warp of the lower fuselage half that contributed to my issue.
Otherwise this kit has been a gem so far!
11 May 2019, 05:35
Welcome Stephan!
The fuselage is mostly assembled now, and it will not be too long until I am ready to prime. Since this will be an in-flight build, I need to finish painting the ejection seat and the pilot, as well as mask and attach the canopy pieces.
Really happy with how quickly this project is progressing. This is really a nice kit, very fun build so far!
12 May 2019, 06:12
You have some momentum in your projects! The Apache hardly fully dried and this one already in full shape 🙂 Looking forward for details & colors 👍
12 May 2019, 06:15
I built the Hasegawa F-16 years ago. IIRC it had no compressor fan but only a blank wall in the intake. Is that the case here, too?
13 May 2019, 15:23
No, this one has a full length intake, Tamiya style. Took Hasegawa a while to get it done.
13 May 2019, 15:40
The F2 is a slightly bigger F-16, with the most notable difference being the almost 25% larger wing area, thanks to it having a 1.5 meters wider wingspan.
I think the F2 would be the result of taking an F-16 to MTV's pimp my ride 🙂
13 May 2019, 18:50
Thanks Slavo, James, Holger, Pierre, and Patrick!
Slavo, I am back to my breakneck building pace now that I am in my comfort zone with a kerosene burner!
Jos, the kit fits really well, the only issue I have had is with the forward fuselage, but I suspect it's partially my own fault and a slightly warped lower front fuselage. The wing joins were mixed. One side is nearly perfect, the other will require some attention before I prime.
Demigod, Maciej is correct, this has full length intakes with a compressor face.
This thing does look just like an F-16, and is indeed a "pimped" up Viper. Other differences that Maciej didn't mention are the shape of the horizontal stabs and the canopy now has a separate windscreen. Just enough difference to make it unique!
14 May 2019, 04:17
I got the pilot painted and seated in the cockpit, as well as added some other pieces to the fuselage. Next step is to mask and attach the 3 canopy pieces, fill the wing joins, then start priming! I may need to revisit the nose area after I prime, but we will see.
14 May 2019, 04:21
I am becoming more and more enthusiastic about this exotic "Viper" ... realistic pilot Michael, absolutely great...👍
14 May 2019, 18:20
Thanks Patrick, Stephan, and Jos, I appreciate the compliments!
So I have finished priming. As anticipated, I do have some additional work around the nose with the fuselage join, but it is not as bad as I was expecting. I am going out of town for a big car show in PA this weekend, so I will be taking a few days break on this project. 🙂
17 May 2019, 02:46
I agree, a black Beaty already! 👍 I guess the Japanese paint job is immaculate on these aircraft, are you going to marble the colors in or is this just your to go primer right now?
17 May 2019, 04:01
Thanks Michael, James, and Patrick!
Patrick, I decided to go ahead and marble coat this one despite the cleanliness of the Japanese aircraft. The reason for this is the light blue I felt would look a little toy-like more easily without some proper paint depth. I did cover the marble a bit more than usual though, so it is very subtle. The dark blue areas I will just paint with modulation to get a similar effect.
25 May 2019, 06:20
Makes sense and it looks subtle enough to make it look real yet to no make it look overly weathered. I like it so far and am curious how the darker blue will turn out.
25 May 2019, 06:54
Looks like the right decision 🙂 Moving into the most interesting phases! Looking forward for the dark blue & "final touches"!
25 May 2019, 10:36
Thanks Patrick and Slavo! She's starting to come alive!
So I sprayed the dark blue camo today. It had been a LONG time since I last freehand painted such a high contrast camo, so I was a little rusty at first. But once I got going it came back to me and I encountered no major issues. This paint scheme is actually quite a bit harder than it looked. The large contrast between the colors made any mistake much more visible.
Will paint the radome and other gray areas tomorrow hopefully, then add the future coat in preparation for decal application later this week. These aircraft have a TON of stencils, so that is going to take me quite a few days to apply all of them.
27 May 2019, 06:43
Impressive job Michael! I admire all you guys that can free hand a camo.
27 May 2019, 17:52
The slightly uneven effect on the dark blue is very nice! Is it the marbling, or just a slight difference in glossiness? Cant work it out from the pics... in any case looking good 👍
27 May 2019, 19:56
Beautiful plane and great job so far. The 15th photo looks like demonstration of a brand new camouflage🙂
27 May 2019, 20:42
Thanks Michael, Patrick, Jos, Stephan, Sören, Maciej, Slavo, Konrad, and Vladimir!
Slavo, the uneven effect is done by just spraying the dark blue heavier in some areas, and less so in others. I sprayed very close to the model while doing this, and that makes it much easier to spray a bit uneven.
Yeah Vladimir, the marble coat preshade over black does kinda look like some kind of exotic "night snow" camo. LOL
28 May 2019, 03:30
Painted the radome, bird slicers, and antennae tonight. I need to touch up the bird slicers, which were hand painted.
A cool feature of the Afterburner Decals sheet I am using is a mask for the numbers under the cockpit. The numbers are black with a light blue outline of the base color that goes into the dark blue area, which would be hard to make look right with a decal. So I will just have to make sure I place the black numbers perfectly centered in the outline into the dark blue.
28 May 2019, 03:33
Thanks Nathan, Tim, and Clifford!
Started the decals tonight... put quite a few on... and I'm probably not even 1/4 of the way done. This is going to be a long, tedious process, but it sure will look cool when done!!!
30 May 2019, 05:15
Really starting to shine now, colors & decals in concert 🙂 It's a pleasure to watch 👍
30 May 2019, 06:36
Thanks looks fantastic Michael. I've got the Gunze paints to put on mine. How did the MRP colours go? I like the figure too, should look good in an in-flight display.
1 June 2019, 06:39
Thanks Michael, Patrick, Slavo, Konrad, Clifford, James, Hans, and Michael!
Michael, as usual the MRP went down like a charm. The Dark Blue looks to be just right, but I think the light blue is a bit too light and "clean" in color. But I am not overly concerned with the light blue color because once I put the wash on it should darken and dirty up the color just right.
I now have all the decals and stencils on both sides of the fuselage, but still have to do the top and bottom, with the top having many stencils and lines to apply. Should take me a few more days to get the rest done as I can only apply so many before I need to take a break. I've found that if I try to do too many in one sitting I start making mistakes and end up having headaches later. LOL
2 June 2019, 15:18
I can agree with that. Finally got all the stencils on the Meteor, about went cross eyed doing it. LOL.
3 June 2019, 23:56
I think I'll definitely try those MRP paints when I build my F-2. Looking great Michael!
4 June 2019, 12:01
Thanks Nikita, Stephan, and Nathan!
Nikita, I used the Mr Paint MRP JASDF Intermediate and Navy Blue set, MRP-295.
I have the topside decals and stencils almost completed, just a few more to go. Not so many on the underside. Also have the fuel tanks and pylons to do, but I hope to have all of those wrapped up soon. Getting there!
6 June 2019, 05:10
Looks great! I really love the mask-it-before-you-decal feature for the number beneath the canopy.
6 June 2019, 05:57
@ stencils - Yes, there seem to be quite a few of them, but man does the whole thing start to look good! 🙂 👍
6 June 2019, 08:29
Michael it is a good idea with other decals than from the kit. I had a really problem with on my model.
6 June 2019, 19:53
What the f... 😉! I need one too 🙂
Yours looks fantastic Micheal! Can`t wait to see the finished one 👍
6 June 2019, 20:01
Thanks Demigod, Slavo, Marek, Konrad, Nathan, Clifford, and Tim!
Marek, I love your F-2A, those markings are so cool and your build was an inspiration for mine! But I hear you on decals, I used Afterburner, which are about as good as you can get, and still had some difficulties. I can only imagine how big of a pain it would have been with Hasegawa kit decals!
9 June 2019, 22:14
Got the wash applied to the topside now, gonna try to do the underside tonight. I am not going to weather this one much more at all because of the general cleanliness of the Japanese fighters in service.
9 June 2019, 22:15
The colors, decals & wash combo worked perfectly IMO, it looks exactly as it should 👍. You have kicked this plane up in my To-Do-list from "not on the list" to Top 5 now! Q: Will you be adding a final unifying varnish coat? - on pic 46 left wing it seems to show more matted areas, will you even everything out or are you going for a variable glossiness finish?
10 June 2019, 09:47
It's looking really good! I like the contrast of the red roundels against the dark blue. Realy a stencil beast. Well done Michael!
10 June 2019, 20:01
Thanks Slavo, James, Stephan, and Maciej!
Slavo, those are some very nice compliments, thank you so much! Inspiring someone to consider taking on a subject they may not have considered because of my work is among the greatest compliments one can receive! As for the final coat, I will be dong a unifying flat coat with my future+flat base mix, so it will be quite matte.
Maciej, this has been the most stenciled aircraft I have built so far, but I think it is still far less than a Vietnam era Phantom has. LOL
11 June 2019, 03:39
Got the wash done on the underside tonight, it came out looking a little dirtier than I had anticipated, so I may go over it some more with q-tips to get more of it up. I didn't wait long enough to remove the wash this time I think as it was still slightly wet and seemed like I was dirtying up the paint more than usual.
Next up will be the flat coat and work on the weapons load, then the in-flight stand. Not too long now!
11 June 2019, 03:42
Thanks Clifford!
Got the flat final coat on and canopy masking off tonight. I love this part of every build as it really starts looking like the real thing at this point. Still have quite a bit to do, but these next steps are always fun as I near the finish line!
12 June 2019, 03:09
Great job Michael... 👍 You implemented the very attractive scheme perfectly..Congrats
In my opinion the Japanese Design is absolutely stunning !
12 June 2019, 07:21
Thanks Daniel, Glenn, and Tim! I really appreciate the compliments and support!
12 June 2019, 19:02
Yeah that is a awesome looking bird!
Cant wait to see it on flight position 👍
13 June 2019, 18:55
Yeah! Shame on you Michael! After this, how can we ever live with our own models again?.........
😉
14 June 2019, 18:27
Thanks Konrad, Holger, Erik, Nathan, Ricardo, Patrick, Roland, Chris, Clifford, Marek. Patrick, Tamiya X-21 Flat Base and future, at a ration of 5 parts future to 1 part flat base. The great thing about this mix is I can change the amount of flatness or sheen based on the ration, but I do not recommend going much below 4:1 or it can frost up. I spray this mix at a bit higher PSI, around 30.
If anyone has any questions about the mix, just let me know. I will be happy to help!
Marek, I really appreciate your comment, as it is your F-2A build that is my inspiration for this build of mine. I absolutely love yours, so it is especially meaningful to me that you like mine!
15 June 2019, 15:44
No update yet, but I have been working on the weapons. Also will begin working on the stand for the in-flight pose. I will also post a step by step how-to on how I make my bases. 🙂
15 June 2019, 15:47
Thanks Michael! I'll give that recipe a try. The hard part with flat coats is getting it flat without frosting up. I overstepped that line a couple of times... 🙁
15 June 2019, 18:31
As for flat coating I use Winsor and Newton Acrylic matt varnish, diluted with water. Sprays like a charm and I have never encountered any frosting. I'll post a picture of the thing in a couple of days.
15 June 2019, 19:46
Thanks guys!
Patrick, I know that feeling. That happened to me on my Su-35 build. Some colors seem to show even minor frosting much more visibly.
Maciej, I look forward to seeing that!
18 June 2019, 15:38
Only a small update, added the fuel tanks, horizontal stabs, and some other small paint details. Still working on the ordinance, putting lots of weapons on this... Because that's just the mood I'm in lol. After that, just need to make the display stand and will be done!
18 June 2019, 15:40
So cool, I love in flight displays! Cant wait to see this beauty all finished, great work 👍
18 June 2019, 17:55
Can't wait to see this finished and photographed with the author's customary sense for angle & details 🙂
18 June 2019, 21:49
Thanks Konrad, Stephan, Chris, Daniel, James, Clifford, Daniel, Slavo, and Glenn! Your kind words all keep me going with enthusiasm!
I finished the weapons tonight, decided to go with a full, probably unlikely, load. But it's my build, so I can do what I want LOL.
Only have to finish the nozzle, paint and add the pitot, attach the weapons, then construct the base and attach the model, then I will be done. I should finish this weekend! The finish line is near 🙂
22 June 2019, 05:01
Martialic with all the load and elegant at the same time! Wonderful Michael 👍
22 June 2019, 08:34
Nice load...! Will take a few more inches of the runway to get airborne but all will be fine in the end... 🙂 Lovely details on the bomb & missile pylons too - are these OOB or aftermarket?
22 June 2019, 11:16
Thanks Stephan, Daniel, Slavo, Nathan, Daniel, and Clifford!
Slavo, the AAM-3s are OOB, but the rest are all from the Hasegawa JASDF Weapons Set.
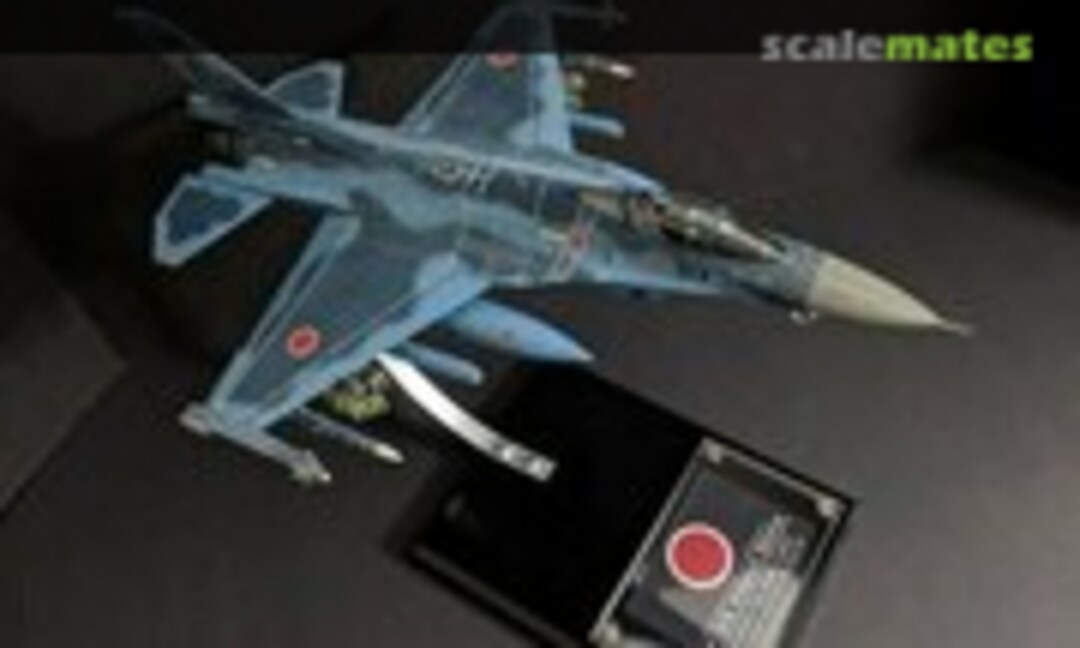
This one is now completed! You can see the final pics here:
Hasegawa F-2A Viper Zero - Completed! | Album by Fighting 84 (1:48)
26 June 2019, 01:16
Great work on the weapons. Heading over to the final reveal album to take a look......
1 July 2019, 01:42