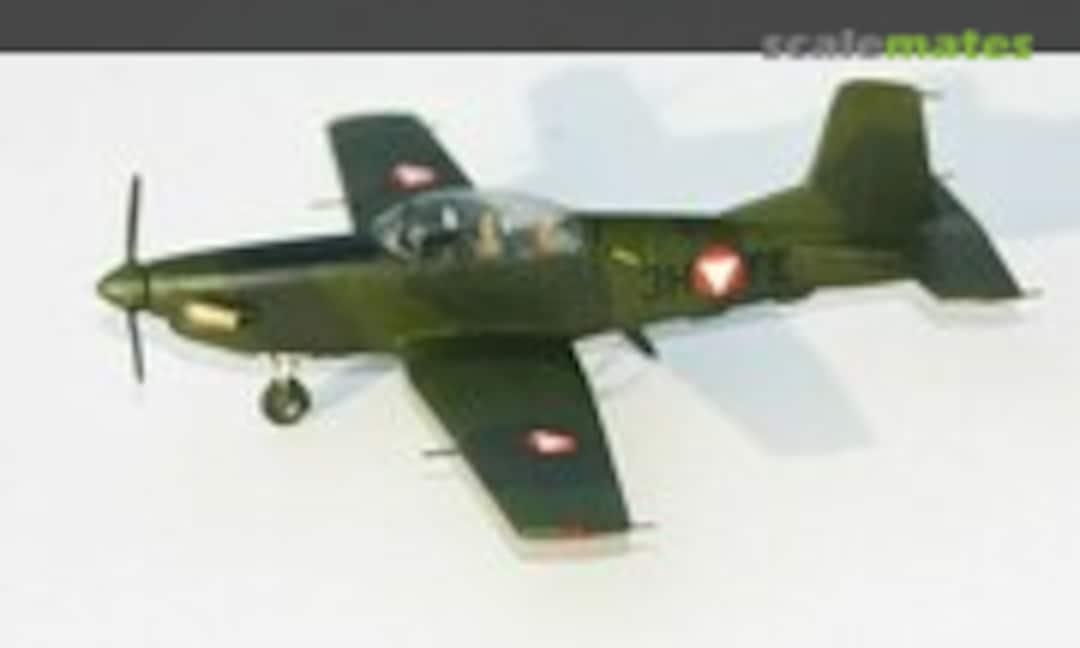
Pilatus PC 7 - Double Build - Done!

Bought an old resin kit last month.

unfortunattley the kit is not complete - Wheels are of wrong size and not from the original .resin kit. Propeller blades are mssing as well

Second kit is from Planet Models

2 sheets from Brent Air for the special liveries.

I had to scratch build the tries. The kit I bought was used/opened - and unfortunatly the wrong size of wheels were added.

I took the tyres of the Planet Model kit as my "master wheel".


E'viola. Front & back side of my two, new wheels,...

I built the same kit from IMPS in the past. It was a "Tailsitter" as the complete fuselage is filled with resin. Adding Horizontal and Vertical stab's makes the plane sitting on its butt.

Therefore I decided to cave out the back.

For better access I milled away resin from two directions. I entered the back of the plane from cockpit and fuselage bottom.

The nature of resin casting locked the Air-In-Take as well, so I opened it up.

Exhaust exit added.

Closing the "cave". 😉

Closed.


Also the Planet Model parts have some pinholes. So filler is required here also.

My first time scribing panel lines,....OMG - the wing looks terrible. Too deep, no constant depth (resin?), not really straight lines,...

I put my first bad experience on resin & scribing aside (wing). I am fully motivated for the fuselage,....

I tried to take more care,....

....well. It is slightly better. Lessons learn for what ever comes next 😉

PC7 Spinner and Propeller @ work,...

Shape and Size of the spinners from the IMPS as well as from the Planet Model kit does not match to the "real" thing,...(left side)

So I decided to scratch them with remains from my rummage box - not 100% but much better I think.

Both the cockpits (IMPS LH/Planet RH) are poor in details

Planet Kit shows a nice gab between front fuselage and cockpit panel

different approach on pilot seats as well

I tried to "harmonize" the seats appearance and added head rests

closing gabs and adding details to the cockpit

getting closer to the picture references I have consulted

some extras and a HUD - on one of the two birds that should become weapon equiped

no exhaust pipes in the IMPS kit - so I make my own

craving and sanding some sprue

evoila - copy and paste 😉

some dry fit - seems ok

This Austrian PC7 carrys FN Herstal HMG-250 Gunpods.

I searched a lot aftermarket products - but did not find 1/72 Gunpods that would fit,....

....so I have to make my own - right?

Hard eraser/rubber, quite easy to cut and - you can sand it in shape.

The flash cover of the Browing machine gun is made from spare parts,....

I use filler to get rid of the "elastic" surface and to be able to paint it.

Not entirley finished yet, but I need to do a trial fit. Looks ok.

Lau32-7 rocket launcher - same thing, I could not find aftermarket products in 1/72 for that kind of pod

So I checked some spare parts from other kits (a CH 53 + NH 500) to build the launcher I need,...

Drilling the "back" of this launcher model to get my "master model reference" for drilling the holes for the 7 rockets,...

Here we go - the seven first rocket exits are there,....

Assembly of what I have collected together,...

Some filler and sanding was needed.

Ready for dry fit and paint,...

mmh....I guess thats acceptable.

First coat dark green is on....

"Do it yourself" gun pod FN Herstal HMG 250 & rocket launcher LAU32-7 finished !

Some antenna parts, etc,...needed to be copied for the IPMS set where those where missing.

Trial #1: fitting a "new" canopy from a different kit onto the IMPS fuselage.

The spare window I used looked great - as long as it was not fitted to the fuselage.

Right hand - pretty good fit
left hand - no good fit
left hand - no good fit

so trial #2: adjusting the narrow fuselage with putty in a way that the canopy is unconstrained and without major steps and gabs

transition of the two components is quite ok now

the front section will need some further attention....

didn't like the front wheel without axis

my 2 front wheels

pimping the lower front of the aircraft

main landing gear - one set way too long, the other one way too short (? some things doesnt make sense at all,...)

Locking forward for some paint,....

A shiny black primer

I decided to apply "black basing" on this bird to get some worne and weathered skin. A test sample in the back...

Blurring in some olive drab.

Working with some "shades". Dark green, some white and black on radomized panels.

Paintjob almost done - appling some extrem light layer (1:4 IPA) with dark green at the end.


Wood green is the last layer of this paint scheme.

2 layers of Future. Greasy and ready for decals and wash.

The new decal from Brent-Air (horizontal stabilizer paint scheme only) went on smooth and easy,....

..., but, OMG. The meanwhile 15 years+ old decals from the IPMS box are - scrap now. Maybe I could have saved them by appliying a layer of fixing/primer/etc... I did not think about this option before. I have to order new decals now.

So - as the other bird is waiting for new decals I can switch to PC7 #2. Unfortunally I need more carving as the plane still want to sit on it's tail.

So roughly 1/3 behind the engine cowling is now filled with fishing lead instead of resin.

I try to compensate my mishap during scribing of panels. My first attempt in scribing ended with "canjons" instead of panel lines. I try to fill it with surfacer.

After ~ 10 min I wipe away excess material on the panel with IPA.

It looks much better now - did the "panel filling" operation 2x.

I did some paint trails on a spare part to get an idea how the dark blue and the day glow orange need to be applied. ...Let's start!

The Primer is on.....checking the surface for distracting defects and checking the panel line depth. Some minor rework will be done.

I tried a "reverse Black-Basing" to get some depth effect on the blue.


ORANGE!
I had to play a little to get the right positions/edges - I need them pretty accurate for the decals that will follow now.
I had to play a little to get the right positions/edges - I need them pretty accurate for the decals that will follow now.


The anti glare is a "draft"" - I need some visual helping points for the cobra decals. I assume I have to adjust it afterwards.

The new Decals arrived. - The Aircraft after oilwash.

The Aircraft after oilwash.

Working on the undercarriage....

Preparing the underwings to attach the weaponry

Gun pod & rocked launcher attached

...almost done. Gear doors, propellers, etc..still missing, but #1 is getting close to the finish line.

I started with the decals on the bottom side - looks quit okay.

Oh-Oh..... something went wrong here -that is definitively NOT the way it should look like. The still wet and unadjusted decal on the PC7...WTH -the organe is coming through the decal film.
Did not expect that and didn't consider to mask the whole head of this snake to asure a blue layer underneath.
Mmmh...need a break here to think about how I can manoeuvre out of this situation.
Did not expect that and didn't consider to mask the whole head of this snake to asure a blue layer underneath.
Mmmh...need a break here to think about how I can manoeuvre out of this situation.

The new Decal arrived - so I beheaded the old one.

My Viper got skinned - I did cut the head along a panel line in front of the wing and prepared a mask to apply a blue layer.

Blue layer done.

Not perfect, but let's give it a try.....

Head of the new decal film applied....it went on pretty well.
Mishap recovered. 😉
Mishap recovered. 😉

Finally - DONE with my couple of PC7s.

Finally - DONE with my couple of PC7s.


Decal issue resolved and final details attached.

Will add some pics in a seperate album soon.
Коментари
16 25 November 2019, 20:58
Interesting build! But man, do I hope you had a dust mask when you drilled out that opening in the back! 😮 An awful lot of resin dust there!
27 January 2020, 19:04
Hey Patrick! Your are right - it was a mess. 😉 And I hope it was worth doing that operation.
27 January 2020, 19:09
I just recently updated with few more pictures - I am a desperate modeler. First time scribing: I am not happy with the output 🙁 I have to take that as a lessons learned....
27 January 2020, 19:12
What kind of paint do you normally use? I like to use lacquers and when I doubt my scribing, I spray some gloss lacquer on to see how it looks under paint. After that I just take it off again with 91% alcohol and continue my build.
27 January 2020, 21:55
When you don't like your scribing, fill in the grooves with sprue goo, sand flush and scribe in that. Because it cures as plastic, it's a very solid scribing material and much more forgiving than brittle resin.
27 January 2020, 21:57
THX Patrick for your advice. Well noted. That's what I like on scalemates - someone is there to share experiences and to help out,...thx and I will try this by next change.
28 January 2020, 19:25
Well first the PC-6 now the PC-7... as an Austrian I have them in my stash too 😉
(Took me some effort to get them...)
Good to have a pro to learn and follow 🙂
30 January 2020, 17:31
Hi & welcome NorK. I know what you mean - Austrian Airforce "Schmetterlingssammlung" is hard to complete. IF you get them, the build can become a pain... e.g. Marivox Saab 105,...
I started a "collection" folder with the aim so list (=build) all flown types since 1955. Well,...kind of challenging. Time will show if that list once get completted. 🙂
31 January 2020, 16:39
update - I figured out that spinner from the kit(s) to not match the real thing in size and shape. I decided to scratch with spare parts from my rummage box to come closer.
6 February 2020, 18:55
Anyone ever stumbled over Herstal Gunpods in 1/72 ? I did not and decided to scratch them - not sure how they turn out,....
16 April 2020, 19:25
I had the same Issue with LAU32-7 rocket launchers,...was not able to find that one in 1/72. So again some scratch work where required. Meanwhile I have a first layer of dark green on those pods...
19 April 2020, 15:53
Thx Mirko.
Thx Lukasz. That makes it even more interessing,... (to me).
22 April 2020, 20:02
You made me start thinking of buying the Dutch one, one day maybe... 🙂
22 April 2020, 20:55
after some months of zero progress I was able to spend some time on my PC7 trainers,....
12 August 2020, 19:56
Hi Andy, Lukasz - you know that normally I like to puzzle over such kind of tasks and to try to make the best out of such kits (from my perspective of course 😉 )
.... to keep the patience and to avoid butchering the kit instead, I take a break sometimes to calm down...so - actually no clue when I will continue ! (🙂 kidding)
16 August 2020, 06:16
Cold & Rainy outside - a perfect day to spend time at the paint booth. Some progess on this one....
11 October 2020, 16:12
Great looking paint, Juergen! I prefer one a little more colourful though...
controller.com/listi..ilatus/pc-7/aircraft
11 October 2020, 20:44
Getting there... 🙂 Or did Gordon convince you to try that lollipop scheme? 😉
14 October 2020, 00:53
🙂 Gordon, Patrik - I like lollipops. But for this bird I guess I have to stick with my original plans. Sorry.
But bird 2 of this douple build will get a more colourful dress - I hope you will like it 😉
stay tuned...
21 October 2020, 17:40
Paint job #2 ready to go. Gordon...what to you think? 😉 not really a lollipop but,...close!
6 November 2020, 19:45
Orange is my favourite colour! Looking forward to seeing the paint come together. And great job on the builds! Some very impressive scratch building and detailing!
6 November 2020, 19:55
Hi Stefan. Tricky kits those two ...But I'm motivated to get the best out of it. Only limited by my skills.....on the other hand I learned alot during this build (keyword -Future & Gunze; amongst others...) 😉
21 November 2020, 14:05
A mishap - I have to reconsider how to proceed now. TheGold of the decal didn't entirely cover the orange layer.
29 November 2020, 17:11
Great job on the masking of the blue! Not any easy looking job, either.
5 January 2021, 12:09
Thx, Gordon & Lukasz - I was a bit wary and unconfident on how to fix that issue for the last couple of weeks. But - nothing ventured, nothing gained. I'm lucky that this LH side went quite ok. Tackling the other one asap.
5 January 2021, 13:32
So as the Me 262 group build had a higher priority this bird had to wait,.... but not too much was remaining, so therefore I can call this douple build "completed" now. Some pics of those 2 and as a quardruple with 2 older builds will follow asap. cheers
23 March 2021, 20:34
Album info
Adding 2 more to my collection....
Special liveries for being 30 and 35 years in service.