
Novinky
")
")
")
")
")
")
")
")
")
chce tohle
")
Soviet and Russian
Naval Infantry, Fire Support Vehicles - Part 3 2S9 Anona, 2S23 Nona SVK, 2S1 122mm Howitzer, MT-LB & SA-13 Gopher Star Decals 1:35
35-C1056 2017 Nová forma Multitéma (5)14 October, 10:10
")
")
přidal nové fotoalbum.


67 5 June, 13:13
As usual, a full build video with all details can be found on my channel: Youtube Video
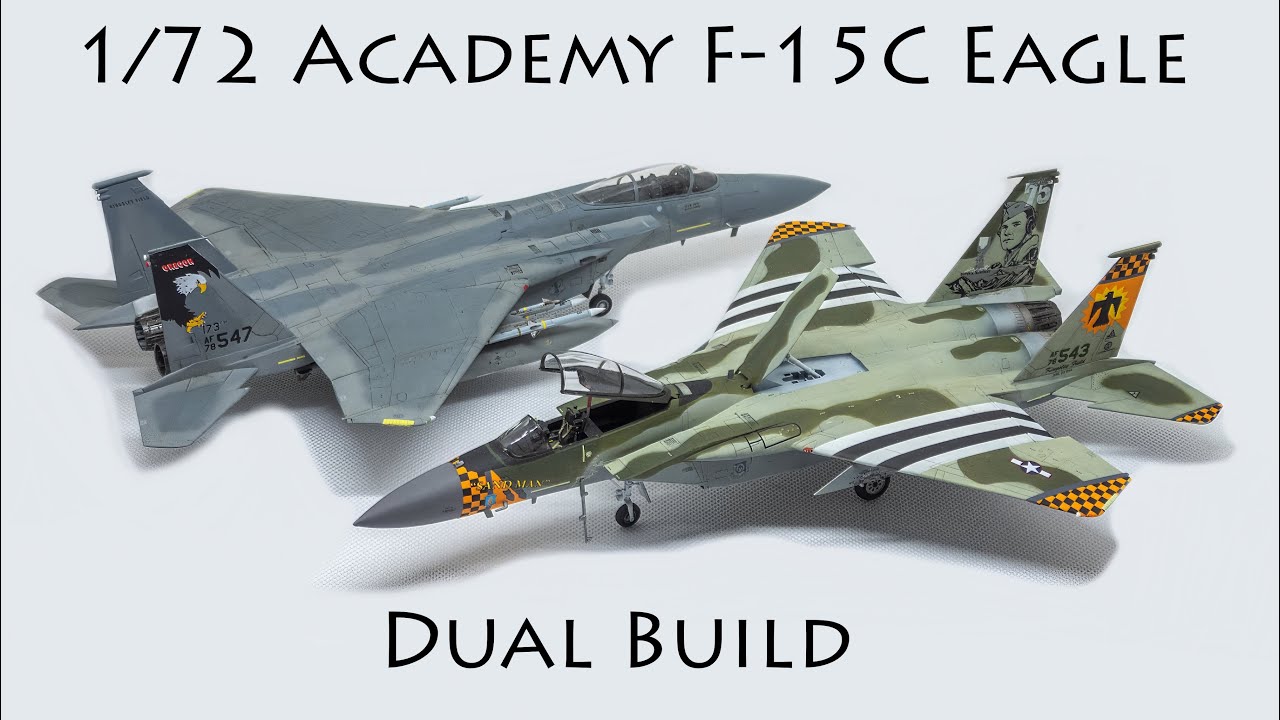
17 August, 18:02
Great build, but I was surprised by the quality issues. Seems like these kits are from old molds, not the recent double seater ones.
17 August, 21:23
@Mattes Danke! According to scalemates, these molds are from 1991. Hopefully, the Revell, Hasegawa and GWH kits I have are better ☺️
17 August, 21:49
Beautiful twins! Loved the build video which highlighted your… challenges with the kits!
26 August, 19:27
Like them both, but the grey one in particular. That scheme with am machine from Spangdahlem waits in my stash.
10 October, 07:12
vlastní tuto položku
")
Bf 109G-6 late series Overtrees - Sprues only; no decals, instructions, mask or PE parts
Eduard 1:48
82111X 2016 Nové díly 14 October, 10:09
označil tuto položku jako objednanou
")
Free State Hogs 104th Fighter Squadron A-10A/C 1989-2009
Afterburner Decals 1:48
48-052 2009 Nová forma 14 October, 10:08
")
")
přidal nové fotoalbum.


14 October, 08:27
A question to all the experts out there: is the yellow-greyish transformation of the decal transfer film avoidable? It's a shame on an otherwise fine scale model and especially around small numbers and letters it's impossible to cut it exactly at the surroundings of the decal coloured areas.
14 October, 09:41
This happens with older decal sheets. Expose them to direct sunlight and the yellowing should fade or disappear
14 October, 10:06
")
")
chce tohle
")
DDR - NVA # 3 Numbers & insignia of the East German Nationale Volksarmee
Star Decals 1:35
35-C1344 2022 Nová forma Multitéma (12)14 October, 10:06
označil tuto položku jako obchodovatelnou / prodejnou
")
Cena zatím není k dispozici
14 October, 10:06
chce tohle
")
War, Conflicts, and Special Operations in Ukraine Part 9 Russian T-72B (obr 1989) and T-72BA
Star Decals 1:35
35-C1380 2023 Nová forma 14 October, 10:05
chce tohle
")
War in Ukraine #23 Ukrainian Big Guns and Rocket Artillery
Star Decals 1:35
35-C1422 2024 Nová forma Multitéma (5)14 October, 10:04
")
přidal nové fotoalbum.


4 5 September, 08:25
Good work on a difficult subject. I read recently that Jody Scheckter is selling that Ferrari T4.
5 September, 11:40
Thanks George, yes he did, he sold it at Sotheby's in Monaco for 7.6 Million Euro!
6 September, 08:51
")
")
chce tohle
")
BMW 003 Turbojet Engine For Revell 1:32 He-162 Salamander with Engine Cover
FPW Model 1:32
32703 2024 Nová forma 14 October, 10:02
")
přidal nové fotoalbum.


31 15 September, 11:53
These pictures are the start of a model project that I had long shied away from with respect: the kit parts promised a lot of fun and a highly interesting aircraft as a result, but also a lot of 'toil and trouble'. On the other hand: the adventure simply beckons.... 🙂
Here you can see the parts in almost raw condition, I only started to detail a little with round and flat wire. The tricky question was how to treat the sensitive and already somewhat battered transparent part of the unusual cockpit glazing. I decided to cut off the two side parts, mask the inside and outside of the windows and only attach the central clear part at the very end. I like the pictures with the over-designed radial engine: what a power-to-weight ratio for these racing machines!
The last two pictures show the current state of construction and detailing.... Well, we'll see...
15 September, 12:00
There she is now - at least on her own two feet, even if the appearance with engine and mighty cowling - not to mention the upper wing - will change a lot. The construction steps up to this point were accompanied by a lot of sanding, but the accuracy of fit turned out to be surprisingly good.
20 September, 17:00
Ok now that's one interesting plane. Certainly not a Laird a**. What a huge engine!
20 September, 18:26
You're right!
A friend asked if I was building a flying washing machine - in fact, the empty mount for the huge motor still reminds me of it. All the more so now that everything is white: it went well with all the white that Martin Mars is currently applying and forms a good basis for the following 'lemon yellow'.
21 September, 16:48
Looks a bit like a cement mixer to me, but I can see a washing machine in there.
21 September, 22:27
Thank you Skyhiker, Cement mixer - I'm laughing my arse off, the Solution is obviously an inspiring sight: how apt!
It's probably time for the massive cowling with the mighty radial engine to go on the front end. One step towards this is the colour yellow, which will remain on the wings and tailplane. I would like to use Gunze's 'Emerald Green' for the fuselage colour.
22 September, 09:51
From this morning with freshly applied decals: everything seems to shimmer and shine appropriately - but it turned out that the decals are absolute 'self-destructors'. The ones you can see here on the model fortunately went reasonably well, but the large markings on the wings and fuselage were beyond repair: just crumbs. Now I'm looking for someone who might be able to make me some painting masks on a PC. Luckily I scanned the decal sheet beforehand.
24 September, 06:31
I always enjoy the surprise you reveal to us. Often with a type of aircraft that I had never seen before. Please keep it up! 👍
24 September, 13:29
Beautiful paintwork!
I don't know if this helps but I've sent scans of decals to stsdecals before and they were able to make replacements for the ones that shattered.
24 September, 16:51
Hi mates, I'm sure you can imagine how motivating your reactions are - thank you very much! I'll try that, Ben, thanks for that too!
25 September, 13:14
Looking gorgeous !! let me know if you are succesful with stsdecals, I might have other contacts too.
28 September, 09:54
Thank you Jürgen! I've just returned from the 'Bavarian Modelling Days' in Erding - a most enjoyable modelling weekend! 🙂 STS really doesn't look bad, but I may have found a quicker way: A modelling colleague has taken on the task of creating adhesive masks for the outstanding identifiers on his PC. The way things are going, it should be possible to spray soon.
This morning I was able to brace the Super Solution using what I think is a good method: The flat wire is stapled into one hole with cyanoacrylate, the other end is drilled through so that the wire is fixed in place with a drop of super glue while one end is pulled hard. Once everything has hardened - with a spray from the 'activator' in seconds - you can let go - the wire tightens perfectly and all is well. Now all that remains to be done is to sand the excess wire and glue flat before applying a new coat of paint.
30 September, 17:09
Oh it's looking so good!
I use a similar approach to wires but I use fine rubber string. I learned from Elias K on here to drill the holes and then patch the finish like you're doing.
30 September, 18:21
Thanks Ben! That sounds very interesting with the rubber strings! Can you explain that in more detail? I would be interested!
1 October, 09:48
I use a product called "ez line" - maybe the best example is on my tiger moth or deperdussin builds. It is a very fine rubber string. This makes it easy to stretch tight. I drill holes and use a drop of super glue with accelerator as you do. I can do one end, stretch it tight, then do the other. The only drawback is the kind I use isn't perfectly round which is visible when it's twisted. Maybe some other modeler can comment on a better (round) brand of fine rubber line.
1 October, 11:06
Thank you very much for this explanation - it helps a lot and puts me on the right track: well, to my surprise, I'm already using the material! 🙂 I know it under a different name from "Uschi van der Rosten". Excellent when it comes to depicting round wire. You have already described the shortcoming of the material. Many thanks for this tip!
1 October, 11:25
A couple of new pictures show the surfaces that have been sanded smooth again in the places where I fed the tensioning wire through the holes yesterday. Now it's time to paint and touch up again - then nothing stands in the way of applying the final markings!
1 October, 16:17
There are also a few new features on the Laird Super Solution - especially the huge engine changes the appearance! But it looks good on the little thing, no more traces of 'egg-plane', but pure power!
6 October, 16:45
Now it's almost done! I was able to paint the missing markings on the fuselage and the upper and lower wings after a friend generously created exact masks for me on his PC and cutting plotter - thank you very much!
I drilled out the headlights on the leading edge of the upper wing once, the pitot tube on the left strut is improvised from two pieces of silver wire and the peculiar cockpit canopy is mounted - now a few small touch-ups will follow, but the Super Solution is close to the finish line!
12 October, 10:14
Well, now it's actually finished: it was actually a very entertaining build, which required a bit of initiative, but was also very informative. I'm really learning to love the kits from Williams Brothers - the choice of models, the research into the original and the approach to realising it in plastic - it's almost all great enjoyment and leaves plenty of room for personal creativity!
13 October, 12:23
Really nice addition to your collection. Top results as always. Congratulations.
13 October, 12:37
Great result Roland - I hope you will bring this one to the show next week?
👍
14 October, 10:02
W \"Sherman\" (Zvezda 3676)")
/cs/search.php?q=*&page=newsfeed&fkSECTION[]=Newsfeed
search-solr.php?lang=cs
35
35
/cs/search.php?q=*&page=newsfeed&fkSECTION[]=Newsfeed
35
todo