

Novinky
označil tuto položku jako objednanou
")
Ejector Seat Guide Rails
Reheat Models 1:72
RH168 31 July, 19:01
")
přidal nové fotoalbum.
52 obrázky
WIP Köln truck
1:24
The roof should be 6 decals. But the biggest shred in 4, so I make it 9 ;-)


Projekt: DAF 95 XF & Trailer "Köln Truck"


17 16 June, 18:26
I spent a couple of hours cleaning up some parts that I cut of the frame
22 June, 18:33
These curbside chassis, really upset me. Just like the Volvo VN. If the manufacturer, went to the trouble, of making an engine, and separate frame parts, with other kits, then why would they cheap out, on kits like these? I love what you're doing with this though. Keep the pictures coming, buddy 👍
22 June, 19:35
I didn't put up pictures of all the cutting and sanding. A summary:
All parts are cut, sanded and glued where possible. Only a few drops of filler were needed.
The cab consists of 10 parts that need to be positioned just right. **** job, but I think I managed.
Next up: Primer.
18 July, 09:20
And primer is on after a monster session. 200ml primer + 50ml SLT = just enough.
Primer is zero paints grey. But a dirty grey.
18 July, 16:16
Tamiya Bright Red for the chassis and Zero stone grey as main colour for the interior
19 July, 13:51
The Zero stone grey was a bit depressing, so I mixed a batch 50/50 with white to lighten things up a bit.
Tamiya aluminium was airbrushed, and Tamiya black as well.
Done with airbrushing for now. Letting the paint cure before decalling.
20 July, 14:19
That's pretty good moulding. I thought they were PE mate.
I'll get some pictures up myself, tomorrow, of what I've been up to?
It's been a rollercoaster, that's for sure!
20 July, 21:50
Great progress with the DAF
I do hope Revell will re-release all of its classic and colorful kits like this one. It will looks amazing with all the decals.
30 July, 07:16
Started with the decals. They're a bit older and fragile. Should have read the instructions better. Would have made life a bit easier now.
I don't know what Revell were thinking, but some of the curves are too steep for these decals. It takes a lot of softener, a hairdryer and a boatload of patience to get them right. Even then they tore in places. And I've only done 5 pieces.
30 July, 17:09
Sorry to hear about your bad experience mate.
However, it's definitely made a difference, and I know, that it looks bloody fantastic!
This is why I'm not a big fan of decals. It's the worst part of any build, for me. Hence why I push myself, with my airbrushing? But, I have to be in the correct mood, in the correct conditions.
The decals on my Turnpiker, were terrible. The amount of decals softener that I used, started to affect the clear coat. Next time, I'm going to airbrush everything, and then put them both together, so you guys can give me your honest verdict.
But to try and airbrush those beautiful decals, that you have there, would take me years!
Do you think, you would have been better trying to copy them on your own decal paper, and trying it that way?
30 July, 17:51
What I hate most about working with decals is the fact that there are no spare ones (at least for older, no more available kits).
So I wish you a huge amount of patience and luck! Take care, it will look great 👍
30 July, 18:02
The overall quality of the decals is well enough. Thin, almost no decal film on the edges. It's just that on the rear of the cab, the trenches are so deep. Luckily this is the only part that has this. The roof has some extending bits, but there are seperate decals for those.
My life would have been a bit easier if I'd read the instructions more carefully. Revell wants you to decal some pieces, before glueing. That way all edges are nicely covered. I'm an advanced modeler, so I just did my thing...
The artwork on this one is a bit too complicated to airbrush, it would take me more than a few years.
It might take some time, but I'll finish this job in the end 😄
30 July, 18:10
Before starting to use a complex or questionable decal sheet I take a high resolution photo of it with my phone (an old school flat-bed scanner will be even better). My reasoning is that if I mess the decals I would be able to print a new sheet somehow. Luckily never had to actually test this theory so far...
30 July, 19:07
RTFM is overrated.
Good idea Goldman. Should give that a go on future builds.
31 July, 19:01
")
chce tohle
")
CH-53E "Super Stallion" / MH-53E "Sea Dragon" Folded Main Rotor with Blade Fold Restraint Systems (7 Blades - 3 Engines) for A  ResKit 1:48unknown48 2024* Nová forma
31 July, 18:58
chce tohle
")
CH-53E "Super Stallion" and MH-53E "Sea Dragon" Engine Nacelles with Air Intake and Exhaust for Academy Kit ResKit 1:48unknown48-1 2024* Nová forma
31 July, 18:58
")
označil tuto položku jako objednanou
")
M981 FIST M113 Conversion Set
Verlinden Productions 1:35
547 31 July, 18:57
")
")
")
 Bombs (ResKit TBA)")
")
 Bombs (ResKit TBA)")
")
")
označil tuto položku jako objednanou
")
Israeli M48 'Urdan' Cupola
Accurate Armour 1:35
C001 31 July, 18:52
")


")
")


")
")
přidal nový projekt.


1 30 July 2022, 18:29
Roy, I built a C-1A Trader from the S2 Tracker. Did a YouTube video series on it. Let me know if you have questions, need references or instructions.
Youtube Video
- John
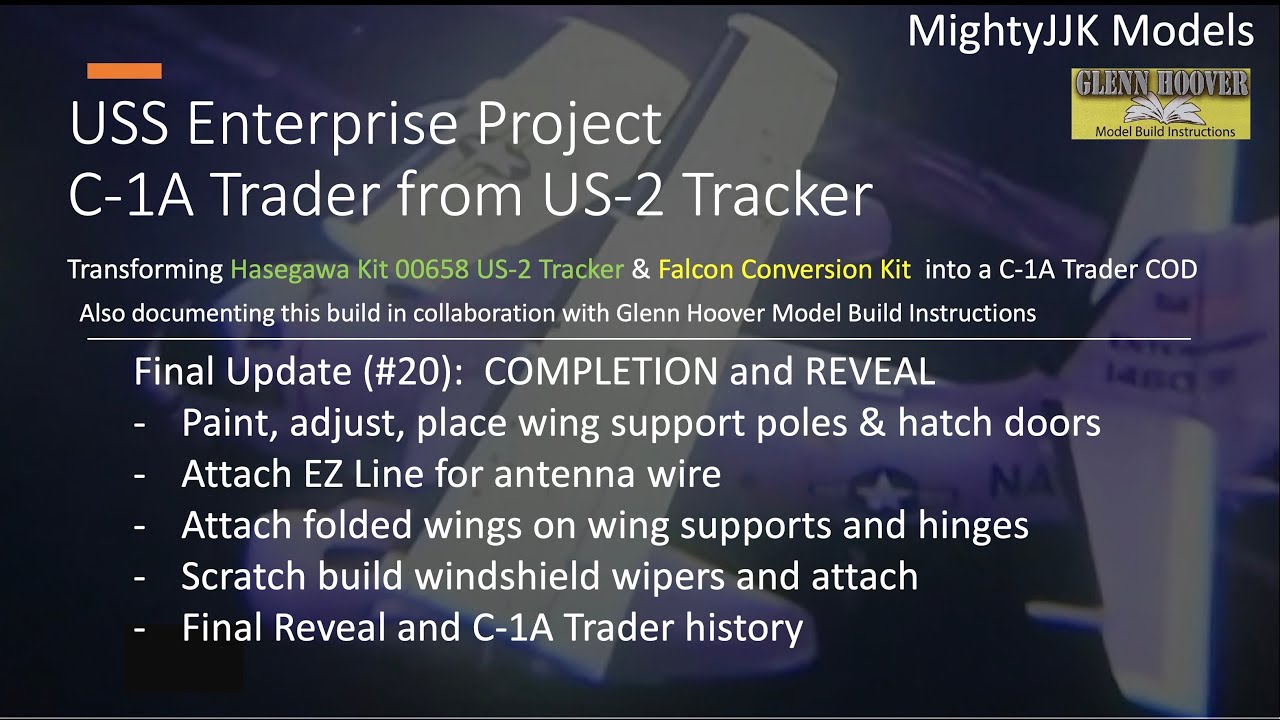
31 July, 18:47
")


dokončil tuto položku
")
Liberation - U.S. Paratrooper 2 US Paratrooper No.2 - Normandy 1944
Dynamo Models 1:35
35014 2022 Nová forma 31 July, 18:43
vlastní tuto položku
Liberation - U.S. Paratrooper 2 US Paratrooper No.2 - Normandy 1944
Dynamo Models 1:35
35014 2022 Nová forma 31 July, 18:42
označil tuto položku jako obchodovatelnou / prodejnou
")
Cena zatím není k dispozici
31 July, 18:41
chce tohle
")
Sea Master 1:350 Series
HMS Repulse armament 15in (6pcs), 4in QF Mk.V (6pcs), 4in BL Mk.IX (9pcs) barrels Master 1:350
SM-350-036 Multitéma (4)31 July, 18:41
/cs/search.php?q=*&page=newsfeed&fkSECTION[]=Newsfeed
search-solr.php?lang=cs
35
35
/cs/search.php?q=*&page=newsfeed&fkSECTION[]=Newsfeed
35
todo