
Newsfeed
hat ein neues Fotoalbum hinzugefügt.


39 29 September 2024, 18:45
The IsraDecal publication is absolutely pricesless for this project!
29 September 2024, 21:31
Cool project, following along as well. Not sure I can help you on the squadron selection - lots of good options.
4 October 2024, 17:10
Perhaps knowing which squadrons participated in "Swords of Iron" would help?
4 October 2024, 18:37
I love the IAF, and Israel. Your model looks great so far. I'll be watching!
6 October 2024, 01:28
This will be a nice little gem to the collection.... nice tidy work so far 👌👍👍
6 October 2024, 14:03
Just starting the F-16AM (ROCAF) version of this so I'll be following along. What color are you doing the cockpit tub? I've got a mix for dark gull grey that "looks close" but curious what you settled on.
Oh, also the kit comes with a bunch of 500lb resin Mk. 82s I don't plan to use, along with resin MERs for them. Let me know if you want them.
6 October 2024, 14:11
I have six aircraft in the collection:
S-199
P-51
F-16C
F-16I
F-4E
F-15E
When it's all done, I'll put together a single collection!
2 8 October 2024, 01:08
Great cockpit.! In some photos the paint job is really weather beaten, are you planning to replicate it?
10 October 2024, 06:22
Okay. Well, the "Swords of Iron" operations have been very hard on all these aircraft in Gaza. Should be pretty torn up when I get done.
11 October 2024, 14:29
Sadly, the update parts for the F-16I from IsraDecals is not all that great. The antenna fairings for the sides of the intake are okay, but the ones for the sides of the nose are kinda poo...
16 January, 03:40
I follow. And I see one big mistake I made when designing my workshop. A Big drawback is the Big desk. Arranging it takes a lot of time!
1 16 January, 07:20
Looks like the resin parts will work. Just takes quite a bit of time. Panel scribing will take some time too. It seems to be worth it!
16 January, 23:16
BTW, I tend not to arrange too much on the table unless I am doing a Tamiya kit...
1 16 January, 23:17
That big scale seems to need a big amount of plastic - so I join the big show! The Minion looks cool 🙂
Was only a bit confused about the order of the pics in the album (yeah I know, can be afford to move a bigger amount of pics in "Manage" ...)
1 22 January, 22:41
I'm a fan of Merlin... living life in reverse...
The pics are newest first and tell the history of the build.
23 January, 03:21
I sanded the wing roots quite a bit. Looks like they went on okay. Should be minimal sanding with a little Surfacer to close any gaps.
23 January, 03:31
Hi Desert 👋 looking good....see your getting good use of the scotch tape, Do you use super glue for wings on larger models? Or stick to stand cement?
Nice subject by the way 😁👍
1 23 January, 21:54
Thanks. I'm using standard Tamiya Extra Thin Cement. The quick Setting cement is not good for those joints. The regular cement, when given plenty of time to cure is pretty good. The fuselage joints have come out really strong. The wings are good when plenty of milling is done to make the joint very clean. Then the cement has a large surface area to cling to. So far, its all gone very well.
1 24 January, 00:38
Thanks Desert👍 l get concerned sometimes on larger parts if the extra than is enough. Sounds like if you have good surface it will be ok.
Good luck with the build 😃👍
1 24 January, 11:31
I'm with DM. I love the quick-setting but it's just not as strong. I also reinforced mine with some sprue "spars" but they had to be thinned down a little because the wings are quite skinny and would bulge otherwise.
2 24 January, 17:12
There are a ton of antennas on this bird. Sadly, the flaps fit very poorly so much cleanup is needed. All the other mods are roughed in and will clean up with primer and dressing...
26 January, 04:10
With the nose antenna mounted too low, I have had to see if I can remove them and reposition them higher to match the real aircraft...
1 29 January, 19:58
Both antenna are 1.5mm from the radome aligned on the panel line to the rear of the antenna and spaced down from the piano hinge line.
1 29 January, 23:13
Getting close to primer phase. Need to paint the canopy interior and blend the navigation light pods on the sides of the inlet…
1 February, 00:27
hat ein neues Fotoalbum hinzugefügt.
15 Bilder
The Few dual build
1:48
The fuselage halves are joined once the cockpit is installed. Now it's time to do the same work on the pre war 19 Sqn one.


8 27 January, 13:41
hat ein neues Fotoalbum hinzugefügt.
66 Bilder
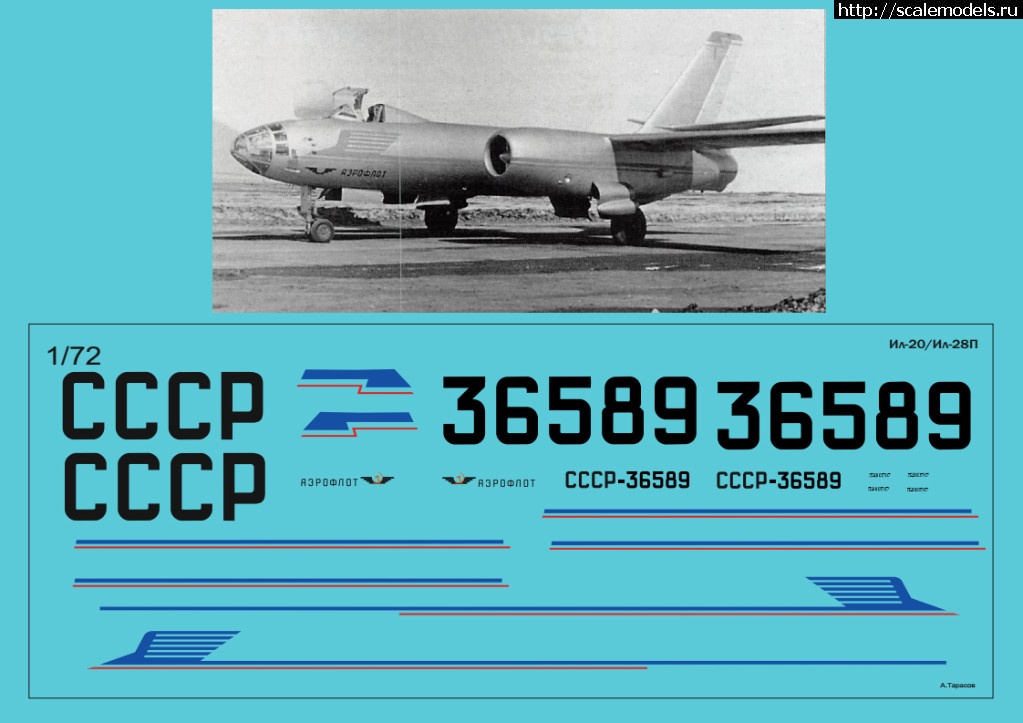
Il-28 'Beagle' - Trumpeter - перезагрузился!
1:72
Masks removed from the transparencies - a few glass panes needed to be cleaned with a wooden cocktail stick to remove a ...


42 6 January, 15:50
You need to pay attention that the IL-28 produced in China had differences.
It's not right to just make it with red stars.
7 January, 11:57
Thank you gentlemen! 🙂 Denis, yes, I know, the kit contains all the parts for the Soviet built Il-28, they need to replace the kit original parts for the H-5. But the truth is that this kit has so many incorrect features, that it really doesn't matter that much. I simply intend to have fun!
7 January, 14:00
Dear fellow modelers, you are all welcome to enjoy watching me struggle.
1 11 January, 10:11
I got tired of all the filling and sanding and put my own piece aside. But I'll be following your build and keeping my fingers crossed 😊
12 January, 10:48
I have a feeling of deja vu that I followed it last year. Is it just me?
Following anyway 🙂
13 January, 12:48
Łukasz, you are absolutely right. The first project ended up with the half-finished model flying gracefully into the bin after one mistake too many. I am now giving it a second attempt, knowing the pitfalls in advance and also possibly being slightly more experienced. I am already past the line where I gave up the last time. To be quite honest, this kit is not that bad, it just needs a bit of persuasion and elbow grease.
13 January, 13:26
Hope it's going better this time, looking for reference before I start mine.
13 January, 14:27
Great progress, Thomas! Those engine mods look cool 👍
In pic 42, is it necessary to glue the bending part of the landing gear piece or is bending it enough? Thanks!
14 January, 19:35
Cuajete, thank you! No, you need to cement the part. Unfortunately the fit is rather poor, so you will need to be careful with the correct alignment or the model will not sit straight on its wheels.
1 15 January, 05:40
Interestingly, the IL-28 was flown by Aeroflot.
477768.livejournal.c..utm_source=3userpost
[img1]
[img2]
[img3]


1 15 January, 08:43
In the article linked above, it says that he carried urgent mail and the matrices of the central newspapers.
2 15 January, 12:02
I am now getting to a tedious level where I am just trying to eliminate the rough patches before priming. Lots of filling, sanding and polishing. Since the Hungarian Beagles had extremely smooth metal surfaces (coated with a clear coat), every blemish needs to be fixed or they will just stick out like a sore thumb.
17 January, 07:59
I feel your pain Thomas. I am dealing with same on my build. Overall, your Beagle rebooted build is coming along nicely I think 👍
1 17 January, 13:13
I usually use super glue for filler to speed up the process since it doesn't shrink and dries quickly. A modified electric toothbrush can help with sanding and polishing. I've had some pretty good results using mine. I just glued a Velcro disk onto it and attached the soft side of the Velcro to any sandpaper that didn't have it already.
2 19 January, 10:32
Skyhiker, thank you for the tip! 🙂 I have in the past tried to use superglue, but I find it that it dries really hard, much harder than the plastic and so it is very difficult to get an even surface. I also tried liquid styrene (pieces of sprue molten i solvent), but it takes ages to solidify and is super messy. Nowadays I just take my time with regular putty and sanding sticks and finish off with Mr Hobby polishing cloths. I then use a regular manual toothbrush to brush over the surfaces and clean up the panel lines.
1 19 January, 11:32
Well done so far, Thomas 👍
I think it's better to mix cyano with talcum powder for smoother sanding. I've heard something about that, but haven't tried it yet.
1 19 January, 19:48
CA poured on baking soda works very well - at least with resin. I tried it on my "Texaco bug", filled an indent with it and no one could tell where it was done 😉
2 19 January, 19:59
Cuajete & Robert, I will need to try the CA + baking soda recipe! Thanks for the suggestion!
2 19 January, 20:14
You're dashing like hell and I still have deja vu watching these pics 😛
1 19 January, 21:48
Hi Thomas 👋
I use super glue gell , the locktite version, it is really fence think super glue, but it doesn't dry as hard sands bit easier.
I've used super glue and soda it did generated alot of heat and fumes. Experiment with it first l would advise.
Super glue gell is slower to dry, l tend to leave it for an overnight dry.
1 19 January, 21:48
Many of us are probably at the same stage. My second one is waiting for me in the storage. The first one literally flew away. My oldest son is mounting it for a drone. I'll post a link to the video on Instagram tonight.
1 20 January, 07:12
This is my first Il-28 piloted by my son. instagram.com/reel/D..gsh=MzRlODBiNWFlZA==
5 20 January, 20:28
Haha, that was a cool flight of the Il-28! 🙂 I was almost expecting it to hit the walls at a few times.
2 21 January, 06:08
Recessed frames at a clear part are really a weird feature. I like how this one progresses.
I share your thoughts on the KV masks. Often I wished that they would have done them on paper, but on the other hand they are often the only game in town.
1 21 January, 19:00
I may be wrong but that masking material sounds like the wrap they use to protect surfaces and sometimes stuck on new appliances ect.
Your doing a great job of it so far very crisp work 👍😀
1 21 January, 19:32
Mr D, it's exactly like that material. I was almost ready to fire up the primer when I noticed that almost all the masks had began to lift off at the corners. It would have been a nightmare to have paint blowing in on every glass pane. I am now spending the evening cutting my own masks from Tamiya masking tape, based on the KV Models masks - even if it takes more time, it is definitely worth it.
2 21 January, 20:01
It's best to do that, some times it's good to breakdown tedious jobs into 2 or 3 sessions bit more comfortable than way, always best to double check maskings just prior to airbrushing, sometimes even Tamiya lifts on awkward edges, l usually put a bit of colored thick clear on bits like that as a masking fluid 8/10 times it holds down better... I go almost to the edge.
I use a thick gloopy clear as it doesn't run under joints in masking.
I don't use latex fluid as it is sticky n pulls of at slightest touch.
Good luck with it 🤞👍
1 21 January, 20:13
The material is Oramask 810. I don't like it at all. This foil gets big cars and things, but it's hardly applicable for our purposes. If I make masks, I prefer 3M 50-series. Much more flexible, stretchable and thin. Yes, the glue is much more aggressive, but for a period of two weeks it doesn't cause any problems. I tried to buy paper in large sheets. At least A3 or at least A4, but I couldn't find such anywhere.
2 21 January, 20:21
Couple of companies provide bigger masking paper sheets, e.g.Techmod:
mojehobby.pl/product..abuki-5-pcs.-A4.html
4 21 January, 20:33
Shiny black primer coat added and I am now waiting for the primer to fully dry before I can start metalizing. As the Ilyushin is standing on my work bench, I cannot help but thinking that it looks kind of like a dominatrix dressed in black vinyl for the night at some goth or S/M club - but hey, what do I know of such things.
1 22 January, 15:16
🤣🤣🤣
"A friend of mine told me that he had seen one and it supposedly looked similar." 😇
1 22 January, 18:08
soo nice, what type of Black Gloss primer did you use ? look really smooth.
1 22 January, 21:25
Pierre, it's a primer called Badger Stynylrez (or UMP Ultimate Primer) and comes in different colors and sheens. It really levels out beautifully if you spray wet on wet, but it requires a lot of air from your airbrush (almost 3 PSI) and cannot be thinned with anything I have tried. Also, you need to use a very wide nozzle (0.4 mm works for me).
2 23 January, 09:36
Hi Thomas,
I think a small error sneeked in concerning the pressure. 3psi is way too little. 30psi would equal about 2 bar and 3 bar are roughly 45 psi. As I never managed to achieve satisfactory results with this primer with pressures up to 2 bar, I guess 45psi/3bar might be the intended recommendation.
1 23 January, 13:14
Thank you Thomas, if I read correctly accordinng to Michael you are around 2 bar (30 psi), how do you manage not to flood the model and keep the detail such as you did ?
23 January, 13:25
Michael, you are absolutely right. 3 bars is what I meant. Thank you for correcting!
23 January, 13:27
Pierre, the Badger primer is so thick that a lot of air is needed to simply drive the airbrush. It sprays great with about 2.8 bars of pressure and levels out beautifully. I first mist the surfaces so a good adhesion layer is created, wait a few seconds, and then paint wet-on-wet until the surface is fully covered. If the coat dries inbetween the spray coats, it will lose some if its shine, so you need to work really fast!
2 23 January, 14:27
Finally metalized! Now let's give the metal a day to cure before applying the protecting varnish coat and then proceed with the detail paintjob on gear bays and stuff. Also, boy, it took quite some time to fully spray this model, sometimes I am glad that I don't do 48's.
3 24 January, 09:22
That metallic finish looks great Thomas. What prompted the brush application of the gloss coat?
2 February, 04:43
hat ein neues Fotoalbum hinzugefügt.
6 Bilder
T-90
1:35
Decals are drying, will need to seal it up with matte soon.


Projekt: Russian/Ukraine War T-90A


 1+
1+ 26 11 December 2024, 21:35
Lookin really good and I paint in steps too. Im too ham handed to paint everything once it's all assembled.
12 December 2024, 05:40
These aber t-70/80/90 barrels with the photoetch fins are not the easiest build. The instructions recommend soldering the fins in place but I used IC-2000 black CA glue. Still, its a process and you really have to take care not to knock them off as you are manipulating the turret while building it out. The thermal sleeve clamps were a lot easier to assemble and tack into place around the barrrel with the same glue. Almost ready to put on the first coat of AK reflective green. I am using the AK Interactive Russian modern AFV colors for this build for the 3-color camo. I used Mr color transparent red for the Shtora-1 dazzler lights.
14 December 2024, 20:48
Looking forward to see this great build and paintjob 👍 finished and in a base 😉
1 31 January, 20:22
I have had some problems locating decent diorama bases at reasonable prices. Any leads? My next purchase is probably going to be a decent tall display case with glass so damn dust stops ruining my builds.
31 January, 20:29
Well, I've a collection of photo frames so that I don't need to worry about that.
In Europe we can also buy some cheap chesse or bread wooden cuting bases, on i.e. Ikea or cheap stores...🤔
I have also been saving wooden wine bottle crates for the same purpose.
31 January, 20:36
As a budget shopper, I buy china cabinets at estate sales to use for model cases, and I'll buy any cheap picture frames I find at garage sales. I have some other hobbies that they are useful for, but as Rui says they're great for making bases as well.
31 January, 21:36
Thanks guys for tips on display cases. I remember back in the day wood glass cabinents were so cheap but now they can cost as high as $1200-$3000. I recently saw a nice 7 foot tall case on Amazon which looks perfect for about $270 so Im going to try one, I am always looking in the used section of news papers too for old pawn shop or jewelry store display case counters.
1 1 February, 22:59
I was just replying and trying to help about diorama bases at reasonable prices 😉 the display cases are all other issue. I've made two my self and bought one on IKEA, 80€ plus euros.
1 February, 23:13
Ty Rui. I just found some hobby lobby wood bases that are 8x8 or 9x9 that are round and nicely routed. They fit on several of the round resin terrain bases too. They only cost like $3-$5 each. I will look on Ikea for those too.
2 February, 05:32
hat ein neues Fotoalbum hinzugefügt.


8 27 January, 21:53
Hmmm, it may look better if you add a gray wash, it may tone down the yellow. Maybe you got a mis-marked marker.
27 January, 22:45
Welcome Dave. These markers are not perfect I know, but my camera seems to add some yellow, maybe from my lighting I have here.
Tried today in the daylight and on the grey background, in reality it's bit more close to RLM02 than I see it in the pics, but maybe I just need to meet some optician 😄
1 28 January, 21:27
Welcome, mine too, only second to this: My first 109 simply has to be Polish :) | Project by Woody (1:72) 🙂
29 January, 19:39
I'd say that's quote a speedy process here! Watching ere it's all finished!
1 February, 15:20


hat ein neues Fotoalbum hinzugefügt.


7 7 January, 15:16
Thank you lochsa river
Best take your shoes off and get comfortable...
It will take a bit...lol
24 January, 04:14


hat ein neues Fotoalbum hinzugefügt.


50 22 July 2024, 21:16
Welcome Torsten & Robert!
I've started the fuselage assembly and clamps were needed.
27 July 2024, 15:43
Nathan, I am following along as well. I have friends in eastern Ukraine, so very interested in this one. Kind regards, Dutch
31 July 2024, 20:47
Welcome Dutch! This build is turning into a slog. Clamps and super-glue "force-holds" galore. Luckily it is a tiny plane so I'm nearly done already, just completing all the seam sanding.
1 August 2024, 18:44
Working on the cowl. I had to use 2-part epoxy clay to fill a large gap on the bottom of the cowl that was created by making the cowl fit straight & level.
8 August 2024, 20:53
Looking good. Keep up the progress. The splinter pattern will be stupendous when done.
13 August 2024, 16:03
Thanks Dutch! Man I just realized looking at pictures that the wing camo is a mirror image for the other wing. It won't be perfect… 😁
13 August 2024, 20:47
Welcome to the show Ben! I've applied the first color today. Now off to cut masks for the next color. I've been spoiled by those pre-cut masks…
16 August 2024, 17:41
Nathan, quick question. Why not just spray the first color overall, then mask only the subsequent colors? Saves at least one step, I should think. Carry on. I am enjoying the show.
16 August 2024, 17:47
In this case I just got a little too happy masking. I even decided against my usual preshade since this plane's paint looks really new in all the pictures.
17 August 2024, 17:20
Nathan, are you going to put kill markings on it?
google.com/url?sa=t&..e2eYFcXbT_ewibuKmesM
18 August 2024, 20:13
Well my printer is dead, but my dad has a similar one so I'm going to try… Wish me luck.
19 August 2024, 17:35
The second color has been applied. Slow going here as my workbench time has been lacking.
25 August 2024, 14:13
Thanks Dutch! Today I masked off the areas for the gloss black. The tan colored areas are quite small, but they're everywhere. Tamiya tape stock is going up!!
26 August 2024, 17:32
Well my gloss black was solidified, so flat black will have to do. Hopefully it will all even out when the clear is applied
28 August 2024, 00:20
Thanks Jennifer and Villiers!
Work continues on masking these tiny sections.
30 August 2024, 16:13
Well that was a whole bunch of masking for some very tiny pixels… I also added a coat of Future to help with the panel lining effort to come.
3 September 2024, 23:57
Today has seen the underside color selected and applied (Tamiya X-14 Sky Blue) along with masking/painting the cowl colors using Steel & Red.
4 September 2024, 13:58
I'm using both AK & Mig panel wash. For the bottom I used Grey-Blue and for the top I haven't decided whether I'll use a dark brown or black wash. Of course for the black areas I'll use the Stone Grey wash which I think is Mig.
4 September 2024, 18:28
Thanks LC & Guy!
More masking for the Ukrainian flag on the tail today.
6 September 2024, 01:59
Thanks Robert!
Chrome Yellow has been applied for the first half of the Ukrainian flag on the tail.
6 September 2024, 14:53
The Ukrainian flag on the tail has been completed and the landing gear legs have been painted and attached.
7 September 2024, 23:01
Thanks Dutch! Today I completed painting the canopy framing and the wheels. Also my clear gloss arrived in the mail today, so I'll be able to apply that to the entire aircraft. After that I only need to paint the anti-glare panel on the upper cowl. Nearing the finish line.
9 September 2024, 20:31
Calling this one complete. Thanks for the interest and likes!
10 September 2024, 15:49
Ooh-la-la! Well done Nathan. Definitely a special addition to the display case.
10 September 2024, 15:54
hat ein neues Fotoalbum hinzugefügt.
6 Bilder
F-16AM Ukraine "Viper in the Fields"
1:48
The new resin nose now added. I still had to add a little nose weight.


Projekt: F-16AM Ukraine “Viper in the Fields”


 5+
5+ 14 12 December 2024, 15:30
The next project has been selected, along with a shelf of doom F-16 that will be built alongside this one.
12 December 2024, 15:35
This build also went down the rabbit hole of launch rails. I did have several LAU-129 type that I was able to use for my Makos build but not for this one (which will require them). Likely it will be after the new year before any of my orders will arrive but I should be able to continue with the sub-assemblies since these items are nearly the last things to be attached.
20 December 2024, 00:07
Took time today to remove the forward fuselage in preparation for the KASL resin update.
23 December 2024, 02:49
Welcome aboard Robert, Guy, & CaptGPF!
Work had halted since the last update as I was on vacation. I did have some progress today and will add photos in the morning.
30 December 2024, 02:56
Added shots of the built Reskit drop tanks as well as the resin KASL MLU nose.
31 December 2024, 00:41
Taking a seat as well, interesting project. Looking forward to the camo scheme!
31 December 2024, 01:37
hat ein neues Fotoalbum hinzugefügt.


3 26 September 2018, 02:22
Hmmm... this seems likely something I'm interested in... is it all done? Need more pics!
26 September 2018, 02:38
It is all done, a very simple kit, and very high quality. All my other pics came out blurry!
26 September 2018, 02:44
Is the kit in the database? If so, can you add it to your project? I'm curious how big this thing is... because you're right, it looks a lot like the Tintin rocket of the same name. I'd be very impressed if you scratchbuilt this, because that's what I did on my Tintin rocket project, and t'weren't easy...😉
26 September 2018, 04:58
No it is not scratchbuilt. I can't get the mobile app to attach kits so it will have to wait til I am at a desktop. There are two sizes of the kit available, this is the smaller 1:350 version.
26 September 2018, 16:50
thak you for sharing Ben, agree with greg it servce more pics we can appreciate your work
2 February, 00:20


hat ein neues Fotoalbum hinzugefügt.


5 1 February, 23:09
I built the model as a relaxing OOB build in 4 days.
The kit is from PROFI series and contains PE parts. The build went smoothly, the kit parts fit together perfectly. There was hardly any need to putty. The only place I used putty was in the gap between the wings and the fuselage on the underside of the fuselage. The gap wasn't too big and a minimal amount of putty was enough to fill it. The only thing I modified were the engine exhausts, where I replaced the plastic part with metal pipes.
So far some quick photos taken under the lamp just after the model was finished. As soon as I have time, I will take a picture of the model in daylight.
2 February, 01:17
hat ein neues Fotoalbum hinzugefügt.


38 16 July 2024, 13:41
Sorry about the slow rate of updates everyone. I hurt my back at the gym so I'm having to avoid being hunched over at the modeling bench this week.
19 July 2024, 14:02
OK! Back at it with the interior. This kit is definitely a jump in difficulty from the last one. PE is definitely difficult, and if you're doing this kit, make sure you frequently fit check the flight seats and how they'll mount to the bulkheads!
7 August 2024, 15:57
AAAAAND I hurt my back again pushing too hard at physical therapy. :/ more delays
22 August 2024, 19:14
the detailing on this kit is really lovely, but the fitting of the parts is really bad. And advice on fixing the massive panel gaps in pic 43 to 47 is appreciated.
3 September 2024, 22:27
Is the top portion already glued on? If not, try adding some bracing with some cut sprues to force the sides apart. Right about where the kink/end of the doghouse is.
Is the aft bulkhead of the crew cabin causing the problem? If that is glued to both sides, forcing the sides apart may not work.
5 September 2024, 04:03
Very good advice. Had to pry it apart but addint braces definitely helped!
5 September 2024, 18:58
If still relevant.
Pic 43-45. Before gluing the fuselage roof to the lower part, I glued 2 spacers from sprue scraps between the walls.
Pic 46 and 47.
I simply cut off the inner side of the hood wall, leaving the outer side untouched, achieving a tight fit along the outer surface. And I puttyed a little bit on the front of the hood.
24 September 2024, 08:14
hat ein neues Fotoalbum hinzugefügt.


12 3 January, 02:57
Welcome dear audience! I started with the cockpit. Most parts will be almost invisible after the plane is finished. So this is best for testing the decals from IPMS-Austria. They are very very thin and on the other hand I am used to 30 year old decals. But it worked and with Micro-Set they look great. The most I like the seatbelts, because they look better than all the photo-etched parts I have ever seen. I get headache thinking about two other seatbelt-decals still to apply.
Meanwhile go to the toilet and get another drink 'till the show goes on.
😉
5 January, 01:43
Interior is finished. In sparetime I will work on the kit. But still think about my job, that starts again now. I am a teacher - loving my kids and am engaged 24/7 for them. If nothing happens here - I do my fulltime job 😉
2 6 January, 01:51
In Picture 18 you see the two flow fence items on the wings. The port one is white, the starboard one is as the moulding plastic. Guess why? Although I have laminate flooring with no gaps I lost the original part and had to rebuild it. Took me a while.
2 February, 01:19
hat ein neues Fotoalbum hinzugefügt.


15 29 January, 04:30
Top result in spite of the problems you had with the kit. I like the finish very much.
29 January, 10:01
hat ein neues Fotoalbum hinzugefügt.


9 11 January, 02:06
I have built several of these cool Radar Frescos, but this old model is a very tricky one to build correctly. Have fun and I am sure you will do a great job!
11 January, 07:09
Tricky model?
Correct dimensions, fine and many details, discreet engraving, colorful and usable decals, I really don't know what you mean, Thomas.
Good luck, Chris.
11 January, 08:53
Please don't scare me. 😉 But I'm used to making old kits. Not possible - is not possible!
Just lay back, grab beer and chips and watch me struggling. 🙂
12 January, 01:45
I've built the old KP MiG-15UTI and Su-7. In both cases for some reason the cockpit doesn't go together like the instructions, so fit stuff before gluing. The parts count is low. The surface detailing is nice. The fit is indifferent.
1 12 January, 02:53
Strange. I built the cockpit as in the instruction. Fits well. When dried, the instruments panel will be next.
14 January, 22:26
hat ein neues Fotoalbum hinzugefügt.


5 2 February, 00:16
hat ein neues Fotoalbum hinzugefügt.
61 Bilder
Beriev Be-6 flying boat/ By Playfix -Veb -Plasticart & Revell 1:72
1:72
T shaped antenna mast's added.


81 24 July 2024, 16:32
Thanks for the likes 😁👍 it's interesting to see how a 33 year old kit builds up ??
1 August 2024, 15:31
Great idea about the watch pins! ⌚ Definitely gonna try this out on my builds. Looking forward to the finished result.
1 September 2024, 08:43
Hi Edouard👋😀👍.
Yes l just get cheap ones of eBay, the do different sizes, you can pull ends n spring out for barrel look, or file ends last to have a recoil cannon look.
The gun turret nearly there now....lots of sanding n filling low spot.
Thanks for looking in on build.👍👍
1 September 2024, 13:24
I'm very curious to see the result. I built this model as a young boy too.
4 September 2024, 20:22
Hi Zbynek 👋🙂👍.
Thanks for your interest. Nice to know you had it too, l built X3 the Tu airliner and the bomber. But this was my favourite as l liked the shape and that it had floats n guns.
Got part of tail on this evening.
Keep looking in for updates 😃👍👍
4 September 2024, 20:57
Good to have you along Guy 👋😃.
Bit of fine sanding n tidying to do next then look at getting an engine effect in cowling area.
I replaced side vent for smaller one now, checked photos... and l made it way to big.
Catch you on the next steps.
7 September 2024, 20:15
Thanks to Everyone who has liked n taken an interest 👋😃👍.. Appreciate it 👍
7 September 2024, 20:16
Hey Mr D whats the Gorilla Glue like? Is it a clear PVA or a resin Super Glue Type? Do you use it just for clear bits or as n all purpose? Thanks in advance E.
12 September 2024, 21:46
Hi, it dries 100% clear but is slow.. to air dry ..so leave overnight.
But it's worth it as very strong. And is very neutral on paint and clear parts.
It's almost like an air drying epoxy, not harsh like super glue or poli ...very safe.
I only use it on clear stuff as it's stronger than PVA but not good for general building.. l do use it to fill gaps sometimes.
👍
13 September 2024, 10:34
Don't think I'd trust those decals. The red stars are easy enough to replace or paint on, the bort numbers might be more of a challenge.
13 September 2024, 12:47
Hi Edouard 👋..yes 🤣 lm on 12 model with it and never had anything come loose.
Mike👋.... No mention neither! I've purchased some more Soviet stars now, may have some numbers leftover from others project's.
Gorby, Thanks buddy 👍
13 September 2024, 15:53
This is a quite interessting plane you're building! I like the shape of the wings. Pretty good build and pictures.
18 September 2024, 04:57
@ Christian W.
Thanks buddy 🙂👍
Yes it a bit different, yes has nice gull-wings.
It's a trip down memory lane for me... I slapped one together back in 1991 as a kid.
Thanks for the interest.... I like seeing people's build processes n history....so doing the same.👍👍
18 September 2024, 16:41
I'm anxiously waiting at the monitor for the paint job! Fingers crossed!
18 September 2024, 19:04
Mr D ... 🙂 I like too to see, how much progress my skills during the last 10 years did. Good for me is, that I own most of my model kits since I was a kid. My first plane, car and truck are still in my shelf or boxes.
Because I stumbled somehow over your wip, I checked the history of the kit. It is rally unbelievble, that those engine openings are on the bottom of the motors. Amazing. I wouldn't notice that without your hint.
19 September 2024, 04:25
Cannot wait to see the result. Your work reminds me of my first kit, it was a Victor bomber by Matchbox (They had a JV factory in Shanghai at that time). But hard find it in the market now.
21 September 2024, 11:33
Hi Lorraine 👋.
Glad your interested 👍 there are X2 colour schemes for the be-6 the Soviet green or the Chinese blue, l liked the blue version but could only find suitable replacement decals for Soviet.
My first kit was the Matchbox Electric lightning,.... Built it with my dad....was nice as was 3 colour plastic out the box.
The first models l built on my own were the Veb/Playfix be-6, & Tu- bomber, so nice to revisit.
Got X2 models at min I'm preparing for paint.
Yours is coming along well...."carefully work" 👍👍
21 September 2024, 15:00
Thanks Skyhiker 👍
I usually use Velejo or AK acrylic, but I'm going to use Tamiya on this one as it won't fit in cabinet.....and l find Tamiya acrylic is a tough paint better for wear n tear, as I'm sure it's going to need dusting now n then 🙄🤣.
The Tamiya paint turns out to be darker than advertised on the lid n chart, I've ordered a white n thinner to Tone down.
Like you I've had 2x build going on.
The Fw-190 really pop's once decals are on..... Remember the trim tabs are red....l just had paint.
😁👍
12 October 2024, 21:34
As a child, I once built the kit with my father.
Very simple kit of its time. But the shapes and proportions are convincing and you really did a fantastic job with it. I'm looking forward to the finished model.👍
5 November 2024, 21:40
Hi Marko👋
Nice to hear you have good memories too, first kit l built with my Dad was the Matchbox Electric lightning, it was good as had 3 colours... think my dad painted few bits silver too.
the Veb Playfix kits l would buy on Saturday morning with pocket money it came with strange pot glue.
I built 3 or 4 definitely built the Bear soviet bomber...l can remember.
Funny you commented on this tonight......as l was just checking it over ready for paint in next few days. I've just been wrapping up my IAR-80 project.
😁👍 Stay tuned
5 November 2024, 22:19
Wow, it would be very excited to see the finished model.Very detailed research and nice details. I visited an aviation museum in Beijing few months ago and saw this aircraft. A beautiful flying boat indeed.
8 November 2024, 15:10
Hi Weizenbrot 👋
Yes it looks nice with it's gull shape wing, ione of its rolls was to search n destroy trespassing submarines with it's depth charges .
Think the Chinese one is Blue colour??
Thanks for interest 👍
8 November 2024, 16:44
Did you finish it? I just necro-surfed the whole build only to be unceremoniously dumped back at phot number 1 lol
10 November 2024, 02:20
Hi Trez, l have recently painted the bottom colour, l will be painting the rest this week, lve had few other projects on the go... Won't be long.
😀👍
10 November 2024, 16:02
Hi Mr D. Yes they are light-blue for belly like the Soviet ones and dark blue for the rest part. Some of them have even been modified with turbo-porp engines.
1 11 November 2024, 02:22
Hi Dave 👋 thanks 👍
Been working on this long time now between other projects... try n push to get her done now.
1 26 November 2024, 20:09
Es freut mich sehr, wenn da jemand ist, der noch so alte Plasticart Modelle zusammenbaut und sich dabei richtig Mühe gibt.
Ein Teil, was ich in meiner Jugend mehrmals gebaut habe, nur leider habe ich keins mehr davon.
Ich schaue hier weiter gerne zu. 🙂
2 27 November 2024, 16:31
Hallo,
Es freut mich wirklich, dass es dir gefällt und ich habe auch schöne Erinnerungen daran.
Ich habe auch den sowjetischen Bomber Bear gebaut, also werde ich mir diesen eines Tages zulegen müssen.
Danke für den netten Kommentar Bernhard 😃👍
27 November 2024, 18:09
Nice painting! Looks like a lot of masking tape died in the process. 😉
1 5 December 2024, 11:06
Let p equal the number of tubes of perfect plastic putty used.
And let t equal the number of rolls of tamiya tape used.
Then let f represent fun: f = p * t
2 5 December 2024, 13:55
Hi Gorby 👋 Ben 🤣🤣
Not kidding 😲 l need to re stock soon, un-masking was a marathon 😄.
I painted a thin coat of pink primer on the trim tabs tonight.... hopefully not need so many red coats to bring colour up.??
I have enjoyed the process on this one... nice now I'm getting towards the end a bit now.
Thanks for your interest 👍👍
5 December 2024, 19:27
Be-12 is not a modification of Be-6, do not mislead those who are not familiar with the topic. These are completely different planes.
The evil irony of the Russian army and navy in 96 is also unnecessary.
I can also make fun of Britain's modern army and navy.
The color from the bottom is not the same.
Photos of the Be-12 cabin can be found without problems.
myskillsconnect.com/..-vnutri-24-foto.html
15 December 2024, 14:41
Hi Jennifer 👋, hopefully get a bit of time get round to it soon, thanks for interest 👍
1 17 December 2024, 15:26
From the prehistoric era kit and it's hatching into a nice airplane. Fingers crossed with the completion!
1 9 January, 21:06
Oh yeah that's coming along nicely. From the photo of the original it looks like the plane is gloss or semigloss. I think I would go with a semigloss since it's not an airliner or racing plane.
1 9 January, 22:23
Hi Skyhiker 👋 l think your right 👍 just a bit of shine ...not to much!
I didn't think Matt/ flat would be right for water .
Thanks for 😀
9 January, 23:37
Really nice to look at, color dress and all the color details.
Great model.👍
1 10 January, 07:30
👋Hi Jennifer... thanks, I've taken the masking of the windows now... Antenna and prop work next.
Good luck on your Dio😀👍
25 January, 10:16
Thanks Captain, David.... glad you like it, just stringing the antenna,s. this evening.
😃👍
28 January, 19:24
hat ein neues Fotoalbum hinzugefügt.


22 29 September 2024, 22:35

You could get some decal paper and get a local print shop to do a high quality photo copy of your decals on to it.
Nice interesting model build.... looks forward to seeing it take shape 👍👍
10 October 2024, 21:52
I'm not pleased by the little square feet on this one. I need to come up with some nice round dish-shaped pads like the Apollo lunar module has.
20 October 2024, 14:14
I printed some lunar lander feet and a bit of moon surface for a diorama. It'd been a year since I used my resin printer so it took some work to get it dialed in
26 January, 17:10
are you sure those are not normal water slide decals? I say so because they seem to have a carrier film, and when I check the produc page of the kit, it say that it contains water slide decals.... they certainly look quite yellowed (no wonder with their age) but that sometimes can be resolved placing then in a window to get the sun to white them a bit.
30 January, 14:22
Thanks... I've been 3d printing some stuff for it, will have more pics soon. I've gotten sidetracked as I tend to do. I think you call it "faffing"
1 30 January, 16:27
The decal instructions remind me of those fake tattoos you got as a kid in the candy/sweets packs n some bubble gums.
very rarely did the paper pull away without taking a bit of the picture with it.
Could be similar stuff...???
30 January, 19:04
Not sure. i scanned them, and I learned how to make decals the other day for my Orion spaceplane which unaccountably HAD NO PAN AM DECALS WTF. 🙂 so I can make waterslides if I want
On this kit I decided the lander needed proper feet, so I had to get my old resin printer which I hadn't used in a year working again and then I printed feet, but then I figured it needed a moon surface so I found one and printed it but it was too small so then I decided to use it with an old build spaceship build I did a few years ago of a smaller spaceship, so now I'm going down that rabbit hole but as long as I had the printer working I decided to make tracks for another build of mine where a tank was missing the rubber band tracks so I worked on that, but hey, there was some empty space on the build plate so I decided to also print some parts for a KNIL armored car from the Netherlands East Indies... and parts for a Schnieder WWI French tank.
I have been spending a fair amount of modeling, but not very much time finishing things.
Oh and I printed a larger moon base yesterday and it's out in the sun hardening.
2 30 January, 20:20
definitively dry transfers, no doubt 🙂 no idea if putting them in the window will clear the yellow or finish ruining them.... and since they are quite simple (some would be better to just use masking), making new ones seems a really good idea.
30 January, 20:23
Yeah or I might just use spares from my decal box, or I could use my cricut to cut masks for things and paint them on or... who knows what trouble I will get into. This is why I never finish anything.
30 January, 20:25
i have a silhouette (quite similar to cricut) and i can tell you that you can make veeeery nice maks, with no trouble at all. the checkered decal may be a bit of a pain in any way you do it, but the rest should be a piece of cake. i can recommend inkscape, works like a charm 🙂
30 January, 20:27
for the US flags, the spares box will probably be an easier option, of course.
30 January, 20:28
by the way, is it possible to scan the original decals, conver the design to vectors, clean it up and make your own decals/mask with inkscape. the same design can be basically used for both
30 January, 20:29
What I've done is scan at a high resolution, clean it up in the gimp, and send it as PNG to the cricut software on my iphone. A PNG with transparent/non-transparent parts imports nicely. At a high enough resolution it doesn't matter that it's not vectors. But I can try inkscape, it sounds fun.
30 January, 20:31
in inkscape you can use the option to trace a bimap. it may take a couple of tries until you get it right, but then it is a vector ready to use for both decal or mask
30 January, 20:33
I updated the kit description. An ambitious person would upload pics of the decal sheet and the instructions as well. Too late for box contents. Perhaps I will be that ambitious person this evening, but perhaps not.
2 30 January, 20:50
Amazon women on the moon? A little green man greeting the space-suited travelers? Red stars and a Soviet flag, some kind of alternative history? Giant 1950's radioactive insects? Any ideas welcome.
I did scan/upload the decals and kit instructions. Someday I'll get a second star.
1 31 January, 20:18

My daughter made a giant alien moon slug out of milliput
I think I will do the moon ship in Guinea Bissau markings
🇬🇼
1 1 February, 01:54
You could make it a Mars Ship. The red sand might be more interesting than the moon surface. 😉
I like the slug. ❤️️
1 February, 10:35
I've done a red planet diorama before (lost in trek wars) but decided this time it's the moon. Had a little bit of splatter on the lightest grey because it's a bad airbrush day but overall I'm happy with it.
1 February, 23:50
in bad airbrush day you have to accpet what it has been given. Honestly I do not see the splatters. looks v. good
2 February, 00:40
hat ein neues Fotoalbum hinzugefügt.


8 20 January, 17:18
hi everyone, starting a new kit simple build I hope for the begining of the year.
first step opening windows and hole in the hull.
20 January, 17:26
1ststep working on the openings windows, gouvernail, and decks to give a less toyish look. uploaded photos. Let me know if you have further suggestion of modifiction on deck and hull. thanks !
22 January, 11:13

additional pics to show progress. Santa Maria Carack did have the main bridge open and not closed. The kit propose you to have solid walls and paint them in black. I decided to open them. but I has also to create the prolongation of the main deck now visible.
Filled also the masts crippled with ejection pins..
24 January, 00:33
additinal pics I did research and it seem the bow of the boart is incorrect as it is in the recent replica of the santa maria or in the plands. I cut the upper breadge at the bow and will replace it by a triangular platform as seen in the pics. work in progress.
26 January, 21:12
Finshed painting of the main desk using 1mm band with 3 different wood collor to give some detail to the deck. May be not really accurate but give some interest on it. Next step masking and painting the hull. let me know what you think.
28 January, 06:42
now I getting stuck trying to paint the the hull. I tried to start by a clear tone ochre yellow and a wash with Citadel constrat seraphim. but I am far to obtain what I want in the ref pic I found on the wen. any thought shal I mask aslo the hull to make planck and fill it with more redish brown tone ?
1 February, 03:24
I'm building a similar small ship and decided to just use a wash to add realism. Masking individual boards on such a small model seemed not worth it to me.
1 1 February, 04:23
indeed will take a lot of time and there is a lot of reinforcment in the way. thanks for the advise.
1 February, 04:28
Also the hulls are very curved. Maybe next time I will try it but not this time.
1 February, 04:54
second layers with vallejo colors (I do not have oil paint with me). still too light for a boat that crossed the ocean. need more work on the hull.
2 February, 00:44
hat ein neues Fotoalbum hinzugefügt.


1 2 February, 00:48


hat ein neues Fotoalbum hinzugefügt.


18 20 March 2021, 02:23
Interesting collection of top models. I like the different degrees of weathering you applied!👍
20 March 2021, 11:05
hat ein neues Fotoalbum hinzugefügt.


27 8 October 2024, 16:31
How did I miss the start of this one? Looks sweet so far! Pulling up a chair 💺
1 25 November 2024, 08:28
Large airplane. Nicknamed "The Whale" because it was one of the largest aircraft to ever trap on an aircraft carrier! This is a great one to watch!
19 December 2024, 01:14
hat ein neues Fotoalbum hinzugefügt.
32 Bilder
All my finished models
The 1996 Revell Jagdpanter. All but the jerrycan on this side is from the original kit. The antenna which was supposed t...


10 15 September 2024, 20:56
hat ein neues Fotoalbum hinzugefügt.
12 Bilder
1/72 C-130J-30 Qatar Emiri Air Force
1:72
...mostly covered up!


Projekt: 1/72 C-130J-30 Qatar Emiri Air Force


40 24 November 2024, 16:11
I've been working on this project for months but never found the time to share it—until now. This is the largest aircraft I've built so far. When someone from Qatar asked me to take on this project, I was immediately on board. I knew the Hercules' sheer size compared to my other kits would make this a challenging and exciting project!
24 November 2024, 16:17
Thanks Rui! More about the Eagles can be found here: F-15C Dual Build 1/72 | Album by Mike_AUT (1:72)
25 November 2024, 20:25
This is an amazing project, taking a seat and popcorn 🙂 The size of the Hercules model is s satisfying to see !
28 November 2024, 11:04
Thanks Cristian! For me this is almost too large so I'm looking forward to build something "normal" soon 😅
28 November 2024, 16:56
Another update on the Herc. The cockpit isn't very detailed, so I spent more time painting the crew. Beforehand, I tested which of my paints best matched the uniforms of the Qatari Air Force.
1 28 November 2024, 18:54
Cockpit interior and Qatari pilots look awesome, keep going. Cannot wait to see this big boy wearing its Qatari Air Force roundel.
29 November 2024, 09:52
Am I the only one who is reminded of the Terminator by the co-pilot figure? I'm not sure why.
Nice start with the cockpit. 👍
29 November 2024, 12:29
Thanks Mr D. I wasted too much time on the cockpit, considering that you can't see anything once the model is finished 🤦♂️
1 4 January, 21:19
@ starfish.
I know the situation 🤣 modern fighter jets are good for cockpit displays, Desert Marlin has built some great examples.
I quite enjoy the cockpit work and always have the Snaps 📸 , l have to confess..l sometimes takes to the cabinet with my 🔎 have a look through the cockpit window 😆
1 4 January, 22:25
hat ein neues Fotoalbum hinzugefügt.


9 3 January, 21:18
Hi! The answer to the question of what the wire in the photo with the model is for will be at the end of the project! Stay tuned for updates.......
7 January, 23:46
hat ein neues Fotoalbum hinzugefügt.
15 Bilder
Space Shuttle-Mir (NASA-Roscosmos)
1:144
Some experimentation today! I tried applying some color shifting metallic art tape to a spare solar panel, burnished it ...


Projekt: Space Shuttle-Mir (NASA-Roscosmos)


 1+
1+ 6 21 May 2023, 16:12
hat ein neues Fotoalbum hinzugefügt.
6 Bilder
Kaido Copen
1:24
Went with a completely different color after a handful of missteps. I painted the roughest parts with a bit of rust-like...


Projekt: Kaido Copen

14 17 December 2024, 17:56
Thanks! Kei cars are an amazing thing. These over fenders were a universal free file, first for shows that it'll be a bit of a struggle to get fit. But a challenge isn't a bad thing.
1 19 December 2024, 15:57
Well... First attempt at glueing the over fenders on was a failure.
BSI Super Gold+ was used, felt like it was good, then I set the body down and half of them just popped off. Sanding super glue off a kit body is for the birds. And if this fails 2 or 3 more times I won't have fenders to glue over fenders on to :/
Wondering if I should try a different super glue, a 5 minute epoxy, gorilla glue contact adhesive, or a NOT free file for over fenders? I am currently testing the BSI and contact adhesive on an old kit. I plan on filling the gaps with Tamiya putty tomorrow. But I'll be browsing other STLs until then.
21 December 2024, 01:38
Would anybody share what grit sand paper they get up to on prep work before laying primer down?
I took this up to 1000# wet sanding but I'm not happy with it. I'm wondering if I need to go finer, or if I need to use hobby paper vs this wet paper from the auto parts store?
5 January, 20:37
"Wondering if I should try a different super glue..."
I wonder if resin type has anything to do with the glue/adhesion? I used Elegoo Water Washable Resin and dollar store superglue on a few projects. Never had an issue with parts falling off. Also, I pretty well use God Hand sanding sponges exclusively.
1 6 January, 08:09
Thanks Mike. I am also using Elegoo Water Washable and I used is the BSI super glue gentle enough for painted and clear parts. I'll try a cheap bottle on a test kit next.
The auto part store sand paper does goes from paper to sponge at 2000 grit, so I'll try to take it a step finer before laying more primer. If that doesn't work I guess I'll buy something specialty.
6 January, 12:39
I made the rookie mistake of thinking a Champaign Pearl color would spray like any other color...
My sad excuse for a desk lamp and my hubris proved that to be false. Worst job I've ever done at painting.
I tried some simple green to strip (to no avail) and ended up solving all of my problems with bigger problems. So now I'm sitting back in black primer with a few spots that I can't sand out without altering the shape of the body noticably.
Now I'm deciding if I'll pivot to a different color and live with some budget franchise body work finish, or if it's going to get the heavy weathering treatment.
25 January, 15:07
Fellow fan of Purple Power for stripping plastics. Works a treat on gaming minis and models as well.
1 31 January, 20:43
Funny enough this is Mr Hobby Gundam Color MS Green (the Zaku II color) over Mr Hobby grey primer.
I am quite happy with how it looks on this kit.
Also... I really need to buy more Purple Power.
31 January, 23:38
I'm also a brake fluid man. Just make sure that you get every single bit of paint off. In details and hard areas, I use an old toothbrush. Once it's all off, I rinse well with cold water, then when dry, wash the whole thing with soap and water, and let air dry. It's probably too much cleaning, but I like to be sure.
1 1 February, 05:59
I appreciate the input. I'm honestly surprised that brake fluid doesn't attack plastic... But it makes sense when you stop and think about the fluid reservoir being plastic under the hood/bonnet. I've got a bottle that's been open long enough to not trust using for brakes, I'll have to try it out on a kit.
1 February, 17:58
RE: sanding.
I sand my bodies with a Tamiya 600 grit sponge. Then it is primer time 2k or Mr Surfacer Grey 1200, mixed 50/50 with Mr Self Levelling Thinner.
After curing, sand the primer with a Tamiya 3000 grit sponge. Then base colour. 3 thin layers, depending on the paint and colour. If necessary sand with 8000 grit Alclad cloth. Then 2k clear.
Sand if necessary and polish with Tamiya compounds.
Rinse and air dry after each sanding, remove the last traces of dust with a static brush or air from your airbrush (if you own one).
1 1 February, 18:41
I did pick up some Tamiya sponges and they are MUCH easier to use on a body with a lot of exaggerated curves like this kit. I'll still have to pick up one or two other grit packs because there was a weird, non sequential, stock when I stopped into the store the other day.
But I hear you, I should be going to a finer grit after priming for a mirror finish.
Do you use the 8000# on a metallic/pearl base as well?
1 February, 22:10
Just a heads up...
Only use Dot3 and Dot4 brake fluid. Apparently, there are others that are NOT kind to plastic?
And also, thick bleach is my preferred method of removing chrome. However, some chromes are treated to a clear coat? This needs to be removed by the brake fluid first.
A 30 minute bath, is usually enough to get the ball rolling.
1 February, 23:11
hat ein neues Fotoalbum hinzugefügt.


18 21 January, 00:57
I didn't know, Tomytec made this wagon. I didn"t know, you build in 1:35. But I knew, you build perfect models, like this one! I love it (especially the wooden insert on the roof panel- sick Japanese)
21 January, 17:30
Why is it so dusty? Do you have to hide something? 😉
Kidding aside. Nice worn look with the perfect used and grimed engine compartment.
21 January, 18:47
very very good job!
This is the most beautiful patina on a civilian vehicle that I have ever seen.
21 January, 18:47
Thanks guys!
Michael, that's exactly why it's so dusty 🙂 my on-again-off-again relationship with clear coat haha
21 January, 22:54


/de/search.php?q=*&page=newsfeed&fkSECTION[]=Newsfeed
search-solr.php?lang=de
35
35
/de/search.php?q=*&page=newsfeed&fkSECTION[]=Newsfeed
35
todo