

Citroen DS21 - WIP

Washed.

The kit has a gimmick to open and close the door, but after assembling it, it seems that the gab in the indicated area is a bit wide.

The passenger side is also a bit on the wide side, but it looks fine.

To modify the driver's door, I sliced a 1mm pla-plate...

Stick it on the end of the driver's door...

I cutted and sanded it to fit.

The end of the muffler is blocked.

The pipe is thin and cut at an angle, so it wasn't easy to drill a hole in the center.

Finished trimming the body parts.

I lost one of the wipers, so I shaved off a 1mm pla-plate to make it.

I also need to paint the body color on the inside of the door, but for masking convenience, I'll paint the body last this time.
So, I finished trimming all the parts.
So, I finished trimming all the parts.

The ivory color was masked as it was from the plastic injection molding without being painted.

Despite what it looks like, it's a whopping eight colors.

Ah... I'm so...
I lost again that wiper. 🙁
I lost again that wiper. 🙁

Made again...

Since I plan to paint the body color metallic, I painted the surface black for coloration and paint strength.

The instructions say to paint the roof white, but this car is a metallic color that is closer to white.

I made plenty because I thought I would use it more in the future.

The roof appears to be a solid color, but in reality it appears to be an very bright aluminum color, almost white. It's so pretty when it's mixed with pearls and reflects softly.
PS: The staircase phenomenon in the bonnet is due to the LED lighting.
PS: The staircase phenomenon in the bonnet is due to the LED lighting.

Moved

But..

Unpacked yet...

1st. clear coat.
I painted very thinly and dryly to avoid the metallic particles becoming rough.
I painted very thinly and dryly to avoid the metallic particles becoming rough.

Once more paint. dryly and thinly.

3rd. coat: This time, it was coated moistly.

4th. coat: This time, I gave it an overly moist coating.

Final coat: Once more.

I let it dry crisp and then sanded it.

And, using compound.

I felt strange during polishing, so I took a picture and enlarged it, and the parting-line remained.

I think I missed it because I was in such a hurry to get the clear coating done before moving.

There was no way to restore it now, so I gave up and just did the final polishing. 🙁

The marked areas need to be painted with matt aluminium, but I didn't want to masking them, so I used Hasegawa sheet paper.

Applied to c-pillar

B pillar too...

I did some paint brushing.

Glued the decals.

A quick detail up while the decal dries.
After cutting the silver tape very narrowy...
After cutting the silver tape very narrowy...

Done.

I have some silver foil tape left over...

UV resin coat.

Ready to assemble.

I started by assembling the engine according to the instructions.

The engine alone has quite a few parts.

Mounted.

For some reason, one side of the handle was thinner.
I don't know if this was the case in the real car.
I don't know if this was the case in the real car.

Unlike the manual, it is convenient to attach the marked parts to the dashboard in advance.

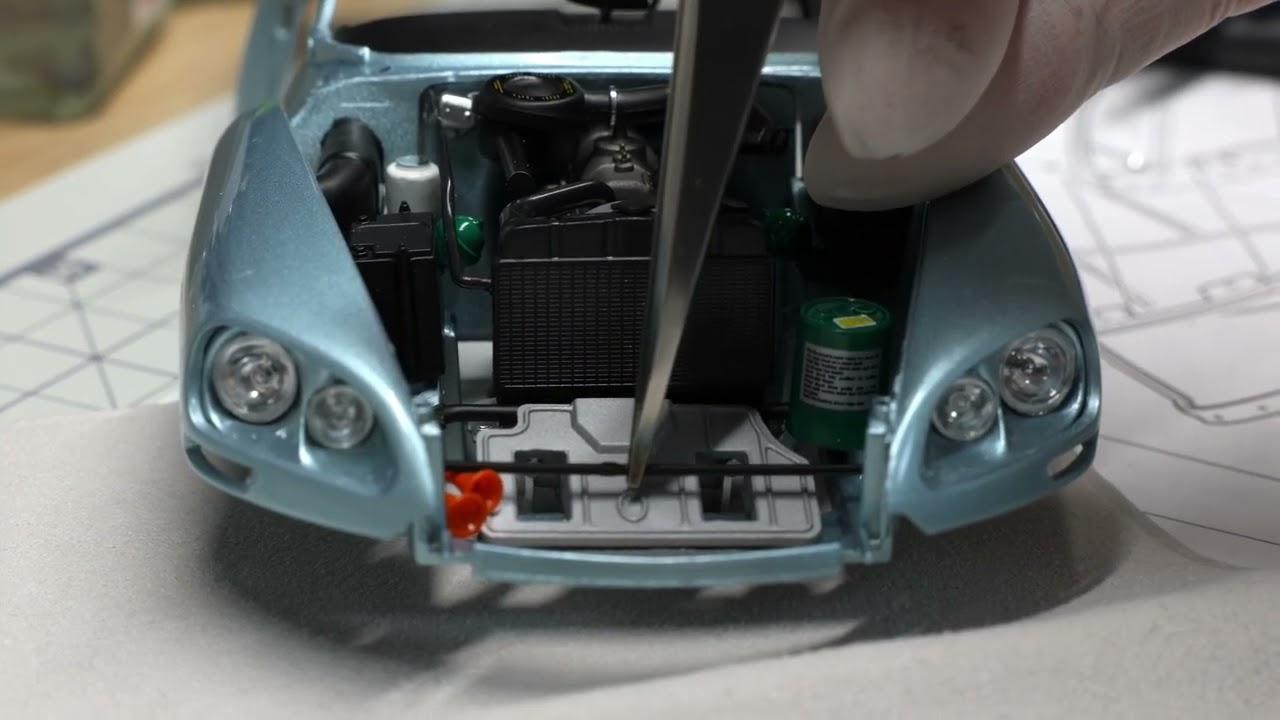
The structure of the shock absorber being operated by the tension of the rear wheel axle is interesting.
Therefore, the indicated center part must be firmly fixed.
Therefore, the indicated center part must be firmly fixed.

Assembled the bottom plate. The front wheel should not be installed yet.

The headlamp was structured to operate left and right like a real car.
So, I assembled it in advance so that the lamps inside were securely fixed.
So, I assembled it in advance so that the lamps inside were securely fixed.

The rear seat armrest can be assembled in either an unfolded or stowed state.

Assembled the inside of the door.

If I fit the rear door to the bottom plate, there will be more space in the marked area.
I'm not sure if this is correct or if I should stick it closer.
I plan to fix it in this state for now and insert it later by squeezing it tightly.
I'm not sure if this is correct or if I should stick it closer.
I plan to fix it in this state for now and insert it later by squeezing it tightly.

Because it was left for a long time due to moving and was exposed to fine dust, much of its luster was lost.
So I used modeling wax, but it didn't really work.
I think modeling wax is 90% only the marketing ploy.
So I used modeling wax, but it didn't really work.
I think modeling wax is 90% only the marketing ploy.

So I polished it again with ceramic compound.

Attached rear windshield.

Installed head lamp. (However, the connector can easily become disconnected.)
Movable head lamp - Youtube Video
Movable head lamp - Youtube Video

When I separated it from the runner, I mistook it for a gate and cut it off, so I glued it back on. 🙁

Assembled tail lamp.

The roof frame parts in this kit not fitted well.
Perhaps because the parts of the D-parts are plated, they are difficult to bond even with instant adhesive.
In particular, the front part of the roof didn't fit together well and didn't stick well, so it took several hours of trouble to finally get it fixed.
Perhaps because the parts of the D-parts are plated, they are difficult to bond even with instant adhesive.
In particular, the front part of the roof didn't fit together well and didn't stick well, so it took several hours of trouble to finally get it fixed.

I should have attached the indicated parts first and then glued the surrounding frame.
Since the assembly order is not indicated in the manual, you may make this mistake if you are not careful.
Since the assembly order is not indicated in the manual, you may make this mistake if you are not careful.

Although the roof frame was firmly fixed, it was forced to open a small gap and then fit in and glue it together.
In addition to this, there are some errors in the assembly guide.
In addition to this, there are some errors in the assembly guide.

Now it's time to combine the upper and lower plates, but before that, I need to attach the wheel caps in advance because the body covers the rear wheel.

It comes with two wheel caps, and I liked this one, but it had scratches on it, so I had to give up and use the other one.

Unlike other car kits, front wheel parts must be assembled after combining the upper and lower plates.

Attached front exterior parts.
The bumper is located in the space between the top and bottom plates, which is quite wide.
I tried to narrow it down with force, but it didn't work.
Fortunately, it's not too noticeable when viewed from slightly above. 😉
The bumper is located in the space between the top and bottom plates, which is quite wide.
I tried to narrow it down with force, but it didn't work.
Fortunately, it's not too noticeable when viewed from slightly above. 😉

The metal decals are really good quality, with excellent adhesion and very little film margin.

Since it's a moving door, I pre-assembled it for strength.

It looks like I need to apply the decal first before attaching the rear extrior parts.

Done.

The other parts went to great lengths to hide the gate, but for some reason the gate position on the side chrome parts is on top, which is ironic.

The same problem.
If I flipped it upside down, I couldn't plug it in because the shape of the 'male-pin' was different, and I couldn't swap the left and right parts because of the slanted shape of the two ends.
If I flipped it upside down, I couldn't plug it in because the shape of the 'male-pin' was different, and I couldn't swap the left and right parts because of the slanted shape of the two ends.

The good news is that it is not clearly noticeable.
And I can't help but praise the fact that the separated door panels fit together so well that there are no steps to match the curves of the body.
But why is the roof frame.....
And I can't help but praise the fact that the separated door panels fit together so well that there are no steps to match the curves of the body.
But why is the roof frame.....

Unlike the assembly instructions, the left/right parts must be swap each other.
This is why only these parts will have the gate facing down.
This is why only these parts will have the gate facing down.

The bonnet can be opened wide like that, but the length of the bonnet holder is short. Structurally, that length is the limit, but I don't know if the actual car is like that.

When I was attaching a metal decal to a window frame, no matter how hard I pressed, the marked part would pop up, so I looked closely and saw that there were transparent granules underneath.
And, because the metal decal was actually metal foil, the bent part was already visible.
So, after tearing it off, I cut the Hasegawa mirror sheet (the thick one) and attached it.
Since it is a vinyl sheet, it is affected by the embossing of the undercoat, so the quality is better when metal decals made of real metal are applied.

Although it is hard to see, metal decals must also be applied to the marked areas.

Lastly, I did attach the side mirror and keyhole trunk handle.

However, these rubber parts remain.
There is no mention of it anywhere in the parts diagram or assembly manual, so I have no idea what the part is.
There is no mention of it anywhere in the parts diagram or assembly manual, so I have no idea what the part is.

Anyway, I'm done.

As it is considered one of the 1st and 2nd most beautiful cars in automobile history, it cannot help but be beautiful.

And it works! 🙂
Thanks for watching. See you next in the 'finished' album.
Thanks for watching. See you next in the 'finished' album.
Kommentare
50 19 February, 11:14
Most roofs were fiberglass, but also a lot in aluminium, mostly in the color of the body. Can't go wrong here. The lighter aluminum roof that you've painted looks great together with the bodycolor 👍.
20 February, 05:10
Nice work, I'm currently stalled on a slightly similar project so I'm keeping à close eye on your progressivement.
20 February, 06:55
Thanks guys. But...
It's currently raining here so I can't air-brushing, and since I'm moving soon, I won't be able to work for a while.
It is expected that the next work can be resumed after at least two weeks.
20 February, 07:34
You sure never desapoint
Fantastic paint and work
Also much appreciated with all the information about how to achieve you're results
2 April, 13:17
A DS by MS K? Sure I gotta follow this. Elegant car and very elegant livery you chose. Coming along nicely.
9 April, 17:08
Thanks guys, almost done.
Above all, it is the most difficult to explain in English.
In particular, translators often translate 'I' as 'You'.
10 April, 12:19
wow, it looks truly amazing. you certainly did an fantastic job on this iconic car!
11 April, 07:40
A lovely build to watch - thanks for the comments as you went along. And a great result!
11 April, 17:21
Album info
FHD imges
Part 1/3 - motorart.tistory.com/743
Part 2/3 - motorart.tistory.com/749
Part 3/3 - motorart.tistory.com/754
Finish - motorart.tistory.com/757
Movable head lamp - Youtube Video

