

The Zoukei-Mura "Test shot" of the Do-335.

This is the final image of the test shot build, and the actual production kit will have all short comings rectified, those being the ones that I 'discovered' and told ZM about so that the 'production' kit would be a bit better to construct.

The foot pedals were the very first step (No pun) in the assembly process, according to the 'roughs'.

As you can see here, the 'instructions' were very basic indeed, and it was not all that easy as the build got more complicated. :-/

The parts are ALL just beautifully detailed, as you will see as the build progresses. No doubt, there will be the usual 'after market' PE sets for the straps for the pedals and all other parts as well.

Now comes the main floor pan and all the side walls and bulkheads that will go to make up the cockpit area and surrounds. And there is a ton of detailing that takes place here too. Note the detailed piping segments.


This is all the 'dry fitting' of parts I was unsure of permanantly fixing in position. these being the compressed air bottles for the ejection seat.

Sorry about the 'blured vision' but this is the ejection seat assembly.

The loops you see at the bottom of the seats are the 'leg restraints' made up of three parts on each side.

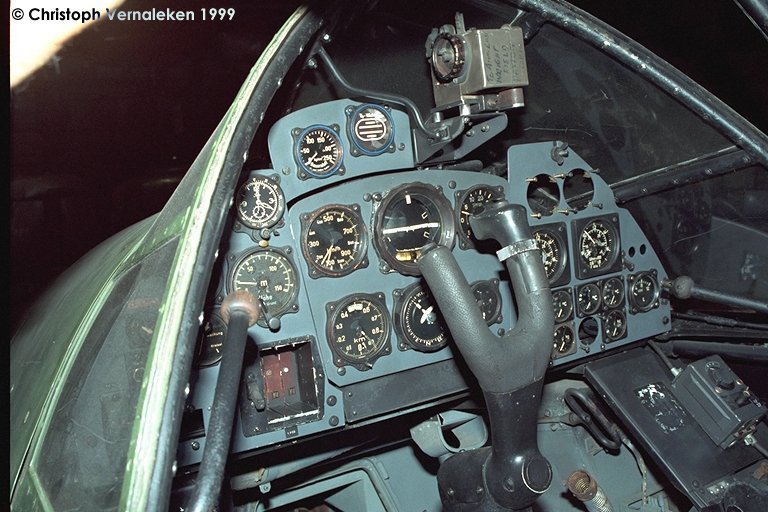
The beginnings of the front fire wall to which the main instrument panel will eventually be fitted to. In the foreground is a 'bag' that goes over the hole you see in the firewall.


I chose to do the grey plastic pannel, as I had no decals at this stage that has the instruments for the clear dash pannel.

With no decals for the bezzels, I just dry brushed white and various other colours to highlight the instrument detail, then a dob of clear acrylic lacqure for the glass lenses

Prior to painting the other knobs and dials, I masked off with some Humbroll latex masking fluid.

The colours I was not too sure of, but as it turned out, I had to go a couple of shades darker, achieved with a dark 'wash'.

The five black looking dots are actually instrument type 'dials' with the 'lense' effect done. this piece goes on the cockpit floor, just forward of the pilots feet.

The seat straps fitted beautifully into the seat pan.

Ready to go flying.

When it came to the hydraulic lines system, Aluminium was in short supply and copper and brass was the preferred metal for high pressure line, with copper connections, and this is what I have gone for in the way of dramatising that fact. 🙂

To make all the metal look as bright as it is here, I used "AK interactive" True metal tube paints (AK454 copper) and (AK 460 Brass)

The AK tube paints thin out well with tutpentine, and is best when 'dry brushed'.


One of the many bulkheads to be used in the belly area, along with all its relative tubing and connections. This is where some compressed air bottles will be installed.

Just like these. 🙂


The little 'box' near my finger and the grey looking 'bag' in the lower left is an other place that weights can be placed to help keep the nose wheel on the ground.

The control stick is beautifully detailed and some careful 'dry brushing' will bring out the raised detail perfectly.

There are three buttons at the base of the Y yolk. these are red from all the images I have seen.

Just some detail in the way of the foot pedals and their linkages, along with the box that has some dials of some sort, along with the control knobs at the base of the seat.

Just a different angle of the previous image minus the box on the floor.


In these boxes is where I would recomend you place some weights before it is all closed up.


Here is where I ran into a small problem with the height of the instrument pannel, as it was just a fraction too tall, having to shave a small amout off each end wher they rest on the upper console area.

This si wher I was doing a lot of dry fitting, in order to make any adjustments to parts that may have had too much beef and needed trimming, but to generally make sure of the fit allround.

Without the detail painted and all parts in place.

Now with the whole cockpit area finished, just have to add the dark wash to bring the overall 'tone' down a bit.

As you can see here and in the previous image, the extra detailing of the small black boxes really sets the 'mood'.

Now comes the machine gun system and all the parts associated. But here is the place where I would recomend some weights be added, to the bag that is attached to the fire wall here, whwre that 'cavity' is you see here.

ALL of these recesses can be filled with weights, as you will see that the guns only fit in the areas that surround all these cavities, starting with the middle here is the first part to take a gun

So, plenty of space to fill that will never see the light of day that would go to waste otherwise, if weights are not used.

Thomas Mayer has posted some images of a product I have never seen before called "Liquid Gravity", looking like miniature 'buckshot pellets' that will fill all this space easily.The whole rear of the actual gun can be removed, making way for the weights.

The cannonsystem is not all that difficult, but make sure of the removal of the seam lines, assuring a tight fit of all parts.

The ammo feed chutes are the 'clips' that will lock the two guns to the top of the ammunition feed system.

Like so. 🙂

This is the 'slot' that the whole gun system will slide into, and here once again is the area that weights can be added, normally it is where the back end of the 20mm cannon would fit into.

So, to afford yourself more area for the weight, the rear of the 20mm cannon will not be missed or have any detremental effect on the overall structure or appearance of the system if you chose to remove it.

Now, there is even the possability of adding more weight once the front "fire wall" is in place,

The compressed air bottles that are for the activation of the ejector sest system, mounted on the rear bulkhead of the pilots seat frame.

MORE weight can be added to the hollow of the Oil tanks, as all this is still forward of the models 'centre of gravity'.

The support ribs for the main fuel tank.

Yet MORE bulkheads are provided, and again, all that delicious detail to get some attention. 🙂

The tank may take many appearances, such as all metal, or bonded with the self seling membrane outer with the metal strapping.

I painted the base of the fuel tank semi gloss black to replicate the 'self sealing ' membrane, but it can be done to the whole tank for a more dramatic effect.

"Working up" the detailed painting was a lot of fun to do, as there is so much of it, and most time consuming. Totally worth every minute really. 👍

Thankfully, all this detail can be seen in the bomb bay area,if mounting the bird on a mirror plinth

The bomb bay door support /pivot struts are clamped into place now.

My "Instructions". !!! Photo copies of the cad drawings and hand scrawled part numbers with acompanying arrows showing the way. :-O

This was such fun to figure out what went where, all the time, dryfitting each and every part to make sure before the committing to the glue stage. :-S

This is where it gets interesting if you are looking at adding any 'weight' materials to stop the 'tail sit'. Thomas Mayer has used a product called. Liquid Gravity.

Miniature "Buckshot" that can 'flow' into cavities, and in my mind, will be the perfect solution to overcoming the problem of bulky fishing sinkers. 👍.

As beautiful as all this detail is, it can be 'reduced' to a degree to provide more area that the liquid gravity can be used

The 'conrods' are redundant really, abut IF you plan a different way of building this kit that highlights all this detail, well and good, but for the most part, sad to see it dissapear. 🙁

The correct 'alignment ' is afforded by the con rods intersecting, but with a careful eye and mounting all other parts in a sequence that will help in making sure all of it 'lines up'

All the components ready for assembly. As you can see here. The main 'block' where the bottom end/crankshaft will normally be has a huge area for the weights to be placed.

The reduction gear housing for the tail shaft on the rear engine

The positioning of the rocker covers is CRITICAL, and if you have them facing the wrong way (Like I stupidly did), it will effect the positioning of all the smaller additions that the motor will need and it's fit into the fuselage mountings. 🙁

The large recess in the rocker cover is important in helping determine the propper positioning and alignment of all other parts associated with the engines appearance and positioning.

As I have said. These rocker covers are the wrong way around, but luckily, I was able to make the correction in time before it all set as hard a concrete. :-/

Because I only had 'roughs' to work from, I was drawing on my experience of building the "Uhu" Damler Benze motor (Exactly the same), and the process and sequence of that build, enabling me to put parts on before the final FIX .

The fitting of all the pipes, fuel lines, and ignition loom is to be done with all due care. ALL the parts fit exactly and perfectly, IF, you follow the correct sequence of the prescribed method.

I left all the assembly unpainted deliberately, as I was not going to fight my way through paint to get the glue to get a 'grip', as the DB engines were semigloss black all over basically, and I later dry brushed all the 'fittings' according to reference

But as I said. Everything that goes on the motor fits just perfectly, and that is a real joy to say. 🙂


The 'ridges' on the exhaust stacks are not to be scraped off, as they are part of the manufacturing process at the Damler-Benze factory.

The 'exploded' view drawings were ambiguous to say the least, and if there is some understanding in your heads of machinery and its pattern, these will be easy once the propper instructions are released.

The 'front' engine, and on the very top the gun barrels protrude from the Gun assembly. This is just the 'dry fit' stage, working out how to fit it all, and what corrections, if any, I had to make, prior to painting everything on the engines.

There will be some small fit problems if you have not made the gunpack assembly fit right up flush, 'all the way home' and flush with the cockpit fire wall .

The engine looks like it 'droops', but this is the way it is supposed to look by all the refference material I could find.


The 'rear' engine is mounted with support struts that will locate in the bottom centre of the block

This is all still the 'dry fit' stage, as it really took a lot of trial and error before I was happy with commiting it to the glue.

THIS stage is one hell of a thing to do. As there are two versions of these louver operating devices, in the "open" and "Closed" positions. 🙂

Trying to 'work out' what the drawings were trying to tell me, I had to really pay all my attention to what pieces were to 'face' each other and how not to break them. 🙁

As I went for the 'closed' option, the shorter 'rod's' were used.


The options will give you two different cowling 'rings' so, be careful to watch what parts you will be needing to use, as I got all mixed up, cutting longs and shorts, and mixing them in with each other. DUMB move. 🙁


The internal structure of the wings shows just how tough these aircraft were going to be if they ever went into production.

When the two halves come together they are prefectly aligned by the way the centre box is structured.

The centre box is clearly seen here, with the ridges that will assure you of the correct alignment and dihedral.

I think that the reason why ZM have given the clear parts is mostly so that the modeller can have a better understanding of what it is that they are building, rather than just gluing two halves together, you get to 'feel' the history in a way.

The center of the whole aircraft was built around the monocoque system, and the wing tanks are located in the forward part of the wings.


This tank is from the second kit I have, the 'production' version, and here, Parrafilm "M" is perfect for masking off large areas, like having the steel straps here painted first, then covered with the film, trimmed and then the black.

the black dots are just from an artists paint pen with an ultra fine tip. I have now polished away the excess black from the 'dots', as well as the 'fluff' on the straps seen here, and it now looks a whole lot better.
Kommentare
7 June 2016, 10:04
I know what scratchbuilding is, but doodle-building is new to me. Must be a nice challenge.
7 June 2016, 11:12
Nice one so far.... and superb in the details... as usual from Zoukai Mura
7 June 2016, 11:22
Michael. Your compliments are much appreciated mate.👍 Knowing what your skills and abilities are like, they mean a great deal. 🙂
Cheers. 👍
7 June 2016, 17:27
Very interesting, Kerry!
The level of detailing of this kit is just great! Well it's ZM, isn't it?😉
8 June 2016, 05:16
Dooh... Waiting for my Concept Note book these pictures here take away some of the surprise.
Just kidding, Kezza! 🙂
8 June 2016, 07:01
I am blown away by your flawless painting of all those tubes and supply lines! I think I must get some of those piants myself, too!
Did you add some weight up front? Or did you leave it as is?
8 June 2016, 07:03
Thomas, Soeren, and Ulf. Thanks guys, and I am over the moon with the way the concept notes looks. So, I now have to live up to that standard now. 🙂 But, with a ZM kit, that will never be a problem, because ZM kits really do bring out the best in everyone who builds them. And Thomas will agree with me here, as his Ho-229 was the centrepiece of the Concept notes that got me all fired up about ZM. 🙂 👍
As for the weights Thomas, it was not until you mentioned that you were looking for places to put the weight putty that I was inspired to go back and look again at just where there could be some places I had not considered before, like inside the engine block as you suggested, and anywhere that has cavities or spaces that are not visible to the eye. 👍
In some of the images I have posted, I have actually made suggestions about some p[laces I will be doing with the production kit I am now the proud owner of. 🙂
8 June 2016, 08:14
what a detail... yummie... Hope they will release some other versions too
8 June 2016, 09:54
Kerry, indeed I already started to add some weight into some parts up front!
[img1]

[img1]

8 June 2016, 14:06
Thomas. ! WOW, That is exactly what I was needing and I will look for it now for the build of the new one I have. But knowing that all the con rods and pistons and ALL the internal detail of the engines will never be seen. Do you think that it could all be removed to create an even larger area for the LG to go. ? :-O
And, as always, Grrrrrr, there is no outlet for the LG or gravity putty here in Oz. (Damm).
BTW, I am seriously looking at adding the PE parts to this build too. :-/
8 June 2016, 15:42
Well another high tech kit in your skilled hands. Your start with the interior is amazing and speedy 👍
I will definitely follow this Kerry!
8 June 2016, 19:19
Cool Urban. !! It is just amazing what is available but NEVER think of. OMG. 🙂
Thanks mate. You may have just saved my bacon. 🙂 👍
8 June 2016, 19:20
Have a 'laff' time. 🙂
Two hillbillies walk into a restaurant. While having a bite to eat, they talk about their moonshine operation.
Suddenly, a woman at a nearby table, who is eating a sandwich, begins to cough.
After a minute or so, it becomes apparent that she is in real distress. One of the hillbillies looks at her and says, Kin ya swallar?'
The woman shakes her head no. Then he asks, 'Kin ya breathe?'
The woman begins to turn blue, and shakes her head no.
The hillbilly walks over to the woman, lifts up her dress, yanks down her drawers, and quickly gives her right butt cheek a lick with his tongue.
The woman is so shocked that she has a violent spasm, and the obstruction flies out of her mouth. As she begins to breathe again, the Hillbilly walks slowly back to his table. His partner says, 'Ya know, I'd heerd of that there 'Hind Lick Maneuver' but I ain't never seed nobody done it a'fore.
9 June 2016, 04:36
Kerry, indeed I removed all the piston rods and other stuff from the inside of the engine. Gives much more space for weight. I filled the engine with lead and filled the remaining gaps with Liquid Weight.
9 June 2016, 06:10
Yes, a good move Thomas, and I would not put any inside the tyres, but have the 'flat spot' on the tyres to help with keeping the centre of gravity more to the front, and did you see all the gaps that could be weighted in the gun pack, parts number (H-34) and H-33) and just below the main instrument panel and where the back of the 20mm kannone fits into the 'bag' part number (H-twenty eight) that fits to the back of the fire wall, (H-43) just in front of the pilots foot pedals. ?and in the wing tanks (I-10 & I-11)that are in the leading edge of the wing too.? 🙂 Any 'space' that is in front of the main landing gear. 👍 AND even in part (H-29)that is on the cockpit floor between the pilots feet. 👍
9 June 2016, 06:19
Just watched the new pics, Kerry, and I must say you did a stunning job!
9 June 2016, 06:23
Thomas, I am always so pleased to see what you say about my work, and to tell you the truth, I was in a 'bit of a rush' to get the whole kit done before the end of the timeline they gave me, and I really could and should have done a lot more. :-/
But now I have the full production kit with the full instructions, I will be really wanting to be more attentive to the detailing I overlooked on the test shot.
Especially all the engine plumbing and main landing gear.
I will be going a little more slowly, and not 'second guessing' trying to figure out the roughs I had to work off that came with the test shot.
9 June 2016, 06:45
Thanks again Mike, and I am hoping that you will grab one of these kits, as the detail your seeing here just has to be seen up close and personal really, as it really is just exceptional what they have done. Truly the 'bench mark' has been set by ZM, true to the beasts they get access to, just nothing missed at all.
9 June 2016, 07:42
Agree on the bench mark, Kerry. I have the other kit (HKM) also here with me. Really, I have made my mind about what kit I would spend my money for! 😉
9 June 2016, 08:57
The Hong K kit. ?? Wow. I have seen one thing I would have liked ZM to do was the 'bubble' on either side of the canopy like the HK kit. But I do believe the detail quality is not as good as people are saying. I do hope you will send me some images of what you will be doing with it mate.?
9 June 2016, 09:17
Oh yes. And, it is the exact same one as the big 32, nothing missing, just scaled down. you will love this kit Mike. 👍
9 June 2016, 12:19
Yes, I've been thinking about it for a while now, Lucky Models have it at the moment for a give away price at the moment. But I'm going 4x4 driving on Moreton Island with Tammy and my 2 girls in October so I need to be careful what I spend.
9 June 2016, 12:23
Moreton is awesome, but just keep an eye out for the 'wash outs', where the fresh water creeks flow to the seaward side from the hinterland, gouging deep gullies across the beach, that if you hit them at speed, a nasty result. Very hard to see mate. 🙁.
9 June 2016, 12:33
Hinterland is the reference we make to any and all lands backing onto the coast line. 🙂 google.com.au/url?sa..m=bv.124088155,d.dGY
9 June 2016, 20:57
Clifford, I thank you for your encouragement mate. 🙂 It's just such fun to build these ZM kits, easy and super rewarding. 👍
Especially for those of us who have thick sausage like fingers. LOL 🙂
9 June 2016, 21:00
Good morning gents. 🙂
Choppa, it is just as you say mate. And more. 👍.
It was one challenge I would happily do again. 🙂
Mike. There are stories on Google of some of the 'accidents' on Moreton from where drivers have just 'driven off a cliff' type of thing when it happens. google.com.au/url?sa..aKPawKyaomwo_pbNsaxA
9 June 2016, 22:38
I didn't know they had those on Moreton, I thought they were only on Fraser.
10 June 2016, 05:11
Kezza, I asked about "Hinterland" with a twinkle, for it is a German word!
It means back country or (hold on!): outback! 🙂
10 June 2016, 05:15
Michael, 🙁 I stand corrected mate, and I was totally wrong. Just thinking 'safety' mate. :-/
Thomas, I am always learning something and twice on the same day, well. There you go. :-p
The 'Outback' here is WAY out the back of the hinterland hehehehe. 🙂
I KNOW they have Warrigals out there, cus I seen em' LOL.
Mike, for sure Thomas is going to wonder what we are talking about here. hehehe. 😉
10 June 2016, 06:36
And then there's those pesky drop bears that the tourists have to be careful about...
10 June 2016, 07:19
Have too many 1/48 variants to do first. Resisted the temptation of the HK Zerstorer too. If this was a B2 or in 1/24 I would not be able to deny myself 😄
10 June 2016, 11:24
With 1/32 you would just HAVE to bring the aftermarket which puts the total over 500EUR. I can build 5 variants with all the goodies in 1/48 for that. Besides, I already have an A in 1/24 - WestWings stick/tissue/rubber power.
10 June 2016, 13:21
222, I hear you on after market for the HK kit. For a kit of this price there shouldn´t be this much add-ons needed to correct flaws of the kit.
The ZM kit, on the other hand, has much more detail out of the box. Mine will only get the colour printed PE for the cockpit, and maybe a pilot figure. The kit itself is this nice, as you can see on Kerry´s masterpiece!
10 June 2016, 15:58
I love the ZM Ho229 too especially in 1/48 and I see this 335 has transparent skin too. Fingers crossed for another downscale.
10 June 2016, 16:43
A downscale is possible if you consider just how popular their Do335 seems to be...
10 June 2016, 20:27
As it only was a test for myself I added weight into the engine, the front wheel and the ammo boxes. I will maybe add more weight in to the radial cooler, too.
But these days there is another project on the bench, so the Do 335 still is in the box.
11 June 2016, 11:58
Thomas. 🙂 Good morning mate. 🙂
I was under the impression that you were actually building a Do-335. :-/
Well, if that is the case, I will be able to let you know what I have done about my weight problem, (As well as my own) and let you know, but first I am having to get and wait for my 'liquid gravity' as it is only available from the EU, and I can't access any 'buckshot', so, I am the grasshopper for a while.👍
I am though, doing as many sub-assemblies I can and prepping other bits and pieces, as all other projects I had running are now in hibernation. 🙂
11 June 2016, 20:26
Kerry, the 335 is VERY tempting! I am about to pre-order some Super Wing Options, but those are not available these days.
I am working on a model for Heidi´s (our) eldest son, who serves in the German army. But the Revell version of a Dragon tank kit is a dog to build. Even worse: it´s moulded in yellow plastic! A tank kit in yellow plastic!! Yikes!!
11 June 2016, 21:06
It is, Urban! Especially on a tank kit!
It is soft, and easily bend. Having build Dragon kits before this Revell issue looks as if they had got Dragon´s waste sprues...
But enough of hijacking Kerry´s thread. Sorry, Kezza!
12 June 2016, 09:10
Hijack away Thomas.🙂 🙂 🙂 It's like sitting around a table while we all build and paint our kits. 🙂 👍
12 June 2016, 11:03
@ Kerry - you mean a 1/48 on the strength of 1/32 sales? Hope so. A ZM skinless build would fit in so well with my intended collection of Pfeil variants.
12 June 2016, 17:53
Tripple 2, Given that the total frame work is there on the Do-335 as is. I would not be surprised if ZM went that road and did one. The internal structure is just amazing on this kit, and it would make one hell of a kit is one was manufactured in 1/48. 🙂
ZM is fast becoming the 'Go to" kits for accuracy and detail. For sure. 👍
12 June 2016, 19:37
Oh my goodness, what a detailed kit! Stunning! (But one question, please: Didnt the cockpit had to be painted in RLM66?)
15 June 2016, 09:57
Holger, what you will find with the finished cockpit of mine is that I was able to darken it with a wash to bring the overall finish more like I saw with some images I was able to acquire of the ones from ZM. Being the grey green like the main instrument panel is. But with the new one I am building of the production model, I have now the concept notes and the colour call outs in the instructions. Something I didn't have when I built the 'test shot'., But it was something I found difficult, getting reference material that was accurate. And what I did see, the colours were all over the place. So, the final images will be of the 'darker' cockpit colours. 🙂
15 June 2016, 10:08
In November 1941 a document was released by the Luftwaffe that said all areas that can be viewed through a glazed covering must be painted 7107.66 (RLM 66).
15 June 2016, 11:04
Doesnt matters, looks good as it is, Kerry!🙂 And i had the same info like Michael.
Here is a pic AFTER the restoration by Dornier in Munich, dont look like RLM66 either...
[img1]
15 June 2016, 11:12
Hi Guys. Thank you both for that info. 👍
I am wondering if you had looked at images 142/3/4 and compare them to 158/9, I had tried to get a darker result and 158/9 was the finish of the darkening of the inside and consoles. But judging by what is in the ZM Concept notes and the images of the one they took all the measurements and images from, I have got the colours right. 🙂
15 June 2016, 11:48
Either way it's the modelers decision how they paint their model and yours still looks great.
15 June 2016, 12:12
Well gents, I am blessed I have your support and encouragement, and all I can do with what I have now, is follow the directions in the book of 'gluing and cutting' and pray I don't loose or break anything. 🙂 👍
It's amazing to build it now, with all the instructions now making sense of all I found a little confusing. :-s
I now see all the mistakes I made in the test shot and how much better it looks now when it's done properly. LOL
But as they say. 'Better armed second time around make all the difference in the fight', and that is true in this case, as I now know what to do, and what not to do, making Jack a happy chap. 🙂
I am actually making yet an other album of the build, and with hindsight, I am hoping it will be an improvement on the last effort, especially in the sequencing and content of the images, along with some scratch work I believe this model just screams out for, especially with the fantastic amount of detail that would otherwise be buried and lost from view. 👍
Ha ha ha, and the engines now look like they are ready for some work. 🙂
15 June 2016, 15:56
Kerry, the details are so amazing, it would be blasphemy to hide them!!!🙂 What a great kit and what a great work from you!😄
15 June 2016, 18:03
Holger. 🙂 Thanks for that mate. 👍.
I have been jumping from build to build, scratching an itch I just cant reach, starting a project and soon find it's packed away, "for later", and THEN !, when I saw this on my front door step, like a gift from the God's so to speak, I just HAD to have a little look, and yup, before I knew it, I was as happy as a pig in shit, up to my eye brows in paint and parts and drills and glue and all those things that makes my heart sing. LOL🙂
When I look at the article on my build in the ZM 'concept notes', I feel a little embarrassed, seeing some of the things that could have been done better, but then I think, well it looks ok for what I didn't have, like instructions, and I am ok with that.🙂 👍
15 June 2016, 21:13
To get the model together with what little instructions you did have is amazing, I wouldn't be embarrassed. And there must be something in the air mate as I'm having the same problem, jumping in and out of kits trying to find one that fits just right.🤔
16 June 2016, 00:02
This one turned out really nice...
know the feeling about jumping from one kit to another, till you find "the" kit... for meknow it seems to be the one I'm busy now... A real bugger to assemble, but in the end, I got more fond of it then on other kits...
16 June 2016, 06:49
Kerry, I am with you on having no hold when this kit arrived at my doorstep! 🙂
I absolutely feel the same temptation to start this wonderful kit in a minute! Gladly I found an excuse for me: some aftermarket is not yet available here in Germany...
16 June 2016, 07:47
I think I should give masking with Parafilm another "Go!", looking at the so precise masking on the new tanks. Kezzy, this cries "Perfection!". I only hope that my roll of Parafilm isn´t too old; I got it so many years ago...
16 June 2016, 07:49
OK, I will address all of you in the order the posts are on my page. (Oh it's a bugger being popular) LOL 🙂
Michael. Thanks to you for your kind words mate. I am glad I am not the only one leaping from box to box, looking for that 'grab', and what I am looking forward to seeing from you is the big 'tanker' in all it's detailed glory, because I know how fussy you get about having things 'just right'. 🙂 And I am sure you'll have all of us enthralled. 👍
16 June 2016, 08:05
Bart. I think it comes with the territory mate, and we are worse than women when alone in the hobby shop, drooling over everything in sight, imagining just where it will fit in amongst all the other ones in the display case. 🙂 And as for the 'fondness', yeah, I can relate to that very easily. 🙂
16 June 2016, 08:10
Thomas, Am I to assume the kit has arrived from ZM for you. ?:-p
And what are the after market items your getting. ?
Are they the ZM ones released to the distributors, like the metal landing gear. ?
I am inclined to go the metal ones, mainly because of all the extra weight I have packed into all those spaces I was telling you about, thinking the pins wont last forever, but the metal will.👍
NOW, as for Parrafilm. It does NOT 'age'. It will be exactly the same in 20 years from now if it's never used. 🙂
The roll I have. It has lasted me well over ten years now. The 'trick' to getting it to perform at it's best is to place the piece you cut for use between the palms of your hands, just to soften it up and that will aid in it stretching in a uniform manner. And the surface it is to go onto must be squeaky clean, and when it is applied, firmly, with your fingers or thumbs, press the film into all the raised detail to force the air bubbles out, and it will 'adhere' to that surface. When you cut it, it only take a small amount of pressure with a brand new blade to pass through the film, trying NOT to mark the surface of the part too much. :-/
but make sure the cut you make is 'complete'. avoiding any tails that will drag the film off the work area when the time comes to lift away the film you no longer need.👍.
The real key to having success with it is TAKE YOUR TIME. Go slow with the cutting along the line you need to follow.
16 June 2016, 08:16
You are right, Kerry. I got my kit from Japan many weeks ago. There even is another one on the way soon from a German distributor! Imagine this: two (2) Do 335´s!!! 🙂
On the aftermarket: I am about to pre-order the colour PE cockpit parts, a pilot figure and maybe the metal landing gear. But so far I doubt this could be necessary at all.
16 June 2016, 12:34
I plan to go with PE, metal landing gear and maybe wheels for mine but the kit itself is still on backorder for me.
16 June 2016, 12:38
Hi guys. 🙂
A word on the landing gear. 👍
I have had a rethink on the metal bits, as the kit gear really is robust and it's not like I will be pushing it around the table top saying Varoom Varoom or the such, but I will be happy with what is there.🙂
And THOMAS, you lucky man. !!! TWO of them. And I will be passing on all the tips I can, but only if you need them, as you are a big boy now and somehow, you must know what your doing eh.?
I am still looking at the Ukranian 1/32 figures for the kit. :-/
The kit I have now, I am just powering through it, but I suppose being familiar with the process helps, but mate, it is going together so sweetly, and clean too. 🙂
I think you will be pleasantly surprised with the extra little bits I am doing with it. 🙂
OK, enough. 🙂
It's your turn for some images you guys. 🙂
See ya. ! 👍
17 June 2016, 00:20
Got my Concept Note book yesterday, signed by all my friends in Japan! I am a happy man! 🙂
Inside, there is a build report from a nice chap from Australia! Ah, I cannot remember his name this minute... Something like Red Roo?!? I know Red Riding Hood, but... 🙂
Will be a great read soon! What makes me happy and proud is that I am mentioned at the back as a contributor! Oh, my Japanese friends make me this proud!
17 June 2016, 05:47
LOL. 🙂 Little Red Riding Hood, indeed. !🙂
Thomas, I hope you enjoy all the reading of the concept notes, and not be too critical of the images I sent to Japan, but like I said. Rough drawings and some knowledge of aircraft construction really helped me through, but the other guys did some magic stuff. 🙂
Yes, it is a nice feeling to see one's name in print, that's for sure.
OK, Back to it for me. 🙂
17 June 2016, 07:54
Isnt it great that SCM established so many friendships, all over the world? I feel very graceful when i think about that! 🙂
17 June 2016, 12:16
That is so true Holger. 🙂 👍
From the moment I joined this family, I have enjoyed nothing but support and encouragement every day. 🙂
And the fact that there is a big social aspect as well, like knowing I will be joining up with a bunch of you all at Wangarooge next March will be the 'Icing on the cake' for me, the extension of the brotherhood that keeps it so much alive.
I am most privileged to be part of the whole thing, all my brothers and sisters in modelling........Salute. 🙂
17 June 2016, 19:42
Salute, Kezza! Such a privilege to have you as a friend! Same to Holger, of course! 🙂
17 June 2016, 21:09
Thomas and all my mates, I have no trouble saying to you people. I love you all. As it's true. 🙂 👍.
17 June 2016, 22:09
No i no doubts about it! I just hope that the weather will allow a just in time arrival! March is famous for an unpredictable weather and i wont hope that fog or storms will stop you from reaching the island... 😉
18 June 2016, 08:19
!!!! Bloody hell. :-P
Now THAT I can do without mate. :-/
We have just had a major storm tare our east coast to shreds and it's due to happen again this week end. 🙁
But, no matter what happens over there, I AM GOING TO HAVE A GOOD TIME. !!!
I have friends in high places mate. lol 🙂
All will be GOOD. 🙂 👍
18 June 2016, 09:18
I see it like you - Nothing can stop us from doing desperately what we want: Modeling! 😄
So put some rocks in your pockets, not that you get blown away from the coming storm;)
18 June 2016, 09:50
The 'rocks' sound a better idea mate, and useful for chasing away the pesky seagulls. hehehehe. 🙂
And Thomas, I will not have you wasting good liquor by pouring it into my pockets mate. 🙂 Just find a big mug and It will be easier than trying to drink it out of my soggy pockets. 👍 🙂 🙂 hahahahah
19 June 2016, 00:20
Even easier to glue you feet to the island soil with super glue! Worked fine this spring: nobody was blown away by the strong winds! 🙂
19 June 2016, 09:03
I really hope that ZM is going for a 48 kit of the Do 335, even if we already have the great Tamiya kit!
16 August 2016, 06:04
Agreed. Their Horten is on my wishlist and I already have 4 Tamiyas to do the variants. An framework one with a workshop around it would be a great addition.
16 August 2016, 06:42
222, The dio of a 'framed' Ho-229 sounds most interesting mate.👍
I think that Uschi have some dioramas of the 229 in a hangar/workshop situation.
I will see if I can find it. 🙂
16 August 2016, 10:14
Thank you Ben. 🙂 It was an honour to be chosen to do the test build believe me. 🙂
16 September 2016, 02:52
Thomas. 🙂 You have been my guiding light mate. 🙂
I will always be grateful for your support and encouragement over these last couple of years and your applause has been well noted and welcome. 🙂
18 September 2016, 23:10
Hahaha!!! Kezza, too much of honour to me! 🙂
This build is yours, finished by your skills alone!
19 September 2016, 06:21
Album info
What this is all about is the way I put together the Do-335 with the very basic 'instructions' I had to download from Zoukie-Mura. These were, to say the least, just rough drawings of the parts, with hand drawn arrows and hand written suggestions as to where parts "Should" go. So, here we go. :-0