

The "For sale to the public" version. ZM Do-335


Kommentare
15 June 2016, 22:09
Michael. I am trying to make this album less cluttered and have more hints/advice/ and encouragement happening, rather than the 'Look what I have done" trip, which I am guilty of doing a lot of in the previous posts.
I would have a whole different approach if I had someone looking over my shoulder with a camera in hand, to capture that 'freeze frame' moment with some aspects of the work I do. :-/
But it's just a snap of the progress rather than the process. 🙁
16 June 2016, 08:37
Bart. 👍 Exactly. 🙂
The second kit is just so much easier, but no less enjoyable mate.
The instruction are crystal clear4, no second guessing, as it is all right there, and you will love it if your getting one.
Urban, I do hope your chair is a comfortable one mate, as I will be going carefully, but more confidently now, and I will be adding some little 'special' of my own, just to doll up the already exciting detail a bit. 🙂
Stay tuned. 🙂 👍
17 June 2016, 00:25
Holger. Everything about this kit leaves no doubt in my mind that the team that got all the information related to the reproduction in kit form did the most comprehensive job, leaving nothing behind. It's like a study of aircraft engineering and design. 👍
17 June 2016, 19:33
Kezza, I am in awe about your skills to paint all those power and hydraulics lines with outmost precision! You really make me want those AK paints!
Love to follow your tutorial build, my friend!
17 June 2016, 21:17
Thomas, You really know how to give me a swollen head mate. :-/ You are always so gracious in you praise, and I am always grateful for that. 🙂
I have just posted two images of the AK product I use to paint the piping. Apply it as you would if you were 'dry brushing' something, as the pigment is intense and it spreads a long way, so just a tiny bit on the TIP of a brush will just keep spreading and spreading, with no loss of intensity. 🙂
17 June 2016, 22:13
Your cutting up your sinkers the same way I cut up my lead sheet, using nippers to make them into buck size pieces, I like your fuel tank.👍
18 June 2016, 09:48
Michael. 🙂 Thanks mate. It was all I could do, as I looked for that "Liquid Gravity" that Thomas has, but it is only obtainable from the UK, and there, it's 19 quid. !!, so, I opted for flattening some sinkers and developing muscles in my right hand I had forgotten I had LOL 🙂
Do you use Parrafilm "m" at all. ? As that was how I got the result with the tank.
It is so useable in so many situations for masking off, and leaves nothing behind to effect paint, no 'residue' of any kind. awesome for clear canopies.👍
18 June 2016, 10:32
It's something that can work one day and completely escape you the next. I hate to think how much I have wasted trying to 'get it right mate. :-/ But when it goes right, the world is looking great again. 🙂 👍
18 June 2016, 11:51
I feel as sitting next to you, when you do this build! Appetite wetting WIP builds!!!
18 June 2016, 12:15
Michael, It really is worth the effort, and compared with other masking materials, if you get it direct from the main supplier, it is dirt cheap, and you don't notice the 'wastage' but more the successes. 👍 For sure mate. 🙂
18 June 2016, 23:58
Herr Mayer, I am just hoping the images tell enough for you all to be a little more prepared for what you will find with your builds. I live in hope. hahahahah 🙂
18 June 2016, 23:59
Herr Cox, this is a lot of precise wiring going on! I have to check sources, but I think that oil or fuel lines haven´t been painted but left in metal.
19 June 2016, 09:01
Thanks Thomas, I would really like to know, as I have just ordered some more AK paint tubes in aluminium and silver from BNA @ $12.00 a tube ! :-/
Mostly for the engine plumbing I am not happy with, as the testors paints wares off too easily and it gets into and onto everything I don't want it on. Grrrr 🙁
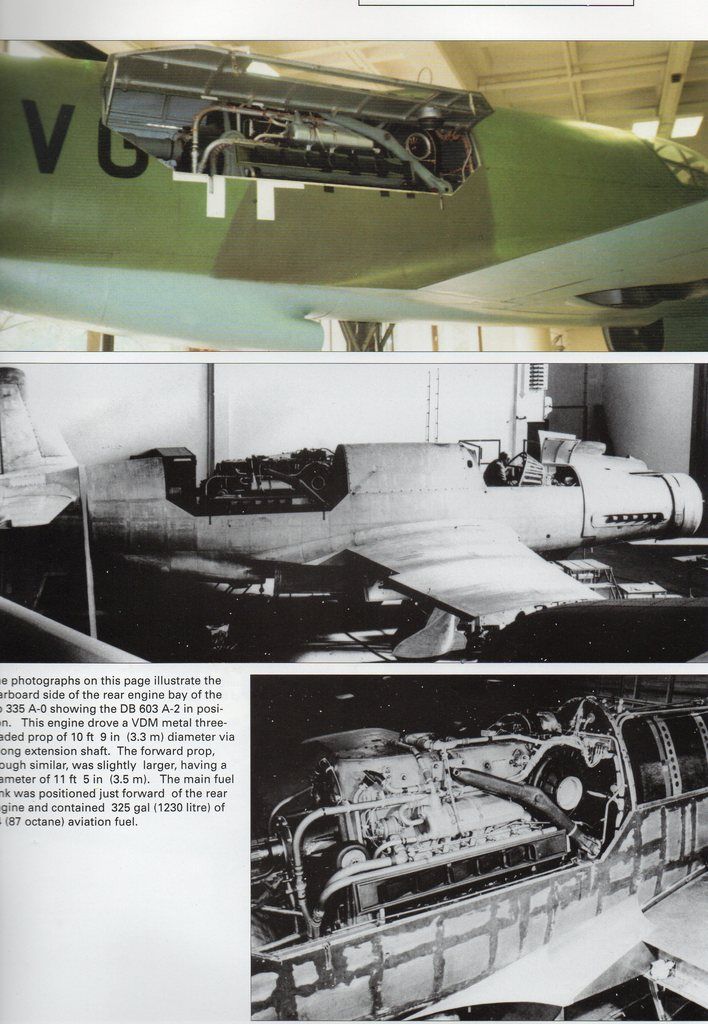
But I am pleased you like the fuel and oil plumbing I am adding, as this is based on the diagram on page 13 of the concept notes.🙂
19 June 2016, 10:17
Kezza, this minute I am about to collect some AK True Metal paints according to your suggestion. Euro 5,90 each.
Did you polish them after use? How did you apply them this clean on the fine moulded-on lines?
19 June 2016, 12:30
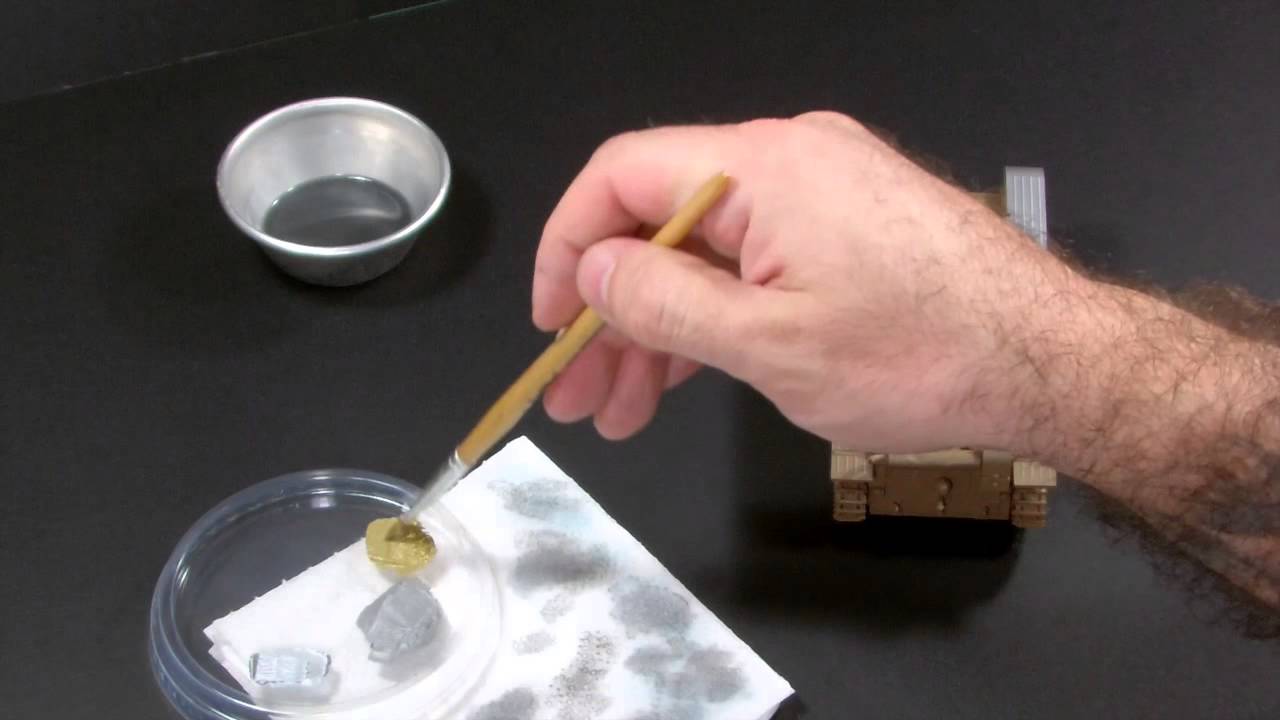
Thomas, All I can offer you in how the paint is used is this.👍
It is a WAX based paint, and I know you are familiar with the technique used to do 'dry brushing'. 🙂
The same applies to the use of these paints. A fine tipped flat bristled brush with just the smallest amount possible on the brush, then LIGHTLY touch the raised detail with the very tip of the brush until you start to see 'colour'.
As the paint starts to appear in some quantity, you can then judge how much more you will need , based on what your seeing appear.
Keep spreading the paint as far as you can, mainly as the pigment is so good, it will go a long way without thinning out too much.👍
But practice is the key to getting it right.🙂
BTW, It takes a soft cloth and a bit of a rub to really make it stand out, and it really shines. 🙂
In this video, he "Overkills" with the amount he has used for the demonstration, as I have found, less is more. Because it just covers so well and you do not need much at all to have an effect. 🙂
EXPERIMENT, starting with the minimum and work up from there.
Youtube Video
19 June 2016, 13:29
I knew this video. Not the best to promote those paints. He really takes very much paint to cover an area.
19 June 2016, 16:21
Good morning Thomas. 🙂
The video is a great start as to how NOT to use it. :-/
But as I say. 'Less is more'. 👍
19 June 2016, 21:17
Good morning gents. 🙂 I am most grateful to wake up to these compliments, as I am starting to wonder which 'way to go' in the final presentation. Those being, closing it all up or devising a way to give the kit more 'exposure', as there is so much detail that must be either hidden or, somehow, revealed, without cutting it or doing any heavy 'modifications'. :-/
I am totally open to suggestions/ideas, as I have exhausted my ideas box. 👍
Cheers guy's. 🙂 👍
24 June 2016, 00:04
Well I take it your going to have the engine covers completely off, cockpit would be naturally open to show off your great detail there. You could also open the covers in front of the windshield, it would be nice if you could show off the fuel tank as well.
24 June 2016, 01:01
<a"[img1].html" target="_blank"><img"[img2]" border="0" alt="Do 335 photo img005.jpg"/></a>

24 June 2016, 01:30
Kerry if you click on the image and look at the middle pic, you'll see what I mean about the covers forward of the windshield.
24 June 2016, 01:33
All of the above Michael. 🙂 And the kit comes with all the support struts for propping open all access panels, such as, all the area in front of the cockpit has doors for accessing the guns and magazines, plus the rear of the main instrument panel.👍 Plus the main doors for the rear and front engines too.
I have done some detailing on the 'drop down' rear air scoop where the air flow is regulated to the rear radiators (2) by louvers. The tank has taken a bit of a battering with all the handling I have done, thinking I should have left that till last 🙁
But, still a long way to go and I should be able to 'cover my tracks' with some careful recovery air brushing. !
How is your build progressing Mike. ? I am keen to know how far you have come with it. 🙂 ?
24 June 2016, 01:38
Good to hear you got it covered mate. I've been busy with doctors and what not, and now that I'm modelling in my double garage and Tammy is coming back into the hobby I've had to rearrange a few things. After thinking a fair bit about it I decided that I need to get in and complete some models, so I'm sticking with my Gainful by Trumpy which is going really well. Then for a little bit I'm going to try to just making Tamiya kits as they are so easy to build and quick to get through. I want to finish the chassis of the Gainful before paint then I'll post a couple of pics of her.
24 June 2016, 02:00
Thanks a ton for the images Michael. 🙂There are some of the original ww2 images appearing now I have never seen before and the two B&W you posted are the ones I have never seen either. Yes mate, the ZM kit has got it all really, and there are many options one can go with, but I am just a the 'crossroads' of what I want to be looking at in my display case and what it could look like if I was to compete with it too. Mmmmm
The test shot had so many flaws with it, and it did not come with all the bells and whistles the production kit has, like much clearer plastic for the main fuselage and the really noticeable lack of seam lines that spoiled many parts, but on all the new component it's so much easier to clean up. But I digress. 🙂
Your thinking on the Tamiya kits I so agree with, in their ease of construction, and they are more of what I went for when I got back to being settled and had time and room to spare, followed by the Hasegawa team. 🙂
Good to know that Tammy is part of the addiction (lol) and if there is one thing I really would like to have is someone who is good with a camera, who models and has a better idea of what your aiming for when it comes to capturing those WIP shots while holding tools and parts in position. 🙂
I hope you have a warm environment to work in this winter, as my garage is as cold as charity. 🙁
Gainful picks I am looking forward to. 👍
Cheers. 🙂
24 June 2016, 02:56
The garage isn't too cold , but most nights I have to slip into a jumper and a pair of ugg boots.;)
24 June 2016, 03:24
if you want to display some whistles and bell (this models deserves it), why don't you build is as a half finished fuselage found by the Americans in an underground shelter. then you aren't bound to plates that can be openend or not. you can add panels in aluminium, factory prepainted, one engine in, or no engines yet, seems filled with filler...
24 June 2016, 08:06
Bart, You are just the kick in the pant's I needed mate. 🙂 That suggestion smacks of brilliance for sure. 🙂 🙂 🙂 Thank you my friend. 👍 👍 👍
27 June 2016, 11:06
Holger, I was quite intrigued by Barts Suggestion, so much in fact that I went right back to bare plastic, stripping off all the aluminium paint I had applied and had a real good rethink about his view and idea. The 'mind's eye' is working overtime here as I start to configure that 'product'. 🙂
27 June 2016, 12:51
sorry for the extra amount of work and brain-wear, but in the end it will turn out good when looking at your other builds
29 June 2016, 11:23
James, That sounds like you have one in your possession. YES. ?🙂
Mate, I just post stuff in the hope that it helps others avoid some minor glitches I have experienced. 👍
My photography is something I must improve, but I hope it helps. :-/
Cheers mate. 🙂 👍
29 June 2016, 22:36
Thanks guys, the kit is the material /canvas I am given, I am just filling in the spaces so to speak, as the kit is so perfect in every way, you just cant help but have a lot of fun with it, as it really take you on a fantastic voyage. 🙂
30 June 2016, 10:39
This build has more turns and twists to it than my bike ride around Australia. :-/
I have finally come to the end of how I am going to have it "Presented", being, all 'see through' with all the internal ribbing highlighted with hand painted silver paint, then over sprayed with acrylic clear, as I discovered by mistake that the factory produced 'frosty' effect the clear parts have now, becomes relatively 'see through' with the clear acrylic covering it. SO, I have Bart Goesaert to thank in a funny sort of way, as I was taking his suggestions and applying what he believed I should do with the build after I asked for some 'suggestions' on how it could be done in a way that was unusual, and implementing Bart's ideas, it has turned out much better than I anticipated.👍
This build is just going on and on and on, and, I am just so delighted that it is, as I was really not looking forward to the 'end' of this build as I had imagined it, but now I can see a better ending than I had before. 👍
From here on out, I will be posting images of that process of making this bird, "And now for something completely different".
30 June 2016, 23:07
Have to say my jaw dropped as I started scrolling through the pictures. Simply outstanding!
30 June 2016, 23:58
Anthony, I am pleased you like what you see mate, and I am hoping that what I have left to do will bring out the pure genius of the production team at Zoukie-Mura, as what I have just done with some clear acrylic has really helped me get this detail that is all over this bird become a bit more pronounced. 🙂
Thank you again. 👍
1 July 2016, 00:51
Mike. Hi mate. 🙂 Yes, it really has taken on a life all of it's own now, and with the changes I have made, I am feeling a lot more confident with what I see in my minds eye. 🙂
It has been a totally different build in the last two weeks, having gone back to 'bare bones' .
I have looked in on your 'Gainful' and I see that your taking your time, (no, I am not being a smart arse) LOL, but I am imagining that it is going to be one that will take some great care and detailing to have it look as good as you usually do. 👍
Cheers Mike. 🙂
1 July 2016, 02:06
Glad to hear you're enjoying your Do 335 as I am with the Gainful. At the moment I'm halfway through assembling the cradle for the missiles, just glued the four sides together of each arm, later I'll putty and sand to clean them up. While I'm waiting for those parts to dry I'm heavily modifying the missiles as they are to long and to thin. I can't wait to get in and paint her, I want to try some new painting techniques that I've read about. I'm interested to see how she comes out as armour is not my strongest field.
1 July 2016, 02:25
Kezza, I spend half of today having fun sawing and cleaning parts from the transparent sprues! My Japanese HyperCut saw with a 0.1 blade makes removing the transparent parts a breeze!
I see you have got enough weight up front! Congratulation, my friend!
2 July 2016, 19:04
Thomas. Mate, ! YES, It worked. 🙂
🙂 I am so pleased to know your getting stuck into your 'Arrow' mate. 👍
I will be anxiously waiting for your images as you start getting it all to come alive. 🙂
As you see, I am not going to paint the bird but using the clear acrylic, it certainly helped reduce the 'frosted' effect, allowing so much more detail to be seen.👍
I never thought about the clear acrylic until I was washing some parts I had removed some paint from, and when I saw that when it's 'wet', the frosted surface disappeared, allowing me to see right through the parts, so I experimented with a door, and bingo !, I had the answer to how to clear up the frosted look. 🙂
With the parting of all the parts from the trees, I used candle to a heat a blade to cut them away and then a medical scalpel blade to gently 'shave' away any remainder from the parts, as this prevented any cracking or shattering caused by mechanically cutting them off, as that really can ruin some parts.:-/
I am going to 'anchor' all the doors and struts with the clear paper glue (clearfix equivalent), as it dries really hard and is crystal clear, again, preventing any damage from the attacking nature of Tamiya glues.👍
I think that in a competition , the viewer would be much happier looking at something as complex as the 335, being able to see, "How it all works" instead of the usual painted model that seems to be everywhere.
I think that a mirror base will certainly aid in adding to the overall impact this kit presents.
3 July 2016, 00:03
I see you already have a very elaborated plan, Kezza! 🙂
I so far not really have "started" mine, so no pics. I only had the time and fun removing the clear parts from the sprue using my Japanese saw! No knife has been used so far doing so! This could shatter or break those clear parts! But with the 0.1mm blade of my saw there almost is no sprue to be removed at all! Love this thing!
3 July 2016, 06:34
That is good to know, BUT, there is one spot I MUST ask you to be the most careful with. It is the back of the canopies. It's SO SO brittle that a big chunk will come away if it is roughly handled. 🙂
3 July 2016, 07:11
Kerry, picture 170: this bright wheel hubs are quite unusual for Luftwaffe aircraft. I for myself paint those in satin black, with the tyres in tyre black.
3 July 2016, 09:04
Thomas, you are quite right on the satin black, and I will alter that when I have finished all the handling I have to do between now and the setting the open panels and doors in place.
I will also be giving the cockpit a 'dark' wash to tone down the overall 'brightness' of the side consoles and main dash.👍
Thanks for the painting tip Thomas. 👍
Have you managed to solve the problem with your 3D chopper bits. ?
I am going to have the crew working in open spaces so I can have the covers in a more convincing position, like either propped or leaning against ladders.
Cheers 🙂
3 July 2016, 09:50
Ah, the 3D printed Flettner! Just now some remaining parts are in a ultrasonic cleaner to get the wax and other residue off the parts! ShapeWays had to redo the whole kit due to the first print being useless.
But I have to say that the customer service of ShapeWays is top, first class!
3 July 2016, 12:51
An ultrasonic cleaner is the one thing I MUST get myself. 👍
I am really pleased you had a win with the kit, and more so, the producers service to help you get it all on track. 🙂
I must mention here. The wing fillets on the wing root is really easily broken if you forget to follow the sequence in the assembly process.
I was fortunate not to have glued the wing assembly into place before the fillet was meant to be attached, otherwise, it will be MOST difficult to get them into place without damaging them. 👎
Dry fit is the message, 🙂
3 July 2016, 14:44
So, you would advise to follow the instrucions: first the wing to the fuse, than the fillets?
3 July 2016, 18:43
Hi Thomas. What I had difficulty trying to achieve with the placement of the fillets, was, that if you try to fit them into place once the wing assembly is installed, it will be a miracle if you don't break them trying to make them fit, as described on page 40 in the illustration sequence on the bottom of the page, so I attached mine to the wing root before I inserted the finished wing assembly into the fuselage, as there is enough 'play' in the assembly to allow the whole assembly to find its place and sit where it is intended to locate.
You may find the way said in the instructions is hassle free and all will go well for you, but I was wanting to avoid any 'scars' from having to glue parts together after they were broken and then attached, 👎.
Even with the test shot, I experienced extreme difficulty to have them 'locate' with the 'click' of the parts when they went into the recess in the fuselage. Just a warning, that's all Thomas, as you may find no difficulty at all, but I did, so I am passing that on. 🙂
3 July 2016, 22:40
👍
Good I have a set of spares, because one of those fillets was broken when I got my kit from Japan. I will see how it works when it´s time. Please give me some months / years, Kerry... 😉
4 July 2016, 07:20
looks very good like that...
@thomas, is that about the 1/18 Flettner?
4 July 2016, 07:50
Thomas, I will give you until March next year, and I will expect to see the results by then mate :-O, and I am not surprised there was something broken in your kit, as the parcel handling companies are not all that gentle with what they handle. 🙁
4 July 2016, 08:00
Bart, I am pleased you like the way it is developing mate, as it was based on your suggestion and my imagination as to how I 'saw' what you were thinking I could do. 🙂
I am really pleased it is a totally different effect from all the others, as I do like being a little different with my builds. 👍
4 July 2016, 08:04
I'm really enjoying this build but amazed about the speed your building it. Especially all the masking that you do must take a lot of time. Compliments and keep up the good work!
4 July 2016, 08:48
Lex, Thank you for your comments mate, I am actually going as slow as I can on this build, but having built the test shot, the sequence is better understood second time around. 🙂
And I have wanted to present it differently from the way that it has usually appeared every where, and when I asked my mates for some ideas on how it could look different, it was Bart Goesaert that had a great suggestion and I have incorporated some of his suggestions along with how I feel it could be presented.
I am pleased your enjoying the build. 🙂 Because you should see it from my end. LOL 🙂
I am really looking forward to posting the images of the finished kit, especially in the way I will think about how I will want it to look on a competition table. 👍
4 July 2016, 12:51
Fantastic work my friend, the build and the "step-by-step" posts 🙂 You plan on keeping the whole surface clear, or will you paint some of it?
6 July 2016, 19:29
Vegard, How wonderful to see your post mate, I am thrilled. 🙂
The whole model will be devoid of all paint except where I have the main wing landing and control surfaces and then the moving surfaces of the tail assembly, wanting the viewer to be able to understand just how complex the design and build of the original aircraft must have been by seeing it all through the skin that usually hides all that extraordinary detail.
What paint there is, it will be on the raised riveted surfaces to help accentuate the rigid structure and assembly of the access doors and panels.
I am currently getting to the 'finals' of the build, making sure I haven't missed anything. 🙂
Cheers mate. 👍
6 July 2016, 23:50
This is coming along really nicely mate, can't wait to see the end result.👍
6 July 2016, 23:55
Thank Michael. I am getting close to the final bits being attached and a bit of a clean up of the odd finger mark here and there. But I would say it will be done in a couple of days, as the weekend is here and I will have the time. 🙂
Cheers. 👍
7 July 2016, 03:15
Kezza, first I could not imagine how your plan of a full transparent build would look in the end, but now I am impressed! A very clever move to paint the inside ribs and stringer and enhance the clarity with Tamiya gloss!
Oh, btw: I just remember I still owe you a reply by email... My bad! Will try to do this today!
7 July 2016, 07:06
I have been hanging out for the email mate and I can flick you some images of the little things I have done too. 🙂
7 July 2016, 07:52
That's some fine work you've done in the canopy with the wiring and the frames came out nicely as well.👍
11 July 2016, 06:12
Thanks Michael. 🙂 I am a little disappointed that one of the pins is a little longer than the other, but over all, compared with the photo in the Concept notes, (Images 139/40) it is as close as I can get to what it looks like.
The canopy will be in the open position, and there is also a cable that stops the canopy from going too far that can be seen in image 140, just below the attachment point shared with the release pin, and I will look at what it will take to get that rigged up too. Believe me Mike, this has been just so much fun to do, and I really would love to go to the USA to see the Smithsonian and also the place where this bird was sized up for the model Mmmmmm 🙂 Dreamin'. hahaha
Have you had any time to have a muck around with your parrafilm .?
BTW, the canopy on the real bird is 'double glazed' !!
I sware by it. 😉
Cheers mate. 👍
11 July 2016, 06:23
I haven't had a chance to try the Parrafilm again, or even time to sit down and do any real modelling with my 2 daughters visiting. They sadly🙁 go home to their mother on Saturday so it's a trip to Sydney to take them home and catch up with a good friend of mine that lives in the Blue Mountains. Next week I should be able to hit the workbench nice and hard.😄
12 July 2016, 00:57
TWO daughters, Lord!, .........I thought I had my hands full with a b and g to deal with 🙂 🙂 🙂, But I would not trade a second of time of all we went through. 👍 for sure. Mmmm Mine share the same birth date, 12 months apart to the day, but their mum was killed in a crash near Taree and I then had them from ages 3 and 4. Hard to do when the 'authorities' think that a man can't raise kids by himself and kept sticking in their two bob's worth, lol. I hope your daughters are not too stressed by it all mate. 👍 Take some woollies to the mountains, as I hear it's pretty bloody cold there @ the moment !!
Cheers mate, and take care.
👍
12 July 2016, 05:09
🙁 Sorry Mate. And yes there's another cold front headed that way again.
12 July 2016, 12:52
When you dudes say, its getting cold - about what degrees are we talking?
12 July 2016, 13:01
Well Holly tomorrow I'm going 4x4 driving on Pebbly Beach and its supposed to be about 18 degrees. On the news tonight I saw that Sydney felt like it was 10 degrees this afternoon and Melbourne was 1. Mind you I'm sitting her in my garage/Hobby Room only wearing stubbies (shorts) and a t-shirt. I think I'm in the middle of winter not really sure though.;)
12 July 2016, 13:13
Puh, ok thats "fresh"😄 Not the right weather to wear only a t-shirt!
12 July 2016, 13:50
Congratulations Kezza.
Your work is from another world.
No words Mate,
Just, AMAZING 👍
13 July 2016, 09:23
Thanks Gentlemen. 🙂 I had some reservations about the see through, but I often wondered why the ZM was made clear, and then see its detail,only to cover it all up :-/
But with a little worm from Bart Goesaert wriggling around in my head, it gave me the incentive to go with my thought of 'all seeing view' like she is now and I am happy. LOL 🙂
And to tell you the truth, I am glad it over yet I'm not. :-/ ?????
13 July 2016, 11:17
Hey Kerry!
I dont know if i like it... Dont get me wrong, your craftmanship is not a question! The whole interior Looks awesome and its very interesting to see all the bits and pieces and tanks and bottles and so on!👍
But what would the original Do 335 at Udvar Harzy say, if she would see herself naked and exposed? Downgraded to some modeler p*rn? And guys with glue on their Hands become nasty thoughts, when they watch her transparent Skin and delicate innerself? I could imagine, she would cry for someone who gives her a coat of RLM, to prevent the nasty eyes of the judges on a contest-table! Just my two Cents... 😉
And yes, I will be one of those drooling guys who is Standing there and gets mega-nasty thoughts! 😄 What a kit - what a great kit!!!
Cheers Buddy, your drooling mate, Holly
13 July 2016, 12:10
You brute. hahahaha 🙂 Down graded to [****]. ? Mmmmmm :-/
I do understand what you mean Holger, so I will reply with these thoughts.👍
I took a suggestion box and posted it here and asked the mates for a few 'ideas'. And of the ones that were posted, I liked the one Bart Goesaert left, as it was similar to what I had been tossing around as a bit of a thought too.🙂
Each comp I have attended, some models were well presented, but failed to 'grab' my attention and, I have always thought that if I had done it, I would like to see more of what it's engineers came up with before the skin went on.
The complexities of an iconic bird deserve more attention and this kit was made 'internally' and given a clear skin, and so, why ignore that opportunity to be captivated by how it all 'came together' to make it as it has come presented.
Clear plastic is fraught with problems if you overdo the gluing, ruining a lot of what the eye would otherwise enjoy, and as the ZM kits are a marvel of the tool makers expertise in having perfect alignment if all surfaces, and the replicating all the most intense detail, I went with what was there
I do believe it is an insult to all those guys that conducted all that research and engineering to produce this kit, to just to hide it away, and after all, the Do-335 was one of THE most complex engineering efforts by the Germans that was always a bit of a mystery.
When I put this on the table, I will enjoy watching people taking an interest in what this kit provides, just as I watched my Ho-229 getting a lot of attention as people stood and pointed an tried to see as mush as the could of what I had put there for just that reason, to inform and enlighten the public.
I will always wonder if I have done it justice as I look at it in my display case, but I will always remember the joy and fun I had in the challenge I took on. 🙂 👍
13 July 2016, 12:51
So i see you got me and my kidding!🙂 But you are right, thats wonderful interior has to be displayed! I love it!😄
13 July 2016, 13:01
Have you forgotten to paint the ladder? And why have you opted to leave the canopy strings unpainted? Excellent build though mate! I will probably do as you have with mine. Paint all internal stuff but in the end cover it all with camouflage. Why paint at all? Well, I will know that it's there and that's enough for me...
13 July 2016, 15:02
Then it must be related to Peter Paul Rubens - fugly and naked, but still a masterpiece 👍
13 July 2016, 16:38
Gents, all will be taken care of, and as for the canopy and it's cables, there will be a final 'walk round' with my fine tipped brush to totally finish the whole build.
Urban, I "know what's there", but the ones who will see it at the Expo I will be attending may have never seen the Do-335 in such detail before, so it's worth letting that complexity remain uncovered, and besides, I now have two of them, and they will compliment each other on a display table, the 'dressed and undressed'.🙂
We all do our kits for our own enjoyment, and at times, as we feel others may like to see them and then, gladly talk about it for hours with those who come to see what is on the comp tables and those ones that get inspired and want to do something similar.
Just like here on SM where we all become involved with each others work, sharing all the tips and techniques we discover or are told about and how to get better results.
My rendition may not be everyone's 'cup of tea', but I am excited to read the feed back, and that's better than no feed back at all. Yes,? 👍
Cheers guys, and thanks. 🙂 👍
13 July 2016, 20:16
Oh yes and one fact is that the only other builder that ever will see my builds is my brother...
13 July 2016, 23:04
As I have said before, I am not a huge fan of WWII stuff. But I can surely appreciate a good build. You have done this kit justice. In spades. Makes me hope they do a clear F-86 or F-4 or F-15.
16 July 2016, 08:20
Album info
This is the kit by Zoukei-Mura of the 1/32 Do-335 that has been released onto the world market.
This will be, as best as I can, a step by step of what it is like to have the finest kit in the world of the Do-335 to build.
The instructions, used in combination with the Booklet "Concept notes" is a must, as it gives a very detailed view of this most incredible aircraft and a what 'made it tick' view with images of the aircraft used in the actual development of the kit, being granted access to the preserved and restored aircraft in America.