Kondor D.2, WIP

The SPIN model kit allows the first prototype. This is the box.

There are nearly no bubbles on the wings.

The fuselage is very short - a little bird.


Some small parts.

A little decal sheet.

The manual.

The wings of the kit are nice but I like individual ailerons so I cut and reattached them.

This allows also a cutout for the aileron control wire. Please note the mounting plates, but I decided to remove them.

I primed the wings and added some shading, may be not strong enough.


The kit drawing (see above) shows a blue lower surface, but there is also a 1/72 kit. That manual tells 5 color lozenge on upper and lower surfaces, also some drawings in a Jack Herris book. After checking the available photos I decided to go that way.
So I applied Aviattic 5 color lozenge. After drying overnight I fixed the edges with Micro Set.
(I forgot pictures, here I started already with the rib tapes on lower surface.)
So I applied Aviattic 5 color lozenge. After drying overnight I fixed the edges with Micro Set.
(I forgot pictures, here I started already with the rib tapes on lower surface.)

And the upper side.

I added thin stripes of another Aviattic sheet, 5 color lozenge on white decal paper, as rib tapes.
Not easy to cut identical tapes, but the look is impressive.
Not easy to cut identical tapes, but the look is impressive.

The upper side is more nice.

Again as macro shot.


As shape of the crosses of the decals looks different to the Windsock drawing, photos and even the kit box! I decided to draw and cut masks with my cutting machine.
Masks on decals is dangerous, it stopped my Albatros triplane project (I still haven't fixed the damage!), but I got the advice to spray a flat coat. Thank you, that worked! I lifted only two rib tapes a bit, which could be fixed easily.
Masks on decals is dangerous, it stopped my Albatros triplane project (I still haven't fixed the damage!), but I got the advice to spray a flat coat. Thank you, that worked! I lifted only two rib tapes a bit, which could be fixed easily.

This way also the gap between wing and ailerons is handled automatically and I like the look, with the embossed rip tapes.

As I removed the mounting plates for the decals I need now new ones.
I soldered 12 small brass plates (+ some spares) to a block and filed it to shape and drilled for mounting.
I soldered 12 small brass plates (+ some spares) to a block and filed it to shape and drilled for mounting.

So I have some self made PE, threaded to avoid loss.

I glued them on and bolted to the wings with 0.2mm wire.

Again as macro.

The lever of the ailerons are also painted black and glued in place.

Now together with the wing. I painted also the mounts slightly. Some metal looking through was intended.

Luckily I had the matching Small Stuff engine in my stash and have done it. Here during the build process.

The finished engine. The ignition wires are added too. I really like the copper intake pipes (Alclad).

I turned again a new alu cowling. After that I milled a cooling slot for the undersurface.

The resin part is more thick.

Also the Axial airscrew is done in a raw shape.

All new parts for the front together with their kit counterparts.

The new parts working together.

The airscrew still need a bit of work, but there is a chance to reach the look of the original.
Note: here you see also the second prototype with a more powerful engine, different cowling and installed weaponry.
Note: here you see also the second prototype with a more powerful engine, different cowling and installed weaponry.

With some kit parts, metal, wood and a bit of paint I created the cockpit.

Since the opening is wide I missed something behind the dark frame so I created a fuel tank from wood and brass foil.

Ready for mounting.

Glued in place.

The seat belts are Eduard Steel PE, some dials are also Eduard PE.

Last view before closing the fuselage.

I cut also all control surfaces and made new hinges.

After glueing the fuselage halves I added also the prepared tail parts.

Looks nice with plugged on control surfaces.

On the front I added some plastic with the inside diameter of the cowling.

The cowling has a tight fit.

The upper struts made from wood with metals pins ...

... can hold the wing without glue. The outer struts can be added later.

On the right side you can see the outer struts, the length is not yet final.
The undercarriage struts are plugged to the fuselage but are somehow on the long side. 😉
The undercarriage struts are plugged to the fuselage but are somehow on the long side. 😉

After shortening I tried to connect the legs with wires but this fails so I moved to metal inserts glued with CA.

The undercarriage can be plugged to the fuselage. Please note the position of the connection board with straight front ...

... which is in the height of the axle.

I will use some wheels from the spare box.

Here are some tail skids. The socket of the kit part below was very thin, so I made a new one from a beautiful dark wood.

The socket alone:

In full beauty with metal and suspension (without glue).

The beast on its own legs, all just for dry fitting.

After sanding I primed again.

Then I painted acrylic "wood base" in an irregular pattern to have different brightness in the base.

And I painted wood with oils. It is not that red, as on the picture, my cam has some strong red and was not able to manipulate the picture to show correct colors. That is also valid for the next pictures.

The fuselage is not yet touchable, so I continued with other details.
The struts are painted now. I tried a different shade this time, less orange, to have a difference to the other birds in the cabinet.
The struts are painted now. I tried a different shade this time, less orange, to have a difference to the other birds in the cabinet.

Same with the undercarriage, then I mounted the axle with the suspension.

Here a view from below showing the bungee cords of the suspension better.

Then I detected another detail on a picture, which I had to realize. Really pity I killed one of my smallest drill bits 🙁The pin is 0.2mm in a brass bushing, which slides onto the axle.

Now the wheel track matches the drawing.

Now to the title as I was able to finalize the airscrew with final sanding, wood primer, polishing, some clear paints to make it darker, gloss coat for decals and final coat. The final step was bolting PE onto it.
Here the final result from back.
Here the final result from back.

The side view is more nice, after the picture I filed the bolts down a bit.

And the beautiful front view. I know, that the AXIAL logo was normally not in gold shade, but the white ones I have was much to small.

A teaser for the final look.

After the oils are hard I added some clear paint layers, followed by a satin clear coat for protection.
Later I masked the tail, painted the fin white and added the cross with plotter cut masks.
Later I masked the tail, painted the fin white and added the cross with plotter cut masks.

A light wood structure is still visible.

I masked again and added future to the tailplane and the control surfaces. A day later I started here to add lozenge.

The original plan was to add alu sheet metal to the fuselage, but this fails. The shape of the fuselage makes this not easy. So I decided to paint with Alclad. With removing the masks I noted some trouble, where the Alclad bites/solves the wood paint 🙁 Should have tried kitchen foil!

The lower wing is glued into its slot. The intake pipes are also added from metal.

Tail skid is finally mounted.

The undercarriage too. That is a little bird!

The lozenge on the tail needs to dry and some care then on hinges etc.

The upper wing is only plugged on for test fit. I need to prepare the rigging before.

Luckily the painted alu is not very prominent in the shadow of the upper wing.

The problem was also to much paint. I have 3 Alclad alu shades in my stash. I thought that that dark alu is to dark so I sprayed "Aluminium" at first, but this was darker compared to the cowling. So I sprayed a layer "White aluminium" on top, which matches the cowling better.
Another problem seems to be, that the red-brown clear coat was going also in the metal area, so the solvent was able to go below. Something learned: more masking the next time.
Here the damage as macro shot!
Another problem seems to be, that the red-brown clear coat was going also in the metal area, so the solvent was able to go below. Something learned: more masking the next time.
Here the damage as macro shot!

This discussion about the hand gave me the right idea!
I found a hand on a Aviattic decal (in real it looks better, here we have a Moiré pattern).
I found a hand on a Aviattic decal (in real it looks better, here we have a Moiré pattern).

Some mechanic got his oily dirty paw on the fuselage!

For mounting the tail parts I need to add the control horns. I created some from 0.2mm brass add made it more thick and round with solder. So the drilling is also easier.

That is the look with the mounted control surfaces.

I masked the wheels with plotter cut masks and painted a light grey. After drying I added different greys with a piece of sponge.

Here also the lozenge is added.

As next I added 16 plates as fittings.

To finalize the undercarriage I added the rigging and glued the wheels in place.

The control wires on the tail are also done.

Here a better view.

The cabane struts are alse glued in place including the rigging. You may notice also some more connection points for the rigging.

On the outer struts I tried something new. The side pictures showed the rigging lines attached to the struts.
After shortening to the right length and adding the upper pin I prepared the rigging with Gaspatch Anchor points and One end.
After shortening to the right length and adding the upper pin I prepared the rigging with Gaspatch Anchor points and One end.

After mounting the upper wing (Did I mention that there are moments when I hate superglue? What do I say moments, I mean days!) I added the rigging.

Here is the cross rigging of the outer struts and as last step I added the V-style control lines to the ailerons.

A final picture of the other side.
Kommentare
31 20 July 2021, 12:00
There are enough of started projects in my man cave, but there is a special reason to add the next one.
Today, on the July 20, but in the year 1912 the aircraft company "Kondor Flugzeugwerke GmbH" was founded in Essen (t least according to my Windsock article, Wikipedia says June 15th; another date I found was December 15th). Esssen is one of the bigger cities in the german "Ruhrgebiet" (Ruhr Metropolis, Ruhr is a river).
My wife was born there, and my mother in law lives there.
So you guess what? I have to build a Kondor aircraft!
After the experience with my last project Quadruplane I know that I'm able to handle a resin kit by Spin.
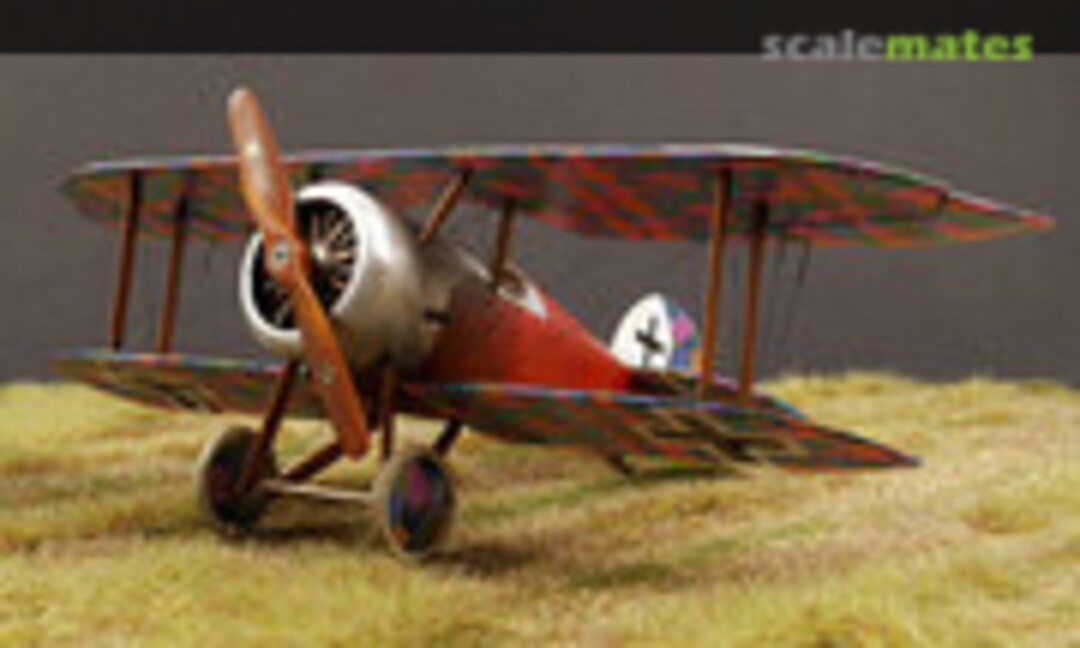
And Spin offers also some Kondor aircrafts, I decided to try a nice little biplane: Kondor D.2
There was a D.1 biplane, with Nieuport style struts and a single spar lower wing.
This was not very successful so the D.2 project was started. The upper wing was the same as D.1, but now 2 spars in the new lower wing and conventional struts. Two prototypes was build, the first with a 80hp (some sorces says Oberursel U.0) in a round cowling and a second one with a 110hp Oberursel UR.II in in horseshoe type cowling. Both take part on the fighter competition, but not ordered into production.
[img1]

The designer was Walter Rethel, who was later involved in Arado aircrafts and the Bf 109. For the German readers: His granddaughter is an actress and was married to Johannes Heesters.
There are no Datafile for those rare birds but Windsock International Vol 13 No.2 has an nice article, photos and drawings about the Kondor aircrafts. A picture here shows clearly, that the engine was a Le Rhone 80hp. The U.0 looks different.
So far the background of my new project.
20 July 2021, 12:11
After showing the kit content now the first real update with work on the wings. Not yet finished.
20 July 2021, 14:57
I imagine that it didn't behave that well in the air with such a short fuselage.
20 July 2021, 15:49
Welcome to the show mates!
Urban, it was a small bird overall (also the Fokker Dr.I and the E.V were small). Pilots praised the aircraft's flying qualities, but criticised the poor performance.
20 July 2021, 17:03
So with a better motor it would've performed well enough to be produced.
20 July 2021, 17:42
Even the more powerful rotary of the second prototype was not enough. We will newer know....
I added more pictures, the wings are finished. I very happy, that masking on top of the decals worked this time 🙂
20 July 2021, 19:16
Hey, you sneaked up on me! Just when I stop looking for your next project, you publish the first pictures... 😉
Very promising start. As always.
20 July 2021, 21:27
Yes John, that was the intention 😉
Added some pictures of engine and cowling.
21 July 2021, 11:27
Hi Bughunter, concerning pic 29, how do you manage to cut the rods off?
I did it as delicately as the sausages I replaced my fingers with allowed me to do, but some of them still flew off into the carpet monster's realm, never to be seen again... (luckily, Small Stuff ships more than the needed number)
21 July 2021, 15:44
Wow, pic 19 makes me believe that you covered the wings with real fabric - superb decal quality ?
I went to school in Essen and lived there for 10 years, but I never knew that there has ever been an aircraft manifacturer located there…
Live and learn
21 July 2021, 15:58
Thank you mates!
@René, exactly as shown in the last picture of the manual. I used a piece of wood below and a very sharp razor blade (I opened a new multi-blade razor and have now 3 sharp blades. Be careful!). A light cut is enough on this thin resin.
@Hanno, I like the color shades of the upper side more (pic20), the blue looks like a jeans. The company was in Essen, the workshop and the airfield in Essen-Gelsenkirchen-Rotthausen. Two links, the postcards are nice:
gelsenkirchener-gesc..enkirchen-Rotthausen
gelsenkirchener-gesc..viewtopic.php?t=5557
@Marcel Thx! Nice to see you here too 😉
21 July 2021, 18:32
To keep the project under steam I added the cockpit pictures - the fuselage is closed.
22 July 2021, 14:37
Thank you Dietmar and David, and for the lines!
I must admit, I already have a bit of a head start 🙂 I wanted to avoid to posting the next shelf queen and so check for early blocking points.
Now I have to wait a bit, because I painted oils on the fuselage yesterday. The oils are hardening now, but before I worked on the struts and undercarriage, so here are the pictures for that.
23 July 2021, 17:18
As I mentioned already the oils are hardening, but I have not shown a picture. In meantime I prepared other details.
It was a lot of work, but I now have a result that no one can buy, you have to do it yourself 🙂
24 July 2021, 16:26
Thank you for these links - completely unknown history to me ! 👍
Prop and cowling look fantastic
25 July 2021, 08:35
Thank you Urban, Justin and Hanno!
I forgot to add the nice front photo, which was my template for the airscrew. As this is stored in Wikipedia I can show it here.
[img1]

25 July 2021, 11:06
What a colourful little bird it is! One easily forgets that it was a military plane. Looking fantastic!
30 July 2021, 19:44
Pic 77, seeing how tiny this bird is makes my respect for your work even bigger.
30 July 2021, 20:59
Thank you mates! And no, my hand is not a construction worker's paw 😉
@Robert That's why I build these colourful aircrafts! Years ago I saw a collection of many WWI biplane models in a museum - that was my key moment!
31 July 2021, 10:45
I love the rendering of the motor pan, it looks like brushed metal. well done
31 July 2021, 11:02
Thank you! But the cowling looks like metal, because it is metal 😉 See pic31+
31 July 2021, 11:08
I perfectly understand you, Bughunter 😉 The (Polish) book on WWI fighter aircraft was one of my favourite when I was young - there were many silhouettes in full colour presented.
31 July 2021, 11:20
The hand is not in the original photo, but I take artistic licence! Thanks for the suggestion!
31 July 2021, 11:43
Thank you Marcel!
Now it is a biplane, the outer struts are in correct length and glued in too 😉
2 August 2021, 18:30
I love the artistic license with the oily hand print in order to cover up the paint damage!
2 August 2021, 18:59
Thank you Urban for your opinion! I heard also the opposite and I must admit, that the contrasts are a bit high now. Let's see how it looks like after Weathering, but that will be done after the Brathering 😉
2 August 2021, 19:15
Well it's a bit distinct put you could smear it out a little with some oil paint.
2 August 2021, 21:37
Yes Urban, I will add some oil paint wash anyway.
That is a type of Triplane which I need to add to my collection! But that is the wrong scale 😉 Instead I have this SPIN kit (and the matching Eduard kit) in my stash: Nieuport Triplane (Ni 17 fuselage) (SPIN model K4804, 1:48) May be later this year.
There is also another Nieuport triplane type, I own also a SPIN conversion for the Special Hobby kit of the Nieuport 10.
 (SPIN model K4804)")
3 August 2021, 13:28
Thank you Eric! I'm working on the rigging now. It is already a biplane.
4 August 2021, 14:41
Some fixing of collateral damage is needed, some detail painting, washing, ... But the light of the end of the tunnel is visible, or is it an oncoming train?
4 August 2021, 18:33
How the heck did I miss this! And a project with special significance to boot. Outstanding 👍
5 August 2021, 11:58
And I missed you, as a strong supporter of my projects, too! Thank you Alec!
5 August 2021, 15:23
Thank you Dietmar! This Kondor is finished now. The rigging lines are metalized now, some weathering applied and added as last step the cowling and the airscrew.
The final shots still have to be taken.
5 August 2021, 17:44
We are all waiting impatiently for final photos of your masterpiece!
5 August 2021, 19:07
Ok Robert, and all the waiters: don't miss the final album:
Kondor D.2 | Album by bughunter (1:48)
5 August 2021, 22:05