
Noticias
")
")
")
")
artículo marcado como pedido
 (Triumph Model F72003A)")
IJN Ground Crews with Gunners Model Set (1)
Triumph Model 1:72
F72003A 2024 Nuevos moldes Multitema (1!!)5 October, 11:48
")
")


")
Nuevo álbum de fotos añadido
5 imágenes
MiG-21
1:144
Gaps at the tail filled and rubbed smooth.


Proyecto: MiG-21/The PLA Air Force F-7II

3 28 September, 13:24
")
")
")
")
")
Nuevo álbum de fotos añadido
29 imágenes
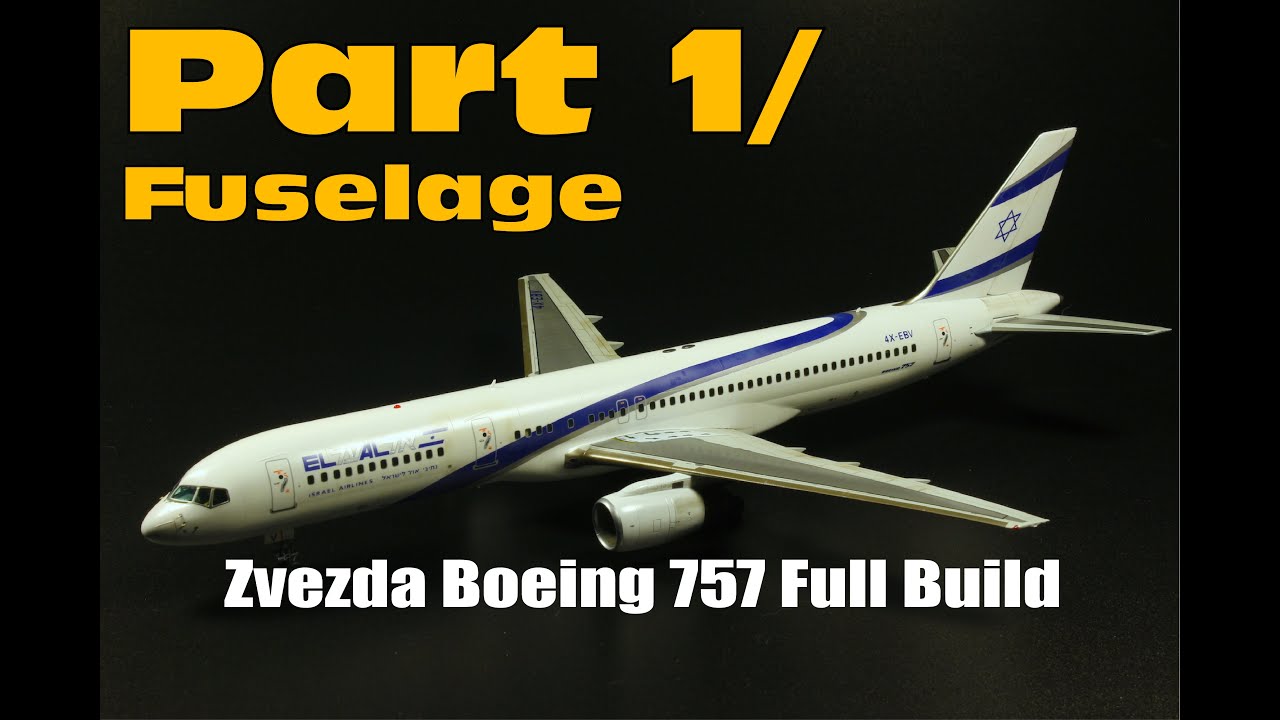
Boeing 737-530 Smart Wings 1:144
1:144
The window frames on the starboard side have been installed. Emergency exit also. The cleanliness of the window glazing,...


Proyecto: Daco Skyline Boeing 737-530 Smart Wings


 5+
5+ 40 10 December 2023, 18:22
After a long time I got into modelling and so managed to move a number of things forward. Now I have to let the putty cure properly on the transition between the pylon and the engine. And then the careful sanding and cleaning and final painting of the pylon and engine will begin.
30 June, 19:41
Great to see you back on this one, the livery looks v.cool indeed.
And don't even think that Zvezda nacelles are much better 🙂
30 June, 20:20
wow it it is looking really good. I really like the windows, and the shades you added
30 June, 20:45
Łukasz, I've got 373-800/700 waiting for me from Zvezda. And I'm looking forward to it. However, given my snail's pace, I don't know when their turn will come... 🐌🫣
30 June, 20:50
My both 800s are waiting as well 😄 Revell & Zvezda
Btw. How did you do such a nice pair of landing lights? I'm looking for ideas as decals are not available for all liners in 144th.
30 June, 21:11
I am impressed by how clean and evenly you cut out the windows. Which material did you use to cover the windows before pouring the resin. I use regular Cello tape but the resin dissolves the glue and this sticks to the windows.
30 June, 22:35
@Łukasz - I use either "little lenses" that I bought years ago at www.morellingtool.co.uk or nail glitter that I bought at a bead store.
I seal the headlight area first, then spray paint it matt black and glue the lights (glitter) in the appropriate places.
Then I sealed everything with transparent resin. After the resin hardened, I sanded everything to the shape of the leading edge of the wing and then polished.
1 July, 11:29
@ Michael - I use an electrical tape that I bought on e-bay. I got a reference for it on YouTube here: Youtube Video
It's High Temperature Resistant Kapton Tape. The packaging says it is "Advanced Polymer Tape" and is characterized as "Clean Removal". And the adhesive doesn't really stick to the resin.
1 July, 11:39
Thanks Zbynek. I will try this. The Cello tape glue can be quite easily removed with IPA, but lazy as I am, I like the idea to omit that step.
1 July, 17:31
So I moved forward a bit again and sanded and cleaned up the transition between the pylon and the engine.
4 July, 21:55
In between letting the putty cure in the transition between the pylon and the engine, I started speculating how to improve the cockpit window frame.
In the end, Authentic Airliner Decals were used. I really like the way the authentic metallic finish looks on the decal, plus they depict the rivets and the thin black line showing the insulation between the glass and the frame. I had to cut the decal because the dimensions are a little different on the model, but I really like it. So I ordered another set. The windshield is wider, so one set was not enough for me.
On the photo you can see where the original frame is sprayed with Alclad and where the decal is.
19 July, 17:20
So I found some time for modelling - Pylon/engine transition painted, wash oil paint on top of wings done, airline name decal placed on fuselage.
20 August, 07:16
See you like your Airlines 👍.
I may do a Soviet era TU in future.
You done some nice projects 😀👍👍
3 September, 13:15
Thank you for your kind comment Mr D.
I am also going to do a Tupolev, specially TU-134 Malév. That was the first airliner I flew in from Budapest to Prague.
4 September, 20:18
A small step forward has been made. The window frames on the starboard side have been installed. Emergency exit also. The cleanliness of the window glazing, unfortunately, did not turn out the way I wanted due to my mistake. I have to learn to live with that. Hopefully it will be better on the port side of the fuselage...
18 September, 05:07
It's all a learning curve, as in all art forms ......it's the persute of perfection very rarely we achieve it.
Looks great to me and I'm sure others think the same.
Your Tu-134 sound like great idea.
😁👍
18 September, 17:16
"It's all a learning curve, as in all art forms ......it's the pursuite of perfection very rarely we achieve it." - Exactly! Thank you for the precise wording, Mr D!!!
That's also my curse...
18 September, 19:01
Today I came across this: what a wonderful work 👍
Such glossy finishes (on cars or airliners) are not easy because it brings all little mishaps to the surface. But I like your careful work, and it is great that you go a step back and fix things even it is more work.
18 September, 19:26
Thank you very much for your encouraging comment, bughunter!
Thanks to my almost obsessive nature, everything takes a very long time though.
Your fast forward while maintaining exceptional quality and cleanness is one of the things I highly admire. Your masterpieces are a great inspiration to me.
18 September, 20:50
it looks really good, what is the issue about the windows? they look great in the pictures
3 October, 22:24
maybe some tiny white spots? you can say it is result of condensation, I have seen that in quite a few real flights 😉
3 October, 22:27
Thanks for the kind and witty comment, Spanjaard.
The tiny white spots are bits of dust that got into the fuselage, although I tried not to let that happen.
The other problem is that melted paint from around the windows has soaked into the clearcoat when I dripped too much diluted varnish over the dent left by the masking tape. It created some weird maps...
But you're right, it could be some condensation, I've experienced it in real flight too. Thanks! 👍🙋🏼♂️
5 October, 11:28
")
")
")
")
")
")
")
")
")
")
")
Nuevo álbum de fotos añadido


53 8 November 2023, 21:10
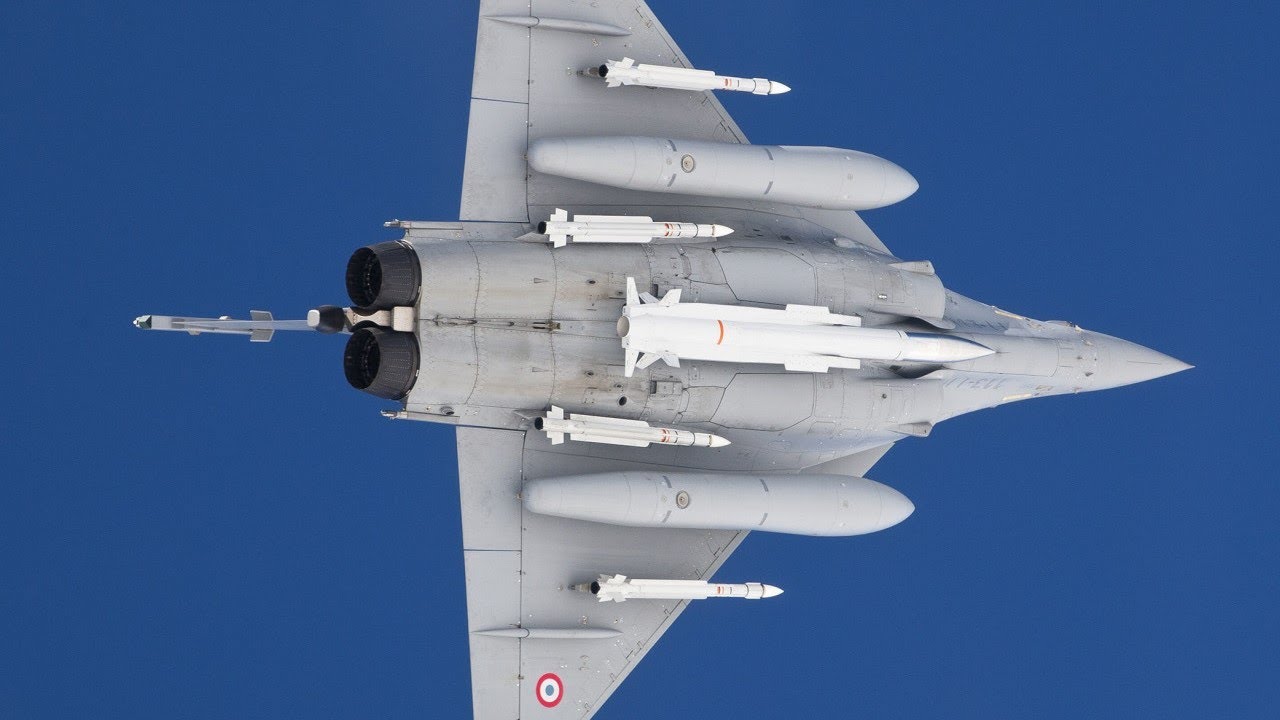
This project will have both pilots on the intercom and watching the engine startup process. That is why the same type figure is used in both cockpits. They both monitor the engine to ensure that the EGT and RPM is increasing appropriately. Each has their hand on the control stick to be able to open their MIC as they confirm everything is normal at start. The plan is to have the aircraft loaded with a Nuke (Apache Cruise Missile?). Seems appropriate to me for the days we live in now...
8 November 2023, 22:16
Maybe go for resin seats as well?
Seems like kit plastic never can compete with resin seats. 🙂
Though, I no longer crave for resin interior for the cockpit because of the work, but seats are ok.
9 November 2023, 05:17
I'll paint these up and see if I can tolerate them. If they are too bland, I have time to change my mind! Thanks for the idea!
9 November 2023, 21:25
Great video of the weapon that goes with this version of the Mirage 2000N
Youtube Video
25 November 2023, 00:46
As I have begun work on this kit, I am yet again struck by the lack of information in the variations and options provided in the kit. For example, the tail tip is not called out that applies to the 2000N version. While the nose of the 2000D is provided in the kit, it has to be modified to make it correct for the 2000N. Oh bother…
20 July, 02:40
Selected "most appropriate" tail tip and mounted the correct nose to fuselage.
21 July, 20:04
Okay, now I'm excited to get some paint on this cockpit!!! ResKit, you guys have done some great work with your 3D Resin Printing!
16 August, 18:29
Oh, did you fiddle with the nose part to make it match the N version, or did you have to buy aftermarket nose for the N version? I have this kit in my stash, but haven't really looked any it yet.
28 August, 05:43
I'm using the D nose but converting it to an N version. I'm also closing the "sucker doors" on the inlets to represent an engine that is not yet started... I'm assuming initial hydraulic power is applied from the APU and auxiliary hydraulic pumps have brought the gear door up. I'm going to close the speed breaks for pre-engine start configuration...
28 August, 17:36
Looks like BAM has some corrected noses still need the N one. Maybe reach out to him. I could use the corrected nose for this kit also. The Reskit stuff looks amazing.
bam-models.com/produ..2000-corrected-nose/
30 August, 13:57
Thanks for the heads up! The BAM nose looks fantastic! Sadly, the 2000N nose has a pitot tube and does not have the RDY antenna lines. It seems that much of the 2000N systems are somewhat earlier than the -5 systems. Everything I can find on the 2000N seems to be somewhat austere compared with the 2000-5. The ResKit cockpit is worth every penny!
30 August, 14:59
Like it 😀👍
Nice when the pilot looks like he's actually doing something and engaged with the craft.
30 August, 15:22
Thanks. It's really sad to remove detail from the ejection seat, but that is the only way to get the pilot in place...
30 August, 22:47
The pilot is from REEDOAK. They have several different figures in various poses so the realism can be developed based on the aircraft scenario. This model is being build to represent events just prior to engine start.
31 August, 01:50
Remaining cockpit items:
1. Glass
2. Decals on seats
3. A little more weathering
4. Fix pilot's France Flag
5. Add WSO's Right shoulder patch
6. Check that I can get the canopy actuators in after everything is assembled...
7. Add HUD glass
1 September, 03:07
The glass and HUD went in great! I had to lightly sand the edge of the glass to get it to fit snugly into the ResKit frame between the front and back seats. I used 1000 grit and lightly buffed all the way around the edge. Fits perfectly!
3 September, 16:01
Cockpit is done! Looks like the ResKit cockpit tub fits perfectly! Lots of trimming to get the crew in the proper fit. Right now, I think it's ready for final checks before fuselage join. The forward control panel needs some sanding for fit, but it does work. I have left the seats, pilots and control panels loose until final fuselage join just to have "wiggle room" before closing. I was able to adjust the forward control stick to make it match the pilot's hand more closely. Just need to check a few more things and then join the fuselage halves!
4 September, 22:19
attention aux couleurs sur les notices kinetic etc , certaines sont fausses!
5 October, 11:29
")
Nuevo álbum de fotos añadido


108 29 June 2023, 12:47
Great project! Your cockpit detail is superb, taking notes for when I get to mine 👍
29 June 2023, 13:11
Thank you Alec! I know, that this variant of Ar 234 is something like ,, what if or luftwaffe 46´´ , which is usually not may cup of tea. But i hope, it will look cool on my display case 🙂 ( especially with the Julia)
4 July 2023, 09:01
Thank you Jan!
I´ve finished the cockpit. Engine nacelles are done ( quite a hard work), wings are glued to a fuselage. Now, i´m repairing and adding same new panel lines.
23 July 2023, 21:04
Very nice processing und fine cockpit. I'm looking forward to the finished plane. 🙂
2 September 2023, 08:44
Thank you, Alec, for your feedback. I didn't know, how to represent those bolts, that were on real aircraft. Than i decided to try this relatively new product from Eduard. And.....i think, its OK. ( I did not count the number of bolts 😄 )
31 October 2023, 10:40
Good idea. Did you highlight the rivets after painting the frames black?
31 October 2023, 12:41
Yes, i did. Primarily i sanded the rivets with very fine sanding sponge to uncover the layer of silver color underneath. But it was not 100 % OK, so i highlited the rivets by drybrushing them with silver oil color.
31 October 2023, 19:32
Superb so far! The effort with the fasteners for the canopy frame was worth it.
12 November 2023, 18:00
Thank you very much, gents, for your comments!
I must add some last details and make few final touches. I hope, that soon i will be able to make pictures of completed model.
13 November 2023, 15:09
Great painting on this lovely build and the subtle weathering is a great touch. Great build
21 November 2023, 13:41
Dane díkec!
Thank you, Mr James!
Right now, the build is completed. I hope, i will make some pictures ASAP
21 November 2023, 19:38
The four engines look great on the Arado. Very nice work on the weathering.
21 November 2023, 20:07
Thank you, Vincent and Daniel!
Finally, i made some pictures of comleted model.
30 November 2023, 11:22
Nice piece! Those four engines added a lot of interest to the plane. Looks very good! 👍
30 November 2023, 11:23
Glorious finish. That thing slung underneath is superb, very well done Jakube 👍
1 December 2023, 14:37
tiene este artículo
")
Antonov An-24/26/30 correct AV-72 earlier type propellers set resin airscrews parts + deicers panels decals
MLH/Bring It! 1:72
#796-1 2023 Nuevos moldes Multitema (3)5 October, 11:29
/es/search.php?q=*&page=newsfeed&fkSECTION[]=Newsfeed
search-solr.php?lang=es
35
35
/es/search.php?q=*&page=newsfeed&fkSECTION[]=Newsfeed
35
todo