

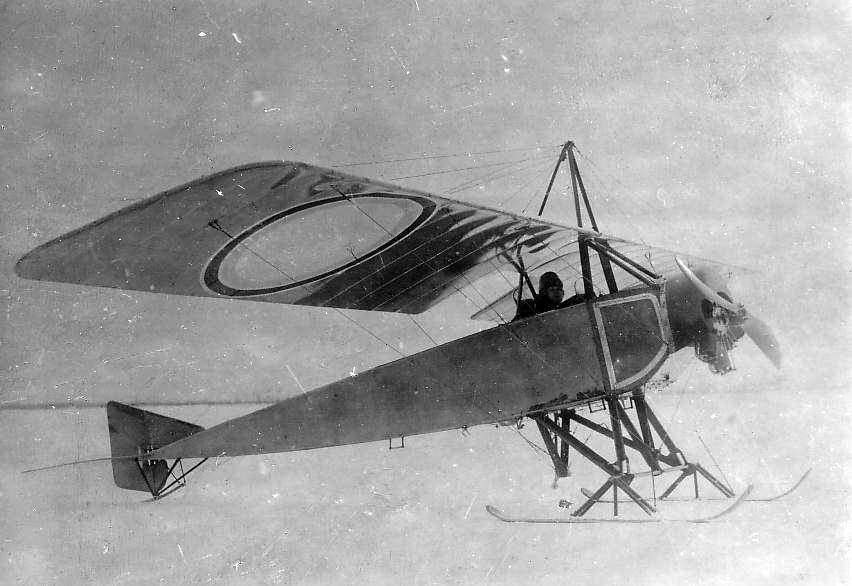
Morane-Saulnier Type I in russian service

sawed, cutted, drilled ...

A lot of small brass pipes ...

... soldered together.


tinned


some scratches


New wooden airsrew according to drawings.

The back side.

Added very thin layers of H406


Toned down with clear sepia. Color looks like real here.

Future for decals and cout outs on spinner.

Even with the addional paint layers wooden layers are still visible.

Warping: outside very flat, pitch increases towards inside.


Linen on underside.

White (only thin layer) on top.

Decals area two layer affair, first.


Blue and white are the second layer.


light weathering


Brass color, decals, PE rings and Kristal Klear.

Floor painted with acrylics

Seat with real wood and Eduard Steel belts.

Cockpit completed

Fuselage with alu, linen and wood painting

Cockpit mounted into fuselage.

Some small parts were already prepared but not yet soldered. I started with that.

These will represent the linkage of the elevator and are movable now.

The fuselage is primed and painted: at first with bleached linen followed by white.

In retrospect, it can turn out to be practical to write detailed build reports. So I could now easily look up how I had realized the parts for the Morane-Saulnier type N project.
Again my own cut "PE":
Again my own cut "PE":

As expected, the middle struts were also too short on this model.

These are all the parts prepared for the landing gear.

Here during the careful fitting process. It was not easy to get the new length right.

After that I could prime and paint the front part of the fuselage black and also painted the parts of the landing gear. Here the landing gear is finally mounted to the fuselage and the spring rubbers are also visible.
On the pictures the axles look dark, so I have them chemical blackened.
On the pictures the axles look dark, so I have them chemical blackened.

An impression how the finished plane will look like.

The next step was to install the engine. But first I had to add the ignition cables, insulator plate and prepare the axle.

The engine is now finally mounted. This is necessary because it does not fit under the hood from the front. You have to insert it diagonally and then insert the axle from behind.

The tail skid of real wood is mounted on a 'rubber cord'.

I made the cabane struts from brass. The struts of Eduard had a waist, which fit for some Type N but here I need continuous ones.

It will be completed with a pulley from the kit, which lies here folded on the cent piece and comes into this recess at the head.

I can show a few things on this picture: The new intake manifolds, the tinned cabane struts and also the widened fuselage cover with the newly built wind shield.

For the wind shield I really needed some tries! Here the plastic attempts are missing.

For the final assembly I had to take care of the fuselage. The cutout for the perforated plates had to be enlarged (drawing in the manual) and for the back support I made a larger upholstery from Miliput, so that the thick plastic of the fuselage parts is not to be seen.

The cockpit cover was painted (aluminium inside and black outside) and mounted. The Gaspatch Vickers got another outlet and during the assembly I unfortunately scratched the paint of the Vickers (Steel/Gunmetal) and had to mask it again and repaint the barrel.

After painting the backrest upholstery in leather color I mounted the cover, put in the cabane struts and my prepared wooden parts for the box could be glued on top.

The drawings and pictures are difficult to interpret, but I suspect that in winter, in addition to the enlarged wind shield, a further screen made of wood and transparent part was installed.
@Daniel: I lost the clear foil during cleaning before mount. Need to made a new one!
@Daniel: I lost the clear foil during cleaning before mount. Need to made a new one!

And all this from the pilot's point of view:

At the wind shield the opening was certainly closed and so I created a mini window with my Punch&Die set and scissors.

Here it is glued in:

Also the decals are applied! Here the nice side, on the other side I unfortunately broke the decal and I still have to put it on the lacing (I should have sanded it away before painting!).

And finally the status: skis and wings are plugged on and the tail parts are just primed.


After priming, the tail units were shaded, masked and painted with white, bleached linen and linen.

The other side.

The tiny cockades on the tail unit, which were kindly supplied by Erik from a 1/72 set to me, are applied.

For the crafting of small parts I like to drill before cutting out of the etched part residue.

And two parts as result.


On the Vickers gun I added the synchronization, the two small parts left and right with the axle through the cooling jacket. From the Gaspatch program I had luckily chosen the right version, which has a spring in the front. I had studied and built this function at the Flyboys-Nieuport and recognized the parts on the photos.

I got the russian pennant from the old flashback kit as decal, but the original pictures show it as a kind of dragged banner. So I cut very thin strips from black decal leftovers and applied them.

The rudder is mounted and all six control cables are installed at the tail.

The lower tower is mounted and the first rigging cables with turnbuckles are attached.

I rigged the model with fishing line, because it really has to support the wings. Here all wires are pulled in. The comment of my wife: "What a chaos!"

Same on the bottom side.

After all turnbuckles have been glued in the correct position and the threads have been tensioned, it looks quite neat

I also noticed a funny effect on the model! If you lift it with the skis on, the skis are tilted by the center of gravity so that you certainly couldn't land. Therefore the original model has two tensioning ropes with rubber bands which keep them in the right position.

And the view from below.

Now really not that much is missing! Some detail painting and the airscrew ...
Comentarios
12 22 July 2019, 14:12
DCI Klink supposes a Curtiss Jenny 🙂
Book: Curtiss Jenny (by Colin A. Owers)
")
22 July 2019, 16:42
Hey my friends, very nice research 👍
David, no heli - to new 😉
Slavo, very good: in russian service,the ski looking the same 👍, but a newer Morane-Saulnier.
Daniel - no Jenny, but a title of a Windsock is a very good match!
Derek, this is a 98% hit! The russian ones has a 110hp Le Rhone and was called "Type I".
I want to build the machine known from the Brian Knight painting on cover of the WD 58: Book: Morane-Saulnier Types N,I,V (by J. M. Bruce)
")
22 July 2019, 17:29
Hehe, nice little guess the celebrity quiz... And very nice work on the object of guessing too - crazy stuff & techniques you do there... 👍 I almost suspect you have a dummy 10cm diameter € cent coin on the table... The work would be still great, but at least believable😉 Is the use of plastic or a "kit" in the classic sense at least planned in this build? 😄
22 July 2019, 18:38
Yap Slavo, it is in fact a oversized cent containing chocolate ..
[img1]

Back in our youth those were called Schokotaler.
22 July 2019, 19:24
Slavo, thank you! You asked for a new Cent picture, so I just made a new one and uploaded it. But I doubt that it is more believable now. 😉 Yes, I will use a Eduard kit 8091 Profipack. The project was already entered together with all the accessories, but as idea. Now I attached the album to that project. The plastic wheels on the axle are replaced by skis at the end. Since I was not sure about how to scratch those skis I decided to do it first, to have the option to do a different marking in case of fail. The rest will be very similar to the type N project: Morane-Saulnier Type N | Project by bughunter (1:48)
There are still problematic tasks: engine is bigger and I need a different cockpit cover.
The decal problem is solved, because other users here was able to help me 👍
22 July 2019, 19:35
As Sherlock Holmes would say 'Elementary, my dear bughunter'! I much admire your work on the early machines - building 'stick-and-string' has always frightened me! I have no doubt this one will end as a real gem again.😉
22 July 2019, 21:49
I fully expect the cylinders and exhaust pipes are fully drilled out, and the valve pulleys positioned correctly according to the firing order of the engine, of course...😉 👍
23 July 2019, 21:15
I saw the pic and went... "Holy...Sh..." and then I saw it was bughunter's work and went... "Meh... not bad..." I think I've been desensitized to the spectacular now...
25 July 2019, 14:09
Greg, that is a effect of habituation (the engine), to avoid this I tried something new: the skis😉
25 July 2019, 14:32
An actually running engine would legitimately be allowed to reach up to 5€-cent coin size...😉
Seriously, the air-cooling ribs and the quality & cleanness of the work is just beyond... 👍
25 July 2019, 19:43
The kudos is going to Eugeny from Small Stuff for such incredible kits! Not only the quality of the resin parts is perfect but also the engineering allows to build such gem in a very short time. With the experience of around 10 rotaries of different types (9 kit types are available) I can build and paint it on one afternoon😉
25 July 2019, 20:03
Alec, nice to meet you here! Uploaded the pictures of the airsrew, only decals and final clear coat missing.
28 July 2019, 13:26
Thank you Alec and Slavo! It is a bit crazy to create a wooden screw and paint it brown 🤔 So for my Type N I used the kit provided one, but here I need anyway a different one and I'm used to that wooden ones ...
28 July 2019, 16:54
Beautiful instruments & cockpit details - but the title goes to the classy chesterfield seat upholstery😢 👍
11 August 2019, 20:27
After a year as shelf queen I decided to continue on this project, after the Triplane has left the bench.
19 August 2020, 15:18
Are you somehow in a competition against yourself Bughunter? Will you be able to surpass Black Maria?😉
19 August 2020, 19:35
Thx! Competition? Yes, I want to (or should?) finish sleeping projects before starting new ones.
Surpass the black Tripe, not sure. Most of the work was done a year ago, but then I had now idea how to create the huge cockpit cover against the Russian winter. I tried some different ways, with brass sheet, with alu, with Evergreen - but I didn't like any of the attempts! The problem is still not solved. But if the rest of the aircraft is finished this will put some pressure on me to find a new way or be happy with a less perfect solution.
19 August 2020, 19:52
Ah Intermission ended..
Very nice progress with the engine Frank.. Looking superb as usual...
20 August 2020, 18:57
Thank you Daniel! Had a déjà vu, see pic55!
Yeah, some important steps done (the one, which forces it to be shelf queen), new pictures added.
21 August 2020, 19:20
So now you are re-discovering engineering solutions for early aviation Ski´s landing gears - just a natural evolution of your approach to making these kits.. 🙂
The rigging on this one with all the metal inserts is just epic. Your models are completely losing any sense of perceivable scale when photographed as the Maria with all the details & original materials... 👍
25 August 2020, 09:21
Meh... the blue of the tail roundel doesn't even match with the others... Not impressed!
KIDDING!
If there's a "scalemates biplane modelling deity", it should have your name. And I'd worship it!
(And that's especially hard for me, being a hard-boiled atheist...)
25 August 2020, 09:36
Thank you mates for your kind comments! Highly appreciated 👍
@Björn good to see you back 🙂
The fishing line has the disadvantage, that not all lines are always under tension but it is needed here to hold the wings. My usual rubber line do not work if functional rigging is needed. Now all wires are painted with metal paint, looks even better. I hop I can show the final pictures soon.
25 August 2020, 14:50
72-75: in der Tat, was für ein kontrolliertes Gewussel 🙂 Ergebnis sieht wie immer top aus! Wie spannst du die Kabel, damit einige nicht durchhängen bzw. mehr/weniger Spannung haben als die anderen? Ich vermute symmetrisch links und rechts? Von innen nach außen oder anders herum?
25 August 2020, 15:38
Oh god, it took me a few seconds to notice the turnbuckles. Just magnificent.
25 August 2020, 15:55
@Bernhard, eher frei Schnauze😉 Teilweise gehen die Seile einmal komplett rum, da braucht man dann links und rechts nicht extra spannen. Man muß nur immer dran denken, nur eine Seite zu verkleben und am anderen Ende vorher zu spannen. Ich habe es geschafft, an einem Seil beide Enden zu verkleben, ohne zu spannen. Da durfte dann das ganze Seil nochmal neu, grrr! Als alles fertig war, habe ich die Durchführungen durch die Fläche erst verklebt, damit die besser gesichert sind.
@Gary, most of the turnbuckles are Gaspatch Type C.
25 August 2020, 16:47
Schlau. Und logisch. Hab's bisher nur im „Kleinen" am Leitwerk wie z.B. Mr. Mulligan oder Bellanca gemacht und nicht so global (Tragfläche) gedacht🙂. Beim nächsten Projekt probiere ich deine Idee aus.
25 August 2020, 19:01
Again a project finished - thanks for watching 👍
Don't miss the final pictures here:
Morane-Saulnier Type I | Album by bughunter (1:48)
25 August 2020, 20:45
Geez... even Bugsy's "shelf of doom" inmates achieve greatness... Unbelievable as always.
26 August 2020, 13:41
Album info
The aircraft is known from a painting by Brian Knight (Guild of Aviation Artists) on the cover of the Windsock Datafile 58.


