

Baubericht

Fangen wir mit der ersten Mandibel an.

Nummer Zwei. Ein Wahnsinn welchen Detail Reichtum Bandai hier geschaffen hat.

Das erste mal das ich spachteln musste.

Alles sehr filigran.

Ansonsten sind alle Spalten hervorragend abgedeckt.

Am Wochenende mit Schrecken festgestellt, daß ein großes Bauteil verzogen ist. Revell angeschrieben und um Ersatz gebeten. Jetzt ist erst mal Baustopp bis ich weiß wie es weitergeht.

Update. Bin vom Sockelshop wo ich den Falken gekauft habe und Revell, die das Bandai Modell vertreiben begeistert. Hat 5 Werktage gedauert und schon habe ich ein Ersatzteil. Super Service.

Und darum kann es auch weiter gehen. Das Unterteil vom Falken ist fertig gestellt.

Oberer Deckel.

An der Oberseite ist bei der Rampe ein Spalt entstanden.

Das konnte so natürlich nicht bleiben und wurde gespachtelt und geschliffen.

Aus dem 3D Drucker kommt dieses Bauteil.

Passt genau in die untere Hälfte des Falken

Dieses Bauteil dient dazu die Halterung für das Diorama aufzunehmen

Nach Grundierung und preshading ist die erste Grundlackschicht drauf. Habe mich für White Grey von Vallejo entschieden. Reines Weiß wäre mir zu kalt gewesen.

Die ersten drei Platten sind rot lackiert. War recht kompliziert, da ich im Vorfeld nicht daran gedacht habe die Klappen Steuerung erst nachträglich zu installieren.

Platte für Platte geht es vorwärts. Eine Menge Abklebe Arbeit ist von Nöten.

Habe mir erst mal ein paar Halterungen gebaut um den Falken vernünftig lackieren und altern zu können.

Die Decals sind drauf, beginnen wir mit dem Panel Lining.

Auf der unteren Hälfte ist nun ein Filter aus Khaki, Blau Grau und Grün aufgebracht.

Das washing besteht aus Braun und Dunkelgrau.

Jetzt mit Klarlack sichern.

Zurück zu den Mandibeln.

Auch sie haben eine Washing erhalten. Fehlt noch das Chipping und Fading.

Mandibeln eingebaut

Experimentieren mit dem Chipping.

Unterseite fertig gechippt.


Auf zum Fading.

I did this very subtle fading. Think it’s perfectly adequate. It’s often easy to do too much.
Now that has to go on the rest of the saucer.
Now that has to go on the rest of the saucer.


Kommen wir zum Abschluss der Unterseite.

Es fehlten noch die letzten Schmutzschlieren und das Chipping habe ich noch ein wenig verfeinert.

An manchen Stellen wurden noch weiße Highlights gesetzt.


Als nächstes widme ich mich der Oberseite.

I found the underside a bit too homogeneous, but it was only my practice object.
Therefore, after the panel lining, I did a panel lightning. In other words, individual plates were masked again and a black shadow was cast in one corner.
Therefore, after the panel lining, I did a panel lightning. In other words, individual plates were masked again and a black shadow was cast in one corner.

Next, I’ll focus on the top.
The base coat with the colored plates is on, now the lengthy process of aging starts again.
The base coat with the colored plates is on, now the lengthy process of aging starts again.

Another small update.
Think the 3D blaster damage is really great.
But that’s why I didn’t understand why parts of the inner ship can only be seen in one of the larger holes and I filled the other holes with leftovers from the rummage box and styrene.
Only the left hole was filled.
Think the 3D blaster damage is really great.
But that’s why I didn’t understand why parts of the inner ship can only be seen in one of the larger holes and I filled the other holes with leftovers from the rummage box and styrene.
Only the left hole was filled.

And the filter is on it too.
The lid is only put on to see if the mandibles and the upper side match the sound.
The lid is only put on to see if the mandibles and the upper side match the sound.

Today I dealt with the scaffolding for the diorama.
The idea was to let the falcon fly through a kind of bisected tube. This should then be equipped with a Death Star surface that I will create later.
But as I said, first of all it’s about the scaffolding which will probably be made of wood.
I made a 1:144 scale model out of cardboard.
The idea was to let the falcon fly through a kind of bisected tube. This should then be equipped with a Death Star surface that I will create later.
But as I said, first of all it’s about the scaffolding which will probably be made of wood.
I made a 1:144 scale model out of cardboard.

I can then screw the threaded rod on which the model sits to the body through a hole.

Today we take a small step towards lighting the drive.
In the original kit, only very few LEDs are provided for the drive, which has already been criticized by some model builders.
A remedy had to be found.
So I got myself a lighting and sound module from America.
The engine light strip consists of 34 super-bright mini neopixel LEDs
In the original kit, only very few LEDs are provided for the drive, which has already been criticized by some model builders.
A remedy had to be found.
So I got myself a lighting and sound module from America.
The engine light strip consists of 34 super-bright mini neopixel LEDs

These are glued to a carrier also included in the set and intrigued into the fuselage. Fits great.
Then I cut the plug.
The cables will be extended here later and new small plugs will be soldered on, because I did not build the control unit and the loudspeaker into the model, but into the diorama.
Then I cut the plug.
The cables will be extended here later and new small plugs will be soldered on, because I did not build the control unit and the loudspeaker into the model, but into the diorama.

And so the wedding could be celebrated today, the big lids have united.
Now you can already see the well-known silhouette.
Now you can already see the well-known silhouette.

Small update.
The retaining clips and lines to the mandibles have been added.
The retaining clips and lines to the mandibles have been added.

The brackets are also one of the few components that I had to putty.

With this, the falcon at the bow is complete and can be further aged.

So today again made the framework for the diorama. This time with the original model.
Everything has to be right before it is built.
And what can I say, I’m quite satisfied
Everything has to be right before it is built.
And what can I say, I’m quite satisfied

The falcon has to move a little more to the right.

And tilted a little more at the angle.

At the moment I don’t have much time for model building, but I have painted a little more on the engine cover.

Filter, washing and dry painting complete.

Put it on once, goes with the rest.

I needed a little break from chipping.
That’s why I took care of the inner values of my Falcon again.
First glued a styrene strip behind the LEDs and lined the sides with foam.
So that the light cannot be seen in front through the crevices of the mandibles.
Then I extended the cables. The electronics should be in the diorama, not in the model.
Then connect it and run a test.
What can I say, great. But see for yourself:
Youtube Video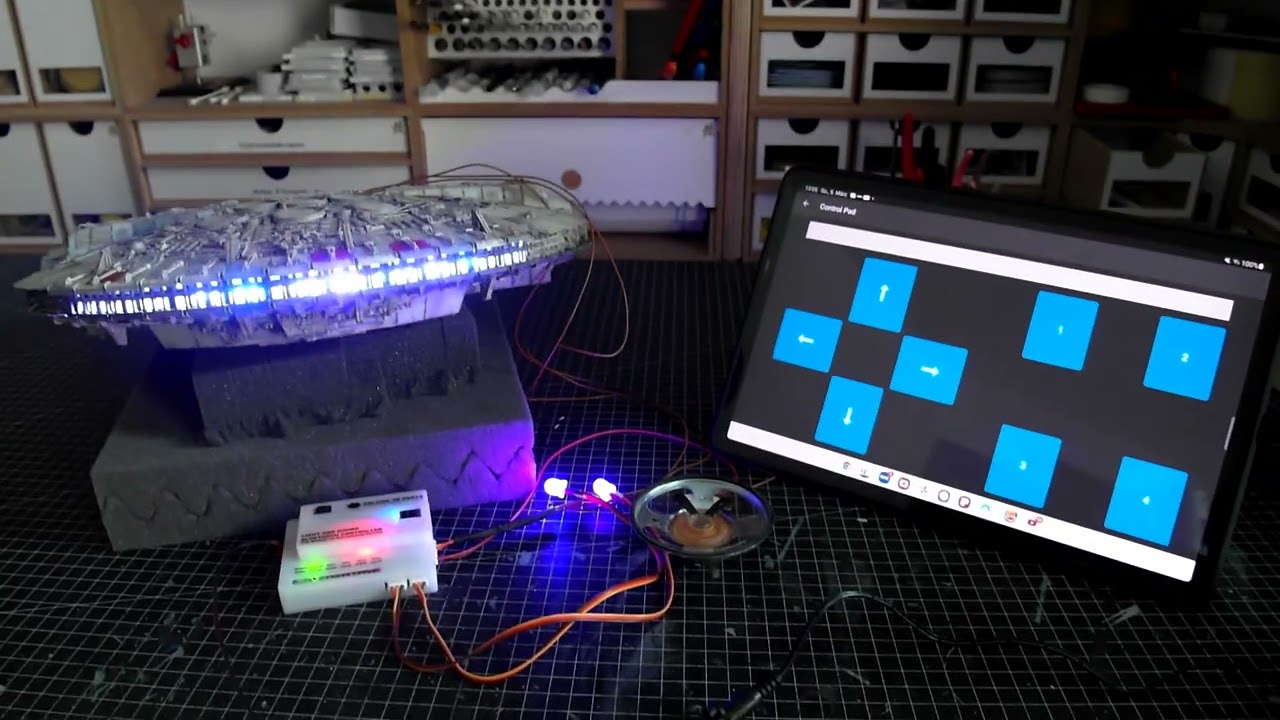

In the meantime I’ve finally finished chipping the fuselage and sealed it with clear coat.

I drew fine lines on the blaster damage to increase the effect.
Now dry well and then comes the fading.
Now dry well and then comes the fading.


I finished weathering the hull without the cockpit and engine cover.


After a lot of back and forth, I decided to go back to the original component and not to use the Greenstrawberry set.
The decals from them are simple stickers and I didn’t like that at all.
Bandai’s decals are excellent.
But all the fine details had to be filed away from the surfaces to allow the decals to lay properly. Even with Micro Sol it doesn’t work properly otherwise.
The decals from them are simple stickers and I didn’t like that at all.
Bandai’s decals are excellent.
But all the fine details had to be filed away from the surfaces to allow the decals to lay properly. Even with Micro Sol it doesn’t work properly otherwise.

I could use some of the accessory kit after all. The etched parts cover the holes in the seats for the original figures.

Falcon 3D figures are great. Far livelier poses than Bandai’s rigid sitting ones. Unfortunately, Chewi is missing the cartridge belt, but otherwise great.

What is of no use at all from the original kit are the LEDs. They’re way too weak. Disappointing for a 400 euro kit. Especially since there are very bright lights for a mere 8 cents apiece.
To be on the safe side, an additional pair were installed behind the cockpit. Then drilled holes in the blackened transparent part and lo and behold…
To be on the safe side, an additional pair were installed behind the cockpit. Then drilled holes in the blackened transparent part and lo and behold…

Let there be light.

This was the first time that a part didn’t sit perfectly.

A huge gap had to be bridged with Mr. surfacer.

After all, what are we model builders for, close the gap. I only had to score a new board seam with a mini chisel afterwards.

I like it that way very much.

Then again panels painted in different shades.

And a lightweight Panel Lightning. Individual records immediately get more depth.

Finally the panel lining and the decals.

And one step further.

The cockpit is now also on the fuselage.

So aging is complete.

You had to use a lot of force to snap the component into place. With all the color, however no wonder.


Control the light

And found good.

If an LED is defective, I no longer have the opportunity to change it anyway.

Let’s go to the engine cover.

He’s also completely aged now.

The traces of exhaust gas from the fans were created with pigments.

And with that, only the two weapon bays are missing.

And a little hint...
The covers of the weapons bays are ready for aging.
The covers of the weapons bays are ready for aging.

Still runs great.

Let’s get back to electronics.
The plugs for the control unit still had to be soldered to the cables.
Afterwards, of course, check again whether everything is still working properly.
The plugs for the control unit still had to be soldered to the cables.
Afterwards, of course, check again whether everything is still working properly.

The light with the super bright LEDs is fantastic. Really looks like a plasma stream because the led strip flickers slightly.

Then put the bottom cover on, pulled the cables through, sorted and tied them up.

We slowly approach the diorama.

So I did another rehearsal.

The angle of the threaded rod has been changed and its position.
I like it better now.
I like it better now.

And again the rest of the chipping is avoided.
Love making the base plate for the Dio.
Love making the base plate for the Dio.

This is now made of PVC and not of wood as I had planned.
It’s easier to edit, I’m a locksmith and not a carpenter.
I created threaded rods in different lengths and angles. Then try to find the best one.
It’s easier to edit, I’m a locksmith and not a carpenter.
I created threaded rods in different lengths and angles. Then try to find the best one.

With all sorts of angles, the plate is well stiffened and securely accommodates the falcon.

I pressed in a threaded hollow rivet to hold the threaded rod and secured it with a nut.
Now the little bird is in an excellent position.
Now the little bird is in an excellent position.

I will make the framework for the Dio in two parts.

So I can also disassemble the Dio with the falcons, for example to go to a trade fair.

Pushed together and good. I will then cover the gap with all sorts of greeblies and styrene.


Today I come to the second part of the framework.

I added another level below, on which the loudspeakers and electronics will later be placed.

Pushed together, fits perfectly.

A large contact surface to the rear as well. So that nothing falls over afterwards.

And a look behind the scenes again.
The threaded rod is now attached with M8 nuts and body washers. Holds more than the threaded sleeve.
The threaded rod is now attached with M8 nuts and body washers. Holds more than the threaded sleeve.

Then the little bird can take a seat for a test.

Everything seems to fit.

The gentle reader may have noticed that the upper weapons bay is also in place.
Now the only thing missing for the falcon is the bowl.
Now the only thing missing for the falcon is the bowl.

The pure falcon model is finally finished and I brought you some pictures of the little bird at halftime.

Curtain up for the Fastest Hunk of Junk in the Galaxy…


The base is now ready to receive the Death Star surface.

Everything is filled, sanded and primed.

The small dormer from the 3D printer was placed under the falcon to adjust it.
I’ll have to shorten it a bit, otherwise it won’t slide well under the model.
I’ll have to shorten it a bit, otherwise it won’t slide well under the model.

So far I’m really happy with the framework for the Dio.

Now it’s time to work out the details.

Simple half-timbered steel girders with tubes running around.
The base coat is on and a small rehearsal was made
The base coat is on and a small rehearsal was made

The front covers are fresh out of the printer and untreated.

Hello everybody.
Here I am and many thanks.
I had a very nice vacation but also a little craft break to recharge my batteries.
In addition, I first had to acquire some skills in creating print templates. It wasn’t that easy and sometimes a bit boring.
But slowly I’m getting better and in the meantime I’ve created the following structures for the bottom plate of my diorama.
First there would be a truncated pyramid. The gray part on top is the shots of a laser.

And this simple square. The surfaces are still untreated. A few finer details are also printed and laid on top.

Then the semicircle. Based on the original. Of course, all the fine surface details are still missing.

And already roughly distributed on the plate.

I’m not yet satisfied with the cover for the threaded rod, but I’m busy creating new shapes.
So, the beginning has been made and I think that new information will now be given at a faster rate.
So, the beginning has been made and I think that new information will now be given at a faster rate.

It continues.
And these are these next printed parts for the Dio.
Printing time for the two plates, almost 16 hours.
And these are these next printed parts for the Dio.
Printing time for the two plates, almost 16 hours.

They are sculpted slabs of the Death Star surface found on the web.

They are intended for the side panels.

And the casing for the mount of the falcon is also made.

It drags a little on me and the diorama.
But I’ve made a start.
But I’ve made a start.

The first parts are primed and now much smoother on the surfaces.

Finally I can start kitbashing.

Now the details are getting finer and finer.

Then primed.

And glued to the bottom panel.

And another little update, I've started to set irregular plates like the falcon.
The styrene plates from Evergreen, for example, are ideal for this. Simply run the scalpel along a steel ruler and break off with flat-nosed pliers.
See for yourself...
The styrene plates from Evergreen, for example, are ideal for this. Simply run the scalpel along a steel ruler and break off with flat-nosed pliers.
See for yourself...

It’s gradually getting a little easier.
The sheer size and emptiness on the diorama framework made me a little desperate at first.
The sheer size and emptiness on the diorama framework made me a little desperate at first.

But I’m slowly getting the hang of it.
Here is the latest construction progress at the star.
Here is the latest construction progress at the star.

Small update.
Print straight panels to dress the dormer that conceals the falcon mount and adjust.
Since they are quite simply detailed, filament plates work quite well. Foundation follows.
Print straight panels to dress the dormer that conceals the falcon mount and adjust.
Since they are quite simply detailed, filament plates work quite well. Foundation follows.


Next time the whole time in plain gray primed.
Seems completely different.
Seems completely different.

So we come pretty close to a Death Star surface I think.

Now a look at how it could go on.

I’m not sure what position the next block will be in.

After I pushed the cover for the model holder quite far forward, a setting test had to be done today.

As you can see, tight but sufficient.

The cables also thread well into the compartment intended for the electronics.

I like it.

Again just a small mini update. Kitbashing is really very time consuming.
Right side cover.
Here, too, the slot of the two-part diorama must be concealed.
Right side cover.
Here, too, the slot of the two-part diorama must be concealed.

And now fresh from the airbrush cabin… still a little damp…

I think the big effort in kitbashing was worth it.

Continue with the star.
I’m afraid that there will only be small updates in the near future.
It’s extremely time consuming. First the creation on the computer, then the printing, the bold priming and the subsequent kitbashing.
I’m afraid that there will only be small updates in the near future.
It’s extremely time consuming. First the creation on the computer, then the printing, the bold priming and the subsequent kitbashing.

Here you can see the very simple, printed structure with the subsequent refinement using old components from the leftovers box.

I hope that the spare box will also be enough to create the complete diorama.

And it comes together.
This part isn’t quite as elaborate as the one on the right, as you won’t see much of this area once the falcon is in position.
This part isn’t quite as elaborate as the one on the right, as you won’t see much of this area once the falcon is in position.

This is the current status.

Laid the armor plates.
I love Styrene so awesome and easy to work with.
I love Styrene so awesome and easy to work with.

And details laid out.

Ready for the primer.

Fresh out of the paint booth again.

This roughly finishes the surface of the lower panel. But i’m sure I can remember one or two details.

We come to the next floor.

Just rehearsals again.

Modified parts of the Iron Dome model are installed on the lateral front.

The beginning has now been made on the second floor…

In connection with the base plate, it already makes a slim foot. German proverb. 🤔mile:

Nothing to see from the gap

Next Details at the corner…

and primed.

It goes.

At the moment I have time and can build a little more every day.
Current result.
Current result.

The truncated pyramid from the printer needed a little upgrading.

A little grey…

…and everything fits into the overall picture.

What have I done to myself??
But the star grows!
But the star grows!

And again it was time for a rehearsal.

Not what comes afterwards. It’s tight…

But since everything fit, I was able to refine it further.

As always, fresh from the airbrush booth.

It fits.

I had to go to the lower floor again. I still didn’t like the quarter circle 100 percent.

Too few details. And finally a little tiger should also be installed.

Better.

Yes, that’s how it works.

Now the lower part also fits the upper part of the Dios.

And now we continue upstairs again.
First create the next structural framework.
First create the next structural framework.

Attached the upper fan box and the right side panel as a test.
I like it.
I like it.

Also on the right with the scaffolding.

And the next connection to the ground floor.

The right side also received its appropriate framework.

And further connections from the middle to the lower level.

It continues on the right side.

With a mix of kitbash and styrene plates.
The right edge was covered with parts of Iron Doom.
The right edge was covered with parts of Iron Doom.

Prime everything properly.

In the middle I inserted a printed profile with 2 components glue. Not only intended to look good, but also to reinforce the most unstable part of the scaffolding.
The fans were also placed in their positions.
The fans were also placed in their positions.

And a picture for the overall impression.

Kitbashing is really extremely time consuming.

For me, the middle plate was further refined with kitbashing.

And fresh from the cabin…

There’s nothing left to see of the gap.

In gray it looks completely different. By the way, my favorite color. :wink:

This would also complete the middle panel.
However, it is possible that one or two tubes still come to mind.
However, it is possible that one or two tubes still come to mind.

Let’s move on to the next level.
Since I have also covered the back of the scaffolding, I can now put it upside down and carry on sensibly without bending my fingers.
Since I have also covered the back of the scaffolding, I can now put it upside down and carry on sensibly without bending my fingers.

The same procedure here too. Relatively poorly detailed structures from the 3D printer in connection with styrene plates and old model building remains.

And of course all sorts of tubes that wonderfully conceal unwanted gaps.

After a short creative break, we can continue fresh.
First, armor plates were cut and attached to the top.
First, armor plates were cut and attached to the top.

Then on the right the structure started to be built further.

Some people will probably call me crazy, but I got the Y-Wing Starfighter and the A-Wing Starfighter from Bandai to exploit. :woozy_face:
I’m slowly running out of good, adequate kitbash parts. Here you can see, for example, the sawn-off half of the Y-Wing stand. These are also covered with styrene panels.
I’m slowly running out of good, adequate kitbash parts. Here you can see, for example, the sawn-off half of the Y-Wing stand. These are also covered with styrene panels.

The sides are painted, but not yet equipped with the small Styrene rectangles. So I can put it on the side so I can continue working there.

The right interior of the framework was provided with a printed plate, which I use like this. Super fine details are not so important here.
This is part of the original Death Star interface that can be freely downloaded online. Primed with grease it should be enough to cover the print marks.
This is part of the original Death Star interface that can be freely downloaded online. Primed with grease it should be enough to cover the print marks.

Now further detail the basic structures I created.

All I see in my mind’s eye are tubes.

Buying the Bandai Y Hunter was definitely worth it. Won many small applications for kitbashing again.

And in gray it looks like this.

I haven't made much progress at the moment and just did another test today.

Now we can go to the other side.

So that I can see where more or less fine details need to go.

At the top center, for example, more parts have to go than previously assumed.

Whereas on the right side behind the falcon there are more than enough.

Little Update

Here's a look at my kitbash session today.

I didn't really like the position of the bird in the diorama yet.
So I tried a slightly longer threaded rod.
So I tried a slightly longer threaded rod.

I'm coming to my meeting yesterday.
More Y parts…
More Y parts…

I think the falcon looks better this way. Not so deep...

...then the backside hangs.

And that happened today.

And a few little things in the middle.

Now clean up again before we continue.

Let’s come to the finale of the middle and upper sections.
After cutting what feels like 1000 small plates, we distribute them evenly into the remaining free areas.
After cutting what feels like 1000 small plates, we distribute them evenly into the remaining free areas.

The Y hunters really pay off. It’s just money anyway.

The last pipe was also laid.

And with that I present fresh from the paint booth…

My very own Death Star.

And again in a long shot.
Now I have to briefly go back to the lower plate.
The covering for the threaded rod needs a surface on top.
Now I have to briefly go back to the lower plate.
The covering for the threaded rod needs a surface on top.

And on we go.
Let’s start with the cover for the threaded rod.
Let’s start with the cover for the threaded rod.

Printed and covered with styrene.

From the paint booth…

This should hide the cables and threaded rod quite well.

The sides also have to be filled with the obligatory squares.

And other Side.

This completes the inner section of the star.

Let’s get to the cover test.

Everything seems to fit.

Here are a few more pictures from the final test.

Here are a few more pictures from the final test.

Here are a few more pictures from the final test.

Here are a few more pictures from the final test.

The check showed that there were enough tubes and squares.

I’m starting to have enough too.

Let’s get to the painting work.
First the obligatory pre-shading.
First the obligatory pre-shading.

Base coat on and decals glued.
When it came to panel lining, things got complicated.
It doesn’t work here like it does on the falcon model. The plates are only indicated there and the color is drawn into the gaps between them by capillary action.
The panels of the diorama are of course glued on and the gap is much larger. That’s why I have to carefully apply the washing color here with a fine brush.
But do it with a steady hand.

The countless squares emphasized with a light gray.

And the armor plates painted a shade of a darker gray in the corners. This way I get greater contrast.


Now I’m back to the decals, but I’ve had enough for today. ?

Let’s move on to mid- and high-level preshading.

Pannellining and lighting. As well as highlighting individual structures.

Everything is slowly coming to fruition.

After the top two sections were so full of great little details, I have to go back to the base plate.
Here I started with the quarter circle and practiced kitbashing. After comparing it with the top plate, I found it to be a little sparse.
So I picked out a few more parts and created more details.
Here’s the bottom plate before for comparison…
Here I started with the quarter circle and practiced kitbashing. After comparing it with the top plate, I found it to be a little sparse.
So I picked out a few more parts and created more details.
Here’s the bottom plate before for comparison…

And after I lent a hand again.
The newly added parts can be recognized by their lighter surface. The plate already has two filters on it. Consisting of blue-grey and a medium gray which also results in a slight washing.
The newly added parts can be recognized by their lighter surface. The plate already has two filters on it. Consisting of blue-grey and a medium gray which also results in a slight washing.

Since I added the Y-fighter parts very late, they enrich the lower section very well.

Better filled the plate.

And the sides received a few decals.

What have I done to myself…
Washing and dry painting is extremely time-consuming.
Thousands of places that you can hardly get to and you always have to be careful that excess paint dries on places that you don’t immediately see.
Washing and dry painting is extremely time-consuming.
Thousands of places that you can hardly get to and you always have to be careful that excess paint dries on places that you don’t immediately see.

But I think it’s worth it.
A nice contrast is created.
A nice contrast is created.

Left side up to the middle level is done.
A week of work.
A week of work.

It took a while, but the washing and dry painting of the plate is finished.
But first I had to improve something on the upper structure, otherwise it would have been too bare.
But first I had to improve something on the upper structure, otherwise it would have been too bare.

Then we could finally start with the upper level.

What a slog.

Countless places were difficult to reach.

But it’s coming together more and more.

And again the overall view from the front.

To finish off the base, I printed out steel structural elements.
However, I am still a beginner in 3D printing and therefore the rivets were defective no matter what I tried.
Here are the freshly printed front pages.
However, I am still a beginner in 3D printing and therefore the rivets were defective no matter what I tried.
Here are the freshly printed front pages.

That’s why I removed the rivets after assembly.
I just didn’t like it.
I just didn’t like it.

My old Punch & Die set helped.

I got this for this model years ago because some rows of rivets were wrong or missing.

And so the faulty rivets were replaced.

Then painted.

And glued under the base.

Ready for inspection.

The bottom plate is now finished.

I think that it represents a neat conclusion to the bottom.

Now I’ll continue on the sides.

Happy New Year and it can go on.
I’ve made a lot of progress with the pages.
First I cut the armor plates with which I will cover the surfaces.
I’ve made a lot of progress with the pages.
First I cut the armor plates with which I will cover the surfaces.

Fits.

By the way, the styrene plate with the X is not a plate but the gauge with which I always mark the same recesses.

A few more squares spread out.

I attached the top plate with a little overlap, which conceals the gap nicely.

And in the front, of course.

Base color on it

Here’s the overhang again.

This should ensure that the maintenance flap is well covered. I will probably create a locking device using a magnet.

Left side finished.

And the right one.

Do you know that?!
The pages are finished…pffff.....?
When I looked at the Dio from behind, something was missing.
The pages are finished…pffff.....?
When I looked at the Dio from behind, something was missing.

It still needed a little more substance.
And with this technical surface, what’s better than pipes?
That’s right, more plumbing.
So I took out the hot air dryer again and quickly made some.
And with this technical surface, what’s better than pipes?
That’s right, more plumbing.
So I took out the hot air dryer again and quickly made some.

I put another one in front of it and now it’s more consistent on the sides in my opinion.
Now just need to be aged.
Now just need to be aged.

Not much will happen on the back wall of the diorama, as you can only see a little of it. The surface will probably mainly be decorated with large armor plates.
Only on the sloping top plate should a little structure round the whole thing off. That’s why I got a few delicate steelwork girders from the railway model making sector, which are supposed to end in a bracket I printed.
Only on the sloping top plate should a little structure round the whole thing off. That’s why I got a few delicate steelwork girders from the railway model making sector, which are supposed to end in a bracket I printed.

Another little update.

The steelwork supports are primed, glued and the left side is finished.

Now the armor plates in between are missing. But it’s the weekend and I hope to have this section finished by Sunday.

I’m making good progress.

The back wall panels were still missing.

Here I made it easy for myself with the extremely large units. You can hardly see any of it afterwards anyway.

All the little squares are still missing.

And the view from the front. The fan blades are mounted just above the large structures on the bottom.

I think that rounds off the view of the top plate well.

And again a small update is inserted.
I have installed the last big panel and the end is near… ?
First the locking mechanism for the maintenance hatch. It now closes tightly with two small, strong magnets.
I have installed the last big panel and the end is near… ?
First the locking mechanism for the maintenance hatch. It now closes tightly with two small, strong magnets.

Preshading of the upper armor plates.

Base coat on it.

And here are the last two armor plates. Cut, cleaned and glued.
At the top, the small squares have already been given their lighter base color to increase the contrast.
At the top, the small squares have already been given their lighter base color to increase the contrast.

The back has two filters and very slight chipping.
I don’t even know if I still do dirt running.
I don’t even know if I still do dirt running.

But now the last segments have been added to the front.
The upper laser…
The upper laser…

And the one on the big truncated pyramid.
The cover for the falcon holder is also designed.
The cover for the falcon holder is also designed.

All parts are now installed.

And again in total.

The dress rehearsal took place today.
The falcon was screwed onto its threaded rod one last time for testing.
I did some light chipping and fading on the base plate and am now checking to see if anything is missing anywhere.
Take a look at the bird.
The falcon was screwed onto its threaded rod one last time for testing.
I did some light chipping and fading on the base plate and am now checking to see if anything is missing anywhere.
Take a look at the bird.

The front laser looks in exactly the right direction for me.

The height and angle of the falcon looks good.

Of course, it is unnecessary to paint any further details in the middle.

There is still a little aging missing on the lower plate, front edge.

Sides look good too.

And the upper laser also shoots in the general direction of the falcon.

The plate had to be placed on its back one last time to be able to do the details at the top.
But this time carefully supported on a foam.
But this time carefully supported on a foam.

Then off to the airbrush cabin. So as far as this huge structure goes.

All parts finished painted.

So, that concludes my construction report. I’ll take some decent pictures of the model this weekend and then present them to you.
It was a great pleasure for me to embark on this journey with you into a galaxy far, far away.
It was a great pleasure for me to embark on this journey with you into a galaxy far, far away.
Comentarios
244 11 October 2022, 15:17
Hi Jorg, I'm just in the process of getting one of these!...look forward to your build!
22 October 2022, 11:28
Wir ihr sehen könnt bin ich im Moment sehr wankelmütig was mein nächstes Projekt angeht.
Es geht also doch weiter mit dem Falken. 🤦♂️
1 December 2022, 16:09
Schöner Fortschritt, durch die Farben kommt mehr Leben rein, stay on target 😉
25 December 2022, 09:14
Danke Torsten.
Ich werde mit den Filter und Washing Farben noch ein wenig experimentieren um das ganze noch ein bisschen lebendiger zu bekommen. Das kann ich an der Unterseite recht gefahrlos machen, da man die im Diorama kaum sieht.
25 December 2022, 20:37
Was sind das für interessante Halterungen, welche an den Mandibeln sind?
1 January 2023, 11:20
Vielen Dank Männers. 😊
@ Michael
Ich mag unaufgeräumte Arbeitsplätze nicht. Da ist man nur am Suchen.
@Torsten
Das sind selbst gefertigte Aufnahmen für die Mandibeln. So kann ich sie besser anfassen und lackieren. Einfach ein Stück Gewindestange in ein Kunststoff- und Stahlprofil gesteckt und verschraubt.
1 January 2023, 11:54
Sehr schön! Bin auf das Diorama gespannt. Hast du denn den Platz für das fertige Modell schon reserviert?
19 January 2023, 05:43
Danke Chris.
Bei mir kloppen sich die Modelle langsam um die besten Plätze.
19 January 2023, 07:23
You're even building a Diorama for this? Dang. Might need a separate coffee table / display space for this. Looking forward, though, this thing looks great. Recently bought one as well for quite cheap and am looking forward to building it.
19 January 2023, 09:20
Danke Dash.
Da ich sonst Schiffe von über einem Meter Länge baue, kann der hier auf dem Nachttisch Platz nehmen. 🙂
Ja, freu dich drauf, macht echt Spaß den zu bauen.
19 January 2023, 09:51
Oh wow, that diorama idea.... will be... crazy. Really looking forward to that. 😮
2 February 2023, 17:50
This is getting more and more interesting! Looks like a real poorly maintained YT-1300.
2 February 2023, 21:48
Nice that you like it.
True, Han really could have put a little more money into maintaining the Falcon. 😄
3 February 2023, 03:46
Late to the party here, but following along with interest. Great work so far!
10 March 2023, 15:14
Spectacular 👍🏻
Might well be better than the actual film prop - wow - great job and an unending field of details to discover - love the weathering and blaster damage ! 👍🏻
18 March 2023, 14:30
Möge die Macht weiter mit dir sein, Jörg. Bisher sieht der Falke super aus 👍
18 March 2023, 18:15
Jörg, I'm honoured that you thought my little Falcon was a "Sehr schöne Falke", yours is absolut klasse 😊
5 April 2023, 17:40
Bin mal auf das Diorama gespannt, Jörg, aber da wartet mein Falke auch noch drauf..
6 April 2023, 17:09
Und ich erst mal Dietmar.
Mach mir schon einen Kopf wie das Grundgerüst am besten zu realisieren ist.
7 April 2023, 08:04
Stunning. I love the gouge on the underside and the contrast as you flip from the weathered underside to the pristine topside between pic38-39 is a stunning contrast highlighting the work you have put in there. Amazing and inspiring stuff 👍
7 April 2023, 08:11
excellent work, I love the paint shop and the weathering. the shading is outstanding...
7 April 2023, 08:24
Q: Unsure if OP said anything about this, but are the LEDs linked in a serie, or are there multiple wires for all the LEDs?
11 April 2023, 10:16
Manny thanks..
Two LEDs each are soldered to a cable, since I only had two outputs, Treehugger.
11 April 2023, 15:12
I have yet to fiddle with LED's for my Enterprise NCC-1701 refit, but I did learn from some place that, if one place LEDs in a serie, then if one LED fail, they all fail. So probably best to have serveral wires around instead of one loop for such LED projects.
Another thing to worry about, is not having the LED die too soon, but I guess that might be just some calibration thing if building all this stuff from scratch.
Heh I invested in a digital power supply for LED projects some years back, but haven't gotten around to using it yet.
11 April 2023, 16:31
I'm not particularly worried about the LEDs.
They won't often be glowing in the finished model. Maybe at an exhibition or when there are visitors. A permanent light is therefore not provided. It's just a nice gimmick for me
12 April 2023, 08:02
Lieber Jörg
Wenn ich meinen Falcon gedrucktbhabe und zusammenbaue, müssen wir 2 uns mal kurz schliessen und reden wegen der Bemalung. Die ist ja wieder Mega von dir!!!
Gruss
Jörg
19 April 2023, 18:54
I meant whether the indicated tunnel is made of cardboard. You have made a design to that effect behind the hawk
20 April 2023, 02:57
Yes is part of the diorama framework and is then made of stable PVC
20 April 2023, 05:14
Very cool! The Falcon looks amazing. 👍
This is promises to be a great presentation too.
20 April 2023, 06:16
Jörg, every time I check on your project is it becoming more and more awesome. It just gets better and better every time.
19 May 2023, 17:04
Outstanding work. Simply the best Falcon I've seen. Movie quality work on display here.
26 May 2023, 10:06
Hoffe das Dio wird genaus super wie dein Falke, Jörg, möge die Macht mit dir sein...
7 July 2023, 17:06
Thank you Torsten.
It's easier for me now too.
At the beginning I really thought that I would never get the huge free space filled 😅
13 August 2023, 09:04
This will be so amazing when done. Quick question, are you planning some sort of protective case for it as well? Or will it sit in a display cabinet?
14 August 2023, 16:25
The base is getting better and better, it could have been used in the movies!
21 September 2023, 07:41
I am absolutely no fan of all this Star Wars, Treck, Shmeck, Heck stuff. But the way you build up layer upon layer of details into a very convincing composition is fun to watch. I am sure that the result will impress even me.
21 September 2023, 09:18
Thank you guys.
Yes Michael, you have to like that. When I was 10, my father took me to see this film and since then I've been into the stuff, along with warships.
And building this Diroama was simply a challenge for me that I enjoy.
21 September 2023, 12:05
are you planning to bring this beauty to Lingen next year? please say yes 🙂
1 November 2023, 09:13
Thank you.
I actually want to try that. I think the last time I was at the EME was in 2014.
If I get the model ready by then, you can count on me. 😉
1 November 2023, 09:51
I am planning to be there, so i hope to have the pleasure meeting you and seeing this amazing dio! 🙂
1 November 2023, 10:48
"Did you fly in that trough? You're braver than I thought!" - Princess Leia
15 November 2023, 10:08
This is astounding! If I recall correctly, kit-bashing is also what has been done on the actual Death Star model that was built for the movie in 1977.
22 November 2023, 13:44
Thank you.
Not only the star, but also the falcon were realized with this system.
The guys from ILM were the creators of all of today's aging and scratching methods that we as model makers know and appreciate.
23 November 2023, 08:58
A lot of grey but it is not boring at all to look at! 👀 👍
This looks great, and is full of details.
1 December 2023, 13:34
Leider kann ich nur ein Like geben, deine Arbeit hätte wahrlich so einige verdient! In jeder Star Wars Ausstellung oder Sammlung sicherlich das Highlight! Fantastisch und vielen Dank für die vielen Bilder!
3 December 2023, 13:22
Es wächst, immer No h ein Detail dazu. Super, bin schon gespannt wie es weitergehen 👀👍👍👍
31 December 2023, 10:46
An amazing build! The Death Star especially! Your dedication, patience, and talent has really been rewarded with this build! Well done!
30 January, 11:44
WOW, this is amazing, absolutely stunning build, cant wait to see it all completed.
30 January, 17:22
Awesome, indescribably fantastic. An appropriate base for the falcon. I'm looking forward to the illuminated finale. 👍👍👍👍👍
30 January, 19:10
truly speechless, this build is one of the best I have seen here, the falcon is magnificent, and with the most incredible base you have made, well, it is just perfect!!
so, it is finished in time for Lingen 2024, right? if all goes to plan, I certainly will look for it there 🙂
4 February, 16:53
Thank you very much people.
Yes Spanjaard, nothing should stand in the way of that. It would be really great if we met there and chatted a little.
5 February, 15:09
ZORIONAK! (congratulations in basque language) GREAT JOB !!!
5 February, 15:17
This is one of the best models I've ever seen! It could go head to head with the real models used during the filming of Star Wars.
7 February, 03:46
Thank you for sharing your build process with us - your work is truly amazing and inspirational!
11 February, 16:34


