
Uutisvirta
")
lisäsi uuden valokuva-albumin.
40 kuvien
P-38J (Robin Olds) [COMPLETE]
1:48


projekti: P-38J (Robin Olds) [COMPLETE]


18 16 October, 21:30
Looks great. I have the kit in my stash, will have to build it soon 👍
16 October, 21:50
After two hours, the whole cockpit, wings and "fuselage" were together. I got totally sucked in after the first two hours and it really got in the way of other projects! So fun!!!
16 October, 21:53
Biggest issue is the choice of D-Day markings. The white bands are 60 mm on each wing and on the booms. This makes the individual stripes 12 mm. Pretty easy once you see it. I started out with 50 mm white band. That was clearly too short.
16 October, 21:56
Model Master Neutral Gray on the underside and Vallejo 71.043 (US Olive Drab) on top. Lots of Tamiya Panel Line accent black overall.
16 October, 21:58
I have seen claims that Olds first two kills were in this specific aircraft.
17 October, 00:27
Really nice work DM....Lovely build.
Best story around Robin Olds in a P-38 was that he got behind a flight of 109's.....he was ready to open fire when his engines cut - dead. He had forgot to switch tanks to his internals when he jettisoned his external tanks. Instead of resolving his fuel transfer issues he just carried on lining up on the 109 and shot it down while in 'glide mode'. That's calmness under pressure for you.
17 October, 06:16
Great build! The nose wheel is up, does the the nose weight ball included in the kit need to be reinforced with extra lead?
17 October, 07:04
Thanks all…
The nose wheel appears elevated because I use a sheet of glass on my bench. The glass is 1/4" thickness.
17 October, 15:02
Now if I can get my antenna insulators to compare with Bernhard Schrock's Sea King! Definitely a worthy target!
17 October, 20:02
")
")
lisäsi uuden valokuva-albumin.


12 14 October, 14:53


")
")
 (Special Hobby SH72122)")
")
")
lisäsi uuden valokuva-albumin.
299 kuvien
Westland Seaking Mk41 German Navy 89+63 (50 Jahre)
1:48
In the last week I actually managed to instal all the parts without mess, breakdowns and disasters on the fuselage.
Alth...


 5+
5+ 155 30 March, 15:44
You are welcome. As usual a lot of first rows free! Popcorn for all! 🙂
3 April, 05:00
What a combination: a great new kit, nice accessories and finally a master modeller at the tools - EPIC !
10 April, 16:20
Thank you JAM-SCREW.
Btw: just I saw you actual portfolio of sets for the Seaking! SCM Brand: JAM-SCREW
Absolutely remarkable!! I'm looking forward especially for the landing gear and main rotor hub. 🙂
12 April, 05:52
Just look at that winchframe !!! There is absolutely no doubt that after plugging these plugs the winch will be working. As with all your builds, for the watchers the path is the destination.
Wonderful wip pics - keep'em coming…… 🙂 👍
18 April, 05:02
Rapid progress sir! Very impressive attention to even very fine details for accuracy. Thank you for the updates and images.
22 April, 17:06
Michael ureol is A kind of foamed plastic. It comes in different degrees of foaming. The more foamed, the softer and lighter.
29 April, 09:32
Hallo sieht genial aus.
wo bekommt man sowas ? habe auch schon versucht sowas zu finden.
29 April, 09:39
Ah, that explaines as well the nice texture the cushions have. Thanks for the info.
And - by the way - as always a pleasure to follow your delicate modelling.
29 April, 10:43
Your are welcome.
Robert: vor paar Jahren habe ich von einem Modellbaubekannten Reste zum probieren gekriegt. Daher musste ich erst mal schauen, wo man das kriegt: eBay hier und da so wie bei Modulor in Berlin.
29 April, 13:08
Great looking detail you are adding, Berhard! Those seat cushions are fantastic.
29 April, 13:27
Vergiss nicht, einen Kasten Bier bereitzustellen, wenn du die bordtoilette nutzt 😉
29 April, 17:47
Thanks for comments and praise.I would like to share the praise with the excellent photographers (TN and BD). Ä Only such photos as from TN and BD make it possible.🙂
2 May, 16:10
It was probably difficult to wire all the little rotary switches on the back. I assume that they all work!
8 May, 09:42
Just absolutely fantastic Bernhard, I dont think everyone will appreciate just how difficult all those details you have added are to do. you have achieved what I only dreamed of achieving. I am lost for words with these details. Stunningly beautiful work.
8 May, 09:45
Thank you David, bughunter and Dan for you very motivating comments🙂. The Seaking is meanwhile my favorite helicopter. It was great to see one of them flying over the beach in Boltenhagen: we went on vacation there last year.🙂🙂
8 May, 15:13
I am impressed not only by your skills, Bernard, but also that you are not over-whelmed by the many, many fine details that you are taking on. RESPECT 🙂
8 May, 16:25
Last monday I had the chance to take a very close look on all these masterpiece subassemblies in person - an all new level of depth in detail, even by Bernhard's standards !
These oxygen bottles look as if they were very closely related to 500 pound bombs….. ? 🙂
18 May, 20:01
I'm happy that you like my bottles... 🙂. In fact, I have often used bombs as a basis for various parts. 🙂 This time, however, it is a sprue with a diameter of 4 mm.
19 May, 06:17
The level of detail is mad. amongst the best scratch-building I have ever seen on Scalemates.
26 May, 14:27
Excellent progress. I like how in Germany, when helicopter model parts get mailed, one just has to write "Bernhard" on the box and it gets delivered to the right person… 😉 😄
27 May, 12:21
I'm out of superlatives ! What can one say - you are constantly exceeding your own standards with this build, and that really says something !
Deeply stunned and impressed by your R.O. workstation !
27 May, 18:33
Well, first test is passed - package arrived. Second test passed looks in good condition. 😋. Now is the real test. How does the builder feel about the parts and are they suitable for this unbelievably excellent project.... time will tell.🍻
28 May, 07:02
JAM-SCREW.How big is your production facilities,you might need bigger premises as your products look great albeit in the hands of a master modeller.
28 May, 14:28
Wow, again every little sub-assembly is a fine model on it's own - fantastic 👍
30 May, 14:44
Thx for you feedback 🙂🙂
The entire interior is lined with upholstery, which is primarily used for noise-insulation. Until yesterday, I broke my head because I didn't know how to repicate it… After a conversation with a mate (thx Hanno), the brilliant idea came to me: Fimo clay.
The material can be processed excellently and is solid in the oven after 30 minutes at 130°. The most important thing is that it does not become bone-hard but left elastic and can even be sanded.
1 June, 08:20
150 pics and you didn't even close the fuselage. And not a second of dullness. Finest modelling entertainment. 🙂
4 June, 17:09
This morning I was curious and unpacked the chassis of Jam-Screw. As already written, the quality is outstanding. But everything is so filigree that you have to be very careful and not to break anything when handling. I had to improvise a bit here and there. In the end, I was finished after 2 hours. Including preparation for laying the cables.
8 June, 18:37
Der Baufortschritt ist echt sehenswert und beeindruckend Bernhard. Die Bilder vom Innenraum von Dir und Thomas sind toll! Es gibt leider sehr wenig Bilder vom Original und sind eine tolle Vorlage. Vielleicht macht ihr nen extra Walkaround hier. Ich freue mich schon auf die nächsten Bilder.
9 June, 15:13
Danke fürs Lob Tom. 🙂. Dank der hervorragenden Innenraum-Fotos macht es wirklich sehr viel Freude herumzupuzzeln. Mein Seaking Projekt hat, könnte man sagen, eine „kritische Masse" erreicht. Dank diversen Kontakten zu Hubschrauber-Spezialisten, und ehemaligem Wart und nunmehr der Connection zur Jam-Screw habe ich die Möglichkeit offene Fragen auch dort zu klären. Für seine CAD files hat JS / Andy und seine Leute hunderte von Fotos geschossen, zu den ein normaler Sterblicher keinen Zugang hat.
Deinen Vorschlag werde ich an Thomas weiterleiten. Deine Idee ist sehr gut.🙂
10 June, 08:18
Wahnsinn was du da reingesteckt hast allein die Instrumente und Sitze sind schon ne Show
17 June, 07:25
Thank you for the big praise. I am very happy to have such a large number of fans of this WIP.🙂🙂
Dietmar: nur dank der Unterstützung von einer Handvoll von Mk-41 Fans ist es mir möglich so tief in die Materie einzutauchen.
Übrigens: Ganz am Anfang wollte ich die Türen offen lassen und nur ein „bisschen" im Inneren tun. Aber als ich die Fotos von Thomas betrachtet habe, bin ich „getürmt und hab mich auf dem Boden versteckt". Irgendwann habe ich jedoch den „Zustand der inneren Ruhe" (die Phase wenn ich kein Problem mehr damit habe mich z.B. mit einem Rucksack aus Fimo eine halbe Stunde zu beschäftigen)🙂🙂 und betrachte es inzwischen als eine Herausforderung, wieviel ich von dem Zeug nachbauen kann.
17 June, 18:24
Very exciting to see what can be achieved with even a very good kit. Commitment and patience wonderful recipe for outstanding success. A pleasure to go along for this journey.
18 June, 08:41
Thank you for your unique and supportive comments !🙂🙂
It's a usual business copymashine/printer in tower design, Minolta serie 7.
18 June, 18:03
The interior is a delight to the eye, for sure. Inspirational modelling🙂
18 June, 18:28
🙂🙂.
The last big point for interior components is completed: rack for electronic equipment & foldable seat.
26 June, 12:27
God God! I'm just amazed how much scratch built detail you put into this build with each passing day!
30 June, 02:56
A waterproof green rubber mat is laid on the cabin floor of the SeaKings of the German Navy. However, not under the equipment rack and not in the area of the „shower cabin" (radaroperator workstation). There, the rubber mat was left out, shortened and folded upwards.
At the points of the mountingpoints and other hatches, access covers (probably also made of rubber) are incorporated into the rubber mat.
30 June, 12:13
i really love the details of the rack for electronic equipment & foldable seat.
30 June, 19:07
The lecture continues ! Altough it's a pity to partially hide all these wonderful details in the closing halves, I'm curious !
5 July, 08:12
After completing the engine housing I begun today detailing the bottom.
Just as on the fuselage sides, the equipment on the bottom of the Mk41 is different from the british variants.
10 July, 17:18
The level of detailing on this thing is simply too notch. Number of bits you have added must be in the thousands! Masterclass 👍 👍👍
14 July, 12:40
Einfach nur Geil.....hast du jede Niete nachgezählt, Bernhard 👍
Liebe solche Modellbauer da komme ich nicht mit
15 July, 11:19
Holy smokes, this is escalating everytime I'm checking the progress here !
The Airfix-guys must be crying for their mama by now…….😄
15 July, 18:20
Sehr schöner Innenraum. Ich liebe deine medizinischen Hilfsmittel. Bin selber im Thema drin und kann keinen Unterschied zu den realen Maschinen feststellen. Echt gute Arbeit!
20 July, 16:58
Thank you for the last wave of such nice comments. I have the last big hurdle to taken: installing clear parts for the cockpit without mess.
Qwertzel: freut mich, dass dir mein Medizin-Equipment gefällt. Du hast erwähnt, dass du selbst sehr dicht dran bist. Hab gesehen dass du auch einen Rettungs Quirl im Bau hast bzw. Eine ganze Menge von Feuerwehrfahrzeugen. Bist du selbst auch im Einsatz? LG B
20 July, 18:26
Ja, kann man so sagen. Bin seit mehreren Jahren bei der freiwilligen Feuerwehr, bei den Maltesern und beim DRK im Sanitätsdienst und Katastrophenschutz. Ab einem gewissen Punkt ist das ganze Rettungswesen eher eine Lebenseinstellung, anstelle eines Hobbys
20 July, 20:23
… and they are in place, flawlessly installed. I admire your precision, truly excellent 👍
27 July, 13:22
Thank you Alec: Your comment honors me very much.
Today morning I worked on the nose, installed several parts of SeMa Models And finally the „thing" looks like a Mk41. 🙂
28 July, 11:23
I look at the photos and marvel at the precision and modeling skill. Fantastic, Bernhard! 👏👏👏
30 July, 09:38
Incredibly realistic look and extraterrestrial cleanliness in paintjob and especially masking the clearparts, exemplary !
30 July, 20:29
Looks amazing! Beautiful results on that glass, I bet that felt good to remove and see the results. 👍
30 July, 23:50
I have hardly any experience with 3D printed parts, especially concerning the flexibility. The material used by Jam-Screw is quite brittle. Therefore, I decided to disconnect the axles and insert a wire. This also has the advantage that you can align the wheels precisely afterwards, especially because they are flattened.
10 August, 16:11
Thank you mates. 🙂
Result of a modeling mini task: DIY FOD covers.
I wanted to be very „smart" and install the exhaust pipes from the outside after painting. I overlooked that the opening in the fuselage is much smaller than the „hidden" end. Therefore, I had to improvise: I sawed off the outer end and inserted them obliquely from the outside.
17 August, 17:33
I just can't get over the sharpness of the color separations. Absolutely straight, no ragged sections. Superb.
17 August, 21:35
🙂 🙂
As usual I installed the door without glueing via 2 x piece of 0,26 mm wire. I drilled 2 holes (0,24 mm) from outside through the door into the fuselage.
Who can find the two places? 🙂
18 August, 10:36
Today I finished one of the last complex parts for the fuselage. The whippers. What do you think: how many individual parts does a windscreen wiper consist of? 🙂
22 August, 15:49
You missed the wiper mechanism spring 😄
Joking, I have no idea how you manage to cut and drill such microparts.
22 August, 18:56
Just been looking at your wipers in awe (not a phrase I thought I'm be using this morning). Stunning work!
23 August, 07:21
Fully-functioning wipers? Too much for my brain to comprehend...... Amazing, Bernhard, amazing...!
23 August, 14:38
Never before have I completed a tailrotor in this quality in such a short time! Thanks to Jam Screw!!!🙂🙂🙂 Compared to the original, all this is great: even the kink at the back edge of the blades is reproduced correctly.
25 August, 11:53
Your spectacular build and pic 255 makes me wanna build one german SAR Seaking too.
1 September, 05:14
I'm glad I was able to inspire you for this machine. By the way, I was lucky/opportune to see the 89 + 63 and 83 + 58 live on Friday at the very last statics display in Nordholz. Hence the photos: in bright sunshine! All spotters were really lucky!🙂🙂
1 September, 08:06
Oh yes, great pictures of the original - I really like the "stressed skin effect"!
And I learned recently during my visit in Oberursel museum (reported that on SM) how the filter works, which you show in pic260.
Fantastic modeling show here 👍
1 September, 11:55
WOW, all out on the details, Dont think i have ever seen a more acurately detailed model before. Think this is a price winner. Very beautifull.
1 September, 12:06
This is very impressive. Can you give a tutorial on how you achieved the stressed skin effect?
1 September, 15:57
Schön, dass Du noch das Vorbild in echt sehen konntest! Ein toller Moment, den man nicht so schnell vergisst. Ich hoffe, Du hast noch genug Fotos gemacht hast! Wäre cool gewesen das fertige Modell neben das Original zu stellen. Weißt Du was aus 89+63 wird?
1 September, 19:08
KyMustang: the Seaking - Kit of Airfix is on of few witch offers stressed skin.
Tom: in der Tat, das war das Ereignis des Monats! Wie bereits schon geschrieben, habe ich das große Glück, Mitglied einer WhatsApp-Seaking-Taskforce 🙂 zu sein. Felix und Thomas waren gestern bei dem VIP Termin dabei und haben ihre Informationen in der Gruppe geteilt. Demnach bleibt die 63 in Nordholz. Vielleicht ergibt sich mal eine Gelegenheit, das Modell mitzunehmen und nach Nordholz zu fahren. Vielleicht hätten die Museumsmitarbeiter Interesse das Ding in klein zu sehen.
1 September, 20:04
I'm just waiting for the decals (thanks DF 🙂🙂) and taking a creative break. For a change, I opened another box 🙂
2 September, 18:47
Wow! This is extremly impressive!! Build already 2 Airfix Sea Kings but this is a whole other level!! 🤩 I also want to build this retro Sea King (I was also present during the spottersday and the last flight. Can you tell me witch decals you will use? Thanks in advance!
21 September, 15:47
Good morning Aaron,
thank you for the praise! That was indeed a great experience for me in Nordholz to see the 89+63 live on friday. 🙂I would have liked to see the Seaking in flight on saturday🙁
The decals have been created by a modeling-friend exclusively for me and our Seaking task force 🙂.
HSQ / Mr. Fienne Schola has released a sheet exactly for the 89+63. Here are two links.
https://ebay.de/itm/186437323778
heli-scale-quality.d..iebebilder:::53.html
22 September, 06:09
I got the decals on Friday. Everything except the blue elements is meanwhile in the right place: I'm thrilled! Thank you very much David!!🙂🙂🙂🙂🙂
22 September, 14:25
Bernhard, es ist atemberaubend was Du hier zauberst! Erste Liga, ohne Worte 👍
22 September, 14:34
Last Monday I had the opportunity to lay my eyes on this milestone in the making, even more impressive in reality. So now it's decalling time !
Finish line in sight !
23 September, 19:19
The large decal has layed down nicely 👌, looks a difficult area!!
Nice job your doing 👍👍
23 September, 19:24
Rotors are nice job, interesting model this one ....and very popular, lots of interest.
Best of luck with next steps 😃👍👍
25 September, 18:49
In the last week I actually managed to instal all the parts without mess, breakdowns and disasters on the fuselage.
Although I am not finished yet (the parts for the rotor have not yet arrived from Australia) I wanted to share some photos of the details with you. 🙂
At this point I would first like to say thank you to my 4 modeling friends, without whom this project would not be possible.
To Thomas for his great photos that left no questions unanswered.
To David for his support by creating the outstanding decals.
To Felix for his boundless knowledge of helicopters and his tireless answers to my countless questions.
Last but not least to Carsten for his efforts in the creation of the seat cushions and his communication with the former technician of the Seakings: so I had „access" to hundreds of pages of the service manual, which a normal mortal does not get to see.🙂
17 October, 15:57
Again and again I am taken aback by the quality of this build when lured onto the thread by another magnificent teaser picture.
17 October, 18:48
lisäsi uuden valokuva-albumin.
41 kuvien
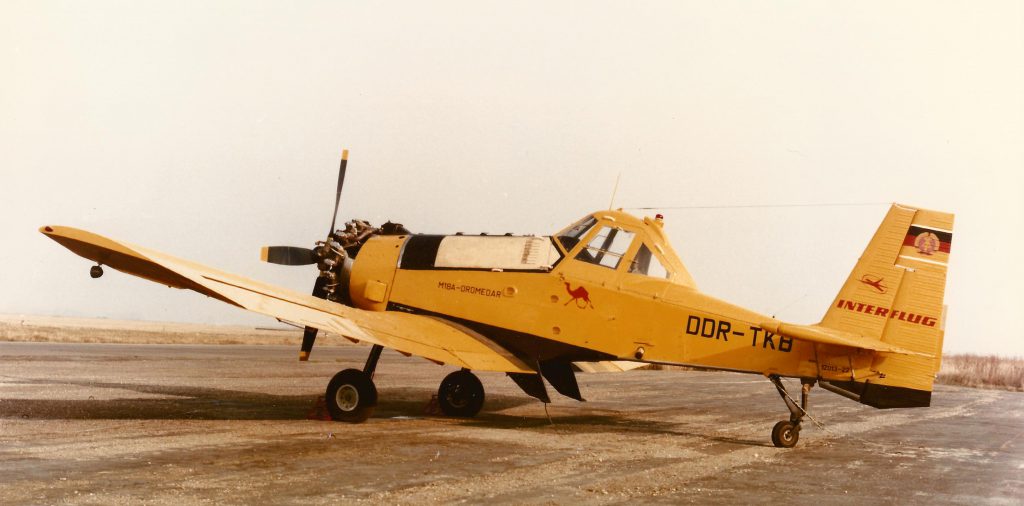
PZL M-18 Dromader + Weimar T174-2 - East Germany, 1989
1:72
Decals printed and applied. Sealed them with Emsal Bodenglänzer and sprayed a coat of matt varnish. Now the weathering c...


57 22 January 2023, 10:20
This is the first time for me to tackle a complete resin kit. And when I look at the individual parts, it will be a real challenge. There is an extreme amount of rework needed on each part. Hope I can get it to work.
22 January 2023, 10:29
A 3D-printed PZL Dromader???!!! Following for sure!! (The Grand Models cast-resin kit is perhaps above my skills - and I still wait for the Karaya injection one...). Your ag-aircraft & ground equipment dio will turn... monumental! 👍
13 February 2023, 19:12
Thank you all for watching. Alex, I also saw the Grand Models kit for the M18, but I was frightened from some build reviews, there is a lot of rework to do on that kits. I have now the same or a bit more work, but I got the 3D file for free from Thingiverse.
I am really not a Pro in sratch building but I will try to engrave some panel lines and add some more greeblies to the plane. The 3D file is very poor in details.
14 February 2023, 09:34
Fantastic Dromader! (I wish I had one... I have no access to 3d printing, alas...😭 )
21 February 2023, 18:06
Robert, you can have a look to the Grand Models resin kits. I am much more disappointed that there is no kit in 1:72 and no 3D file of a PZL 106 Kruk. I would spend some money on that because it would fit perfect to the Dromader and Cmelák.
21 February 2023, 18:10
Actually, that is something that makes me angry too - I would love to see (and buy) decent kits of "Wilga" and "Kruk" (not mentioning PZL M-15 "Belphegor" 😉 )... but apparently no Polish manufacturers are interested in preparing these.
21 February 2023, 18:52
Guys... let's look a bit at the bright side: who would have thought a few years ago that one day (today!) there would be kits of the Cmelak, the Dromader, the Grumman AgCat (in both 1:72 & 1:48!!!), the Piper Pawnee?! Some are short-run, some are cast-resin, some are 3D-files-to print - nevertheless, something is slowly moving towards that direction! So, yes, I do hope too there will be someday a Kruk available in 1:72 or a Belphegor! And your buys of such kits and your modelling work proves that there's some interest in such topics! Keep it up! 👍
21 February 2023, 19:06
You're right, Alex 🙂 "Always look on the bright side of life..." 😉
21 February 2023, 22:00
I am afraid there is a spelling error on the decals, Chris... I see "Dromedar" instead of "Dromader"... The plane looks awesome!
24 February 2023, 15:43
Robert, I can understand that it is confusing, but in the GDR, "Dromedar" was actually used. This is the German translation of the word. Feel free to search for pictures of it, here would be an example: [img1]
24 February 2023, 17:01
I have not known about that, sorry Chris... That's really interesting.
24 February 2023, 17:17
Everything top notch here! But what about the excavator? May a combined diorama?
29 June, 10:21
The excavator is still coming. I haven't dared to go any further yet. Let's see, maybe I'll get motivated again in the fall/winter. 😉
9 July, 13:19
It is not easy to find out with which lettering the excavator was delivered in the color used in the respective year of construction. I'll have to see which decals I print out.
7 October, 18:21
That's excellent, I operate a CAT M3050 Material Handler at work, very similar. Weathering on the grabs are spot on. 🥸👍
17 October, 16:35
lisäsi uuden valokuva-albumin.
69 kuvien
Beriev Be-6 flying boat/ By Playfix -Veb -Plasticart & Revell 1:72
No
Darkened the lines in the control surfaces....the Ailerons move.
I'm just waiting on some white Tamiya paint ....as the...


37 24 July, 16:32
Thanks for the likes 😁👍 it's interesting to see how a 33 year old kit builds up ??
1 August, 15:31
Great idea about the watch pins! ⌚ Definitely gonna try this out on my builds. Looking forward to the finished result.
1 September, 08:43
Hi Edouard👋😀👍.
Yes l just get cheap ones of eBay, the do different sizes, you can pull ends n spring out for barrel look, or file ends last to have a recoil cannon look.
The gun turret nearly there now....lots of sanding n filling low spot.
Thanks for looking in on build.👍👍
1 September, 13:24
I'm very curious to see the result. I built this model as a young boy too.
4 September, 20:22
Hi Zbynek 👋🙂👍.
Thanks for your interest. Nice to know you had it too, l built X3 the Tu airliner and the bomber. But this was my favourite as l liked the shape and that it had floats n guns.
Got part of tail on this evening.
Keep looking in for updates 😃👍👍
4 September, 20:57
Good to have you along Guy 👋😃.
Bit of fine sanding n tidying to do next then look at getting an engine effect in cowling area.
I replaced side vent for smaller one now, checked photos... and l made it way to big.
Catch you on the next steps.
7 September, 20:15
Hey Mr D whats the Gorilla Glue like? Is it a clear PVA or a resin Super Glue Type? Do you use it just for clear bits or as n all purpose? Thanks in advance E.
12 September, 21:46
Hi, it dries 100% clear but is slow.. to air dry ..so leave overnight.
But it's worth it as very strong. And is very neutral on paint and clear parts.
It's almost like an air drying epoxy, not harsh like super glue or poli ...very safe.
I only use it on clear stuff as it's stronger than PVA but not good for general building.. l do use it to fill gaps sometimes.
👍
13 September, 10:34
Don't think I'd trust those decals. The red stars are easy enough to replace or paint on, the bort numbers might be more of a challenge.
13 September, 12:47
Hi Edouard 👋..yes 🤣 lm on 12 model with it and never had anything come loose.
Mike👋.... No mention neither! I've purchased some more Soviet stars now, may have some numbers leftover from others project's.
Gorby, Thanks buddy 👍
13 September, 15:53
This is a quite interessting plane you're building! I like the shape of the wings. Pretty good build and pictures.
18 September, 04:57
@ Christian W.
Thanks buddy 🙂👍
Yes it a bit different, yes has nice gull-wings.
It's a trip down memory lane for me... I slapped one together back in 1991 as a kid.
Thanks for the interest.... I like seeing people's build processes n history....so doing the same.👍👍
18 September, 16:41
I'm anxiously waiting at the monitor for the paint job! Fingers crossed!
18 September, 19:04
Mr D ... 🙂 I like too to see, how much progress my skills during the last 10 years did. Good for me is, that I own most of my model kits since I was a kid. My first plane, car and truck are still in my shelf or boxes.
Because I stumbled somehow over your wip, I checked the history of the kit. It is rally unbelievble, that those engine openings are on the bottom of the motors. Amazing. I wouldn't notice that without your hint.
19 September, 04:25
Cannot wait to see the result. Your work reminds me of my first kit, it was a Victor bomber by Matchbox (They had a JV factory in Shanghai at that time). But hard find it in the market now.
21 September, 11:33
Hi Lorraine 👋.
Glad your interested 👍 there are X2 colour schemes for the be-6 the Soviet green or the Chinese blue, l liked the blue version but could only find suitable replacement decals for Soviet.
My first kit was the Matchbox Electric lightning,.... Built it with my dad....was nice as was 3 colour plastic out the box.
The first models l built on my own were the Veb/Playfix be-6, & Tu- bomber, so nice to revisit.
Got X2 models at min I'm preparing for paint.
Yours is coming along well...."carefully work" 👍👍
21 September, 15:00
Thanks Skyhiker 👍
I usually use Velejo or AK acrylic, but I'm going to use Tamiya on this one as it won't fit in cabinet.....and l find Tamiya acrylic is a tough paint better for wear n tear, as I'm sure it's going to need dusting now n then 🙄🤣.
The Tamiya paint turns out to be darker than advertised on the lid n chart, I've ordered a white n thinner to Tone down.
Like you I've had 2x build going on.
The Fw-190 really pop's once decals are on..... Remember the trim tabs are red....l just had paint.
😁👍
12 October, 21:34
lisäsi uuden valokuva-albumin.
61 kuvien
Finnish MiG-21bis 
1:72
The model is completed!


projekti: Finnish MiG-21bis "Non-realized edition"


 2+
2+ 36 3 September, 20:24
Like a Mig 21 👍👍
The extra work looks good.
What were the holes you had to fill ??
11 September, 21:40
Welcome, mates! @Mr D Those holes I opened and then filled are auxiliary air doors that seems to be open always when the plane is on the ground.
12 September, 20:10
Coming along nicely now , Nice decals set..👍👍
How do you find the KP plastic??
Keep up good work...nice subject 👌
13 September, 21:58
Thanks! 😄 I think the plastic is pretty nice. Not too soft and not too hard, but maybe closer to hard. The kit itself is challenging. Seemingly pretty detailet parts with rivets and all, but the fitting is bad. I have already lost some rivets due smoothing seams and filling gaps.
14 September, 07:03
Coming along nicely 👍👍
Like the blue-tak to place canopy.....l do same n remove once dry... works well.
Good luck on next steps 👌👍👍
6 October, 14:08
The stencil worked out well, l like your cutting tool....looks more accurate than a standard scalpel.
a fiddly job sorted now 👍
6 October, 20:06
I'm trying to get this ready before Saturday, but landing gears and probes are under construction. I caused a little disaster by accidentally drilling through the wing...
15 October, 20:58
Well done 👍👍
Created a great model for your collection, The extra custom work you done has paid off, the tail art is great 😃👍👍
17 October, 19:33
")
")
")
")
")
omistaa tämän kohteen
")
Northrop F-5A/F-5B/RF-5A Freedom Fighter RNoAF - post 1972
Vingtor Decals 1:72
72-157 2024 Uusi työkalu 17 October, 19:56
")
")
")
lisäsi uuden valokuva-albumin.
73 kuvien
Iron Maiden - Aces High
1:32
Eddie getting comfortable


projekti: Iron Maiden Aces High


25 12 August, 17:43
Hey Villiers/Christoph - hope you enjoy the build and thanks for watching the progress. Thinking about a custom paint job on the second spitfire with reference to the album power slave of which Aces High is from. Have some home print decal sheets that I have been meaning to use for years so might try testing them out. Revell have been kind enough to send a second Eddie Sprue so will have him seated in both planes when completed.
18 August, 19:11
Up the Irons! I gotta get started on my kit one of these days... Lookin' good so far!
29 September, 21:49
Cheers guys will soon be trying to figure out how to make custom decals using paper I bought yonks ago! Any tips and tricks would be appreciated 😉
4 October, 10:19
"Chubaca's human brothers" Eddie won't be happy about this comparison 😄
4 October, 11:11
I built this one a few years ago, no where near this standard tho! Excellent work on Eddie & the cockpit👌👌
Watchin!
11 October, 17:25
Thanks Munky, I wouldn't be so hard on yourself you did a bang up job on yours! Glad your enjoying the build and I hope the final outcome comes off like I hope!
11 October, 20:57
Hey Mr D
They have been easy to print and super quick to detach from the backing compared to official decals. Interesting to play with but a note to the wise, figure the decals you want and their placement as transparent decals will only be visible on light colours. See my body art for an example!
You then have the issue of how to get round this, which I have yet to decide the best method. Thinking maybe a top coat then a second run through the printer!
Both white and transparent paper are hard to adhere to bumps on the surface without creating bubbles, think this might be A: thickness B:my poor application (more likely 😅).
I need to find some junk kits to do some proper testing before I next use them on a project I think 🤔
17 October, 08:45
Thanks Edouard 👍👍
Good luck with it, sometimes double printing can off-set a little so make sure paper 100% straight.
😃👍
17 October, 09:04
Know that for a fact, worked as a printers assistant for a time and adding gold elements required a method of double printing, was a nightmare 🤣
17 October, 11:19
")
")
")
")
")


")
")
/fi/search.php?q=*&page=newsfeed&fkSECTION[]=Newsfeed
search-solr.php?lang=fi
35
35
/fi/search.php?q=*&page=newsfeed&fkSECTION[]=Newsfeed
35
todo