
Uutisvirta

")
")
lisäsi uuden valokuva-albumin.


10 20 August, 14:26
The engine is done. At the end it will be covered by the side cowl and will be visible by 15% 🙂
24 August, 12:44
Brilliant, a good start 👌.
Tamiya know there bike's 👍👍 l did the NRS-500 it had a see through fairing, So l did an oval area unpainted to see engine.
Like it 😁
24 August, 16:27
Finally finished the exhaust. For this kit it was a bit tricky, because of Tamiya provides a bit different way of assembling it (in my opinion is not very successful).
4 September, 07:46
The project is nearing completion, but I'm really tired of it. The sets from the '90s are cool, but they have their own peculiarities.
5 September, 16:12
Coming along nicely now good exhaust heat effect 👌
What paint system do you use.
Nice bike good project 👍👍
5 September, 17:59
Thank you, Mr. D! Painting exhausts is quite straightforward. I am using Mr. Hobby's GX clear paints. For this particular exhaust, I applied gun chrome as the base color, followed by a "rainbow" effect with successive layers of clear blue, clear purple, clear red, and clear brown.
5 September, 18:51
Great 👋😃👍 thanks for the tip's l will try this technique on jet exhaust's
Good luck with the rest of build, will keep n eye on it.👍👍
5 September, 19:08
")

")
")
")
")
")
")
")
")
")
")

")
haluaa tämän tuotteen
")
Kantai Collection
I Class Submarines I-401 / I-58 / I-168 Aoshima 1:700
315577 2014 Mallijoukko Multi-aihe (3)16 September, 15:53
")
")
")
omistaa tämän kohteen
")
Manned Research Submersible Shinkai 6500 w/Completion 30th Anniversary Wappen
Hasegawa 1:72
52292 (SP492) 2021 Uusi laatikko 16 September, 15:52
lisäsi uuden valokuva-albumin.
10 kuvien
1/72 Ace Sd.Kfz. 6/3 (Diana) Diorama 
1:72


projekti: Sd.Kfz. 6/3 ‘Diana‘ 1/72 Ace Models

6 16 September, 14:00
I agree! I specially like the attention to all the small details (the chain, the tools etc.). How was the ACE kit?
16 September, 15:52
")


")
")
")
lisäsi uuden valokuva-albumin.
20 kuvien
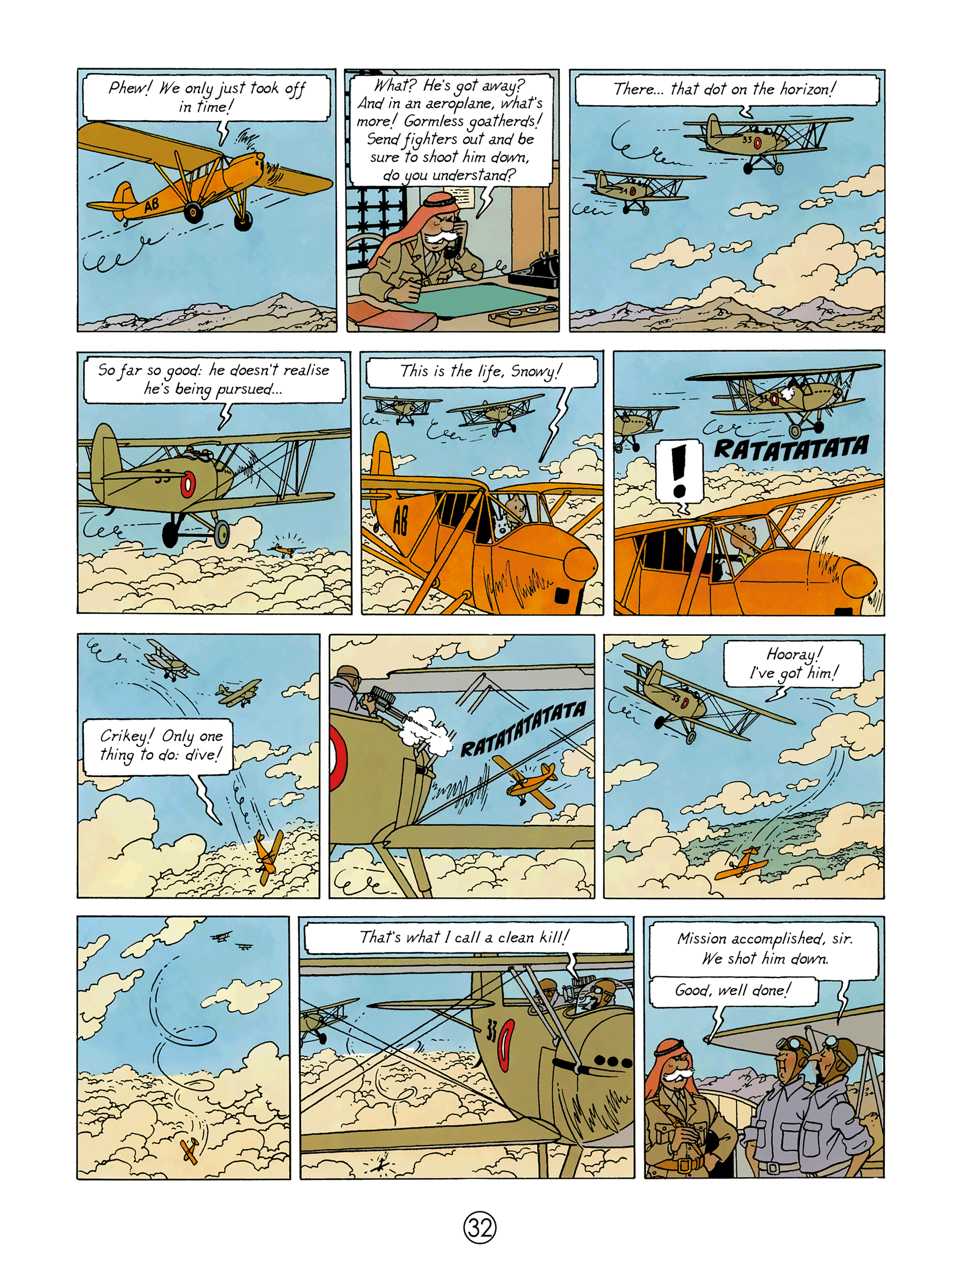
Cigars of the Pharaoh (Hawker Demon)
1:72


projekti: Cigars of the Pharaoh (Hawker Demon)


39 18 April, 05:15
This one is likely to be a quick little build. It's basically the companion piece to the Puss Moth, so I felt like I couldn't really build one without the other. Erik is right though, the kit is of an impressive vintage. It is indeed a few years older than I am, and has the flash to prove it. 🙂
Anyway, thanks for joining, there's plenty of seats available, so no shoving. 😉
18 April, 14:01
You say that now... but wait till you see how much putty and sanding is required~
6 May, 19:05
Well, it's supposed to be a Hawker Hart apparently... but the Hawker Demon is close enough... I mean, it's not like it's a Spitfire. 😉
6 May, 23:10
Good enough for me - I'm arguably one of the least rivet-counting persons in here... just asking/checking... 😉
6 May, 23:25
And only a masochist with ADHD would consider trying to convert it back to a Hart like the original 1957 tool... 🤪
7 May, 16:18
What did you call me? 😉
I mean, besides the dip between the two cockpits... are there any other differences? They look quite similar to me...
7 May, 17:57
Well, the "dip between the two cockpits" is the main difference I was referring to above... Plus, you'll have to skip the Demon's long exhausts, I guess...
7 May, 18:25
Not exactly sure what picture to take to update my progress… I'm working on bits of everything all at once!
10 May, 05:52
The main difference between a Demon and a Hart is the exhausts, the turret and the starboard machine gun. Will send a PM
16 May, 16:53
IF however (regardless of how a real Hart should be) what is shown in the comic ("That's what I call" etc frame) is indeed a starboard mg (please correct me if I'm wrong...) then starting with a Demon kit was perhaps indeed a better idea than starting with a Hart kit.... IF this is the case... then you'll only have to deal with the rear seat/turret thing and the free (ala Fury) exhausts, no?
16 May, 19:43
Yeah. I think so. Matthew provided some detailed comparison images but after looking at them and at the main page from the album... it seems to be a little bit of both...
16 May, 22:09
In Tintin in the Land of the Black Gold it could be a Hawker Hardy
i.imgur.com/57c2RcA.jpeg
23 May, 21:51
A couple of updates. The supports next to the fuselage were so weak that 3/4 of them snapped even before I got them off the sprue. So instead I just used some bent wire. The holes they are meant to slot into were gaping caverns as well, so a fair amount of putty was needed to make it at least slightly better. Now I'm left with a decision to make. The Hawker Demon has two large exhaust tubes that run from the engine down the sides. They're not present in the Tintin album (which most closely resembles a Hawker Heart I believe). So... do I leave the two side holes and the large trenches on either side of the engine cowling, or do I just shrug my shoulders and use the parts that came in the box?
The Blue Rider decals went on easily enough. They're a bit shiny, but I think I can deal with that.
11 September, 15:38
Thanks Matthew. I'm quite pleased with how the colouring came out too. A 2:1 ratio of Tamiya Buff (XF-57) and Khaki (XF-49) seems to have done the trick... or at least close enough for me.
11 September, 15:58
I just noticed the artwork has actual rigging on it, so it looks like I'm not quite as done as I thought. Besides that, only a few nice white fluffy clouds needed for the base.
13 September, 13:50
Looks great in these Danish markings and that colour. Btw what paint is it?
16 September, 15:27
Thanks guys!
Łukasz - the paint job comes courtesy of a 2:1 ratio of Tamiya Buff (XF-57) and Khaki (XF-49). I hadn't realized these were Danish markings though... that's very interesting. I'm going to do a bit of research about that.
16 September, 15:29
Looks quite Danish to me, though at least one Polish airplane sported these before the checkerboard has been approved (1918).
Thx for the paint info.
16 September, 15:50
")
omistaa tämän kohteen
")
Bristol Britannia C Mk1 Undercarriage set for Mach 2 kit
Air-Graphic Models 1:72
AIR.AC-218 2020 Uusi työkalu 16 September, 15:49
")
/fi/search.php?q=*&page=newsfeed&fkSECTION[]=Newsfeed
search-solr.php?lang=fi
35
35
/fi/search.php?q=*&page=newsfeed&fkSECTION[]=Newsfeed
35
todo