

SMS Emden 1914 light cruiser - build

This is how the deck looks like before the brutal measures start

I did not buy a wooden deck. I will build one from some leftovers of the Snowberry kit.

The battle has begone.

The aft hull with propeller shaft tunnels. Doesn't fit perfectly on first glance, but is fine after some dry fitting and clamping.

The same seen from the inside.

Dry fitting is most important. Looks fine.

This shows the changes for the Eduards PEs. The one in green still to be done.

My self made wooden deck dry-fit. The panel lines to be added.

This round wall needs to be removed. They stored spare blade(s?) for the propeller there.

I filled up the holes with PS sheet

This looks worse than it is

I love the Tamiya extra thin glue

I use Humbrol filler mixed with Aceton and applied with an old brush

Detail

I added the panellines with a pencil

This is how it looks

Parts to be removed Eduard forgot to mention

Gun barrels. I will try to build up the turrets on my own

internal gun for comparison - these will only get the forward barrel

Starting with the Eduard PEs

Starting with the Eduard PEs

Starting with the Eduard PEs

Starting with the Eduard PEs

Self made pillars for the later fixation to the board

screw fixation on the inside by CA and PS sheets

mounted

Propeller shafts exchanged by brass tube 1mm

Propeller shafts

installed

To avoid a look through I added these sheets

... and painted them black

Middle deck in medium grey

And Linoleum in a mixture of leather brown and dark earth

First PE parts on the hulk

After a failed attempt I started with Anthracite

Then gray for the upper part

That's the status by now

Removed the small guns ...

dito

touchup

painting the light grey on the hull

also some superstructures

First fit test ... lots to do

barrels for the lower guns

Getting somewhere ... the gap needs some putty

New middle deck


Kommentit
6 December 2014, 23:10
I've been tempted to build one of these for some time. I'll be watching your build with interest.
Dave
6 December 2014, 23:50
Good to see some more mates building ship models
Nice start Marc, I'm in with this. Do you plan to build her in her peactime or wartime scheme?
Cheers, Christian
7 December 2014, 11:02
Actually I plan due use the wartime paint scheme, as it is rarely seen. I am still not at all trusting Revell on the colours though. Any tips are greatly appreciated!
@Dave: Welcome. Sometimes you just have to start,
7 December 2014, 11:22
Hey, found this:
[img1]
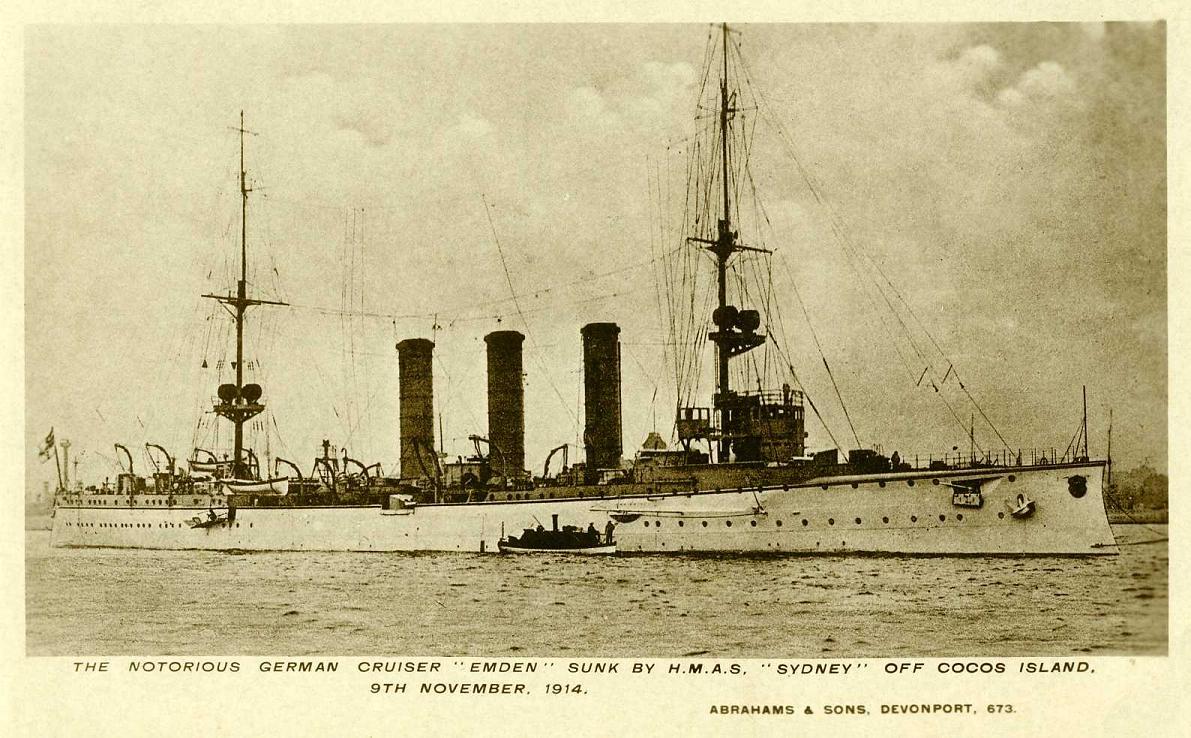
According to Groener:
Farb-Nr. 11: 98er weiß/gelb: Schiffe im Ausland
weiß, Schiffsrumpf bis Höhe Hauptdeck bzw. Hauptdeck Schanzkleid ferner Kanonen, Türme, Schutzschilde
gelb, Oberdeck, Aufbauten, Schornsteine, Ventilatoren, Masten usw.
[img1]

7 December 2014, 11:34
By the way, may you note there is a little bit different between the instruction Nr. 11 and the real photo. The instruction correspond to the color side view but not in all to the real photo. All upper works above the main hull strak seems to be yellow also the gun mounts. I would like to trust the real photo. Because of the yellow, that seems to be an ochre. You should contact Mathias Carl here on Scalemates. He is a good expert of German warships of all centuries.
7 December 2014, 11:39
Danke für die Bilder.
Revell sagt bei Ausbruch der Gefechte: Revell 43 Mittelgrau für die Aufbauten, Schornsteine und hinteres Schanzkleid, sowie Revell 57 Grau für den Überwasserrumpf.
7 December 2014, 11:54
I found this as a paint scheme for wartime (paint scheme 9)
[img1]
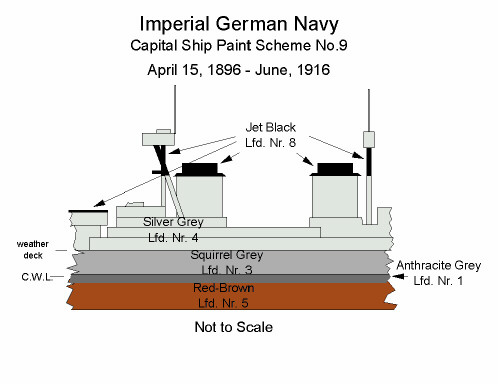
I am going to use it by adapting my colors.
7 December 2014, 18:33
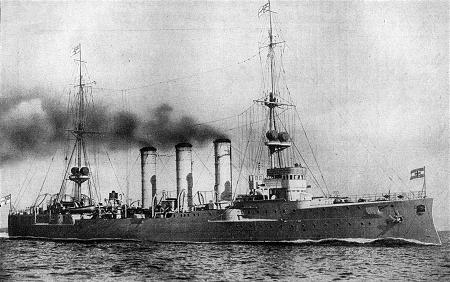
Ok I see you will paint her in a friendly grey🙂
It is not Emden, but what an impressive photo of SMS Dresden. Here you can see the painting according to Farb-Nr. 11:
[img1]
This could be something of your interest while building SMS Emden:
shipmodels.info/mws_..48a9b5a1d2e7e92f22d5
7 December 2014, 18:37
Thank. I had that one already for the gun, which will give me a great headache anyway.
7 December 2014, 19:37
Cool, Marc.😎
Vielleicht sollte ich auch mal wieder ein Schiff machen, lange ist's her...
7 December 2014, 20:06
I built this kit, but have not done the rigging yet. For me it was all about the colors. I did the Emden in Revell's recommended 1910 colors using ModelMaster enamels. I just didn't want two grey ships. It is nice to have kits that can be done a couple of different ways. I wish you well with your second time build and look forward to seeing how you pull all your details together.
7 December 2014, 21:08
The "A" color call out is for a 50% matt white with 40% matt yellow and 10% matt ocre brown. I mixed 50% Testors 1168 flat white with 40% Testors 1169 flat yellow and 10% ModelMaster 1701 Military Brown. My theory which does not fit the purist is that in times of war they used what they had. My Dad told me when they painted their trucks in Korea that they mixed their own camouflage paint and he always made sure to have extra black in his mix - cause that is they way they did it. Given the variations of color intensity (Testors & Model Master are notorious for making their colors too dark) I don't see how you can "get the color wrong." If someone can enlighten me I am an eager student.
8 December 2014, 14:23
Knowing the "german"-style (don't ask how 🙂 ) I assume that at the beginning of the war the arsenals had all the supplies needed. I tend to believe they followed still the book. But still due to scale one has to adapt the colors to get the same look and feel.
8 December 2014, 18:02
Nice progress Marc and a very nice self made wooden deck. Good idea and well done!
22 December 2014, 11:21
I started with the PE set today. That is insane work at it's best .. I love it! 🙂
22 December 2014, 21:45
Good start with the PE. Seems to be there are a lot of parts in the set!
Do you plan to close the edges along the deck houses bending curve?
23 December 2014, 08:09
Thx. Imost cases either a second part will sit on top or the superglue already did it. I will have to paint them to verify it. That's for me a new level of detail.
23 December 2014, 08:51
Good work and don't forget practice makes the master!
Looking forward to more progress, Cheers Christian
24 December 2014, 12:58
Wow, that looks convincing! That´s micro-modelling at its´s best! I will have a look at this beauty...
26 December 2014, 16:10
Just about at exactly the same point with this same model - First time ship builder and have splurged on the Eduard 1&2 etch sets. Steep learning curve and have realised quickly that no matter how long I've been at the bench - I definitely don't have all the answers: ergo I shall be following you closely with this one. ................ Cheers!
26 December 2014, 23:15
Thank you all for the support. It`s really appreciated. @Andi:you are welcome. Next update will be soon! 🙂
27 December 2014, 00:48
I started with the paint job. Had one failed attempt and finished now the 2nd, which is OK for me.
29 December 2014, 22:59
Very nice progress on details and paint work. Very well done Marc!
9 February 2015, 17:17
The wooden middle deck was too coarse in structure. I scribed a new one into 0.3mm PS with my cutting plotter ...
2 April 2015, 07:10
I was kind of frustrated about the artillery that was not covered by the Eduard set. Also the handling of the PE parts needed some improvement from my side. In the end I waited until I made my own PE parts. Ths is my first attempt for the 10.5cm (4"😢 gun with armor. Maybe I'll try a different design before I decide on the final design
11 January 2017, 23:00
Looks good... think I will need to do the same for my Flaklighter with regards to the 88mm's resin blocks....
12 January 2017, 10:04
Moin!
Na das sieht doch mal interessant aus, hier schau ich mal zu.🙂
12 January 2017, 13:16
Hi Marc, that looks much convincing to my eyes 👍 Did you solder the bond or glued?
12 January 2017, 19:47
Album info
The old Revell kit has been highly improved by the Eduard sets and I am really looking forward to build this kit a second time.


