

Dassault Rafale C Hobby Boss

doing some mess inside the plane with plastic card, putty and epoxi

I built this shape inside to simulate the intakes and block the view from outside to inside the plane

i still have to model the uper part to close completly the view, but you guys got the idea.... walls in the right intake have been thinned down

I'm looking to reproduce this "ramp" efect that exists in the real one, I like deep intakes in my models, note that the compressor blades of the engine are not visible, also I'm thinning down the walls to look more like this, the kit ones are quite thick!

Various bits and pieces primed with Mr. Surfacer 1000, thinned with tamiya lacquer, interior parts are primed in AK interactive black primer

Mr Surfacer give a very nice satin finish, but is extremely smelly, Ak interactive primer isn't very strong, it chips and scratch easily, I use for the interior only, I have faced some pealing off the final paint when I tryed to mask for postshading, T_T

Painted with tamiya X-1 gloss black

I want to make a good base for the white color

Also this one will have one shine NMF warhead, I´m not very happy with this "texture" in the paint, it shouldn´t be there... :-/

The intake dummy is complete ^_^

That's the effect I've been looking for! the "ramp" solved the see trough problem nicely.

I have to thin down the walls in this little intakes .

Done! for this scale, as much as you can thin down the things the better it looks, it will never be thin enough...

Various parts painted today, with Vallejo and Revell acrylics

Wash on the gear well, I realised too late that I painted the seat wrong, the french ejection seat does not have this green color, it was supposed to be black, but there will be a pilot over it so I will not change.

The kit have nice details in the cockpit, but to use the provided decals you have to sand them down, so I decided to cut minutes bits and place it in key points, than I handpainted the rest.

I love this little things, once closed in the plane, most of it is not going to be seen again T_T

I couldn't resist to dryfit alltogether to see how it is going to look like, I still have to finish this tomcat... T_T

I will have to be careful wen closin this plane, the gap behind the intake will require some "magic"

not much of the cockpit detail or the instrument panel will be visible, specialy because I will use one figure inside, as I have no seatbelts for this one. at least the canopy is very clear, very little distortion, I´m not sure if I have to tint it....

panel lines and rivets look a bit overdone for this scale, but I will not change it

doing this micrometric masking on such small wheels had burned my eyes today, but I had to do it anyway for the sake of the result....

I just love the efect that this technic result! ready for wash and small touch ups....

carefuly reproducing the rivets in the exhaust

all primed and ready to go, the center pilon was modified based on some reference pictures to hold the ASMPA

for the primer I am using Mr. Surfacer 1000 thinned with tamiya lacquer thinner, this provide to me the best results, very strong primer! I have modifyed the outher wing pylons (seems to be a popular modification among rafale modelers)

After some break I did some more work in the Rafale, simple pre shading with tamiya xf-17

Main collor is done witthe closest match that I could find in my stash: model air 71.050 from Vallejo

The tactical nuclear missile are ready, painted and decaled.

Decals for this plane are going to be from aftermarket, Syhart .

Decaling on the way! I'm going to be using aftermarket from company syhart ones since the kit ones are not accurate and is lacking many stencils, the point is the stencils are very low visibility being very close to airplane's color.

I have been trough many things in personal life that are slowing my progress, but I'll try to finish as good as l can.

The decaling continues, I did the scalp missile but I believe that I'm not going to use it, there are tons and tons of microscopic stencils in this Syhart set, and I'm willing to use them all!

Tamiya panelline wash on, all nice and dirty!

I have done some wiring and scratch build in the gear legs, here I have just aplyed wash

the efect of the landing lights are very nice, I like it a lot!

all in position, landing gears are done!

I brush painted it using Vallejo metalizers dark aluminium and dull aluminium

the instructions of this model tell me that I have to assemble the main gear struts BEFORE glue the wheel well in place, later I realized why, in the way it was designed you can´t put the struts for the outside... so I had to operate some modifications..

after the surgery, a lot of test fitting, I used superglue and now it is correct, aligned and ready to go, nice wen you see your baby on its own legs for the first time! ^_^ (behind is my new project, the dragon Hellcat, will be adding it here soon)

very happy with the way it is turning out!

Some more steps to go: semigloss varnish, some pigments, mask and paint the walkways, more decals to go on the air to air missiles, some more details to brush paint here and there, before call this one done, we are getting there!

here I sharped up one piece of sprue and putted under the nose to see if I can fix something that was bothering me a lot! the rounded shape of the noose

and that´s how it looks withoud the point, wich one is better?

that´s one sample of the real one, and that´s how it is supposed to look

first I putted the bit of sprue in the dreemel and start to turn it over a File

using a drill bit, I turned the piece of sprue onto it to create one hole

that´s it

here I cutted the bit off one pin to place it in that hole and have one strong point

with a lot of superglue around, after all was dried I start to spin it over some finer sand stick

here are my options: I can either use the metalic point one or the pure plastic

here the noose was cutted and the parts was glued together, than I used mr surfacer 1000 all around, I think that will fix the shape problem and make it looks pointier as a proper French noose ^_^

here I will use the masks on the decal package to create the anti slip patches over the paint, here we can see also the result of our plastic surgery in the noose! very happy with that! looks like the reference pictures now!

masks in place, they don´t aline 100% with panel lines but it is not very visible, it is just one touch lighter and very matt surface so I will not bother myself changing it

by using tamiya flat coat XF-86 I created the efect that is only visible catching the light, just like the real one!

Load out all done

here a better view from the pointier noose, canopy masks removed; I bought this set of sensor lenses efect that was designed for gundam 1/144 , gess what...

it just fitted perfectly using the pre-cutted smaller one! how cool is that? now I cutted off the point of the refueling probe, it was bothering me by the lack of definition, I'm waiting now the Mr. Postman to bring me the MasterModel replacement for it.

and that´s how it ends... as I was preparing to attend to one modelers meeting, I prepared the display carefully and left over the bed for me to take later, after deliver my son to school, I returned to my building to see my wife bringing the model....

She gave the case to my daughter 8 year olf to hold and than when going downstair, she droped the box, and my models fell in between the stairs, from more than 3 meters high... that´s the result... my heart is broken, I´m thinking in leave the hobby...

Fixing the disaster, landings are drying

Shaping the replacement for the noose cone

The repared nose after glue the replacement point I brushed Mr. Surfacer and carefully sanded it paying attention to not damage the edge

I masked all and it's ready for priming with diluted Mr.Surfacer

And after redoing the wash and glue the hanging stuff, it's back in one piece, not without some scars but I'm glad I didn't gave up, the most complicated was the nose and the landing gear, fortunately the canopy survived without a scratch, watta relief!

continuing with the series: Taken decent pictures of my models, now it´s time for the Rafalle, with was finished, broked and restored

As the fit of the canopy was good enough, I just added a bit of plasticard to the tabs to fill some gap and left that unglued (I used blue tac to hold in place during the panting stage) interestingly I can position it opened that the tabs hold, love it!

I also haven´t glued the canards so I can also position it as I want.

the sensor sticker shine in diferent colors as the angle change.

the sensor lens here looks orange, the plastic probe was replaced by Master Model metal one

landing gears and payload

detail of the landing gear in the front, I´m happy that I didn´t gave up on the pinty edge of the cone.

Another view of the underside, it is hard to detect but getting close is possible to see loads and loads of tinny low viz decals and stencils all over the place

front view of the baby, the glass landing lights showing good here

underside

tires showing the fake tread masked and painted, I'm very happy with the air intake solution for the see trough, it realy works!

front view, after the rebuild the alignment looks not too bad, the canards are movable, here one is straight and the other a bit twisted

refueling probe from master model is one exelent detail to add, canopy from Hobby bos is exelent,


By trying to frame the details in the cockpit area for you guys I located one missing fur from my cat on the pilot... :-/

another view from my cat´s fur, with the pilot behind!

Showing some dirty in places

if it was today, I would have tryied to make the navigation lights out of transparent plastic, resin or epoxi... they don't look nice painted, it's the weak point of the model in my opinion.

the exhaust original from the kit, looks ok, I haven't found any replacement aftermarket for it


And that´s the end, I hope you've enjoyed!
Kommentit
5 9 February 2016, 23:06
The Rafale C don't carry the ASMP-A missile. Only Rafale b off 1/91 Gascagne squadron and Rafale M carry it
14 April 2016, 14:21
Hey Villiere, that makes me sad, now I can't change since I already scratch built the pylon for that and it is glued and painted, I gess I will take it as one "wat iff" project, if the Rafale M can carry that so it is not so impossible for the C version to carry them as well... Thanks for the info by the way!
20 April 2016, 22:22
one other detail, the extrem up antena TELEMIR is only présent in Rafale M
22 April 2016, 20:38
I gess that´s the price you pay for modeling from hobby boss Villiere, this kit have many versions problems and inaccuracies, by comparing the decals from the kit and the syhart you can see it, you realy have to know deeply your subject and be willing of doing lots of modifications, I am not expert in Rafale but I am trying to correct what I can, you think that it is only sand off the thing in the top of the ruder and it will be correct?
22 April 2016, 22:00
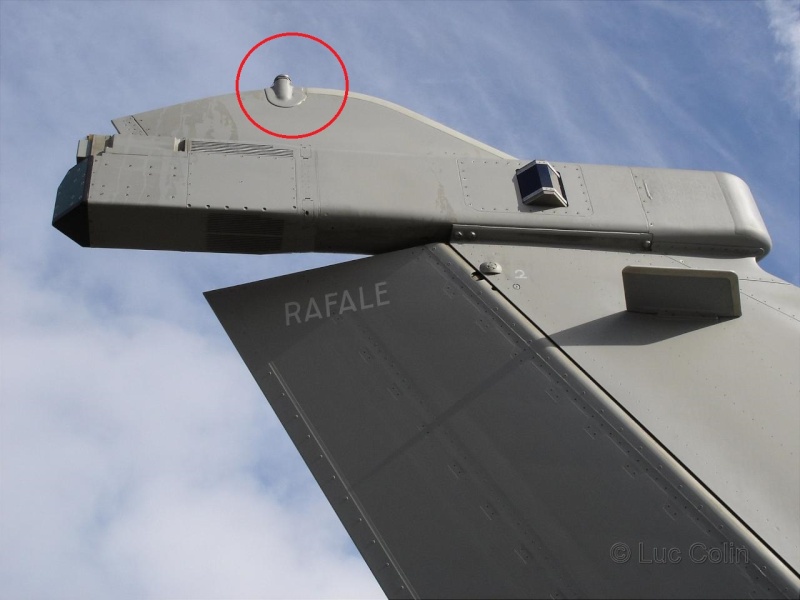
Thanks for the tip Villiere, I did this modification and reesprayed the area, I never liked the look of this detail anyway, it is very nice to have a clean tip on the tail, looks much better, I am finishing the decaling and I will post some update pictures.
26 April 2016, 21:37
So bad... I think you have to conserve these model on photograph for a while. I think fixing them can be possible without to much difficulties, but with motivation.
4 November 2016, 13:15
What a shame! However, as we all know accidents, and even modelling catastrophes, can and will happen. Don't be too disheartened and either try to fix it, which I also think is possible, or start on a new kit. Either way, good luck!
4 November 2016, 17:32
Thanks guys! I already started the repairs, some scars will remain but I'll put it back on one piece, landings are glued and I have done one replacement for the noose cone.
4 November 2016, 21:03
Never seen anything like that. Inspirational build , great work! The nuclear weapon is after market? Now i noticed that rafale has stealthy characteristics.
25 May 2017, 22:57
Album info
I will build this one with some scratch building in the intakes and one special payload.


