

Build shots - Cousteau's Calypso in 1/125

Drilling port holes near the bow

The moulded anchor was filed away and hole drilled

Adding bow observation chamber windows

Before (right) and after (left) of moulded anchor removal.

Moulded anchor removal

Observation chamber windows drilled out

Drilled windows in observation chamber

Drilling out windows and port holes in super structure parts

Drilling out windows and port holes

Improving capstan shape

Improving capstan shape

Removing molded anchor chain and drilling chain pipe

Using brass tube for straight and crisper prop shafts

Original helipad

Original helipad. Actual ship has trusses underneath

Cutting away styrene under helipad

New trusses under helipad made from Plastruct 4.8mm styrene truss

New trusses under helipad made from Plastruct 4.8mm styrene truss

Milliput and wood to support display stand plinth holes

Temporary stand for painting and construction

Main mast structure glued together. Stuck to OOB for this.

Hydraulic hoses made of 28 gauge beading wire

Hydraulic hoses made of 28 gauge beading wire on Yumbo crane and winches

Cable conduits on mast made of 28 gauge beading wire

Adding watertight door handles made from 0.3 mm copper wire bent in a master tools grab handle/ladder rung jig. They look a bit over scaled but better than bare doors, I hope.

Adding watertight door handles made from 0.3 mm copper wire bent in a master tools grab handle/ladder rung jig. They look a bit over scaled but better than bare doors, I hope.

Adding watertight door handles made from 0.3 mm copper wire bent in a master tools grab handle/ladder rung jig. They look a bit over scaled but better than bare doors, I hope.

Adding watertight door handles made from 0.3 mm copper wire bent in a master tools grab handle/ladder rung jig. They look a bit over scaled but better than bare doors, I hope.

Anchor windlass brake controls made from 0.3 mm copper wire. They should have a wheel top but these will be better than nothing I think.

Making a start on painting. Trying some preshading to make the white less uniform. It's humbrol enamel satin white. The question is how much preshade to leave showing.

Making a start on painting. Trying some preshading to make the white less uniform. It's humbrol enamel satin white. The question is how much preshade to leave showing.

Making a start on painting. Trying some preshading to make the white less uniform. It's humbrol enamel satin white. The question is how much preshade to leave showing.

I mixed 5 parts humbrol enamel 73 to 3 parts humbrol enamel 100 for the hull red. I was just going to use humbrol 73 only, but felt it was not red enough. I'll use the humbrol 73 for the stern and deck fixings.

Hull red on, trying to keep the right amount of preshading still visible.

Hull red on, trying to keep the right amount of preshading still visible.

Hull red on, trying to keep the right amount of preshading still visible.

Insides of bullwarks are grey.

Some dark grey for the winches.

The upper and main deck superstructure have a grey boot line along their base. Used humbrol enamel 1 for this. Should have just masked the grey then spray white rather than doing this way round.

Masked for black boot line spraying.


Masking tape removed. Overall it worked fine, but some touching needed due to some making tape becoming loose.

Preshading helipad.

Getting started on superstructure detail painting.

Keeping the mded life rings. Think I will try and print some decals to go on the life rings of 'CALYPSO TOULON' as in reference images. images.app.goo.gl/xK3dLbMRDfYJutdk6

Adding some brass tube to replicate details not molded in kit.

Removal of molded stanchion ropes /chains.

Masking brown painted decks ready for antifoul red spraying. Very time consuming.

Aft hatch cover. Not sure what the raised circle details represent.

Aft hatch cover scribed to replace raised lines. I believe this hatch cover is antifoul red in colour, but in ref photos is often seen with a green tarp over it.

Deck hatch painted but not weathered

Painting the decks.


Painting the decks. Attempt at deck planking effect after gloss Varnish coat.

Helicopter pad progress. Trusses brush painted with metal cotte

Top deck painted in antifoul red as per the scheme I am using. This maybe grey or bare wood at other periods of the ships life.

Added a navigation light to the funnel rear as seen in reference images. Made using plastic rod and sheet and will be painted with a lense.

First ever attempt at DIY inkjet printer decals. Mainly for vessel name and home port labels on life rings but also to add colour some other details like outboards and name plates. I have sealed them with humbrol enamel gloss Varnish which seems OK so far. Test will be how they go down on the model, how they react to decal fix and how they look.

Happy with first ever attempt at DIY decals. Inkjet clear decal sheet sealed with humbrol enamel gloss varnish from tinlet. Need to make some life ring brackets still somehow, probably with plasticard.

The life ring decals worked great. The decal for the brass letters on the wood name plate was not so good due to the clear backing. Will need to rethink how best to do the name plate.

Hull weathering and matt cote application done.

Hull weathering and matt cote application done.

Replacing the molded anchors with these resin ones will make a big improvement to any build of this kit.

Replacing the molded anchors with these resin ones will make a big improvement to any build of this kit.

Hull installed on the display base so that the decks and superstructure can be securely attached without damage.

Second deck on with Bridge house

Main deck now glued in place. Not the greatest fit, especially at the stern, but it's progress.

Second deck on with Bridge House. Funnel test fitted.

Second deck on with Bridge house

Trying to improve heli pad supports with styrene I-beam

Trying to improve heli pad supports with styrene I-beam and some original parts.

Trying to improve heli pad supports with styrene I-beam and some original parts.

Trying to improve heli pad supports with styrene I-beam and some modified kit parts.

Test fitting helipad on new helipad supports

New pulley mounts for yumbo crane wire and master link on boom.

Adding cables to winches and Yumbo crane. Made from 0.4mm tow cable (see project inventory).

Yumbo crane pulley wheels cut with razor saw to allow cable to sit inside them and new pulley mount in end of boom.


Adding cables to winches. Made from 0.4mm tow cable (see project inventory).

I'm going to try and hi the hughes 300 helicopter as best I can,as it is a quite a feature of the build and point of interest. So need to keep good ref images to hand.

Adding some ballast just in case I addweight to the tail boom through scratch building. Unlikely to tail sit though due to large floats, and I will probably glue it to the heli pad. Better safe than sorry though.

Making seats and harnesses.

Scratch building cockpit detail.

Adding fuel tank straps with thin styrene.

Added detail to fuel tanks and scratch built cockpit interior.

Replacing tail boom with brass tube for a crisper finish.

Old rotor blades next to the new ones. Definite improvement and not too tricky

After removing the old rotor blades the rotor head was carefully sawn with a razor saw to make grooves for scratch built thinner blades.

Replacement tail boom and rotor shaft support struts made of fine styrene rod and new brass tube rotor shaft

Replacement tail boom struts and rotor shaft support struts made of fine styrene rod and new brass tube rotor shaft, tail boom and rotor blades. Note the kits parts next to it for comparison.

Close up of Hughes 300 structure improvements.

Scratch built tail stabiliser, tail rotor and wire rotor guard. The kit tail boom assembly is quite poor in detail and chunky

Comparison of kit tail parts and scratch built tail section.

Hughes 300 build pretty much finished.

Reference for satellite antenna on bridge house. Motors would change the angle and direction of the antenna based on the ship and satellite position I think. Most photos of the calypso with this fitted have the main H-part of the anntena at an elevated angle from what I can tell.

Modified satellite antenna using plastruct rod and kit truss mast. I drilled a hole through the kit truss frame to try and make it look thinner and more realistic. The thin x-shaped antenna elements are far from uniform but it looks OK and better than basic kit part.

Hand wheels used.

Plastistruct companions

Anchor windlass with PE handwheels

Bridge roof companion and main mast installed.

PE ladder from white ensign (1/125 scale) on funnel

Modified PE hand wheel for Bridge spinning window inspired by Frank Spahr

Main mast installed. Not straight which I'm disappointed about.

Bollards, oar holders, benches and oars added to the two kit boats.


Not sure if I will add side windows at this stage


Sea flea subs have styrene strip added to edges and water jet nozzles added which are missing from the kit. Hatch handle is made from toothbrush bristle type plastic. Observation holes drilled out. Some panel lines were also added with a scriber.

Sea flea subs have styrene strip added to edges and water jet nozzles added which are missing from the kit. Hatch handle is made from toothbrush bristle type plastic. Observation holes drilled out. Some panel lines added also with a scriber

Grey primer first then a thin white satin coat to help following yellow paint look bright.

LA TROÏKA sledge cut back before scratch building.

Cutting away and sanding down poorly moulded tube details. They were replaced with half round and round styrene.

LA TROÏKA camera sledge improvements. Its an odd asymmetrical design to make it self righting.

LA TROÏKA camera sledge improvements. Poorly moulded tube details were replaced with half round and round styrene. Camera and light from 1/72 Shinkai model kit spares.

Grey primer is applied first then a thin white satin coat will help the yellow paint look bright.

Screen shot of saucer sub in Brittanic expedition

Screen shot of saucer sub in Brittanic expedition

Screen shot of saucer sub in Brittanic expedition

Adding some details to the SP-350. A bit of kit bashing and using wire and cut chain.

Adding some details to the SP-350. A bit of kit bashing and using wire and cut chain.

Grey primer is applied first then a thin white satin coat will help the yellow paint look bright.

Diving bell. Some styrene detail added and windows drilled out. Wires scuba tube and empty scuba tank rack made form styrene strip.

Grey primer is applied first then a thin white satin coat will help the yellow paint look bright.

Diving bell. Some styrene detail added and windows drilled out.

Side scan sonar being deployed from the bow main mast davit during Brittanic expedition.

Mini subs and diving bell installed

Mini subs and diving bell installed

Nearly finished. Display case still to build plus some paint touch ups

Album of finished model here Completed Revell Cousteau's Calypso in 1/125 | Album by Menaivalley (1:125)
Kommentit
42 15 October 2019, 20:31
Interesting subject, can't wait to see the progression of this build.
15 October 2019, 20:57
Permission granted Tom. This should be a fun build I hope. Lots of flash and cleaning to do on the parts. It's a great subject, I have real interest in research vessels.
16 October 2019, 06:51
At this link is the best version of this revell kit I have seen in terms of detail.
britmodeller.com/for..ch/&tab=comments
16 October 2019, 06:51
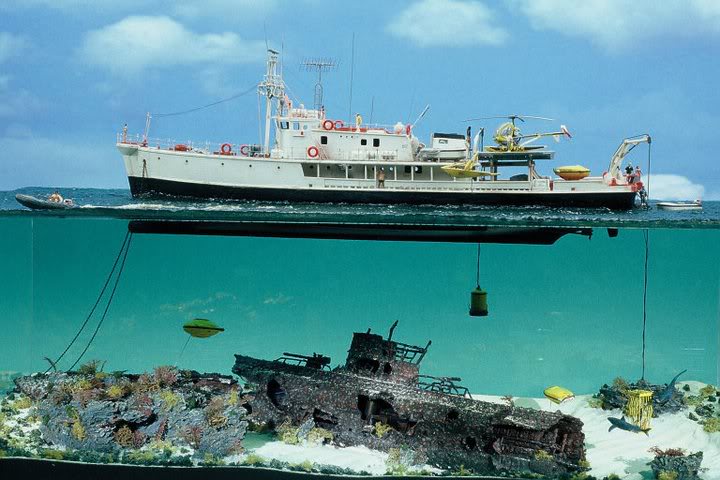
This is the best version I have seen on the Web regarding a diorama by Tatsuya Kaneko. [img1]
16 October 2019, 06:52
Charming model. 🙂 I would at the very least use bits of thin transparent plastic sheet for the cabin windows. Now that I think about it, I am not sure how to best glue on such thin windows, maybe superglue in tiny amounts at the edges if possible, or one big sheet behind the windows. I guess I could simply experiment with gluing on such thin windows, by using a piece of styrene strip and a piece of plast transparent plastic sheet.
16 October 2019, 06:56
I was going to try and the windows using humbrol clearfix which worked on smaller windows on the Le Suroit model. If the windows are too big, yes I'll use transparent plastic sheets from packaging glued with humbrol clear fix.
16 October 2019, 07:03
Watching... one of my favorite kits I built when I was a kid. I might build it again, want to see what you do with it, in terms of improvements.
10 February 2020, 19:26
Tried my first ever DIY decals on calypso tonight. Mixed results, but overall very pleased with how the life rings look after their name and home port decal application. Just need another coat of humbrol clear then weathering on main hull and decks
23 July 2020, 21:29
I'm at the same point with my trawler - the lifesavers. Keep it up, it's gonna be awesome reference for future builders (perhaps me too) 🙂
23 July 2020, 21:37
Wish I knew which anchors to buy for my trawler, yours look great 👍
2 November 2020, 15:58
Lukasz I got mine from starling models. The set in the project invetroy that I got for this build have a good range of sizes. They are for battle ships, so work out for smaller ships in larger scales like the Calypso and possibly your trawler.
2 November 2020, 21:54
Made some good progress on the Hughes helicopter tonight. Its taking a while to work on a small part of the kit, but worth the effort as it will be a focal point. And it's one of the best bits about the real Calypso.
30 November 2020, 23:16
I enjoyed all the helicopters and boats and submarines when I built this kit years ago. Lots of little kits.
1 December 2020, 00:36
Brings back memories. First built this as a child 40+ years ago; the (badly yellowed) decals with the original Calypso name are still in my stash. Built this again with my niece 10 years ago; had lots of fun with the boat and all the accessories it comes with. I think I have to get another copy...
1 December 2020, 17:29
Superb work going on here Tim - following with great interest as currently working on the re-box but making it as RV Calypso instead 👍
10 February 2021, 11:50
Lukasz. See the project stash/items for a reference book by siverine I bought off ebay. I also have Cousteau DVDs which help. This website is also very helpful passioncalypso.com/fr/. And Google images!
10 February 2021, 18:32
Childhood memories ! One pf my favourite books when I was at my grandad's, was Costeau' s book „The Whale" with a lot of pictures of the Calypso and her equipment. I used to spend hours looking at the photos ( age 6) of course I built this Kit later on and used it as a toy like we all did at some point I guess..... Great attention to detail, looking very good so far !
13 February 2021, 19:19
Applied my DIY decals last night. It was a bit of a disaster. I don't think I had enough coats of varnish on the decals as the ink was running and they were very fragile. Using decal fix or water did not seem to make much difference. I applied them anyway and will need to touch up with paint. Pretty frustrating.,but hopefully they will look OK from a distance.
26 February 2021, 09:40
Dear Tim
Modelling is also a challenge... everything is connected. This is a multidisciplinary hobby. The must important is that you having fun! 😄
Cheers mate
26 February 2021, 13:47
Man I used to love watching each episode of The Undersea World of Jacques Cousteau! I'm now loving watching you improve this classic kit! I can hear the narration in my mind while looking at your project.
2 March 2021, 23:23
Glued a number of pieces onto the main ship now after some painting sessions. Looking more complete but still lots to do on it. It's never ending! Nice to get the Hughes 300 helo and NASA anntena glued on, hopefully i'll stop breaking them now.
2 March 2021, 23:31
Great build! I love this model due to all the different things going on the ship. I built this when I was in High School and would do it again. Even rigged the divers cage with the shark swimming around it..
3 March 2021, 03:40
"And now we see Falco disappearing into the whale shark's gaping maw. It is magnificent."
3 May 2021, 17:52
The details are amazing, the chopper looks so real. I'm getting scared of starting mine now 😉
All these remote subs look like some Star Wars equipment 😉
PS. Looks like a typo sneaked into your screenshot captions 😄 They make me LOL all the time 😄
6 May 2021, 09:18
Oops that was a bad typo! I'm always writing them quickly on my phone. Thanks for the heads up and encouragement Łukasz.
6 May 2021, 17:54
Another useful set of reference images I forgot to use during my build. facebook.com/humbert..853043084&type=3
10 May 2021, 10:58
So glad to see updates on this! I loved this kit so much as a kid, and I'm enjoying watching you do it to such a high standard.
3 January 2022, 16:31
So enjoyed this build. She's a beauty! You put your heart into her and it shows!
3 January 2022, 22:45
Images of finished model here Completed Revell Cousteau's Calypso in 1/125 | Album by Menaivalley (1:125)
6 January 2022, 20:52
Album info
It took me ages to find this kit, so I want to do a good job. I have lots of reference material which should help.
All images have captions explaining the build methods


