

Saab A 32A Lansen

Cockpit with prepainted Maestro Models PE parts. I didn't try to match the prepainted green but chose to work with two different tones as this is also visible in reference photos.


I'm going to show the airbranes deployed. The Maestro Models PE set offers all needed parts. But you'll need a very steady hand and much patience!

I spent some time to rework the air intakes. The macro photo shows how crude it looks when you take a closer look 😄 But still better than what's in the box.

As I plan to build a NMF Lansen I think some additional rivet detail will look great later on!

I drilled holes into the airbrakes to make it easier to open them up.

On the right the result after the airbrakes have been opened. On the left I started to thin down the edges.

The airbrake inserts from the Maestro Models set were detailed with PE scrap parts and stretched (transparent) sprue.

The air intake trunks were simulated with aluminium foil that was put on the sticky side of a piece of electrical tape. On the non-sticky side some scrap PE was added. Like this the part can be bent in the desired shape.

Everything in place - the fuselage halves can now be glued together. Some nose weight can still be added later.

That's how it looks now. I think I'll ad some rivets now - just as I already did on the wings.

Rivets have been added but are only barely visible in the photo. The wings show a quite nice fit - no glue has been used yet.

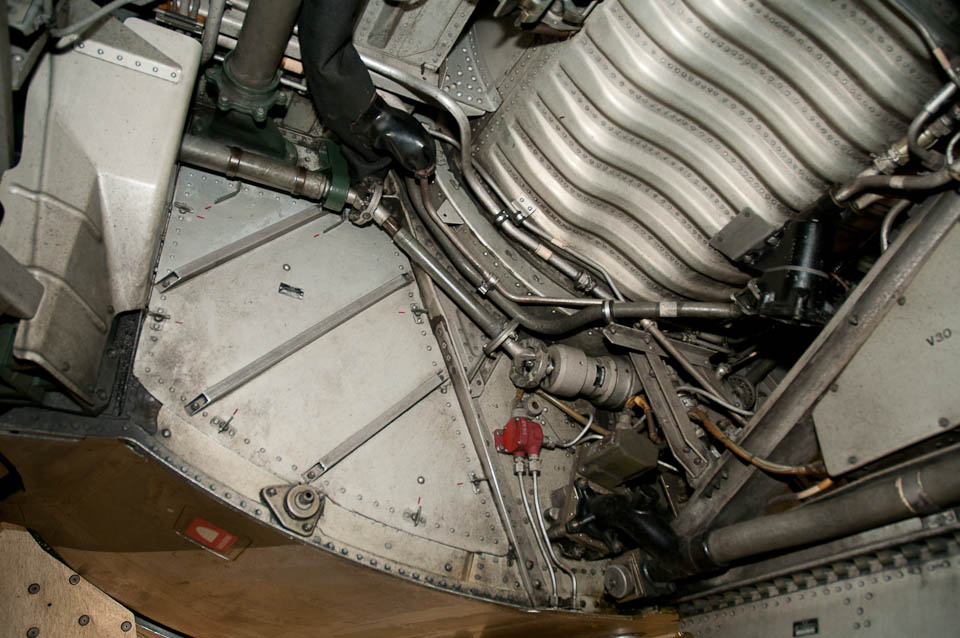
Heller moulded the landing gear bay as a plain and small closed compartment. On the real thing there is in fact a lot going on inside the landing gear bay and the internal fairing of the jet engine is visible quite prominently. Therefore I opened them up.

Some time ago I had bought some carving foam which I was eager to try to work with. I thought I could give it a go to model said internal engine fairing.

The carving foam was a joy to work with. I think next I'll apply some primer.

The primer could wait a bit longer. First I had to try my new contour gauge tool in order to measure the shape of the bulheads aft and ahead of the wheel well. This worked quite nicely. I smaller gauge would have sufficed, though...

The shape of the bulkhead was then pasted to some plastic sheet.

And this it what it looks like now. The wings haven't been glued to the fuselage yet, so I can paint the wheel well separately.

Change of plans again: In the end I finished detail work on the wheel wells after the wings had been glued to the fuselage. This is now done and looks much busier than out of the box. Of course, I took a lot of artistic licence when I did the wiring and plumbing...

The wheel wells were masked prior to spraying them with 1st grey primer/microfiller and 2nd aluminium paint. After a wash and some satin varnish...

...it now looks like this.


The navigation lights were made from some scrap clear sprue. A small hole was drilled and filled with paint to simulate the coloured light.

The cockpit is now finished. I'll attach the vac-formed canopy next. I chose to show my model with a closed canopy as I like it better that way to show off the Lansen's clean lines.

Alclad II Gloss Black Base was sprayed on and some imperfections were polished with a polish sponge and toothpaste.

I used Alclad II White Aluminium for the base NMF finish. Some panels will be sprayed with other Alclad shades later. And I did some touch ups at the wing-fusleage joint, which doesn't look too good in this photo.

Some panels were sprayed with different NMF shades.

The paintjob is now finished. The radome became just a bit "too orange" - I'll try to tone it done a bit during weathering. But first some gloss coat and the decals.

The Moose Republic decals worked finde. First it looked as if Mr Mark Softer made the decal film more visible as it looked like silvering after I had applied the decal softener. But after some drying time everything looked good again.

A very light weathering was added. The Lansen had just entered service when it was still in this NMF scheme.

I really like how the wing tip navigation lights turned out!


The nose colour was toned down using some dark and white pigments.
Two 1.5mm lenses from modellingtools.co.uk were added to the front gear doors. Heller provides clear parts, but one of them was missing.
Two 1.5mm lenses from modellingtools.co.uk were added to the front gear doors. Heller provides clear parts, but one of them was missing.

I had planned to add a small rearview mirror to the canopy. But the next time I thought of it I had already glued the canopy in place...
I didn't forget to add brake lines to the landing gear though!
I didn't forget to add brake lines to the landing gear though!

The angle of the wheels seems to be off - but this is characteristic for the Lansen. However, you can see in this photo that engraving long curved lines along the fuselage shows the limitations of man vs. machine...


For the base I started by drawing the structure of the tarmac on some Heki dur 3mm foam board. You cannot work this material with a scribing tool, but drawing a pencil along a ruler created nice recessed lines.

In one corner of the display base I wanted to let the tarmac end and create some adjoyning soil. I tried Sculptamold for the first time. It was really easy to use.

This is how everything looks after some airbrushing and drybrushing with pigments.

I collected some dirt in the garden, sieved it and used that for my "earth". Some pigments where then applied - a bit of browm and green on the ground corner and some "concrete" on the tarmac. The little sponge thing that I got from Søstrene Grene worked very well with the conrete pigments on the tarmac.

Of course I wanted to know how everything looked with the model in place 🙂
Next I'll paint the edges of the display base black and glue it to the picture frame which can be seen in one of the previous photos.
Next I'll paint the edges of the display base black and glue it to the picture frame which can be seen in one of the previous photos.


Here she sits in the display cabinet. But shelf space is already running low...
Kommentit
76 4 October 2020, 08:05
Thanks Juergen and Henrik! Here's some more progress. The air brakes were very fiddly to build.
11 October 2020, 16:00
You are certainly doing an incredibly fine work here! I know how fiddly those PE air brakes are and I am not sure how you managed to attach those microscopic triangles... I am definitely going to watch this!
11 October 2020, 17:55
Props for rescribing. I have to watch this, can't cure my love for Heller kits - must be the boxarts after all😉
11 October 2020, 18:18
That is some really cool upgrading work on a very basic kit of the good old days👍
11 October 2020, 18:53
Thanks a lot guys!
@Thomas Kolb: First I tried to use CA glue on those tiny triangles. But that didn't work out. I then tried Revell's "FIX-kit" UV glue which only cures once you point an UV light at it. Like this I was able to take my time and position the triangles correctly.
15 October 2020, 12:57
Good to know Revell is selling it too 👍 Looks very similar to Bondic I got last week.
15 October 2020, 12:59
Yes, Łukasz, it's basically teh same thing. I have also used Bondic in the past but now I have the Revell stuff as my local hobby shop sells it.
15 October 2020, 13:46
Thanks Marc! The tool is from RB productions. I started using a tool from Trumpeter (the same is available from Revell) but really can't recommend those as they broke down after just one model was finished. They're all out of plastic (except the riveting wheel itself). The RB productions tool is more expensive but much better to use!
I've made some progress and opened/detailed the air brakes. Soon I'll be able to close the fuselage 🙂 I hope to make some more progress as I'm on vacation now - and due to the recent new lockdown in Germany this vacation is confined to our premises.
1 November 2020, 10:19
Ich liebe es , wenn man aus alten Bausätze mit eigenen Ideen und gekauften Zubehör mehr herausholt, als eigentlich vorgesehen ist. Tolle Umbauten bis jetzt , da bleibe ich natürlich dabei 😉
6 November 2020, 18:50
An old Lansen kit from Heller by Bernd Korte... Good news and fantastic progress!!
6 November 2020, 19:09
Thanks Stefan, Matthew, Oliver and Cuajete! I have to admit that most often the things I correct/add to a kit I've seen before in builds of fellow modellers! Before I start a project I do a thorough search for built models of the kit in question.
7 November 2020, 10:08
Any tips for working with vacuum canopies? Never worked with vacuum canopies myself (but I have such stuff in my stash).
7 November 2020, 11:34
As requested by treehugger - I am looking forward for Bernds tips on working with vacuformed canopies too.
I use "blue tack/patafix/..." and fill the masked inside of the canopy complettely. This is giving it a pretty good stiffness when cutting it with an "extra sharp/new" surgery blade. With that filling I reduce bending and moving of the thin material whilst cutting and normaly this works quite good. I interessted how you guy doing this,....
7 November 2020, 16:52
And Bernd - I am in...nice progress on this old kit. watching...🙂
7 November 2020, 16:54
Thanks for your comments, guys, that's very motivating!
I thought I had seen an answer from Thomas Kolb re the vacuum canopy question the other day but that seems to have disappeared.
Thomas and Jürgen seem to have more experience than me with vacu-formed canopies. I'd recommend to use a new scalpel blade, too! And I testfit the canopy all the time while I slowly sand the edges into the right shape. The blue tack strategy sounds also very good. Especially when you're working on a very thing and wobbly canopy.
Today I completet riveting the fuselage and I testfitted the wings (without any glue). Looks quite nice. But I think before mating the wings with the fuselage I'll now take care of the very empty landing gear wells.
8 November 2020, 17:16
Oops, I think I accidentally deleted my reply... Here is what I usually do with vac-formed model parts (not just canopies BTW): I first score the outlines with a black micron pen, just to have an idea where the edges of the parts are. I use a razor saw (fine tooth side) to cut out the parts, leaving about 5 mm of plastic. I then use a Dremel at 5000 RPM with a grinder stone to carefully grind away the excess plastic. You need to be careful, this tool really eats away the plastic! When I have only like 0.5 mm left, I switch to a sanding stick, continuously dry-fitting the part to make sure that it will fit without gaps. Juergen's tip with filling the inside with blu-tak is really great, it will help avoiding creating stress cracks. I will absolutely start doing that. Personally, I wouldn't use blades with vac-formed parts; they are quite hard and slipping with a fresh blade is scary.
8 November 2020, 17:36
Bernd, your Lansen sure starts to look impressing! Will you do it in NMF for Blue Petter, like in the illustration?
8 November 2020, 17:40
Thanks, Thomas! I'm aiming for the NMF plane as seen in the profile. The Moose Republic sheet 72001 offers those markings.
8 November 2020, 17:45
Thanks Laurent and Daniel! Yes, the Heller kit is quite basic but a very good base in my opinion. But you can add countless extra hours of work depending on how much detail work you want to achieve. Today I decided to rework the landing gear bay, for example...
Here you can see what I'm aiming at with that piece of carving foam:
[img1]
14 November 2020, 20:46
Carving foam - die Lernkurve geht schon wieder steil nach oben !
15 November 2020, 09:54
@Oliver: Ja, das war in der Tat was komplett Neues für mich. Hat viel Spaß gemacht mit dem "Carving Foam" zu arbeiten!
@Laurent: Thanks!
21 November 2020, 15:24
Konturmesswerkzeug ! Google Übersetzer muss dem Schulenglisch heute Abend aber deutlich auf die Sprünge helfen !!! 🙂
21 November 2020, 18:27
Thanks bughunter! I always tell myself that the next kit will be some state of the art offering with minimal extra work... 😄
22 November 2020, 16:30
Nice progress with the gear bay! Judging by the amount of filler around the wing part, it looks like you have to struggle with this kit, but I am sure it will be worth it.
22 November 2020, 16:37
Yes, the fuselage - wing fit isn't the best. But I've seen worse. Perhaps the fit is compromised by my landing gear bay add-ons.
22 November 2020, 18:47
Some very busy and important looking details in that wheel well Bernd, looking very good !
23 November 2020, 13:07
Thanks Christian and Hanno! It seems there's always something else to improve: today I noticed that the navigation wing tip lights didn't exist in the kit, so I made my own from some scrap clear sprue.
12 December 2020, 21:38
Nice project, I nearly missed it. Really nice work so far.👍 Seems there are no easy way with the current kits to get a nice looking Lansen. 🙂
12 December 2020, 22:15
Thanks Daniel! Yes, the Tarangus kit seems to have its own challenges, so I decided to use what I already had - Heller's old kit.
I just completed the basic NMF paint job today 🙂
23 December 2020, 15:40
That big effort paid off Bernd.. That superdetailing work..
No one would believe you started this with the Heller kit...wow 👍
23 December 2020, 21:56
Thanks for all your comments! The paint job is now done. Next I'll spray some Future as a gloss base for the decals. We're approaching one of my favourite modelling steps!
28 December 2020, 11:17
Thanks Spanjaard and Dutch! Today I finished the decal work. The Moose Republic decals worked fine. Now onto some light weathering!
30 December 2020, 16:34
Thanks Cuajete and Christian!
The Lansen is now done 🙂 I'm pleased with the result - there's only a little flaw on the canopy that I couldn't fix anymore. Time to tidy up the work bench for the next project. And I'll do a display base for the Lansen, too. However, this time I'll use some other materials for the base than what I used for making my B-58's tarmac.
2 January 2021, 19:22
Superb result, especially the air brakes and wheel well interior deatailing. Excellent NMF finish !
2 January 2021, 19:31
Flugzeuge in leichtmetall und eisenfarben sind einfach Dein Ding - da setzt Du Maßstäbe !
2 January 2021, 23:50
Thanks for all your comments, they are always a great motivation! I don't know, but I like to work with these older kits from time to time. When I look at my albums here on scalemates the ratio of old/not that old kits is almost 50/50. The next project will be a much more recent issue though!
3 January 2021, 08:27
I started work on the display base as I was eager to try "Sculptamold" for the first time. I had only heard good things about it in some tutorial youtube videos and wanted to use it to create a small patch od soil in one corner of the display, where the tarmac ends. If you don't know him yet, you need to check out Luke Towan's youtube channel: Youtube Video

3 January 2021, 14:50
This is an absolute beauty - the panels and the metal surface is first class. Unbelievable that you built this from the Heller kit!
4 January 2021, 10:32
Very nice result, unbelievable what you made out of the old Heller kit. Will look great on that little base at the end.
4 January 2021, 11:45
Will that be snow in the corner? Pretty Scandinavian if you ask me...
4 January 2021, 19:52
Absolutely outstanding work, Bernd. The metal finish is perfect! Cheers.
5 January 2021, 10:08
Great result, I like it very much. All the best in the new year. 👍
5 January 2021, 10:44
@Thomas Kolb: I'm glad you like the outcome! Your Lansen build was part of my motivation!
You're right, it looks a bit like dirty snow in the picture. That could have been a plan, too! But I already covered that spot with some sifted dirt from our garden. I'll continue work on the weekend and post a new photo.
@Neuling, Daniel Mysak, Bernd Grün and Bernhard Pethe: Thanks a lot for your comments and a happy new year to all of you, too! I just recently started to add display bases to my models. The first being the base for my B-58. So there's still lots to learn!
6 January 2021, 18:33
And how it comes together! What a splendid result, your hard work pays off. First class show stopper!
9 January 2021, 21:27
Thanks to all of you for your comments and for following this project! Today the small type plate arrived in the post and I was able to complete the base - bringing it all to an end. Now off to the display cabinet!
16 January 2021, 11:14
Thanks again! I've added a photo of the display cabinet where the Lansen has now taken her place. As you can see shelf space is already running low... And no, I don't think I'll be able to just put away all the other stuff that's already in there - besides my models 😄
21 January 2021, 17:06
Bernd, seems that you are going to have to choose between your models and the family in the display cabinet 😄
21 January 2021, 18:49
Not real a question of choice in my opinion🙂
There is enough space on the wall
21 January 2021, 18:53
Yap, and those frames all come with an option for wallmounting 🙂
The kits do not....
21 January 2021, 19:24
Yeah, well. I'm more than happy that - apart from the models in the display cabinet - two nice aviation themed prints by Romain Hugault have already made their way on our living room's walls. I guess I don't want to push my luck too much...😄
14 February 2021, 09:44
Having missed this one in its entirety….may I be the last to say 'well done' ?!
16 January 2023, 20:59
Quite some effort put into this. I pull my hat for rescribing this lad. I am still anxious how I will fare with my Safir. Very good result.
17 January 2023, 17:22
Thanks a lot for your kind words! I was happy to see this older thread again resurfacing!
It was a fun project. From time to time I like working with these old kits.
18 January 2023, 13:41
Album info
Heller's venerable and accurate Lansen kit, rescribed and equipped with add-ons from Master, Maestro Models and Moose Republic Decals.


