Work in progress

The build starts with the cylinders of the engine. I found here a possible scratch improvement.
I removed the rocker pipes and tried to restore the fins.
I removed the rocker pipes and tried to restore the fins.

The Tamiya parts are painted and mounted.

On the lower side I re-added the rocker pipes made from aluminium micro tubing. I have drilled holes in the engine core before.

Here in upper view. On the cylinders a cabling is added from the Eduard set. That are not ignition wires, I think it are measuring of the temperatures of the cylinders/heads.

Then I closed the underside with an air baffle.

Now in front view. That is the reason why I used the alu pipes.

Some years ago I had the chance to take pictures of a real, airworthy engine. It was mounted on a test stand.
You can see that the airflow is pressed though the cylinder fins.
You can see that the airflow is pressed though the cylinder fins.

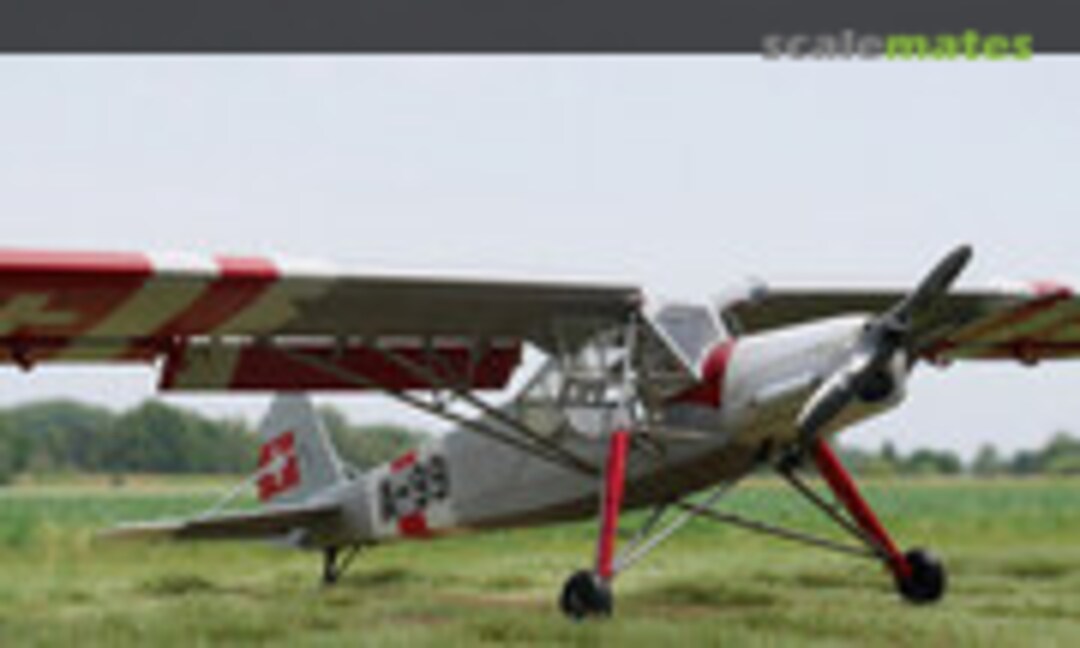
Here the Argus in a side view. The mounting is a bit different, as this is foreseen for a Bf 108 and not a Storch, but the engine itself is the same.

That helps a lot to understand all the parts provided by Tamiya and Eduard.
For example there is a PE part for ignition wires and air baffle between the cylinders on outside. That is one part to be folded.
For example there is a PE part for ignition wires and air baffle between the cylinders on outside. That is one part to be folded.

And now some pictures of the finished engine.

Even the eyelets for the crane are present. The tension straps on the tank are also wonderful.

Many parts are added from the Eduard PE set.


The engine carriers are only plugged to the firewall. All the other parts are glued in place.

As next thing I have made the three seats. The belts are on the prepainted PE fret (17 parts).

A lot of PE from the Eduard set, eg the backplate to close the holes (I don't need the MG) on the right seat. That fit is perfect, for other parts sometimes not.

I don't have a comparison picture, but the strut work on the middle seat is nice, compared to the Tamiya plastic.
I hope with the door open that will be visible later.
I hope with the door open that will be visible later.

Tamiya provided two different pedal part, but I used PE.

Eduard provides also both variants. The belts are now painted leather.

There are a lot of different cockpit colors possible! But after noticed a wooden floor on one reference picture I decided to do that here too for this early Storch.

Tamiya provides masks, but those are not pre-cut. I scanned the sheet and drawn my own set in Inkscape and let the cutter do its work. The main reason: I need also masks for inside, which are not on the Tamiya sheet. Once drawn its easy - copy and mirror the block.
Why the hell he needs masks for inside you ask?
Why the hell he needs masks for inside you ask?

There are PE frames for inside on the Eduard interior set, which needs to be glued into the clear parts. That is not easy, the fit is not perfect, so I had to use CA. No chance with white glue. The risk is high to ruin the clear parts. I applied the inside masks only after the frame because I fear CA running under the mask.
Some Tamiya parts are also added to the walls, but all modified for PE parts I will add later.
Some Tamiya parts are also added to the walls, but all modified for PE parts I will add later.

Here also a frame, frames and the first PE boxes are in place.

And why the effort? On the original Aircraft you can see a small inner framework in the windows. The Eduard PE frames shows that nicely. My painted fuselage below (the Gunze RLM02 grey looks very dark here).

The inner masks are removed, the outer ones are still in place as I painted only the inside RLM02 also on outside. The alu paint comes later.
I really hope that no metal of the frame will be visible from the outside! But if I mask off first, paint the grey and then mount the frames, I'm afraid the CA won't be able to hold the frame on the paint (without primer).
I really hope that no metal of the frame will be visible from the outside! But if I mask off first, paint the grey and then mount the frames, I'm afraid the CA won't be able to hold the frame on the paint (without primer).

The right side. On top of the grey boxes I will add pre-painted PE plates.

The oil cooler is available in two sizes in the kit. Eduard provided four wonderful PE parts, with smaller and bigger holes.
But even with the small PE in the front the real one looks different! So I turned a new front part, see left.
But even with the small PE in the front the real one looks different! So I turned a new front part, see left.

The finished oil cooler. The plastic front is cut and replaced with the turned part. The front should be painted in metal anyway.

The back side, with the bigger PE.

I made the wall so thin that I could insert the etched part from behind.
Now it looks like the real one 😉
Now it looks like the real one 😉

The exhausts of the kit are split, as the lower part needs to be mounted after adding the cowling. That make the paint job complicated.
On the arms of the tweezers are two bent and soldered etched parts (done on a shaped piece of wood), very nicely etched with the vents.
On the arms of the tweezers are two bent and soldered etched parts (done on a shaped piece of wood), very nicely etched with the vents.

I glued the lower kit parts already now cut them away again. They are now the mount helpers for the PE parts.

After painting (done mainly with Alclads) I glued the exhaust pipes to the engine. The grey ends will hold the PE parts.

Dry fitting. The PE ends are painted together with the inner pipe, but will be added to the model in a very late step.
The look is fantastic, with the vents and open outlet.
The look is fantastic, with the vents and open outlet.

The pre-painted instrument panel is a two-layer part. I filled the instruments with Kristal Klear as glass.
Sorry, the printed panel shows some Moiré pattern with the camera. In real it looks better.
Sorry, the printed panel shows some Moiré pattern with the camera. In real it looks better.

A folded PE part creates a map case below the instrument panel.

Nice part - the engine control.

The manual looks plausible, but if you fill the cutout (what I have done) and mount it, you will run later in conflict with the instrument panel!
This was just an example, you need to check all.
This was just an example, you need to check all.

A inner frame has to be glued with the Tamiya metal wing holder. On lower side a frame is added.

On the frame a plate with some electric boxes.

The upper end is covered with a nice thin PE. For that an upholstery needs to be removed from the kit part, later re-added as PE. I made the middle more thick with CA.

Some paint added. A pre-painted label added then.

The upholstery looks ok now.
The part is prepared for mounting.
The part is prepared for mounting.

The left shell with all little parts added.

The right shell, with more little parts.

The lower part is complete too.

And finally the firewall.

The fuselage is closed.

A side view, I will let the door open.

The top side will be closed later.

As I added oil paint to the cockpit the engine got a wash too.

Some other parts are added as dry fit to the fuselage - that will be a huge bird!

The wings are build (also with many small PE fittings). Then primed, painted white and followed by a thin layer MRP Insignia White, to break the white surface a bit. Masked and painted Alclad semi matt aluminium.
The slat is not fixed.
The slat is not fixed.

A lot of masking! I let the cutter do crosses to avoid using decals for the crosses. The stripes have to be masked anyway.
It is hard to match the positions of the not yet mounted parts.
It is hard to match the positions of the not yet mounted parts.

Unmasked and plugged together without glue. The positions matches nearly.

The wings slid onto the metal spar.
Wow, I like the look!
Wow, I like the look!

The tail plane are also prepared. The tips are white, below are little slats. The slats are also a bit white.

The rudder as provided by Tamiya. A little part at the end looks like a trim tab.
But in real it is not.
But in real it is not.

That are two ground adjustable trim rudder tabs, with a gap between.
So I removed the plastic and added the two tabs provided by Eduard. At the position according to this reference pic.
Later I realized, that the position was different on every Storch! So I moved them up according to my ref pic of the Swiss A-99 Storch.
So I removed the plastic and added the two tabs provided by Eduard. At the position according to this reference pic.
Later I realized, that the position was different on every Storch! So I moved them up according to my ref pic of the Swiss A-99 Storch.

A lot of masking and painting on the rudder, all masked again so no decals needed.

And all parts together as little teaser.

The legs and flaps are painted too, but not yet dry.

The position lamp are moulded in gray.
On the tail I cut the lamp away, drilled a 0.47 mm hole. A piece of stretched sprue was sanded and polished round at the end, then cut and glued into the hole.
On the tail I cut the lamp away, drilled a 0.47 mm hole. A piece of stretched sprue was sanded and polished round at the end, then cut and glued into the hole.

For the wings that is not so easy as the lamps are not round. Eduard had teardrop shaped holes on the edge of some of the larger PE frames, on my frame here in six sizes. I put them on the wing to find the right size. Then I presses heated clear sprue into a hole.
After cut you have a clear position lamp, see below on the globe of the Cent.
After cut you have a clear position lamp, see below on the globe of the Cent.

I cut the gray lamps away, glued the clear drop in place and painted them with Clear Red/Green.

With more bright light it looks nicer.

A part of a picture of the real one - that tail cross is unusual.

I decided to continue with the back part of the fuselage with multiple masking and painting sessions. Some PE bling-bling added to the tail.
This bird used the skid, so I used the optional wheel part to protect the PE parts on lower surface while handling and painting.
This bird used the skid, so I used the optional wheel part to protect the PE parts on lower surface while handling and painting.

The flaps, slats and ailerons are glued to the wing.
Plugged together for dry fit.
Plugged together for dry fit.

That is the result of masking and painting.

The registration is in different position within the stripes, but this is confirmed by pics. May be because it is shorter than the previous HB-ARU?

The stripes are also on lower side.
Here I don't use the Eduard PE with zig-zag-pattern, because the Tamiya stitching is nicer shaped. I guess if you search long enough you will find a Storch with this pattern (and the zig-zag inside) 😉
Here I don't use the Eduard PE with zig-zag-pattern, because the Tamiya stitching is nicer shaped. I guess if you search long enough you will find a Storch with this pattern (and the zig-zag inside) 😉

And finally the actual state.

For another project I ordered strong 1mm x 1mm magnets, but never used them. The upper cowling has some mounting stripe, like the original Storch. So I integrated some of the little magnets. Not so easy to mount them as they used to jump around to another one or tools on the bench, or even to my CA application needle 🙂

All of my normally used sheet metal is not magnetic, so I cut small strips from an old tin can. I made the side walls a bit thinner and glued the strips in place.

The magnets are strong enough to hold the side cowlings.

Here all is plugged together without glue, and it seems to fit nicely. I only had a conflict with the exhaust pipes, which are visible at the front of the side cowlings. I had to sand the recess on the inner side of the side cowls thinner.

The struts are cleaned, primed, PE added and painted.

The PE details look nice.

I found a lot of different fuel indicators and its colors in the references. I decided to paint them yellow because yellow was used for fuel related things and it is a speck of color on the model.
Tamiya should have molded them in clear plastic too! So I need to add a wash.
Tamiya should have molded them in clear plastic too! So I need to add a wash.

The struts fits greatly, but not yet fixed.

The mounting position of the fuel indicators.

The clear parts are framed (and other PE added) and masked inside and outside.

The grey green is applied inside, here the door inside.

... and outside.

The airscrew (no wood this time!) is also painted dark green and black. The bolt was dry brushed.

The kit offers a lot of options: ski, wheel and skid for the tail. The A-99 needs the skid, so this is painted steel and leather.

The tires are painted "Tire Black", the rims black (also on the other side with masks). The kit offers also other rims.

After the front window part is prepared with frame inside and compass I glued it in place. Then again some masking and painting fuselage with struts.

Even more masking for the stork beak.
Made again a mistake, should have masked before os paint white again.
Made again a mistake, should have masked before os paint white again.

All parts on the pic are finally in place.

The upper clear part (also with internal framing) holds the wings in place. Used different glue, on the back to the other clear parts with CA.
Must have made some little mistakes before as I have now some little gaps here and there, but left it as it is.
Must have made some little mistakes before as I have now some little gaps here and there, but left it as it is.

All the prepared parts speed up the mounting process.

The pitot tubing from the kit is added, connected with PE wiring. On the side of the struts you can see little tie-down rings.
I decided finally to replace the thick Tamiya trim tab control by PE.
I decided finally to replace the thick Tamiya trim tab control by PE.

On the other side the rings and trim control.

I mentioned recently the IKEA Kvizzle letter tray for storing running projects - the Storch still fits in one tray.

The wheel (painted in tire black and flat coat) ar in place. I decided to use the Eduard brake lines. Yes, they are flat, but so thin and filigree that the mounting clamps are more important.

After mounting the engine cowling I added the prepared oil cooler and the exhaust pipes.

The airscrew is finalized with PE and bolts from the back.

... and decals on the front.
Tamiya decals are a bit special.
Tamiya decals are a bit special.

The tail is complete. On this side I lost a little stencil decal during drying? I can't find it.
Luckily the red cross on top of the right 9 is still there.
Luckily the red cross on top of the right 9 is still there.

Also very little stencils on the black wheel disks.

Here the front with applied side cowlings. To have a good fit I had to made them thinner again inside, to avoid a conflict with the exhaust.
Need now a new paint inside.
Need now a new paint inside.

And with side cowling removed.
Also all the window masks are removed - ok so far.
Also all the window masks are removed - ok so far.

A view into the front screen. The last step was to mount the door. I used the kit mount as I somehow have not trusted the little PE parts.

From top you see also the fuel marking decals.

I have only done a very very light weathering as the original pictures showed a absolute clean Storch.

And as last picture of this build a view from below.
Kommentit
91 9 May 2023, 17:03
So the real work on this project was started and the engine is done.
This is time consuming as Tamiya has optional parts and both Eduard PE sets add more then 250 parts, also with different options. So it needs time to understand the parts with checking the references to use the right options.
I have no idea what will be visible later but I added all the nice parts to the engine.
9 May 2023, 17:37
the engine looks great - you could open the engine side cowling so it would be partially visible?
9 May 2023, 17:50
The engine is perfect, just start it. 👍 Apropos, when are you going to do a running test? 😉
9 May 2023, 17:52
Very interesting to watch! I guess the Swiss Air Force engine mechanics would be jealous 🙂
9 May 2023, 18:32
Thank you mates and a warm welcome to the show!
@Thomas, that sound not bad, let's see. I have also not yet done the exhausts.
@Ludvík I made the pictures of the real one, but there was a problem so I was not able to see and hear it running 🙁
@Melgg After an oil wash it will look better and the mechanics will be reassured 😉
9 May 2023, 18:56
I see it but I don't really believe it: a „modern" prop on you're workbench?!?! A first row seat please! 🙂
9 May 2023, 19:16
Already it's a Bughunter. The one cent piece, the intricate engine detail. Awesome 👍
9 May 2023, 19:24
Nice progress. But I am surprised to see the oil tank - or whatever it is - colored in copper. I haven't seen any pics with this part in this color. Can you enlighten me?
9 May 2023, 19:37
Thank you mates!
@Bernhard For the background please see my comments below the project, the discussion starts already once I had added the project 😉
@Gary Glad you are like it. My models seems to bear all the marks of Bughunter, I mean a personal style is detectable? (I don't know, if I used the right language terms).
9 May 2023, 19:46
Kripes! I am day late and there already are 10+ comments… 🙄. Oh wait… aha…it's a Bughunter build. 😂😂😉
10 May 2023, 11:53
Welcome Robert and Alec!
Alec, I was surprised too! The discussion starts already after I added the project, without any picture.
I am not sure if too much is expected here. With all the glass parts, the potential to run the project is high, because of course I had to fiddle there with CA. I'm not used to the handling of clear canopies etc, that doesn't exist with the biplanes. Let's see ...
10 May 2023, 16:57
I only discovered this now - following! Fascinating work 👍🏻 And as things use to be, this is most likely just a warm-up... 😉
10 May 2023, 19:06
I'm glad to see you here Slavo! Thanks!
I added new pictures of seats and crazy work on the window framing. I won't know if I've messed around with CA halfway cleanly until the masks come off after the fuselage painting.
The check of references costs lot of time, as there were my options. As I don't have internal pictures I made assumptions, as the A-99 was an early Storch used at first in a civil marking. So no MG related parts. Tamiya and Eduard provided a lot of options and parts, for example a second instrument panel on the right of the middle seat. But that one was only used if the middle seat is also equipped with controls (not often). So it helps to understand the functions of the parts and check for plausibility.
10 May 2023, 19:55
Servus Frank, wieder ein Eindecker ganz ohne Verspannung? Was ist los bei Dir?
Sieht aber wieder mal fantastisch aus.
Christoph
10 May 2023, 20:08
Danke Christoph, mir geht es sehr gut! Freut mich, daß Dir mein Gewerkel gefällt 😉
10 May 2023, 20:16
Oh nice!! Bughunter builds a Tamiya Storch! Will be a amazing model for sure 👍! Great work on the engine and cockpit already!
10 May 2023, 20:30
Thanks Erik!
Oh yeah, that is my FIRST Tamiya kit at all, I'm still a newbie somehow 😉 And yes, it is a great kit. The Eduard additions as well, but you will need good references to understand the parts sometimes.
10 May 2023, 20:38
Svělá práce! Dřevěná podlaha v kokpitu příjemně oživila nudný jednobarevný povrch interiéru. 👍
10 May 2023, 22:15
Excellent work BH!
I have the same kit and aftermarket PE sets in my stash and I am glad to see someone attempt to add metal framing on clear plastic. I am certainly going to learn a lot from this project.
11 May 2023, 02:16
Thank you very much mates!
@Ludvík I was able to translate your comment with deepl.com 🙂
@John The frames are a nice idea, but you have to take care which set you use. Tamiya has 3 different upper windows in the kit (plus flat and bubble round window. The Eduard sets have different frames. I think you have the same set as I use here, which do not allow a Storch with the round back window. So with my Tamiya kit the A-99 is the only option which helped me with the decision A-98 or A-99 😉
Adding the frames is a tricky thing. The fit is not perfect, in some corner a little bit and some obvious bad fit, like the strut on top of the door. For some other parts I have not understand the manual how to mount a part, until I found a reference picture.
I'm curious about the result myself, as it's also new territory for me in some things!
11 May 2023, 06:42
Totally different topic in the Bughunter - universe : Checkin ‚ in !
Very refreshing to see your usual perfection being directed onto this rather modern subject. The swiss livery adds to it, the „no swastika" approach would be mine as well,
as the usual old 70/71 paintscheme could'nt be more boring if tried.
Love the engine ! 👍
11 May 2023, 06:49
If there was a problem with my comment, I apologize. I don't speak English very well, so I use a translator. Coincidentally, I use the same one as you - DeepL 🙂
11 May 2023, 13:51
Thank you mates!
Hanno, you love the engine, and I love the kit 😉 It's great, but the huge amount of Eduard additions needs its time. Ans always a fit check, as I run multiple times in conflicts with later mount after adding parts. But I have a steady progress with nice little details.
11 May 2023, 16:59
Hiya Frank, this is a bit of a departure from your usual WW1 aircraft but not from your trademark immaculate model making.
15 May 2023, 13:41
Thank you Richie and Jakub!
@Richie, I would have loved to see your surprised face when you discovered this build log! 😉
@Jakub Now if only I had your skills with paint ...
I added today some pictures with small details needed later.
15 May 2023, 19:58
Your oil cooler is wonderful. And That engine is stunning as a whole. Great progress
15 May 2023, 20:01
Thank you mates!
@Christoph The parts are nicely etched with the special shaped slots. I forgot a pic but see upper right corner in the attached picture. The bending is tricky but it works around a toothpick which I sanded thinner and flat an two sides.
[img1]

16 May 2023, 06:42
I didn't think the Eduard Exterior PE-set to be a real benefit for my Tamiya Storch, but seeing your progress I might well reconsider. The exhausts alone seem to be worth it.
16 May 2023, 08:13
Oh, even more visitors, comments and likes! Thank you very much!
Michael, the same is valid for the interior kit. Some really nice parts, but the question is whether they will all be needed and visible later. That are more then 250 PE parts, if you count interior and exterior together. But as I own them I used many of them, but not all so far.
The exterior set includes slat brackets. I am also wondering whether I can/should/must use these? These are much closer to the original, but I wonder if the six small attachment points per side can hold the slat? The Tamiya ones are much too thick, has nothing to do with the original, but can hold the slat. Very thin ice.
The fuselage is closed now 🙂 I hope I can show some pictures later.
16 May 2023, 16:29
A new set of pics uploaded. There is still a lot of preparation work to be done: door, front window, roof window ...
16 May 2023, 18:55
Skvělá práce! 👍
I have the same experience with Eduard colour photo etchings. They don't look the best on a magnified photo or under a magnifying glass, but in reality (without magnification with a loupe or camera lens) they look good.
16 May 2023, 21:34
Now the wings and tail parts are prepared and painted. A lot of white crosses on red background for our friends in Switzerland!
A lot of work with all the masking, but I really like the alu/white/red look 👍
25 May 2023, 18:12
woow the colors really add life (on a macro-scale, we know about the micro- and nano-scale "life" in this particular build 😉 ) to the model. Looks actually better in scale than as original 👍 😄
30 May 2023, 07:59
Thank you Slave and welcome to the show!
The decision for this marking was "facts driven" 😉 The other Swiss one A-98 is also nice in white/red/green/light blue. As the Eduard PE was already sold out I was looking for an interior set everywhere and was not aware of the differences. I was happy to find one, which was the C-3 variant. That is a set without the round window at the back, so this A-99 was the only possible marking. But I really like this marking as it looks non-military.
30 May 2023, 12:21
Today a little scratch work that Slavo called "nano-scale", what I never have done before. But some build report mentioned the drop shaped holes on Eduard PE frets so I tried this myself.
I do not like the gray position lights so I replaced them with new ones made from clear sprue. The clear sprues from an Eduard kit worked better then the much harder Tamiya clear sprue.
30 May 2023, 15:16
Brilliant work! Finest Storch I have ever seen. Except the Swiss Cross on the rudder maybe? The Swiss Cross is defined by 7/6/7 = 20. Means each Balken is 20 long with a width of 6 leaving 7 parts on each side. Numbers are relative of course.
Hope I don't spoil something and your measure is correct.
30 May 2023, 20:10
Wow Thomas - that is a valuable information 👍 I was not aware of this and used the decals as base for my masks. I checked the wing crosses, they seems to match your rule.
On the other hand - the tail cross on this specific Storch cross looks different? Please see pic 67. The decals are based on this picture (may be more slim) which I used as base ( +- measurement errors). I think I let it as it is now.
And I'm glad that you like my work!
30 May 2023, 20:38
Indeed! looks like we can trust Tamiya!
Maybe these crosses were painted when in civil use? The wing crosses were definitely painted when drawn into the Flugwaffe and are therefore painted to specification.
30 May 2023, 21:09
Yes, good catch 👍 I checked it now. The tail looks unchanged to the previous civil painting as HB-ARU. At that time the wing looks different. So the wings was later repainted in the neutrality scheme.
I looked also for the A-98, beside the green/light blue wing the stripes are identical. But here the complete rudder was repainted in red and the cross matches your rule.
30 May 2023, 21:21
Ah, the HB-ARU painting explains also the small red area on the fuselage. The entire cowl was red, with a curved transition to the fuselage. Later, the hood was painted white with a vertical demarcation, only the transition area remained red.
30 May 2023, 21:37
It looks like I fear to work on the windows so I continued on the back part of the fuselage with a lot of masking and painting.
1 June 2023, 11:44
I was surprised at your choice of project but I certainly approve. Looking excellent so far and I hope it'll fit into your display case.
1 June 2023, 15:46
Thank you very much mates!
@Jan You are right, I like it too 🙂 Have already enough birds with the green PC10 in my cabinet.
@gorby For the reason of this project see the comments below the project.
From the drawings, I thought it should fit in the display case (I also had the idea of folding a wing, but the Tamiya kit does not allow that. The model would also tip over). After your comment I just tried it - tight, but fits. I can even tilt the Storch a bit.
1 June 2023, 16:10
As always, you're doing a great job. The silver surface of the machine combined with the white and red marking is attractive. 👍
Reminds me distantly of the livery of some of the post-war Czechoslovakian Security Air Force aircraft (e.g. my recently completed FA-223 Drache).
1 June 2023, 20:55
Thank you very much mates!
I was out of the town for a short trip, so no progress. But now I'm back home so I hope to be able to continue soon.
7 June 2023, 18:41
Thanks Erik, but a flawless model only exists in our imagination! Once the box is opened, it is already over. First scratches in the plastic, separated sprue gates. And then only the construction and painting with all the little bloopers.
No, a perfect model does not exist and the respective builder knows that best.
Example in this case? I used too much "Insignia White" on top off the white for the white bands on the fuselage.
9 June 2023, 13:11
On the one hand I really liked Thomas idea to leave the side cowlings open (see second post on top), but on the other hand the Storch shows more beautiful lines with the added cowlings.
So what about optional open ones?
I had strong round magnets with 1mm diameter and 1mm length and always wanted to try a magnetic holder for lids. Now was the time to do it!
12 June 2023, 18:25
Brilliant idea with the magnets 👍. Would have been a pity to hide this beautiful engine
12 June 2023, 19:49
Very cool idea with the magnets. Looks good and we can still get to see that beautiful engine.
12 June 2023, 20:06
The magnetic engine cover locks are an excellent solution and I like them very much. Importantly, thanks to the small size and high holding power of the neodymium magnets, this solution does not interfere with the appearance of the model.
12 June 2023, 20:53
Thx mates!
I have seen magnets in build reports about changeable weapon loads on jets, but not on covers, so I thought it would be a good idea to show this in detail.
13 June 2023, 08:19
Looks great.
Simple question: is there a kit for money? Lol I will build € 0.05 a lot 😆 😂
13 June 2023, 17:27
Thank you very much!
@Ard Do you mean the 1 Cent coin? That's just a size reference, which comes from my biplane builds and scratch work, to give readers an idea of how small the parts really are.
According to Gary Kitchen (see above) it is already my "trademark" 😉
13 June 2023, 18:20
To increase the fun it is recommended to use from time to time a big coin:
magic-factory.de/riesenmuenze-1-cent-euro
13 June 2023, 18:31
Not more fun but more confusion. All you previous build even less clear and more confusing by this info. Very disappointing this info is to me.
14 June 2023, 15:53
No worry tyu, it was a joke to answer the joke of Ard. You see also the raster of lines in background 😉
May be I have later some new pics ...
14 June 2023, 16:01
Spend some time for preparation (a lot of nasty little pin marks) and painting of small parts.
14 June 2023, 19:25
Some progress with some small mistakes on the last mile - the perfect model exists only in our imagination.
20 June 2023, 19:11
Thank you Kyle and Villiers!
The fit of such kit is nice, but every little error sums up for a gap at the end.
21 June 2023, 06:04
Nice progress! Stumbled over the picture of the dark green painted propeller … i am in Croatia on Holidays but believe it was, at least on the front, in a brighter shade
21 June 2023, 10:57
Thanks Thomas, but you notice everything!
There is a pic of the HB-ARU with the black green propeller, and you are right, a later pic of the A-99 shows a brighter one, but of a completely different type, with a different hub. As Tamiya offers only the first mentioned type (and say to paint it black green for all variants) I will stick with that and assume, that it was replaced later 😉
21 June 2023, 11:23
... and another reason I forgot to mention: the decals are already applied to the propeller.
21 June 2023, 11:43
As I never build a Tamiya kit I never used their decals. I only used the little stencils but the adhesion was not very strong so I lost one stencil during drying.
Some small tasks may remain (I forgot to add a pair of PE handles. The inside of the side cowlings needs to painted again.) but this Fieseler Stoch is finished.
Thanks for all the likes and comments during the build! I hope you were well entertained outside of my usual theme.
Once weather and time constraints will allow I will do some final outdoor shots and add a final album.
21 June 2023, 19:03
A wonderful build and one that was a pleasure to follow along with. Great work, as ever. I will be awaiting the outdoor shots as those are always stellar!!
21 June 2023, 20:33
Beautifull work, and those tie-down-rings are such a tiny detail, giving your build the extra kick.
21 June 2023, 20:50
Great construction of this machine. Silver with red and white accessories suits Storch very well. 👍 It was a pleasure to watch this build.
21 June 2023, 21:44
Top work! Extremely clean but realistic finish! A masterpiece. 🙂 pic 108: what is your solution for attaching the break line to the strut? Looks very good.
22 June 2023, 12:30
Thank you very much for your kind words mates!
@Bernhard I was really afraid of the clear parts as my usual build don't have those. The result is nice, but not perfect 😉
For the brake line please see pic 97. I decided to use the very filigree Eduard part even it is flat. It has may be the same with then thickness. I mounted it with tiniest drops of CA below the "clamps".
22 June 2023, 13:20
@Christoph The damn little but beautiful tie-down rings are another good example for the reasons to add the Eduard PE sets to a Storch build! I have not used all parts, but many.
But there are some traps: in some cases you fully understand the manual and see it on ref pics, but you cannot mount the part then due to conflict with other parts while adding the assembly to the model! As always: dry fitting, dry fitting and after that dry fitting!
22 June 2023, 13:48
If I build a stork, it'll be my reference. That's all: on your photos you can see exactly how the ailerons were articulated and how the pitot tube lines runs. 🙂
22 June 2023, 15:26
Thx mates! Feel free, even it was a Limited Edition 2012 it is still available - with 25% discount at the moment for less then 34€! See first link below the kit 😉
The kit is fantastic 👍 I really liked the integration of clear parts with the grey fuselage and how the wings are constructed around the metal holm. The upper clear part holds the wings together.
BTW: if you want it to look even more like a stork: Tamiya offers also an in-flight undercarriage kit, with longer and differently bend steel wire, new struts etc. because the Stork has a very long suspension travel.
22 June 2023, 15:34
The final pictures are done and uploaded as new album.
Don't miss it! Fieseler Fi 156 Storch - A-99 of Switzerland | Album by bughunter (1:48)
22 June 2023, 18:33