
Fil d'information
veut cet article
")
German
88mm Gun Flak 36 w/SSys Wagon Border Model 1:35
BT-044 2024 Nouvelles pièces Multi sujets (1!!)13 September, 06:55
")
")
")
")
")
")
")
")
")
")
")
a ajouté un nouvel album photo.
101 images
Eaglemoss BTTF De Lorean
1:8
More fine wiring on the RHS of the engine bay "shelf". - later used a dab of hot glue to tuck those wires in properley


Projet: BTTF De Lorean

14 2 August, 02:50
the window are manually lifted, sorry - you lift up the gull-wing door, and that reveals the bottom cog which you can wind with your finger
9 September, 09:23
")
a ajouté un nouvel album photo.


16 12 September, 15:38
Oh yes indeed. Lovely mottling spray job and great scratches and wear around the frame.
12 September, 17:38
Very nice build and paint work Richard. Love the mottling. Top job Sir.
13 September, 06:47


")
a ajouté un nouvel album photo.


32 18 April, 05:15
This one is likely to be a quick little build. It's basically the companion piece to the Puss Moth, so I felt like I couldn't really build one without the other. Erik is right though, the kit is of an impressive vintage. It is indeed a few years older than I am, and has the flash to prove it. 🙂
Anyway, thanks for joining, there's plenty of seats available, so no shoving. 😉
18 April, 14:01
You say that now... but wait till you see how much putty and sanding is required~
6 May, 19:05
Well, it's supposed to be a Hawker Hart apparently... but the Hawker Demon is close enough... I mean, it's not like it's a Spitfire. 😉
6 May, 23:10
Good enough for me - I'm arguably one of the least rivet-counting persons in here... just asking/checking... 😉
6 May, 23:25
And only a masochist with ADHD would consider trying to convert it back to a Hart like the original 1957 tool... 🤪
7 May, 16:18
What did you call me? 😉
I mean, besides the dip between the two cockpits... are there any other differences? They look quite similar to me...
7 May, 17:57
Well, the "dip between the two cockpits" is the main difference I was referring to above... Plus, you'll have to skip the Demon's long exhausts, I guess...
7 May, 18:25
Not exactly sure what picture to take to update my progress… I'm working on bits of everything all at once!
10 May, 05:52
The main difference between a Demon and a Hart is the exhausts, the turret and the starboard machine gun. Will send a PM
16 May, 16:53
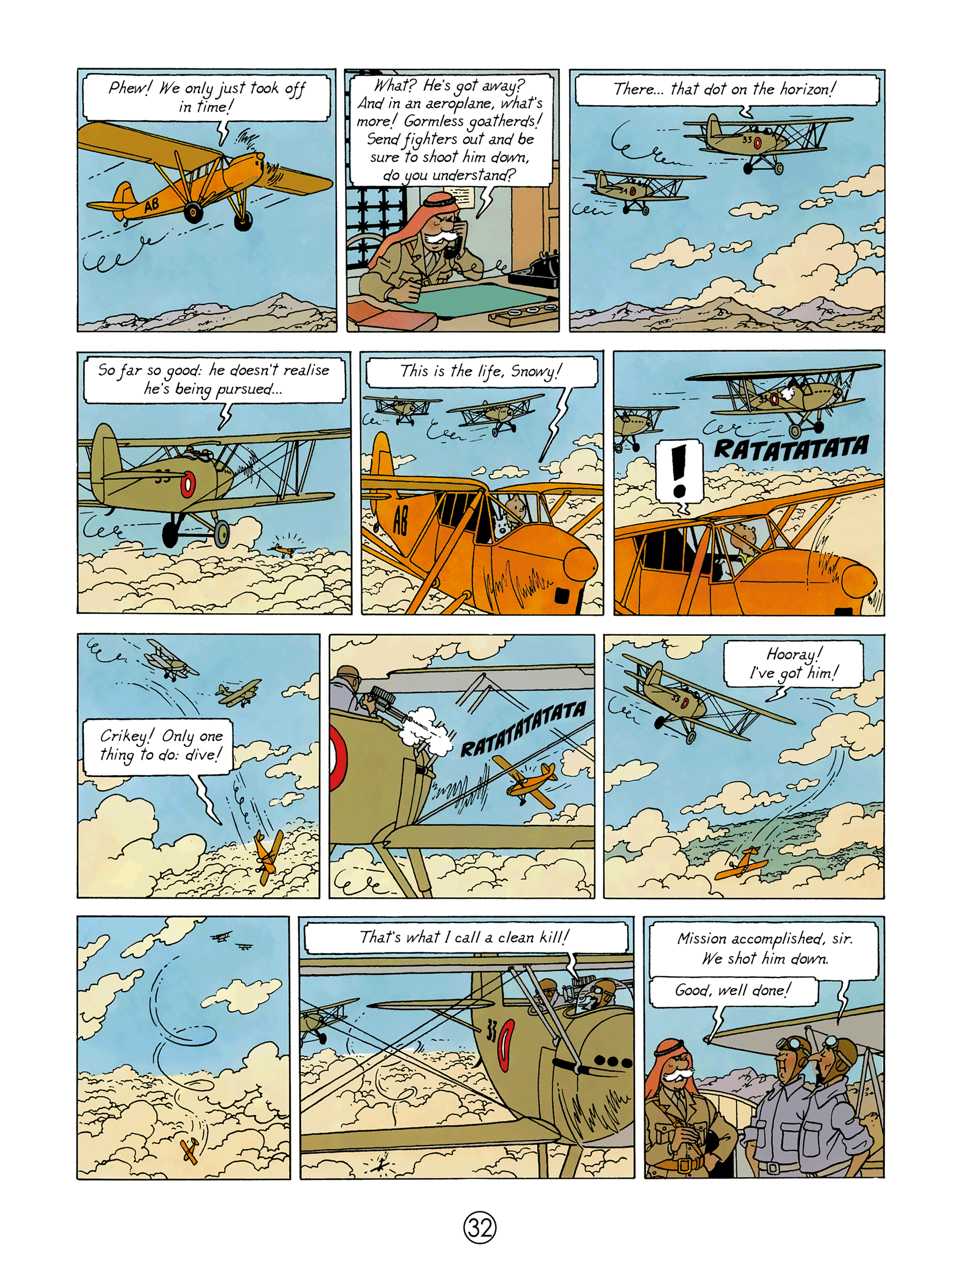
IF however (regardless of how a real Hart should be) what is shown in the comic ("That's what I call" etc frame) is indeed a starboard mg (please correct me if I'm wrong...) then starting with a Demon kit was perhaps indeed a better idea than starting with a Hart kit.... IF this is the case... then you'll only have to deal with the rear seat/turret thing and the free (ala Fury) exhausts, no?
16 May, 19:43
Yeah. I think so. Matthew provided some detailed comparison images but after looking at them and at the main page from the album... it seems to be a little bit of both...
16 May, 22:09
In Tintin in the Land of the Black Gold it could be a Hawker Hardy
i.imgur.com/57c2RcA.jpeg
23 May, 21:51
A couple of updates. The supports next to the fuselage were so weak that 3/4 of them snapped even before I got them off the sprue. So instead I just used some bent wire. The holes they are meant to slot into were gaping caverns as well, so a fair amount of putty was needed to make it at least slightly better. Now I'm left with a decision to make. The Hawker Demon has two large exhaust tubes that run from the engine down the sides. They're not present in the Tintin album (which most closely resembles a Hawker Heart I believe). So... do I leave the two side holes and the large trenches on either side of the engine cowling, or do I just shrug my shoulders and use the parts that came in the box?
The Blue Rider decals went on easily enough. They're a bit shiny, but I think I can deal with that.
11 September, 15:38
Thanks Matthew. I'm quite pleased with how the colouring came out too. A 2:1 ratio of Tamiya Buff (XF-57) and Khaki (XF-49) seems to have done the trick... or at least close enough for me.
11 September, 15:58
a ajouté un nouvel album photo.


26 22 August, 23:59
Hi all.
I have a video about my progress on this kit on YouTube of you are interested.
Youtube Video
Thanks

23 August, 00:06
Hi nikfrost.
Just 1, Ross Jackal.
But as I have deviated on the colour scheme, I may make one up. Hoping to find some rub on letters at the hobby shop.
Any name suggestions? (Question open to all of course 🙂 )
Have a good day.
24 August, 10:14
Thanks M0rce. I live near the Humber Estuary which is connected to the North Sea, my suggestion would be Mud Shark haha.
24 August, 14:13
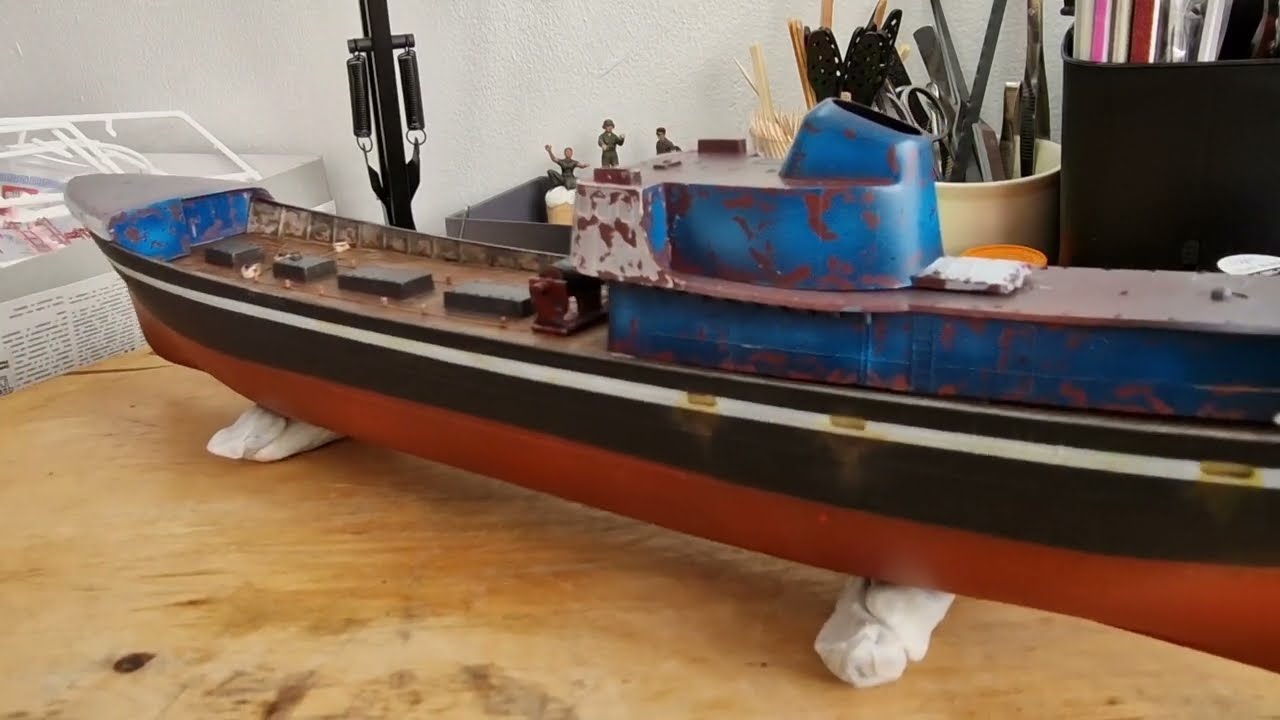
Hi everybody,
Thanks for your comments and ship name suggestions
I didn't manage to find any rub on letters at the hobbyshop, but got a few sheets of single.letter decals...
Not sure haw that's going to work. Got to.pravtice that a bit before I attempt on the model.
Keep ship name suggestions coming.
24 August, 20:52
Hi everybody,.
New update video on youtube.
Youtube Video
You input would be apprecisted.
25 August, 20:03
Erm.... just found this build yesterday... I need to up my game on this build.
modellversium.de/gal..s-cougar-revell.html
26 August, 09:37

Hi Tcamp.
Are you my youtube buddy?
Show your work.pleaee, I'd love to see it. 😀
11 September, 08:24

")

a ajouté un nouvel album photo.


5 12 September, 23:28
Now that's a blast from the past..!! I Remember building this back in the 80's.... I hope you enjoyed building this Ian. Nice work.
13 September, 06:43
")
Hallo,
sind die Mosquito Control Surfaces und Flame Dampening Exhaust Shrouds noch verfügbar und zu verkaufen?
Viele Grüße
Thomas
")
9 September, 19:46
Hallo Thomas, ja, die sind noch da!
Hättest du sonst noch an etwas aus meinem Stash Interesse?
Gruß, Steffen
11 September, 21:00
Hi - die beiden Sachen sind dann alles. Ich komme mir selber etwas dämlich vor, dass ich das übersehen habe, als ich die Mosquito angefragt habe... seufz. Jetzt bin ich alles durchgegangen. Viele Grüße, Thomas
12 September, 05:04
Hi Thomas, damit ich das Porto bestimmen kann, muss ich wissen, wo du wohnst. Wäre PayPal ok? Gruß, Steffen
12 September, 21:26
Hallo,
der Versand wäre in Deutschland, hier schon mal meine Adresse:
Thomas Neuss
Wilhelm-Leuschner-Weg 5
25524 Itzehoe
PayPal (Freunde) ist völlig ok für mich.
Viele gRüße
Thomas
13 September, 06:43
a ajouté un nouvel album photo.


13 September, 06:41
")
")
")
veut cet article
")
Panzerkampfwagen IV Ausf G. Early Production & Motorcycle Eastern Front
Tamiya 1:35
25209 2023 Nouvelles pièces 13 September, 06:42
")
")
")
")
a ajouté un nouvel album photo.


59 23 January, 04:48
Gonna shift gears with a more straightforward Tamiya build. I wanted to make the all-black night fighter option, but thought the color scheme was too simple and I also wanted to try some camo painting. So I got decals for a night intruder option, which is the best of both worlds, and the camo with black underneath just looks really cool.
23 January, 05:09
There is nothing more complicated, to replicate a all-black aircraft not making it look too dull, in my opinion
23 January, 08:14
Interesting choice. Both when choosing a machine and when choosing a kit manufacturer. Compared to the Crusader, we go back in time by choosing the aircraft, but it's a big step forward in kit quality.
I wish you a lot of fun and as little trouble as possible building this kit. And of course I will be happy to follow it 👀
23 January, 12:08
Welcome friends! Yes Ludvik this is a "palate cleanser," I wanted to see how a nice Tamiya goes together, it's also the second kit I got so it's been sitting in my stash awhile. I'm already messing with ejector pin marks, we'll see how much trouble I create for myself 🙂 and Markus--yeah I figured the topside camo would add a lot more visual interest.
23 January, 13:47
And so it begins!!! You have earned the right for a break from raised panel lines!!!
25 January, 22:07
🤣 I guess I have! The Monogram Voodoo lurks around the corner. The Mosquito's fit sure is mostly nice so far
26 January, 00:19
Wings and nacelles are glued together and been painting the many cockpit components. Drilled out the gun barrels on the .303 Brownings too, I like the look
30 January, 05:11
Did some detail painting, and been pounding the instrument panel decal with micro sol. It's slowly conforming to the raised dials, but I have solvaset and mark softer on order since Tamiya decals are apparently known for this…
1 February, 04:30
I improved the cartoony decal seatbelts by applying them to foil, cutting them out, and painting the black edges a similar color. Idea thanks to an old IPMS Stockholm article.
23 February, 18:52
I have the FB and NF versions… I need to finish my P-8 and get started on a Mossy…
25 February, 04:03
Thanks Marlin! Definitely my favorite part of the build so far. Actually just threw the whole thing together today, now that the cockpit has been all worked out. It's not exactly intentional, but because this NF version I chose doesn't have the radar features, I've been breezing through construction since it also doesn't use the FB rockets/bombs/bomb bay. Next I need to get the canopy on ASAP since I keep breaking off gunsight 🤬 the only construction left is the landing gear, props, and the crew hatch and boarding ladder. Looking forward to painting
25 February, 04:40
Excellent work on the model. Looks great. 👍
I'm sure you're not the only one who breaks off small parts of the model. I have the same problem. All it takes is one very brief moment of inattention and one careless move and that's it. Although I try to handle the model as carefully as possible, for example, I have broken off the antenna on the bottom of the Gripen four times. 😭
25 February, 11:09
Thank you all, and glad to have you here Guy and Aman! No more breaking off the gunsight for me now Ludvik, the green strip decals are on the inside of the canopy and masks are on. Just gotta mask off the guns and then it's time for surfacer
29 February, 04:03
Nice! I just finished the cockpit on the P-8 so, I really appreciate this step you have accomplished!!! Cheers!
29 February, 04:41
Guess I'm onto the painting phase! I already painted the propeller caps ocean grey, then decided to hit the bottom side with matte black. Also getting the undercarriage painted and assembled too.
10 March, 04:48
Thanks Marlin! I got it ready to paint the dark green. IDK what others do for camo like this, but to make a "hard edge" camo I used Tamiya curved tape to make the lines, and then used regular masking tape and paper towels to mask off the rest. Excited to see the finished paint job
18 March, 02:37
Thank you Neil! At first I was thinking the ocean grey looked too dark, but with the dark green I find it contrasts well. Just got to fix some overspray and touch up some areas and it's on to decals
19 March, 11:48
Oh yes!!! Great Saturdays provide the opportunity to focus on all those little details seen in the mind's eye!
23 March, 14:02
Hell yes Marlin especially a rainy one like this! Working on the landing gear while giving the gloss time to cure
23 March, 15:26
Marlin, it looks like Rando was visiting the Czech Republic today. It's been raining here all afternoon 😄
Rando, that chassis looks fantastic. Didn't you put pictures of the real chassis here by any chance 🙂
23 March, 22:28
If only Ludvik, I'd love to come out that way. Would have come by to say hello and see your workbench! Been a pretty nasty day here in eastern Massachusetts too. Was also a good day to bring the kids to a model train show, fun look at an adjacent hobby.
Here's hoping the chassis fit into the nacelles without too many swear words 😉
24 March, 00:01
Rando, I believe it would be a pleasant meeting. I'm sure we'd have a lot to talk about. And of course I would love to show you my desk 🙂
26 March, 00:03
Indeed Ludvik we sure would, I'd be thrilled to meet you Marlin and all my modeling friends on here someday.
Mosquito is like 99% done! Landing gear went in surprisingly easy and now just some wingtip lights to install, finish painting the crew hatch, and attempt to rig the antenna mast. Pics soon!
Definitely looking forward to seeing painted the P-8 Marlin!
26 March, 00:45
So I have to say I'm disappointed with how the canopy looks. I used Eduard masks and they were a struggle to get on as they didn't fit great. In hindsight I should probably de-tacked them too, like I do with Tamiya tape, since it seems like they left adhesive residue. They left some rough paint edges. Not sure how to improve it, I've done some careful scraping with toothpicks and Leveling Thinner, which improved it some, but considering popping the whole thing off and repainting it.
26 March, 17:55
Using a 000 brush, put a couple of coats of thinned out black along the bottom of the canopy glass then a similar thinned coat of color over the black. That would firm up the window frames. The rest of the frames look pretty good to me!
26 March, 20:53
Thanks Marlin, so would that help with that weird splotchy white color, especially noticeable on the frames in back?
26 March, 21:57
Those should be dressed with a thinner brushed on in very small quantities until the streaks relent. I had thought those were aluminum chipping which would also be valid!
26 March, 22:58
The Mr. Color Leveling thinner with a stiff hobby swab would help clean the edges. The Mr. Color thinner doesn't seem to harm clear plastic…
26 March, 23:01
LOL, amazing that my mistake looked like something good! Shoulda just rolled with it. I do have a stiff kind of swab, I'll give it a try
26 March, 23:12
I actually got Leveling Thinner after you recommended it on my Crusader build and it's all I've been using lately. Good stuff, I like that it can leave a smoother finish
26 March, 23:12
I can confirm. I have the same experience, Mr. Color Leveling thinner will not damage clear plastic.
26 March, 23:24
I think I've improved the framing a good deal already, both with paint and the thinner. Now just gotta glue on some nylon thread for the mast rigging, which I've never done before. So far I managed to attach it to the mast with some gel super glue.
27 March, 01:18
You use super glue, it just stretches nicely without putting a lot of pressure (i.e. bending) on antenna masts. So you can anchor one point and then stretch it easily so there is no sag when you attach the other end.
27 March, 01:43
Got it! I'll order some. I've already had trouble with the mast popping off once.
27 March, 01:48
The antenna on my Buffalo build is EZ Line, it's also handy for those annoying multi-wire antennas.
27 March, 01:50
Basically done! Aside from the rigging wire, which I will attach when it gets in. After that I'll upload the beauty shots. Now to clean up my very messy workbench and get the next project going!
28 March, 00:00
So I decided to finally upload the glamor shots for this Mosquito. These were taken months ago but I was dissatisfied with how the photos looked at the time since it was difficult getting the plane to fit in the frame without ugly background. Looking closer though, I thought they actually turned out fine, and pretty nice actually with some cropping and brightening adjustments. So belatedly, here she is completed, the Mosquito night intruder. Great kit, most difficulties I had were my own doing. Eduard masks are not their best. Eagle Strike decals are great. If you have this one in your stash, pick out a cool scheme and build it!
10 September, 13:47
Hey Rando, I can only repeat previous comment, nice Mossie! I think the canopy looks fine. I'd probably do a masking like this myself for the reasons you ran into. I don't like the "put the tape on the canopy then carefully trim the frames" technique because a mistake can be disastrous, but in this case since most of the frames are straight and well defined, I think I'll do that for this one instead of my usual cutting and taping dozens of little pieces of Tamiya tape to the canopy, which also works, but is time consuming. I did get this kit after seeing your build and I plan to do the NE D bird, I just like the scheme. Looks like the EZ line worked out really well for your antennas. 👍
10 September, 14:12
Thanks John and Draken! Yeah I kind of gravitate towards cutting directly on the canopy for some reason, even though it's soooo risky. One thing that might be a good alternative to the Tamiya tape is scotch tape (suggested by Marlin), since I found you can more clearly see the actual place you're cutting into. I did that for some windows on my P-51 build and it worked out pretty nice. And also yes--the EZ line was a breeze, thanks for that! For some reason it fought me hard on the aforementioned P-51.
Shameless plug for my F-8 double build, putting the decals on tonight. So excited!
10 September, 16:02
yeah it's ridiculous LOL. I'll be building other planes, I promise! At least after I try CAT4's new early nose conversion.
10 September, 17:14
Thank you Marlin and Ludvik! Who doesn't love a Mosquito? I sure do like the look of it on my desk at work.
10 September, 20:33
Mosquito is very nice. I can imagine that it looks good on your desk at work.
11 September, 03:02
")
/fr/search.php?q=*&page=newsfeed&fkSECTION[]=Newsfeed
search-solr.php?lang=fr
35
35
/fr/search.php?q=*&page=newsfeed&fkSECTION[]=Newsfeed
35
todo