WIP - Mig-23MLD Monument

As usual I started from armament. Not much choice as only seven pylons...

and 3 of them are taken by droptanks.

While waiting for resin I cut and glue other parts.

Set of resin from Aires including cockpit, wheel bays, exhaust and many others.

I tried to fit main wheel bays - what a surprise they fit pretty good.

I also glued and sand an air intake.

Trying to fit main gear bays as they are a little bit different that kit's (which are open at the top.

Then I'm trying to fit exhaust nozzle.

So a lot of cutting is required as resin is bigger then Trumpeters.

Dry fit.

Almost perfect - resin is a little bit too small.

Engine parts looks very nice - they are very well detailed.

To fit cockpit and front panel some cutting is needed.

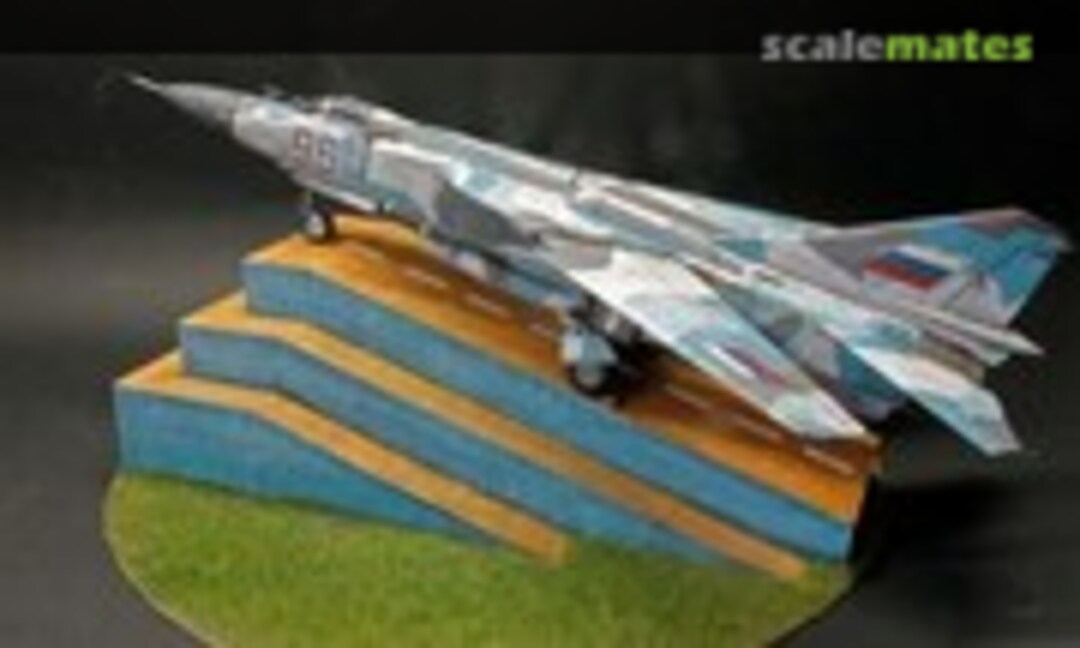
Simple visualization of model on monument.

Painted wheel bays (without wash).

And color test for cockpit.

Cockpit front panel.

Side panel.

Other side.

Seat view.

To mount cockpit and fron wheel bay I had to add some wooden stick to strenghten whole construction.

Main gear bays glued in place.

Main gear bays glued in place.

Front fuselage halves glued.

Front windshield added (on photo with maskol).

Ejection seat added.

Dry fit on canopy.

Production of plaster elements for monument.

Production of plaster elements for monument.

Wing moving mechanism ready...

...and working.

Airbrake glued as monument planes do not have them open.

Dry fit of all main elements.

Engine cut to fit resin exhaust.

Some parts added to engine.

And resin-plastic engine. I will add some wiring also.

Corrected exhaust of S-24B rockets.

Glued canopy. Some putty was required.

Cleaned up, polished and glued gear.

May be not needed...

...but I made...

...a cart to lift up the rear section.

Scratched plaster board will be used to cast some copies.

Main module of monument.

Front view.

Bottom view.

Dry fit of model and base.

Dry fit of model and base.

Added one more part to monument.

Front view.

And one more...

Top view.

Another bricks layout.

And this is how monument looks so far.

Base plan.

Some pavement added.

Stones and land added.

Air intakes added.

Side view.

Teets as vortex generators added. Looks odd.

Engine interior painted and assembled. Waiting for painting.

And MiG as StarWars spaceship.

Painted and weathered elements of engine.

The same.

The same.

The same.

Assembled engine - rear.

Assembled engine - front.

Compleded engine...

...mounted in rear part of fuselage.

Elements used to join mid and rear section of fuselage...

mounted in place.

All combined together.

Dry fit of all elements.

Kits wheels look poor so I ordered resin ones from Armory.

2 hours of preshading.

Some painted and washed.

Cart with colors...

...and wash.

Added some smaller rocks...

...and grass.

Working on central part.

Test of reusable progel to create molds.

Monument so far.

Added some wiring/plumbing to gear struts.

Antennas/pito tube added.

More sensors added.

Chaff/flares launchers and air scoops added.

Chute/sensors added.

And more sensors, lights, gun pod added.

Monument ready for painting.

Some blue on walls...

... and oranges on rest.

Base waiting for upgrade.

And with some asphalt layer...

..and monument. So now I have two bases in one. 😉

The whole set of load out is completed.

And plane is primed...

...and ready for...

...some preshading.

Bottom part half done.

Bottom part and side painted on some crazy colours...

like those.

Gear flaps and fuel tanks ready.

Corrected front gear bay doors.

Preshaded top surface with black, grey and white.

First color masking.

Dark grey sprayed.

Masking for second color.

2 of 4 colors ready.

Quite tricky masking for third color.

And light blue is on.

Worst masking. But last one.

Camo is now ready.

I tried to mask and paint tricolour flag instead of red star but masking was bad.

So I did in PS my own masks. Here is the painting result.

I also paint some details...

...chaff/flares ejectors...

...and the nose cone.

I also did my own masks for side number.

Primed...

...preshaded...

...first color painted...

...added rest of masks and painted.

And the result.

Started wash and added from wheels.

and main gear struts.

Exhaust ready.

Exhaust ready.

Exhaust ready.

Exhaust ready.

Some dirt and striking on top.

Closer look.

Model on monument.

Monument with grass.

Air mission armament.

Ground attack.

Mixed air/ground.
Commentaires
1 20 September 2015, 16:00
The detail is certainly there to be enhanced Przemek, and the wheel wells are certainly a great start. 🙂
21 September 2015, 08:33
Przemek, is it based on a real monument? Do you really want to put all that detail in a monument, mostly they don't have any dials and seat in them 😉
21 September 2015, 10:26
Thank you very much Antonio.
Gunther - idea is to combine 2 in 1. As a base I would like to put a monument on a display, but I also would like to do it as removable, so I can show only model on this base.
21 September 2015, 11:23
Great idea.
I'm also thinking of making some monuments (found in Belgium) but then it would be just like to monument with e.g. tainted canopy.
21 September 2015, 11:25
I found picture of MiG-23 monument few hours after ordering details to my model. It was too late to cancel order but I wanted to build it as monument so I had to think of something which allowed me to use model as stand alone but also to put in on a monument.
Maybe some day if model will be bad I will albo build it as statue with all doors closed, simple engine and closed and covered canopy.
21 September 2015, 12:56
very interesting subject and very well executed so far... wouldn't the rocket's exhauts be covered with a plate as a dummy on such a model? Last pic does look more than a Gundam or a Valkyrie (macross series) then starwars, but that is my opinion...
7 October 2015, 12:19
Bart - you're right about the rocket exhaust but that's the part of surprise. 😉
7 October 2015, 13:46
nice work on the monument, and the teaser for the camo... can't wait to see it...
26 October 2015, 12:15
Thank you Bart. I will try to find some time this week to finish camo painting.
26 October 2015, 14:26
Przemek, will you fill with putty this small [four] holes on both front undercarriage doors.
27 October 2015, 09:09
Holger - soon, maybe even today as I have three colours ready, masking for last one. And of course some details paintng like sensors, antennas etc.
Marek - Thanks. I thought that there were holes not stencils. It is done now but I will have to repaint those elements.
28 October 2015, 08:11
Hello Przemek, an amazing paint job! 👍
What colors do you use? Is that UHU Patafix?
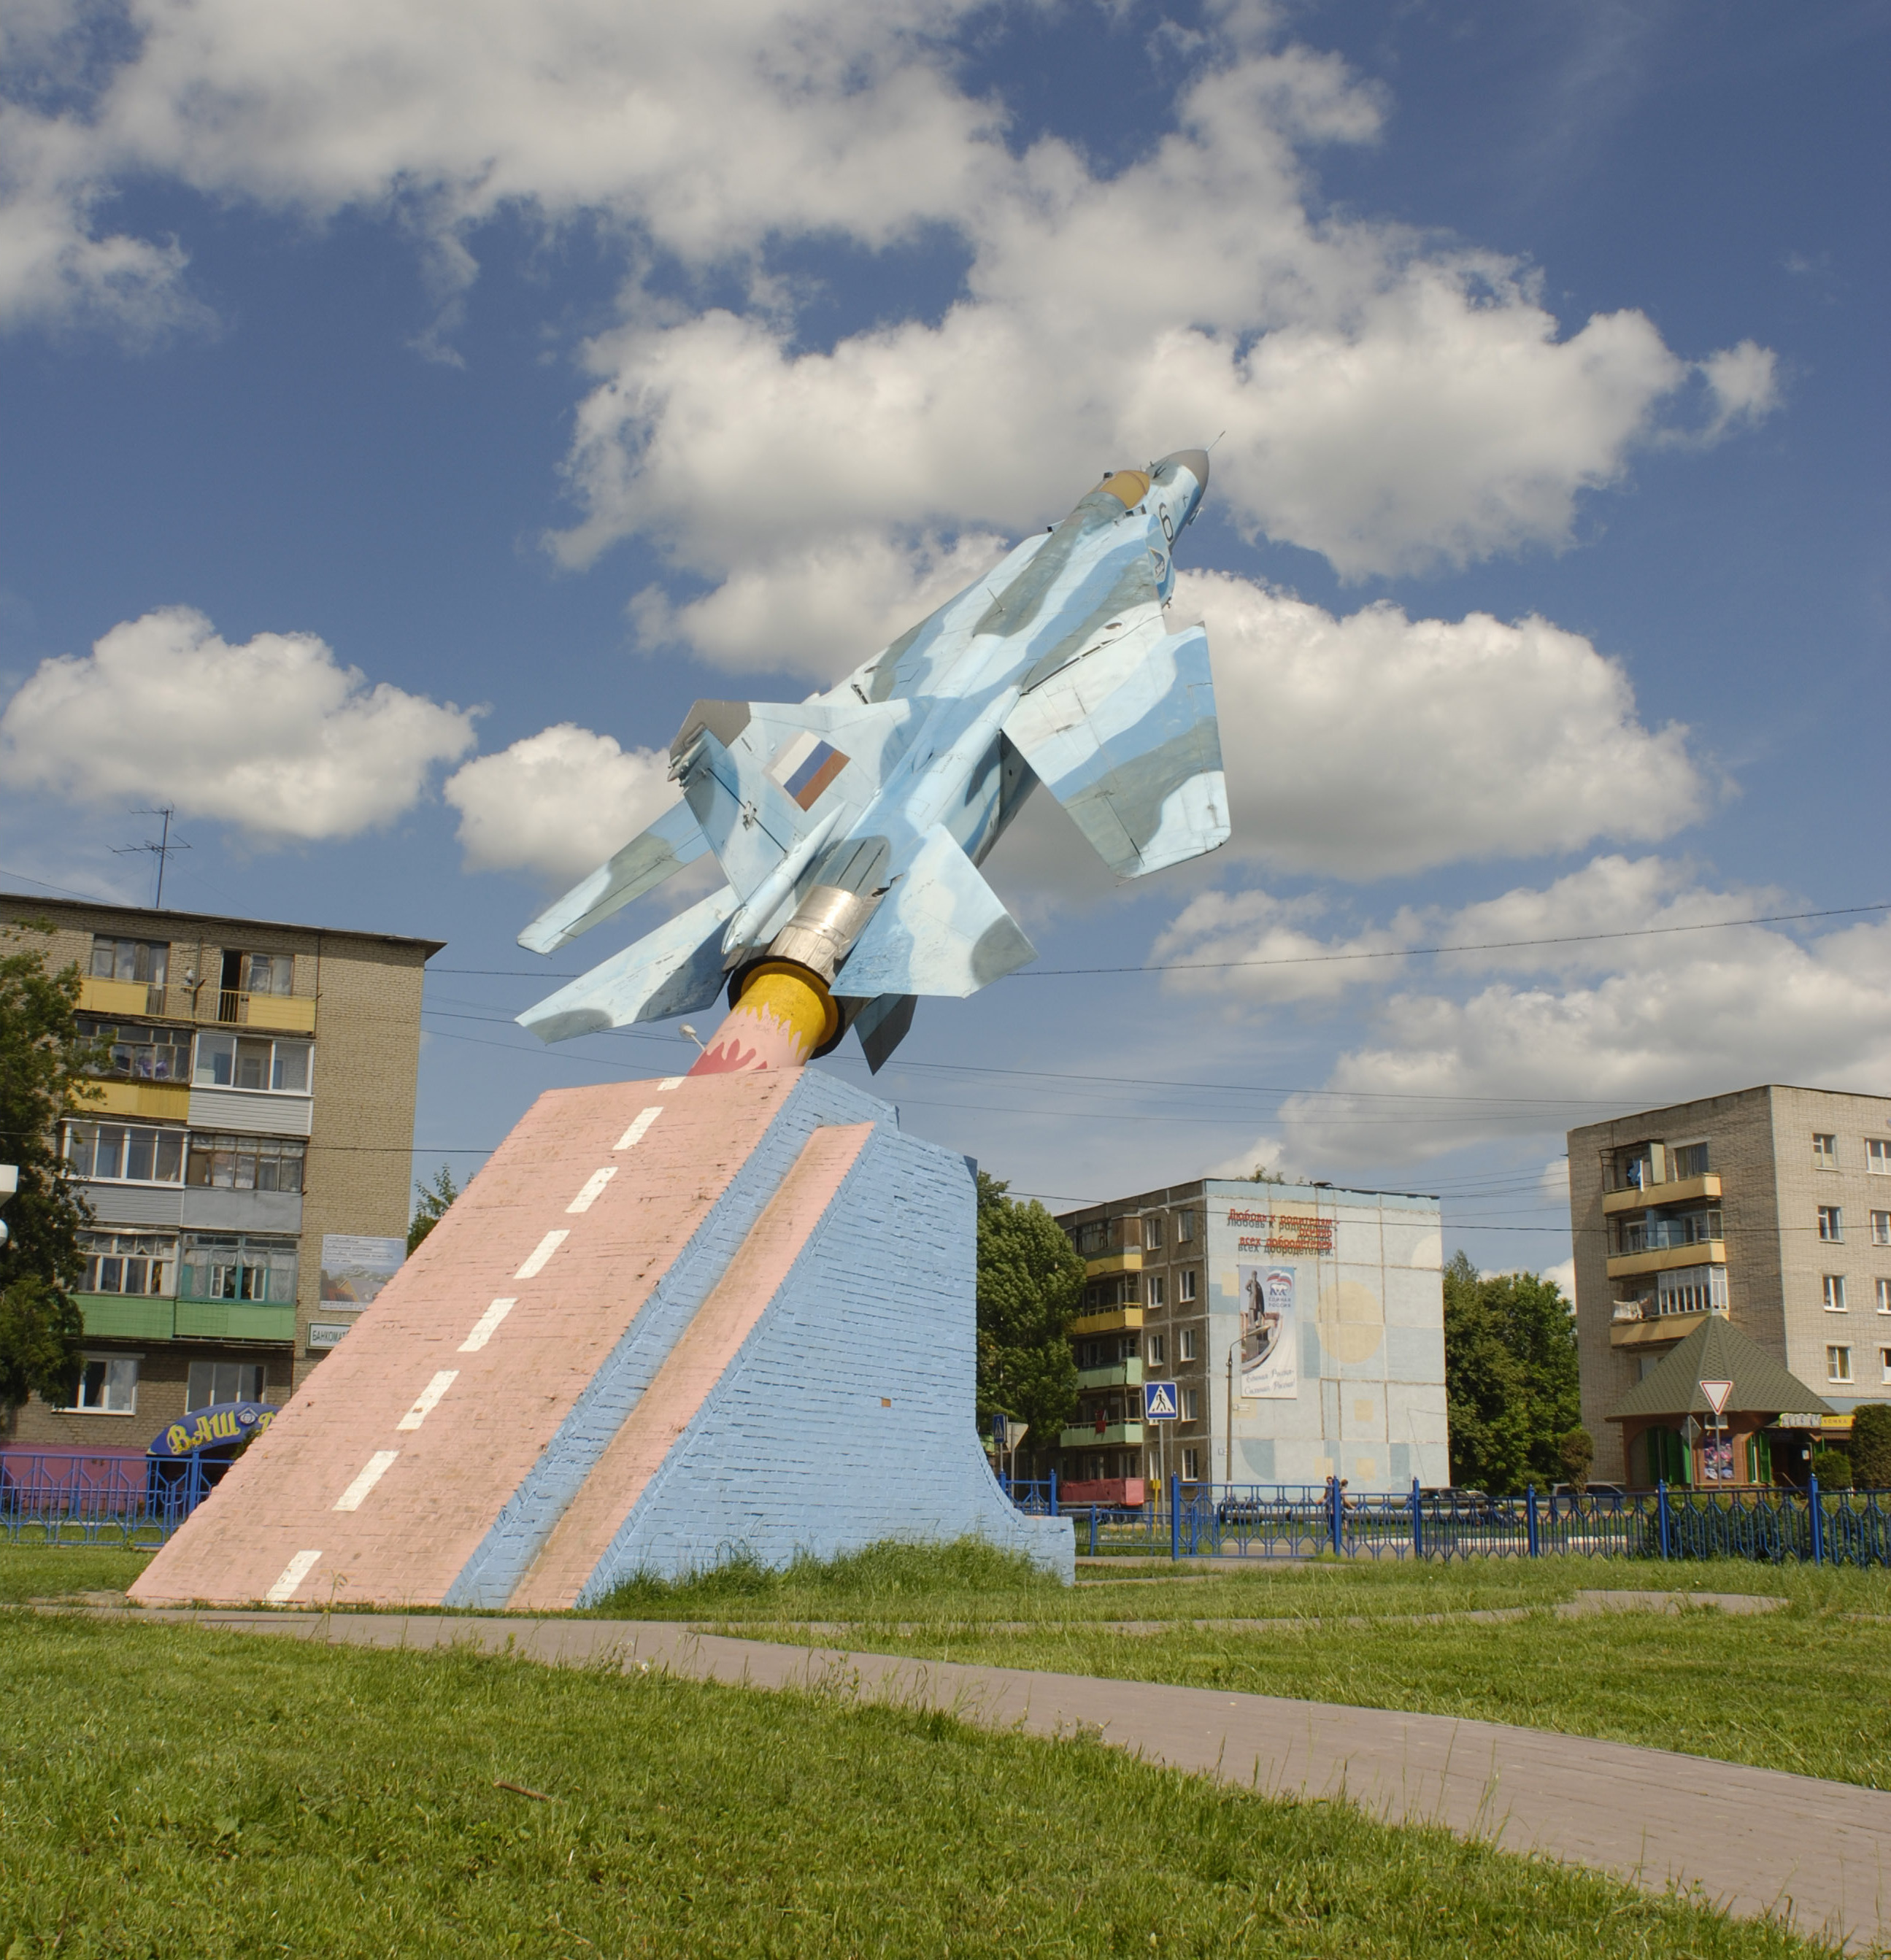
Could you post a picture of the real monument? 😄
29 October 2015, 12:43
komoras - Hi, thank you very much. This is BluTack aomething quite like Pattafix.
Colors were my mixtures, unfortunately I'm unable to provide exact ratio because I was adding something paint straight from jar and sometimes only few drops. Dark grey is an XF-53 Tamiya mixed with white and a fe drops of X-14 Sky Blue. Dark blue is based on X-14, black and white. Light blue is lighter version of previous one and Light Grey is a white with only a little bit of black and blue.
Picture of real monument:
[img1]
Bart - Thank you very much.
29 October 2015, 13:08
Very remarcable project! Kamuflaż wyszedł super Przemek! Bardzo jestem ciekaw, jak wszystko będzie wyglądać. 🙂
2 November 2015, 16:59
Thank you Bernhard. I'm thinking now should I paint flags on the wings or not. Real planes have red stars there but plane on monument do not have anything on the wings. Besides I'm wondering what to do with decals.
So many problems to solve. 🙁
3 November 2015, 11:27
Wow.... this is spectacular.
As far as scale models go, modern jets aren't my first choice but your work definitely gives me 2nd thought.
A question, going thru your painting progress, why do you paint the various colours (white, light blue, med blue and grey) as seperate sections, why not say do a base of white, then add the blue splotches over top? Paint get too thick and reduce details?
21 December 2015, 02:17
Looks great! What did you use for a wash to make the rivets show like that. Going to try that on next model.
21 December 2015, 03:38
Przemek, your one hell of a talented modeller mate. 👍 👍 👍
The detail you have achieved is wonderful to see, and in fact, quite inspiring and motivating. 🙂
There will be a lot of guys going back to look at what more they can do with their builds. 👍
I know I am now looking a little harder at my work.
Super job. 🙂
21 December 2015, 03:41
Guido - Thank you. Model is quite big, it's almost 60cm long and about 40 wide with spread wings.
Steven - Thank you for your suggestion. I thought about it but I've decided that similar base and presiding for all layers will be better. I've never painted colors over white base so I wasn't sure how this will look like at the end. Also in this case the lightest color is not white as it might appear as it. It's a white with small addition of grey and blue so even I would paint white base I would also have the same number of masking as I would have to paint white with my whitebluish mix. Anyway you idea of painting is so interesting that I will have to use it some day on maybe Su-27. Thank you again for your comment and suggestion.
Bryn - Thanks. Was is homemade mixture of VanDyke brown and Ivory Black oils with white spirit. After first layer and wiping it off I usually add some more wash but only in some points in few different steps. To add some dirt, smudging etc.
Kerry - Thank you mate. You warm my heart with such words. Thanks to you I feel that my work makes sense.
I put a lot of work, time, heart to my models and it's good to know that someone enjoys it.
Usually when I build plane I never like the stage after camo painted. Time when glossy lacquer is applied and model is like a plastic toy. I like painted plane with raw colors and I like it even more after wash and matt finish where you can see all the details, masks are removed, addition parts are mounted and it finally start looking as a plane and not just a pack of plastics elements.
21 December 2015, 07:44
I am yet to meet a modeller who has a different view of our hobby and, what we go through to get our final result too mate, but in the meantime, we just try our best to please our selves and all those who look on.
An achievement like yours is not all that easy, but I bet you could look at it for hours, and still have a big smile on your face too.
Top job. 👍 🙂
21 December 2015, 08:08
Hahaha Przemek, don't mistake my question for suggestion XD i'm complete amateur here - it was an honest question from amateur asking a pro like yourself :'D
21 December 2015, 10:39
Kerry - thank you again. And yes, you're completely right. I can watch for hours and smile all the time. That's why I'm not able to sell any of my completed model (even I had few propositions and one or two were really tempting). So they sit on a shelf collecting dust but hey, I know what I build through last couple of years.
Steven - Thank you. I didn't took you as an amateur and I do not feel like a pro. I'm just a simple modeler. Sometime thing get better and sometimes they not. 😉
John - Thank you. I tried to add this red and blue burnt areas where metal gets overheated and change the color. Unfortunately it barely visible on photos. In real it's looks quite different - less gold more blue.
21 December 2015, 13:14
Marko - Thank you.
Leihton H. - Thanks.
Kerry - Thank you very much.
24 December 2015, 15:10
"I can watch for hours and smile all the time."
yeah! I know this sweet moment of peace... looking at your creation... a complex creation, your child... "And God saw that it was good" (Genesis) 😄 😄
24 December 2015, 21:24
I admire your skill, the painting is sensational. Think that is a great decal option, I've never seen that before on the wings. Merry Christmas
24 December 2015, 21:31
Michel - Thanks.
Augie - Thank you.
Mike - Thank you.
Vladimir - Thank you very much.
Scott - Thanks. Nice to read such words.
Eugen - Thank you.
25 December 2015, 07:58
So cool and beautifully coloured ....but these flags on the wing all messed up I have never seen such notation
25 December 2015, 12:18
Christian - Thank you.
Mike - Thanks.
Roland - Thank you very much.
Alexander - Thank you. My model was inspired by the photo found on Wikipedia. Camo, colors, flags are just my own version of this plane. Some elements are like real monument and some are not. It is just an easy interpretation of this subject. Please take a look at mentioned photo - I hope it will explain some more my idea:
[img1]

25 December 2015, 13:35
Especially I like the "wear and tear" you did on this exquisite model- just look at picture 127, how real the sweeping wing is reproduced in the stains on this picture of the airplanes underside!
Just excellent!
25 December 2015, 19:36
Erik - Thanks.
Roland - Thank you very much again.
Jan - Dziękuję. 😉
Guido - Thank you. I will post some photo of finished model in a few days. I'm just waiting for everything to dry up to easy and safely manipulate model during photo session. :-D
26 December 2015, 02:16
Glenn - Thank you.
James - Thank you very much.
Soheil - Thanks.
Thank you all for your kind comments. 🙂
26 December 2015, 14:14
Album info
Pictures of my work on model of MiG-23MLD with some extras.