Halberstadt Cl.II

A big PE fret, which is made from thick 0.2mm brass.
Please not the full scale gun belts on the right!
Please not the full scale gun belts on the right!

The kit has very thick sprue gates with tight placement (see left/low of the Cent) - no chance for a cutter. A resin saw is useful!
Some parts are broken, see up/left of the Cent.
Some parts are broken, see up/left of the Cent.

The sprue gates goes into the parts, which are itself nice, so this needs a lot of cleaning effort! See part 24, or the gun on top.
Sometimes you also don't know, where the parts ends and the sprue gate starts.
Sometimes you also don't know, where the parts ends and the sprue gate starts.

I started to prepare and paint parts for the cockpit of this two seater.

There was also a tank, but made from six parts with bad fit! The WNW kit has one piece ...
I don't want to clean those seams, checked the colored museums pictures. Ah, the tank was soldered!
Sanded a piece of light wood on my small disc sander quickly into shape and put a stripe of thin brass foil around.
I don't want to clean those seams, checked the colored museums pictures. Ah, the tank was soldered!
Sanded a piece of light wood on my small disc sander quickly into shape and put a stripe of thin brass foil around.

The side walls are remains of Eduard PE. Soldered to it and removed the overlap.

After checking pictures of the WNW sprues I added two bands around and also Filler and outlet from brass with a copper wire. Much nicer compared to the kit parts and don't need to be painted.

For a used look, you can dent the tank with your fingernail 🙂

The lower side is not nice, but it will be the glue surface.

A quick dry fit (nothing glued) with the kit cockpit. The nice wooden side walls are kit PE.

All the parts on the frame are finally mounted and test fitted to a fuselage halve.

The result of the raw sanding, front view.

Rear view

Matches nearly the template.

Decided to use the kit engine, which matches the size of the plans. I have a nice resin engine in stock, but it is bigger and I fear to much problems with that, e.g. panels and exhaust. So I put my low-friction bearing directly into the modified engine.

After closing I added also the single cylinders. Here the air screw is plugged on.

And the finally sanded (I found a pictures on my air screw books and used that for the layout of the layers), primed and painted the airscrew.
Will be toned down a bit with airbrush later.
Will be toned down a bit with airbrush later.

I tried a side view picture, to show the thin shape.

Some brass plates soldered on a piano wire and turned on lathe to washers.

The kit axle is according to the latest Datafile plans to thick, so I replaced it with 1.2mm piano wire and soldered the turned washers in place.

The kit undercarriage struts are very thin so together with the brittle plastic I don't trust them.

So I soldered a new metal undercarriage! The wire on the picture simulates the suspension.

After undercarriage after cleanup. The kits struts are to wide (2.1mm). I squeezed 1.3mm brass tube.

There again with axle on top. The legs were also to long. I started with the kit size and shortened the legs on top, until the undercarriage sits according to the drawing. The pins to the fuselage are added after that.

The connection are 0.7mm nickel silver (kit part was broken already on the sprue). I let the pipe open, as on the museums aircraft.

After tinning the new undercarriage looks nice and is totally strong!

Apropos pins - the upper wings should be glued to the middle part. That is make the painting easier, but I added already brass pins.

I made also new wing struts from 1.2mm brass tube. The mounting tool from the kit is a nice provision. I marked the strut positions and could use the tool for strut length preparation.

The tail plane is very thin and had 0.5mm plastic pins?! Here I drilled and added 0.33mm nickel silver pins.

So the tailplane can be mounted safely after painting and decals.

I thought I was done, but I noticed thick stripes on the lower end of the kit u/c. With checking the pictures from the museum it was clear: I had to add an suspension travel limiter! A steel rope, here 0.1mm nickel silver wire.
Soldered it on small pieces of squeezed brass tube on one side, put it on and soldered the other side.
Soldered it on small pieces of squeezed brass tube on one side, put it on and soldered the other side.

On left side I noticed also a missing step, soldered on two drills.

I fixed the positions of the new parts with CA.

I was curious how it would look mounted, so I painted it gray green and attached the axle with the "spring rubbers".

Accidentally I destroyed partly the paint layer during handling the springs, but this created a great used metal look. Luckily there is no yellow brass visible.

Now I can call it finished, looks really nice plugged on.

After heavy bending (due to the thick brass it was hard to get the shutter plate into shape) the shutter plate in its frame. Theoretically it could glide, but I fixed it with glue. So far so nice.
In contrast to the manual, the frame here is already bent asymmetrically.
In contrast to the manual, the frame here is already bent asymmetrically.

The PE do not respect the fact, that there is a strut fitting below the radiator. If you mount the PE according to the manual you cannot mount the wing later.

Compared to the original the shutter is to wide, and the frame has a asymmetric mounting as on WNW. I tried to fix it with moving it to the left. The legs on the right are nearly to short, but the strut should fit now.

Now I can live with it.

I have also the Halberstadt Cl.IV in my stash so I wanted to check, how it looks on this kit.
Note: The Cl.IV has the struts on outside of the middle part of the wing.
Here the PE, the frame is now asymmetric, good. But the shutter plate (part 3) is much to wide to fit into the frame 1 !!!
Note: The Cl.IV has the struts on outside of the middle part of the wing.
Here the PE, the frame is now asymmetric, good. But the shutter plate (part 3) is much to wide to fit into the frame 1 !!!

The aircraft equipped with wireless transmitter and receiver can be noted from outside by a installed cover for a generator attached to the engine. The bubble has a much thicker socket, which I sanded down. I guess this was intended, since the shape of the fuselage is not flat here. I made the plastic also thinner to be sure, that the generator fits later.
The kit offers again options here: a PE plate for not installed generator and also a small PE frame to left the hole completely open.
The kit offers again options here: a PE plate for not installed generator and also a small PE frame to left the hole completely open.

On the sprue there are two devices and according to the manual those are optional parts, this OR that. But the second device is the transmitting amplifier, which was not always carried. The WNW manual was very helpful here.
So I will use both devices, added cables (braided lines). On top are two spare cartridge belts. Here the kit is really crazy!
So I will use both devices, added cables (braided lines). On top are two spare cartridge belts. Here the kit is really crazy!

The PE of the kit contains four full belts and an empty belt! Never seen that in a kit. I used only a pieces of one belt for both spare drums.

For painting of the radio I had the darker gray green in the airbrush, so I painted also the header tank for the upper wing.

A PE was glued on top before, and after painting I added a piece of stretched clear sprue as fuel gauge. It is mentioned in the manual but there are no clear parts in this kit.

Back to radio: The devices are installed, also the cable to the generator. Also the belt drums.

I added a scratched morse telegraph key on the right upper frame, as shown on the WNW manual.

A pump for fuel pressure was also done in brass, here on the picture of the museum aircraft my creation and the kit part. The kit contains also a longer pump, as installed on some aircraft.

As mentioned the last time the aerial was missing. I need a spool for the long wire, a (very small) spool and the outlet below the fuselage are plastic parts in the kit.
I used the WNW manual as example and made new wooden parts, with wound up thinnest copper wire.
I used the WNW manual as example and made new wooden parts, with wound up thinnest copper wire.

And mounted. I primed only the base plate. The wanted raw wood in contrast to the other, also wood painted, cockpit parts.

Again a picture today in day light, the seat for the pilot (I replaced the square mounting struts by round brass), control column and the belts are also added.

The dials are a film to be painted from the back side. The white areas are ok, but the small areas e.g. on the compass are damn small!
My punch and die tool do not cut very clean sometimes and I ruined two dials later!
My punch and die tool do not cut very clean sometimes and I ruined two dials later!

Some details added like clock on the wall, magneto and paper instruction cut from manual and glued to the wall. Finally a washing was added.

The instrument panel is available as plastic and PE. I used the PE one and added the small details.

I checked the manual for missing cockpit parts and found maps some pages later - very nice!

I folded the smaller one add moved it in the gunners cockpit below the front seat.

I forgot to mention two rods in the pictures before. There were two small recesses for the lower wing mounting. I drilled holes for pins and noted, that the space behind the holes is free. So I had the idea to go through with a brass wire (unvisible below the tank) and in the front a thicker nickel silver wire (below the control colums mechanism).
This allows a teaser: the wings can be plugged on and allows later a robust mounting. The undercarriage is plugged on too, and the engine body (shown with the airscrew some posts ago) is painted.
This allows a teaser: the wings can be plugged on and allows later a robust mounting. The undercarriage is plugged on too, and the engine body (shown with the airscrew some posts ago) is painted.

As I reported a Vector engine was to big, so I want to use the kit engine. But the valve drive mechanism lacks a lot of details (the upper one). On my Albatros W.4 I used a Vector engine, but converted it with the kit parts to a Mercedes D.III. So I had a spare drive of the D.IIIa in my stash, which has much more details! The only thing: it is to long.

So I removed the shaft below and glued the remaining little buggers onto a new shaft.

I removed the plastic pins (valves) and glued the new part in place after painting with different Alclads - very promising.

For the valve springs I wound colored 0.15mm copper wire on a 0.4mm drill shaft and cut it in short pieces.

The new valves are glowed 0.33mm nickel silver, with the springs glued in place.


To be able to see, how the engine fits with all accessories around, I need to mount the Spandau MG. I removed the jacket from the kit Spandau and added blacked Master brass parts. With other parts from the kit it is prepared for mounting.

A very fine kit PE needs to be added to - the control of the generator.

Both are mounted, then I added also the panel in front.

More parts was added to the engine, and I had also to modify the engine mounts in the fuselage.


With a wash it looks much nicer!


The engine is finally in place! After that an "brass" oil tank is added too.

Should have modified the carburetor a bit, because there is some slight trouble with the Spandau. A PE plate will be added later here.

The kit provides two variants of decals for fuselage.
I'm not sure, if I like this. Only the upper one is an option.
I'm not sure, if I like this. Only the upper one is an option.

So I experimented a bit. Painted a piece of plastic in the layout of the middle wing with five colors according to WNW, followed by a splatter painting with very low pressure.

The same piece, just on a white background.

Painted the lower surface of the wings. I used the recommended paint by WingnutWings, 10 parts with with a part deck tan. The result was the same, to much paint and I don't like result. Removed.
Luckily the alcohol removed the upper layer but left the shadows nearly intact, the primer too. Shadowing by accident.
Luckily the alcohol removed the upper layer but left the shadows nearly intact, the primer too. Shadowing by accident.

Painted again with the lovely MRP linen paints. I think this is ok now now and I let it as it is.

The upper side is also prepared with shadows for the decals.

I prepared 5-color lozenge pieces, normally used on lower surface, for the upper side.
And added hopefully enough Future to the wings, as I learned on my Dr.I that enough was not enough.
And added hopefully enough Future to the wings, as I learned on my Dr.I that enough was not enough.

To apply the already connected stripes was an easy thing, and this saves a lot of waste due the 45° orientation, compared to normal stripes.

After some hours drying time I conformed the decals on the edges and tips with Micro Set (the blue one). The decals reacts wonderful on it. The I let it dry overnight.

Today afternoon I applied the rib tapes. The main problem was to cut 0.7mm strips in a consistent way. After this was sorted out I had good progress.
Note: For rib tapes a special sheet with white decal paper is needed, see project inventory.
After some drying I cut wider strips and applied them on leading and trailing edge. This is much more tricky compared to the rib tapes!
Note: For rib tapes a special sheet with white decal paper is needed, see project inventory.
After some drying I cut wider strips and applied them on leading and trailing edge. This is much more tricky compared to the rib tapes!

I really like the look. On the right wing the main spar is still visible. The plywood on the leading edge and the spar were very nice moulded by Mirage.

And another view. I still need to fix the tapes on leading and trialing edge after some drying, may be with Future.

The lower surface is a bit darker, but it will be in the shadow once mounted.
Let's see if I can move the look into the direction of the profile, without loosing the fabric effect.
Let's see if I can move the look into the direction of the profile, without loosing the fabric effect.

The tail skid is a new wooden one, with metal fittings.

The kit one has to be glued in before closing the fuselage halves.

Mine can be added after painting, as long the axle pin is not fixed. A thin etched PE plate change the outlet shape, and a frame provides a limit stop. Both PE are kit parts.

The lozenge decals are applied to the tail. Tapes not yet applied.

Linen on lower surface.

Lozenge job is completed and a thin filter layer was applied. Here nearly invisible, but in normal light it is ok.

For the tail I tried to cut very thin rib tapes. The wings has now tapes on wing tips. The tapes on leading and trailing edges needs much patience!

The crosses on the rudder are masked and painted. In some light angles you can see the decal fragments below, no chance to fix it. This is the better side.

On upper side the cuts and on the right aileron needs some care.

The crosses on the lower wings are from my spares box.

I soldered also new V-struts from 0.9mm brass, since the kits ones are only 0.58mm thick. I don't trust them and want to avoid later problems. The front needs some final adjustment. Please note the side pins for mounting.
I think I will replace the front struts (in the right middle of the picture) too, but here I need to adjust the length to get the correct angle of the upper wing.
I think I will replace the front struts (in the right middle of the picture) too, but here I need to adjust the length to get the correct angle of the upper wing.

That is the mounting position below the middle wing part.

I was still working with wings. Prepared a lot of small parts.

On the lower surface of lower wing I painted a bubble dark grey green. You guess what it is?

Yeah, the compass mount. The compass looked a bit naked in its hole, so I turned a very thin ring.

Mounted and put a "glass" in with Kristal Klear. On the right of the compass you see a shadow.

That is a weather shield, provided by the kit. Also all the other metal parts like lids and step plate.

Added those maintenance covers also on lower surface.

I showed already the struts, but not the profile. Now I soldered pins into them.

I used the plates of the kit in a different way, the double hole ones on this side. Here you see also hole in the struts. Not easy on the thin trailing edge.

Prepared for painting

But before painting I made a dry run! The lower wings plugged on.

The four outer struts are able to hold the upper wing.

After painting I wanted to add decals, but ruined them. Used some from another kit now and protected them with a clear coat before applying them.
The stencils are wrong now but at least the VL (Vorn Links), HL (Hinten Links), and VR and HR for Rechts (means front/back, left/right) are readable. The numbering of the kit in the manual is wrong!
And my strut mount in comparison to a sketch.
The stencils are wrong now but at least the VL (Vorn Links), HL (Hinten Links), and VR and HR for Rechts (means front/back, left/right) are readable. The numbering of the kit in the manual is wrong!
And my strut mount in comparison to a sketch.

For the cross rigging between the struts a turnbuckle One End is used, the other one is an Albatros (both types from Gaspatch Models).

Some details on the fuselage are not that nice, but the kit has PE replacement. So I removed the plastic.

The PE are glued in place after the primer.

Beside the other hatches there are damn small mounts for the tailplane too.

And now for the stipple camouflage the five colors recommended by WNW are applied to fuselage and middle wing.

The layout is not perfect, but I let it as it is.

After a day drying time I applied the splatter colour with airbrush.


A check of the look. It is very hard to take the real impression of the colors with the camera!

After my problem with the decals I tent to cut masks for the bigger parts, but I need to use the stencils.
Here I need some help: 6 are the propeller logos, also mentioned in manual.
But 5 and 8 are not mentioned, for none of the 3 markings. 8 seems to be another propeller manufacturer.
5 are clearly the nice logos of the "Halberstädter Flugzeugwerke", but where to apply? I can't find any hint, also not in WNW manual. On the tail, as usual on Albatros and Fokker? Any idea?

For the stencils I had to use the decals. For this
- the fuselage was painted with gloss clear coat
- the decals are sprayed with Gunze Metal Primer (as recommended to seal self printed decals)
- decals applied (has problems even with those small ones)
- some silvering on corners fixed with Micro Sol
- decals protected with flat clear coat
- the red lines was available as decal, but I masked and sprayed them

All the other decals was read in with my scanner and I made masks of them in Inkscape and let cut them on my plotter. This was not easy, because the white was moved against the read, which I tried to correct.
At first I masked and painted the cross and the aircraft marking. So I had to change the paints in the airbrush more often, but it was not possible to mask all at once.
At first I masked and painted the cross and the aircraft marking. So I had to change the paints in the airbrush more often, but it was not possible to mask all at once.

After masking the flames (the fit was bad, I had to split the mask on one side) I painted MRP White and fit in the small stripes from the mask.

After paint of Tamiya X-7 Red this is the result:


On lower surface it is more worse due to the frame for the camera opening.

The forward struts was still plastic, due to the complex mount. I decided to replace the too, with cut off the mount part and reuse it with a brass pin.

Not perfect, but I can live with the result. Some details lifted the mask again and again, which caused some trouble.

Here the backwards V-struts hold the upper middle wing.The front struts are a bit longer then needed so I can adjust them later with the wing.

But it was needed to mount them now to be able to continue with the cowling.

So I thought it is may be a better solution to create a shoe with gluing the parts on the front. After drying I primed and painted dark alu.

Now it is a red shoe. It needs to be painted now, because I cant paint it below the Spandau.

The I tried to get the shoe on, which was not easy. The main problem was the carburetor with intake pipes, which was in a wrong position.
After drying I noticed, that I made a mistake on the front, because the propeller shaft is not in the middle, but to late to be fixed without destroying more.
After drying I noticed, that I made a mistake on the front, because the propeller shaft is not in the middle, but to late to be fixed without destroying more.

Now it was much easier to mask the engine.

The kit provides two spinners, one fits to the airscrew, but both are very small.

Since rotation-symmetrically constructed part, I decided to turn a new one from brass on my lathe.
This was not easy, because it is very small so it hard to turn it inside.
I glued it with CA to a drill shaft and milled the airscrew outlets.
This was not easy, because it is very small so it hard to turn it inside.
I glued it with CA to a drill shaft and milled the airscrew outlets.

For the final shape I used files. The head of the spinner has inside a 1mm hole drilled already on the lathe for a easy symmetrical mounting. The backplate on the right is made from nickel silver (soldered a piece on piano wire and turned it on the lathe; de-soldered again).

Looks much nicer! It is still a bit smaller in diameter, compared to the drawings.

But it mostly hides my mistake on the front.

The spinner is tinned and all is plugged together for a motivational dry fitting.

Many prepared parts will hopefully soon form a biplane!

The kit contains a blast protector as PE, but it is much to big and do not fit. Here tinned.

After modification I blacked it the chemical way and mounted it. For the hole in the cowling I created a maintenance cover. I forgot to mention: the hole on the other side was closed prior painting with some polystyrene.

The camera hole on lower surface is closed now. I forgot to paint the lid.

Two little PE parts form the step to enter the cockpit.

The exhaust was painted with Alclad Steel, Gunze H453 Rust Red and Alclad Exhaust Manifold. In real it looks much more metallic!

The exhaust was mounted.

On the tail I added my wooden skid. On top of that is a travel limiter, provided by the kit as PE. I added a little "rubber bumper".

A little instrument ...

... was added in front of the pilot. The leather strip was repainted. Oh yes, I need to clean some filing!

The gunners ring is also mounted. It was hard to get in place in the right position. The front strut was a closed triangle, but then the ring is too high. It needs to be shortened very much on top, then it fits (two independent struts). This is also correct for early CL.II, the later ones uses a X-strut.

And the final impression of the actual state. The fuselage is finished so far, but some paint fixes of the grey green are needed.

Regarding the red: I painted the metal parts with aluminum before, so now it is darker on the metal parts than on the "wood" parts.

I continued with the tail plane. After adding the rudder horns I noticed, that the middle part needs some support. The original shows some metal bands, so I added two metal stripes in cuts in fuselage and control surface.

After adding the lower wings I adjusted the strut length on top of fuselage by help of the kit tools to hold the upper wing in place.

The struts are glued in place.

I added the fuel pipes to the header tank, bend the wind screen and glue it it place.

I added the prepared parts to the middle wing, the leather is painted. Also some Gaspatch Anchor points for the rigging are in place now.

Middle wing is mounted.

As I struggled to get the fuselage painted, I was already preparing the rigging - very handy for quick progress!

So I started the rigging, with Gaspatch turnbuckles of type "Albatros".

The lower half of the rigging is done.

I glued the prepared metal undercarriage in place.

That one is also rigged.

That is the actual state, only the wheels are not fixed.

The ailerons are not yet under control so I prepared the arms. Instead of cleaning the thick rods I cut them and added metal. Below the arm it was thinner, because there is a pivot.

And mounted in a slightly different angel, matching the aileron position.
In the middle of them I added a wire, which was a field modification to avoid that the gunner destroys the own airscrew.
In the middle of them I added a wire, which was a field modification to avoid that the gunner destroys the own airscrew.

A side view shows the control rods going into the fuselage cut outs.

The water pipes to the radiator are provided by the kit (0.9mm), but requires a lot of cleaning and are brittle. So I used 0.8mm lead wire.

To hold the pieces together I had to create real hose clamps. I used a slightly different green, as shown in the Datafile profile. It looks also more interesting.

And mounted.


The next step was to add the upper wings and finalize the rigging.

At first some engine tuning for the Mercedes D.IIIa. I turned a sprue and added stretched sprue.

The control wires on the tail are also done.

Together with a turned brass part it completes the front of the engine.

The weapon for the gunner is needed too. Here I don't used the kit part but a Eduard Brassin with resin and PE from my stash.

But for the barrel and jacket I used a Master set, which don't need to be rolled. Already chemical blacked here. Until now I have used only Spandau MGs from Master, because this is my first German two seater.

The Parabellum is complete, here on the Eduard manual drawing.

I tried to mount it, but run into trouble. It doesn't look nice - the mount is the reason!
There is no kit PE, so I had to create my own mount. The first one made from a brass rod brakes so here is the result of the second try - used 0.3mm brass. Left the original one. I found also some wing nuts on an old Eduard PE!
There is no kit PE, so I had to create my own mount. The first one made from a brass rod brakes so here is the result of the second try - used 0.3mm brass. Left the original one. I found also some wing nuts on an old Eduard PE!

The new one in comparison to the plastic block. I waited with removal until the new one is finish, just in case ...

Removed without accident and the new one mounted.

Now also the Parabellum fits.

May be you remember my wooden spool with aerial wire? This needs an outlet. I replaced the kit plastic by metal pipes.

After some paint I added the same wire as on the spool with a drop of solder as weight. Nice detail 😉

And I decided finally to add a airspeed indicator (made by Gaspatch Models). The were grey green or black. I used black to have a little contrast to the grey green strut. My first mount was more filigree, but the this brass brakes, so I used a PE stripe.

And in final position.
Commentaires
50 9 January 2021, 18:39
Welcome mates! This will be the second/my first german two seater for my collection.
Will be "nearly oob", but with my usual enhancements, like wooden airscrew and metal struts. And some accessories of course.😉
10 January 2021, 14:33
The kit includes 3 plastic ones, shows the options during the build - but do NOT tell, which option has to be used for which marking. The WNW manual says Garuda. Ok, that is not the identical machine, but I will go with that.
I selected the kit one, which looks like the WNW Garuda as template for sanding.
10 January 2021, 18:28
Excellent looking tank... 👍
Is this another "I can do better than the box-art" projects? I hope so, the presented pattern with red nose & "natural colors" looks spectacular 🙂
Off to a great start!
10 January 2021, 22:09
Welcome mates! Yes, since I like it colorful, the red flames are the only option!
We're a little crazy, aren't we? We find the red flames beautiful and spectacular, although on a fighting machine. I think those in the trenches thought otherwise when this biplane appeared. Good that those times are over!
I have also the Cl.IV in my stash, but I will _not_ build that one with "the monster face" (manual) because it looks like a gas mask. Gas masks and skulls do not go on my models.
Sorry, that just came to mind ...
11 January 2021, 14:48
A lot of metal work, after I cannot airbrush due to snow and ice on my roof window.
For me it seems, building a kit "out-of-the-box" means "by using some kit parts".
Hope the picture description is visible now, edited them the 3rd time (lost before).
17 January 2021, 16:20
Thank you James!
On the way back from my last exhibition, the axle of a Nieuport broke. I glued it, but it will always be visible. So I take special care now for robustness so a metal undercarriage is a valuable addition.
17 January 2021, 21:19
I don't have the WNW kit at hand, but that undercarriage could not look better😉
19 January 2021, 19:46
Today I was put to my limits by this challenging kit! I was not able to use the kit PE, but don't worry, this build is NOT going to hold! I will use Eduard parts instead! More the next days, as usual with pictures.😉
20 January 2021, 21:34
The fit is bad ... Want to see an example?
Do they build the kit once after designing, before starting the production? Wrong in both Cl.II and Cl.IV kits in different ways.
The kits have a great potential to deliver nice details even in smaller scale, but I think the quality control of WNW was much better!
I learned to check here every small step for surprises, but this needs a lot of time 🙁
21 January 2021, 20:10
Thank you mates!
.-. .- -.. .. ---
You may ask, what kind of headline is that?! Of course I talk about the communication system of this Halberstadt. I found an interesting page about that wireless communication system:
stonevintageradio.co..p;UID=20210113135642
24 January 2021, 20:43
Somehow I missed this 🙁
Needlless to say, but perfect work again.
Nur Bild 35 tanzt aus der Reihe.
25 January 2021, 20:02
Welcome Christoph!
Und danke für den Hinweis, ist jetzt 42😉 Habe da schon einen Bug an Tim reported. Das erste Bild ist immer das letzte, wenn ich es dann hochschiebe rutscht es viel weiter nach vorn.
25 January 2021, 21:47
Thank you! I created a wooden spool for the aerial. I really like the copper shine seen from above. Wood was used because do not influence the electromagnetism. The remaining missing parts was added to the cockpit and the fuselage is closed now.
30 January 2021, 16:09
Beautiful cockpit details and materials... 👍 - pity the opening to see it all is so small in the end
31 January 2021, 08:36
The skillful way you juggle the different materials to a superclean and realistic result is always breathtaking, no matter if it's the prop, the tank or the undercarriage, outstanding !
31 January 2021, 08:44
Thank you Slavo and Hanno! I think it looks so "superclean" since I try to use the properties of the material so I can avoid detail painting. So it is easier for me and looks better. But that's also where the "old biplanes" theme plays into my hands; it wouldn't work like that on a modern jet!
If I have good references it is pure fun to replicate the engineering solutions a century ago. It doesn't have to be perfect because it wasn't back then😉
A lathe is also able to do woodturning, so to do the aerial spool in wood was a try with nice result at the end. The axle is a piece of a tooth stick.
31 January 2021, 18:16
"Hmm... I'm thinking about building that Spad XII... maybe I should check out Bugsy's latest build for inspiration and tips..."
Looks at every picture in the album twice... throws Spad box away and goes to lie down...
1 February 2021, 15:53
I'll have to start calling you Fantastic Frank - certainly a worthy moniker.
I nearly missed this one but just had a very enjoyable catch up - coffee in hand.
1 February 2021, 16:10
@Greg Baker I sooo know that feeling...
@bughunter My thick beard protected my glass jaw quite effectively, thanks!
🙂
1 February 2021, 16:30
You are all welcome here mates 👍
Greg, really a SPAD XII ??? In 1:48? The JMGT kit? I want that! The other SPADs are much more common: VII is available from Special Hobby and the XIII in many Eduard boxings ...
@gorbygould You haven't missed much yet. It's only the cockpit that's finished. I still have a long way to go.😉
1 February 2021, 16:53
But by the time you get to the cockpit, you've put more effort in than most of us do for half a dozen kits!
1 February 2021, 18:07
That is part of my problem to build so slow ... and this one is a two seater, which means much more parts in the cockpits. This kit is very special, with many many parts and every single one of it needs careful cleaning and test fitting.
I have also the Halberstadt Cl.VI kit from Mirage, but it will go very deep into the stash after this is finished ...
1 February 2021, 18:39
Uh, oh... I meant Spad XIII... I was thinking more.... 1/72... Academy.😉
1 February 2021, 18:49
Oh, in God's own scale, ok. There was also a SPAD XI, which was used as Nightfighter with a huge search light in front of the air screw hub. It was hold by a lot of struts from below, with the generator belt driven by airscrew. That would be a crazy project!
1 February 2021, 20:16
Thx! The fuselage is closed already. The opening on top is wide, because pilot and gunner have a nearly common fuselage opening, only a small wall between, for good communication. So you can still see a lot of the details - but not the cartridge belts! On the other hand there will be later a gun ring on top with a Parabellum MG, so this may cover details. Let's see ...
However, some details will be clearly visible to the naked eye, the cockpit is not covered by thick clear plastic as seen he on jet models😉
I made a good progress on the engine, but it is not yet finished.
1 February 2021, 20:33
The Engine and the Spandau MG are in place. That was a lot of work, but an important step is done
2 February 2021, 20:19
Amazing and i really hope that you build a early japanese Navy plane like the Nakajima A1N or the B1M one day...
3 February 2021, 22:00
Since we're firing off requests... I want to see a small DC motor inside that fancy engine!
3 February 2021, 22:56
Greg, on picture 15 you can see the self-created easy running bearing. The slightest breeze and the propeller turns - very environment friendly😉 There is no need for an electric motor.
4 February 2021, 11:52
Amazing build ! When I start on my WWI models, I'll be sure to come and check back here for inspiration (and hopefully not desperation !).
That's what I call multi-media : not what's in the box, but how you improve on it... Even just that beautiful gas tank !
4 February 2021, 12:39
Thank you Boris! Do you plan to build WingNut Wing or 1/48 ? If you like this biplane you should not miss my other projects😉
4 February 2021, 18:41
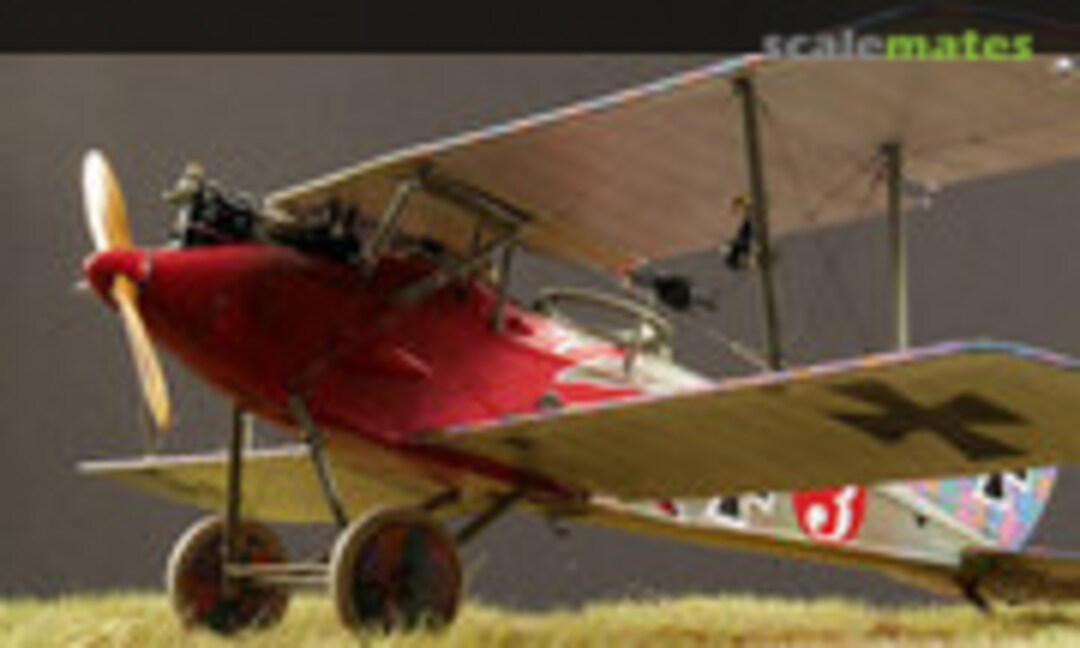
I'm not sure about the painting of the fuselage. The kit provides two decal sets. WNW recommends painting, with very low pressure. So I experimented with this. The result should look like this: [img1]
What do you think?
6 February 2021, 17:21
I have collected a few 1:48 WWI kits, mostly eduard. I will definitely check your other builds when I get to them. I like your attention to detail and painting, it's never unjustified or overdone, but still meticulous, reality-based and creative in your solutions.
7 February 2021, 10:37
Most of the rest of us have given up with anything like feedback and just drool with our mouths open at bughunter's projects.
8 February 2021, 03:21
Thank you Greg, nice to know you are following.
After I tried to paint the fuselage with five-color lozenge patches I don't like the result and removed the paint. Luckily the white primer has survived the attack with alcohol.
So I tried something different ...
Now patience is needed to not apply those huge decals on fresh future.
10 February 2021, 20:55
That wing-job looks fantastic so far - hope the result will follow the intended path! Watching with a lot of interest! 👍
10 February 2021, 22:04
Thank you Slavo! It looks like the special lozenge decals are working much better on a more glossy surface. 🙂
11 February 2021, 19:42
The lozenge decals are applied on the wings. More work was to cut 0.7mm rib tapes and wider tapes for leading and trailing edges and apply them.
I'm very happy so far. Luckily to lower surfaces don't need lozenge decals, because I need a break now!
12 February 2021, 20:55
Thank you Gordon! The major problem was a clean cutting of the 0,7mm rib tapes.
13 February 2021, 15:51
Oh a bughunter special aye?... I've been gone for a year, I've missed your insane craftsmanship!
13 February 2021, 15:53
Welcome back Chris! I have built more in the last year than ever before, but SM does not forget anything, you can still enjoy it afterwards😉
13 February 2021, 16:24
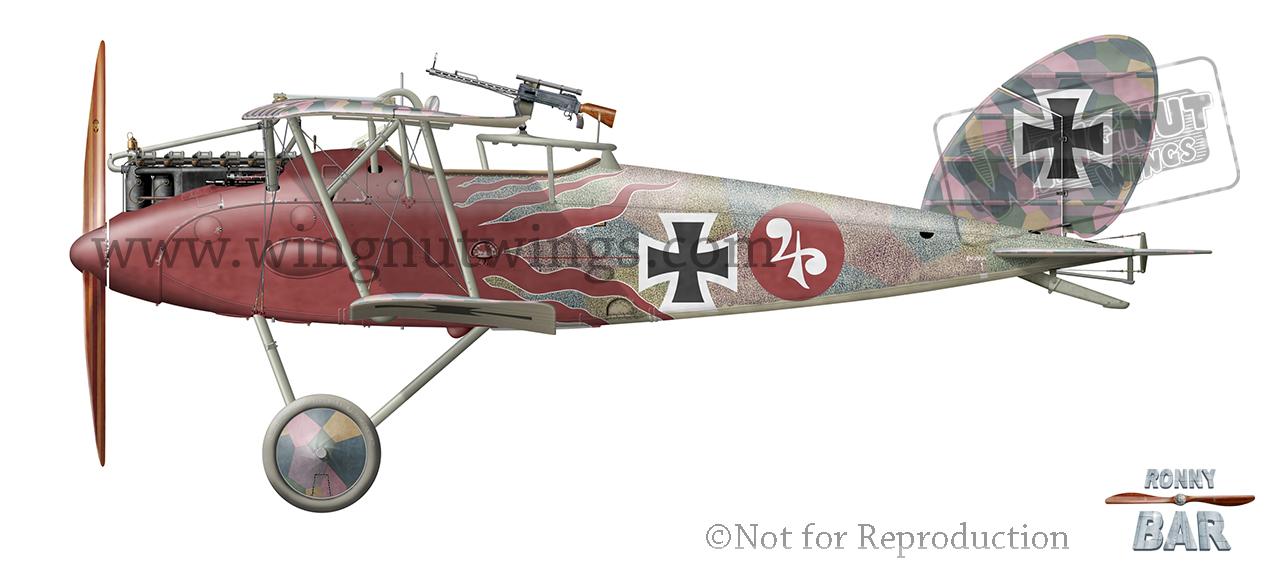
Thx James! I only don't know, if I break the strong color with a very thing layer of linen or off-white. I like the look in the profile by Ronny Bar. But I don't want to loose the fine fabric structure.
13 February 2021, 19:43
Coming together beautifully! What was your technique for cutting consistent .7mm rib tapes? I've had two problems, consistent width and decal chipping and cracking.
14 February 2021, 12:47
I used a fresh scalpel blade and a steel ruler. To be able to hold the ruler, the pieces could not be too long.
15 February 2021, 17:03
The wings are primed with Alclad white, shaded and some layers Future added (low pressure, no thinning) as the lozenge decals need really a glossy surface. On top of the decal there is no varnish yet. The pictures shows pure decals.
15 February 2021, 20:10
That looks just plain excellent - not that any of your builds would be lacking in any departments, but you still keep pushing closer & closer to representing all the different real materials involved in these machines...
The wings and the lozenge camo, shading & co are just a perfect scale representation of what they should be, nothing missing & nothing overdone! 👍
16 February 2021, 13:23
Thx Slavo! The paint job is still my weakest point, I tend to use to much paint, so the lower layers are often too much covered once dried. And also on the wings there some areas, where it was not glossy enough for this picky transparent decals. Added a new picture of comparison to the profile.
16 February 2021, 19:41
This is like watching Michael Angelo argue with Leonardo da Vinci... 🙂
17 February 2021, 03:22
I have no excuse for missing class thus far... That fuel tank is just amazing. So, of course, is the rest 👍
@Greg: I know the feeling 😭
24 February 2021, 13:49
Welcome Alec 👍 No problem, everyone needs a vacation! You can always catch up on everything.
24 February 2021, 15:35
I sure did 👍. You always do a spectacular job describing your work, very helpful and much appreciated by all, I am sure.
24 February 2021, 18:25
Alec, are you sure with "much appreciated by all"? 😳 I'm just an advanced beginner after all and have to learn a lot.
Now I had an déjà vu! After the experience on my (still on hold) Dr.I I wanted to avoid masking on top of the decals and so planned to use the kit decals. But they are very brittle, the black crosses fall in many parts. At that time I had the white-border-crosses already applied but they breaks the later during try to cut them on the separated (by kit!) control surfaces. But I was not able to remove them completely without ruin the decals below.
So I put flat varnish on top and masked the crosses, at least on the rudder. But my self cut cross was not perfect, and other mistakes, so the end result is not that great. On the upper wings I need to think about a solution, I put them aside. Let's see ...
The middle part of the upper wing and the fuselage are still unpainted, or more the first try is removed. And I have started to cut brass sleeves for rigging. I'm doing everything I can right now to avoid having to paint the fuselage, but I'm starting to run out of excuses.
@OttovonLindberg I used a new scalpel blade knife ( I have a deep respect for those little bastards as they can brake) and a steel ruler. I was only able to cut shorter pieces, otherwise I'm not able to hold the ruler and the decal moved out, or more the knife pull it out and you will get inconsistent wider stripes.
24 February 2021, 20:42
Found some out of order pictures, sorry. Now all should be in correct order.
24 February 2021, 21:03
Some new pictures of work here and there ... I'm really glad to have the lozenge decal work behind me!
25 February 2021, 21:51
Boy, I thought I had it rough with the decals for the S5, being brittle and broke over the side radiators. But that could be fixed with a little white paint. I can very well imagine that this has the potential to drive one up the wall..... I am sure that you are pne of the few who will come up with
a exemplary solution.
25 February 2021, 22:22
Hanno, today I ruined even the small stencils 🙁 Take another ones from a CL.IV kit and sprayed a layer Gunze metal primer (should have done this on the original ones), now the text is wrong, but at least the position VL HL VR and HR are readable.
[img1]
After I found this sketch I thought about how the replicate that strut mount. Now it is done 😉
%20wing%20and%20undercarriage%20detail.jpg)
27 February 2021, 22:25
Uff, the stipple camouflage paint job is finally done! Hope you will like it.
4 March 2021, 20:42
Looks great 👍 . I imagine that to get that nice even pattern was not easy to do.
5 March 2021, 01:04
That's looks remarkable paint job. I'd run away screaming if I was told I had to paint that scheme. 😮
You certainly don't go for the easy option Frank. 😉
5 March 2021, 15:48
Thx my friend! The other options needs more work, often also lozenge decals on lower surfaces (=double effort on wings) and this special camouflage on the whole fuselage. On the other hand I'm trying to do the flames now, which is also not easy. More work than expected.
5 March 2021, 19:41
I don't know the answer to your question in photo 120, but you my want to reach out to Mirage hobby. It's a long shot but you may just get lucky.
5 March 2021, 20:13
I'm not sure, but the web domain moved to a shop, which is selling the remaining kits. This kit here is long gone, otherwise it would be nice to have replacement decals for the struts. I found out the answer to the question myself😉 All are prop decals, 6 is "Niendorf", 8 is "Propulsor" and 5 is "Halberstädter Flugzeugwerke". They are not only the manufacturer of this aircraft but also wooden airscrews.
The decals are really problematic, the next batch of pictures soon.
5 March 2021, 21:07
For me is the handling of the kit decals is the weakest point of this kit. I'm able to work with them.
I would say that I would never have achieved this result with the decals. In this respect, I am satisfied.
This must now dry thoroughly before I mask again and paint the rest of the nose red.
5 March 2021, 22:03
Brilliant worksmanship as ususl snd what a beautiful and colorful schemeFrank👍
Wow!
6 March 2021, 09:52
Fantastic job bughunter. Especially the masking and spraying of the flames..
6 March 2021, 09:56
Your painting job is 'not perfect' indeed, but it is amazing ! And it's not a word I use lightly...
6 March 2021, 14:06
Thank you mates for your great feedback! I like those colorful schemes😉 But this is a very time consuming project, with many parts in the kit, lozenge decals and huge effort paint job.
Should have used liquid mask on problematic points additionally. Afterwards one is always wiser.
6 March 2021, 16:33
Well, we all learn wile doing. And most of us learn by watching you do...😉
6 March 2021, 21:47
Lots of „never seen befores" for me in this project. Wasn't aware of this cool camo technique, and even more so that the stiff prussian dominated german army allowed such a degree of non regulation aircraft decoration. Love these „hot rod style" flames, great work !
7 March 2021, 09:27
Thank you! @Lord Bilbo - I think everyone prefers to learn from own mistakes. That is called "experience": be able to detect, that you made the same mistake already before😉
@Hanno: the kit contains two larger sheets with different camo shades for the fuselage with little white "holes", which have to be applied on a base paint where the color matches the dots. Found a build on britmodeller with a nice result using this decals (in small pieces, panel by panel), but I preferred to use the airbrush.
7 March 2021, 16:28
I didn't comment since a long time, even when I following your builds. Reason is, that I'm constantly running out of words of superlative. What you doing here just makes speechless.
So I am sitting back and enjoy the show. One after the other,....thx Frank
7 March 2021, 17:52
After red painting I could add the remaining details to the fuselage. This is a huge step forward! The number of remaining parts is going down dramatically😉
14 March 2021, 21:29
Well, well, well, when props become regular, the master makes his own spinners. Another step closer to complete scratchwork.
14 March 2021, 22:37
More glorious eye candy from Bughunter's modeling shack 🙂. I really like the red color variation achieved with a different underlying color 👍
15 March 2021, 00:21
Kept watching but could not find the time to post in proper here.
I´m really impressed by the results of the masking & airbrushing jobs 👍 - I think that especially on "front modifications" this method - tiniest imperfections included - provides a better result than a completely flawless decal would. Looks very natural and true to original (in this case, as I imagine it😉 )
15 March 2021, 08:54
The tail skid (to take just one exampe among many, many) is amazing... the modest little tail skid !
15 March 2021, 13:16
Thank you mates for your great feedback 👍
@Christoph I like to work on the lathe, even if I have to learn a lot, how to do things on it. So it was a great opportunity, and the final piece is nice.
@Alec: that works even below a metal finish. I primed a Nieuport grey and white to get this effect.
@Slavo: I wanted to cut a second set of masks, with only the outer line to put that on top of the first layer to secure the small stripe. Then when I was working on it, I just forgot about it! I am getting old 🙁
@Boris: I try to improve those parts with every model, at first airscrews, then tail skids and now I really like the freshly build metal undercarriages of my latest models.
Now I can start the final mounting process. With finishing the fuselage, my preliminary conclusion is that on the one hand it's a great kit with lots of detail, but on the other hand there are some fit problems, as if they never tried to test build the kit. I think there are not many of my finished models with such amount of work spend! I have also the Halberstadt Cl.IV in my stash, but it will move now to a very low position😉
15 March 2021, 16:41
Total awesomeness. Will bookmark this build for my 1/32, I'll be happy if I achieve half of your precision.
17 March 2021, 08:31
Thank you Mathieu! Your words are nice fuel to keep the build log running!
Oh yes, the WNW seems to be a great kit, as far as I know from some friends. But the finished 1/32 biplanes are too big for my cabinet.
17 March 2021, 18:53
Meine absolute Hochachtung für das Anbringen der Lozenge Decals auf der Hälfte des Modells!! Und überhaupt. Genau. 🙂
160-165: Hast du ein langes Stück Leine für mehrere Abschnitte der Verspannung verwendet, um alle gleichzeitig stramm zu ziehen?
17 March 2021, 18:57
Dankeschön Bernhard! Die Spannschlösser links im Bild 160 habe ich in einer ruhigen Minute nur schon mal aufgefädelt. Die gingen alle in die Fahrwerkverspannung. Da noch nichts verklebt ist kann man die noch auf dem Faden verschieben, aber die Teile können auch nicht mehr flitzen gehen😉 Das ist dann fix montiert:
- am aktuellen Ende den Faden in der Messinghülse verkleben,
- das Spannschloß bzw Öse einkleben.
- Das nächste Schloß in das gegenüberliegende Loch kleben. Kurz warten, strammziehen, Hülse verkleben und abschneiden.
Und den Zyklus von vorn am nächsten Seil.
Erfordert aber ein gewisses mitdenken beim Auffädeln ...
17 March 2021, 19:32
A huge step forward, the rigging is done😉 Have you ever seen such small hose clamps?
18 March 2021, 21:06
Alec, here you can see the used Gaspatch turnbuckles: 10 Albatros, 8 One End and 18 Anchor points
19 March 2021, 14:28
Great work indeed @bughunter. Regarding WWI planes, it is so far, to me, a mistery which turnbuckles to use with which planes. I have a few 1:48 and 1:32 WWI planes in my stash and at some point I will have to dive into this subject myself. This build is a great inspiration to me. 👍
19 March 2021, 15:01
Thank you Ricardo!
That turnbuckles business is no rocket science 😉 At first: check references, e.g. pictures, Datafiles
The available types of Gaspatch can be seen here: [img1]?c=2
Some general, typical rules:
- only one turnbuckle in one rope, so a Anchor point on the opposite site
- turnbuckle on the lower side, so the mechanics have easy access
- if a turnbuckle is somewhere in the rope: Type C
- if there is a mounting device (two noses and the tb between) see pic 110: type Albatros
- if the mount is hidden (inside the fuselage etc): One End
- Type A is Type C with a Anchor point
- Type B is a turnbuckle mounted to a fitting, on a wing for example
A special thing are the british RAF wires. Those were no steel cables but flat steel bars in a aerodymanic shape with threads on the ends. Those have on both ends special mounting terminal, but not turnbuckles.
And again, check references.

19 March 2021, 16:29
Wahnsinn das anbringen der Spannschlößer 👍 👍 und die Lackierung ist sehr gelungen 👍
19 March 2021, 17:47
bughunter, the medical world lost a star neurosurgeon with you.
19 March 2021, 17:52
Thank you mates! Your comments are highly appreciated 👍
@James Oh yes, I like this bird too! I know someone who told me that this is the most beautiful biplane build ever😉
@Dietmar That is all a good preparation. This was an easy task, compared to other birds in my cabinet. For example on the lower mount there was a half ball in plastic (see pic 168). I drilled holes instead. The Albatros balls need a 0.7mm hole.
@Alexander and Daniel: No, I can't see blood! And I could not live with mistakes in that case.
Worked on more details today, but the weathering is not yet done.
19 March 2021, 19:42
In a last sprint I added again a lot of details. All the prepared parts are now mounted, for example the air screw, but I don't have more pictures.
The Halberstadt CL.II is finished now, so again a project come to the end.
Thanks for watching and commenting! This was a great fun to build this nice aircraft and I hope you had some fun too😉
20 March 2021, 21:56
Thank you Christoph! This was a model with bigger effort due to details, decals and paint job.
Don't miss the album with the final pictures:
Halberstadt CL.II | Album by bughunter (1:48)
20 March 2021, 23:05
And a big pat on your shoulder for a job exceedingly well done... 👍 🙂
21 March 2021, 11:46