
Hírfolyam
")
")
")
")
")
")
")
új fotóalbumot adott hozzá.
115 képek
1/32 Trumpeter F4F-4 Wildcat. 
1:32
As is my usual way, I have absolutely no idea what I'm doing, just going with the flow, it seems to want to be like thi...


Projekt: Grumman F4F-4 Wildcat


22 2 August, 14:09
Made a start on the 1/32 Trumpeter F4F-4 Wildcat, I'm having my wings permanently folded, this is just all dry fitted so far, I'll add more detail later when the wing is added. No point cleaning up the inside part of the wing of ejection holes, as this will be hidden behind the wing. Think it looks ok so far.
2 August, 14:11
So today I've semi painted up the other sides wing root fold system. And started dry fitting the engine. Need to pick a scheme from the Techmod decals at some point, thinking of 1 or 4 so far.
2 August, 14:19
Ooh landing gear and engine support structure. Just needs a few touchups, thats it done for now, have to glue it all up straight away, doing it later would be a pain in the ass. Looks ok, I'm no expert on these things. Just for fun build in-between other stuff.
8 August, 12:51
I think, as an engine that'll do really, don't need anymore detail on it. Couldn't see it if it was there anyway. I'll paint the rear bank of cylinders, but that's probably it.
9 August, 13:43
That's all for today, making the most of what you get in the kit, only added bits of wire, no sense going mad with detailing parts you wont see. Prop tomorrow, finish the rear bank of Cylinders, and make a start on the cockpit. Looking nice so far, looks like an engine to me.
9 August, 13:43
Engine, exhaust manifold system and front bulkhead done. For what you can see, the kit parts are good enough. No point spending lots of money on a resin engine. Just some wire and a bit of paint.
10 August, 14:05
That's it for today, don't think I can handle seatbelts as well. So far so good, looks like a cockpit, when it's in the plane, you won't see anything. I tarted up the kit seat, as I couldn't stomach making the PE eduard one.
11 August, 19:54
So I can do seat belts, but I hate doing seatbelts, not brilliant, but for all you'll see, it'll do me. My fear of PE is lessening, I'm getting a bit more confident each time, next the top straps. Then I can tackle the joining of the fuselage halves together, which is tricky on the 1/32 Trumpeter F4F-4 Wildcat, as a few parts need extra sanding to fit. Looks ok to me so far.
13 August, 11:00
Seatbelts done, that'll do. With my eyesight it'll look amazing from far away lol 😆 but for me, as a learning exercise, looks fine. I would wholeheartedly recommend HGW Laser seatbelts, they make it a lot easier.
13 August, 13:09
Tomorrow I'll make a start on the Empennage and getting everything to fit. I'm not using any of the PE hinges either. Then wings.
13 August, 18:29
Hmm, this is going to be interesting. As usual no idea what I'm doing, just riding by the seat of my pants. I'll try and block in all the colours then look into weathering. Who knows how this'll look.
30 August, 14:06
Well, it's blueish grey now, or greyish blue. Because I'm a cantankerous stubborn fool, I paint everything with brushes, Main colours blocked in, teeny tiny fiddly bits added, now I've just got to build some more layers up, start lightening and shading areas. It won't be brilliant, but it may look good on my shelf. Which is the main thing, due to lack of space, pretty much all the aircraft I'm going to build will have folded wings.
31 August, 19:44
Very nice, the wing internal colour looks spot on👌, l tried mixing this colour but struggled to get right tone.
Nice looking kit, what do you make of the Trumpeter kits??
Good luck with the next steps 👍👍
31 August, 21:02
Hello Mr D, so far I've only looked at early Trumpeter kits, panel lines are a bit too light for me, the early ones have gimmicks like working wing folds, and the PE hinges, but they build up quite well, and to me look like what it says on the box. I've got a lot more Trumpeter and Hobby Boss kits to build up in the future.
31 August, 21:17
As is my usual way, I have absolutely no idea what I'm doing, just going with the flow, it seems to want to be like this.
A very, very long way to go still, it'll be a lot lighter than it is now, and not so stark. I know, I shouldn't weather it until later, but i can't help it, it's a curse.
2 September, 16:23
It's a cracking looking model 👍👍
The weathering is looking good nice balance.
The internal metal parts ....the yellow/green..Did you mix or have the colour ready in a bottle
2 September, 17:14
Mr D, the green is just mixed up as and when I need it, it's just a caramel mixed with green paint.
2 September, 17:20
Thanks Ian, good to know...l tried mixing from yellow n green but didnt look right.
Cheers 👍👍
3 September, 16:11
Mr D, try black and yellow. It sounds strange but it works. The more yellow, the more like yellow zinc chromate it looks. More black gives you the OD version.
3 September, 16:28
")
új fotóalbumot adott hozzá.
19 képek
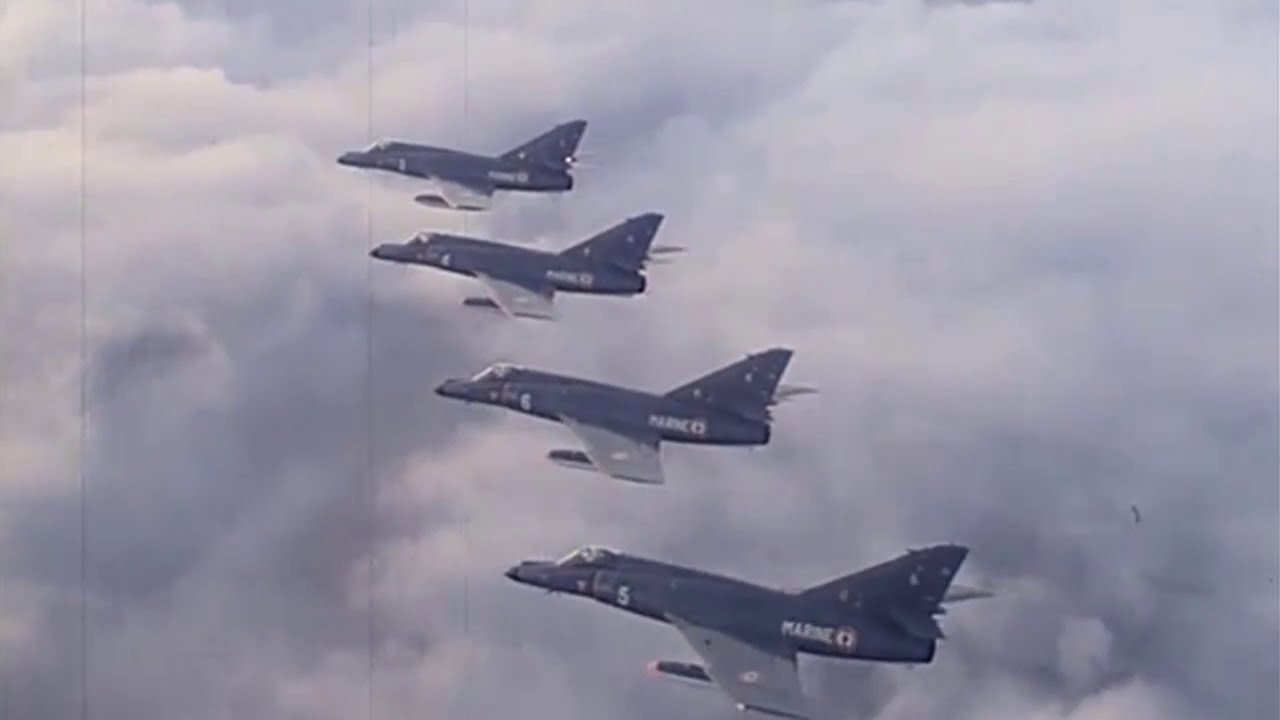
Super Etendard (Academy\Modelist)
1:72
The brave Argentine "Etendard" number "02" is finished.


Projekt: Super Etendard (Academy\Modelist)

29 17 August, 09:21
Excellent project, watching. The Argentine Étendard aircraft were effective in causing significant damage during the Falklands/Malvinas conflict.
29 August, 21:11
And, in conclusion, a video about French "Etandards" and other deck-based aircraft, after which I want to build the F-8 Crusader as well. It looks too unusual! 🙂
Youtube Video
3 September, 16:26
")
új fotóalbumot adott hozzá.


32 26 July, 18:08
Very nice cockpit! How do you find the 3D decals, are they worth the extra cost?
17 August, 07:48
Welcome mates. In 1:72 scale 3D decals are a way better than pe and my hands are to shaky to paint. I use them for most of the models with open canopies. For inflight models and with pilots i think it's not necessary. With Kelik and Eduard 3D i'm not always happy, but Quinta for me it's the first choice.
17 August, 08:54
Falk maybe it is the lighting but that blue on the fuselage spine looks too dark for the color of a Bavarian flag. You might want to add a bit of white to the mix.
2 September, 10:12
It's not as dark as it seems on the pic but you're right. It will need a lighter shade at the end.
2 September, 17:33
Starfighter is an amazing looking fighter ✈️ look brilliant in the chosen scheme.
Starfighter is a good model for creating heat exhaust effect on.
Like the project 😀👌👍👍
3 September, 16:25
")
új fotóalbumot adott hozzá.
25 képek
Interflug Iljushin IL-62M
1:144
The inside of the cowling is painted grey and then masked. The stainless steel edge of the cowling were sprayed next. Mo...


Projekt: Interflug Iljushin IL-62


 3+
3+ 17 30 July, 07:20
Taking a seat and I keep my fingers crossed that the building will be joyful and successful, Michael!
30 July, 09:33
Can't miss an IF project 👍
That windshield is terrible - what's your plan for it?
And most importantly - are you going to build Lady Agnes? 🙂
30 July, 14:27
Hi mates. Nice to have your interest and you on board. Thanks Zbynek. So far it took much more effort than I expected. Lets see how it continues.
@Mr D: childhood memories. I suppose you build it in scale 1:100? VEB Plasticard?
Lukasz, I bent and glued it und sanded it flush afterwards. As I will use the Authentic Airliner decals for the cockpit windows, they do not need to be transparent.
30 July, 19:16
Hi Michael 👋,
Yes it was the Veb version, very basic....but l was enjoying building it as fast as l could.... Glue finger prints n all 🤣
Can you sort the cockpit glass ?? Surprised.... Zvezda usually very good.
Thanks for your upload..... I'm big Soviet era fan.
30 July, 20:20
Good choice Sir, the AA window decals are super cool.
Unfortunately some of their livery decals have some errors.
30 July, 20:24
Yeah, I was surprised by the fit issue too. On the upside are definitely very fine and consistent engravings which I hope to preserve.
And - by the way - it won't be Lady Agnes¹. I like to represent the plane I flew to Moscow with. Unfortunately I do not have a picture of this particular aircraft and am thus not sure about it's actual registration. The history of some a/c is available to me, so I can rule out some. And I photographed two parked IL-62M too while taxiing which I can rule out too.
With these informations I ruled out registration: SEW, SEC, SEF, SEG, SEY and SEK. So right now I will go for registration DDR-SET.
¹ a word for those not familiar with Lady Agnes. She is obviously an IL-62M too and was flown to Stölln. After being stripped of everything unnecessary she landed on a 900m grasstrip (how on earth did they manage to get a permission for that?!) and is used now as a Cafe there in it's original Interflug livery.
You've never heard of Stölln? It is located in the federal state of Brandenburg, about 40km west of Berlin and is the oldest aviation site on earth and in the history of mankind. No other that Otto Lilienthal tested some of his gliders there.
31 July, 06:57
Watchimg with pleasure! Of course, I remember VEB Plasticard kit very well 😉 And thanks for the interesting story!
31 July, 07:10
Oh, a very personal project - watching! Sorry, I digged so deep into my build that I missed yours.
So I'm now in and good luck!
Regarding putty: I'm now a fan of Tamiya light curing putty which hardens quickly with UV light.
If wee meet again I like to hear more background about this trip and can provide other insights 😉
1 August, 21:14
Hi Frank. No reason for apologies. You are welcome anytime.
Looking forward to our next meeting.
2 August, 14:10
Looking good, really nice shaped Airliner 👍
Do you use the black to find imperfections?? Or is it a pre-shading??
I'm in process of building the Veb Be-6 Soviet flying boat, and may help me to do similar.
Thanks for your uploads... Like anything from Soviet era n russian.
3 August, 21:12
Welcome mate. Always nice to have you around.
Yes, Mr D, I use the black primer to identify imperfections as the grey one is too close to the plastic color and with the white one, flaws are not that visible. The downside is that it takes a lot of color to cover the black. So next time I will most likely go for a lighter primer color.
4 August, 10:19
Thanks 👍👍 for letting me know, l built the Yak-3 made by Zvezda, lit was quite nice to build, some of the fine parts were really accurate, but then it was bit gapy around the wing, but otherwise pretty good.
4 August, 11:08
Nice to see the update on this one 😀.
The PE parts give a more crisp realistic effect.
Good stuff 👍👍
30 August, 20:03
Welcome. Another set of blemishes is fixed and the primer coat repaired. A light sanding with grid 1200 ensured a good base for the polishing steps which will be next. No pics as all looks more or less the same.
3 September, 16:23
")
")
új fotóalbumot adott hozzá.
23 képek
Cigars of the Pharaoh (Puss Moth)
1:72


Projekt: Cigars of the Pharaoh (Puss Moth)


41 26 March, 05:19
Go for it Greg - not much room for wiring though! I also thought you'd go for one of the AVI/LF styrene kits.
26 March, 11:30
If I hadn't got excited and spent $35 on this kit 5 years ago after seeing your build, I probably would've gone with the styrene - they do look really good. Oh, well, we work with what we've got...
Of course... that's only until I figure out that the correct version of the Puss Moth is the Mk. V and not the Mk. XIV and then I can't unsee the problems... 🙂
26 March, 16:00
As for the wiring, I've drilled out the engine cowling to create enough room to slot in the DC motor. It's VERY tight and I was very careful not to breach the surface. I haven't tested it yet, but I think I was able to get close enough. The small DC motors always have such a small shaft, which can be helpful but sometimes creates a challenge. I'll run two thin wires out and then hide them behind a small, scratchbuilt control panel. Then under the styrene floor and down through a hole in the underside of the fuselage. I'll have to put a resistor on it in the base, otherwise the motor will likely spin this little plan apart. 🙂
26 March, 16:07
This is interesting! I'm following. I have a question. How do you connect the motor to the propeller?
26 March, 16:42
Because I can't quite get the DC motor out of the engine cowling due to the size, I'll have to add a styrene rod to the propellor and then have it go into the cowling. To attach it to the motor itself, I'll likely drill a small hole (about the same diameter as the DC motor shaft) into the short styrene rod and then fit it to the motor shaft with a tiny bit of CA glue (making sure not to get the glue INTO the motor itself). Then I'll glue to styrene rod to the propellor. It'll be tricky to keep everything centred, otherwise the spin will be off. I'll take lots of pictures to show the process... if it works. 😉
26 March, 17:06
I am asking about the centering. I have some experience with DC motors. I have several similar ones collected from children's toys, but I dare not try.
26 March, 17:16
Centering... well now... usually what I do is drill a hole as close to the centre as I can manage it... then I drill a little bit this way... then a little bit that way... then I slice the rod until I get a bit that is arguably in the centre...
Then I ignore the wobble. 🙂
26 March, 20:29
Alright. Some progress. I have out some of the cockpit to make room for the extra windows. I was as eloquent as Uwe, so I covered my mistakes up with some thin sheet polystyrene. Put in some wires to reinforce the wings, and got the propeller spinning. So far so good, I think.
27 March, 05:50
OOH. An Omega kit - I have one of their BN Islanders - Watching this one.
29 March, 19:45
Got the fuselage more or less put together and painted the interior. Next up will be fitting in the windows… if I'm not back in a day or two, notify the authorities. 😉
3 April, 05:21
The frame of those windows seems very fragile being resin. You have great skill, Greg!
3 April, 17:45
Thanks Cuajete - the resin is quite tricky to work with and I had to add in some extra windows, so it was a bit touch and go. I did copy Uwe's idea to use some wire supports to both hold the wings on and provide some structural stability. The only problem is that I put one of them in the wrong spot and had to cut it out to remove and replace it.
3 April, 17:50
After an enormous amount of fiddling, I finally got the windows in place and Tintin, Snowy, and the medical kit seated. Now I can start to close it up. Thanks god.
12 April, 06:38
Nice project again. A resin kit is always tricky and the tiny parts fragile, especially the u\c. Luckily this one will be flying. btw , Greg, do you mind making the propeller spinning in the opposite direction, so that it pushes itself in place ? I did it on some of my models, it is hardly visible . The main advantage is that you don't need to glue the propeller to the motor axle with ca, just a little bit of tacky paste inside the propeller tube will be enough.
18 April, 06:54
Greg is building an Omega resin bird 👍 I have some in my stash - in 1:48 as usual - but have not started one until now.
18 April, 12:53
You're right, Erik. I replaced almost the entire upper canopy framing with polystyrene and wire. I had to add some windows to this kit and wanted some consistency in the thickness of the frame. It was tricky to get everything glued in place, but I got it done more or less to my satisfaction. I'm hesitant to add the u/c elements because they seem rather fragile, but you're also right that it being in-flight will help a lot.
18 April, 14:09
I'm intrigued by the opposite spinning propellor idea. I can see where that might make things easier. Hmmmm...
18 April, 14:11
You haven't missed much... I had to redo much of the canopy... updated photos coming soon~
6 May, 19:03
And... we're back. As I mentioned, the canopy basically fell apart while trying to install the windows, but it seems to be stable now. I also added a small tail wheel (as in the reference image) that I scavenged from the spares box. Next up, paint it pink and fix any issues that reveals. 🙂
23 August, 18:21
The first of my "back to school" photo album updates. This was a really challenging kit to build. I'm not sure how Uwe did such a great job on his version... The canopy/wing spar almost defeated me. The clear parts are a lot less clear than I would've liked, but at least you can tell who's flying the plane, right?
3 September, 16:21
új fotóalbumot adott hozzá.
12 képek
Stash & Hauls
I'm confused about how they made this decal sheet. The red "T" shape at the top of the tail seems to be incompletely pro...


16 25 December 2023, 21:07
Haha how many crusaders and voodoos can a man have ??? 🤣
Answer = Not enough
Looks like my phantom stash… 38 and counting 😵
30 December 2023, 11:10
Hahah yes I certainly have some specific interests! Not pictured are five conversion kits I've collected between the two planes so far, and a box of Voodoo aftermarket.
And 38, wow. I imagine you've built quite a few more, what's your pick for who makes the best one? I heard the recent Tamiya release was among the best models ever kitted.
30 December 2023, 14:03
Sorry for the late answer. TBH , they all have their ups and downs. The Hase is getting old and lacks detail but still renders a good likeness. Best for me is the Zoukei mura kit. It's just personal as the Tamiya kit is fantastic as well. I actually quite like the old italeri kit as a base for a decent model. It's cheaper than the Hase and the savings can't be spent on useful resin parts. Academy has taken the place of Hase as the go to for a decent well priced kit.
15 February, 08:19
Oh yeah hahah, I'd like to know if other modelers have a singular obsession with a specific subject like I do with the Crusader. Maybe it was because it had its own episode on Dogfights and featured a lot on Area 88. It's just a unique and aesthetically pleasing fighter jet. The Sword RF-8 release got me more into building some 1/72 scale so I'm getting a couple Academy kits and decals too.
18 February, 23:16
I've noticed something frustrating about this Aeromaster decal sheet. There's a section of red missing from the "T" shape on the F-8H option. It looks like only the black outlines have been provided and so the only option appears to fill it in somehow, be it paint or spare decal? Either way, I feel like it would be really challenging to get the color to match perfectly. Has anyone built this or done something similar? Is there something I'm missing here? It's a shame because this is a really cool option I'd like to build but I'd only do it if I felt like I could match the decal color perfectly.
3 September, 16:11
")
")
")


")
")


")
")
megszerezte ezt
 78148)")
Bomber Aircraft A-20K Самолёт-бомбардировщик Б-20Ж  Chernomorskaya Yhrushka (Black Sea toy) 1:7278148 1989 Új doboz
3 September, 16:16
")
")
új fotóalbumot adott hozzá.


18 26 March 2023, 09:37
Je suis absolument impressionné. Bravo. L'intérieur est magnifique de détails. Je suis en train de le monter. J'ai été piégé par le lest à mettre dans le nez et les antennes qui ne sont pas très correctes. Je ne sais pas comment vous avez réalisé le treuil.
Un grand bravo en tout cas !
29 August, 04:17
Merci pour vos commentaires. Thanks for the comments!
Le treuil est réalisé à partir de plusieurs épaisseurs de carte plastiques collée ensembles et mise en forme petit-à-petit à la lime.
1 September, 16:48
Je vais donc suivre ces bons conseils, mais je ne pense pas être à la hauteur. Je vais faire de mon mieux.
2 September, 14:05
")
This kit is a pig. The parts only kinda fit. The amount of flash is stupendous. The detail is, well, lacking. The instructions are another level of 'WTF". Otherwise, it looks good when complete. A good paint job covers a multitude of sins.
")
2 September, 14:18
Dream kit of my youth. Unaffordable then. Still looking for one with a acceptable price tag on it.
3 September, 16:15
/hu/search.php?q=*&page=newsfeed&fkSECTION[]=Newsfeed
search-solr.php?lang=hu
35
35
/hu/search.php?q=*&page=newsfeed&fkSECTION[]=Newsfeed
35
todo