

Tamiya's Repsol Honda RC213V'14


I have attacked the exhaust system first, as what I do with it will set the tone for what else I have planned. I do hope you like what I am about to show you all.


Both sets are now to be painted the clear yellow.The 'dust'on the surface is polished off with a pair of cotton gloves, rubbing gently, and the chrome looks better than chrome. !!!

This is one of the most spectacular aspects of the latest Moto Gp bike technology. And the welding and heat leave these almost 'pretty'colours behind. I love it.


Even if it didn't turn out well, I can always go back and start all over again.


On the swing arm, there are strips of semi gloss black that must be done. Thanks to my trusty Parrafilm "M", it turned out well.

It may not look like it, but this is the same swing arm as the previous image. The light and chrome don't mix.

And again.

The carbon fibre decals are now dry.

It may not look it, but there are 5 different shades of metal paints here. !!!!!!


No matter what. ALWAYS wear your cotton gloves. It will save you a LOT of anguish. 🙁

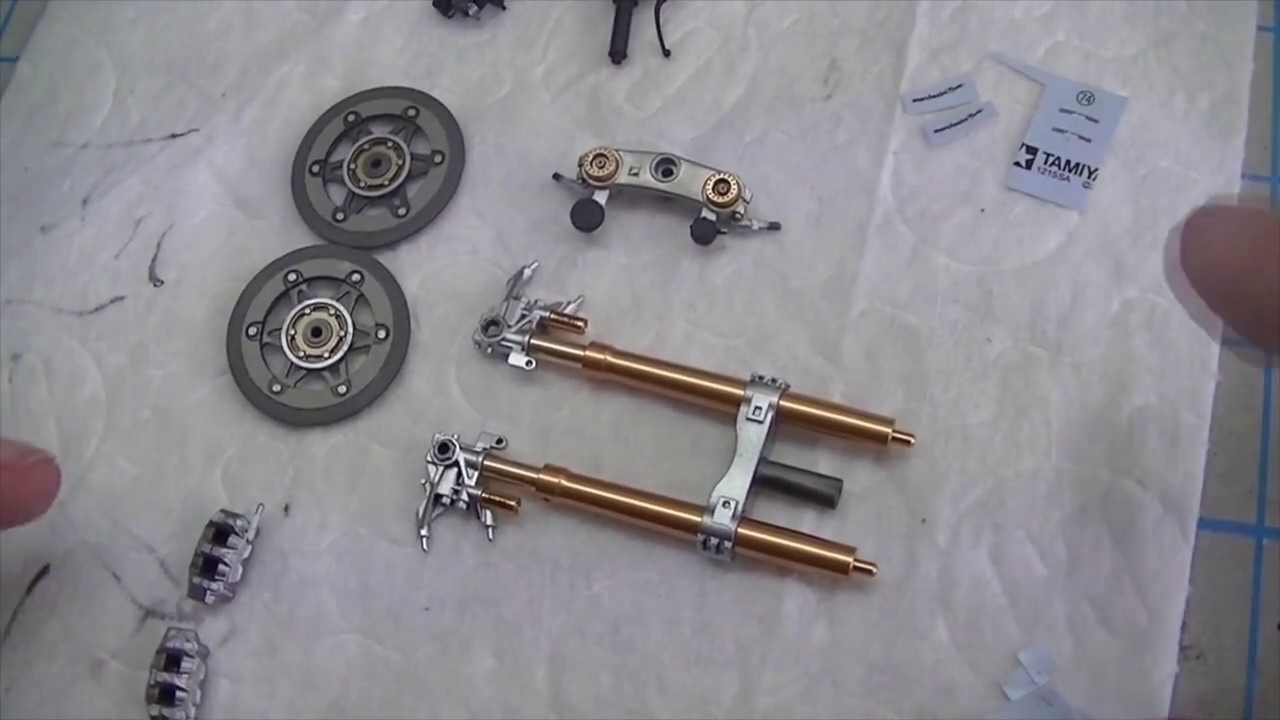
One of the more difficult aspects of bike building is the wheel rim paint jobs. So easy to 'overload', in fact, I just may have to strip this back and repeat.

I am NOT HAPPY with this result. So I will remove the paint and go with the spray can paint I can 'decant' as that is the best way to get the coverage I want without having the part look drowned in paint.

When ever possible, I always buy two of the same model and in this case it is no different BUT, the 'update fork sets' were $35 here each, but from Japan, two for the price of one with postage. Go figure.

Masking off is all about clean edges when the mask is removed. I prefer masking in a way that as soon as you have laid down the last coat of paint. STRIP the masking while the paint is wet. Clean edges result.

The front discs are carbon fibre. The 'colour' I use is German RLM Grey. the inner metal is left bare plastic, highlighting the fastening bolts with just a dab of silver. The rear disc is steel.

These gems deserve the treatment of making them look like they BELONG on the bike and would make perfect sense to paint them as such, and leave the fairing OFF.

Any reference image of these latest Honda's all show this almost gold metal, built up of dozens of pieces and welded by a computer welding jig, leaving a 'signature' of heated metal that changes the colour of where the seam lines from the weld are left.

The strange looking 'protrusion' on the throttle side is a safety measure, following an horific crash when the brake lever was hit buy an other rider at the start of a race, jamming the brakes on and flipping the bike and rider end over end.

Using clear plastic tubing, I replicated the hydraulic brake and cluth fluid lines by running some clear green into the tube and removing it before attaching it to the resevors, giving it a more 'authentic' look.

Being such short pieces, I attached them first saving the effort of trying to locate them when it was finished.

The result is as real as you can get.

Alclad base black first. Then the 'chrome' alclad, followed by clear Tamiya yellow to create the 'gold' look. THEN, winding ultra flexable thin plastic tubing around the pipes, creating a 'space' where the weld marks are to appear, spraying clear blue.

Even though most of the colours of the pipes will not be seen, but what is visible, it will look OK.

It may look "A bit much" to some of you, but better this than nothing at all, and that is what we are all about I believe, getting a good result rather than hearing, 'you could have done this'.


Now. This is where it got confusing. The "recomended" colour in the instruction said TS-96, 'fluro orange', the same as the wheels. BUT, look at the fairing, it is an orange yellow, several shades lighter than what is called out. So, I made my own colour.

You will notice here that I have a really sharp edge to the colour. I masked up with a 'tag' hanging off that I could grab and lift the mask off while the paint is still wet. NO feathers. 🙂

I get the glossy look by 'loading' the paint on in stages, and as it gets a 'wet' look, I stop just when it all looks equal.


No dust or blemishes at all. I am really pleasede that I have perfected this technique, as the results are great.


Now I wait for a couple of days to a week to let the paint 'cure' before I start adding sticky masking tape that will leave marks that just cant be removed.

The tyre decals and the small ones on the rims are flimsy and difficult to master, but patience and the use of the glue substance from the decal paper is ideal for getting adhesion on the spot your placing them on the rims. The tyre ones are adhesive back

Lucky I noticed it when checking what I had photographed. The spot between the repsol and the HRC sticker has a curl under, so I went to work and fixed it before it dried.

All fixed and clean.


Spanjaared. There are actually three tubes here. The brake line. Motion sensor. And a clear tube that ends on the bottom of it all. See it.?
Hozzászólások
17 September 2017, 11:21
Thank you Martin. I had only just unwound the wire and I just HAD to post it mate. hehehe All excited at how well it turned out and just HAD to share. 🙂
17 September 2017, 12:14
Having this kit in my stash, also with the fork update i thought about building this it in the near future...definitely will follow your WIP to see where the stumbling stones are 😛 That exhaust looks fantastic btw!
18 September 2017, 10:35
Great exhaust painting! But i guess the Repsol logo will be tricky to apply...
18 September 2017, 11:48
Nice detail painting! I'll be following the build as it is one of the kits I really want to build in the future.
18 September 2017, 11:51
looking amazing already, and you just started. i will not miss this one for the world 🙂
18 September 2017, 11:54
All my distinguished friends, I am really pleased with the progress so far, but as always, TIME must be spent in doing all the tedious chores. Like seam lines and flow gate removal and all the ejector pin marks. Alclad preparation is time consuming, but be warned, get a big stock of cotton gloves, as you cant afford ANY finger marks to show on this little gem. 🙂
I am stoked you like it so far. 👍
Thank you all. 🙂
18 September 2017, 12:39
Doesn't look too bad, that rim. Just to clarify, you buy two kits and accessories to build ONE model in case you screw something up majorly?
21 September 2017, 08:31
Alexander, NO NO NO. I am building one bike in "Wet race" set up with wet tyres and the second with the "Dry race" slicks. All in a small 'garage' /pits dio scene. 🙂 👍
21 September 2017, 09:54
With having two kits the same, it allowes you to portray a different scene with each. Like my TAKOM 1/35 King Tiger. I opened it up in a 'cut away' and the other, it will be 'war weary', with superficial damage from small arms and maybe the odd hit from someone who managed to 'get a hit'. 🙂
21 September 2017, 09:57
Hy Kerry looks great so far. 👍 I wish you good luck for the rest of the building.
21 September 2017, 11:37
Johne and Alex, Greatly appreciate your thoughts and comments guys. 👍
I am waiting for the right paints to arrive and then I will get too and have some serious fun. hahahaha 🙂
21 September 2017, 12:00
Awesome idea with the braking fluid! Fantastic painting job, too. The exhaust indeed looks very unusual and "colourful" but in the end when all parts come together i bet it will look awesome. Looking forward to it!
30 September 2017, 10:01
Alexander. I am most grateful for you comments mate.👍
I have just seen where I can get some micro thin tubing that can better replicate the brake and throttle lines to a more believeable scale than the Tamiya garden hose size stuff. 🙂
Also some .050" hex bolt heads to replace the phillips head screws that completely kill these kits because of the ship rivet type look. 🙁
All American stuff, but SO cheap for what you get.
BTW,I HATE poor paint jobs, especially ones that have an 'orange peel' look.
But that's just me. Oh well.
Cheers.👍
Kez.
30 September 2017, 10:34
Spanjaard, At the moment, I have to content myself with what is in the box, but here is the link to the video where I saw the micro tubing used. Youtube Video Go to the 47th minute on the timeline and he discusses the tubing. Cheers. 👍
1 October 2017, 10:10
those micro tubes may come handy... i found a couple of things
hareline.com/tub123.html
hmhvises.com/tubeflygear.php#tubes
even one shop around here flyandspin.nl/hareline-tubing-serie.html
1 October 2017, 10:48
By the looks of it, one can replicate the double tube system on the front brakes quite nicely. 🙂 I will post an image of what I mean.
1 October 2017, 11:25
the clear should be possible with the thinnest and transparent of hareline, or maybe the middle one. right?
1 October 2017, 12:58
Even thin fishing line would give the same result. It 's not like its going to actually be hollow. I am going to get some, but first, I need to see what it is like. So I will get a pack of each and do an album on it and all that jazz. Yes. ? AND, In that video or one of the ones he made, he had bought some hexagonal bolt heads that were "Acorn Nuts" .050". from RB Motion.com Amazing stuff, all for the scale modeller of vehicles mainly, but there are certainly many other applications for what they have. google.com.au/url?sa..XA3dFI6RVDS5LluG9Tj5
1 October 2017, 13:17
A world of discovery at every touch of the keyboard guys. Anything and everything is out there. All for our pleasure and the spectators delight. hehehehe 🙂 👍.
1 October 2017, 20:58
Album info
This will be the "full montey" build, meaning the front forks update kit, and what's the point in doing the front if you don't do the back end. I will be covering the appropriate parts that are made of Carbon fibre with the decal of the same and I will be paying special attention to the exhaust system and it's unique look and colour. I hope you like what I am about to do.