

Scalemates Schwalbe Group build 2021

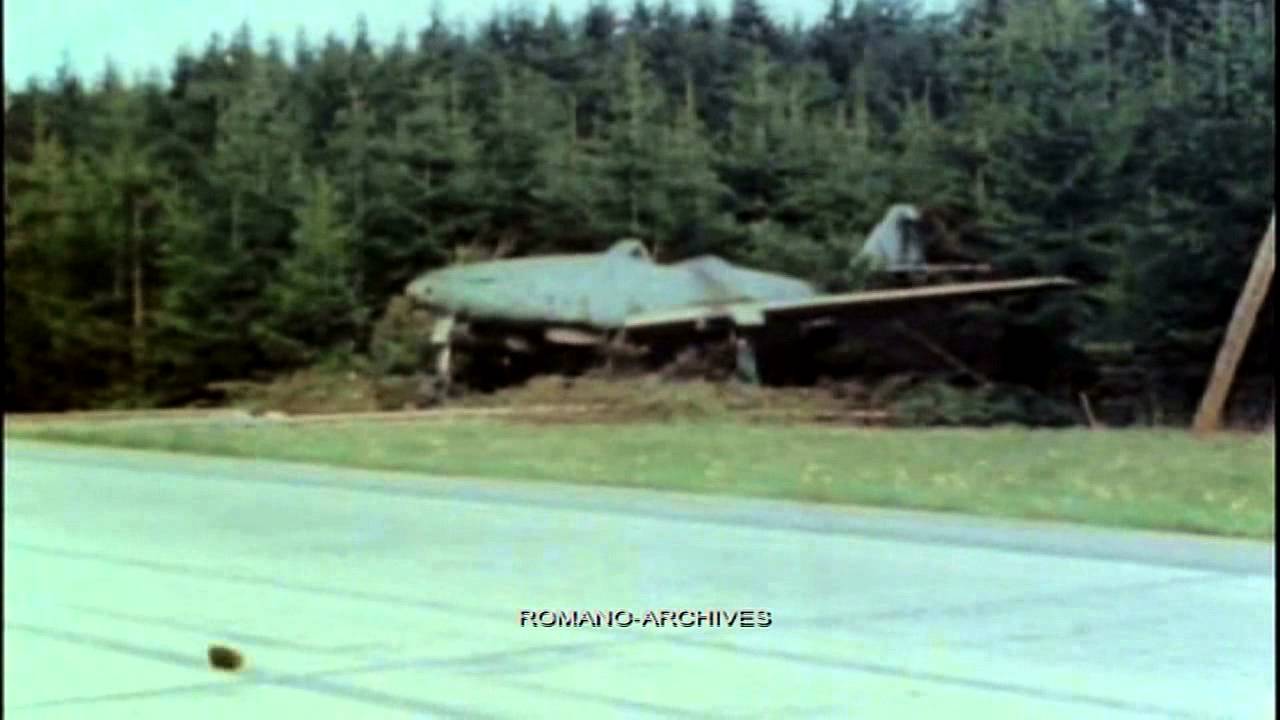
I always found that bare appearance very interesting. I will go for this one,....

The Revell Kit 4119 Me 262 A-1a is the "choosen one".

.....it's content.

Let's have a look into the Cockpit before we start assembly work.....RH side

....and here the left hand area.

So the very first parts are waiting to get processed... 😉

Dashboard done....

...and built into the cockpit. Further, I used some spare PE seatbelts.

I am opening the bays (glare covers) for the machine guns.


Checking for the alignement of the MG fire lines,....

Ok - now let's check whats going on at the main landing gear bay,.....

...ok....

....so far so good.

Opening the wheel bay, that is closed which this kit from Revell....

...done.

adding some styrene stripes to simulate...

...some stringers and stiffeners in the wheel bin housing.

Added some holes nad notches to pass through some wires, hoses & pipes -plus sprayed the inner space.

More details and colour added....

Finished - Ready to get covered by the wheel bins.

Finished the Landing gear and Wheel bin detailing - need to start my airbrush now.

A pic of the canopy. There where some requests on the quality respectively the fit.
To me this looks quite good.
To me this looks quite good.

Detailing and painting of landing gear finished.

Added some brass tubes to simulate MG barrels & some transparent sprue for the cover of the BSK16 camera system.

I guess this extra effort will hardly be notice in this 72 scale - but....now it's there. 🙂

Some of those lead ball will become a new home in the nose section.

Nose & underwing attached.

The 2 nacelles from the revell kit vs. my resin engine. The resin kit from Quickboost is slightly smaller (diameter and lenght).

I decided that the new opened engine could maybe need some cover panels (in a diorama scene). So I used the spare RH nacelle to cut out such pieces.

The pretty thick panels need some sanding to get rather reasonable thickness dimensions.

The counterpart of the support frame need to be scratched out of styrene sheet.

Done. Ready for paint.

Drilling the cutouts of the support frame.

Adding some tubes and wires as seen on picture references of Jumo004.


Engine waiting to be fixed to the wing.

Making 3 out of one,....I will display an opened canopy.


My new RH Pos.Light

My reference for detailing the canopy/cockpit area.

Some detailing in the canopy/cockpit area

The opened canopy is held in place with a lanyard.

Therefore I used some material I normaly use for riging bi-planes...

I build-in the handle that is used to lock the closed canopy.

Cockpit and lights done.

Now I add some colour to the outside Canopy-frames.

The paintjob is visible on the movable middle section of the cockpit glass. The rest is already covered and prepared for the next painting step.

I have fitted the engines now and also prepared them with a nice wrapping for a save paint application.

The back of the resin engine was in bad condition - I had to remove it, in order to fit it to the wing. The missing fairing was made with liquide sprue and a lot of sanding - it is light grey now.

The fit in the front section was better - still needed some putty to get a smooth transition to the upper wing panels.

As painting is coming closer I decided to do some paint trials. AlClad in shades/and variations.....Putty is a greenish gray - pretty much looking like the stuff used nowadays. Not sure if the colour was the same once. Colour picture of the "putty camo" are quite rare.

The result is pretty promising - at least for my expectations,....I guess that's the way I will do it.

Started to fill the later non visible panel lines with Mr. Surfacer 1000.

Filling completed.

Gloss black base coat applied,....

Gloss black base coat applied,....

The bird masked and ready for first metal coat. During this exercise - which took some hours - I got into a state of...well, I don't know...am I nuts doing this?

First coat applied - dull aluminium.

De-masked, and...

..re-masked, and...

...de-masked. Okay - endurance in this masking sessions paid off - it looks quite nice.

The colours I used are dull and dark aluminium from Alcad.

Bottom view.

"Faying surface sealant" applied now. Hope I got them all close to the original - had some picture references, but might have missed the one or the other panel line (especially on the upper wing panels, I fear).

Now I have to apply a clear coat to make the bird ready for decals and decent weathering. Some effects on the metall sheet appearance (reduced uniformity) I have already applied.

All decals applied now,...

...and some "weathering" applied too. I think it is a bit overdone - but flat varnish is already done too.

Decals are put together from spare material,...concerning the appearance, I tried to keep close to the picture references I had,...

...so therefore some panels show "section" numbers and others had some "text" written on them.

Finally I can anounce: DONE

Closer look at the engine & front section

Closer look at the cockpit

I did some adjustments on the appearance of the insignia. As the whole aircraft turned out quite dark and flat - so I put an semigloss layer on all the black areas. Luckely they emerged from the "mist" giving more contrast to the appearance.

LH view

Details of the tail section - light condition is a big contributor on the way we recogince colours - the putty in dayligh is greenish gray. On the pictures here with my artificial lights it shows more green....

Right hand rear view

Nacelle covers and open engine
Hozzászólások
72 4 January 2021, 12:59
Nice choice of subject, looking forward to see you do the bare metal finish
5 January 2021, 12:57
Thank you Jan & Spanjaard. Can't wait to continue - had to take care on other stuff this weekend 🙁
16 January 2021, 20:24
Hard to believe that this is supposed to be a 72 scale! awesome!
17 January 2021, 09:04
Thanks Roland, Jan & Guy for your appreciation. That's motivating.
I did some work on the landing gear hydraulic and the nose section (thx Spanjaard for your infos) last night - pictures will follow soon.
17 January 2021, 13:45
Joining 👍 I have considered the same "camo", but maybe next time...
17 January 2021, 15:45
Found this today, thinking of the putty colour too...
Youtube Video
20 January 2021, 19:33
Lukasz - thx for sharing.
So we can start a group build of Schwalbe "putty camo" within the existing Schwalbe Group build ! 😉 what to you think? - who's joining? 😉
cheers
21 January 2021, 20:35
The only obstacle I see are the black outline crosses - browsing the stash since yesterday to find some...
21 January 2021, 20:37
Today I received the engine and a sheet where only black and white Luftwaffe crosses are on - 1/72 - I have not use for all of them - let me know.
21 January 2021, 20:44
Very nice, I follow! maybe I will start mine, soon. Still have to decide kit and project...
22 January 2021, 00:32
Added one more pic before I need to undergo the next paint job on the landing gear and wheel bin. Hope to close the fuselage soon.
26 January 2021, 19:29
Juergen, how is your canopy? I had a terrible canopy when I did this kit. Eventually I will have to replace it with a vacuform.
26 January 2021, 19:34
@Skywalker - added pic #23; it looks that my kit contained a quite ok canopy.
27 January 2021, 18:52
Wow, you got lucky... Everyone I know who has this kit has canopy problems. Mine was so thin on one side that it cracked and the shape didn't fit on the fuselage. I wonder if they updated the clear parts? This is turning out to be a great build!
27 January 2021, 19:00
cockpit seems quite ok in the picture.
but afer looking at mine, i got a couple of vacuformed ones for my two 262's....
27 January 2021, 21:16
Now I'm getting very curious after the one in my recce kit.
Hope it is as good as yours 🙂
28 January 2021, 16:52
Hi all - thx for your comments and good luck with your canopies!
Different topic - key word "putty camo" - your ideas resp. comments are welcome. As I coming closer to the paint job, I thinking more and more about following "mistery" (at least for myself): do I have to fill the panel lines? I guess the "putty" was used as faying surface sealant in order to reduce aerodynamic drag. If so, I think most of the panel lines where not visible on this bird. In consequence the models panel lines need to be filled.....Someone supporting this approach? thx for your feedback.
29 January 2021, 14:37
I did not fill the panel lines when I did mine, that way you can still pinwash them, otherwise the model may look a bit bland.
Ps my canopy looks ok🙂
29 January 2021, 14:50
Thinking of it too. Hopefully in my case the Airfix got quite deep panel lines, so I hope my "putty" (currently leaning towards brushing Light Gull Grey acrylic paint by Testors) will not cover them completely. Then I plan to add some dark grey wash, so it doesn't have that comic look😉
29 January 2021, 15:11
Here's a link to the tamiya me262 I did a couple of years ago.
Some of my older works | Album by Jan Peters
I painted the putty lines with a medium grey over flat aluminium.
29 January 2021, 15:41
How does one get in on these group builds? I just happen to have finished one of my 262s.
29 January 2021, 15:41
Change the tittle of your album to Scalemates Schwalbe Group build 2021, and it is added like magic🙂
29 January 2021, 15:43
you can also "attend" the event. but yeah, the album name is most important.
(to attend, just go to the event, Scalemates Schwalbe Group build 2021 (1. January until 31. December, ) and add your response)
29 January 2021, 15:46
and i would say paint rather than putty is the right way for a 262 in 1/72
29 January 2021, 15:51
A few upates in the pic's album. Nose section, landing gear & engine done. Tackling next the canopy aera and wings.
30 January 2021, 14:20
Very cool project. I found this to be a great kit (presuming the two seater is of same quality). Regarding the panel lines: I lean toward them being filled. They certainly were filled on the real thing. As far as the impact this will have on the "feel", I think that the putty lines will provide the visual interest instead. All that said, the lines on this kit are pretty fine and will not be very visible in any case (I personally would skip the traditional panel wash to avoid highlighting them). Above of course does not apply to any service panel lines. In any case, very nice progress and I look forward to an update 👍
7 February 2021, 12:21
Love this build! Can I ask you why you painted the canopy frames black?
7 February 2021, 15:59
Hi Alec- thx for your comments and your feedback. It is encouraging my considerations towards filling them...
Still a couple days to think about it....thx.
7 February 2021, 16:31
Andrea - thx for your comment. What you see here is the inside of the canopy only. The outside surface in not yet painted. The reason why it is black is based on my picture reference - see #43 I have added. I am not sure if this refurbished museum aircraft is restored in the original coulours used once,....might be wrong.
7 February 2021, 16:37
Thx - Lukasz for your interessting input. I looked it up in the web then....found the same. I took "anthrazit black" by coincidence, which should be close to the grey-black RLM66 type. On the pictures it looks pretty dark and shiny - I guess this is because the of the shinny, glazing canopy and unpainted frames. However - thank you mates for your comments - always interested to learn more. cheers
12 February 2021, 07:52
Some small steps forward, after a few days off the bench.
Did some trials with paint as colouring is coming closer,...
20 February 2021, 21:39
Testbed looks very good indeed, looking forward to see it on the model
21 February 2021, 16:57
Wow, that's shiny. I already screwed the topsides, so you might take me over soon😉
27 February 2021, 21:23
Thx, Lukasz & Alec. you know - painting is not my favoured part in model building. So I always push ist to right as long as possible,....:-]
28 February 2021, 16:55
I know what you mean. I was just listening to the Plastic Model Mojo and they were discussing the "fear of screwing it up", i.e. reluctance to continue in a build when a skill we are not best at comes up. I don't love painting either, but canopy work is my bane 😄
28 February 2021, 18:09
I see no problem with painting, pure pleasure (unless the airbrush is clogged😉 ), but sanding and PE frets kill me 😄
28 February 2021, 19:18
Hreat looking Schwalbe, Juergen! Looking forward to seeing the end result.
28 February 2021, 19:28
Thx mates for your inputs.
Today I up-loaded some new pic's after some hard days of repetitive masking&painting sessions.
7 March 2021, 08:20
You must be nuts Jürgen. This amount of added detail in 1/72 is top work! Enjoyed looking through the album very much
7 March 2021, 08:54
Beautiful! Not sure if it is the same for the A-1, but in the B version the point of the nose was wooden, while the other nose section was iron and as such, was protected with primer HTH
7 March 2021, 11:00
Thx Roland, Sebastian, Martin & Andrea - your feedback honors and I needed some balm on my soul after all that hours spend with masking - 😉
@Martin - yes, I was asking this myself several times the last couple days..... am I nuts doing this?
@Andrea - to you know the "real" appearence of that wooden nose cone? Was is really bare wood or was there some primer/putty on top too?
On the old black and white photographs you can hardly see any difference. I saw some colour pictures of the 711 - it was a greyish metal appearance (but the pic could be colourized and likely that the colour was taken wrong)
7 March 2021, 17:40
I don't think it was bare wood, all the pictures I have, colors or b&w, show it a dark color (grey? black green?) with the same kind of traces of putty and sanding than on the airframe. I found some pics and info here ww2aircraft.net/foru..62-b-1a-b3-zm.44836/
7 March 2021, 18:19
I have checked my reference, Me 262 vol. 3 Smith-Creek: regarding B-1a/U1 W.Nr. 110305 red 8, now in South Africa, it is written that the nose cone was of a wooden skinning, covered with alluminium foil on both inside and outside surfaces. Filler was applied to the outer skin than smoothed and painted. The restorers mention also a layer of outer brick red resin. Tape was on the main fuselage and nose section joins... Please note that this nose cone is from a radar equipped Schwalbe, I don't know if the manifacturing process was the same for fighters
7 March 2021, 18:41
Thanks for the info Andrea, that should help me a lot too 👍
Juergen, we seem to be going head-to-head😉
7 March 2021, 21:22
Thx Andrea for those interesting details. I have considered the foil and the filler now on the nose. Not sure how to tackle the red resin, yet. Maybe I skip it.
Lukasz - a few more steps to the finishing line we have to go - 🙂 so I give an status: "putty on" since yesterday; hope to have clear coat applied until end of this week.
I figured out that I have an issue with the decals (size of serial numbers not in my spare box) - further I'm not sure how deal with the insignia on the vertical fin.
Pics follow asap.
10 March 2021, 11:22
it is looking great. if i may offer a suggestion... I would have simply painted it all in the shiny color, then masked the areas you want shiny, and painted the dull color. I think it would have probably give the same result, and saved you a masking session.
10 March 2021, 11:47
Juergen, both kits have their pros and cons. Revell got the black crosses (though for the topside of the wings only), Airfix however got some serials, that I plan to cut and make 711 out of them (the smaller copy is placed under each stabiliser too, but I'm gonna skip these). Probably you have to steal the serials from some other decals. The swastikas look quite generic to my eye, so my Techmod set is ready.
10 March 2021, 12:32
@Spanjaard - thx, this might have been a quite good approach in order so safe some hours. I will remind your suggestion on my next bigger masking project 😉
@Lukasz - I looted my decal spares already, some numbers will hopefully fit.
@Daniel - thank you for your kind words.
@all - 2 more pictures with the putty camo now added to the album - cheers
10 March 2021, 18:16
It looks great Jürgen, the 'putty' is bringing all the colours together.
10 March 2021, 18:30
Marveous! Great work! I am planing to do a similar Me 262 in scale 1;32, yours will be my reference, for sure!
10 March 2021, 19:09
Thx mates for your nice words, this kind of echo is quite motivating.
11 March 2021, 18:47
😉 go for it - seeing the putty camo next to your "red B" sounds interessing
13 March 2021, 08:26
So,.. done with the "appearance". Decals are on, some "weathering" effects I tried to apply (to avoid uniform metal panels - but from a distance of a day I fear this was a little too much).
But - that's what it is now. Looking forward to finish the bird during next week with last assembly steps like wheels, antenna and canopy.
14 March 2021, 15:55
The putty turned out quite dark after all, what colour did you use? And I see you managed to find the digits 👍
14 March 2021, 16:07
Hats off Jürgen, your model is extremely close to the original. Very good work!
14 March 2021, 16:16
Thx gentlemen.
@Lukasz - I was not happy with the various greys in my stash - I mixed RLM71 & FS16081 (2:1; dark green, engine gray).
14 March 2021, 16:21
It is looking great Jürgen.
The ailerons were deliverd to the factory in light grey or RLM 76 according to my references.
14 March 2021, 17:08
Thx gents for your nice comments.
I am a bit upset that I underestimated the effect of my wash. The idea was to vary the appearance of the various shades of the panel similar to the b&w pictures. Unfortunatly the whole thing turned out way darker than expected after applying the flat coat.
16 March 2021, 08:54
On one hand it got darker. On the other - I started with lighter grey and it turned out to be barely visible on the BMF. So, I'm going to test similar putty shade to yours, but will avoid washing it instead.
17 March 2021, 09:46
Hello all - today I report this build as finished. DONE with the ME 262 #711 "putty camo" 😉
It was fun with quite alot of ups & downs. Thx for your interest, comments and inputs during this build - much appreciated. cheers
20 March 2021, 08:04
Turned out great Jürgen! Love the details on the tail, are those decals, or did you paint the writing?
20 March 2021, 08:38
Hi everyone.
Wow...I am really pleased about all this positive feedback. Thanks to everyone for leaving all those motivating tributes. regards Juergen
21 March 2021, 13:18
Really fantastic build of a hard to reproduce scheme - you pulled it off perfectly though!
27 March, 16:19
Project info


Group Build
Scalemates Schwalbe Group build 2021
1. Január amíg 31. December 2021
1. Január amíg 31. December 2021