

WIP Chevy Fleetside

I will try to lower the suspension on the front end

Rear is lowered by 4mm

The front of the bed has these ugly openings too

So I closed them

First steps on the engine

Removing the beaded line around the rear wheel well

Done

Other side as well, but why?

That’s why!

Starting on getting the cab in one piece. Blue is sprue glue

The bonnet is a 4 piece contraption. Will need some effort to get it nice

Added a thin rod over the seam line. Makes it more pretty and a bit stronger

The front end need some putty


Spreading the body a bit for a better fit with the rear end

Made a bed cover from 0.25mm sheet

Added some h-beams for strength

Reworked the grill

Dry fitting


All parts cleaned

All parts

Primer on

Primer on

Let's give this a go in the airbrush

The results are passable. I'll let it cure before a verdict

As this paint takes a while to cure (supposedly), I have covered the pieces, while letting enough room for ventilation

This looks good!

These too

Not so good

Downright bad


The red engine that could?

Much better, let’s see after curing…

Much better, let’s see after curing…

Much better, let’s see after curing…

Test by request. The plasticard is 48hrs old sprayed Molotow, slow and heavy. The clamp is 24hrs old, sprayed quick and light repeatedly

Masked both with a piece of Tamiya tape

After 2 minutes maximum, the tape damages the paint

And even after 48hrs, the paint is damaged

After sanding


The exhaust doesn’t fit anymore as the suspension has been lowered

Cut it shorter, opened up and dirtied a bit

Chassis is place

Sprayed 2k clear with my new 0.5 airbrush

Wired


Too heavy! Orange peel everywhere

To take a break from sanding down the peel, I painted some red on the hub caps.


And did some work on the interior.

Sanded and polished. This is as far as I dare to go.


So I went for the full garish look. Chrome everywhere!

This looks nice

The bed is all done and closed

Some more parts in there

She’s rollin’

More drivable with a steering wheel

The interior needs to go into the cab

There’s stuff in the way when trying to fit the body to the chassis


But it worked!

Nearly there


Commenti
11 7 November 2021, 09:16
While the Stratos 2k is curing, started work on another old stash dweller
7 November 2021, 16:28
thats interesting. nice progress, looks like you planed a custom
7 November 2021, 19:36
After a quarantine with 3 positive familymembers ( i was the only one sick with flu like symptoms), I finally found some mojo to paint. All body parts are primed with 2K, the rest with regular primer
10 December 2021, 21:52
I tried Molotow Chrome in my new airbrush. It either is a lot of quick successive thin layers, or a slow wet one. No middle ground found.
11 December 2021, 16:22
I look forward to see how the chrome comes out. I've used the pens but never tried to shoot in an airbrush. Hope you feel better soon.
11 December 2021, 16:25
Thanks Ben. I'm just following Barbatos' lead here Youtube Video

11 December 2021, 17:39
Well Ben, the results are in. It's a mixed bag. Small pieces look really good, the large ones need to be stripped and done again
12 December 2021, 12:18
Also, the 2k primer gave a very rough finish. So I adjusted my notes to add a bit more thinner
12 December 2021, 12:19
Hey Martin. Did you see my experiences with clear coating Molotow Liquid Chrome? Some clear coats, dull the appearance. I found Alclad gloss coat didn't. Also, Johnson's Klear, worked well. I'm keen to know if any others work well too?
13 December 2021, 20:02
Hi Bozzer, I saw your experiences. I want to try Zeropaints 2k diamond over it. See what happens. But first I have to strip the bumpers and headlight piece.
Thanks Bob!
13 December 2021, 20:43
Imo, the Molotow is good with a brush and small parts or fix spots on chrome parts. I'm not that fan of brushing it. Perhaps, it is a better result with a layer of high gloss black before brushing it? Similar to alclad?
14 December 2021, 10:54
Vibrant! Looking forward to seeing more of this. Also curious about what you'll come up with for a topcoat on the chrome, I've yet to find something I'm satisfied with.
14 December 2021, 12:13
Purple haze... I think you should try Vallejo Chrome, it could be better choice.
14 December 2021, 20:03
Martin, no worries brother. Always happy to share my experiences and conclusions. Feel free to share your findings, when you get your results? I'm always happy to learn .
14 December 2021, 20:58
István, there is no Vallejo Chrome in my collection. For this one I'm sticking to Molotow (for now).
Because I feared a snafu, I had applied 2k primer. Much easier for stripping, as no re-priming is necessary.
For my second attempt I took a different approach: Youtube Video
Apparently there is no primer or gloss black necessary?
I will keep you updated on the results. Beside spraying Molotow again, I also took care of the body and sprayed some other parts.

14 December 2021, 21:40
Interesting. I've painted car grilles, mirrors, etc. with it, just using it in the pen. I'd love to get an all-over high shine on a 1/72 Lockheed Constellation but this video makes me think that won't be a good idea because you want to paint the whole thing "wet" as overspray onto dried ink with wet ink doesn't look good. No way can I do a plane that size all in one go, and fast enough that the whole thing will be wet at once.
15 December 2021, 00:31
Not with this stuff Ben. The overspray will kill it. Perhaps Alclad or István's Vallejo?
15 December 2021, 06:26
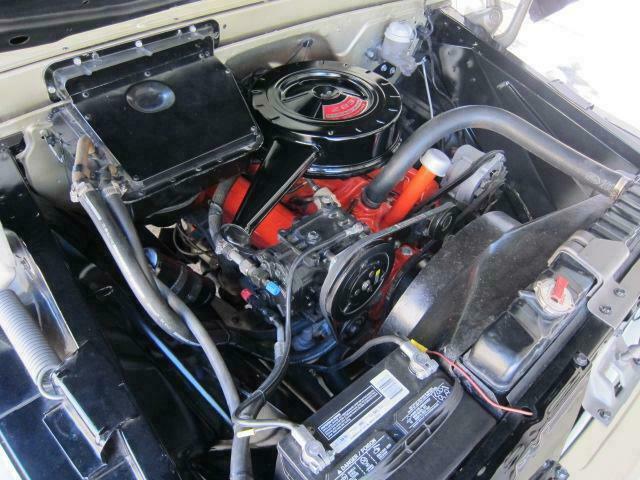
Martin, the Chevrolet engines are orange, not red! The Testors have special paint for it (4629- Chevy Engine Red Gloss- it's a kind of orange). Look at this:
[img1]
15 December 2021, 10:06
Interesting video. I'm thinking about painting the Red Bull Lightning with it. The tip with the overspray is important. You could perhaps paint in stages and mask off what has already been painted along the panlel lines.
15 December 2021, 10:11
Eric, a word of caution. I wouldn't mask, straight over Molotow. Clear coat it first, then when dry, mask it. I like your thinking though. I've never airbrushed anything as big as a plane, with Molotow? I'm always happy to learn though
15 December 2021, 17:56
Thanks! Yes, the Molotowlayer is very vulnerable, you can also see in the video. I am also curious if this works. 😉
15 December 2021, 18:25
István, this particular car has a red engine. It was custom built for me by me and I wanted a red engine 😄 Why? Because I had a jar of Ferarri Engine Red paint I just wanted to use. Sorry to disappoint you!
Bozzer & Erik, masking Molotow requires curing for more than 48 hrs. As luck would have it, I did a testspray before each session. Not on the best of surfaces, but good enough for this test. Just check the pictures...
15 December 2021, 19:17
Nice build so far I work on the same kit at the moment but go a other way 🙂
18 December 2021, 23:55
That's the fun of this hobby Ron. You do your thing and I'll do mine. Both enjoying the same kit in different ways. Where's the album?
19 December 2021, 07:35
Indeed everyone has their own idea about how to build a model and that is what makes the hobby so much fun. I put my under construction Chevy online and the plan is to turn it into a well used truck with some worn paint and some rust.
19 December 2021, 14:13
I had a horror 2k clear experience. I sprayed too heavy and was rewarded with orange peel, everywhere. It took me days to sand the body down and then polish the body. Far from perfect now, but this is as far as I dare to go. Paint has been damaged in enough places already.
30 December 2021, 21:48
Pretty bad when something like this happens, but it does happen sometimes. Still looked pretty good after polishing except for some scratches, at least I think I see them 🙂
30 December 2021, 22:21
Martin, go out of your house, check your own car, is it scratched? Then go back to your model 😉
It looks good from here🙂
31 December 2021, 01:08
Ron, you do see some scratches. (I see a lot more)
True Spanjaard!
Bill, the pigeon carrying your invitation has been fired! From now on you have a standing invitation for all my Scalemate parties!
31 December 2021, 15:34
So I started assembling today. Not quite there yet.
If you look closer, my seat was glued tilted. When I finally had the interior fixed inside the cab, I had a loose seat.
Fitting the body on the chassis took some courage. A lot of parts already in place, not a lot of clearance. But both the bed and the cab are on the chassis!
1 January 2022, 21:56
Picture 68 is a bit too dark to really appreciate the beauty of this car
1 January 2022, 23:47
In the evening at the kitchen table gives substandard light for pictures Spanjaard. When she's done I'll get some better pictures😄
2 January 2022, 08:41
This purple would have been also awesome without clear coat. Great build.
2 January 2022, 14:54
I think it might have been better Christian.
Anyhow. Assembly is nearly done. I need to redo the fenders as the Molotow lifted while polishing the 2K. So close!!
2 January 2022, 16:19
With the fender skirts and it being a custom, one would normally expect Lakes pipes. Are you going to add them?
3 January 2022, 05:47
Ahh ! The Purple Nurple is a beauty. Nice touch with the custom skirts, well done !
6 January 2022, 00:57
Bill, I had to Google Lakes pipes. I found some in another kit, will need tot [****]fit first before I give a tes or no
István, Brandon & Bob, thank you!
6 January 2022, 09:37

