
ニュースフィード


新しいフォトアルバムを追加しました。


10 27 April, 20:00
Thank you very much for the kind comments! I also started a YouTube channel, any advices are also appreciated. Thank you.
youtube.com/channel/UCESlPPvsqN0HeHcZKpKiTAg
28 April, 11:58
新しいフォトアルバムを追加しました。


32 4 September 2020, 20:46
great reference pictures, i will certainly use them when i get to do my KR500 🙂
4 September 2020, 22:21
Brilliant!
That's how I always remember Korky, 70's tache & big hair!
What an awesome talent, one of my childhood heroes 😉
Great build pix Phil, the details are amazing!
5 September 2020, 14:44
just add a racer and build a small diorama, quite happy with the result.
16 October 2020, 14:19
That's fantastic Phil! The pic of the dio with the collectors card is just perfect 👍
16 October 2020, 15:04
I wish I knew back in the day that he did run with sunglasses.... it would have avoided the stonned look in my figure 😄 (learning how to paint it correctly probably could have been a solution too 😛 )
15 November 2024, 16:53
ahah the face of the old tamiya figure are not always easy to paint...it wa kinda cool to add some sunglasses to this model!
17 November 2024, 00:19
新しいフォトアルバムを追加しました。


75 17 September 2023, 07:34
What an amazing result, fantastic weathering and very interesting presentation! 👍
18 September 2023, 20:39
ahah JD, for me an old fiat is really old and rusty...I love doing rust and dust and stuff from time to time...its like a more abstract way of painting, you can do whatever you want and its pure freedom.
19 September 2023, 10:02
I'v had to look twice if it is a model…🙂 excellent result! Chapeau
19 September 2023, 11:00
Thanks Bernhard and Michael, I bought this kit specifically to do the photos with Lupin III & Co...so i wanted it waymuch more clean and cartoony at first, but at this scale I finally wanted to create something very realistic and go all in with the details and weathering (and also, I love doing this). A really good kit from Italeri, easy to build and quite detailed, but with some great flaws with the doors and the front suspension..I glued the front suspension and the front wheels as the system was way too fragile and I didn't care that much. The rear suspension is really good tho.
19 September 2023, 14:03
新しいフォトアルバムを追加しました。
7 画像
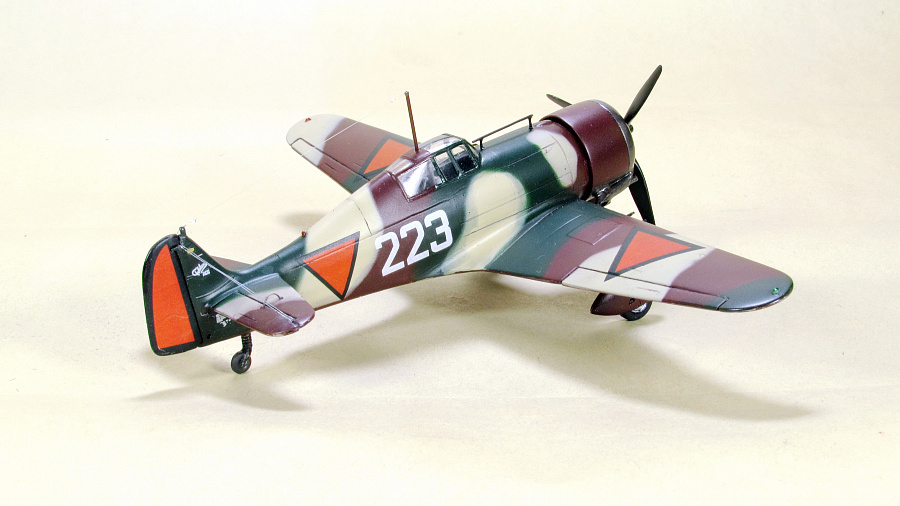
Hawker Hurricane Mk I // DT-A // 257 Sqdn. // December 1940
1:72
I've made a couple of small improvements: the actuator rod for the radiator air intake with stretched sprue, and a coupl...


 1+
1+ 13 21 April, 22:35
I collected this set, you need to do something with the lantern, there is a very thick relief.
[img1]

28 April, 10:38
新しいフォトアルバムを追加しました。
9 画像
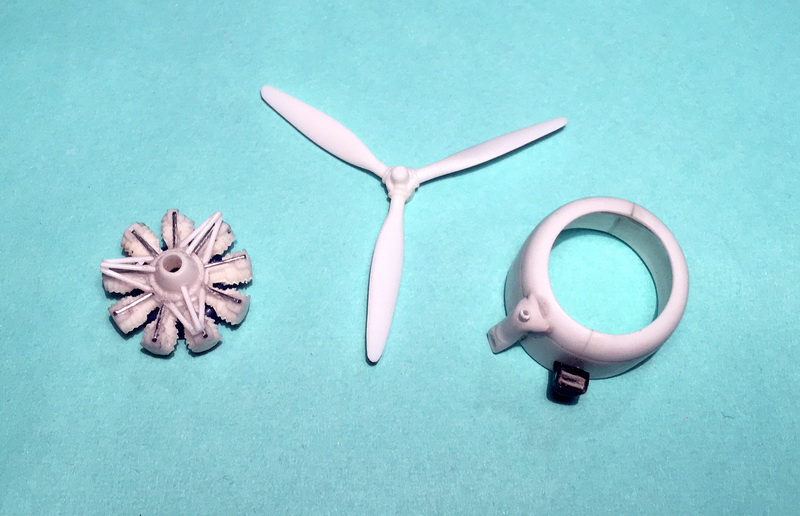
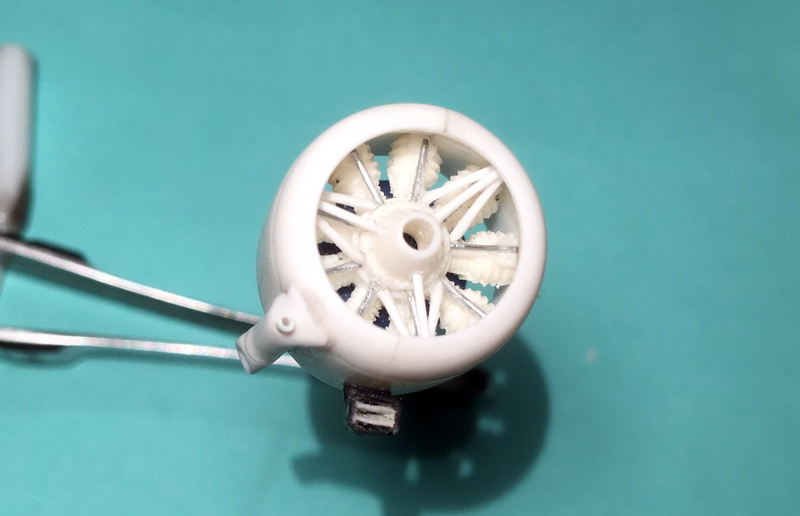
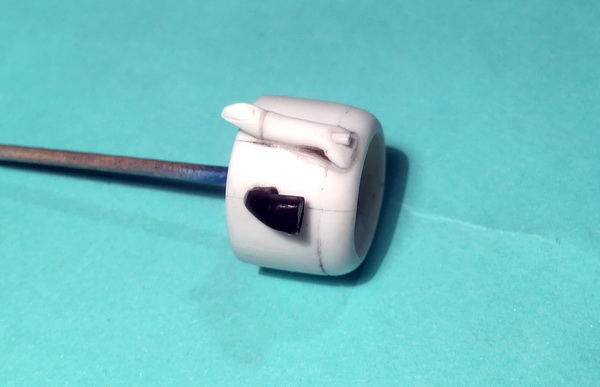
Dora Wings Marcel-Bloch M.B. 151.
1:48
Most of the kit assembled. No locating pins, so dead reckoning called for. The bane of my life too, photo etch.


プロジェクト: Marcel Bloch MB.151 C.1


5 27 April, 19:46
Looking good, forge ahead. Funny, I can and have used tons of photoetch on ships without any issues. Outside of seat harnesses I have no desire to add or use PE on aircraft. Most if not all of it is hidden or not that much better than the kit part. Just my humble opinion 😄
27 April, 21:11
I hate photo etch with a passion Nick. I would rather use the kit part, like yourself than photo etch. If I can get hold of fabric set's of seatbelts I use them. Or mock them up with masking tape. Thank you for the compliment too. 🤟🥸🤘
28 April, 05:04
新しいフォトアルバムを追加しました。


9 1 October 2024, 08:04
Deserves way more photos, please zoom in a little closer! That looks great!
2 October 2024, 06:20
新しいフォトアルバムを追加しました。


10 27 April, 13:13
Thanks Gorby, Rui, and Alex! I appreciate the feedback. This was a challenging kit. My second TAKOM weasel build.
27 April, 17:24
")


新しいフォトアルバムを追加しました。


2 28 April, 10:12
新しいフォトアルバムを追加しました。


3 28 April, 10:07
Any suggestions on how to get rid of the reflection of the decal carrier film from the decals on the flight deck?
28 April, 10:12
Do avoid this, you have to spray gloss clear paint on the flight deck. After this you can add the decals. When there are settled you have to spay flat clear paint over it.
In your case it is to late for it. But you can try flat clear over ist.
modellbau-koenig.de/..matt-Spraydose-100ml
28 April, 10:18
You can also try to remove the transparent part if the decal is not too thick. It will adhere badly so you can simply take it off. The flat clear will only help for the shine, a color difference will remain.
28 April, 10:42


新しいフォトアルバムを追加しました。


79 1 December 2024, 19:43
Some of the detail work I see on 1:72 kits on this site is unbelievable - this is another one - fantastic work Davy 👍
4 December 2024, 20:25
I like your serious approach.
I have assembled two Fokker D.XXI 1/72. One of them was converted from the Novo set. The second one is from Special Hobby
[img1]
[img2]

4 December 2024, 20:50
My version of the engine and hood. I took the details for revision from the Blenheim model Novo.
[img1]
[img2]
[img3]
4 December 2024, 21:04
Fantastic work on the interior. The exterior paint work is also very good.
14 April, 20:12
Your seatbelts really came out nice for this scale. Kind of amazing. You're a wizard.
15 April, 15:02
It looks really good, congrats for this amazing result 🤗
Love this airplane, built my version 2 years ago but in 1/48 scale
1 15 April, 20:08
新しいフォトアルバムを追加しました。


30 7 March 2024, 11:26
Kit engineering looks complicated so I'm not surprised that fit is terrible.
16 March 2024, 09:05
Lol yes it may fit and good progress
Sure to follow
But yes those things do leak oils
16 March 2024, 09:34
"A mere beginner..." So you must have an innate talent 😉 The model looks perfectly realistic!
28 April, 06:17


新しいフォトアルバムを追加しました。


35 12 August 2023, 00:03
The frame is constructed in the first building step. It's a bit complicated to analyse, but you have to get through this to get all the components ready to fit between the profiles.
22 August 2023, 23:06
All welcome, I now assembled the front and 4th axles. All are movable in a steering position, but as usual you have to decide and then fix everything. Also I found that one set of wheels is not parallel, so I cut the steering arm and added a millimeter of sprue roundel. Does this not appear if they test-fit these kits, or did I make a build error?
9 March 2024, 22:22
All 4 axles are now added to the frame, together with the shock absorbers that I had to shorten a bit at the front axle. The torsion bars are fixed at one side so I can remove the air bellows for painting.
18 March 2024, 23:59
The fuel tank hoops and steps are now replaced with PE. The steps are quite hard to bend in the right order and no dimensions or angles are given to mount them.
14 April 2024, 20:13
The radiator is now detailed with the Voyager silver mesh. You only see the front side now, it's on both sides. When it was assembled I realised that the air horns also need a PE part. There is some warping in the sump and the top cover, I hope it isn't evident looking through the front grille later on. The air tanks must be stripped like the fuel tanks, but you get equal lengths of PE strips to attach two kinds of tank. Therefore I clipped 4 of them and redrilled the hole on the end. The assembly with the 2 tanks and the container is suspended on a single PE part that I had first bent the wrong direction, I hope it doesn't get fatigued.
27 April 2024, 22:53
I started the interior with some colored PE from Eduard. The Black Dog figures are assembled and also a Maim figure and two Legend armament sets were added to the project. But the Maim gunner appeared to have a large backpack, so I don't know he's feasible.
4 May 2024, 21:50
Continuing the interior with the seats. Also the fenders are completed, it's very important to align the bent beams that sometimes are replaced woth Voyager assemblies. It's preferable to use that, the replacements are sturdier than the originals.
22 June 2024, 22:48
The cabin exterior is done using some original kit PE and clearparts, but both have problems. The clearparts are not calibrated and have distortion because of this. I will be replacing the large parts with plexiglass. The kit PE is wobbly because it's not thick enough., I even had to hammer it quite a while. Then I found out Voyager does replace half of the protection kit, but not the large parts behind the doors. At least half of the creases are removed then. But Voyager messed up at the hood closing strip, providing two identical parts in stead of mirrored ones. This could be remedied with some re-riveting.
29 June 2024, 23:52
The pVoyager photo etch cabin roof is constructed with all its nightmarish embossing deformities corrected, the badly fitting airco module that was mosly bent the wrong way around so it broke at one instance. I replaced the 3 largest clearparts with a piece of Trumpeter 1/350 airplane set transparent box cover, that has the right thickness to be able to sand the corner roundings in it. The air purifier system is not installed completely, because that would impede the clearpart masking. So now it's down to interior painting.
15 July 2024, 01:26
Looks amazing so far!
I'm also amazed at the number of projects you have on the go and still manage to achieve such remarkable results.
15 July 2024, 14:03
Thanks Gorby, this was now put to wait for the Essex carriers, but as these are awaiting some last details it can go ahead now. The NATO green interior is painted after the appliance of the Eduard masking set. This replaces the kit masking set and has a cool black film, but still needs some trimming on the outside masks of the smaller windows.
22 October 2024, 12:09
The truck cabin is now finished with the Eduard safety straps. While fixing the roof I noticed that a small strip should pass over the rear to make the internal frame fit to the rivets in the PE.
24 October 2024, 10:43
The hood is dry-fit on the frame and it seemed that one fender had to be rearranged. I prepared the PE for the rear view mirrors that are quite complicated. I also built the Gecko Models pallet truck as a dio element. It's a very fine kit, there is only one pallet contrary to the image with the 4 pallets on the truck.
26 October 2024, 23:24
I added the Italeri 20ft container to the project as one of these is clearly visible on the Tankograd pictures. I got it from the store next door. I might cjt up the container to get a better composition on the dio and like that I can get 2 out of 1.
7 November 2024, 16:23
Welcome. I assembled the container in a few hours, an easy process if you wanted to show it closed down. But the option with open doors is incorrect and needs some changes to the locking system. I had done this with the right door, but it would make no sense to have the pallet loader blocked by the left door so I have to change that one too. I made a sketch of the design for the dio, though the cut might be more oblique to gain some volume.
8 November 2024, 01:28
The container is sawn in two and painted in some typical shipping container colors.
12 November 2024, 21:38
The rear view mirror and the winches are built. The chassis part for this has some sink and needs sanding. It will be difficult to add the cable to this assembly, the drums will not revolve because of a narrow fit.
1 24 December 2024, 00:38
Looking great. Very nice details. Sometime it is a shame to cover all this shining brass with paint...
24 December 2024, 16:27
Thanks, Goldman. In this case I think the many colors will improve the aspect. I added a folding ladder to the exhaust frame and used the Voyager turned bolts for the bumper. then I built the Hardox container with the kevlar blankets. Small parts are used for the connections to the container. I decided the two splintershields for the gunners are oversized and should be replaced with Evergreen, making them half as thick. I also looked at the Legend armament, the Mk19 will improve on the barrel proportions and the M2 might be a bit overkill with the televisor. But the kit M2 is in 2 halves and has a bad cooling sleeve.
2 February, 16:10
Beautiful work Steven.
Does this kit include the parts to be able to build it as a tractor unit (the fifth wheel etc.)?
2 February, 18:37
Thanks, Goldman. The fifth wheel remains even with the armored box on it, but the rear frame covers guiding the trailer are not used. They can be found. I also noticed a flashlight on the cab is left off in this version. The mudflaps are connected lower on the frame.
1 3 February, 01:59
Both weapons are built without the special visor, even if that meant cutting into the M2 to remove the support. I discovered flaws in the armored container from the kit and decided to correct them. In Tankograd you can see the rear of the truck and it shows that the support frame for the container should fit between the towing eyes of the truck. Hobbyboss seems to have missed this in their contruction and now the frame goes on the outside of the towing eyes. Also one of the access ladder rungs seemed to fit under this frame. That was the Hobbyboss solution for having shortened the container with 3mm, also visible on the Tankograd picture. I had to rebuild the container frame and add an edge to the container to make that ladder fit again. Another strange observation is the shadow from the gunner's position, showing that the M2 turntable was fit in a rectangular hole. No trace of that is found in the Hobbyboss container roof. Maybe I'll correct that one before I start painting.
3 February, 15:34
After a good wire brush polishing round of the cabin PE, painting started. I had only enough NATO green for the cabin, but I was able to do the armored container in rust colors. Even the interior should be like that, so it was real fun to bring up all those corrosion colors. I started with Gunze H7 orange and then shadowed in a mix of Tamiya black and Gunze Russet. Then a mix of Gunze H7 and yellow lighted everything up.
4 February, 14:24
The M1070 frame takes a complete Tamiya paint jar to fill every nook and cranny. The armament is primered black and I alos found a photoframe that fits the dio.
7 February, 13:11
Camo colors are completed and the Hardox rusty color is added, based on Gunze H7 with some dark brown and yellow. I used a few SKP lights from an LMTV set. Now I noticed that I closed down the cab without the radiator in it...
11 February, 12:10
The truck and container decals are applied. I made changes to the numbers on one of the containers according to the registration system. Some details were scratched, like the bumper identification marks that were for some reason left empty by Hobbyboss. On the rear armor I painted the nickname of the truck. The cables were added to the winches with some parts unmounted. I did open up the cab to add the radiator I forgot. The base is made from thick cardboard with the concrete slab edges cut into it.
14 February, 16:36
2 new Blast figures are added, one to push the pallet loader and the second to accompany the one in the armored container. I painted the cartboard to look like concrete slabs and added pigments and wash to the truck.
1 March, 01:22
The truck is now slowly coming together. I made the mirrors out of some Earth Metal scraps and I removed one backpack from a figure, replacing it with an alufoil copy of another figure's vast.
1 4 March, 02:41
Thanks, Rui. Now the figures are finished, but one lost an arm while being glued in to the truck. He'll have to be painted inside the cab now. The cargo containers are weathered and the pallet lift will roll over a spare anti-skid plate from the kit.
7 March, 01:40
This project is finished by adding the Primeportal reference pics on the container backsides. I was able to repair the paintwork on the driver figure. Also the pallet loader was placed in front of the red container. This model will attend KMK Scaleworld in one month.
27 April, 21:06
新しいフォトアルバムを追加しました。


20 17 January 2021, 09:16
You did a fantastic job on this old Revell kit. I built one as well which is on my wall. This kit aged very nicely. Good work
1 10 April, 12:38
新しいフォトアルバムを追加しました。


5 1 April, 14:05
Good work on this Tamyia oldie! The use of aftermarket parts really paid off.
28 April, 10:11
新しいフォトアルバムを追加しました。
22 画像
Lockheed C-130J-30 Hercules Royal Australian Air Force
1:72


プロジェクト: RAAF C-130J-30 Hercules


6 28 April, 09:45
新しいフォトアルバムを追加しました。


66 1 September 2024, 18:19
looking forward to seeing more of this project👍.my uncle(5th SF) was in country just after TET and one of the few things he ever... spoke of more than once, was about riding on top of a M113 that rolled over a mine
12 October 2024, 18:07
Thank you Mona, that must have been a terrifying experience. The idea would be a fortified position in the Mekong Delta. I'm planning to build a sandback bunker and a piece of ricefield. The M113's will be stationary in a defensive position. Soldiers will be relaxed not knowing what is coming. But the layout is still evolving. Haven't decide the size of the groundwork yet. I'll be starting the diorama base soon... Will be continued 😉
13 October 2024, 08:21
Thank you Neuling, Spanjaard and Kim! I'm starting the diobase this week!
5 November 2024, 10:35
Looking good Mathias. Lovely work on the M113's. What did you use as the 50 cal casings?
5 November 2024, 12:09
Thanks Mr James, I used simply the copper of an electric wire. An idea I got from lasercreationworld. It is a bit too narrow, but the overal impression works I think.
5 November 2024, 20:17
Very nice looking vehicles, above all the interior; also the entire scene - I'm very curious about this diorama.
13 November 2024, 10:40
Thx Rui and Thomas E.! I hope it turns out as I am imagening it!
13 November 2024, 15:24
you may find this helpful (I hope so 🙂): data.opendevelopment..tnam-.compressed.pdf (5.11.2024)
12 January, 13:30
Good "gardening" work then Mathias,
you will have all my comprehension!🤗
15 January, 15:32
I'm experimenting with a thermoplastic called Worbla. This leaf was manually made. Next try is to lasercut it. If this is possible, the possibilities will be endless!!
16 January, 09:52
I've not heard of Worbla before. This is an interesting video about using it:
Youtube Video
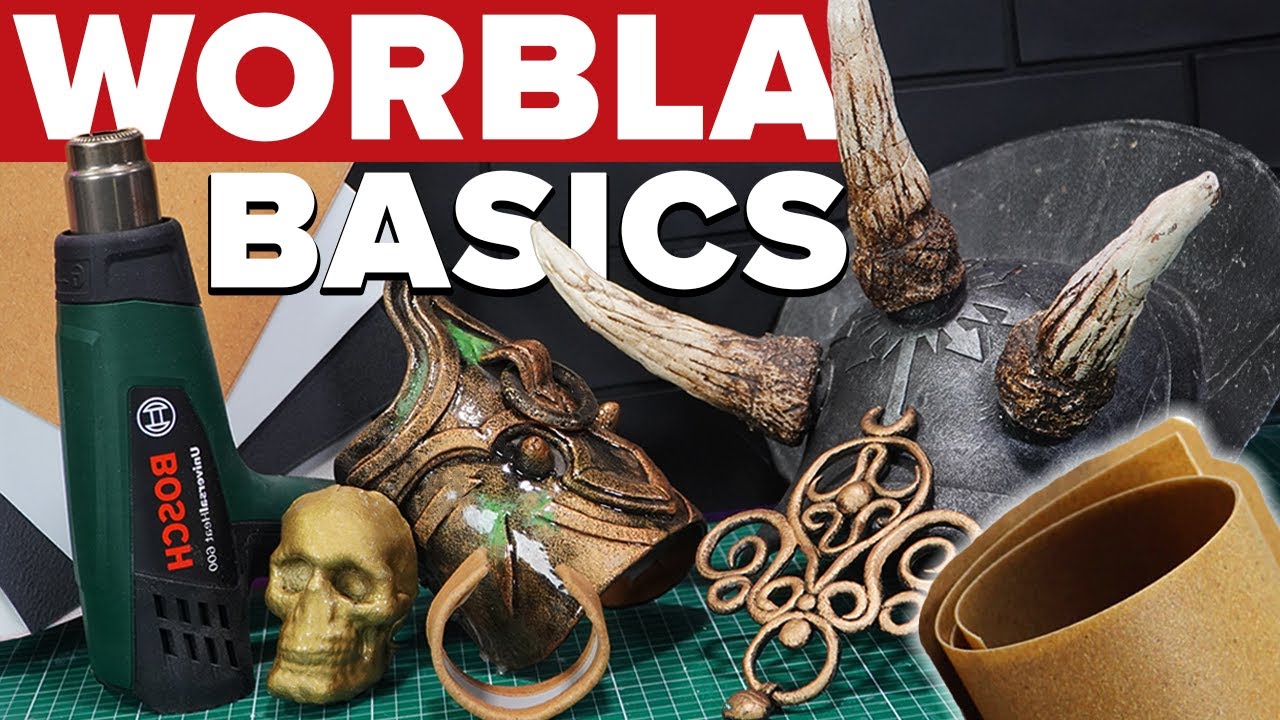
3 16 January, 11:17
I used it for my other artwork: instagram.com/artrop..gsh=OWh4c2Jyd2Vqamgy
Thx!
1 16 January, 12:02
OMG - I'm so glad I saw this. The M113s are simply stunning! The Dio is really shaping up to be a killer as well - don't know how you havent\'t gone crazy building the palm leaves, but wow!!!!
1 February, 14:53
@CaptGPF, thanks man! I cheated a bit on the palmleaves. I lasercutter the leafs in a thermoplast sheet, but there is still a lot of finalising to do offcourse. I don't think this method has been tried before... Also thank you Rui!
1 February, 21:53
cheated? i certainly disagree. you did a great use of what you have at hand. why should you buy the same stuff as aftermarket if you can make your own? 😉 great job
1 1 February, 22:21
Totally agree with Spanjaard - it's not cheating if you make it yourself. Making kits doesn't mean you have to suffer if a more efficient way can be used!
2 February, 16:10
Thanks for the approval guys! Very excited to see the end result
2 February, 18:44
Looking excellent so far. The palm trees are the most realistically modelled ones I've seen.
20 February, 17:07
I agree with Lebloge. Living history in scale 1/35. Congrats for the well deserved prize! 👍
28 April, 10:05


")
新しいフォトアルバムを追加しました。
15 画像
1993 Dodge Stealth R/T Turbo - wip
1:25
After a new layer of base cote the first layer of black is done. Looks good so far.


プロジェクト: 1993 Dodge Stealth R/T Turbo

8 20 February, 14:37
Basically all parts are painted and the body is fillered and wet sanded. The color isn't decided yet and I'm thinking about the chromed rims. I think, I will paint them silver too because on my point of view, this kind of chrome doesn't match with a modern car well. Particullarly at this one.
6 March, 06:17
I painted the body black to get a better result for the final color. My experinces the last month told me, that somehow the edges and "panel lines" came through the paint and stayed brownish. To avoid that I decided to paint the whole car black. As you see, the edges and panel lines are well painted too. But .... after two days of drying, I have some scratches on the drivers side and the hood. Great. Love it like pest....
11 March, 07:30
Stripping of the color didn't work on the first shot. Only the black paint was gone, not the primer. On top, the primer was week and sticky. So I decided to change Dowanol (the fluid, which is a paint stripper) because it can be, that it is to old. I thought. And was right. I never changed it since a hand full of years. I can't even remember, that I changed it anyway.
So I have to report, that the primer is gone and I can start with painting again.
17 March, 05:05
You have no luck with the black paint... Heads up, I'm sure, another beauty is borning!
18 March, 15:31
Thank you. Meanwhile I think it is just the Dodge. Maybe you remember the same issue with the 1973 Dodge Charger (1973 Dodge Charger - wip | Album by christian-w (1:25)). Same material, even the same rattle cans caused the same problem. I repainted that thing 😉 with enamel by Revell. That worked out.
But - and now the big but: around Christmas I painted a C5 Corvette the same way. Same filler, same black out of the same rattle cans and nothing happened! The only different was the producer of the kits: both Dodge are made by MPC and AMT/ERTL (in the 1970s and 1990s) and the Corvette by Revell. I don't think, that MPC / AMT/ERTL used the same plastics 20 years long. I think this is totally impossible. I don't get it.
So I'll repaint this Dodge Stealth again but not the black. I'll throw this bottle into the farest corner and will only use it for small parts.
1 19 March, 06:20
I will tackle the challenge and will beat the system *lol* I'll paint it black again but with enamel of Revell. Then the decided color. What worked on the Charger lately should work here on the second try too.
19 March, 12:56
Hi there.
Does anyone know the difference in box content between the Zimi Model ZM53001 and the ZM53001S (1/35 40mm Bofors)
Does anyone know the difference in box content between the Zimi Model ZM53001 and the ZM53001S (1/35 40mm Bofors)
28 April, 03:51
53001S is First Limited Edition. Gun barrel is upgrated to copper, and pre-painted 40mm shell.
28 April, 06:29
Hi Qnb, I got this information from Zimi's official post:
mp.weixin.qq.com/s/FeSUM8XspGN35ck0Y4pLUw
the last paragraph is talking about the differences: "The first launch edition is priced the same as the standard version. It adds a transparent gun shield, pre-painted 40mm shell casings, upgrades the metal barrel to copper, and improves the model packaging to a premium lift-off box."
1 28 April, 07:06
Sorry I dont know, not sure if you could get the information from the instruction manual?
scalemates.com/products/img/6/7/3/1511673-16-instructions.pdf
1 28 April, 07:27
No problem. Tried to check as well; your link is MUCH clearer (TY!!!) but sadly still no help...oh well. TY!! You are VERY kind and helpful!!
1 28 April, 07:32
新しいフォトアルバムを追加しました。


38 16 December 2024, 18:05
Hope I can make it interesting to follow.
The kit doesn't seem very complicated and the Eduard photo etch is mild level. Just the open doors are a new thing for me. They might cause problems when painting and building modules together.
1 20 December 2024, 11:12
I think this project will pick up pace now when I have finished Schleswig-holstein. This is the first ship I build with waterline option and it was very hard to fix the hull seam. I did several cycles of filling, sanding and priming and still it is very visible.
23 February, 09:06
Thanks Villiers! My daughter asked me today if I had only built two ships and one small plane after working such a long time. She looked incredulous when I told her that was actually the case🙂
2 23 February, 20:57
The notorious "pocket battleship" Graf Spee! Taking a seat for this one!
1 27 February, 20:14
Very nice clean lines on the hull. My respect working with the small and delicate photo etch assemblies.
4 April, 19:00
Thanks Villiers! The PE isn't very complicated on this kit but I do feel I have made improvements since my last ship.
1 4 April, 19:52
Thanks Agnius. I'm trying to stay focused on this project and progress has been good lately.
Unfortunately I had an accident today, I dropped the turmmast on the floor and two PE pieces were knocked off. I think it is repairable and could have been much worse.
10 April, 20:16
Thanks J35J, Ricardo and Jörg! I'm happy with the painting, trying to find the right balance between the contrast effects and realism. I know ww2 ships and planes shouldn't look like space marines but I like when shading and highlights make models pop a little.
1 11 April, 12:57


新しいフォトアルバムを追加しました。


149 26 August 2024, 05:51
Wow! This is going to be a true masterpiece... Watching with pleasure and interest!
1 26 August 2024, 05:55
Thank you for the encouragement, will keep on working on this.
8 September 2024, 04:04
Looking more awesome each time I check in on it! Keep up the amazing work!
9 September 2024, 14:00
Makes me wonder, what happens next... You've managed this skeleton kit absolutely perfectly. Chapeau bas!
1 16 September 2024, 17:10
Nice, VERY nice! How did you attach the metal parts: glueing or soldering? Very clean build, impressive1
16 September 2024, 18:07
Here's a dumb question - how do you keep the paint from chipping off of the PE? I tried spraying Mr Surfacer on it, prior to painting, but it still chips very easily.
16 September 2024, 18:11
Thank you everyone!
@Michael Kohl, this kits are from Jasmine Model. The PEs are great, while the instructions a little bit difficult to understand.
@tyu, I used instant adhesive to glue them together. Some small parts, I used UV glue.
@CaptGPF, I used Mr. Color C series to paint it directly after assembly, keep the paint as thin as possible. But yes, it still chips easily, try not to touch it : )
17 September 2024, 01:58
Great project!
As I build some Stripdown aircraft already I thought about this one too, but the kit is hard to get here and pricey so it was only an idea.
@CaptGPF You can apply Mr.MetalPrimer from Gunze first. It is a acrylic clear coat which hardens to a thin robust layer even if applied with a brush. I prefer the glass bottle over the rattle can.
SF-242 Mr. Metal Primer, Mr.COLOR , Lacquer, 40ml
17 September 2024, 14:19
I have used Mr Metal Primer for a while too with satisfying results. Paint adheres much better.
17 September 2024, 17:31
Copper foil plating and going for a french version. This is getting better every day. 🙂
17 September 2024, 17:34
There is a newer version with an additional "-R" on the name, I don't know what was changed. I still use the original one.
Tamiya has also a product for this (have not tried it): 204 Metal Primer, Tamiya Gloss, Enamel, 40ml
17 September 2024, 19:24
Now Lorraine....That is dedication to accuracy 😲.
This is why the Chinese were making Ming vases.. while the rest of the world made clay pots 🤣.
Very talented n clever 💯%
17 September 2024, 19:55
Thank you Mates!
@skyhiker, It is 0.02mm cooper foil, and it needs to be annealed first (>650 degree C, a cigar lighter or gas cooker is good enough.)
@Micheal and bughunter, thank you for the suggestion, I just ordered Mr. Metal Primer-R.
18 September 2024, 02:30
@bughunter, I just received the new "-R" version. The new label says "improved transparency".
19 September 2024, 10:44
The rivets on the copper look a bit strange because they are not in alignment with the plane's ribs. On a real aircraft wouldn't they be?
19 September 2024, 11:07
@skyhiker, thank you for the comment. This is to verify my idea, I am making a new skin. And will try to make the rivets to align with the ribs. Thank you again.
19 September 2024, 11:23
Thank you for the info!
I hope it still sticks to metal like the original.
19 September 2024, 11:42
Outstanding work. This goes beyond modelling to precise engineering.
19 September 2024, 11:43
Wnat to mention another usage:
The Mr.MetalPrimer can also be used, if the metal should not be painted. It protects the metal surface and prevents tarnishing and oxidation over time.
19 September 2024, 11:49
Additionally to the metal primer you can treat your PE parts with a fiberglass eraser pen beforehand. It cleans the metal from the oxide layers and roughens it up just a tiny amount to create perfect conditions for paint adhesion.
19 September 2024, 13:13
Fantastic progress! It's a pity that the beautiful framing is covered up. Did you press the foil against the kit to get the detailing?
19 September 2024, 15:34
I cant put my finger on it but it seems too perfect. Too good to be true
19 September 2024, 17:16
If you look closer, you will spot a few imperfections, Kesa (both on the side of the Jasmine model kit, and in the assembly). Notwithstanding, is a fantastic piece of workmanship.
19 September 2024, 17:26
I agree with Robert, everything looks authentic and not "doctored". I absolutely do not want to take away from Lorraine's craftsmanship, but there is nothing "too good to be true" about this. Great idea, very well executed, just fantastic craftsmanship. Every step is plausible and well documented and I don't even know how or why you would fake something like this 😄
19 September 2024, 17:53
Well for 300 Euros per kit some people might have to fake it. That's a lot of money.
19 September 2024, 18:14
but faked HOW is what I wonder about. CGI? Yeah, it looks impressive, but it is still a kit. You cut the parts out, you assemble them and you paint the whole thing, no black magic to it really. It would be much more difficult to "fake" it imho
19 September 2024, 18:24
@Skyhiker Do you mean 300€ for the whole project, with the Eduard kits and accesories?
The Jasmine Hellcat can be found from below 130€ from aliexpress (ok tax and co needs to be added) and around 150€ in ebay, but not 300! List price at Jasmin own shop is 169$
19 September 2024, 18:31
@Kesa - if you think this is too perfect, wait till you see some of the other posters like Neuling, Mr James, Markus and Jörg (to name a few)- their stiff will also blow your mind!!!! However, Lorraine is definitely the God of PE!!!!!
19 September 2024, 20:09
@alexander grivionev i would say its just a pre built set but because of the WIP photos i cant :/
19 September 2024, 20:34
I didnt mean my comment as an insult to her and her ability to build, paint etc builds. I just found her build oddly good
19 September 2024, 20:36
Kesa, sometimes things can come across wrong way, so it's best to keep comment positive or just hold back... Everyone including yourself has nice experience here.
The site is a community forum and not competition ground.
There are people who are starting out ...brush painting over sticky fingerprint's.
Also there are amazingly talented artists like Lorraine here.
Everybody work n project is important to them, it's the enjoyment of the hobby above all, as you know for the nice work you have created yourself... Hopefully subject will move on now..🤣
19 September 2024, 22:08
I believe that the friends in this community enjoy the process of building models, the satisfaction of removing the painting masks, and the interaction and sharing with mates here. Rather than showing off a pre-built model. I joined this community a little over a month ago, and I've seen many excellent works here, learned a lot of building techniques, and most importantly, had the opportunity to communicate with mates from all over the world. I feel connected with everyone, and I will continue to complete this project. Thank you for all your comments and support.
20 September 2024, 08:36
@CaptGPF, yes, I press the copper foil against the kits to get the shape and details. I don't know "rubbing" is the right word the describe the process. And I plan to cover half of the fuselage. So it is called "cut away": )
20 September 2024, 08:54
I applied Mr. Metal Primer-R as mates suggested here, it works well. The only thing is the surface is a little bit sticky even after 12 hrs. I guess this is how it prevents the painting from chipping.
20 September 2024, 09:14
@lorraine i can see, i feel honoured to have one of my builds be followed by a skillful builder like you
20 September 2024, 09:48
@Kesa - I don't think anyone took your post as inflammatory or starting a war - it's nice having conversations like this - and I think it's the best compliment once can receive when someone says "it looks too good". Be yourself!
20 September 2024, 14:23
Wander if the 🧸 bear gets sticky paws gluing all that PE together .... they make a talented team there pair..🤣
Coming on really well Lorraine.... interesting to see a different technique 🐻✌️
20 September 2024, 20:44
Very creative modeling. I enjoy seeing someone build something to this high of a standard as well as trying new things.
21 September 2024, 04:35
Thank you Mates!
@Mr D, haha, actually she is a lovely fox, Lina Bell. My favorite friend in Disney Land 😄 I built a helicopter for her.
[img1]

21 September 2024, 11:57
😁 your right a 🦊 fox got the pointy ears..fox's need to get about too 🤣
Really good...👍👍
21 September 2024, 15:15
Looks awesome! Are you going to cover other fragments, Lorraine?
28 September 2024, 10:14
This is truly amazing, dedicated and insane project! Awesome!
28 September 2024, 13:30
Propeller looking 👍 nice.
Care you planning to cover it all ??
Or have some of the model skeletal for a display-cutaway effect??
28 September 2024, 14:07
Thank you Mate!
Robert and Mr D, I will not cover it all, maybe some part of the wing. Will leave it as cutaway effect.
28 September 2024, 14:59
This MUST be left at least partially as a cutaway. Would be a crime to cover up all that intricate detail!
29 September 2024, 16:21
Haha Greg, will not cover it all. Actually the skin is also removable as I attached it to the fuselage with TAMIYA craft bond.
30 September 2024, 05:31
Excellent, clever and Educational, Exhibition worthy work.
Been a joy to follow 😃🦊
✌️👍👍👍
1 October 2024, 18:13
Awesome indeed! Fantastic models and photos. You're a master modeller, Lorraine!
2 October 2024, 07:31
Awesome work! The contrast with a traditional kit makes the reality very clear!
2 October 2024, 21:47
Agree with doubtingmango - nothing less than incredible! I love the mounting and final presentation!
3 October 2024, 05:50
From start to finish a fantastic project with beautiful models as result 👍
4 October 2024, 17:43
新しいフォトアルバムを追加しました。
33 画像
Nissan GT-R32 Race Cars - WIP
1:24
I tried to pour more primer but it was clogged and wouldn't come out, so I opened the inner cap and there was this sludg...


プロジェクト: Nissan GT-R32 Race Cars.
![1:24 Unisia JECS Skyline (Skyline GT-R [BNR32 Gr.A] 1993 JTC) (Hasegawa 20705)](/products/img/8/3/1/1545831-27767-26-t180.jpg)


16 21 April, 16:01
I'm here too. "It is expected to be a pure assembly with little modification" 🤔 whatever it means when you're building 😉
25 April, 10:06
Tried to order parts from HG models i received an email from the company saying because of the tariffs they cannot ship parts to the US.
28 April, 03:26
I heard my local hobby shop can't get gunpla anymore. I don't build that but you know how it is first they come for the gunpla modelers, then they'll go after the gundam modelers and eventually they'll ban model ships.
1 28 April, 04:33
新しいフォトアルバムを追加しました。


7 25 April, 10:37
Looks like the Airfix tooling. Not a bad kit really. Looking forward to seeing how you get on.
25 April, 20:26
Yes, it is old Airfix kit, but with different painting shemes. It's really old and every part need some sanding, fitting and putty, so it will take ages 😉.
1 26 April, 20:32
新しいフォトアルバムを追加しました。
19 画像
F-104N
1:48
Model Complete! Finished it day before IPMS Seattle and was able to get it entered. Won an honorable mention in the sin...


プロジェクト: F-104N


 2+
2+ 48 18 March, 22:10
If you scanned them you should be able to make them yourself or get them made from stsdecals.com/ or similar.
1 8 April, 17:20
Apart the 1 or 2 panels in the rear (as shown in your real life image) I feel your rendition is too shiny, but ymmv. Great job on the finish though.
1 20 April, 19:14
Thanks tyu, I realized I uploaded the photo of 812 now, not back when it was flying and had the polished bare metal.
1 21 April, 02:26
I feel they only did it because I finally put down these older decals after waiting a year so you're welcome haha
1 22 April, 18:45
They also redo their CAS Viper sheet… but this is off-topic, back to your F-104 🙂
1 22 April, 18:54
Looks very nice. Translucent yellow decals are always a hassle. I try to under spray in white when I can, but with NMF, that is not always an option.
1 22 April, 19:06
John - yeah that was the issue here. I wasnt sure how thin these would be and they seemed to work well over the orange-red but it was pretty evident once I put it on. Unfortunately they locked in place quick so I could fidget it back off in time.
1 22 April, 19:15
新しいフォトアルバムを追加しました。


12 25 April, 15:50
So here's an interesting Tintin project I've been working on for a while now. The hardest part was getting the electronics to work. After beating an ESP32 microcontroller into submission I was finally able to get my tiny screen to display the video/audio clip I trimmed from the Tintin animated series. With that success, I moved on to 3D design of the awesome Professor Calculus invention, The Supercolor-Tryphonar (as seen in the Castafiore Emerald album). Next up... 3D printing and assembly.
In the meantime, here's the proof-of-concept video...
youtube.com/shorts/U..?si=u-ootNYEMdGWY8cm
2 25 April, 15:55
Thanks guys! First batch of files just came off the 3D printer. Will need to make a couple of adjustments to the screen size, but it's looking good so far. Also, I knew the steel bar supports were going to be too small to print properly (they warp while they dry), but I've got a bit of metal screen that I can cut into strips. Hopefully will look better and actually support the thing.
1 26 April, 19:25
Ok, so all the main pieces are off the 3D printer and I've cut the metal sheet into the straightest strips I could manage. It was quite difficult to bend it tightly along a single line. Much thicker than a regular PE part, but hopefully will look the part.
I had a lot of difficulty getting the electronics to work. I followed another maker's project (there are several versions of the ESP32 Mini TV projects on YouTube), but it was both a hardware problem because none of them seemed to wire up the screen's backlight, but until I did, I had not even a flicker. It was also a software problem because the library code was out of date, so I needed to go backwards to make it compatible, which led to other problems. Anyway, I vowed to use my Easter long weekend to either solve it for good, or give up forever (yeah, right!). After sourcing each of the issues one by one, I finally got it to work. Next is the assembly!
1 28 April, 04:05

新しいフォトアルバムを追加しました。
47 画像
Revell Rosenbauer GFLF Simba 8x8
1:24


プロジェクト: Revell Rosenbauer GFLF Simba 8x8


26 7 October 2024, 13:54
I have been drooling over this kit since it was new, so definitely following
7 October 2024, 14:21
Yeah, I agree with Martin. This has always been a kit, I wanted to get my hands on. I actually saw the built model, at Bolton IPMS in January. Those tyres are amazing and the vehicle itself, looked almost space-like.
13 October 2024, 06:42
Thank you, Bozzer! Right now, I'm working on the equipment boxes in the back. I didn't start with the cabin. I will post some pictures later
19 October 2024, 07:16
It most definitely is, a "must have" kit, for me! I can't help but wonder, why it's not been re-released again? I can only assume, it's something to do with the licence?
24 October 2024, 21:59
It has been twice after approximately 10 years. Last one was in 2013….
25 October 2024, 05:55
It's possible to buy this kit from eBay, but it costs round about 150€. I bought the kit produced in the 1980th and the plastic is very fragile and the equipment boxes aren't well detailed and it's not possible to open them fully. Besides that, I love this kit. The overall fitting is good and this kit is well designed. If it is possible to get this kit in a bundle with other kits, it is possible to get it relatively cheap
25 October 2024, 07:22
Let's hope they release it again, soon? I read an interesting review of this kit, from when it first came out. I'll share it, just incase anyone has missed it?
25 October 2024, 16:11
My kit finally arrived. Still factory sealed and all the way from Poland. I'm looking forward to building it, in the new year. I'll certainly be creating a build log, of it 👍
Yours is looking mighty fine, and proof, that these things can't be rushed 🙂
24 November 2024, 23:15
You need to be careful with the black and white parts. I broke many of them while building the chassis
25 November 2024, 06:47
That cab looks mighty complicated to operate.
I guess that it's safer inside, than outside?
Them boys deal with firefighting, on a different level.
Excellent work, as always, and merry Christmas to you.
28 December 2024, 17:44
Thank you. Unfortunately it's not possible to show you the blue lights on the pictures
26 April, 14:30
The lights are an eye-catcher. Very nice build 👍. I started the same model (paper instead of plastic) but got stuck in the middle 😑
26 April, 14:34
/ja/search.php?q=*&page=newsfeed&fkSECTION[]=Newsfeed
search-solr.php?lang=ja
35
35
/ja/search.php?q=*&page=newsfeed&fkSECTION[]=Newsfeed
35
todo