
News Feed
added a new photoalbum.


33 27 March, 16:53
Thank you mates. It was a fun build, until I got to adding the wings and landing gear. Needed three hands to hold pieces in place.
27 March, 18:40
I'd never even heard of this plane. I take it, it was a spotter plane? For searches, etc?
1 27 April, 08:20
There are stories that this plane was Rommel's favourite for scouting out the battlefield.
1 27 April, 13:18
There's a great film about British commandos kidnapping a general on the Greek island of Crete and it has a lot of scenes with one of these trying to find them. It's either this plane or a very similar one. Can't remember the name of the film now but it's a classic.
29 April, 13:22


added a new photoalbum.


29 April, 13:46
added a new photoalbum.


37 7 April, 01:51
A fantastic duo John! They look awesome. Very well build and beautiful weathering.
22 April, 13:51
Very impressive. I'd pay good money to take a master class from you on how you did the OD one! Struggling along with an OD Mustang right now.
29 April, 03:33


added a new photoalbum.
42 images
ESCI/Humbrol | No. 4060 | 1:48 | Aermacchi MB-326K Impala
1:48


Project: Aermacchi MB-326K IMPALA

39 4 December 2023, 11:03
Thanks Gorby! 🙂 and to others for liking also. Pretty much finished this one now, armament added, etc... More images to come soon... 👍
12 July 2024, 11:22
Hi Felix and Desert Marlin. Thanks very much for your kind words. I have a few builds that are now complete, so reveal images coming for a handful of albums soon! 😉 Thanks also for the likes all 👍
1 14 October 2024, 20:17
Hi mates 🙂 Here's another build I've finally crossed the finishing line with! Have got around to adding the reveal photos, hope you like it 🙂 enjoyed this one, a pretty tidy kit tbh 👍
1 29 April, 10:00
added a new photoalbum.


5 29 April, 09:08
My second Defiant. This time from the Battle of Britain. Main differences with the night fighter are the camouflage scheme (of course) and the type of radio. Here it was the TR.9 which has much more detail than the TR.1133 and also required an aerial wire between the antennas.
I had done a lot of - subtle - shading of the dark earth and dark green. And then, by the time I had done the decals it had all faded and was completely invisible! No way to redo shading with the decals on so I decided to try a black wash. I applied the wash over all the dark green/earth, let it dry and then removed selectively with cotton swabs.
There are supposed to be lots of stencils for incidence board. But of the 18 only five have the white under the red in registry. So the numbers 1 (wings) and 2 (empennage) disappear. So I removed what I had done.
The flat on the wheels wasn't flat enough so I decided to use a dremel to remove some from the bottom so the wheels sit properly flat. Should have done that before the wheels were glued in position. Now I sprayed small plastic particles all over. And you cannot remove them by blowing or wiping with a soft brush because the model is static and what you remove in one place simply pops up in another. Finally used low-tack masking tape to remove them.
The squadron codes were painted and masked, decals were not used.
29 April, 11:01
added a new photoalbum.
33 images
Convair B-58A Hustler - build log
1:48
Reveal time!
I must say that in hindsight this kit was out of my league.... rescribing such an old kit is no joke... But...


Project: Convair B-58 Hustler


27 10 November 2024, 09:53


added a new photoalbum.
86 images
1/72 Boba Fett's Starship Slave 1
1:72
WIP continues. Washes chipping and weathering. Going for a old battered look, not screen accurate, just rule of cool, be...


23 18 April, 21:00
My very much long awaited build of Boba Fett's Starship from the Empire Strikes Back, Slave 1.
18 April, 21:05
Where I'm at. The rear engine deck is now glued to the upper skirt body. Small engines, built, painted and installed. Some plant on details, radar dish, large engine still to go. Bit more weathering then the back will be done.
21 April, 17:14
Finished a few more bits and pieces, engineering plates, and made a start on the wings, by painting up and weathering the main wing support arms.
21 April, 17:15
Some close up greeblie pics. I think it looks ok. As long as long as it looks busy, I'm ok with that.
22 April, 16:22
One wing almost done. Just needing a tidy up and some more scratches.
23 April, 19:09
Worked on the left and right stabilizer fins, and the sensor dish array. Enjoyed the layering build, paint and weather. Just the pistons to put in, then these parts are finally finished.
24 April, 20:36
That's all for today, food and back to OblIVion. Made a start on painting the Slave 1's skirt, putting on the light grey, that will have a pink tinge, then I'll come in and do some muck washes, panel line chips and a bit of micro brush detail painting.
28 April, 13:21
Today added Washes chipping and weathering. Going for a old battered look, not screen accurate, just rule of cool, because life's too short, and it's just going to get dusty on my shelf.
Painted with old, new hobby store, and vallejo acrylics, weathered with watered down artists acrylics, painted by hand with a brush.
29 April, 13:22
This kit is a SCAM. Do not lose your money by placing an order for it. No kit will get delivered.
")
Excelsior Class Standard Format Limited Edition
Epitome Apparel & Design 1:537
0003 2021 Cancelled | Never released 29 April, 12:48
added a new photoalbum.


11 28 April, 15:22
Thanks for taking the time to post the photos. I enjoyed looking though them. 👍
28 April, 15:58
added a new photoalbum.


21 20 March, 11:36

At 55 years old here it's really hard to stand on my head, if you go into advanced settings you can turn your photo's to face correctly. I know because I have to fix all of mine too. Have fun with the photo etch, thats actually my favorite part of building a model. You'll need a folding jig to do really nice bends, and for glue I've used and had great results with Clear Nail Polish, Microscale's Micro Kristal Klear, Mig Ultra Glue, and of course super glue. For positioning I do a 2 step process when my pe part is ready to install, first a tiny dab of Microscale's Micro Liquitape and let it dry a few minutes till it turns clear. It in now sticky like a very light adhesive and can be placed and manipulated into just the right position, then a dab of your choice of glue. If you go with any brand super glue and it's the thin kind I highly recommend a Glue Looper set, very cheap and will last forever. Clean up old glue on the tip with a cigarette lighter. Good luck and I hope you enjoy your build 🙂
1 20 March, 18:44
I've done a terrible job with my first ever part.
Glue looper? Why have I never heard of these things? lol we are practically twins. Well, I'm 56. With the modelling skills of a 5 year old 😳😂
20 March, 22:01
@lorraine are there actual female modellers? Clair is that a male name where you live? Surely there aren't 2 female modellers on earth? I'm showing my 1970's attitude here. 😳😂
By the way Lorraine cute cat. I have a dog but he's scared of cats. In fact he's even scared of doors! lol
20 March, 22:03
Danny, female modelers are relatively fewer in China, especially military modelers. But we do exist😜 And I also see many females in this community.
[img1]

3 20 March, 23:38
Thats ok Danny, Im 55 and act about 5 lol. I get along with my 3 year old grand daughter on the same level 🙂 Clair is a dude unless there's an e on the end usually. I have 2 cats, the one is super skittish, I remember when he was a kitten he farted, it scared him n he ran a good 15 feet before turning around to look at his butt. Hahaha
2 21 March, 00:06
Oh and to get that paper off use some nail polish remover. It dissolves super glue pretty quick. Then touch it up.
1 21 March, 00:12
Great conversation going on here!
I have to catchup:
1st - I'm in the same age bracket at 59 with the modelling ability of a 90 year old who can't find his glasses 🙂
2nd - whats this I here about using a lighter to cleanup the tip on glue! How does that work? Is it for super glue cleanup? I'm always dealing with nasty clogs.
3rd - Where I live in Canada we have very few female modellers. In fact, I have never seen one. I have a theory that females can be amazing modellers because of small fingers. I don't have fat sausage fingers but they are big enough to get in the way of intricate work.
4th - @Danny I know another modeller on here named Jennifer. She is relative new to the hobby and already quite good. Lorraine's work is amazing!
Lastly - I have cats. I use to have dogs when I was younger, but now it's cats. They drive me crazy and I think the little assassins are trying to kill me, but I love them to bits.
1 21 March, 03:48
I love this site. So much good advice and just when I felt like giving up I get lots of lovely people encouraging me to carry on. Thank you. I also need to give a shout out to Jakko. I drive him crazy with almost daily questions and he's never once told me to stop and leave him alone! 🙂
@Rui, I'd love to see a few more females in the hobby. In fact I need a new wife and one who could help me build a model would be a definite bonus. It's all about the lack of sausage fingers, as you say 😂
2 21 March, 07:02
For PE parts, I use lighter to clean up the instant glue. It works very well, 100% burned up.
And sometimes, I wish I had a third hand, help me to hold the small parts so I can glue them together😛
2 21 March, 08:33
Remove superglue from a glue looper, a needle, blade, or whatever metal item you use, by holding it into the flame of a lighter. Let the tool cool of, remove residue with a paper towel.
1 21 March, 08:53
Thanks Thomas.
@lorraine a third hand would be invaluable! In fact on a serious note are there items you can get to help with that? I often find myself wishing I had something to place a model in when I need to add a tricky part. I bought a small jewellers vice that I sometimes use but if there are other devices I'd love to try one!
21 March, 10:35
I bought a soldering helping hands in electronics store. It helps sometimes.
2 21 March, 12:04
I think I'll get one too Lorraine. By the way I'm seriously impressed at your skill. Are you a professional model maker? Or something similar? Film business?
21 March, 23:30
I have the same kit on my workbench right now, take care the instructions have a few errors and some missing steps to do, just in case you haven't noticed
1 22 March, 10:43
Danny, I'm not a professional modeler. Building
models is just a hobby in my spare time. I've learned a lot of skills in this community.
3 22 March, 15:23
I have 3 or 4 helping hands of different sizes but this one is on my "snag it eventually" list : amazon.com/gp/produc..8B8CMKBF3NX&th=1 , should prove handy when I am repairing electronics as well.
1 22 March, 19:12
@Robert yeah I've noticed one error so far. I bet yours comes out a lot better than mine!
23 March, 17:35
@lorraine how long have you been modelling? You really are skilled. I'm very new to it but I think it'd take me at least a decade to get to your level!
23 March, 17:37
@Danny, t's not about better, it's just about fun !! and you learn and get better with every model you build - may you've noticed that K3 and K4 track parts the designations are swapped, some drill holes that need to be made are not shown, best you download the instructions of the original Academy kit, last page shows some corretions .... scalemates.com/products/img/5/1/1/839511-44-instructions.pdf
3 23 March, 21:34
Well said Robert, without having a fun time we'd all be doing something else instead.
3 23 March, 23:29
@Danny, about 6-7 years. Agree with Robert and Clair, it's all about having a fun time. I enjoy those few hours late at night when I build models. I can fully immerse myself and forget about other worries. And I also enjoy to learn and to share with all the friendly mates here.
3 24 March, 03:21
I agree but I'm at the stage where I'm messing everything up. I think it'll be a lot more fun when I get a bit better and I have a system for doing things. I mostly make (so far. I have 61 kits and about 2/3rds are AFV) tanks. Can't decide whether it's better to spray the wheels and tracks before adding them or once they're glued in place. I'm veering towards the 'before' scenario. Same with the tools and things like machine guns and rifles (from my universal carrier). I don't feel confident at all with figures. In fact I'd even say they scare me. 😳😂
24 March, 16:13
@Danny, take it easy, may start with your more simple kits, to mess something up sometimes is part of the never ending learning process and fortunely on armour models you can easy hide a mistake by covering it with something, at least mostly 😉 I airbrush the assembled main groups, hull, turret, wheels, tracks... separately. I also glue small things like tools before airbrushing to the hull, I've no problem to paint small things with a fine brush after... just look always what makes more sense. Figure painting is also not such a big deal, many tuturial on YT, start with simple guides.... and don't try to paint eyes, mostly not necessary at all 😮
2 25 March, 12:26
Danny bro,. you didn't mess anything up... Thats the beauty of modelling war machines, Battle Damage 🙂 I've been building models on and off since '74 and I still make colossal goofs here and there. I was doing a Santa Maria all wood kit and guess what, I goofed and cut off in scale probably about 10 feet on the poop deck. I just planked and kept going, now it's a pee deck that bring your own bottle Hahahaha. We all screw up dont fret just learn and do better on the next one buddy 🙂 As for painting, I always paint parts separately, my hands shake a good bit anymore so I'd make one hell of a mess if I didnt.
2 25 March, 23:40
Thanks chaps. Great advice. That made me laugh clair. Pee deck and bring your own bottle. 😂
I actually thought this yesterday. Why am I worrying about a rip in a wire mesh on a machine that's had dozens of armour piercing shells slung its way? Of course it's gonna look beaten up! That's a sure sign that I've not (yet) done any weathering whatsoever! 🙂
And Robert I agree. It's a good job I've (now) got 62 kits (just bought another panzer iv by Ryefield oh and a hetzer by Takom so 63 kits! (They were so cheap on temu. The Ryefield was just £11! Well with my discount.
I have now stopped buying. For now 🙂
1 26 March, 08:03
Danny You surely can do better. Because I just joined this community last year, while you've been here since the very beginning😜
26 March, 15:22
Not me Lorraine. I only joined in November. Or thereabouts 🙂
You did say you've been model building for about 6 years? I might have mixed up your comment with someone else. It's my age! Lol
27 March, 10:24
Can somebody take away my credit card please? I just saw a Takom 1:35 panzer III Ausf.M mit schurzen (armour skirts) on Temu and it was only £15. God knows where I'm gonna put these models once they're built? I'll need at least 3 more houses. Maybe I can build a few model blocks of flats? 😂
While I'm here, do any of you use those PE bending tools to help you? Some are like metal rulers with lots of different shapes to bend around. Another type is a square with another square with shapes cut out and there's a screw down clamp to securely fix the part down when bending. I can get one of each type for around £7 with my current discount . Are they worthwhile or just a gimmick?
On a similar note, I wish I could find a solution to my many different diameter circle masks. Being primarily interested in AFV builds, I find I need (especially if the road wheels are rubber edged and therefore painted in black(ish), I know you can buy specific wheel masks for many kits but they're not cheap. I was wondering if there's a good universal solution. A tool or technique where you can make your own masks or stencils. Bearing in mind, I have the abilities of a not particularly bright or gifted toddler 😂😂😂
27 March, 10:39
I use a Bug from the Small Shop and it's simply a must have to get great folds on the first try. Each bend at the same spot makes brass weaker. So yes, definitely get a screw down type.
As for question 2 >>> Tadah!!!!! scalehobbyist.com/ca..00000048/product.php
I bought one, seems nice quality but haven't needed to actually use it yet.
1 27 March, 10:47
Thanks Clair. You the man. As they say. Funny to think I thought you might've been the (wo)man before you educated me about the different spellings of your name! 🙂 then again (I'm assuming here yet again) you Americans do love to change the spelling of the mother tongue! lol 😂😂😂😁😁
But seriously, thanks for the reply and advice. It does make it feel like I'm not in this arms race against 1940's nazism alone. Even though I'm building German tanks 😁😊
You've convinced me. I'm gonna buy a screw down clamp thing. I mean, for equivalent of ten US dollars, you can't really go wrong?
27 March, 11:11
I wonder if that stencil you linked would cover the British tanks too? I see that panzer iv is mentioned. I have all the British tanks to build. Churchill, Cromwell, valentine, crusader, Matilda as well as the Brit versions of American tanks like Grants, Lees, Stuart's, and shermans ? I guess it'd be expecting a bit too much to have a single stencil to cover all German, American and Brit machines? 🙂
27 March, 11:39
@Danny, I have this USTAR UA-80026, covers all wheel diameters, at least I didn't have one where it didn't fit in scale 1/35. For bending PE parts just a small tool which is usually sufficient for what I need it [img1] [img2]


1 27 March, 12:37
Thanks Robert. I've just bought something similar on temu and a square one that you can screw down. Because I've been buying a lot of kits from them I had some discount. The screw down type was originally £20. I got it for £6. Hopefully it'll be decent quality. I'll have a look at the wheel mask. As well as the one Clair suggested. Thanks to you both.
2 29 March, 20:55
Helpful tips abound here. Sorry I missed it til now. Photo 5 looks nicely done. I apply superglue with a sewing needle with the end of the eye cut off like a tiny little U. When it gets gummed up I burn the glue off with a lighter. In my late 50's as well.
My girlfriend builds models as well but isn't on scalemates. I like to build things with my kids also.
3 29 March, 21:04
Gee Ben, that's a really smart idea there with the needle. I like the ingenuity bud 🙂
1 30 March, 07:24
Hi Ben. I forgot that I bought this little tool from Temu. It's a very fine needle on a small spring and it unscrews from the handle where it's safely stored away. Basically you just dip it in the super glue then dot it where you want it. When it first arrived a couple of months ago I was disappointed but it really has helped. Though I obviously had to remember I had it first! lol
So your whole family model build? That's great 🙂
30 March, 12:55
@clair shall I post a link to the needle tool I bought? It's just a small bullet looking piece of metal that unscrews then you screw it in the other end. It's just a really fine needle on a small limited movement spring like joint. A lot more handy than I first thought! Bear with me I'm not good with computers/phones. I've added a picture of the tool in the project/build photos. See it? They sell them on Amazon too but it was half that price on temu.
2 30 March, 12:58
Actually Danny yeah I'll grab me a few next week when I get my ssi in.Thanks man I'd like to give that a shot, looks very useful.
1 30 March, 15:52
I'm embarrassed to post any more pics of the build. It looks like an explosion in a Humbrol liquid poly and Tamiya extra thin plant as an Airfix lorry carrying T34-85 112 Factory production 1:35 kits was passing….😳
Don't think I'm ever gonna get a call from Industrial Light and Magic with a job offer. 😂
1 13 April, 12:35
Naw buddy, Im sure it's nothing some putty wont take care of, nothing else use tarps and mud to cover bad spots. Perhaps it's a battle damaged 34 getting hauled back for repairs... 🙂
2 13 April, 20:41
Everybody started somewhere, and nobody built award-winning models when they were just starting out.
Also, you'll be amazed what a coat of paint while hide, never mind the suggestions above 🙂
2 13 April, 20:48
I think it's because I'm thinking I can put every part in place then use extra thin. I used to apply glue BEFORE placing the part as a kid. Do you glue before for some parts and only glue while in place if you can do that from the unseen side as it were? Like inside a tank for example and the part being on the outside. Also Like the seams of the hull for example?
I am still enjoying building but I seem to be very slow. I just cut a few parts from the tree, sand them down then add a few then stop. I rarely sit for hours at a time. Just half hour here and there while tv is on. 🙂
These 65 kits (yes 65 now but definitely stopped buying. For now 😂 ) are gonna take a loooooong time! 😳😂😂😂
1 14 April, 16:40
One more quick question. After handling the model for weeks, it's obviously covered in grease from your hands, do you wash the model before spraying? Like wipe with a little soapy water? It's gotta help the painting, no?
1 14 April, 16:48
I glue some parts by putting glue on first, others by putting the part in place and then flowing glue into the seam. It largely depends on whether I think it will stay put ot not without glue 🙂
As for washing it: if the first coat is going to be paint that is alcohol-based, a lacquer, an enamel, or anything else with a solvent in it stronger than water, there's almost certainly no need to wash off grease etc. Which is to say: I can't remember ever doing it, and the only paints that have given me trouble on bare plastic have been water-based acrylics, especially airbrush-ready ones.
2 14 April, 17:21
Like Jakko, it just depends for me on the particular part and how it positions before I even decide which glue to use.
For the wash I absolutely give a nice warm bath with Dawn dish soap to my parts before painting, Im a sweat hog so my hands get all kinds of sweat on the parts, probably a bit of tobacco breath too so they get a nice wash n dry, then paint away with usually acrylics.
2 14 April, 22:10
To be honest Jakko, I only have acrylic paints, even the primers I have are acrylic so I'll probably do the same as Clair and give this one a bath. I didn't with my first 1:35 build a Tamiya Panther (I should add some pics but it's awaiting its 2nd coat of gelbraun and the olivgrun and rotbrun too) and it looked like it might've struggled to stick in a couple of small areas due to what was probably greasy fingers. I did buy some latex finger glove things. But they'll take about an hour to put on! Each finger. 😳😂
1 17 April, 05:48
It can't hurt to wash the model, certainly. Well, as long as you're careful not to break any bits off, anyway 😉
1 17 April, 08:51
Well, there is that of course Jakko. Knowing me, it'll probably end up just adding more glue to the surface somehow. I'll use the wrong toothbrush. One loaded with poly instead of fairy liquid. 😳😂
1 18 April, 07:23
If you apply glue with a toothbrush then I think we've just located the problem 😉
2 18 April, 08:40
Hahaha. Actually, I use a toilet cleaner brush. I find toothbrushes don't allow quite enough poly to get on 🙂.
Can I ask you an unrelated question? I know I have literally asked your advice on hundreds of occasions (no exaggeration. You have the patience of a modelling saint). I know I said I was gonna stop buying kits but there are 3 vehicles I love (one was one I discovered reading the book you wrote Tanks at Westkapelle) the LVT-A4 (is that the one with the cannon on top and MG at the back? That one. And 2 aircraft. The A10 Warthog and the P38 Lightning.
I know you did tell me before but it'd take ages trawling thru your previous replies. Do you know a decent kit of any of them but in particular the LVT? I really want one. Watched 2 documentaries last night. One called Hell in the Pacific and it had LVTs as they landed on Guadalcanal.
The other documentary I watched was set in your local area (or relatively close by). Isleer or Ismeer lake? It was about an Avro Lancaster that had been damaged by flak in Germany and as it flew over the Netherlands to the coast it was picked up by a luftwaffe night fighter and it came down with the loss of all 7 crew. But the Dutch authorities in 2023 built a dam around the crash site, drained it and recovered the bodies so the families of the 3 missing could finally have closure. I think it's great your country shows its thanks and respect all this time later!
2 18 April, 09:39
In 1:35 you only really have two options: AFV Club has an early and a late LVT (4), while Italeri has a range of them (those were also sold in Revell boxes, BTW). The AFV Club kits are much better detailed but harder to build, the Italeri ones are simpler to build but have a number of mistakes. Also, you can probably get two Italeri LVTs for the price of one AFV Club one.
For LVTs in the Pacific, any of the above will do. For British ones in Europe, though, you want an LVT (2), LVT(A) (2) or LVT (4) kit, and if you go for the AFV Club one, the early type, not the late. None of these include the 20 mm Polsten gun, though. LVT-2 Amtrac (Italeri 6462, 1:35) LVT-(A)2 "Saipan" (Italeri 6470, 1:35) LVT-4 Water Buffalo (Italeri 379, 1:35) Water Buffalo LVT-4 (AFV Club AF35205, 1:35)
")
2 \"Saipan\" (Italeri 6470)")
")
")
As for the lake: you mean the IJsselmeer 🙂 That's quite a way from where I live, but I had heard of it, yes.
1 18 April, 10:36
Yes that's the lake 🙂.
Wow, as ever Jakko your knowledge blows me away. To be honest the first time I've ever really noticed the LVT (prob cos of my new interest in tracked vehicles since starting modelling) was in your book Tanks at Westkappelle. I think I'll go for an AFV club version but the one with the cannon wasn't at westkappelle, is that what you're saying? Please forgive me, not been up long and I've overdone things a bit this weekend. Not booze. Just walking and stuff. I could sleep another week!
Do AFV do one with a polsten cannon? Was that the A4? The 'A' stood for armoured, is that correct?
Basically I want the one that helped liberate my old mate Jakko! 🙂 but the one with the MG facing front and one facing back would suffice.
I was telling my brother that the allies bombed the dykes on your island the hinder the Germans defence but killed 159 islanders thru drowning in the process! Necessary I suppose but civilians bore a lot of the brunt of things. As usual.
Have you ever built an LVT by the way? Sure I asked before.
Ps that Buffalo with the shark teeth looks great. That might be the one I think. Was that version at westkappelle/vlissingen, etc?
21 April, 09:32
Did you see it on the news in Netherlands Jakko? At the time? Last year? Or year before? The Dutch authorities do spend large sums making sure allied aircrew get recovered wherever possible. Which is fantastic and a great way of trying to repay the allies sacrifice. Good on you all. I've always liked the Dutch (I know Dutch isn't the correct term for all netherlanders but that's how we were taught . That everyone from the Netherlands are Dutch and all from Holland. And you rightly corrected me. Unfortunately my brain isn't as plastic as it once was and new info tends to need constant reinforcement before it sticks. My brain is under assault at the moment too, trying to learn how to build models 😳😳😳😂😂😂😂😂
21 April, 09:41
The rest of you who want information about LVT's on Walcheren? That's not that difficult: do what Danny did and buy Book: Tanks at Westkapelle (by Jakko Westerbeke) 😉 (All proceeds go to the museum that published it, BTW, so you'd be supporting a good cause!)
")
1 22 April, 08:48
I'm priming her over the weekend. Just a few bits to add after priming. I add the wheels and tracks at the end after painting too so a fair bit to do. I'll show the end result Robert H. To give you a laugh 🙂
1 25 April, 05:49
Well, after it's painted and decals on. Actually I noticed that I'll have to add the small (handles?) on rear of turret after the decal because of their position. They I'll have to paint one white cos it's exactly in line of the decal but it's too big to drape the decal over. You'll know what I mean from the scale drawing pics from the instructions. I'll post in the album. I'm not explaining it very well.
2 25 April, 05:53
@Robert H, I'm so sorry. How rude of me to not ask you about yours? Have you finished? Have you got an album of your one? That I can follow?
1 25 April, 05:59
I'm so glad that you people here don't openly mock my attempts. Obviously I'm very, very slap dash at the moment and untrained but I do feel like I'm learning along the way. Like most skills in life, you get some people who have a more natural talent for a particular skill but for most people it's a case of putting in that 10k hours of practice before becoming expert. (I'm too scared to try and work out if I have another 10k hours left! Surely I have? (Don't call me Shirley). Badoom Tsssk. 😳😂😂
Oh @Robert H, I found your T34 album. Inspiring. Absolutely fantastic work. As were the rest of your albums and builds. There really are a lot of talented people on this site. Definitely the right place for people like me to get great advice. Thank you all once again for all your help. And poor old Jakko whose ear I chew off almost every day this year! In fact, if I spent as long actually building rather than asking about it or searching for kits I'd probably already have completed ten thousand practice hours ! 😳😳😳😂😂😂😂😂👊🏻
3 26 April, 10:21
The only thing that counts is whether you're enjoying it, really. The skills will come naturally when you do.
Well, unless you intend to enter your models into competitions, THEN what matters is building them to please the judges. That way, unhappiness lies 🙂
3 26 April, 11:18
I think I'll go to one of those competions or trade shows or wherever they hold them Jakko. To see the models in the flesh as it were. I guess they're held everywhere?
26 April, 20:02
Little late for the show. But looking through your photos I noticed the surface casting effect on the turret. Just wondering if the kit came like that or did you add that effect.
1 26 April, 20:28
Hi Dave. Not me I'm afraid. That's a bit beyond me at the moment but I do know some people add some poly to a flat surface then wipe off after a few seconds to roughen the surface. I'd watch videos on it rather than listen to my rudimentary advice though 🙂.
Yeah both supplied turrets (one option is for the later version used in the Korean War) have the casting irregularities already there as part of Airfix's mold. I think it looks quite good. I like when manufacturers have welded seams as part of their molds too. Makes it a lot more realistic. That is until I come along and melt it all with excessive poly cement application! Oooppps 😳😂😂
1 27 April, 08:16
See here for an idea of upcoming model shows: scalemates.com/events/index.php?filter=all
2 27 April, 09:44


added a new photoalbum.
39 images
Nissan GT-R32 Race Cars - WIP
1:24
Thanks to that, it was possible to easily pierce the center even though it was a cylindrical shape with a slanted end. :)


Project: Nissan GT-R32 Race Cars.
![1:24 Unisia JECS Skyline (Skyline GT-R [BNR32 Gr.A] 1993 JTC) (Hasegawa 20705)](/products/img/8/3/1/1545831-27767-26-t180.jpg)


16 21 April, 16:01
I'm here too. "It is expected to be a pure assembly with little modification" 🤔 whatever it means when you're building 😉
25 April, 10:06
oh that's really cool work you did with the aluminum rod, what did you use as a chisel?
29 April, 08:23
@Matteo - What you see in the photo is a lathe blade.
At first I used a lathe blade, but I don't know if it's because the aluminum is so soft, but it doesn't cut sharp 🙁
So, unlike in the photo, I carved with a diamond file, cut with an art knife, and polished with sandpaper.
I would like to recommend Oilstone.
29 April, 09:13
added a new photoalbum.
This album no longer exists
7 images
'70 ChevelleThis album does not contain any images.
1:25
Project: Chevelle

29 April, 12:57
added a new photoalbum.


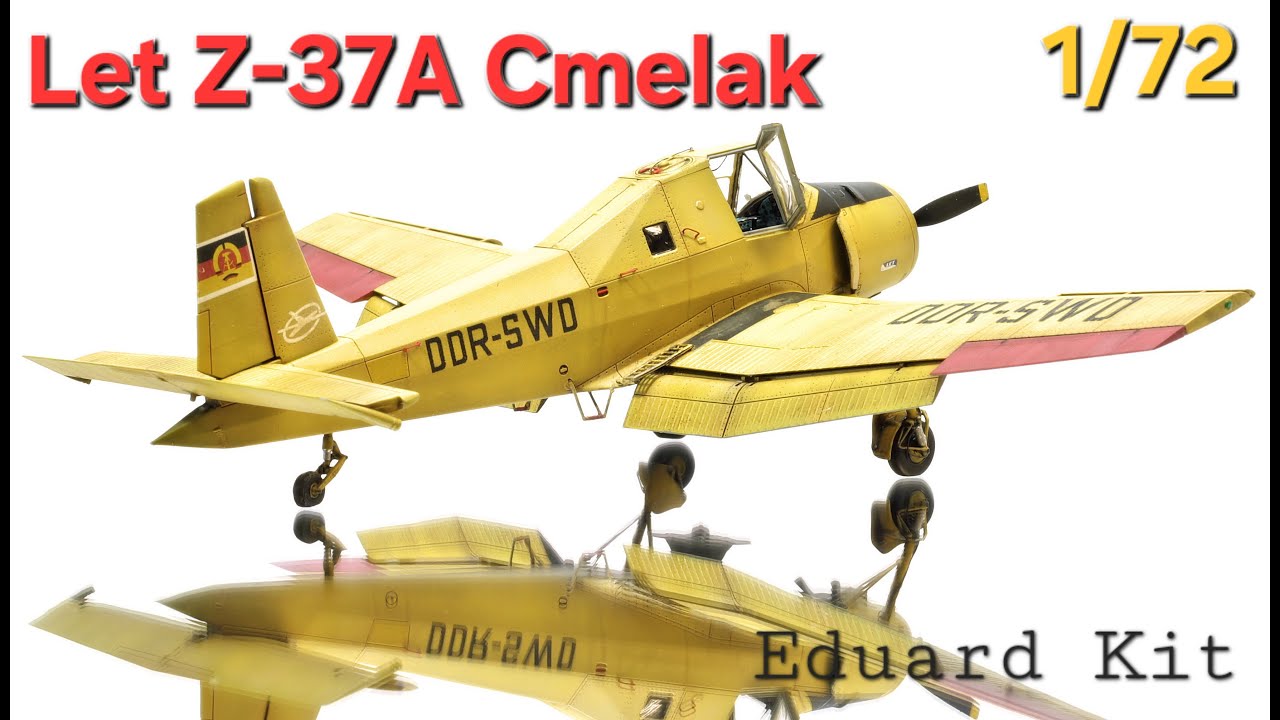
124 11 December 2022, 13:40
Will follow with great interest... not only because I like ag-planes, but also because I love such projects with personal/sentimental value, memories from childhood etc... Good luck! 👍
11 December 2022, 17:25
Thank you for following Alex and yes, those memories are very strong and impressive, so I will try my best to make a small vignette with the "Bumblebee".
16 December 2022, 08:16
@Taylor: vielen Dank. Ich werde nicht die ursprüngliche Lieferbemalung verwenden. Da ich die Flugzeuge eher zum Ende ihrer Einsatzzeit als kleiner Junge gesehen habe, muss es auch diese Version sein. Es fehlen also all die roten Streifen, die über die Jahre einfach in gelb überlackiert wurden. Rote Farbe war wohl Bückware. 😉
24 December 2022, 12:11
Da bin ich mal auf deine Interpretation gespannt. Sieht auf jeden Fall gut aus bis jetzt. Schöne Weihnachten!
24 December 2022, 13:02
Danke Taylor. Hoffe der Weihnachtsmann war fleißig.
Zum Thema: ich habe viel gesucht und recherchiert, aber es ist schwierig herauszufinden, welche Versionen damals wirklich bei meinem Dorf geflogen sind bzw. welche Kennung diese hatten. Das einzige was ich noch weiß und was auch Angehörige bestätigt haben ist, dass die Flugzeuge so ziemlich komplett gelb waren, ohne viel rote Bemalung. Also versuche ich das irgendwie darzustellen. Es gibt einige wenige Fotos auf denen man Maschinen sieht, die zumindest mal in Anklam (nähere Stadt) stationiert waren und von dort aus die umliegenden Flugfelder ansteuerten. Hier sieht man mal Beispiele wie die Hummeln ausgesehen haben könnten:
flickr.com/photos/korom/523854024
abpic.co.uk/pictures/view/1636951
28 December 2022, 07:25
Z-37, mein Thema. Bis jetzt sieht alles ganz gut aus, nur der Glanzgrad etwas zu glänzend. Vor dem Cockpit und die Tragflächen oben, eher ein Seidenmatt.
Wenn etwas in East Germany keine Bückware gewesen ist, dann war es rote Farbe. 😉
Der Hinterrumpf wurde bei der Grundüberholung neu bespannt und somit auch neu lackiert. Um Zeit und Kosten zu sparen, wurde in den 80er Jahren irgendwann die rote Farbe weggelassen.
28 December 2022, 15:56
Danke für die Infos Bernhard, gerade was den Glanzgrad angeht. Hast oder hattest du direkt mit den Maschinen zu tun? Habe zwar eine Z-37 genau vor meiner Haustür (Flugplatz Anklam), aber das Museumsstück wurde erst kürzlich neu lackiert um vor Witterung geschützt zu sein, die glänzt total. Das kann als Referenz natürlich nicht herhalten. Mein Modell bekommt noch ein anderes Finish, der Glanzlack war für das Washing nötig. Interessant auch die Sache mit der Neubespannung.
28 December 2022, 17:56
Ja, ich hab beim Agrarflug 17 Jahre gearbeitet, davon 7 Jahre Z-37 und 10 Jahre Ka-26.
Die Museumsflieger sehen meist immer besser aus, als die Maschinen im Einsatz. Die Flugzeuge standen ja doch die meiste Zeit im Freien und waren selbst im Winter nur notdürftig abgedeckt.
28 December 2022, 18:42
Mir gefällt deine Cmelak bus jetzt sehr gut. Bin auf den Rest gespannt.
29 December 2022, 17:42
Sieht klasse aus, richtig nach dem Arbeitspferd, das es war. Auch die Fülleinrichtung ist prima geworden. Das ruft nach einem Dio.
30 December 2022, 09:57
Wunderschön geworden. Ein so filigraner Bausatz erfordert schon ein entsprechend sauberes Arbeiten und eine feine Bemalung. Und viele schöne Details hast du wirklich toll umgesetzt. Die Griffe, die angestellten Klappen und vor allem die Leine zum öffnen der Einfüllklappe. Hab ich noch an keinem Cmelak Modell gesehen. Klasse😍.
30 December 2022, 23:44
Kann Taylor nur zustimmen. Wirklich sehr schön und überzeugend geworden.
31 December 2022, 09:39
Ach Chris, der Propeller war nur hinten Schwarz. Die Vorderseiten Hellgrau.
31 December 2022, 17:27
Vielen Dank Leute. Freut mich, wenn sie euch gefällt. Und Bernhard, du hast natürlich recht. Das fiel mir auch auf, als es eigentlich schon zu spät war, da waren die Fotos schon im Kasten. Hab das aber noch korrigiert und die Vorderseiten des Propellers grau gesprüht. Endgültige Fotos gibt es dann mit dem Dio-Finale.
1 January 2023, 12:21
I'm still struggeling with printing bigger 3-D parts and have to learn a lot on exposure times and support settings. Besides the Trabant, I also wanted to print a Lada Niva, but it broke away from the supports. So I will need to try it again.
7 January 2023, 21:32
You've done an exquisite job on the Z-37 - and the addition of the 3D-printed loading device and Trabby (and eventually Niva) really adds a lot - keep up the great work! 👍
8 January 2023, 16:45
Very beautiful so far! I am curious about the end result of the Trabant as well, what will you do with the windshield/glass parts?
8 January 2023, 16:51
Thanks guys. Marius, I fear there is no special surprise on the classes. Im happy that the print was successfull and in 1/72 I really do not want to drill and cut. Having no experience it would ruin the print. So I am only able to paint ot in black color. No problem for me, the "Trabbi" is only a small and quick background accessory.
8 January 2023, 19:11
Maybe you can try a second print of the Trabi in two parts: one part is from below up to the door handles (approximately) and a second one being only for the upper frame without the resin "glass parts". Like this you can add a simple interior and the glass to the upper frame. I know it's a lot more work to adapt the 3D geometry than it sounds, but maybe this motivates you.
Otherwise there is of course nothing wrong with your initial plan. Good luck!
8 January 2023, 19:16
Thank you for your hints, Marius. I'm afraid in my current life I won't become an expert in using 3D software. I am already happy when I find suitable finished and printable files and get them printed reasonably.
It's more exhausting as a plastic modeler these days anyway. 25 years ago I glued and painted with brushes. Today you have to be an airbrush artist, electrical engineer and professional photographer as well. 😉
13 January 2023, 10:22
Chris, you are right, but look at the fine model you created and the amount of people you brought joy to by looking at the nice pictures of it. I dare say it is worth the effort. 😉
13 January 2023, 13:24
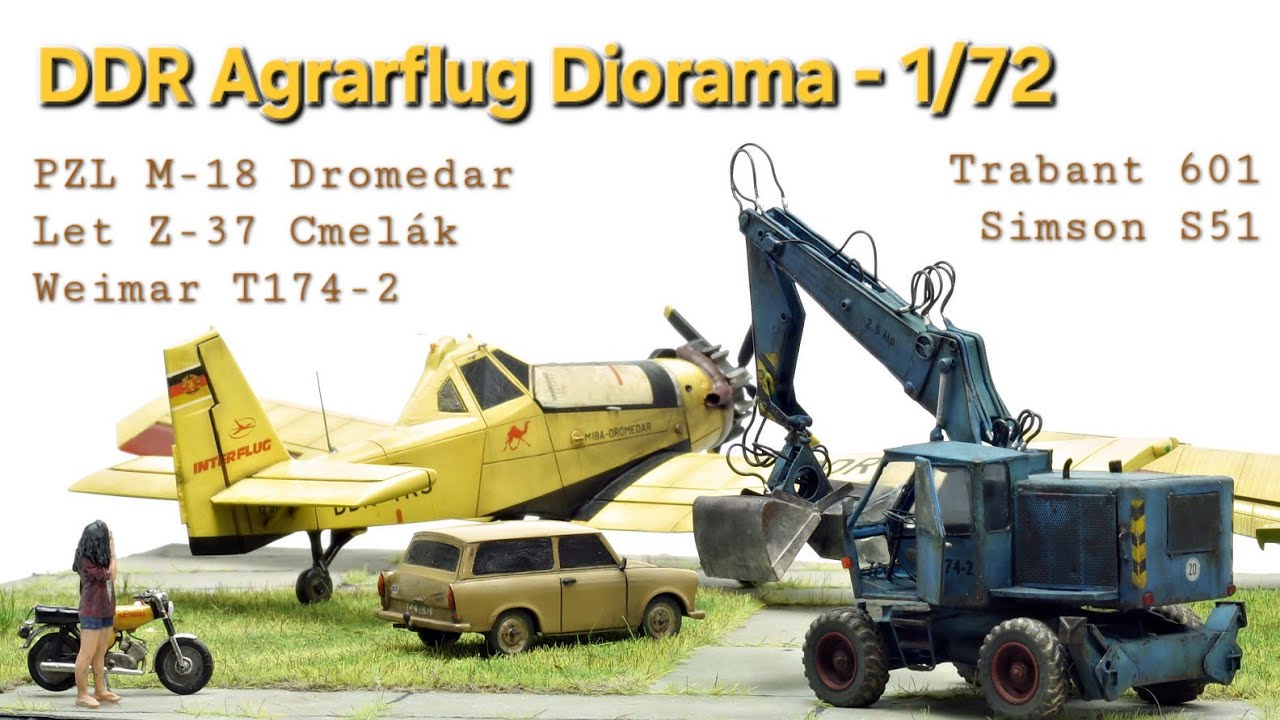
You are right, Michael, I really want to put more effort to this project and scenery, but not on the Trabi (it blurs in the background later). So I ordered the T-174 from Balaton to pimp the base/diorama. I think that is much more impressive and enhances the project much more than a Trabi.
13 January 2023, 13:48
I have now decided to make a completely new base. If the scene is to take place where I watched as a child, then it must be built that way.
For this purpose I found aerial photos from 1991, on which the area can be seen well, as it was used. Of course, I was also directly on location, but there everything is overgrown. One can hardly guess the structures. At least I could still recognize some concrete slabs and determine the exact size for the reconstruction.
19 January 2023, 10:58
I agree with Marius and Daniel - this "soap dish" looks fantastic 😉 (Trabant was given a slang name: "soap dish" in Poland... or "Ford Karton = "Cardboard Ford" 😄 )
19 January 2023, 13:07
The Trabbi looks realy spot on. Your Cmelak will be happy for sure to have such a well matching company.
19 January 2023, 16:37
Nice to hear that you like the "Renn-Pappe" (called "Race-Cardbord" here). 😉
Just noticed that I forgot to share the short video file I made with the Z-37:
Youtube Video
20 January 2023, 12:56
My kinda project. You feel the heart that is in this. I am anxious about the base.
20 January 2023, 23:17
Really great, grossartig! Zurück zu früheren Zeiten 🙂 In meiner Jugend waren es 2 km mit dem Fahrrad zum Feldfluplatz. Oft zugeschaut. Danke!
13 February 2023, 17:38
Awesome! Simson motors were 'Holy Grails' for my friends in the 1980ties...
19 February 2023, 17:54
Yes, of course, spoked wheels would be great. But the 3D file only was made in this version. As I said before, I am not a Pro in 3D design, so maybe in that size it is not easy to print spokes. I have already broken the handlebars and a turn signal when removing the supports. It is really very very small and delicate.
21 February 2023, 10:49
Two Cmelaks! One on steroids. I told them: it will do you no good!
Kidding aside. Two beautiful anc special models you present us here.
4 March 2023, 15:27
So I finally finished the complete diorama. Hope you like it.
26 October 2024, 10:51
Each and every model would be nice by itself, the combination is a really great East Germany dio. Where did Trabant and Simpson come from?
26 October 2024, 11:28
I especially enjoy the 3d printed dromedary. Despite it being fairly low detail, you made it look great with the painting.
26 October 2024, 14:55
Thank you very much guys. @Michael: the .stl files of the Trabi and the S51 are free from thingiverse.com.
27 October 2024, 07:00
Danke dir.
Ich hatte mir ja auch ne C-37 geholt, um sie mit nem Mähdrescher zu positionieren. Hab mich dann aber dagegen entschieden, weil ich befürchtete, dass beide Modelle sich gegenseitig die Show stehlen. Aber bei deinem Dio passt trotz der vielen schönen Einzelstücke alles super zusammen. Macht richtig Spaß.
27 October 2024, 08:30
Excellent diorama. Looks like a bigger scale work. Paintwork and weathering are superb. Great modelling!
27 October 2024, 09:48
Just made a short video of the finished diorama, please see here:
Youtube Video
23 November 2024, 11:06
Sehr sehr cool, mit dem Trabant usw sehr stimmig. Gute Inspiration, ich hab die noch in 1/48 liegen.
23 November 2024, 11:17
This kit is a SCAM. Do not lose your money by placing an order for it. No kit will get delivered.
")
USS Excelsior NX-2000 Premium Format Limited Edition
Epitome Apparel & Design 1:537
00168421 2021 Cancelled | Never released 29 April, 12:47
added a new photoalbum.
30 images
M2A3 Bradley w/BUSK III
1:35


Project: M2A3 Bradley w/BUSK III MENG
Scratchbuilt
9 12 April, 18:18
added a new photoalbum.


14 25 April, 15:50
So here's an interesting Tintin project I've been working on for a while now. The hardest part was getting the electronics to work. After beating an ESP32 microcontroller into submission I was finally able to get my tiny screen to display the video/audio clip I trimmed from the Tintin animated series. With that success, I moved on to 3D design of the awesome Professor Calculus invention, The Supercolor-Tryphonar (as seen in the Castafiore Emerald album). Next up... 3D printing and assembly.
In the meantime, here's the proof-of-concept video...
youtube.com/shorts/U..?si=u-ootNYEMdGWY8cm
2 25 April, 15:55
Thanks guys! First batch of files just came off the 3D printer. Will need to make a couple of adjustments to the screen size, but it's looking good so far. Also, I knew the steel bar supports were going to be too small to print properly (they warp while they dry), but I've got a bit of metal screen that I can cut into strips. Hopefully will look better and actually support the thing.
1 26 April, 19:25
Ok, so all the main pieces are off the 3D printer and I've cut the metal sheet into the straightest strips I could manage. It was quite difficult to bend it tightly along a single line. Much thicker than a regular PE part, but hopefully will look the part.
I had a lot of difficulty getting the electronics to work. I followed another maker's project (there are several versions of the ESP32 Mini TV projects on YouTube), but it was both a hardware problem because none of them seemed to wire up the screen's backlight, but until I did, I had not even a flicker. It was also a software problem because the library code was out of date, so I needed to go backwards to make it compatible, which led to other problems. Anyway, I vowed to use my Easter long weekend to either solve it for good, or give up forever (yeah, right!). After sourcing each of the issues one by one, I finally got it to work. Next is the assembly!
1 28 April, 04:05


added a new photoalbum.


68 1 September 2024, 18:19
looking forward to seeing more of this project👍.my uncle(5th SF) was in country just after TET and one of the few things he ever... spoke of more than once, was about riding on top of a M113 that rolled over a mine
12 October 2024, 18:07
Thank you Mona, that must have been a terrifying experience. The idea would be a fortified position in the Mekong Delta. I'm planning to build a sandback bunker and a piece of ricefield. The M113's will be stationary in a defensive position. Soldiers will be relaxed not knowing what is coming. But the layout is still evolving. Haven't decide the size of the groundwork yet. I'll be starting the diorama base soon... Will be continued 😉
13 October 2024, 08:21
Thank you Neuling, Spanjaard and Kim! I'm starting the diobase this week!
5 November 2024, 10:35
Looking good Mathias. Lovely work on the M113's. What did you use as the 50 cal casings?
5 November 2024, 12:09
Thanks Mr James, I used simply the copper of an electric wire. An idea I got from lasercreationworld. It is a bit too narrow, but the overal impression works I think.
5 November 2024, 20:17
Very nice looking vehicles, above all the interior; also the entire scene - I'm very curious about this diorama.
13 November 2024, 10:40
Thx Rui and Thomas E.! I hope it turns out as I am imagening it!
13 November 2024, 15:24
you may find this helpful (I hope so 🙂): data.opendevelopment..tnam-.compressed.pdf (5.11.2024)
12 January, 13:30
Good "gardening" work then Mathias,
you will have all my comprehension!🤗
15 January, 15:32
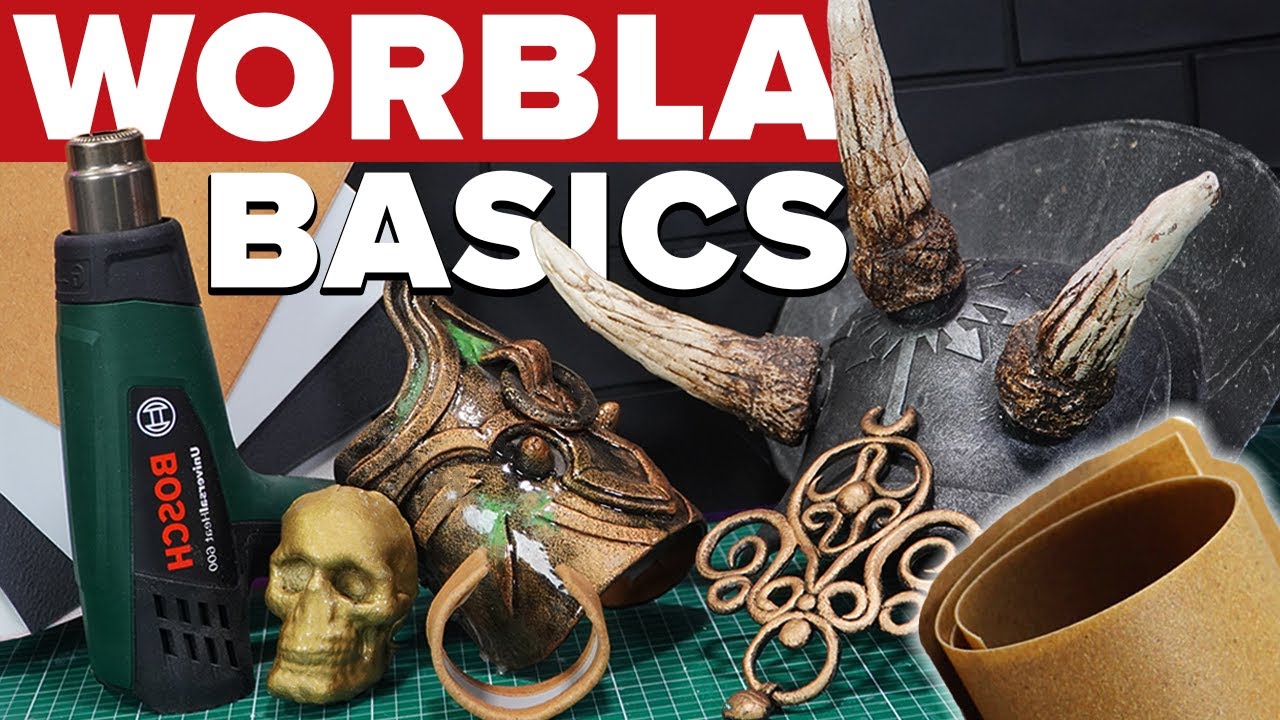
I'm experimenting with a thermoplastic called Worbla. This leaf was manually made. Next try is to lasercut it. If this is possible, the possibilities will be endless!!
16 January, 09:52
I've not heard of Worbla before. This is an interesting video about using it:
Youtube Video
3 16 January, 11:17
I used it for my other artwork: instagram.com/artrop..gsh=OWh4c2Jyd2Vqamgy
Thx!
1 16 January, 12:02
OMG - I'm so glad I saw this. The M113s are simply stunning! The Dio is really shaping up to be a killer as well - don't know how you havent\'t gone crazy building the palm leaves, but wow!!!!
1 February, 14:53
@CaptGPF, thanks man! I cheated a bit on the palmleaves. I lasercutter the leafs in a thermoplast sheet, but there is still a lot of finalising to do offcourse. I don't think this method has been tried before... Also thank you Rui!
1 February, 21:53
cheated? i certainly disagree. you did a great use of what you have at hand. why should you buy the same stuff as aftermarket if you can make your own? 😉 great job
1 1 February, 22:21
Totally agree with Spanjaard - it's not cheating if you make it yourself. Making kits doesn't mean you have to suffer if a more efficient way can be used!
2 February, 16:10
Thanks for the approval guys! Very excited to see the end result
2 February, 18:44
Looking excellent so far. The palm trees are the most realistically modelled ones I've seen.
20 February, 17:07
Thank you for the encouragement! Deadline is 27th of april...
1 6 April, 23:36
I agree with Lebloge. Living history in scale 1/35. Congrats for the well deserved prize! 👍
1 28 April, 10:05
Superb job Mathias! Thanks for sharing - thoroughly enjoyed the details you poured into this!
1 28 April, 14:53
Thank you for the loving comments! Final album is coming soon!
28 April, 15:03
added a new photoalbum.
9 images
Dora Wings Marcel-Bloch M.B. 151.
1:48
Most of the kit assembled. No locating pins, so dead reckoning called for. The bane of my life too, photo etch.


Project: Marcel Bloch MB.151 C.1


10 27 April, 19:46
Looking good, forge ahead. Funny, I can and have used tons of photoetch on ships without any issues. Outside of seat harnesses I have no desire to add or use PE on aircraft. Most if not all of it is hidden or not that much better than the kit part. Just my humble opinion 😄
27 April, 21:11
I hate photo etch with a passion Nick. I would rather use the kit part, like yourself than photo etch. If I can get hold of fabric set's of seatbelts I use them. Or mock them up with masking tape. Thank you for the compliment too. 🤟🥸🤘
28 April, 05:04
added a new photoalbum.


9 15 April, 20:42
USS Nimitz update....amazingly awarded 'Best in Show' at IPMS Scotland Nationals at the weekend!
1 29 April, 08:25
added a new photoalbum.
35 images
Sukhoi Su-12
1:72
Since the canopy was oversized I added edging to it to compensate for the problem.


Project: Su-12

35 5 April, 17:33
Starting a very rare bird. (I am getting bored with the other 9 builds I have still in progress).
2 5 April, 17:42
Nice project Skyhiker 👍👍 you build alot of Soviet stuff, don't see to many of these... nice choice 😃👍
14 April, 12:40
Thanks Dave. It took me a while to get the riveting done. Hopefully after priming I won't have to do it again.
17 April, 17:41
Alternatively you could have coated the entire fuselage with putty, building it up to the required size.
28 April, 19:57
Ben, I may have actually done that if the plane were to be painted with a camo but since this will be bare metal finish I decided to avoid putty as much as possible. I'm not 100 convinced with my solution but it will do for now. If I hate it after painting I'll take it off and have a rethink.
28 April, 23:38
The quality of the kit looks almost as good as Starfix. 😄
Excellent work so far.
29 April, 07:28
The pilots look like blobs of hot glue. Maybe I should have formed the fuselage out of hot glue to match them.
29 April, 10:18
ww2aircraft.net/foru..-trials-1.32229/full
Can anyone guess what the pipes on the side of the plane are? The kit has only the front section of the pipe and interpreted it as an exhaust, but it looks like a pipe to me.
29 April, 10:43


I suggest that Topic
SCM Topic: Civilians (Hunters)
be merged into
SCM Topic: Civilians
since the former only has 1 item in it.
Some of the other existing topics for Civilians are also a bit iffy.
On the other hand, the Civilians topic could probably do with splitting up in some way since it now has 1,850 items in it. But it is difficult to come up with some clear split that will work.
1 29 April, 10:29


added a new photoalbum.
8 images
Schneider 155mm C17S Howitzer
1:35


Project: Schneider 155mm C17S Howitzer


6 20 April, 09:44


added a new photoalbum.


49 24 February, 19:18
The only upgrades are the mirrors, so I can start with the painting! 😉
26 February, 17:15
I painted the green base color and airbrushed the 4tones camo pattern by freehand. Honestly it was awfull. So I deicided to strip the paint and start over again.
So I airbrushed the light brown color with highlights and masked the brown patches. The next color is the light yellow.
4 March, 16:25
Painting process done: 4tones camouflage maskedamd airbrushed. It's shaded before pinwash. Now comes the varnish and I can start with the weathering. Meanwhile I also started tó Paint the base.
17 March, 14:39
Great work. I'm surprised you used masking tape to paint the camo scheme. It worked very well.
1 24 March, 09:43
Without being hindered by any knowledge of the matter,😀 I was of the opinion that it is better to use poster tack or special elastic puty for this to avoid paint bleeding. This is certainly not the case here.
24 March, 15:15
Bohrmann: my experience is that masking putty is good to use when I mask one color and remove it after painting. If I mask multiple layers with putty, the size of the putty in the covered areas changes due to the enviroment temperature, and when I remove the mask, I don't get the result I expected. This is especially true when I paint 4-color camo, because then the mask stays on for several days due to the time between drying each color.
1 25 March, 08:11
I say it's completed now. I can take better photos next week....
1 25 April, 19:40
added a new photoalbum.


42 6 March, 20:16

very nice painting/weathering. What exactly paints/colours did you use?
21 March, 18:43
Marcin, these are all MRP paints, you can lookup in this project profile.
Weathering with AK enamels and oilbrushers and shaders
22 March, 06:33


added a new photoalbum.
25 images
Saudi Falcons
1:32
Although the Martin Baker MK10 pins and seats are made of resin, I don't really like them. I think they're old molds. I ...


Project: Tornado GR. Mk1 RAF


 15+
15+ 19 17 March, 08:20
/search.php?q=*&page=newsfeed&fkSECTION[]=Newsfeed
search-solr.php?lang=en
35
35
/search.php?q=*&page=newsfeed&fkSECTION[]=Newsfeed
35
todo