
News Feed


added a new photoalbum.
100 images
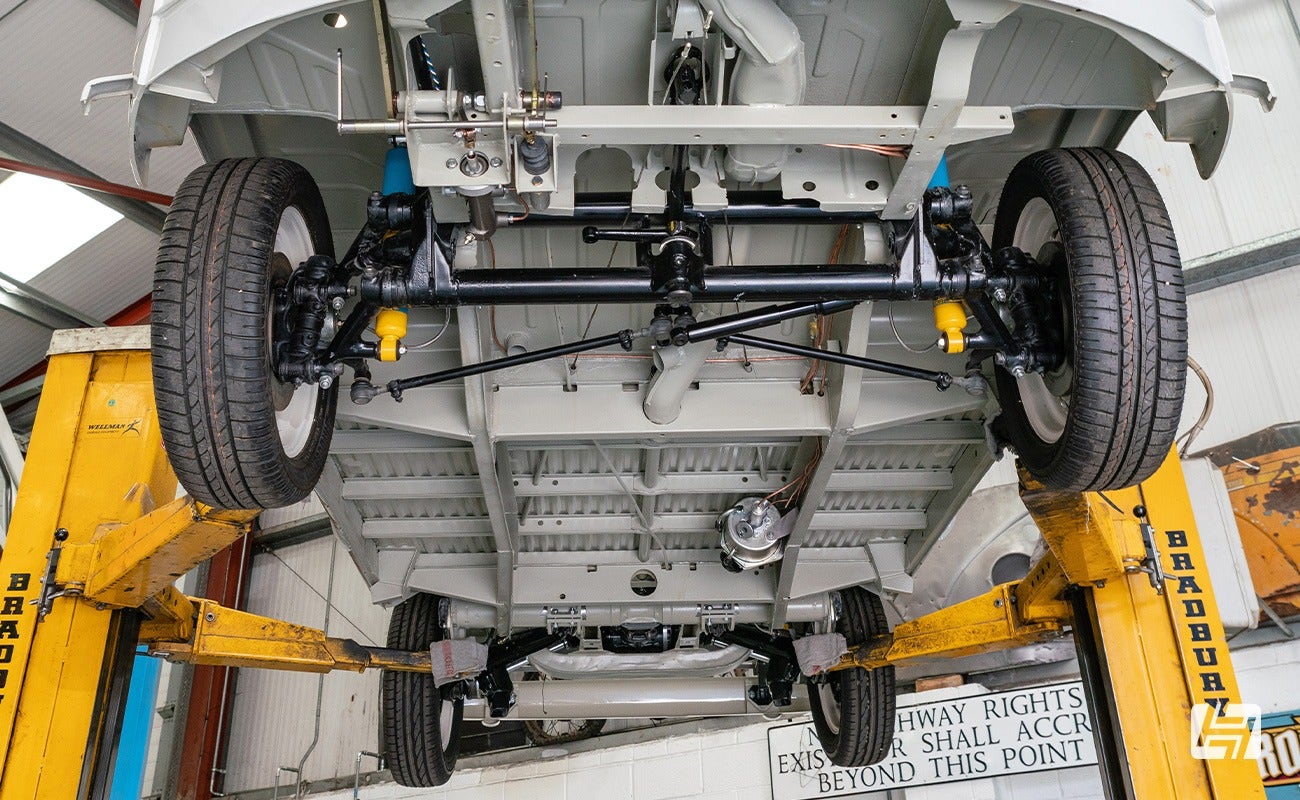
SAAB Viggen - "Thor's Hammers" - Special Hobby - Quadruple Build
1:72
Undercarriage being added, making sure to get the alignment correct so all six wheels are simultaneously touching the gr...


 14+
14+ 114 15 January, 18:11
Me too. Already learned to better open up the RAT turbine at my Viggen. A step I lazily omitted.
2 16 January, 08:33
Main assermbly done on all four models, but now I have a few days to spend sanding and filling unwanted seams and crude areas. A bit tedious, but that's what you get when you choose to build four nearly identical models at the same time.
17 January, 14:23
Oh my... Good luck, Thomas! 🙂
I own two of them and was thinking of a double build but rejected the idea. Thanks for the encouragement!
1 17 January, 18:26
Wow! That's a quick build! 😳 I can only dream to build ONE kit that fast, let alone four at once!
1 17 January, 19:29
Mr D, no, they are pretty much the same. Most of the parts for all versions are provided in every kit. But there are some subtle differences that need attention, like the extension of the fuselage for the fighter version.
1 17 January, 22:05
Patrick, haha, I am a pretty fast builder, but I am extremely slow when it comes to painting. That's where my projects usually come to a crawl.
3 17 January, 22:07
watching with interest - I love SAAB aircraft anyhow, but 4 of them in one project --great!!
1 18 January, 10:31
This is more interesting than I thought it would be. The subtle difference between them are pretty cool.
2 20 January, 10:53
With only a few minutes of modeling here and there this week, it's quite a slow progress, but I am still inching closer to the finished assembly.
30 January, 20:16
Primer coat applied, a few filling errors need to be fixed. Time is unfortunately very difficult to find because of work, so the project moves very slowly for a while.
12 February, 08:46
Undersides sprayed blue-gray with Mr Paint. Now let's wait a day for the paint to dry and then it's time to start working on the splinter camo. With my current speed, I expect to be finished by midsummer.
14 February, 14:15
Oh yes, once you get used to MRP, you'll never want another paint brand anymore! I love their colors, pigmentation and general ease of use. And, as a bonus, their sheen is perfect for adding decals directly on top.
2 14 February, 15:36
I am trying to find a way to avoid tiny gaps between the splinter camo color zones. I think I have figured it out - before spraying a color zone, also remove the masks for all adjacent surfaces not yet painted. Thereby a slight spray overlap is created, so even if the mask is then replaced with a tiny bit of offset, it should not be visible. Special Hobby writes something like that in the mask description, but it's written in a very obscure way.
17 February, 12:11
Looks great just give the corporal in charge of painting a reprimand on his record and send the plane to the flight line......do you know how much it cost to paint aircraft, lol.
1 17 February, 13:55
macro is a bitch for this kind of details... if you place the model in the display cabinet, can you see that microline with wrong color? i think you can not 😉
1 17 February, 14:01
I have now started to add the masks to the models. It's quite a tricky task because I need to be extremely precise with the application - even the tiniest errors will be magnified as more mask segments are added, until things no longer add up. So it's a matter of constantly realigning the segments, which makes it all rather time consuming. BTW, I noticed that the pattern has a few minor errors, but I definitely won't lose any sleep over it.
1 19 February, 20:26
Thanks for your explain, Thomas. I thinked to would be more easy to apply 👍
1 19 February, 20:33
this camo is one of the most complicated to achieve and the fact that you are doing it 4 models at once... my deepest respect!
2 19 February, 21:20
Cuajete, Spanjaard and Łukasz, thank you for your interest! I am certainly not doing any cliffhanging on purpose - I am actually this glacially slow in reality. I also try to avoid aggravating the wifey by disappearing in my modeling man-cave for hours.
2 19 February, 21:45
Good and fully understood strategy 😄
As our common colleague (the one, you share initials with 😛) used to say: "Happy wife? Happy life!"
1 19 February, 22:05
Watching with interest. You will master the splinter camo for sure 👍
1 20 February, 17:10
I am still struggling with the masks, trying to making sure that they are applied exactly identical on all three models, which slows down the process a bit. Not that anybody except me would notice.
3 21 February, 10:59
Nice progress, I'm looking forward to the splinter camouflage. On my AJ-37 I used vinyl masks from DM Models, it looks like the masks you are using are a bit easier to handle.
1 22 February, 12:12
I have always had the conspirational theory that the Danish air force had a secret department dedicated to making life miserable for modellers, with their odd fonts, colours and aircraft modifications. The splinter camouflage is clear evidence of a similar department in the Swedish air force.
4 22 February, 12:19
Daniel, thank you! I am right now hoping that my end result will be at least in the general vicinity of your beautiful Viggen in flight!
22 February, 22:31
Phew, the second color is finally on. Now it's time to cover also the dark green areas and proceed with the black.
16 March, 20:06
Was anxious to see how you handle the masking but see that you struggle with the three tone camo too. Cross my fingers for a satisfactory end result.
1 17 March, 08:57
Michael, it is really not that difficult, only extremely time-consuming and require a very good eye-sight (or magnifying glasses). Too bad that the masks only partially reflect the actual camo pattern, I was hoping that they would be near perfect.
17 March, 09:52
I was wrecking my brain for a simple elegant technique to apply 3-tone camos without the need for re-covering extensively. So - yes the concept is easy, but the work is plenty. 😉. Keep it up. Looking good.
1 17 March, 10:52
Actually, the best method is to have two mask sets. I find that it is very difficult to do it all with just one mask set, as the masks will be slightly stretched and distorted when removed and reapplied and will no longer fit perfectly.
1. Spray the model light green.
2. Place all the masks from the first mask set.
3. Remove all masks segments except the light green ones and throw them away.
4. Spray the model dark green.
5. Add the dark green masks from the second mask set.
6. Spray the model black.
7. Add the black masks from the second mask set.
8. Spray the remaining exposed areas tan.
Also, when spraying a color, do not mask areas that you will be painting with a different color later, or you will end up with tiny strips of areas where the previous color shines through.
3 17 March, 11:41
Maybe to add that such a camo be best postshaded or oil rendered as the various colors have different amounts of paint layers and so preshading gives an inconsistent result.
2 17 March, 14:12
Great job with the painting masks, Thomas!
Thank you for the explain and the steps for apply 👍
1 17 March, 19:01
Thanks for the detailed explanation Thomas. Is there a particular reason for the order of the colors? I would probably have worked from light to dark.
1 17 March, 19:44
Admirable stamina, looking forward to the inevitably great result 👍 I have Fujimi 1/72 Boeing Vertol/Hkp 4 in my stash and Swedish decals for it… even the rotor blades have splinter camouflage.. 😳🙄
1 17 March, 20:20
Thank you all for your interest and encouragement! Nicolas, the tan areas are relatively few and with difficult shapes that are squeezed in between the other colors, so I figured that they would be easiest to leave for last. And for the three other colors, I indeed went from lightest to darkest as you suggested. Kenneth, yes, I would love to do the Hkp 4, it looks awesome in the splinter paintwork! I am however not sure if the Fujimi is available any more.
17 March, 20:39
Łukasz, thank you! Kenneth actually provided me with a link to a German web shop (Modellbau Huber) where the Fujimi was still available, so I placed an order for it. I also ordered the Swedish decal set, so I might as well check if I have some MRP splinter camo paint left. And Valium for the nerves.
2 18 March, 08:44
Wow, Thomas... It will be great to see that Fujimi with splinter camo in your hands 👍. I wanted to do the same too, but unfortunately I got another version instead.
1 18 March, 19:08
Lukasz, I initially bought the 1/72 Hobby Boss CH-46 by mistake and it's useless for a Swedish Hkp 4. You basically need to make completely new rear sponsons yourself, and their shape is relatively complex.
2 18 March, 21:32
OMG. A lot of work in this camo scheme - I sure at the very end all the efforts definitively will pay off. I'm really curios for next pictures....
1 22 March, 12:16
@pic92: ok?! That looks freakin perfect! I cross my fingers for a similar result on all surfaces on all planes.
1 24 March, 20:43
Those colors look awesome already! Very tight demarcations as well! 👌🏼
1 25 March, 18:31
Great! Fantastic result.
The great (and hard) masking effort is paying off, Thomas 👍
1 25 March, 18:44
A little late, but watching with interest - especially if you go insane over FOUR viggen camo jobs!
1 27 March, 00:02
I take my hat off! I just would not have the patience to do every step 4 times - especially the masking (ok, 3 times here…). Great job on the masking Thomas!
1 31 March, 14:17
Thank you all, dear mates for your kind words. They mean a lot to me! But to be fair, at least half the cred goes to MRP for its paints - they are simply incredible to work with. For airbrush work, I cannot see myself going back to anything else again.
2 31 March, 17:53
Wow... Thomas, the patience and work you put in to achieve such a magnificent result is admirable.
1 31 March, 19:20
Congratulations on conversion to the lacquer paints 😄 Welcome to the club 😄
Hint: the other lacquers are great too, but might need thinning.
I'm very sorry to state that the grey one looks so incredibly dull now 😉
1 31 March, 19:53
Łukasz, haha, yes, the grey JA certainly does look boring in comparison, but well, that's what they looked like in real life. Perhaps the large red day-glo numbers on the wings might spruce it up a bit.
2 1 April, 04:53
Wow, my friend, what an incredible job! How can you do something so complicated?
3 1 April, 05:35
Little time for modeling these days, but some progress is done on the details. Next is that fiddly undercarriage and then the part I am dreading a bit, the decals.
2 13 April, 11:36


added a new photoalbum.


20 6 August 2024, 19:51
Nice choice, the Zvezda kits build up nicely.
Interesting project, coming along nicely 👍👍
22 August 2024, 16:29
Model finished, I built direct from the box without any upgrade.
6 February, 13:22
Nice job David 👏 looks really good....well done 👍
I would like to add one to my collection soon.
Great weapon selection 👌
6 February, 16:13
Thank you Mr D, the weapons that come with this plane are the only option it has.
6 February, 20:04
Nice work!
Changing the teaser photo to one of the completed model would get more people to view the album.
25 April, 13:53
added a new photoalbum.


78 11 July 2024, 21:06
Oh ya!
Built a couple of Broplan vac kits, a real challenge but great for the feeling of overcoming a challenge and creative accomplishment
11 July 2024, 23:27
OMG, what a challenge! 🙂 Those panel lines look quite uneven, will you try to rescribe them or just take them for what they are? In any way, I am super curious how these sheets of plastic can be turned into a model, so I will watch with interest!
12 July 2024, 02:31
Welcome mates, the panellines are aweful but the material is so thin, i'm scarred that i cut right trough it when i try to rescribe them.
12 July 2024, 06:24
Following. Got my first vacu kit this weekend. I hope I can learn something here.
16 July 2024, 14:48
Hi DuperScale, I built a couple of Broplan vac ATR kits, converting one 72 500 to a 42 300. A few pics of the work in my "albums" if you're interested in the kind of model you can achieve from a Broplan kit with a bit of work…sweat and tears, foul language, alcohol and time….
16 July 2024, 23:24
DuperScale, how about scribing into a layer of primer paint?
This way, scribing should be a lot easier afaik, scribing into the primer layer of paing, and not plastic.
This guy on youtube did this, on regular plastic models though.
20 August 2024, 05:21
As for the clear parts, I wonder if it could be done this way
1) Cut out a square/rectangle shape, removing the oval form from windows. The larger the hole the better, to create some extra space around the old window shape. Enough space to work with putty later on.
2) Glue in a flat thin strip of transparent styrene on inside of model.
3) Glue in a square/rectangle shape transparent styrene, outside the model, laminated with the existing strip of transparent styrene on inside, so double layered.
If keeping the new window parts larger than the old window shape it should be easier to use some putty after adding masking tape that have the shape of the old windows. The larger these new outer square/rectangle window shapes are, the easier it is to add putty to create a smooth surface, then hopefully the center part is clear enough, to mask off the final shape of the old window shape, before painting.
Afaik a common issue using Mikro Kristal Klear is that you can't sand the clear part afterwards, because the clear part is like rubber iirc. You can iirc easily remove this clear part though, just poke/pull it out. Unsure if there would be any residue left after removing the rubber like liquid clear stuff after it dries.
20 August 2024, 05:25
Another thing one could do with clear parts an idea:
1) Glue in a long strip of transparent styrene on inside of plane.
2) Add some kind of epoxy or something that can be sanded, without the epoxy damaging the underlying transparent styrene.
3) Idea is to use the liquid stuff to fill in the perfectly shaped holes for the windows, then sand the liquid stuff flush after it dries.
What won't work imo, is doing multiple rounds of adding liquids to create some goo that goes transparent. I think if you sand this stuff multiple times adding more liquid stuff, you get a flawed result I think. I tried something like that with gloss varnish, trying to build up a solid clear shape. Did not work as expected.
20 August 2024, 05:35
In this thread, and in photo #13, the guy apparently put tape outside, and poured clear resin on the inside to fill the window holes. Unsure if such resin will react and maybe eat up or warp any thin parts ala vacuum kits. I guess this can be tested with some scrap plastic if having some piece left over.
Boeing 737-530 Smart Wings 1:144 | Album by Zbynek (1:144)
20 August 2024, 07:35
The UV transparent resin is usually sandable (to some degree), maybe that might help?
Similarly to Treehugger I'd reinforce it with a transparent styrene from the inside of the fuselage anyway.
Or you might leave the windows open and fill them with Kristal Klear after painting - this is what I did on my Jetstream, Avanti & Yak-40. But if you want to seal it with gloss varnish, remember to keep very thin layers (guess how I learned it 🙂).
[img1]
Blue Jetstream (SP-KWN) | Album by Woody (1:72)
Avanti! | Album by Woody (1:72)

20 August 2024, 07:59
Hi, thanks for the input mates. I'm quite happy with the kristal clear on the small windows and i think i do it like Lukasz said. After everything is done i do the windows as the last step.
The windscreen window could work but i think i used little to much of the kristal clear.
20 August 2024, 16:10
Like the cockpit..👍
Lots of work but doing a 👍 job... Be rewarding when done.
17 September 2024, 20:48
The kit is coming together very good. You are skilled and brave!
Great to follow the journey to see the final result. 👍🏻
30 September 2024, 19:28
Thanks for the nice comments, from far away it looks good but the fit, lack of detail and scale problems are really annoying.😅
6 October 2024, 14:37
That's the main reason why I've never dared to try a vacu kit before. I've learned a lot from you. Looks good so far.
6 October 2024, 16:08
I agree with mates 👍
@DuperScale, I'm glad you're taking up this project again.
1 25 February, 20:14
Fantastic job! I am impressed with your skills and perseverance, chapeau bas!
1 3 April, 17:41
Close to the finish, at the Moment i try to get the windows done….man i cant get them the way i want. I already tried 3 times and messed them up. Stay tuned….. 😅
8 April, 06:01
So tell us what you really feel about Vaccuform! Don't hold back on us...
1 13 April, 13:29
I'm done, from this point it's just getting worse… 🤪 my opinion, for that price (over 50€) it is really not worth it… the amount of headache you get with a kit like that you can build 10 normal kits. The lack of detail and wrong shapes is so massiv, it's stupid i paid that price 😂
24 April, 20:28
High price? No details? Pain in the a***? Hey, this is the holy grail of modelling. Just bought my first vacu-kit. Ask me again after I build it. 😉
25 April, 13:52


added a new photoalbum.


4 25 April, 01:07
I had problems fitting the canopy with the one I did. I'm not sure if it was something I did wrong.
25 April, 13:49


added a new photoalbum.


48 25 June 2023, 15:18
Thanks Joachim P.I tried to build a little studio at home .It's worth it
26 June 2023, 07:19
Awesome looking Intruder and the photo work is striking! Congratulations. I flew the A-6E TRAM and my last cruise the SWIP version. Only a true Intruder geek would probably know this, but the A-6 version you've chosen did not have the capability to carry HARM missiles. That didn't come until the SWIP version in about 1989. We didn't get SWIP birds till 1992 (VA-155). But the model and photo are first class.
25 April, 10:09
added a new photoalbum.


6 20 April, 16:25
Out of the box built of a great kit. Pretty cheap, not too many parts, but great details. Only minor flash and very few issues with parts fit. The small price point makes it a great kit to test some techniques without too much worries of messing it up. In this case: I used chipping fluid (hairspray) for the first time. I'm satisfied with the results, looks like I'll work further on that skill.
25 April, 10:20


added a new photoalbum.


28 23 April, 14:59
The best decoration ever, the VF111 Sundowners with a legendary fighter. Well done
1 23 April, 19:42


added a new photoalbum.


43 23 March, 20:13
Matteo its not that clean, i see a lot of little mistake, but in a display and in pjoto the model look great.Revell put a lot of details on the body and you need to masked and be careful. The hood also dont fit perfectly, but its a good kit in general.
24 March, 16:21
added a new photoalbum.
53 images
Volkswagen Type2 Micro Bus (1963) '23-window' (Hasegawa 1-24)
1:24
Finished.


Project: Volkswagen Micro Bus (1963)


52 22 October 2024, 18:50
This may be no consolation, but it is the same issue with the Revell Samba bus.
23 October 2024, 03:59
Oh, that are a lot of ejection marks!
For raised ones I use a scalpel nr 15, if there is enough space around. In the middle of pic 1 are some with tight structures around. Here I would use a model chisel like this one (example, there are different sizes): Chisel F2 (Master Tools 09924, No)
Deepened ones can be closed with round pieces of styrene (made with punch and die, in the matching diameter.
")
1 26 October 2024, 19:19
The X-Acto #17 chisel blade is also excellent for removing ejector pin marks. It can be used in the normal chisel angle as well as perpendicular to the surface as a scraper. #17 Lightweight Chiseling Blades - 5 Pcs (X-ACTO X217, No)
")
26 October 2024, 19:44
The metal floor should be corrugated on a type 2, so another approach would be to hide them under corrugated panels.
[img1]
26 October 2024, 19:56
Thank you so much for the comments. I'm in the middle of removing them. Some of them are really high. I use everything I have on the hand (Saw, chisel, scalpel, sandpaper). For some I even used a dremel (really cautious) Even if i would hide the behind corrugated panels (God idea by the way) I still have to remove them before.
You can see in the next picture how high there are. Ione was almost 1mm
27 October 2024, 05:24
I'm liking those plates. I applaud anyone, who tries to advance their skills. And you did it right, by trying this on the bottom first.
10 November 2024, 12:21
Personally, I think that a bit more, would work. Anyone who's owned or worked on an old VW, knows that they're covered in rust. However, you've mastered that technique and it's worked beautifully!
Keep at it, and good luck 👍
22 December 2024, 11:36
Yeah air cooled vws tend to be very rusty - you nailed it! Mine literally had holes in the footwell area in front. I used an air chisel to cut the skin off an old hot water tank found by the side of the road and used the sheet metal to patch my floo
22 December 2024, 11:50
That body looks too good to spoil. Excellent work so far. You have me captivated.
9 February, 15:16
Working on the Concept of my Diorama. I never build one before, The Barrels and Jerry Cans are 3D printed. The rims are from an old kit I build, but didn't survive one of my moves. The bumber was in the Hasegawa Kit. The wooden Fence is not finished.
1 4 April, 17:08
Absolutely fantastic! And thanks for adding comments, really enjoyable to spin through the album. Congrats.
4 April, 17:12
Very happy to see this moving forward. I'm liking what I see! You don't have to spend millions on special parts, for a diorama, most of the time, you've got the stuff, laying around the house? You just need to think outside the box?
Excited to see the outcome of this, now it's nearing completion 🙂
6 April, 06:19
Finally finished. I'm proud that I pulled that one off. Last dumb question should I glue the Bus on the diorama?
1 24 April, 16:32
Excellent result. The weathering looks very good. I guess I wouldn't glue the bus to the diorama. That way you can use the diorama to photograph other cars or put the bus on a different diorama if you'd want that.
25 April, 10:26
There's just so much detail to take in!
You're weathering & corrosion skills are excellent 👌👌
25 April, 10:53


added a new photoalbum.


12 24 April, 16:58
Fantasique!
(Please attached this album to a project (with the items you used), this will make your amazing album visible on the kit page)
1 24 April, 19:38
Another beauty from your workbench. I like the variety in your portfolio.
1 24 April, 20:05
added a new photoalbum.


12 24 April, 13:59
Almost every night can hear how this beast deffending peace from cruds....
24 April, 14:03
Beautiful work 👍 Sorry to know that, you are all, in my thoughts. SLAVA UKRAINE 👍
1 24 April, 15:14
Nice Gepard! Have the original barrels from the kit been bent as well? I see you used aftermarket barrels for the 35mm....
1 25 April, 11:21
big thanks Rui S! Героям Слава!
Big thanks Hajo Lippke as well) Yep, original were bent and brouken... But this one aftermarket barrels are too messive... Planing to do another Gepard. Have anover one from Best resin. Printing is horrible, but barrels are metal and very good from the first sight)
25 April, 12:26


added a new photoalbum.
6 images
Hawker Hurricane Mk I // DT-A // 257 Sqdn. // December 1940
1:72
The assembly of the cockpit, fuselage halves and wings is slightly tricky. Especially if the parts are painted the assem...


 1+
1+ 12 21 April, 22:35
added a new photoalbum.
49 images
Tamed Panther: "Cuckoo"
1:35
It was pointed out to me that a British camouflage net should have hessian strips in, so I glued some strips I cut from ...


Project: Tamed Panther


 2+
2+ 19 13 February, 15:55
This looks better than my Panther. Then again my Tamiya was/is (it's in the paint shop) my first ever 1:35 scale AFV…if I ever get to your level of build quality I'll be a happy cockney 😘😇😊😊😁
1 6 March, 11:02
By the way, you can always trust you Jakko to have an interesting subject matter. Something a little quirky or different. Never knew the allies had one. It was relatively common to use an enemy's vehicles I believe but it's still somewhat of a shock when you actually see it.
1 6 March, 11:11
There are a good number of photos of captured Panthers used by the Allies, but Cuckoo is probably the best-known. For a lot more pictures of all kinds of captured German vehicles, take a look at this thread on Missing-Lynx: tapatalk.com/groups/..-allies-t337227.html
1 6 March, 11:23
If you look at the new hatch door you built, if you zoom in a little it looks a little bit like the palm tree part of the DAK marking that has the tree with a swastika half way down its trunk. Or am I going mad? They do say the human brain tries to find familiar shapes in everything. Could be a case of that! 🙂
1 6 March, 11:25
You mean on the Zimmerit? That's an arrow pointing up, to ensure the hatch would end up the right way round 🙂 I had to take care that the ridges and grid pattern on the hatch line up with those on the turret, and the arrow helps with that.
2 6 March, 12:06
Thanks, I like model threads that actually show what the builder is doing rather than just posting the finished article 🙂
2 7 March, 10:03
Ahhh thanks for the explanation Jakko. I thought it must've been intentional!
1 7 March, 11:24
Bedankt 🙂 I now have to figure out what most of the other stuff is that was on the real tank when it was photographed near Geijsteren and in Tilburg. Some of it's easy, like a couple of jeryrcans, a bucket, etc. but other bits are very hard to make out.
11 April, 20:22
added a new article to his personal gallery:


McDonnell XF-85 Goblin Smallest Fighter Jet or First Egg-Plane
Halberd Models 1:48
by bughunter on Modellversium
1 25 April, 12:22


added a new photoalbum.


9 17 April, 23:42
BIG3311 Contains:
32289 - Exterior
32293 - Bomb bay
32306 - Undercarriage
32708 - Seatbelts
32709 - Interior (S.A.)
JX 127 - Canopy mask
")
25 April, 12:14
added a new photoalbum.


6 24 April, 19:37
Another eye catcher. Outstanding model (& photo) collection 👍 Congratulations
1 25 April, 12:11


added a new photoalbum.
7 images
Tornado Gr.1 'Awesome Annie'
1:72
The cockpit is done


Project: Tornado Gr.1 'Awesome Annie'


 5+
5+ 14 16 February, 16:37


added a new photoalbum.


9 24 April, 10:54
Assembly done... Took me two months. This is a really tiny tank.
24 April, 20:50
/search.php?q=*&page=newsfeed&fkSECTION[]=Newsfeed
search-solr.php?lang=en
35
35
/search.php?q=*&page=newsfeed&fkSECTION[]=Newsfeed
35
todo