
News Feed
added a new photoalbum.


34 20 April, 16:48
Paintwork, weathering, accessories, position of figures: everything just fine!
1 21 April, 10:01
Wow!! God, I'm so jealous! Still I'm but a baby in modelling terms. I be a toddler soon hopefully. Then a child. Then I might even make teenager! lol
Great work Robert
Ps you bought the figures separately?
25 April, 06:02
Do you do YouTube videos? I've got so many questions. What's the part hanging in the back of the turret for example?
25 April, 06:08
added a new photoalbum.


39 17 March, 20:51
Ha! There come the memories of my childhood! Please a seat in the front row and a bottle of Oranżada! 🙂🙂
3 20 March, 09:54
Nice! Seeing this Eastern European military workhorse done justice in 1/72 definetly has my attention 👍
1 21 March, 11:33
Although it looks like a rolling coffin, Zsolt started a great party with it! The modulation looks very convincing.
1 30 March, 14:50
After enamel pinwash I played with oilbrushers from Amm: I faded blended and highlighted the green base color
1 4 April, 21:18
added a new photoalbum.
100 images
SAAB Viggen - "Thor's Hammers" - Special Hobby - Quadruple Build
1:72
Undercarriage being added. Also note the camera-, flash-, jamming- and chaff pods added to the SF 37. These are all resi...


 14+
14+ 114 15 January, 18:11
Me too. Already learned to better open up the RAT turbine at my Viggen. A step I lazily omitted.
2 16 January, 08:33
Main assermbly done on all four models, but now I have a few days to spend sanding and filling unwanted seams and crude areas. A bit tedious, but that's what you get when you choose to build four nearly identical models at the same time.
17 January, 14:23
Oh my... Good luck, Thomas! 🙂
I own two of them and was thinking of a double build but rejected the idea. Thanks for the encouragement!
1 17 January, 18:26
Wow! That's a quick build! 😳 I can only dream to build ONE kit that fast, let alone four at once!
1 17 January, 19:29
Mr D, no, they are pretty much the same. Most of the parts for all versions are provided in every kit. But there are some subtle differences that need attention, like the extension of the fuselage for the fighter version.
1 17 January, 22:05
Patrick, haha, I am a pretty fast builder, but I am extremely slow when it comes to painting. That's where my projects usually come to a crawl.
3 17 January, 22:07
watching with interest - I love SAAB aircraft anyhow, but 4 of them in one project --great!!
1 18 January, 10:31
This is more interesting than I thought it would be. The subtle difference between them are pretty cool.
2 20 January, 10:53
With only a few minutes of modeling here and there this week, it's quite a slow progress, but I am still inching closer to the finished assembly.
30 January, 20:16
Primer coat applied, a few filling errors need to be fixed. Time is unfortunately very difficult to find because of work, so the project moves very slowly for a while.
12 February, 08:46
Undersides sprayed blue-gray with Mr Paint. Now let's wait a day for the paint to dry and then it's time to start working on the splinter camo. With my current speed, I expect to be finished by midsummer.
14 February, 14:15
Oh yes, once you get used to MRP, you'll never want another paint brand anymore! I love their colors, pigmentation and general ease of use. And, as a bonus, their sheen is perfect for adding decals directly on top.
2 14 February, 15:36
I am trying to find a way to avoid tiny gaps between the splinter camo color zones. I think I have figured it out - before spraying a color zone, also remove the masks for all adjacent surfaces not yet painted. Thereby a slight spray overlap is created, so even if the mask is then replaced with a tiny bit of offset, it should not be visible. Special Hobby writes something like that in the mask description, but it's written in a very obscure way.
17 February, 12:11
Looks great just give the corporal in charge of painting a reprimand on his record and send the plane to the flight line......do you know how much it cost to paint aircraft, lol.
1 17 February, 13:55
macro is a bitch for this kind of details... if you place the model in the display cabinet, can you see that microline with wrong color? i think you can not 😉
1 17 February, 14:01
I have now started to add the masks to the models. It's quite a tricky task because I need to be extremely precise with the application - even the tiniest errors will be magnified as more mask segments are added, until things no longer add up. So it's a matter of constantly realigning the segments, which makes it all rather time consuming. BTW, I noticed that the pattern has a few minor errors, but I definitely won't lose any sleep over it.
1 19 February, 20:26
Thanks for your explain, Thomas. I thinked to would be more easy to apply 👍
1 19 February, 20:33
this camo is one of the most complicated to achieve and the fact that you are doing it 4 models at once... my deepest respect!
2 19 February, 21:20
Cuajete, Spanjaard and Łukasz, thank you for your interest! I am certainly not doing any cliffhanging on purpose - I am actually this glacially slow in reality. I also try to avoid aggravating the wifey by disappearing in my modeling man-cave for hours.
2 19 February, 21:45
Good and fully understood strategy 😄
As our common colleague (the one, you share initials with 😛) used to say: "Happy wife? Happy life!"
1 19 February, 22:05
Watching with interest. You will master the splinter camo for sure 👍
1 20 February, 17:10
I am still struggling with the masks, trying to making sure that they are applied exactly identical on all three models, which slows down the process a bit. Not that anybody except me would notice.
3 21 February, 10:59
Nice progress, I'm looking forward to the splinter camouflage. On my AJ-37 I used vinyl masks from DM Models, it looks like the masks you are using are a bit easier to handle.
1 22 February, 12:12
I have always had the conspirational theory that the Danish air force had a secret department dedicated to making life miserable for modellers, with their odd fonts, colours and aircraft modifications. The splinter camouflage is clear evidence of a similar department in the Swedish air force.
4 22 February, 12:19
Daniel, thank you! I am right now hoping that my end result will be at least in the general vicinity of your beautiful Viggen in flight!
22 February, 22:31
Phew, the second color is finally on. Now it's time to cover also the dark green areas and proceed with the black.
16 March, 20:06
Was anxious to see how you handle the masking but see that you struggle with the three tone camo too. Cross my fingers for a satisfactory end result.
1 17 March, 08:57
Michael, it is really not that difficult, only extremely time-consuming and require a very good eye-sight (or magnifying glasses). Too bad that the masks only partially reflect the actual camo pattern, I was hoping that they would be near perfect.
17 March, 09:52
I was wrecking my brain for a simple elegant technique to apply 3-tone camos without the need for re-covering extensively. So - yes the concept is easy, but the work is plenty. 😉. Keep it up. Looking good.
1 17 March, 10:52
Actually, the best method is to have two mask sets. I find that it is very difficult to do it all with just one mask set, as the masks will be slightly stretched and distorted when removed and reapplied and will no longer fit perfectly.
1. Spray the model light green.
2. Place all the masks from the first mask set.
3. Remove all masks segments except the light green ones and throw them away.
4. Spray the model dark green.
5. Add the dark green masks from the second mask set.
6. Spray the model black.
7. Add the black masks from the second mask set.
8. Spray the remaining exposed areas tan.
Also, when spraying a color, do not mask areas that you will be painting with a different color later, or you will end up with tiny strips of areas where the previous color shines through.
3 17 March, 11:41
Maybe to add that such a camo be best postshaded or oil rendered as the various colors have different amounts of paint layers and so preshading gives an inconsistent result.
2 17 March, 14:12
Great job with the painting masks, Thomas!
Thank you for the explain and the steps for apply 👍
1 17 March, 19:01
Thanks for the detailed explanation Thomas. Is there a particular reason for the order of the colors? I would probably have worked from light to dark.
1 17 March, 19:44
Admirable stamina, looking forward to the inevitably great result 👍 I have Fujimi 1/72 Boeing Vertol/Hkp 4 in my stash and Swedish decals for it… even the rotor blades have splinter camouflage.. 😳🙄
1 17 March, 20:20
Thank you all for your interest and encouragement! Nicolas, the tan areas are relatively few and with difficult shapes that are squeezed in between the other colors, so I figured that they would be easiest to leave for last. And for the three other colors, I indeed went from lightest to darkest as you suggested. Kenneth, yes, I would love to do the Hkp 4, it looks awesome in the splinter paintwork! I am however not sure if the Fujimi is available any more.
17 March, 20:39
Łukasz, thank you! Kenneth actually provided me with a link to a German web shop (Modellbau Huber) where the Fujimi was still available, so I placed an order for it. I also ordered the Swedish decal set, so I might as well check if I have some MRP splinter camo paint left. And Valium for the nerves.
2 18 March, 08:44
Wow, Thomas... It will be great to see that Fujimi with splinter camo in your hands 👍. I wanted to do the same too, but unfortunately I got another version instead.
1 18 March, 19:08
Lukasz, I initially bought the 1/72 Hobby Boss CH-46 by mistake and it's useless for a Swedish Hkp 4. You basically need to make completely new rear sponsons yourself, and their shape is relatively complex.
2 18 March, 21:32
OMG. A lot of work in this camo scheme - I sure at the very end all the efforts definitively will pay off. I'm really curios for next pictures....
1 22 March, 12:16
@pic92: ok?! That looks freakin perfect! I cross my fingers for a similar result on all surfaces on all planes.
1 24 March, 20:43
Those colors look awesome already! Very tight demarcations as well! 👌🏼
1 25 March, 18:31
Great! Fantastic result.
The great (and hard) masking effort is paying off, Thomas 👍
1 25 March, 18:44
A little late, but watching with interest - especially if you go insane over FOUR viggen camo jobs!
1 27 March, 00:02
I take my hat off! I just would not have the patience to do every step 4 times - especially the masking (ok, 3 times here…). Great job on the masking Thomas!
1 31 March, 14:17
Thank you all, dear mates for your kind words. They mean a lot to me! But to be fair, at least half the cred goes to MRP for its paints - they are simply incredible to work with. For airbrush work, I cannot see myself going back to anything else again.
2 31 March, 17:53
Wow... Thomas, the patience and work you put in to achieve such a magnificent result is admirable.
1 31 March, 19:20
Congratulations on conversion to the lacquer paints 😄 Welcome to the club 😄
Hint: the other lacquers are great too, but might need thinning.
I'm very sorry to state that the grey one looks so incredibly dull now 😉
1 31 March, 19:53
Łukasz, haha, yes, the grey JA certainly does look boring in comparison, but well, that's what they looked like in real life. Perhaps the large red day-glo numbers on the wings might spruce it up a bit.
2 1 April, 04:53
Wow, my friend, what an incredible job! How can you do something so complicated?
3 1 April, 05:35
Little time for modeling these days, but some progress is done on the details. Next is that fiddly undercarriage and then the part I am dreading a bit, the decals.
2 13 April, 11:36
added a new photoalbum.


42 13 January, 15:52
I'm watching! Front row seat please. I'm warning you that I'm stealing ideas 😉 I'm planning to start the same one very soon. I doubt I'll achieve such results, but dreams are free. 🙂
1 18 January, 16:21

Thanks for your kind comments. Probably most of the effort will not be visible in the end. 🤷🏼♂️
Especially since the quality of the clear parts is very bad. They are really thick and blurry.
@Живко Джаков: could you please check your kit if the quality of the clear parts is also bad? I was considering to buy a replacement sprue from Revell, but I read in some other reviews as well about this issue. So I am not sure if a replacement will be any better...
1 19 January, 12:41

Mine are at a satisfactory level and are definitely better than what you have. He 177 | Album by JivkoDjakov (1:72) [img1]

19 January, 13:51
Thanks for your feedback. I guess in this case, I will reach out to Revell for a replacement first. Maybe they will grant it for free because it is clearly a quality issue.
@Jivko: which release of the kit do you have? A newer one or also the 2000 version?
20 January, 10:11
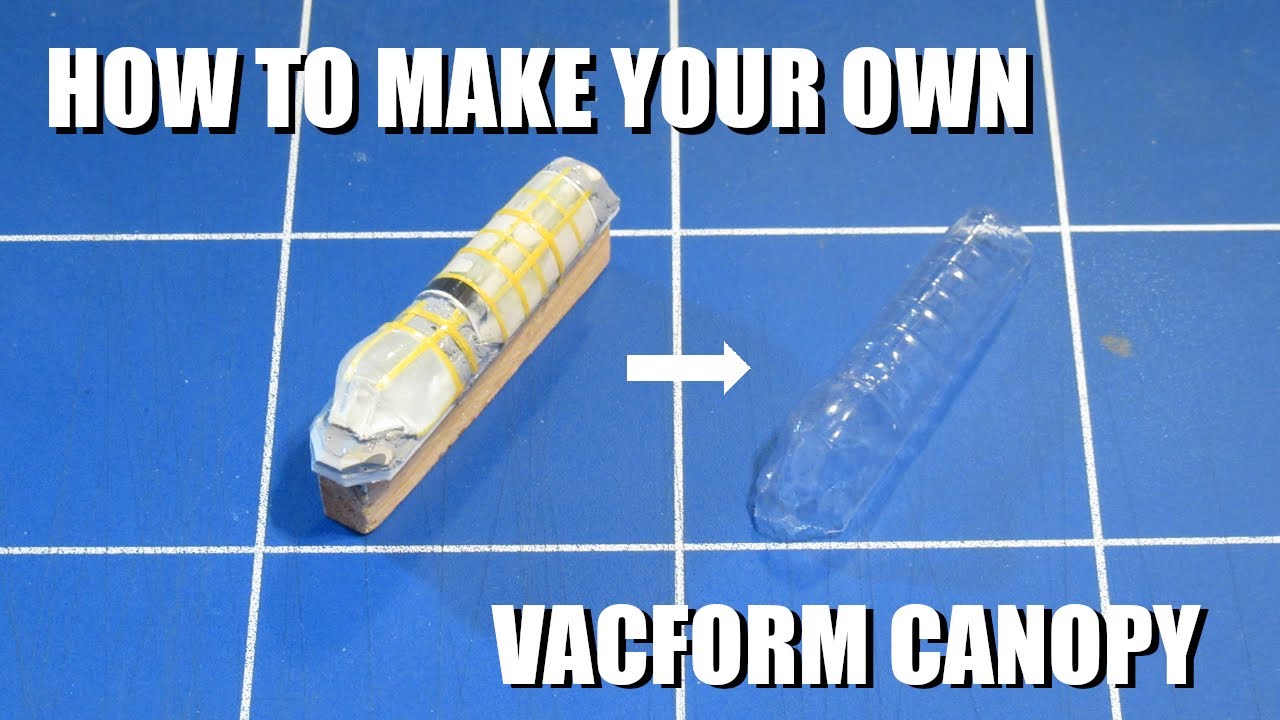
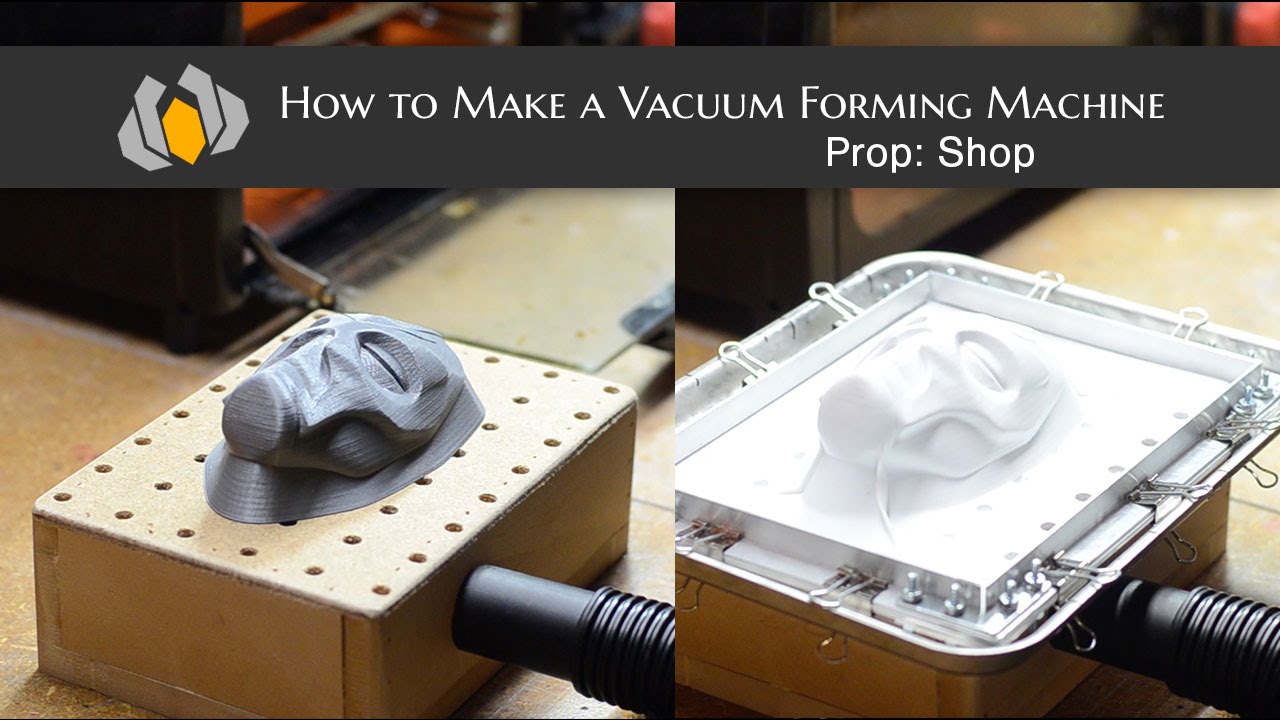
AndreasK, you should try vacuforming a new canopy using the kit parts as a form to wrap a clear styrene sheet around. Just look in your garbage for a clear food container such a salad box. You can use your household appliances to do vacuforming. A sweeper and a toaster is all you need.
20 January, 10:26
I have a package from 2018. As far as I understand, I'm lucky. It's common for the clear parts to go bad. Call Revel for a replacement. It would be helpful to know what they will do. Heinkel He-177 A-5 "Greif" (Revell 03913, 1:72)
")
20 January, 10:33
Make sure to dry fit your canopies. Revell is notorious for making canopies that don't fit. I have the same kit as Живко Джаков but I haven't opened it yet.
1 20 January, 10:39
Skyhiker, can you share a link to a good tutorial video for vacuforning?
20 January, 17:40
Those interiors look fantastic. It would be a shame if you couldn't see them properly through a poor quality canopy. I think I have the same problem, because I have the 2000 box.
20 January, 19:56
I would recommend a few things. First, use a powerful vacuum cleaner. A good vacuum is very important. Second, test with something else. A metal cart or even just a large nut is a good place to start. Third, wait for the mold to cool down before trying again. Polystyrene is a very good molding material, but it is not a good mold. I have never done this before. I have only done large commercials with vacuum molding. This video explains well how to make a molding press. Youtube Video
1 20 January, 19:56
Amazing work. might inspire me to restart my paused build of same Kit (on pause since 2020)
20 January, 20:38
Finally, I received a replacement clear sprue from Revell. The front section looks way better than my old one:
[img1]

But I am glad that I now have two sets to choose from. Because most of the other parts of the new sprue are really bad. Check this out:
[img1]

1 24 February, 12:11
Good news, AndreasK! 👍
What did you tell to Revell to get the replacement?
24 February, 18:47
I used the spare parts service on their website. Uploaded photos, pointed out that it is clearly a production quality issue and asked for a free replacement sprue.
1 25 February, 15:06
Latest pictures show the scratch building of a landing light reflector and bulb
1 25 February, 15:21
Good job with the scratch building of a landing light reflector and bulb 👍
1 25 February, 20:24
Fuselage is finally closed, sanded and ready for a first coat of primer
2 5 March, 10:00
Finished the Preshading. I used Gunze H-56 Intermediate Blue for the undersides and RLM66 for the upper.
25 April, 07:37
That pre-shading looks very detailed and neat - I just cannot get the lines so straight ever.
25 April, 08:53
added a new photoalbum.
41 images
BTR-4E w/ GROM Turret - Ukrainian APC
1:72
Kinda ok with the result. not perfect, but now the whole vehicle sits with a little bit of 'weight' on the wheels.


Project: BTR-4E Ukrainian APC w/ GROM Turret


26 8 August 2024, 14:34
I got a different variant of this kit in the stash and I won't be able to get to it for a while, looking forward to seeing you build yours!
8 August 2024, 15:27
Looking great! I started the version with slat armor, but got pretty frustrated with the seats so it will be finished "buttoned up." You definitely are not having any trouble! As I was doing some research, it looks like the IBG kits aren't really the current BTR-4E, the layout seems more like some of the BTR-4s in Nigerian service.
15 August 2024, 22:25
Hi hiveloc,
I think the version with the slat armor is going to look pretty impressive even being "buttoned up".
Hardly anything of the interior will be seen later, anyway, it's more of a practice for me, I'm afraid 😉
It may be possible that the IBG kit doesn't look like the current Ukrainian BTR-4E (I've seen only very few with the GROM turret), but I also think there are a lot of variants out there atm.
16 August 2024, 07:38
added a new photoalbum.
53 images
Volkswagen Type2 Micro Bus (1963) '23-window' (Hasegawa 1-24)
1:24
Finished.


Project: Volkswagen Micro Bus (1963)


50 22 October 2024, 18:50
This may be no consolation, but it is the same issue with the Revell Samba bus.
23 October 2024, 03:59
Oh, that are a lot of ejection marks!
For raised ones I use a scalpel nr 15, if there is enough space around. In the middle of pic 1 are some with tight structures around. Here I would use a model chisel like this one (example, there are different sizes): Chisel F2 (Master Tools 09924, No)
Deepened ones can be closed with round pieces of styrene (made with punch and die, in the matching diameter.
")
1 26 October 2024, 19:19
The X-Acto #17 chisel blade is also excellent for removing ejector pin marks. It can be used in the normal chisel angle as well as perpendicular to the surface as a scraper. #17 Lightweight Chiseling Blades - 5 Pcs (X-ACTO X217, No)
")
26 October 2024, 19:44
The metal floor should be corrugated on a type 2, so another approach would be to hide them under corrugated panels.
[img1]
26 October 2024, 19:56
Thank you so much for the comments. I'm in the middle of removing them. Some of them are really high. I use everything I have on the hand (Saw, chisel, scalpel, sandpaper). For some I even used a dremel (really cautious) Even if i would hide the behind corrugated panels (God idea by the way) I still have to remove them before.
You can see in the next picture how high there are. Ione was almost 1mm
27 October 2024, 05:24
I'm liking those plates. I applaud anyone, who tries to advance their skills. And you did it right, by trying this on the bottom first.
10 November 2024, 12:21
Personally, I think that a bit more, would work. Anyone who's owned or worked on an old VW, knows that they're covered in rust. However, you've mastered that technique and it's worked beautifully!
Keep at it, and good luck 👍
22 December 2024, 11:36
Yeah air cooled vws tend to be very rusty - you nailed it! Mine literally had holes in the footwell area in front. I used an air chisel to cut the skin off an old hot water tank found by the side of the road and used the sheet metal to patch my floo
22 December 2024, 11:50
That body looks too good to spoil. Excellent work so far. You have me captivated.
9 February, 15:16
Working on the Concept of my Diorama. I never build one before, The Barrels and Jerry Cans are 3D printed. The rims are from an old kit I build, but didn't survive one of my moves. The bumber was in the Hasegawa Kit. The wooden Fence is not finished.
1 4 April, 17:08
Absolutely fantastic! And thanks for adding comments, really enjoyable to spin through the album. Congrats.
4 April, 17:12
Very happy to see this moving forward. I'm liking what I see! You don't have to spend millions on special parts, for a diorama, most of the time, you've got the stuff, laying around the house? You just need to think outside the box?
Excited to see the outcome of this, now it's nearing completion 🙂
6 April, 06:19
Finally finished. I'm proud that I pulled that one off. Last dumb question should I glue the Bus on the diorama?
1 24 April, 16:32


added a new photoalbum.

13 24 April, 19:26
Great job! (Where did you get the proper canopy from? As far as I remember the one in the kit is inadequately shaped, am I right?) And we would like to see more photos of this jewel 🙂
1 24 April, 19:33
The canopy was the kit part. It seems to be in proportion to the rest of the model.
1 24 April, 21:51
Thanks for your reply. Good to know! 🙂 (in other Trumpeter small scale kits it is sometimes the main issue...)
25 April, 06:20
added a new photoalbum.


1 25 March 2016, 12:51
How do you handle chrome parts that are snipped off from the sprue, as there would be no chrome paint on the exposed area. Having said that, I don't currently do car kits, so I guess there is always the chance that kit manufacturers managed to hide the location of the stubs.
15 March 2019, 14:19
I think black was a nice choice, as it contrasts nicely with the chrome metal paint. 🙂
15 March 2019, 14:20
Hi. Treehugger, and thanks for Words.
By the time i've build this truck, i've used a Chrome Marker and sometimes strips of Bare Metal Foil Ultra Bright Chrome for touchups. The stubs are all but not hidden. There is always a part where the Chrome is damaged. On my next Truck i will use the new Molotow Chrome Pens. All the tests with them i've made so far gave me absolutley great results.
15 March 2019, 19:33


Hi
The same product is registered twice. One as Painting (pigments) and another as Weathering. Could they be merged please?
AK 044 Pigments Light Rust, AK Interactive Matt, Pigments, 35ml
Light Rust (AK Interactive AK 044, No)
")
The same product is registered twice. One as Painting (pigments) and another as Weathering. Could they be merged please?
AK 044 Pigments Light Rust, AK Interactive Matt, Pigments, 35ml
Light Rust (AK Interactive AK 044, No)
Implemented
1 25 April, 08:14
added a new photoalbum.
34 images
Sukhoi Su-12
1:72
The canopy is so oversized that I can't make it flush to the fuselage.


Project: Su-12

32 5 April, 17:33
Starting a very rare bird. (I am getting bored with the other 9 builds I have still in progress).
2 5 April, 17:42
Nice project Skyhiker 👍👍 you build alot of Soviet stuff, don't see to many of these... nice choice 😃👍
14 April, 12:40
Thanks Dave. It took me a while to get the riveting done. Hopefully after priming I won't have to do it again.
17 April, 17:41
added a new photoalbum.


29 2 August 2024, 02:50
the window are manually lifted, sorry - you lift up the gull-wing door, and that reveals the bottom cog which you can wind with your finger
9 September 2024, 09:23
Does that window also roll up and down?! That's truly sick! Watching!
11 September 2024, 06:20

Wow! That's huge! Does it have all the functionalities of the original? 😄
25 April, 06:24
Yeah, everything except the 88mph & time travel bits!!! 🙂
it certainly has the weight, around 7kg at the moment!
25 April, 08:31
added a new photoalbum.


20 23 August 2024, 05:55
One question I'm asking myself: do I want to build the RHD option? That would be pretty cool but it won't fit into my project of the Silver Corvette Collection. Good, that I have this kit twice. So I can build one silver and the other one in another color with RHD and fitting license plate.
Take a look (if you want) into my review - kitreviewsonline.de/..25-von-revell-07714/ - sorry, only available in German.
23 August 2024, 05:59
Curious that both RHD & LHD are available.
I've only seen one LHD C8 in the UK
23 August 2024, 08:56
Don't forget that other countries are also RHD including Japan, Hong Kong, and Singapore.
23 August 2024, 10:06
Yeah George, I was thinking that but would GM actually export Corvettes to those countries as well as India, Australia & New Zealand?
23 August 2024, 14:14
Christian, I read your review, and what did I see? The Revell now CAN make wheels, like the original ones- what a progression!
So, I'm curious for the build!
1 23 August 2024, 16:58
Thank you for your feedback and Information! While I wrote the review I was wondering that the Corvette never had RHD. I didn't do more research and believed my source.
I'd like tl see see some numbers how much Corvette were sold in RHD countries. Have to look that up. I think it should be a lot. Why else they gave this option to the costumer now? I think the japanese market could be the most interessting one.
23 August 2024, 17:58
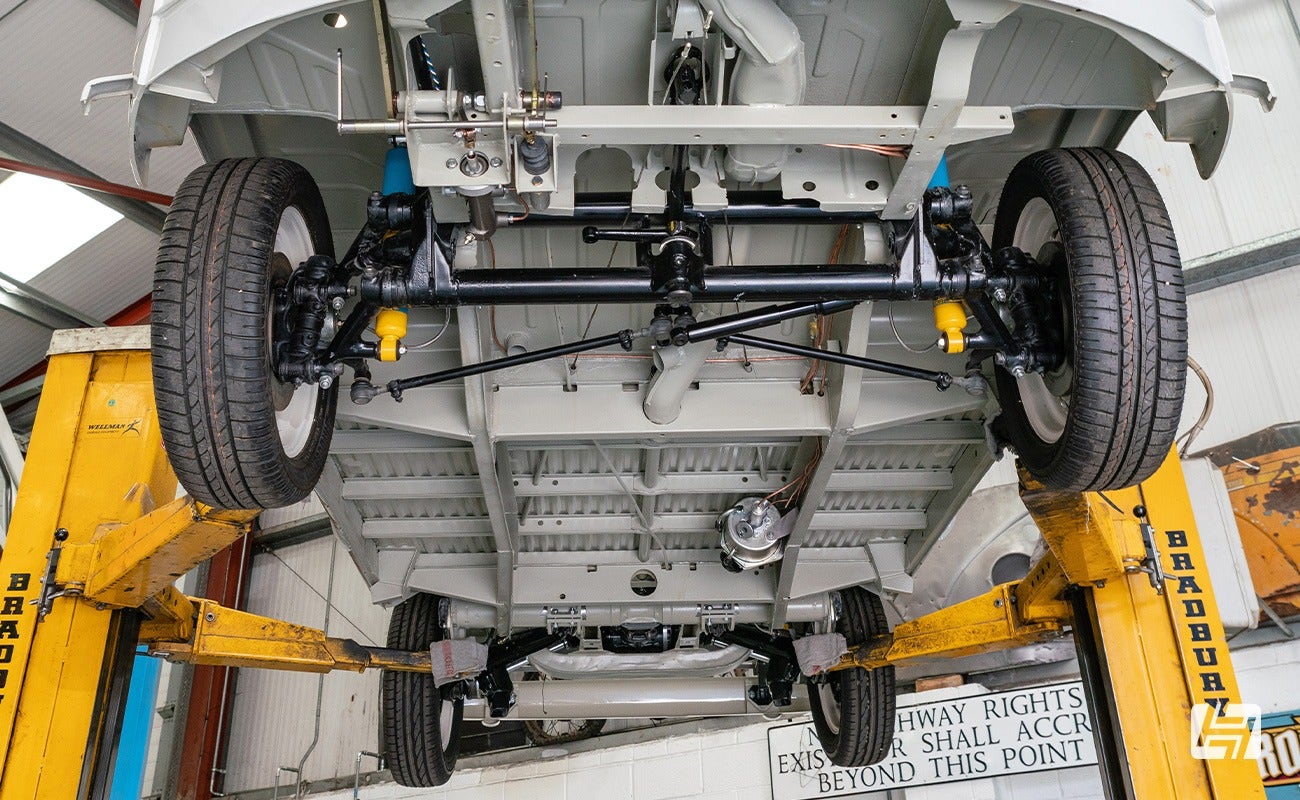
4 months ago I started? Where did the time went? Nevertheless: yesterday I sat on this to check the status and sorted the parts for the planned color for painting. Not more.
5 February, 05:32
I painted the part the last days. I want to paint the interior with red accents. After painting the affected areas I see how small some of the spots are. How I'm supposed to cover it up is still a little mystery to me.
The body is fillered, wet sanded and ready to get painted 🙂
By the way: did you know, that the German instructions only offer some black on another black on a different shade of black *lol* collored interior? The instructions for the US issue offers you that blue interior. Strange.... I added two picture for you guys (and girls) 😉
6 March, 06:24
Who knows :/
On the weekend I finished the chassis. The wheel arches are mounted too. But befor that, I wanted toshow this exquisite engine. There are a lot of details and parts. Sadly, the engine will be hidden in the rear and only the top will be visible. It should be worth it, to build the powerplant seperatly and put it near the model kit for display.
11 March, 06:28
Just to confirm, you have painted the interior accents. Were there no interior decals with the kit?
18 March, 11:29
Your suggestion is right. The German issue doesn't have any colored decals for the interior (except speakers and switches). I added a picture of the decal sheet. Number 18 and 19 are for the dashboard / bezel cover on top somehow. But nothing for the seat, sidepanels, dashboard or middle console.
18 March, 15:31
Three weeks ago, I finished the paintjob. I didn't count but I think there are four layers of clear cote on it. Satisfied 🙂
The curious thing is, that the small roof part above the b-pillar looks lighter than the rest. Like it was painted seperately. But it wasn't. I always paint my kits taped together in one piece to avoid differences in the color.
25 April, 05:26
I can't imagine more boring color than the silver, but she will look good with the interior!
25 April, 06:48
Thank you Istvan! The first build is a kind of a "must be" silver because it will be in the row of my Silver Corvette Collection (which is widened up to more colors in the meantime to show my other Corvettes). I'm plannig another build in the future because the C8 has so many nice colors. But I think, It was the one and only time, I paint the interior this way.
If you are interessted, the link to the project -> christian-w
1 25 April, 06:57
i didn't finish the kit, probably is the third time in 30 years of modeling...very bad fit, a large use of putty, plastic fragile and very bad decals...the decals' instruction are incomplete.
very very bad experience!!!
")
3 29 April 2019, 08:31
Too bad. I did a couple of sword kits, and they were not so bad in terms of fit. And the plastic was actually good quality with fine details.
They are still short run kits though, maybe you got one at the end of the mould lifespan...
1 25 April, 08:32
Is it possible, that this kit is based on the kit by airfix (Formula Firebird (USAirfix 8054, 1:24) / first row, picture in the middle) but with the wheels of another kit by airfix (Fire Ball Firebird (USAirfix 8050, 1:24) / also on the first picture, second row on the left)
")
")
It could be Lindberg (Pontiac Firebird (Lindberg 6503, 1:24)) but they didn't offer any kit with those rims.
")
")
25 April, 08:28


Question for all of you:
You know Good Omens, the Amazon Prime Series?
Many men here knows more older cars than me, sooo:
Is there any (near/similar) model kit to that one and only one unique Bentley on this world?
1934 Derby Bentley Thrupp & Maberley Bodied Coupe
Source:
classicrollsroyce-be..aberley-bodied-coupe
You know Good Omens, the Amazon Prime Series?
Many men here knows more older cars than me, sooo:
Is there any (near/similar) model kit to that one and only one unique Bentley on this world?
1934 Derby Bentley Thrupp & Maberley Bodied Coupe
Source:
classicrollsroyce-be..aberley-bodied-coupe
24 April, 23:32
That type of bodywork looks reasonably similar to the RR Phantom II.
The 1/8 Pocher kit looks the closest, but good luck finding it for a reasonable price: Rolls-Royce (Pocher K/72, 1:8)
Next would be the 1/16 Revell kit which would be much more affordable: Phantom II Continental (1934) (Revell 07459, 1:16)
SCM Search: Rolls Royce Phantom II
")
 (Revell 07459)")
25 April, 07:23
Question of the day:
Some model builders say especially about Oshkosh and M911 and similar Military Trucks/Cars: "I Love Kit" seems over engineered and "Hobby Boss" looks better, but sometimes "I Love Kit" looks better.
But both of them has pro and cons.
Personally I like over engineered kits and since I was a girl I wish there were more kits like these.
What do you think about?
Do you prefer "Nah, I just built easy and relative quick" or do you say "I want it the hard way - gimme details en masse"?
I am very curious! ^_~
Love you all! ♥
24 April, 18:58
personal choice, no doubt. whatever makes you happy 🙂
some would think that doing a detailed PE cockpit in a 1/144 airplane that will never be seen again is totally nuts....and maybe it is, but I like it so I do it 😛
others prefer to go other way? respect and enjoy the ride!
1 24 April, 19:17
I buy tanks with full interior, which others think is pointless, but I enjoy them. Then again, sometimes you might just want to do a build in order to test out a new paint range or something, in which case a quick build is ideal. Horses for courses, I guess.
24 April, 19:36
As with many things, I'm a bit odd (it's been pointed out many times so why deny it? 😄 ). I like simple kits which I then make as complicated as I possibly can. A kit that most modellers would complete in a weekend would keep me occupied for months.
And yet, over-engineered kits I'm not so keen on if there is nothing for me to add to it. Increasingly for me it's all about the scratch-building. 🙂
25 April, 06:58
added a new photoalbum.
52 images
MiG-29 in progress... The fight is on....... [1/48]
1:48


Project: MiG-29 "FULCRUM"


 4+
4+ 30 3 March 2023, 10:18
What an airplane, such an iconic shape👍 nice work so far, what is the opened hatch on the belly?
22 March 2023, 14:24
May I ask how you cut the copper plate at the bottom of the MIG so evenly?
11 April 2023, 18:52
added a new photoalbum.


27 15 September 2022, 00:52
It's been a long road to get here but it's finally done! I had a lot of fun and learned a lot along the way. Some things that went well: my process for printing and sealing decals has improved quite a bit, and I found that a 3D printer is an extremely valuable addition to my workshop. At the same time, I learned that I definitely have some things to improve on relating to photoetch (particularly soldering) and painting/finish coats. Wouldn't hurt to start practicing a bit of restraint during some of the assembly stages instead of rushing ahead in all of the excitement either! So I've got some personal goals in mind for the next set of builds 🙂 Hope everyone enjoys!
Build photos for this project are posted here: WIP - ANMT Freightliner Coronado 122SD | Album by brahoff (1:24)
15 September 2022, 01:17
She came out beautifully mate. I really enjoyed this build. Think you deserve a break or mini vacation now 🙂
15 September 2022, 03:52
Amazing build Brandon I don't think it will get home agen
All will want to keep it
15 September 2022, 05:13
Автомобиль как настоящий, двигатель проработан очень детально. Хром получился натурально👍
15 September 2022, 06:52
Really great build Brandon. Love the engine rack, i see plenty of them type of things at work and the same DDC code, so really nice touch you added that. Top Job Sir. 😉
15 September 2022, 06:53
I once considered scale 1:24 models useful for physical exercise only. Oh boy, did you prove me wrong. 🙂
This was one of the most impressive WIP to follow and I enjoyed every step of it. The result is just spectacular. Thanks for taking us along and happy modelling for your next projects.
15 September 2022, 08:02
Thank you so much everyone! I couldn't have done it without the continual inspiration I get from this community!
15 September 2022, 12:20
So good, Brandon! I really enjoyed watching this come along, and the results are amazing. It's got me thinking about modding up a kit to match a truck I saw on vacation this year... Something to keep me busy as long as this kept you busy. 🙂
15 September 2022, 12:44
Sounds awesome, I'd say go for it! Excited to see what you'll come up with!
15 September 2022, 13:12
Final photos just look incredible. This has been awesome to follow along with. What a gorgeous build Brandon.
15 September 2022, 21:45
added a new photoalbum.


5 9 October 2024, 15:56
That's a very nice truck mate 👍
I was trying to place that roof? Is it shared with one of the Italeri Fords?
9 October 2024, 16:24
Thanks!
Do you mean the roof spoiler? I don't think so. It fits this cab and sleeper very well
9 October 2024, 17:13
It came out very well, as it should. There's 25 years of work in this.
9 October 2024, 17:13
Pretty nice. Somehow I'm not convinced about the rear tires. They're too far inboard for my taste. Somehow.
The truck itself looks really good. Did you have any problems building it? The front axle on mine didn't fit properly, and the hood didn't close properly. I had to make a lot of adjustments to the chassis with the add-on parts. Without extending the front frame, the bumper would have been too far back on one side. I can't even count how many times I added, adjusted, and removed the body and other add-on parts.
25 April, 06:46
added a new photoalbum.
7 images
Saab JAS 39D Gripen
1:48
Starting with the darkest shade to obtain more contrast


Project: Jas-39B/D Gripen


 2+
2+ 15 24 March, 11:44
Good progress so far! The canopy looks great, what approach did you use to get the nice tint?
23 April, 18:47
It's highly diluted Tamiya clear green sprayed from a somewhat long distance (about 12cm). It takes many passes and you can get a very subtle tint
23 April, 19:19
Got this kit in my stash too .... so following 🙂
And nice to see someone else who also mounts the gear struts before any painting goes on 🙂
24 April, 21:14
I usually avoid it, for the sake of painting, but it's quite a complex gear, I wouldn't be able to assemble it properly on a painted aircraft. I normally dry fit, then decide
25 April, 06:38
added a new photoalbum.


77 11 July 2024, 21:06
Oh ya!
Built a couple of Broplan vac kits, a real challenge but great for the feeling of overcoming a challenge and creative accomplishment
11 July 2024, 23:27
OMG, what a challenge! 🙂 Those panel lines look quite uneven, will you try to rescribe them or just take them for what they are? In any way, I am super curious how these sheets of plastic can be turned into a model, so I will watch with interest!
12 July 2024, 02:31
Welcome mates, the panellines are aweful but the material is so thin, i'm scarred that i cut right trough it when i try to rescribe them.
12 July 2024, 06:24
Following. Got my first vacu kit this weekend. I hope I can learn something here.
16 July 2024, 14:48
Hi DuperScale, I built a couple of Broplan vac ATR kits, converting one 72 500 to a 42 300. A few pics of the work in my "albums" if you're interested in the kind of model you can achieve from a Broplan kit with a bit of work…sweat and tears, foul language, alcohol and time….
16 July 2024, 23:24
DuperScale, how about scribing into a layer of primer paint?
This way, scribing should be a lot easier afaik, scribing into the primer layer of paing, and not plastic.
This guy on youtube did this, on regular plastic models though.
20 August 2024, 05:21
As for the clear parts, I wonder if it could be done this way
1) Cut out a square/rectangle shape, removing the oval form from windows. The larger the hole the better, to create some extra space around the old window shape. Enough space to work with putty later on.
2) Glue in a flat thin strip of transparent styrene on inside of model.
3) Glue in a square/rectangle shape transparent styrene, outside the model, laminated with the existing strip of transparent styrene on inside, so double layered.
If keeping the new window parts larger than the old window shape it should be easier to use some putty after adding masking tape that have the shape of the old windows. The larger these new outer square/rectangle window shapes are, the easier it is to add putty to create a smooth surface, then hopefully the center part is clear enough, to mask off the final shape of the old window shape, before painting.
Afaik a common issue using Mikro Kristal Klear is that you can't sand the clear part afterwards, because the clear part is like rubber iirc. You can iirc easily remove this clear part though, just poke/pull it out. Unsure if there would be any residue left after removing the rubber like liquid clear stuff after it dries.
20 August 2024, 05:25
Another thing one could do with clear parts an idea:
1) Glue in a long strip of transparent styrene on inside of plane.
2) Add some kind of epoxy or something that can be sanded, without the epoxy damaging the underlying transparent styrene.
3) Idea is to use the liquid stuff to fill in the perfectly shaped holes for the windows, then sand the liquid stuff flush after it dries.
What won't work imo, is doing multiple rounds of adding liquids to create some goo that goes transparent. I think if you sand this stuff multiple times adding more liquid stuff, you get a flawed result I think. I tried something like that with gloss varnish, trying to build up a solid clear shape. Did not work as expected.
20 August 2024, 05:35
In this thread, and in photo #13, the guy apparently put tape outside, and poured clear resin on the inside to fill the window holes. Unsure if such resin will react and maybe eat up or warp any thin parts ala vacuum kits. I guess this can be tested with some scrap plastic if having some piece left over.
Boeing 737-530 Smart Wings 1:144 | Album by Zbynek (1:144)
20 August 2024, 07:35
The UV transparent resin is usually sandable (to some degree), maybe that might help?
Similarly to Treehugger I'd reinforce it with a transparent styrene from the inside of the fuselage anyway.
Or you might leave the windows open and fill them with Kristal Klear after painting - this is what I did on my Jetstream, Avanti & Yak-40. But if you want to seal it with gloss varnish, remember to keep very thin layers (guess how I learned it 🙂).
[img1]
Blue Jetstream (SP-KWN) | Album by Woody (1:72)
Avanti! | Album by Woody (1:72)

20 August 2024, 07:59
Hi, thanks for the input mates. I'm quite happy with the kristal clear on the small windows and i think i do it like Lukasz said. After everything is done i do the windows as the last step.
The windscreen window could work but i think i used little to much of the kristal clear.
20 August 2024, 16:10
Like the cockpit..👍
Lots of work but doing a 👍 job... Be rewarding when done.
17 September 2024, 20:48
The kit is coming together very good. You are skilled and brave!
Great to follow the journey to see the final result. 👍🏻
30 September 2024, 19:28
Thanks for the nice comments, from far away it looks good but the fit, lack of detail and scale problems are really annoying.😅
6 October 2024, 14:37
That's the main reason why I've never dared to try a vacu kit before. I've learned a lot from you. Looks good so far.
6 October 2024, 16:08
I agree with mates 👍
@DuperScale, I'm glad you're taking up this project again.
1 25 February, 20:14
Fantastic job! I am impressed with your skills and perseverance, chapeau bas!
1 3 April, 17:41
Close to the finish, at the Moment i try to get the windows done….man i cant get them the way i want. I already tried 3 times and messed them up. Stay tuned….. 😅
8 April, 06:01
So tell us what you really feel about Vaccuform! Don't hold back on us...
1 13 April, 13:29
I'm done, from this point it's just getting worse… 🤪 my opinion, for that price (over 50€) it is really not worth it… the amount of headache you get with a kit like that you can build 10 normal kits. The lack of detail and wrong shapes is so massiv, it's stupid i paid that price 😂
24 April, 20:28
How do I delete my picture? It keeps getting posted upside down.
24 April, 15:36
Sometimes the camera orientation code overrides the display orientation.
If you go to 'Manage' and then 'Advanced options' you can change the orientation of your photos. No need to delete.
25 April, 06:19
added a new photoalbum.


20 8 April, 21:35
Ok... so a bit of an explanation seems in order for this project. As most of you know, I have a large and ever growing Tintin project - trains, planes, automobiles, boats... and ships... that were featured in the various Tintin albums. Amongst the long list there are the "Big Three" - The Lunar Rocket, Marlinspike Hall/Chateau Moulinsart, and the Unicorn. For the first two, I've been doing some preparation work to be able to tackle them with 3D model building and printing. But the Unicorn... well, that's a different beast altogether. A sailing ship as complex as the Unicorn is not something easily 3D printed. That's were this set comes in. In 2011-2012 Hachette released a Unicorn "kit" - basically on a "one part per week" schedule. You buy the booklet and the part... and little by little the Unicorn comes to life. I've known about this set for a while, but didn't really have a hope of ever getting my hands on it. I missed the weekly release, which, while still expensive (about $10 a shot... for a 120 shots...) would have maybe been manageable over the long haul. However, trying to get your hands on all the parts at this point is not easy... and generally costs a mint. So, I'd more or less resigned myself to not getting this.
9 April, 04:20
However, as luck would have it, I seem to be getting a bit of a reputation as a builder of Tintin models on a few spots on the internet and after making a few connections ran across a guy who HAD gone to the book store 120 times... and then got in over his head. So for over 10 years this partially started project has sat in his basement... until this past week. There was a bit of negotiation, but the price was quite reasonable (all things considered) and, after finding a few unloved boxes of comic books and sports cards in MY basement, I was able to a 3-way trade and close the deal. 😄
9 April, 04:26
Yesterday the box showed up on my front doorstep... in less than stellar condition. I'm really glad this box was only being shipped across the country and not overseas, because I'm sure I would lost half the parts somewhere over the Atlantic. 🙂 I get the impression that the seller doesn't do a lot of online sales... because he basically threw whatever was on the table in his basement into a flimsy box, threw a scrap of bubble wrap on top and put a piece of tape over the top. However, after a close inspection I was very glad to find that everything arrived more or less intact. I thought I was going to have to craft a few bits to replace the broken off tips on a few of the pieces, but luckily I actually found them on my front step this afternoon. Anyway, it's been cleaned up, all the bags have been inventoried, the broken bits glued back on... and it's ready to go. The first 9 steps have been completed so I'm starting from step 10... only 110 more to go! Stay tuned! This one's going to take a while...
9 April, 04:32
Interesting story. Glad you were able to get it, Greg 👍
110 updates ahead seem to promise hours of fun and days of watching it here 🙂
I can't miss this!
9 April, 19:33
Thanks Cuajete. One of the problems with inheriting a partially started model like this is that sometimes you need to undo someone else's mistakes. This is a rather precise "kit" and I've already had to partially disassemble it to a) clear out a glob of wood glue that was pushing up one of the ribs and would make the deck warp, and b) sand down the cut edges so that the little burs don't keep the parts from sitting flush. Luckily the previous owner didn't do such a great job to glue the pieces in place, so it's coming apart relatively easily. Maybe I should tear the whole thing down and start over…
1 11 April, 06:24
Thanks guys. LucLuke - I've inspected the rest of the pieces closely and there are 3 that I think were originally mis-aligned. So, I think after a bit or regluing I should be good going forward now. I'm a little warry of the MDF wood - it's a lot less forgiving than plastic. I don't want to break and of the pieces by trying to take them apart because they're unlikely to simply break cleanly like polystyrene. The MDF will tear and become full of fibre. That will make it almost impossible to get it back in position.
11 April, 15:59
It'll be an epic... one way or the other. 😉
I just hope Lode doesn't show up until it actually looks like a ship... and not just leftovers from a home building project. 🙂
11 April, 19:04
Thanks guys. This one promises to be a long and plodding project. It'll be a new experience for me though, that's for sure.
11 April, 21:05
Great story and nice that you don't have to wait another week or more to get next set parts 👍 The rather large gunship looks really small compared to this new ship.
Watching no matter how long it takes!
1 11 April, 21:46
Thanks Frank. The pirate ship does look small, but I'm happy to note that I think I got the scaling bang on. My original thought for this project was the Heller 1/100 Soleil Royal (with heavy modifications) and the pirate ship is a 1/110 scale Bounty. Both of which were (at least to my eyeballs) pretty close to perfect for the scale given that this one is "scientifically calculated" to be 1/72 scale.
Anyway, I'm still in the re-do mode. I can tell that the previous owner was a bit less than careful in putting some of the pieces together. I've had to break down a few more parts, do a bit of sanding and then re-glueing them back in the proper place. The trim along the hull for the canons was particularly sloppy and I think that would have caused me a lot of grief once I try to get the hull put together because they would've caused gaps in the planking.
1 12 April, 17:38
Hahaha! I wouldn't survive. 🙂
Anyway, my last bit of re-do work, re-aligning the gun ports, is now done. I've now opened my first bag of parts (10) and have officially started moving forward rather than backward. I've glued one row of planks on the deck. 🙂
1 14 April, 04:28
After days of cutting the staves into 45mm strips, sanding and glueing them in place, I now have the first deck completed. It still needs to be sanded and varnished, but I'm more or less happy with it. I did deviate from the instructions a bit though. Instead of two mirrored sides, I tried to plank it as one piece and try to avoid the seam. It didn't quite work as well as I hoped, as I can still see a bit of a seam, but I think it's better… right?
2 17 April, 15:08
Hi,
What is the policy on watermarked boxart images? I'm talking about the likes of: spotmodel.com/produc..mp;products_id=61546. I've kept away from them, but what is your view?
What is the policy on watermarked boxart images? I'm talking about the likes of: spotmodel.com/produc..mp;products_id=61546. I've kept away from them, but what is your view?
Implemented
1 24 April, 19:20
added a new photoalbum.
21 images
Saudi Falcons
1:32
Although the Martin Baker MK10 pins and seats are made of resin, I don't really like them. I think they're old molds. I ...


Project: Tornado GR. Mk1 RAF


 15+
15+ 16 17 March, 08:20
added a new photoalbum.


19 20 March, 11:36

At 55 years old here it's really hard to stand on my head, if you go into advanced settings you can turn your photo's to face correctly. I know because I have to fix all of mine too. Have fun with the photo etch, thats actually my favorite part of building a model. You'll need a folding jig to do really nice bends, and for glue I've used and had great results with Clear Nail Polish, Microscale's Micro Kristal Klear, Mig Ultra Glue, and of course super glue. For positioning I do a 2 step process when my pe part is ready to install, first a tiny dab of Microscale's Micro Liquitape and let it dry a few minutes till it turns clear. It in now sticky like a very light adhesive and can be placed and manipulated into just the right position, then a dab of your choice of glue. If you go with any brand super glue and it's the thin kind I highly recommend a Glue Looper set, very cheap and will last forever. Clean up old glue on the tip with a cigarette lighter. Good luck and I hope you enjoy your build 🙂
1 20 March, 18:44
I've done a terrible job with my first ever part.
Glue looper? Why have I never heard of these things? lol we are practically twins. Well, I'm 56. With the modelling skills of a 5 year old 😳😂
20 March, 22:01
@lorraine are there actual female modellers? Clair is that a male name where you live? Surely there aren't 2 female modellers on earth? I'm showing my 1970's attitude here. 😳😂
By the way Lorraine cute cat. I have a dog but he's scared of cats. In fact he's even scared of doors! lol
20 March, 22:03
Danny, female modelers are relatively fewer in China, especially military modelers. But we do exist😜 And I also see many females in this community.
[img1]

3 20 March, 23:38
Thats ok Danny, Im 55 and act about 5 lol. I get along with my 3 year old grand daughter on the same level 🙂 Clair is a dude unless there's an e on the end usually. I have 2 cats, the one is super skittish, I remember when he was a kitten he farted, it scared him n he ran a good 15 feet before turning around to look at his butt. Hahaha
2 21 March, 00:06
Oh and to get that paper off use some nail polish remover. It dissolves super glue pretty quick. Then touch it up.
1 21 March, 00:12
Great conversation going on here!
I have to catchup:
1st - I'm in the same age bracket at 59 with the modelling ability of a 90 year old who can't find his glasses 🙂
2nd - whats this I here about using a lighter to cleanup the tip on glue! How does that work? Is it for super glue cleanup? I'm always dealing with nasty clogs.
3rd - Where I live in Canada we have very few female modellers. In fact, I have never seen one. I have a theory that females can be amazing modellers because of small fingers. I don't have fat sausage fingers but they are big enough to get in the way of intricate work.
4th - @Danny I know another modeller on here named Jennifer. She is relative new to the hobby and already quite good. Lorraine's work is amazing!
Lastly - I have cats. I use to have dogs when I was younger, but now it's cats. They drive me crazy and I think the little assassins are trying to kill me, but I love them to bits.
1 21 March, 03:48
I love this site. So much good advice and just when I felt like giving up I get lots of lovely people encouraging me to carry on. Thank you. I also need to give a shout out to Jakko. I drive him crazy with almost daily questions and he's never once told me to stop and leave him alone! 🙂
@Rui, I'd love to see a few more females in the hobby. In fact I need a new wife and one who could help me build a model would be a definite bonus. It's all about the lack of sausage fingers, as you say 😂
2 21 March, 07:02
For PE parts, I use lighter to clean up the instant glue. It works very well, 100% burned up.
And sometimes, I wish I had a third hand, help me to hold the small parts so I can glue them together😛
2 21 March, 08:33
Remove superglue from a glue looper, a needle, blade, or whatever metal item you use, by holding it into the flame of a lighter. Let the tool cool of, remove residue with a paper towel.
1 21 March, 08:53
Thanks Thomas.
@lorraine a third hand would be invaluable! In fact on a serious note are there items you can get to help with that? I often find myself wishing I had something to place a model in when I need to add a tricky part. I bought a small jewellers vice that I sometimes use but if there are other devices I'd love to try one!
21 March, 10:35
I bought a soldering helping hands in electronics store. It helps sometimes.
2 21 March, 12:04
I think I'll get one too Lorraine. By the way I'm seriously impressed at your skill. Are you a professional model maker? Or something similar? Film business?
21 March, 23:30
I have the same kit on my workbench right now, take care the instructions have a few errors and some missing steps to do, just in case you haven't noticed
1 22 March, 10:43
Danny, I'm not a professional modeler. Building
models is just a hobby in my spare time. I've learned a lot of skills in this community.
3 22 March, 15:23
I have 3 or 4 helping hands of different sizes but this one is on my "snag it eventually" list : amazon.com/gp/produc..8B8CMKBF3NX&th=1 , should prove handy when I am repairing electronics as well.
1 22 March, 19:12
@Robert yeah I've noticed one error so far. I bet yours comes out a lot better than mine!
23 March, 17:35
@lorraine how long have you been modelling? You really are skilled. I'm very new to it but I think it'd take me at least a decade to get to your level!
23 March, 17:37
@Danny, t's not about better, it's just about fun !! and you learn and get better with every model you build - may you've noticed that K3 and K4 track parts the designations are swapped, some drill holes that need to be made are not shown, best you download the instructions of the original Academy kit, last page shows some corretions .... scalemates.com/products/img/5/1/1/839511-44-instructions.pdf
3 23 March, 21:34
Well said Robert, without having a fun time we'd all be doing something else instead.
3 23 March, 23:29
@Danny, about 6-7 years. Agree with Robert and Clair, it's all about having a fun time. I enjoy those few hours late at night when I build models. I can fully immerse myself and forget about other worries. And I also enjoy to learn and to share with all the friendly mates here.
3 24 March, 03:21
I agree but I'm at the stage where I'm messing everything up. I think it'll be a lot more fun when I get a bit better and I have a system for doing things. I mostly make (so far. I have 61 kits and about 2/3rds are AFV) tanks. Can't decide whether it's better to spray the wheels and tracks before adding them or once they're glued in place. I'm veering towards the 'before' scenario. Same with the tools and things like machine guns and rifles (from my universal carrier). I don't feel confident at all with figures. In fact I'd even say they scare me. 😳😂
24 March, 16:13
@Danny, take it easy, may start with your more simple kits, to mess something up sometimes is part of the never ending learning process and fortunely on armour models you can easy hide a mistake by covering it with something, at least mostly 😉 I airbrush the assembled main groups, hull, turret, wheels, tracks... separately. I also glue small things like tools before airbrushing to the hull, I've no problem to paint small things with a fine brush after... just look always what makes more sense. Figure painting is also not such a big deal, many tuturial on YT, start with simple guides.... and don't try to paint eyes, mostly not necessary at all 😮
2 25 March, 12:26
Danny bro,. you didn't mess anything up... Thats the beauty of modelling war machines, Battle Damage 🙂 I've been building models on and off since '74 and I still make colossal goofs here and there. I was doing a Santa Maria all wood kit and guess what, I goofed and cut off in scale probably about 10 feet on the poop deck. I just planked and kept going, now it's a pee deck that bring your own bottle Hahahaha. We all screw up dont fret just learn and do better on the next one buddy 🙂 As for painting, I always paint parts separately, my hands shake a good bit anymore so I'd make one hell of a mess if I didnt.
2 25 March, 23:40
Thanks chaps. Great advice. That made me laugh clair. Pee deck and bring your own bottle. 😂
I actually thought this yesterday. Why am I worrying about a rip in a wire mesh on a machine that's had dozens of armour piercing shells slung its way? Of course it's gonna look beaten up! That's a sure sign that I've not (yet) done any weathering whatsoever! 🙂
And Robert I agree. It's a good job I've (now) got 62 kits (just bought another panzer iv by Ryefield oh and a hetzer by Takom so 63 kits! (They were so cheap on temu. The Ryefield was just £11! Well with my discount.
I have now stopped buying. For now 🙂
1 26 March, 08:03
Danny You surely can do better. Because I just joined this community last year, while you've been here since the very beginning😜
26 March, 15:22
Not me Lorraine. I only joined in November. Or thereabouts 🙂
You did say you've been model building for about 6 years? I might have mixed up your comment with someone else. It's my age! Lol
27 March, 10:24
Can somebody take away my credit card please? I just saw a Takom 1:35 panzer III Ausf.M mit schurzen (armour skirts) on Temu and it was only £15. God knows where I'm gonna put these models once they're built? I'll need at least 3 more houses. Maybe I can build a few model blocks of flats? 😂
While I'm here, do any of you use those PE bending tools to help you? Some are like metal rulers with lots of different shapes to bend around. Another type is a square with another square with shapes cut out and there's a screw down clamp to securely fix the part down when bending. I can get one of each type for around £7 with my current discount . Are they worthwhile or just a gimmick?
On a similar note, I wish I could find a solution to my many different diameter circle masks. Being primarily interested in AFV builds, I find I need (especially if the road wheels are rubber edged and therefore painted in black(ish), I know you can buy specific wheel masks for many kits but they're not cheap. I was wondering if there's a good universal solution. A tool or technique where you can make your own masks or stencils. Bearing in mind, I have the abilities of a not particularly bright or gifted toddler 😂😂😂
27 March, 10:39
I use a Bug from the Small Shop and it's simply a must have to get great folds on the first try. Each bend at the same spot makes brass weaker. So yes, definitely get a screw down type.
As for question 2 >>> Tadah!!!!! scalehobbyist.com/ca..00000048/product.php
I bought one, seems nice quality but haven't needed to actually use it yet.
1 27 March, 10:47
Thanks Clair. You the man. As they say. Funny to think I thought you might've been the (wo)man before you educated me about the different spellings of your name! 🙂 then again (I'm assuming here yet again) you Americans do love to change the spelling of the mother tongue! lol 😂😂😂😁😁
But seriously, thanks for the reply and advice. It does make it feel like I'm not in this arms race against 1940's nazism alone. Even though I'm building German tanks 😁😊
You've convinced me. I'm gonna buy a screw down clamp thing. I mean, for equivalent of ten US dollars, you can't really go wrong?
27 March, 11:11
I wonder if that stencil you linked would cover the British tanks too? I see that panzer iv is mentioned. I have all the British tanks to build. Churchill, Cromwell, valentine, crusader, Matilda as well as the Brit versions of American tanks like Grants, Lees, Stuart's, and shermans ? I guess it'd be expecting a bit too much to have a single stencil to cover all German, American and Brit machines? 🙂
27 March, 11:39
@Danny, I have this USTAR UA-80026, covers all wheel diameters, at least I didn't have one where it didn't fit in scale 1/35. For bending PE parts just a small tool which is usually sufficient for what I need it [img1] [img2]


1 27 March, 12:37
Thanks Robert. I've just bought something similar on temu and a square one that you can screw down. Because I've been buying a lot of kits from them I had some discount. The screw down type was originally £20. I got it for £6. Hopefully it'll be decent quality. I'll have a look at the wheel mask. As well as the one Clair suggested. Thanks to you both.
2 29 March, 20:55
Helpful tips abound here. Sorry I missed it til now. Photo 5 looks nicely done. I apply superglue with a sewing needle with the end of the eye cut off like a tiny little U. When it gets gummed up I burn the glue off with a lighter. In my late 50's as well.
My girlfriend builds models as well but isn't on scalemates. I like to build things with my kids also.
3 29 March, 21:04
Gee Ben, that's a really smart idea there with the needle. I like the ingenuity bud 🙂
1 30 March, 07:24
Hi Ben. I forgot that I bought this little tool from Temu. It's a very fine needle on a small spring and it unscrews from the handle where it's safely stored away. Basically you just dip it in the super glue then dot it where you want it. When it first arrived a couple of months ago I was disappointed but it really has helped. Though I obviously had to remember I had it first! lol
So your whole family model build? That's great 🙂
30 March, 12:55
@clair shall I post a link to the needle tool I bought? It's just a small bullet looking piece of metal that unscrews then you screw it in the other end. It's just a really fine needle on a small limited movement spring like joint. A lot more handy than I first thought! Bear with me I'm not good with computers/phones. I've added a picture of the tool in the project/build photos. See it? They sell them on Amazon too but it was half that price on temu.
2 30 March, 12:58
Actually Danny yeah I'll grab me a few next week when I get my ssi in.Thanks man I'd like to give that a shot, looks very useful.
1 30 March, 15:52
I'm embarrassed to post any more pics of the build. It looks like an explosion in a Humbrol liquid poly and Tamiya extra thin plant as an Airfix lorry carrying T34-85 112 Factory production 1:35 kits was passing….😳
Don't think I'm ever gonna get a call from Industrial Light and Magic with a job offer. 😂
1 13 April, 12:35
Naw buddy, Im sure it's nothing some putty wont take care of, nothing else use tarps and mud to cover bad spots. Perhaps it's a battle damaged 34 getting hauled back for repairs... 🙂
2 13 April, 20:41
Everybody started somewhere, and nobody built award-winning models when they were just starting out.
Also, you'll be amazed what a coat of paint while hide, never mind the suggestions above 🙂
2 13 April, 20:48
I think it's because I'm thinking I can put every part in place then use extra thin. I used to apply glue BEFORE placing the part as a kid. Do you glue before for some parts and only glue while in place if you can do that from the unseen side as it were? Like inside a tank for example and the part being on the outside. Also Like the seams of the hull for example?
I am still enjoying building but I seem to be very slow. I just cut a few parts from the tree, sand them down then add a few then stop. I rarely sit for hours at a time. Just half hour here and there while tv is on. 🙂
These 65 kits (yes 65 now but definitely stopped buying. For now 😂 ) are gonna take a loooooong time! 😳😂😂😂
1 14 April, 16:40
One more quick question. After handling the model for weeks, it's obviously covered in grease from your hands, do you wash the model before spraying? Like wipe with a little soapy water? It's gotta help the painting, no?
1 14 April, 16:48
I glue some parts by putting glue on first, others by putting the part in place and then flowing glue into the seam. It largely depends on whether I think it will stay put ot not without glue 🙂
As for washing it: if the first coat is going to be paint that is alcohol-based, a lacquer, an enamel, or anything else with a solvent in it stronger than water, there's almost certainly no need to wash off grease etc. Which is to say: I can't remember ever doing it, and the only paints that have given me trouble on bare plastic have been water-based acrylics, especially airbrush-ready ones.
2 14 April, 17:21
Like Jakko, it just depends for me on the particular part and how it positions before I even decide which glue to use.
For the wash I absolutely give a nice warm bath with Dawn dish soap to my parts before painting, Im a sweat hog so my hands get all kinds of sweat on the parts, probably a bit of tobacco breath too so they get a nice wash n dry, then paint away with usually acrylics.
2 14 April, 22:10
To be honest Jakko, I only have acrylic paints, even the primers I have are acrylic so I'll probably do the same as Clair and give this one a bath. I didn't with my first 1:35 build a Tamiya Panther (I should add some pics but it's awaiting its 2nd coat of gelbraun and the olivgrun and rotbrun too) and it looked like it might've struggled to stick in a couple of small areas due to what was probably greasy fingers. I did buy some latex finger glove things. But they'll take about an hour to put on! Each finger. 😳😂
1 17 April, 05:48
It can't hurt to wash the model, certainly. Well, as long as you're careful not to break any bits off, anyway 😉
1 17 April, 08:51
Well, there is that of course Jakko. Knowing me, it'll probably end up just adding more glue to the surface somehow. I'll use the wrong toothbrush. One loaded with poly instead of fairy liquid. 😳😂
1 18 April, 07:23
If you apply glue with a toothbrush then I think we've just located the problem 😉
2 18 April, 08:40
Hahaha. Actually, I use a toilet cleaner brush. I find toothbrushes don't allow quite enough poly to get on 🙂.
Can I ask you an unrelated question? I know I have literally asked your advice on hundreds of occasions (no exaggeration. You have the patience of a modelling saint). I know I said I was gonna stop buying kits but there are 3 vehicles I love (one was one I discovered reading the book you wrote Tanks at Westkapelle) the LVT-A4 (is that the one with the cannon on top and MG at the back? That one. And 2 aircraft. The A10 Warthog and the P38 Lightning.
I know you did tell me before but it'd take ages trawling thru your previous replies. Do you know a decent kit of any of them but in particular the LVT? I really want one. Watched 2 documentaries last night. One called Hell in the Pacific and it had LVTs as they landed on Guadalcanal.
The other documentary I watched was set in your local area (or relatively close by). Isleer or Ismeer lake? It was about an Avro Lancaster that had been damaged by flak in Germany and as it flew over the Netherlands to the coast it was picked up by a luftwaffe night fighter and it came down with the loss of all 7 crew. But the Dutch authorities in 2023 built a dam around the crash site, drained it and recovered the bodies so the families of the 3 missing could finally have closure. I think it's great your country shows its thanks and respect all this time later!
2 18 April, 09:39
In 1:35 you only really have two options: AFV Club has an early and a late LVT (4), while Italeri has a range of them (those were also sold in Revell boxes, BTW). The AFV Club kits are much better detailed but harder to build, the Italeri ones are simpler to build but have a number of mistakes. Also, you can probably get two Italeri LVTs for the price of one AFV Club one.
For LVTs in the Pacific, any of the above will do. For British ones in Europe, though, you want an LVT (2), LVT(A) (2) or LVT (4) kit, and if you go for the AFV Club one, the early type, not the late. None of these include the 20 mm Polsten gun, though. LVT-2 Amtrac (Italeri 6462, 1:35) LVT-(A)2 "Saipan" (Italeri 6470, 1:35) LVT-4 Water Buffalo (Italeri 379, 1:35) Water Buffalo LVT-4 (AFV Club AF35205, 1:35)
")
2 \"Saipan\" (Italeri 6470)")
")
")
As for the lake: you mean the IJsselmeer 🙂 That's quite a way from where I live, but I had heard of it, yes.
1 18 April, 10:36
Yes that's the lake 🙂.
Wow, as ever Jakko your knowledge blows me away. To be honest the first time I've ever really noticed the LVT (prob cos of my new interest in tracked vehicles since starting modelling) was in your book Tanks at Westkappelle. I think I'll go for an AFV club version but the one with the cannon wasn't at westkappelle, is that what you're saying? Please forgive me, not been up long and I've overdone things a bit this weekend. Not booze. Just walking and stuff. I could sleep another week!
Do AFV do one with a polsten cannon? Was that the A4? The 'A' stood for armoured, is that correct?
Basically I want the one that helped liberate my old mate Jakko! 🙂 but the one with the MG facing front and one facing back would suffice.
I was telling my brother that the allies bombed the dykes on your island the hinder the Germans defence but killed 159 islanders thru drowning in the process! Necessary I suppose but civilians bore a lot of the brunt of things. As usual.
Have you ever built an LVT by the way? Sure I asked before.
Ps that Buffalo with the shark teeth looks great. That might be the one I think. Was that version at westkappelle/vlissingen, etc?
21 April, 09:32
Did you see it on the news in Netherlands Jakko? At the time? Last year? Or year before? The Dutch authorities do spend large sums making sure allied aircrew get recovered wherever possible. Which is fantastic and a great way of trying to repay the allies sacrifice. Good on you all. I've always liked the Dutch (I know Dutch isn't the correct term for all netherlanders but that's how we were taught . That everyone from the Netherlands are Dutch and all from Holland. And you rightly corrected me. Unfortunately my brain isn't as plastic as it once was and new info tends to need constant reinforcement before it sticks. My brain is under assault at the moment too, trying to learn how to build models 😳😳😳😂😂😂😂😂
21 April, 09:41
The rest of you who want information about LVT's on Walcheren? That's not that difficult: do what Danny did and buy Book: Tanks at Westkapelle (by Jakko Westerbeke) 😉 (All proceeds go to the museum that published it, BTW, so you'd be supporting a good cause!)
")
1 22 April, 08:48
I'm priming her over the weekend. Just a few bits to add after priming. I add the wheels and tracks at the end after painting too so a fair bit to do. I'll show the end result Robert H. To give you a laugh 🙂
25 April, 05:49
Well, after it's painted and decals on. Actually I noticed that I'll have to add the small (handles?) on rear of turret after the decal because of their position. They I'll have to paint one white cos it's exactly in line of the decal but it's too big to drape the decal over. You'll know what I mean from the scale drawing pics from the instructions. I'll post in the album. I'm not explaining it very well.
1 25 April, 05:53
@Robert H, I'm so sorry. How rude of me to not ask you about yours? Have you finished? Have you got an album of your one? That I can follow?
25 April, 05:59
added a new photoalbum.
8 images
PuBo: my "let's see"-approach
1:35
AK Interior Wash tryout...


Project: GTK Boxer with Puma turret


7 24 April, 05:37
Thank you, Marc ., fortunately there are some very helping pictures to be found, so just a bit of guessing will be needed 😬
1 24 April, 06:35
Having real life images is very useful during construction. A little guesswork is always necessary especially with a new vehicle that is not yet in service. I am building the same revell kit myself, but with a CV90 C-35 turret. This is not a real vehicle, but was a possible option to give the Dutch boxers more firepower. In the end, the Dutch army also chose the Pubo.
So I have both the advantage and the disadvantage of building a what if vehicle.
1 24 April, 08:51
Nice to hear, i will be following! In general the Revell kit has a good fit, let alone a faulty instruction sheet, luckily the Scalemate product page had the solution posted. Stiff wheels is a bit basic, but the price makes it understandable. Can't wait to go on, thank you for commenting!
24 April, 15:50


/search.php?q=*&page=newsfeed&fkSECTION[]=Newsfeed
search-solr.php?lang=en
35
35
/search.php?q=*&page=newsfeed&fkSECTION[]=Newsfeed
35
todo