
Newsfeed
heeft een nieuw fotoalbum toegevoegd.
70 afbeeldingen
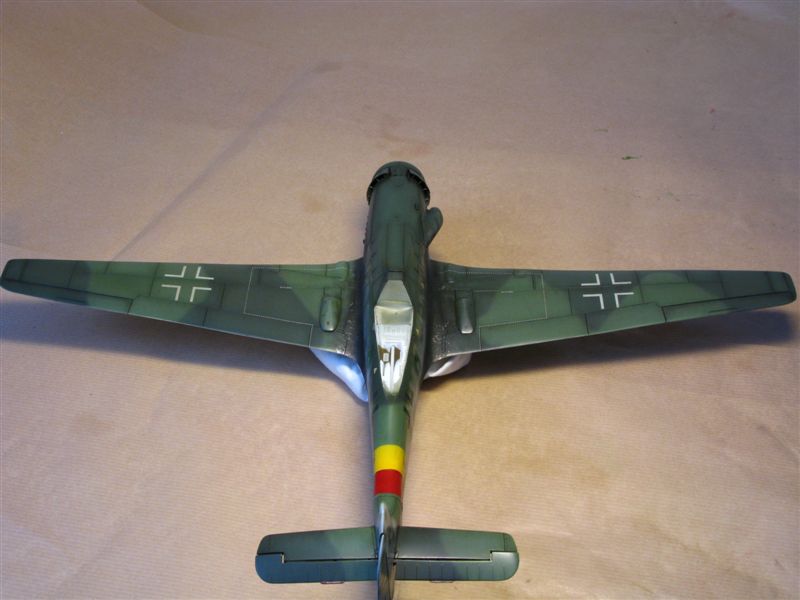
Focke Wulf Ta 152 H-1 (1970 tooling)
1:72
I made the wing plates out of strips of styrene and super glue.


Project: Focke-Wulf Ta 152 H


60 27 January, 18:23
My next big project is turning this FROG into a Prince. Wish me luck I'm going to need it.
27 January, 18:25
I'm following. In my opinion the Ta-152H is the most beautiful plane of WW II. I got the kit from Kora in my stash and hope to start the build in spring this year. Good luck and, above all, have fun building it.
27 January, 20:18
Nicolas, I agree. It's a long, lean, fighting machine as they say. Definitely one of the more elegant designs to come out of the war.
27 January, 22:10
I had to widen the fuselage today, in order to make space, before I scratch build the cockpit.
29 January, 01:47
this is going to be awsome.
I am picking kits that are near perfect so I have fun.
but there are also people who pick not-so-perfect-kits like this Ta152 and they still have loads of fun!
GL 🙂
31 January, 13:12
Well mostly I pick not-so-perfect-kits because I'm a cheap skate. I'd rather pay 6 euros than 40 for a kit. I do have some moderately priced kits and they are a lot faster and fun to make, but often I just have the need to challenge myself and see where my skill level is at.
31 January, 17:56
@Skyhiker: I totally like your approach and I think you did a great start!
31 January, 19:16
same here @Skyhiker, I really like the 6eur price point. so affordable. probably thats why I started to look into the 1/144 scale 🙂
31 January, 19:58
Excellent work on the exhausts, and the cockpit is coming along nicely.
2 February, 03:24
I did a bit more today but I can't seem to get any images to upload. Anyone else having these problems?
2 February, 19:03
Looking at photo #17 I want to give a tip:
I would be a little careful keeping the roll of masking tape on the table. I like keeping them in a holder, or placed in a bag, to avoid the side of the roll picking up all kind of dirt.
2 February, 19:10
Yes, I keep my tapes in a bag but it doesn't seem to help as well as it should. I think I need a better bag. When I photograph things at this scale there is more dust than I realize.
2 February, 19:18
I can finally upload my images again now, I was having problems too.
2 February, 20:13
Treehugger I cleaned my tape and got a new bag. Thanks for pointing that out. No need for fuzzy tape.
2 February, 20:20
I have to take a break and will be back in a week. I must say I am in love with this plane. It's really a beautiful design with those long wings. I can't wait to get back to it.
8 February, 06:54
I'm going to build this one from my stash this year, definitely following! 👍
8 February, 14:14
The canopy was totally uneven and so I decided to do the risky thing and file it from the inside. Hopefully I didn't just ruin it.
2 March, 13:17
I have built 70s Tamiya kit - but that was a least workable. The base was there even though many errors. This 'kit' just seems like a waste of time. Like trying to make a dog poop look edible by putting a cherry on top.
If I saw this kit I would stamp it into the ground. Useless
8 April, 20:15
This kit has its flaws but nothing that can't be corrected with a little bit of skill. Are there more accurate kits out there that are easier to build - yes. But the modern trend of wanting perfect kits seems counter to the art of modeling. If you have ever built a model from a block of wood you wouldn't call this kit useless. Challenging or time consuming I can agree with but it is not crap.
10 April, 08:09
I agree with your modern trend thesis - especially if you add in the AM factor. But I think there is a line to be crossed between the kit manufacturers chucking out a quick buck kit with no effort in a fancy box (my pet peeve - rebox) etc, and thereby throwing the burden on the modeller and on the other side 'great expectations' along with spewing out bundles of dollars on AM on an already close to perfect kit.
I suppose if you are saying the kit can be built into an accurate replica then the modifications and work are justified.
I do admit that scratch building is the purest form of scale modelling so it depends on one's 'Weltanschaaung' and philosophy.
Anyway it looks like you gave up on it which influenced my previous comment - in other words all that effort bore no fruit
10 April, 11:54
I haven't given up yet. Sometimes life forces me to take breaks but I hope to get back into this one soon. I have to put a lot of tiny details in the cockpit next and I need the right head space for that. Kits like these take time and often I will start easier kits mid process to keep things flowing. I absolutely agree that reboxing old kits without a mold date is deceptive. Thankfully with this site we can look up the history and sometimes see the sprues before buying anything. I've only had one kit that I couldn't do anything with. I bought it for 20 bucks opened up and threw it directly in the trash. That was a Top Gun F/A-18 Hornet snap kit, which really was a piece of shit.
10 April, 16:03
lol - hopefully I wont end up with one of those 'open kit open bin' models. I would reconsider throwing in loads of detail in that cockpit because none will be seen - it may be one of those more of a burden - but it is your show.
As I'm just getting into it again I bought several boxes of the 1/72 AZ joy packs - about 20 bucks - 3 kits in a box - although the Gustav set has no stencils the Emil set does but no decals - much easier to deal with. I am using them to practice some skills. (Will post on here soon)
Just to add they are about to bring out AZ Mustang Joy pack - I'm only into German aircraft and armour but it might be for you. I suspect they may bring out another later mustang set
10 April, 17:59
Following. Really looking forward to the end result.
Especially since I built this kit myself last year. Although I didn't put so much effort and detail into it as you are doing.
10 April, 21:29
Worked on the canopy and tried to figure out how the scratch built cockpit will fit into the body.
2 May, 23:45
It's coming along!
From about halfway back on the underside there should be no join line - but forward of halfway you are good which makes things a little easier.
Just an idea but you can download the ZM instructions to get an idea?
6 May, 10:13
Trez your message is pretty cryptic. Are you talking about panel lines or internal wing structures? The last photo is just a dry fit. I haven't started with dealing with any panel lines yet. I've been working on the inside of the wing walls to make something that gives an impression of space for the wheels.
6 May, 11:45
Apologies - I meant the external join lines. I can see what you done - it looks good. I thought the ZM instructions would help as a guide
6 May, 12:56
Trez, thanks for your ideas. I'm using a lot of photos and the instructions from a 1:32 model to help figure out what is going on. This little model is a challenge to correct but I'm having fun pushing my skills and learning as I go.
6 May, 15:36
I worked out most of the cockpit issues today. It's not perfect but I got it in there.
15 May, 23:09
Moreno, I'm glad you're liking it. This is kinda pushing my skills a bit. We'll see what happens in the end together.
15 May, 23:11
Don't worry too much about updates - things like that can cause one to rush. We ain't going away so take your time! 🫡👍
16 May, 00:34
Getting this kit to accept a cockpit was like pounding a square peg through a round hole. I had to reshape the whole damn fuselage.
16 May, 03:35
Whoah!!! Amazing what you did to that old tooling! Very cool to watch! 👍🏼
16 May, 15:20
Really liking what you're doing, Skyhiker, and learning lots too. Impressed with your skills 🙂
16 May, 19:43
Łukasz the shape of the hood is really off in the kit. The superglue is just material for me to try and sculpt into a better hood.
16 May, 20:26
No, It's just cheap super glue from a discount store that I poured right from the tube and hardened with accelerator.
16 May, 22:08
Well the fine engraving blade I just bought broke within a day of use. Very frustrating.
23 May, 14:42
Luckily I bought a .02 mm blade in addition to the .01 mm that broke. It will have to do even though I would prefer the lines to be a little bit thinner.
23 May, 15:06
Amazing progress! Once you go the route of updating such an old kit, there's no way back, is there?
24 May, 22:19
Thanks Patrick, your right there is always more to discover and do. I'm having fun with it. Of course I have no idea what it will look like in the end. I'm spending far too many hours allowing myself to be lost in process. But if that's what it takes, why not?
24 May, 23:19
It's amazing how every kit I look at of a FW Ta 152 H is different. All the photos of the original aircraft are so blurry that details are impossible to pick out, so I'm left with looking at kits and guessing which ones are correct.
26 May, 01:25
Anyone out there with a book on the TA 152? I'm trying to figure out if the top of the flaps have a vertical line down the center of them or not. From underneath there is a line there but I am getting conflicting images of the top surface. Can anyone post a decent image?
28 May, 16:28
I looked through some of my books and picture collection. But to find even a picture of the Ta152 is rare. 🙁
28 May, 17:06
Thanks Mattes. There are a few decent books out there but they go for 80 Euros and I can't afford that. I doubt the library would have anything worth while. Maybe the model shop will let me look through one of their books but usually they are sealed in foil. Hopefully someone here has something. Getting panel lines correct is not so easy. Even worse are the rivets.
28 May, 17:49
I found this image which clearly shows the flaps divide in two sections. Interestingly the sections are not even like the underside.
[img1]
29 May, 05:48
Maybe this would be helpful? flugzeugclassic.de/f..hlands-bester-jaeger
I do not have the magazine, but kind of stumbled over the link 😉
31 May, 13:34
Thanks Ben, this kit gets a bad rap. It's not as bad as people make it out to be. Of course I am putting a lot of work into it to make it better. But if its done straight out of the box it's not that bad. The backwards propeller is a stupid engineering mistake but that's an easy fix.
31 May, 23:54
Yeah, I was a little heavy handed, but it's not a problem. I just glued it back together. I prefer trenching and filling over trying to get the lines the exact depth overall and then accidentally sanding away lines. The only problem with using this method is the deep panel lines can make the model unstable in places if you are not careful. But in the end it should all work out.
7 June, 21:47
I am slowly moving forward on the panel lines behind the scenes. This is the part I have to force my way through because I don't really enjoy it. But it is coming along and I could have some photos soon.
2 July, 18:21
Thank you Moreno, re-scribing is definitely the part that's the least fun for me too. Some days I have to force myself just to do one line. If you do that once a day eventually it gets done. But yeah, re-scribing sucks.
6 July, 16:21
Big step made with attaching the wings. It makes me feel like I am moving forward after all.
7 July, 14:33
heeft dit item gemarkeerd als te ruilen/te verkopen
")
Prijs nog niet opgegeven
11 July, 11:29
is eigenaar van dit item
")
The Heinkel He 177 Greif A Detailed Guide To The Luftwaffe’s Troubled Strategic Bomb...
Airframe Album Nr. 20
Richard A. Franks
2024 11 July, 11:24
")
")
")
The company data for Orion/Haron SCM Brand: Orion/Haron  says it’s based in the Russian Federation, but the new release boxes say “Made in Ukraine” and their web site has a .ua TLD. Unfortunately that site doesn’t seem to have a snail-mail address for the company, so is it Russian or Ukrainian?
11 July, 11:19
heeft dit item gemarkeerd als te ruilen/te verkopen
")
The de Havilland Mosquito Part 2: Fighter variants (inc. Sea Mosquito)
Airframe & Miniature Nr. 10
Richard A. Franks
2017 11 July, 11:18
")
")
")
")
")
")
heeft dit item voltooid
")
World War II Aircraft of the Aces :
Hawker Hurricane Mk1 Special Edition - Squadron Leader R.R. Stanford Tuck Airfix 1:72
02082 1988 Nieuwe markeringen 11 July, 11:14
")
is eigenaar van dit item
")
Sd.Kfz.9 and Sd.Ah.116 German 18 ton Heavy Half-Track and Tank Transporter
Trumpeter 1:72
07275 2007 Nieuwe onderdelen Meervoudig onderwerp (2)11 July, 11:13
")
heeft een nieuw fotoalbum toegevoegd.


103 26 February 2023, 16:11
Exceptional work so far Alec.
You're going to show us all up again aren't you? 😉
(Come to think of it that should have been a statement rather than a question. 😄 )
26 February 2023, 17:41
Thanks Gorby! Not my intention, just sharing my modeling joy in my characteristic pedantic manner 😄
26 February 2023, 18:36
One of my favorite prop classics! Please a seat in the first row! Excellent start. I'm curious for more scratchbuilding especially flaps & co. 🙂
26 February 2023, 18:44
For such exulted following, I better up my game. Welcome to the show mates, I'll try not to disappoint.
27 February 2023, 02:10
excellent and useful build tips....didn't know about acrylic glue....thanks for sharing the build!!
1 March 2023, 10:35
Nice to see another project form you, Alec. Great start. Looks like the Neptune need a lot of extra detailing.
1 March 2023, 11:15
Very nice work in the cockpit, Alec 👍 I'm looking forward to see next steps. Also, i'm surprised how big this bird is 😮
3 March 2023, 12:32
Thanks gents! Erik, you are right, the additional details will make it a nicer build but it's noteworthy how good this kit is after so many years. And yes Jakube, it's a BIG bird 🙂
4 March 2023, 00:12
Alec: they were several colors schemes used on dash 7. Which scheme intend you to build?
4 March 2023, 06:46
Hello Bernhard - I really like the later schemes of Light Gull Gray with white fuselage decking. I came across several renditions of BuNo 147967's scheme (see my project's banner) and as long I figure out the markings (specifically, what kind of decals I will need to make myself), this will probably be the one.
4 March 2023, 23:25
Welcome Oliver! I have added info about my fun time with Plus Model's flaps 👍
5 March 2023, 16:43
Really interesting project. I believe that in your rendition it will be another exceptional model. I will definitely follow this build 👀
6 March 2023, 00:06
A lot of work ahead, but it seem that you have it worked out before hand. Nice
6 March 2023, 00:38
Excellent start on the wings. Watching for next steps. 🙂
P.S. is #PJ 12 in gullgray & white you choice?
7 March 2023, 16:44
Alec, your modifications to this kit are great. 👍 I just don't understand one thing. Is there any reason why you didn't simply weaken parts 62-65, 66 and 67 from the inside and then glue the Eduard parts to them?
23 March 2023, 00:15
Welcome Jakube 👍
Ludvíku: A fair question regarding a choice I myself questioned. I though the Eduard parts were too thin (the formed reinforcing metal structure on the interior of the doors seems quite deep to my eye). Also, the front wheel bay door structure looks different than the Eduard interpretation. All that said, I think thinning the kits' parts and adding styrene strips would have been easier. Cheers 👍
23 March 2023, 11:13
Thank you for your reply. I don't mean to disparage your work in any way. I knew you had a reason. I just didn't know what it was.
The result looks very good. 👍 Especially considering the actual size of the parts in 1:72 scale. It's obvious you take great care with all the details. I wish you a steady hand and a good eye throughout the build of the model and look forward to seeing the progress. 🙂
23 March 2023, 12:11
Most impressive Alec.. That Metalwork is awesome!
Love the outcome so far👍
23 March 2023, 19:12
Thank you mates! Frank: I imagine you and others will relate 🙂. Recently I was going through my "keep for just in case" items and failed to get rid of much. Most of such items do not occupy a lot of space, it's much harder to justify keeping junk that does 😉
31 March 2023, 11:18
That it also a fact: if you don't used a thing for years and drop it in the bin one week later you will need it! That is caused by Murphy's law.
31 March 2023, 11:20
Greetings mates! Contrary to what you may be thinking, I have NOT been screwing off and AM actively working on this, just veeery slowly. Here is an update on my labors.
16 July 2023, 15:27
I'm watching this with great interest. I am always amazed at what can be done on this scale. 👍
17 July 2023, 08:11
Thanks much guys. This gives me strength to keep plugging away at this beast 😄
17 July 2023, 12:32
Impressed by your build, great scratching and use of "household" materials.
18 July 2023, 09:46
Cheers friends. Just so you don't think I gave up on this beast, here are some progress pics. This project has been a MONSTER but it's progressing, despite my every effort to screw it up.
3 February, 00:11
Thanks gents for stopping by and for your kind comments. It's always a pleasure to read those 👍
4 February, 01:33
I love your journaling, so much to learn from you, following 👀. Your work is amazing.
4 February, 02:30
Great that you continued to work on this bird and uploaded new pics....
But, have you deleted all old pics and uploaded new ones? Normally I check the date to see, where the news are, but here _all_ pics are of the actual date 🙁 But some were definitely not new for me.
4 February, 18:23
Thank you friends for your comments and support, very appreciated.
Jennifer: I am glad you like my ramblings. I realize I get into the weeds, but I always enjoyed others sharing their progress in detail and it has helped me great deal with my own modeling journey, so I am trying to do the same.
Frank, you are correct. There was a discussion some time ago about the preferred sizing of images for albums and I realized mine were pretty small, so I decided to re-upload the old pics in higher resolution. The teaser in the album marks where new work images begin. I hope it's not a big faux pas to do this as I plan to upgrade some of my older albums this way.
5 February, 01:02
Thank you Alex - the new bigger picture size is for sure a _good_ reason to replace them 👍
There was also a discussion in feature request that replacing pictures by better ones do not trigger a notify. So this can be done behind the scenes without bother anyone..
5 February, 07:19
Hello Alec. I'm glad to see you back here after some short break 🙂
That new vacu canopy looks great 👍
5 February, 09:44
Finally painted something on this bird that will be visible on the outside. Cheers!
24 February, 02:23
A pleasure to follow you on this journey. Sprue goo bubbles are a problem I am familiar with too and is doesn't have to do with stirring. Unfortunately I cannot provide an alternative theory why this happens. Maybe someone out there can enlighten us.
24 February, 07:05
Alec, good progress! 👍 I admire the precision with which you create the details of the model. My admiration is all the greater because your model is in 1/72 scale.
The bubbles could have been caused by a chemical reaction between the sprue material and the solvent, or between the plastic of the model and the "plastic slurry" during drying (similar to adding yeast to dough), but that's just my guess.
24 February, 09:13
Alec, what a no-compromise project! Very inspiring! And fingers crossed that the wind doesn't get out of your sails. 👍🍀
24 February, 09:42
Hmm, interesting observations regarding the sprue goo bubbling, thanks for commenting on that Michael and Ludvik. Ludvíku, I think there is probably something to your theory. I just bought some dissolved putty from GSI and have high hopes for it.
Gordy: "good grief" about sums it up…
Zbynku, thanks for the encouraging post 🙂
24 February, 12:39
Alec: I am very happy to see that this great project continues. You solved the canopy problem very well. I suspect that your self-made part is clearer than the one from the kit….🙂.
Great details on the wheel bays & landing gear, which is also movable! I am looking forward to further progress.🙂
24 February, 13:56
Great and careful work again!
May be your sprue putty layer was too thick? The extra thin glue need a way to go out. So it is may be better to work in thin layers and give the glue the chance to left the plastic.
I'm also not a fan of normal putty, but I used some days ago the Tamiya Light curing putty (I wrote about in my Swallow project). I like it! But also there it is recommended in the manual to use only thin layers up to 2mm. If you put light on a thicker layer it will get too hot inside and create bubbles. But as this hardens quickly with UV-light it is no problem to apply additional layers.
24 February, 17:27
Thank you mates. I think the canopy was the correct decision, the thickness alone makes it so much better. Silver linings…
Bugs, I think you are right about the goo. I did glob it on pretty thick, forgetting all my school chemistry 😄. Thanks for the advice as well, I'll have to look up that Tamiya light curing putty.
24 February, 22:31
Alec, such a gorgeous aircraft which I also want to build. I got dissapointed to find out that the Hasegawa kit has raised lines and I wasn't yet willing to do the effort you are doing now.
Outstanding work, I admire the dedication you're pouring in this project. Thank you for recommending some scribing tools, mine got old and blunt and needed new ones.
One question: why use the saw for scribing? What is the advantage?
10 March, 06:25
I missed this thread completely - outstanding work! Landing Gear, Cockpit, Flaps and much more just makes me feel like a beginner.
10 March, 08:06
Thanks you guys. Thomas, your work looks rather advanced to me 🙂 👍
Marius, this is my first scribing/riveting project on the entire model and I really enjoyed the process. Regarding my use of thin saw blade: on curved surfaces like the sides of a fuselage, I find it difficult to use the UMM scribers. It's hard to describe, you just have to experience it. To get a nice even panel line with the scriber, I apply several passes at low pressure. This is hard to do when you are following a curve because the scriber's "angle of attack" relative to the surface is important and must be continually maintained as you move the tool. Saw works much better and produces a comparable result. Cheers!
10 March, 19:18
I can only second Alecs arguments. Particularly if you have a panelline which was interrupted- by sanding for example - the saw can use the still existing grove as a guide much better than a scriber can.
10 March, 23:24
Wow. What an odyssey of a build log. So detailed and painstakingly explained. Thank you. All aboard for the remainder of this journey.
11 March, 07:03
Dat rivets look great, watching with envy. 👍
Thx for the Dymo tape hint, I have to test it, all these fancy modelling scotch tapes seem too thin for my taste.
11 March, 10:14
Thanks Gary, welcome to the odyssey. We should hit port soon 🙂
Łukasz, Dymo tape is pretty good and readily available, but couple words of caution: its adhesive is very aggressive and tends to leave residue on smooth surfaces, and it's not very "bendy". It sticks to Surfacer fine and comes off the same, but I had it peel off paint on smoother paint finish. The Carving Guide Tape (HIQPARTS CGT-6MM, No) is a better option IMHO but not sure how easily available.
")
11 March, 12:01
Thx for the additional info. The transparent ones don't work for me at all - my eyesight is too poor 😉
But I think Dymo could be good for the basic rescribing, even before surfacer.
For the later corrections I have these green semi-transparent one, but its edges are not thick enough for me to do the long straight lines:
mojehobby.pl/product..-Edged-Tape-3mm.html
11 March, 12:16
Very nice rescribing, Alec 👍 . As for dymo tape, I have the same experience as you.
Its nice to see, you are using Hauler products. This company is located about 500 meters from my home 🙂
11 March, 16:09
Thanks Clement and Nathan!
Łukasz - for sure, give it a try. For straight scribing, I like a firmer wide tape to keep the "straightness" and Dymo tape works great for that. It's also nice and thick for guiding the scribed. My only complaint, again, is that the adhesive sometimes stay put.
Jakube - thanks for encouragement. Do you mean PlusModel? Or does Hauler makes their PE? Either way, I am jealous 🙂 👍
12 March, 00:12
Alec, i mean Hauler ( scribing template on your pic#110). They really make their PE. I saw it with my own eyes 🙂
12 March, 12:01
Oh yeah, sorry! Got it. I have many Hauler PE sets (as well as their kits) in my stash 🙂
12 March, 12:30
Alec, the longer I follow your work on the model, the more I like it. The care you take with all the details is admirable. 👍
In the time I have been building my models, I have come to the same experience as you. For restoring panel lines on curved surfaces of the model (like the fuselage), a razor saw is best. It's exactly as Michael Kohl writes a bit above.
To transcribe the lines on the model I use (among other things) rulers, which I made from an ordinary rolling ruler metal tape measure. I cut strips of different lengths from it. These strips are flexible and adapt easily to a curved surface. For even more flexibility, the strip can be cut lengthwise into two narrower strips.
13 March, 09:03
This has turned in a very helpful thread with all the discussiond about scribing. I would like to share my own method for irregular surfaces. I'm using tape for electrical cable insulations together with a pointy tool. The tool is normally aimed at scribing access panels or doors, but I use it for larger panel lines too. Check photos #36 and #38 from this album:
MiG-23BN - Iraq - 1982 | Album by Redicus (1:72)
13 March, 11:49
Managed some progress, engines are on the wings. Getting close to assembling this beast and finally painting.
7 April, 17:16
Wow...I can't believe what a huge improvement you are making to this tool. Looks great!
8 April, 18:32
Thanks Cuajete. The beast finally has wings and received a coat of paint. The saga continues...
27 April, 01:41
How did I miss this master-class modelling tutorial? From now I am definitely following this talent show!
12 May, 08:03
Great work on all the detail you added to the Neptune, Alex! Looks fantastic!
12 May, 14:15
Alec, it's admirable what you've done with this model. It looks fantastic. Fingers crossed that you manage to finish it successfully. 👍
The finish line is very close. 🙂
14 May, 15:25
Thanks all for leaving encouraging remarks. It's indeed getting close and chances for me screwing it up loom large: weathering is not my forte…
14 May, 16:47
Danke Oliver!
I am in the final stretch on this one. Just some final weathering and it should be done. Cheers!
11 July, 11:11
")
Added a new review for:
")
Gannet AS.1/AS.4 LooKplus
Eduard 1:48
644272 
In-box review
kitreviewsonline.de
11 July, 11:10
")
")


")


")
")


")
")
heeft dit item gemarkeerd als te ruilen/te verkopen
")
Toyota Gazoo Racing TS050 Hybrid - Detail-Up Set For Tamiya Nr. 24349
Hobby Design 1:24
HD02-0394 2019 Nieuwe mallen 11 July, 11:06
")
")
/nl/search.php?q=*&page=newsfeed&fkSECTION[]=Newsfeed
search-solr.php?lang=nl
35
35
/nl/search.php?q=*&page=newsfeed&fkSECTION[]=Newsfeed
35
todo