modelbouw databank | stash manager
bughunter
bughunter
DE

Work in Progress: Sopwith Camel Comic

Album image #1
I couldn't wait, detached the pieces and loosely put them together to make a little teaser.
As expected from my other Camel build perfect fits! 
 

Album image #2
Also from the 3D printed weapon set ... 
 

Album image #3
... the fit the wing recesses is perfect: 
 

Album image #4
First of all, the wicker seat. I have a lot of options here!
From two plastic parts? Probably not. 
 

Album image #5
With the etched parts of the Profipack you could also build a seat, there are two other injection moulded parts for that, above. Etched and colour printed belts would also be available (in the standard brass thickness).
Could be used ... 
 

Album image #6
... if there wasn't another accessory.
Quote from the foreword of the "Info Eduard" journal from February 2022 (on the Eduard homepage as PDF):
"Also interesting is the high number of 723 sold Camel seats. Although, in this case, it is necessary to add that this is a little gem of a piece, looking like it came out of a fairytale workshop with liberal sprinklings of fairy dust."

Exactly! And I've already bought 10 of the 723 because you can use them for many of the British planes. The first one is in my first Camel, the second in the recently introduced DH-2 and now this is the third. This is the part in question, the little black seat on the penny.
The price is fair, and colour printed belts from the thin STEEL series are also included here. 
 

Album image #7
Primed white, painted with XF55 Tan and treated with oil paint, which now needs to cure.
I guess the seat can stay like this? 
 

Album image #8
Almost all of the comic night fighters had LeRhone rotary engines, in the Camel kit there are 4 different engines as injection mouldings.
I had the LeRhone 9J from Small Stuff in stock, so built this one first. The usual procedure ... 
 

Album image #9
Same engine, but again on a light background. Now you can see the copper ignition wires better.
And I used a polarization filter on the lens for the engine pictures because of the oil wash and metal impression. 
 

Album image #10
For the four different engines Eduard supplies four different cowlings, made in the "Slide-Mold" process. Therefore, it is no longer necessary to glue the cowling together from two parts, as was the case with older biplanes, if openings were included. 
 

Album image #11
However, here, at the point where the top, bottom and side pins of the mould come together, there is a seam to be sanded. There wasn't one on the original! I say this so clearly because I have seen Camel models with the seam. 
 

Album image #12
The plastic has enough reserves that I was able to thin out the inside of the cowling so that the scale sized Small Stuff motor has enough space to rotate (I hope my mounting hole in the back is also in the middle!). 
 

Album image #13
As mentioned, I sanded the propeller, here is the front. 
 

Album image #14
And the back side. 
 

Album image #15
The contour is close to the Eduard version, but also shown a bit wider on some drawings. 
 

Album image #16
A lot has also happened for the innards:
Primed white, linen paint, wood base acrylic, wood grain acrylic, MRP Clear Yellow and Clear Orange, Alclad Aluminium. 
 

Album image #17
The bearing for the rotary motor is ready: turned brass bush with piano wire and soldered stops. 
 

Album image #18
Fits in the front. 
 

Album image #19
On the back I used a reinforcement made of a piece of sprue. Fortunately there is more space here on the Comic than on the normal Camel. 
 

Album image #20
The frames are mounted in the fuselage halves and the internal rigging is completed. 
 

Album image #21
The seat is mounted on its frame and the belts are attached. 
 

Album image #22
Afterwards I could glue the frame in the right half of the fuselage, you can also see a copper line. The right side is finished, on the left side a few lines and control elements are still missing.
The front part is only clipped in. 
 

Album image #23
And although the engine is not yet as far back as possible ... 
 

Album image #24
... I had probably thinned out the cowling far enough that the Small Stuff rotary engine not only had enough room, ... 
 

Album image #25
... but can also rotate freely! Test run successful! 🙂 
 

Album image #26
Here again there are some options. In the Profipack there are also two etched parts, with the dials and the wooden board. I like its grain, it looks finer than in previous kits. You don't have to remove any structures to glue on the etched parts, as there is a separate board for that. 
 

Album image #27
Unfortunately, I don't like the flat instruments, because they were raised on the original. With the first Camel I used a LööK board, but this is not (yet?) available for the Comic. (so this pic is NOT from this build!). 
 

Album image #28
But there is also a normal injection moulded part and decals.
Hence the decision for the normal part. First, with the help of oil paints, an imitation of wood was applied. 
 

Album image #29
After curing, apply some Clear Orange, then paint the instruments black, other details brass. Then applied the individual decals from the kit. 
 

Album image #30
Later glazed with Kristal Klear. Here, however, I noticed another mistake (I'm a bughunter) that I unfortunately didn't notice earlier! Under the board is an extension with two mounting recesses that is slightly offset to the rear. 
 

Album image #31
This is where the intake pipe is attached on the normal Camel, which protrudes from the fuselage on the left and right. 
 

Album image #32
Here the LööK panel with the intake pipe, only for explanation, NOT from this build! 
 

Album image #33
This will also be the case with the Ships-Camel, where there will only be one Vickers MG. 
 

Album image #34
BUT on the Comic, the intake manifold is still at the front, but not the instrument panel! This means that the bracket can and should be removed here, even at the risk of making it even easier to see into the fuselage. Of course, this would have been easier and risk-free before painting.
As indicated on the etched parts, I added the wiring from lead wire and annealed brass, and the oil pulsator got a head from drawn clear cast branch (I had removed the grey part at the very beginning).
Unfortunately the scales of the decals are not as sharp as those of the etched parts. 
 

Album image #35
And mounted in the fuselage, only glued on the right. 
 

Album image #36
You'll still be able to see some of it on the finished comic! 
 

Album image #37
And I tackled another issue ...

The struts are beautifully original, only 0.7mm thick! 
 

Album image #38
But this unfortunately makes it too flexible for my taste, light forces here. 
 

Album image #39
My new struts using the sandwich construction method are now also 0.7mm thick, but much more stable. In raw form, with some primer. 
 

Album image #40
Among other things, I worked on the wings.
After a white primer, I masked off the ribs ... 
 

Album image #41
... and shaded. 
 

Album image #42
After painting with MRP linen on the underside, waited a day and masked again, ... 
 

Album image #43
... to be able to paint the 1.5 to 2 inch border together with the top with PC10. 
 

Album image #44
In the meantime, work continued on other areas as well!
Here is the fuselage cover. The tanks in front of the cockpit on the Comic need filler caps. With a little paint it would be nice, but how should the mechanic get them open? 
 

Album image #45
So once again I made three new caps out of brass. 
 

Album image #46
I like it better after a little drilling. That way I can glue them in place after painting. 
 

Album image #47
While we're on the subject of brass: Soldering is also fun.
Here are a few tubes (0.5/0.6/0.8mm) impaled on drills and clamped. 
 

Album image #48
Results in a stick after riveting onto the tube, instead of the tedious deburring of a small part. 
 

Album image #49
The one from the kit is not bad, but the nice thing is that you can look into the pipes from above.
Let's see if I can wrap some "grip" around it. 
 

Album image #50
To complete the cockpit, some fuel-related things were still missing, e.g. the fuel level indicator. Scratched from 0.6mm brass tube and pulled sprue. If anyone recognises the level indicated with clear green - it corresponds to my current feeling. 
 

Album image #51
The fuel filter was made from brass and copper pipe. 
 

Album image #52
Together with etched parts from PART I built everything into the left half. 
 

Album image #53
Later, a master valve was added in the fuel line, this should now suffice in the left side. 
 

Album image #54
The footboards were still missing from the middle part, whereby a second part is placed on top of the normal one for the comic (all painted with acrylic). This also holds the rudder pedals and the control stick (which was wrapped at the handles). 
 

Album image #55
As Werner said in his comic strip? "Work entails work!"
Since I had shortened the instrument panel at the bottom, you can now see unusually far, so I decided to add the tank, here painted aluminium. 
 

Album image #56
Glued behind the panel with the help of the piece of sprue at a distance. 
 

Album image #57
Far enough away from the pedals. 
 

Album image #58
With the control cables in place and a little washing, the lower part is also ready for installation. 
 

Album image #59
So, the fuselage is now closed. I hope I haven't forgotten anything! 
 

Album image #60
After a coat of gloss paint, the cockades have already found their place on the painted wings. 
 

Album image #61
Have I ever mentioned that I love the new Eduard decals? Why?
.
.
.
Therefore! 
 

Album image #62
From a distance, not much difference. 
 

Album image #63
But from close up: as if painted on!
I can be accused of anything, but in no case that carrier film would be visible here.
I don't know if the decals are all like this, or only here at WWI: there is also a certain variation in the print, which absolutely fits here. 
 

Album image #64
The fuselage cover is also glued, all openings closed and primed in white.
I think the Camel is very successful: note how nicely the covering fabric sits over the frame of the fuselage! 
 

Album image #65
The lacing of the opening on the right side is also successful. 
 

Album image #66
The fuselage is now masked for painting light shadows. 
 

Album image #67
Also on the right and below. 
 

Album image #68
The struts are streamlined squeezed 1.3mm brass, with inserts of 0.5mm brass extending into holes in the lower 0.7mm cross tube.
The right T is 0.6mm brass tube at the top with 0.5mm brass wire soldered into a hole. 
 

Album image #69
Sticks in a hole at the bottom and clamps in the filed struts under slight tension. 
 

Album image #70
And soldered. So far already 7 brass parts per side. 
 

Album image #71
Brass washers on 0.8mm nickel silver tube will later hold the spring rubbers. A 0.4mm pin can be seen vertically, which will later be stuck in the wooden board. Another 7 parts per side. 
 

Album image #72
The half axles are made of 1.0mm nickel silver. Nickel silver plates with a hole threaded onto them, soldered and filed into shape. The holes in the wheels were already a bit bigger, so I added 1.2mm brass bushings. 
 

Album image #73
For the board, I first glued two layers of veneer, sawed the axle cut-outs and then glued a third layer. 
 

Album image #74
Plugged together to form the undercarriage. The axles are movable, a cross pin follows in the pivot point. 
 

Album image #75
The wood is primed, the brass tin-plated and the axles burnished. 
 

Album image #76
On a matt beige I had simulated wood with oil paints. 
 

Album image #77
Album image #78
The wood panels were very dark on this machine, so I have now painted with the following clear paints in that order. But really only a touch of the first red-brown! 
 

Album image #79
With the naked eye there is also more depth, the camera is "stuck" on the first layer of colour. 
 

Album image #80
Album image #81
Oh yes, the linen paint on the underside is also on there. 
 

Album image #82
After masking the front part I sprayed Alclad Grey Primer, sanded problem areas and glued an etched ring from Part's set to the front. 
 

Album image #83
After drying, I painted the front aluminium, the aluminium looks even and quite bright on the original photo. 
 

Album image #84
On the rear fuselage section I masked a white band and painted it with MRP "Insignia White". This is an off-white and not quite as garish. 
 

Album image #85
The underside is finished. 
 

Album image #86
After drying time the next masking session followed! 
 

Album image #87
I then applied a layer of PC10 to almost all the remaining surfaces. 
 

Album image #88
Almost all, because I was then allowed to mask again to add two blue bands. Here I used Tamiya XF8 instead of the specified Gunze H15 because it looked closer to the blue of the decals. The Gunze colour is much lighter, I already have it on the "normal" Camel.
I painted other parts like wheels and tail unit at the same time.
After the photo, I retouched with a brush! 
 

Album image #89
On top of the cent's globe are quick-release fasteners made of 0.2mm brass, one end crimped flat. 
 

Album image #90
I used them to " secure " the access flaps. I had already drilled the holes before painting. 
 

Album image #91
There are also some on the underside, a total of 34 (in words: thirty-four!). If one stuck out too far, I shortened it a bit at the end with a pair of cutting tweezers.
Please note also the notch at the end of the aluminium panel. 
 

Album image #92
Meanwhile, the first round of decals is drying. First round because they overlap and I want to remove the transfer film first before I put the other decal next to it. 
 

Album image #93
In case anyone was wondering about the holes and cut-outs at the top ... 
 

Album image #94
I stuffed these with the headrest. The fit was promising, so I painted them externally to make masking easier. 
 

Album image #95
Now for the notch I mentioned: here the aluminium panel is secured with a steel cable. I drilled holes and glued in 0.15mm wire. The cowling will then be clamped in the same way at the front. 
 

Album image #96
The metal parts of the landing gear are also primed and painted. Eduard says grey, but here I followed the Windsock International article on the comic, which showed all legs in almost PC10 (there was a variant for metal parts). So this is the current state with the undercarriage plugged in only. 
 

Album image #97
First a few words about the new decals!
I had already shown that I had completely removed the carrier from the cockades. Now I noticed during the inspection windows that the decal even lay hollow over the masked window. Nevertheless, the carrier film came off without destroying the decal. 
 

Album image #98
I had also masked off the wheels, painted them, applied a clear coat and applied the decals (picture). However, I did not remove the carrier after 10 hours as usual! 
 

Album image #99
After 24 hours it no longer worked! From one wheel only in bits and pieces, torn off again and again. And it didn't work at all on the other wheel, which now stays on.
Conclusion: really stick to the recommendation and remove it after 10 hours. It seems to dry out further, which then makes removal unnecessarily difficult. Another lesson learned! 
 

Album image #100
The undercarriage parts are all painted, so I was able to assemble the undercarriage and pull in the suspension rubbers. 
 

Album image #101
The pivot bolts of the half-axles were fitted with safety plates. 
 

Album image #102
In order for the wheels to run in the correct track, I had to shorten the stubs a little on the outside. Then I attached the landing gear to the fuselage and bent it into position. The attached lower wings helped with the alignment.
In the end it was mounted with super glue. 
 

Album image #103
The prepared fuel and oil filler caps are now also in their final position. 
 

Album image #104
All decals are now on the fuselage. 
 

Album image #105
In the inspection windows of the wings I painted the details with linen, wood and aluminium paint as well as black. From the windows (clear parts from the kit) I sanded down the frames and polished them out again with up to 12000 abrasive pads. 
 

Album image #106
After gluing the windows with Kristal Klear, I glued on etched frames from the PART set. 
 

Album image #107
The frame of the middle window has to be shortened. Don't be surprised, the Kristal Klear is not yet dry in the picture. 
 

Album image #108
I glued crimped brass bushings into the existing recesses. 
 

Album image #109
Then painted black. This way the struts can be mounted easily and have a black metal base. 
 

Album image #110
The same on the fuselage. I have deepened all the pre-stamped rigging holes a little. 
 

Album image #111
This way the struts sit in position for the test. 
 

Album image #112
I sanded the actual tail skid from wood, plus some metal fittings from brass and nickel silver.
The two parts below are the "slider shoe". The one on the right was the first attempt; I didn't like it and so the one on the left is now the final version. 
 

Album image #113
All parts assembled with superglue. The pivot axle is made of nickel silver and is missing in the previous picture. 
 

Album image #114
Wood and metal are given a little paint, it can look used. 
 

Album image #115
A pair of tweezers holds the part here in its future position, against the light background you can also see the horns for the linkage better. Yes, the Camel could be steered on the ground.
The suspension goes into the hole in the front. 
 

Album image #116
The tail skid is glued into the model, some wire forms the "suspension" and thus holds the model. 
 

Album image #117
To be able to add the wing I need to add all parts below.
For the aiming device there are PE parts in the Brassin set, but my reference photo of my specific Comic shows a different cross and a reversed mount order. I found the needed cross on spares PE. 
 

Album image #118
Glued in place and painted it black (no pic). 
 

Album image #119
I have a lot of options for the weapon frame! There are two different variants.
The one with additional struts: In the middle the plastic kit part, from the Profipack PE part 6, or part33 from the 3D print.
For the one without struts (my Comic needs this): PE part 12 or part 32 from the 3D print. Cut already, top left.  
 

Album image #120
Here we have a quality issue. The resin is flexible, but the frames are deformed.
I'm not a 3D expert. They may not have been cured sufficiently, taken out too early or packed too early? 
 

Album image #121
But the details on the square top frame are nice and there are recesses for the clamps. Only the round legs are deformed.
The PE part is not an option, as this is flat. 
 

Album image #122
That is my solution: I used thin 0.4mm brass so only a thin hole in the filigree bar is necessary. I let them longer and drilled holes in the fuselage for easier mounting. To get more thickness I slide 0.6mm brass pipe on it. 
 

Album image #123
The rails for the Lewis MG are clearly nicer 3D printed.. 
 

Album image #124
Mounted the wing to the middle struts and added the rails. Then I slide the frame from below to the rail ends and fixed it with CA. 
 

Album image #125
Now it is ok for me 🙂 
 

Album image #126
On the right the kit windshield. The clear part is thinner as the moulded frame, but for my Comic it looks a bit too flat according to my ref pic.
It is very nice that every kit of the Camel includes this windscreen. So I could try to use the same part as a base for a foil with PE frame. 
 

Album image #127
My scratched windscreen mounted. The foil is also thinner as the kit shield. 
 

Album image #128
After fixing the lower wings and adding outer struts I could start to rigg this biplane.
A lot of work as usual but nothing new. 
 

Album image #129
A closer view. From below there is better contrast to see the rigging. 
 

Album image #130
A lot of this RAF wires are inserted already using the Gaspatch terminals.
A camel without humps looks strange, even if the distance between the bonnet and the wing is identical to the normal one. 
 

Album image #131
But the rigging task is far from done. A all the control wires needs to be added too. 
 

Album image #132
As on my last Camel I created the famous Camel Spider from 2 parts wood, on 0.3mm NiSi and 0.5mm brass tube. 
 

Album image #133
On the reference pic there a angled intake pipes, so I made two from 1.1mm brass. 
 

Album image #134
The Eduard kit struts has the pitot assembly, but for my wooden struts I made my own. PE from the PART set, but removed the etched "pipes" and soldered 0.3mm NiSi tube. Yes, real tube. Otherwise you can't measure!  
 

Album image #135
The pitot is in place, connected with 0.2mm lead wire and black couplers to the wing. 
 

Album image #136
On the inside strut again lead wires with couplers into the fuselage to the cockpit. The couplers allows the change of wing and struts.
The intake and the rigging spider are also visible. 
 

Album image #137
The engine is mounted finally, after that also the cowling. The cowling is now secures with a rope (0.15mm copper wire) and wing nuts (PART). 
 

Album image #138
On lower side a lot of rigging was added. 
 

Album image #139
Another view. The angles of the spider connections are not perfect, but I leave it now. After the first try I was not happy and removed the spider from the model, cleaned all and tried it a second time.  
 

Album image #140
The intake, lead pipes and target aiming device are visible. 
 

Album image #141
A little teaser with wheels and (not final) airscrew plugged on. 
 

Album image #142
That is the most impressive smallest kit from Eduard I know! I used it already on my last Camel and the F.K.8: the Rotherham Air Pump.
3 pumps of 2 types, 3 different airscrews, and 10 different little PE mounts for 5 ways of mounting, two of each type.
The mounted and painted pump is top right of the Cent! 
 

Album image #143
The same front view much closer without the manual background. 
 

Album image #144
And in side view. Pump and props are 3D printed. 
 

Album image #145
The complete assembly is as big as the globe on the Cent! This little beast put my to my limits.
The next level of Eduard kits will be atoms in single arrangement, or what? 
 

Album image #146
The Rotherham Air Pump is mounted to a front gear strut. As it compresses air to put the fuel tank under pressure it needs only one copper pipe (going into fuselage). This solution is more robust than a fuel pump. In case of failure and on the ground the pilot has a hand pump. 
 

Album image #147
And a side view in flying position. Due to the different length of the mounts the airscrew is perpendicular in the air flow. There is no conflict with the wheel. 
 

Album image #148
I reworked the airscrew especially the shape close to the hub.
Here in finished state after painting and added hub on back side. Hard to see, but there I drilled 0.2mm holes and added nickel silver as bolts. 
 

Album image #149
The front side with 3 PE parts as hub (PART). I'm happy with the final look. 
 

Album image #150
Eduard was so kind to provide a decal for the hub with the airscrew specification - nice touch! 
 

Album image #151
And mounted on the Camel. Engine and airscrew can rotate together.
The wheels got a layer of flat clear coat and fixed on the axles. I forgot a turnbuckle on the undercarriage! 
 

Album image #152
The ailerons are mounted and the control wires added. 
 

Album image #153
Also on lower wing, the connection to upper wing is also shown. 
 

Album image #154
Two control added to the tail skid. The tailplane got control horns (made them all thicker with soldering) with turnbuckles. 
 

Album image #155
Same on upper side. 
 

Album image #156
It is not ready but a little teaser of the final look. 
 

Album image #157
Look somehow like a Camel Comic 😉 
 

Album image #158
Holt light used by British night fighters.
Copyright of picture: Wingnut Wing
[img1]


Album image #159
The lamps are included in the kit as clear part. Only the painting in the manual is much different! I followed the previous picture.
I don't know how to hold it for cleaning the seam and sprue gate, so I drilled 0.2mm holes and added brass wires.
I masked the sides, painted it alu (for the inside mirror) and then brass. Green and red are clear paints.
Finally I polished the front to get rid of seam and paint, sanded up to 12000. 
 

Album image #160
The Holt flares (Magnesium flares) are provided in grey plastic, but I do not like them. So I build the holders from 10 metal parts, the Holt flares itself are stretched black sprue. 
 

Album image #161
The lamp are connected with a wire on the back. For mounting I drilled a hole in the wing and used the brass. 
 

Album image #162
The Holt flares are plugged from below to the brass wire for clean and robust mounting. 
 

Album image #163
To prevent vibrations, a piece of rubber cord was attached. So I attached that too. The rubber is stretched sprue. 
 

Album image #164
I had this old picture of the Holt flare itself on my disk (from the old aerodrome forum), which shows the long ignition wires on top.
The Holt flares have to be replaced after use. 
 

Album image #165
For the ignition wires I wound two ultra thin 0.0nothing painted copper wires around the holder. 
 

Album image #166
With the rudder the tail is complete now and all the control wires and rigging lines were applied. 
 

Album image #167
There is now a turnbuckle in front of the wood of the undercarriage. 
 

Album image #168
An overview picture shows the missing weapons. 
 

Opmerkingen

117 27 May 2022, 19:34
bughunter
Thanks to Eduard for providing the sample kit and the 3D printed weapon set!
It would be nice if some of you would follow my build.
27 May 2022, 19:37
Robin (WhiteGlint)
👀
27 May 2022, 19:42
Thomas Bischoff
We follow - whatever you build …
27 May 2022, 20:12
David Taylor
Would not miss.
27 May 2022, 20:41
bughunter
You are welcome!
As the Comic was never available as injected molded kit in 1/48 (only a long gone resin conversion) this is for me the kit of the year 2022 ❤️️ 👍
If only I could decide on a marking! 🤔
27 May 2022, 20:48
Moritz Fentzahn
Count me in Frank, looking forward to see this come together. The kit looks very nice and I am sure tjis eill turn out as nice as your first Spit from this mold.
27 May 2022, 20:55
Robert Podkoński
Let me watch this talent show too 😉
28 May 2022, 05:49
Greg Baker
Sign me up. I have seasons tickets to this show.
28 May 2022, 06:16
Thomas Espe
👀
28 May 2022, 08:17
Spanjaard
Sign me in too!
28 May 2022, 08:42
bughunter
Welcome to the show mates! With the finished Nieuport Triplane this one could enter the bench.
9 June 2022, 17:56
Kyle DeHart
Here for it
10 June 2022, 05:50
Boris B
I'm in, as usual. Looking forward to more enjoyable learning, before getting one of those kits.
14 June 2022, 09:18
Lochsa River
sittin in!
14 June 2022, 10:59
bughunter
Thank you mates!
After a short holiday I'm back on the bench. The airscrew is in shape and primed. A lot was done for the interior.
14 June 2022, 17:52
Spanjaard
you just did when you entered a comment in this build, for example. now, you will be notified when there are new comments or updates 😉
14 June 2022, 19:55
Boris B
Hi Karl, not a naive question, as it's not as obvious as it could (should?) be. And just so you know, you can 'Disable Notifications ' (that is, stop following the thread) by choosing the option under the 'wheel' icon at the top of the discussion.
14 June 2022, 20:39
bughunter
Next batch of pictures - with successful engine test run 😉
Now I have to take care of the fuel parts on the left, the floor with the control stick etc. and the instrument panel, then the fuselage can be closed.
Unfortunately I have not found a photo of the cockpit of the Camel Comic, so there is a lot of guesswork involved. So if you know one, please tell me!
15 June 2022, 16:45
Alec K
Another amazing build from the resident master. Following, of course.
16 June 2022, 13:03
David Taylor
What makes it a comic fighter??
16 June 2022, 14:49
bughunter
David, good question!
I added a description to the Album, so that it is more prominent on top and is not got lost in the comments here.
Feel free to ask if something is not clear.
16 June 2022, 15:23
David Taylor
Always wondered about comic conversions e.g 1 1/2 strutter etc.
16 June 2022, 18:42
Michael Kohl
like it. superb prop and engine, very realistic wood rendition too.
17 June 2022, 11:34
Bruce Huxtable
Another inspiring step-by-step insight into your world of fine craftsmanship, and artistic painting too 🙂
17 June 2022, 11:52
bughunter
Thank you Michael and Bruce, I'm glad that you like those parts!
Now pictures of two new stories: instrument panel (here I found a bug in the kit - I'm bughunter 😉 ) and struts.
Have fun!
17 June 2022, 21:38
Lochsa River
Bugsy (or iz that Mr. Bugsy, to you?) .....

.....your strut technique with the two pieces of wood glued over a wire and sanded down is a great idea!

However, most (if not all, but a very small number) of us mere mortals have your skill set or tool set...how hard would it be to mold those wood pieces in plastic from a kitmaker like Eduard?

They could include "regular struts", which they already do...just add these as an option...how hard is it to glue two pieces of styrene together with a wire inside....not very hard....I'm in!

Thank you for sharing this technique!

BTW...also thanks for the rigging diagram of that crazy Nieuport Triplane....Nieuport Triplane "RFC/RNAS" | Album by Lochsa_River (1:72)
18 June 2022, 01:46
bughunter
Not sure if this will work. The struts are already 0.7mm thin, I don't know if it possible to mold them in half size.
I showed my struts more detailed in the DH-2 work in progress album.

And the Ni Triplane - I had to create my own "rigging diagram". Every time I checked the high res pics on Imperial War Museum web site, I found new rigging lines 😉 So with adding them all I understand slowly how it works.
Nice to see some new kits of these old birds in 1/72 lately.
18 June 2022, 10:58
Daniel Klink
Wow! The buttons and switches look like they could be used immediately 👍
18 June 2022, 11:10
Björn Svedberg
Another stunning build and comprehensive build log. 👍 Count me in! 🙂
18 June 2022, 12:51
Dick
Those little details.. amazing! Very realistic build, my compliments 👍👍!
18 June 2022, 21:49
bughunter
Welcome to the show and thank you!
The next batch of pictures uploaded.
22 June 2022, 17:06
bughunter
Does anyone recognise the fill level of the tank? Then you know my current mood.

Have I forgotten anything? If not, the lid can actually be put on as well!
10 July 2022, 16:34
bughunter
Have I ever mentioned that I love the new Eduard decals?
I can be blamed for anything, but in no case that carrier film would be visible here!
12 July 2022, 20:07
Ricardo Reis
Following! 👍
12 July 2022, 20:15
bughunter
While the oil paint of the simulated wooden parts was hardening on the fuselage, I worked on the landing gear.

As with the normal Camel, I wanted to replace the very soft struts. Unfortunately the same technique again, late Camels have a modified landing gear.

For good symmetry, it is best to always build both sides at the same time.
It was a lot of work, but is now an extremely robust and original undercarriage!
15 July 2022, 17:53
Bernhard Schrock
Mir sind leider die Superlativen & Belobigungen ausgegangen daher gibt es heute „nur" ein 👍 🙂
15 July 2022, 18:08
Marcin Snakowski
Amazing!
15 July 2022, 18:58
bughunter
Thank you mates!
Did anyone hear the punch? I hit my limit so hard, that's all I can do.
16 July 2022, 16:47
Marcin Snakowski
Limits exist only in the mind 😄
16 July 2022, 17:17
bughunter
Marcin, oh yes, sometimes you are standing in your own way!

In the meantime, the oil paint had also hardened so that I could continue working on the fuselage.
Unfortunately my camera always has a hard time with some colours, despite white balance it is not as red in the original as in the pictures.
Now allow to dry thoroughly and then re-mask and paint the front in aluminium.
16 July 2022, 18:30
Christian Bruer
As always an excellent eye for the detail and great craftsmanship. A pleasure to follow 🙂
16 July 2022, 18:36
bughunter
Thank you very much for your kind words Christian!
After the virus put me out of action, I'm feeling much better now. So I'm back on deck and can work full steam ahead on this little Camel (without humps) again!
17 July 2022, 16:11
Bruce Huxtable
Sorry to hear you caught the virus, Bughunter, but glad that you are on the mend. Enjoying seeing how you bring your creation into life 🙂
18 July 2022, 11:18
Marcel Klemmer
Very interesting paint job. The wings looks very good👍
18 July 2022, 20:18
bughunter
Thank you Bruce!
Marcel - you are the only mate who has been able to see this work with own eyes! Thank you very much for the visit 👍
19 July 2022, 12:55
Roland Sachsenhofer
It makes my eyes glaze over...! So much to learn!
19 July 2022, 13:04
bughunter
Thx Roland, but "So much to learn!" - for me from your fantastic builds and paint jobs!
19 July 2022, 13:38
bughunter
Next batch of pics added - beside some detail painting the fuselage is nearly done 🙂
19 July 2022, 13:47
Michael Kohl
Love to follow your progress.
19 July 2022, 15:22
John Ballman
Amazing work here. This is a How to do magazine. Your doing outstanding work. Thanks for sharing this.
JB
19 July 2022, 16:03
Andy Ball
absolutely stunning!
19 July 2022, 16:26
Gary Kitchen
Fabulous stuff 👍
19 July 2022, 19:47
bughunter
Wow! Thank you very much for such a great feedback 👍
Some new pictures added, with a lot of fasteners and some decals.
20 July 2022, 17:10
Robin (WhiteGlint)
Love the colours. 👍
20 July 2022, 19:57
Moritz Fentzahn
Frank, this build develops great. Again great craftsmanship. I am looking forward to the next update
20 July 2022, 20:02
Boris B
The detailing (fasteners, steel cable on alu panel) is near mad, litteraly ! And great work on the intricate painting... The funny thing is that I was puzzled about what I thought was some odd and somewhat overdone weathering on the fuselage's fabric until I saw it 'moved' depending on the pictures. Then I understood it was a reflection (of your flash?) from your trademark 1-cent coin ! I should have known better 😉
20 July 2022, 22:08
bughunter
Thank you mates for following and leaving comments!
Boris, all little details are also added on my first Camel last autumn. The problem is, if you have done it once I need to do this too on a comparable model. And this variant is for me "The kit of the year", so I want to do all, what is possible.
Sorry for the shadow of the Cent. I do not use flash (due to hard shadows), but the light comes from my roof window.
21 July 2022, 13:44
Guy Rump
Looking great! 👍
21 July 2022, 14:18
bughunter
Thank you Guy!
The next batch of pictures uploaded, worked on different things.
Now all the struts can be finalized, especially the shape at the end, and painted.
22 July 2022, 18:12
bughunter
The tail skid from the kit is only 0.5mm thin, so I don't trust the plastic to be robust enough for transport, exhibitions, etc. So a new one, like the other Camel.
5 September 2022, 17:59
Bruce Huxtable
Totally in awe at the gorgeous paint finishes 😃 Love how you totally play down the manufacture of the filler caps 😉
5 September 2022, 19:04
Greg Baker
bah... with bughunter's projects, we usually reserve comment until he does something TRULY spectacular. The run of the mill amazement just doesn't cut it anymore...
5 September 2022, 21:34
bughunter
Thank you very much!
Over time, some parts become "routine" after I find a way to make them reasonably. I have already installed such fuel caps on previous models.
So that colleagues like Greg are still impressed and it doesn't get boring, I try "something TRULY spectacular" every now and then. This will then become the standard for the next models, but this way I can raise the bar a little bit at a time.
6 September 2022, 06:04
gorby
Well...I was going to do some modelling this afternoon, but instead I decided to gaze in wonder at your lovely work. Certainly not time wasted. 🙂
Incidentally, could you please tell me what type of solder you use?
13 September 2022, 15:12
bughunter
Thank you very much gorby!
I'm still using my "old school" electronic solder Sn60PbCu2. The 2% copper are only to increase the working time of the copper soldering tip. Sn %60 and Pb %38 have the lowest melting temperature of 183 °C, see en.wikipedia.org/wiki/Eutectic_system
But I must admit, that I'm doing a other project of a french monoplane in parallel, with a lot of scratch work. Don't miss it! Full scratched cockpit from wood and metal | Album by bughunter (1:48)
13 September 2022, 15:28
Michael Kohl
Eutectic? Again what learned. 😉 Thanks for the link.
14 September 2022, 10:56
gorby
Thanks for that Frank.
(I thought I'd thanked you yesterday but obviously I must be madder than even I thought.) 😄
14 September 2022, 11:19
bughunter
Michael, I find the german Wikipage a bit better: de.wikipedia.org/wiki/Eutektikum
The fascinating fact is that the melting point at exactly this mixing ratio is much lower than for both metals in pure form.
14 September 2022, 11:28
Michael Kohl
Yes. I have been flabbergasted by this fact - which was new to me - too.
14 September 2022, 11:33
bughunter
Now that other projects have crossed the finish line, I would like to resume my work on this project. Stay tuned!
12 January 2023, 14:16
bughunter
After finishing some other projects I continued on this Camel without humps (is that still a Camel? 😉 ) and some problematic things are solved. Looks not bad for a successful end this time.
4 April 2023, 20:34
Greg Baker
Yeah… not bad. 😉
5 April 2023, 05:11
Michael Kohl
Living in Frankonia (an area in nothern Bavaria) this is about the highest praise you might ever get on your life. 😉😂
5 April 2023, 15:01
bughunter
You are two funny guys 👍 Thanks!
I was out of the town for Easter holiday including some days more for hiking, but now I'm back and will continue to work on this one soon.
14 April 2023, 19:39
bughunter
Some more details are added and more parts mounted so we come closer to the finish.
I added again this most impressive Rotherham Air Pump by Eduard to the project and the model. I think that are the actual technology (and modeler like me handling) limits. The next level would be atoms in single arrangement, or what?
18 April 2023, 19:48
bughunter
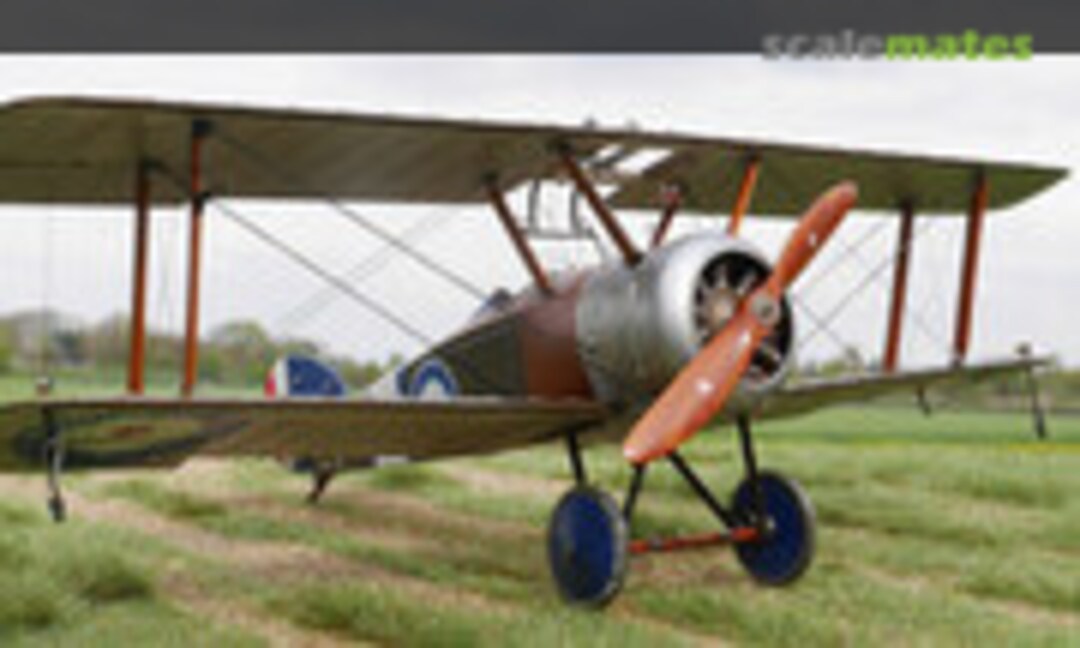
For comparison (pic 145) here is a ref pic by James Fahey of a Rotherham Air Pump on a Camel flying today, here mounted on a upper strut.
[img1]
 
18 April 2023, 19:56
Alec K
Not sure what else could be added to your rendition of the pump. Simply amazing!
19 April 2023, 12:52
bughunter
Thank you Alec! We have to say thank you Eduard for producing such nice accessories.
After I have seen some pictures (typically in museums) I was no more sure about the wingnuts on the cowling, as the wingnuts are going into the fuselage on that pics.
But beside my references of a flying Camel I found a high res pic on Wikipedia: The wingnuts are on the cowling side! That pic is huge.
[img1]
 
19 April 2023, 14:33
Pietro De Angelis
Impressive details, master class work!
19 April 2023, 15:54
Roland Sachsenhofer
An incredible piece of modelling art, coupled with the highest level of expertise! This is simply great! It's hard to believe how beautifully you build!
19 April 2023, 17:41
bughunter
Thank you Pietro and Roland!
Roland, I hope you have the chance to see my new flood of models this year in Ried (and your booth is not empty again as last time). My plan is to finish one model a month, we have middle of April and this number 4 is on a good way to the finish 😉
19 April 2023, 18:37
Michael Jonker
Outstanding!
19 April 2023, 23:07
Andy Ball
I can't keep looking at your posts, my eyes are so sore from the all the dazzling skills!!
20 April 2023, 11:57
Greg Baker
I usually need to lie down for a bit after as well. Frank's projects have that dizzying effect on people. 🙂
20 April 2023, 13:32
gorby
The air pump is even more remarkable than your usual remarkable work Frank.
20 April 2023, 15:44
Slavo Hazucha
aaah, here comes that family-pizza-sized 1-cent coin again!!! 😉 😉 👍
20 April 2023, 15:59
bughunter
Nice to read you funny comments mates 👍 Thx!
@Andy and Greg - Believe me, I don't want to hurt anyone, not even myself (with sharp tools at the workbench).
@gorby The great thing about such nice accessories like the Rotherham Air Pump is, that Eduard sell it for the Camel, but you can use it in a more generic way. My first kit is empty because I equipped both Camels and the recent F.K.8 with such pumps, but I have more of this gem in my stash.
@Slavo I swear that the cent is real! The fake was in the pictures for a short time during the last project 😉

I will now edit pictures for another update.
20 April 2023, 18:37
bughunter
By far not ready, but some steps closer to the finish line.
Missing: Rudder (just removed decal) with control wires, tail rigging with 16 terminals, undercarriage rigging, Lewis MGs, detail painting, metalize rigging wires, weathering, may be night fighter equipment like lamps and Holt flares (kit provided) and may be more.
20 April 2023, 19:46
Andy Ball
There is such a thing as a "Rotherham Air Pump"? The folks of the South Yorkshire former steel town will be in awe 🫢 I wonder if there is a "Doncaster water injector" too!….
20 April 2023, 19:53
Kyle DeHart
Wonderful stuff, as ever.
20 April 2023, 23:41
bughunter
Thx mates!
Andy, your water injector is may be used in WWII (for increase power of engines) but your question invited my to google for "Rotherham Air Pump" and beside nice pictures I found this interesting video: Youtube Video
 
21 April 2023, 18:59
gorby
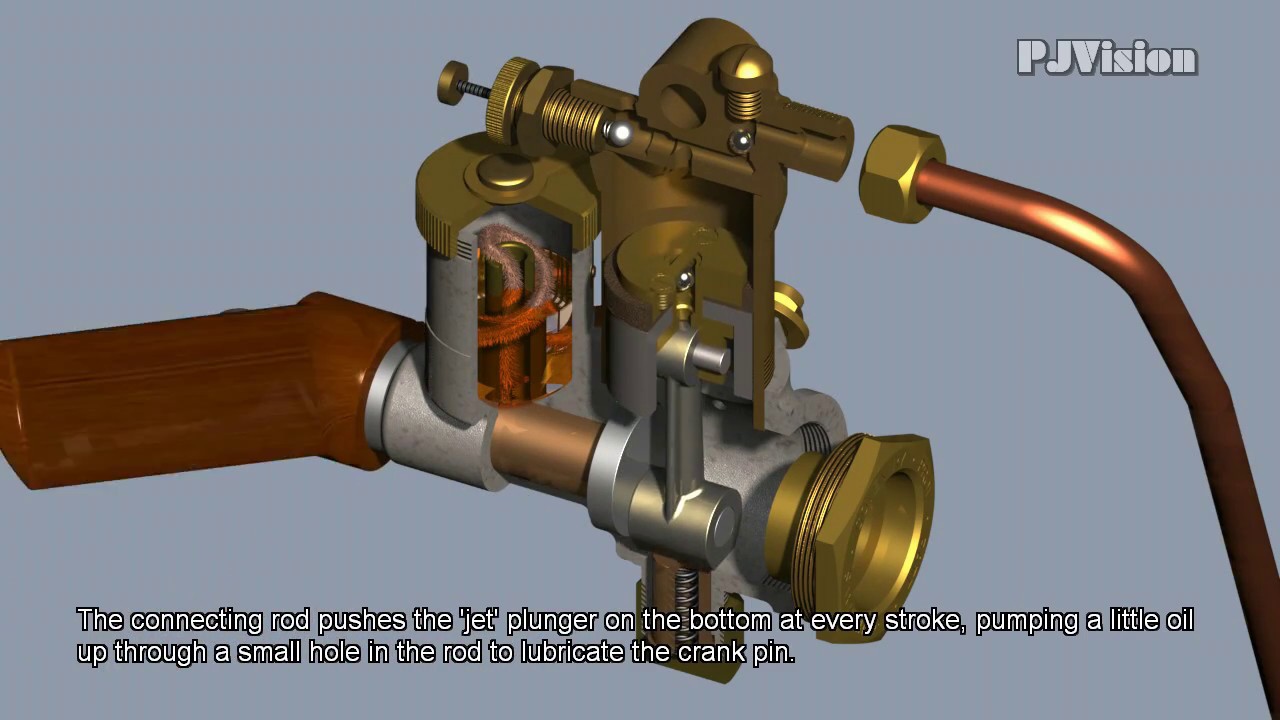
Aahhh! It was form Coventry – my home town. Remarkable what we used to produce – with the emphasis on 'used to'. 🙁
A lot of good things came out of Cov (and the usually stayed out). 😄
22 April 2023, 06:15
Ludvík Kružík
Although this is standard with your builds, again I admire your craftsmanship. I have followed the entire build from the beginning and again admire your craftsmanship and precision.
22 April 2023, 06:45
Simon O'Gorman
This is absolutely beautiful! Wonderful work.
22 April 2023, 11:28
bughunter
Thank you very much mates!
Thanks also Simon for commenting and following. There are many who follow but never leave anything. Very rude of these stalkers.
I think there will be a new interesting update tomorrow.
24 April 2023, 19:00
CaptGPF
Amaaaaazing! Such detail, and so nicely put together
25 April 2023, 18:52
bughunter
Thank you CaptGPF, yes a lot of details, but a downscaled original needs that 😉

Now WWW - Weapons, Weathering and some nice Weather for the final outdoor pictures are needed!
25 April 2023, 19:03
Ludvík Kružík
The details are very convincing. They look like real 1:1 parts. 👍
25 April 2023, 20:10
bughunter
Thank you Ludvík, also for the likes!
This Camel without humps is now finished and the weather forecast for tomorrow sounds good for the final outdoor pictures.

By the way, for those who now also want to build this Camel: the Profipack is currently available with a 50% discount as part of the SWEEP campaign: eduard.com/eduard/so..amel-comic-1-48.html
26 April 2023, 12:11
bughunter
So, this project has reached its final state! Please jump over to the album with the final pictures:
Sopwith Camel Comic B4614 | Album by bughunter (1:48)
Thanks for watching and all your interaction during the build!
26 April 2023, 18:58
Simon O'Gorman
Great build. Congratulations.
26 April 2023, 20:31

Album info

The Camel Comic is a night fighter version of the Sopwith Camel.

A few words about this variant: Why conversion to a night fighter?
It soon became apparent that the muzzle flash of the Vickers MG in the normal mounting position blinded the pilot in the dark. Therefore, it was decided to use two Lewis MG on the wing, similar to the SE.5a (for the Lewis MGs exists also incendiary ammunition, which was more successful against airships).
However, the pilot has to pull them down on rails to change the drums, and this was not possible with the Camel, as the cockpit was too far forward. Therefore the tank (which is behind the pilot in the normal Camel) and cockpit were exchanged. This eliminated the hump of the Vickers MG, the cockpit opening further back than normal. In short: this is an almost new model.

About the name:
First the Sopwith 1 1/2 Strutter was used as a night fighter with weak armament. Pilots used to more heavily armed fighters found the Strutter "a joke of a fighter", so the name Comic came into being and was then retained for the Camel night fighter.

That is the first time we see this version in 1:48 as injection molding.
If you check the sprues carefully, we can also expect a ships Camel, with has some other modifications.

183 afbeeldingen
1:48
Voltooid
1:48 Sopwith Camel Comic (Eduard 82175)1:48 Sopwith Camel Comic Lewis guns (Eduard 648726)5+
Sopwith Camel Comic
GB Royal Flying Corps (1912-1918)
B Flight, No. 44 Sqn. RFC B4614
Februari 1918 - Hainault Farm, Essex
 

Alle albums

Bekijk alle albums »