Blackout over Scarif
![Album image #1 Album image #1](/albums/img/3/4/0/1230340-86172-36-720.jpg)
Insight the Conning Tower. These are round about 200 0,25mm-Fibreobtics.
![Album image #2 Album image #2](/albums/img/3/4/2/1230342-86172-76-720.jpg)
![Album image #3 Album image #3](/albums/img/3/4/1/1230341-86172-61-720.jpg)
Modified Targeting Array and Deflector Generators for a 'Imperial I'-Class Star Destroyer.
![Album image #4 Album image #4](/albums/img/3/4/3/1230343-86172-22-720.jpg)
![Album image #5 Album image #5](/albums/img/3/4/4/1230344-86172-46-720.jpg)
![Album image #6 Album image #6](/albums/img/3/4/5/1230345-86172-95-720.jpg)
![Album image #7 Album image #7](/albums/img/3/4/6/1230346-86172-28-720.jpg)
The Hammerhead-Corvette was cut before the engine compartment to install 0603-SMD-LEDs for engine lightning.
![Album image #8 Album image #8](/albums/img/3/4/8/1230348-86172-58-720.jpg)
![Album image #9 Album image #9](/albums/img/3/4/9/1230349-86172-44-720.jpg)
![Album image #10 Album image #10](/albums/img/3/4/7/1230347-86172-98-720.jpg)
![Album image #11 Album image #11](/albums/img/3/5/0/1230350-86172-83-720.jpg)
![Album image #12 Album image #12](/albums/img/3/5/1/1230351-86172-83-720.jpg)
This is the selfmade reinforcment for the stand. Both Star Destroyers together weight more than you think, so you must prepare the model.
![Album image #13 Album image #13](/albums/img/3/5/2/1230352-86172-96-720.jpg)
The power supply from the first ship to the second is supported via the screws to assambling both ships.
![Album image #14 Album image #14](/albums/img/3/5/3/1230353-86172-63-720.jpg)
Several small connectors for the LEDs for multiple effects. Each cablecolor is a code for a special function.
![Album image #15 Album image #15](/albums/img/3/5/4/1230354-86172-26-720.jpg)
![Album image #16 Album image #16](/albums/img/3/5/5/1230355-86172-53-720.jpg)
![Album image #17 Album image #17](/albums/img/3/5/6/1230356-86172-50-720.jpg)
Inside first Star Destroyer. The blue board is the Arduino Mega 2560. On top is a small speaker for musik, on the other side are a soundmodul and a small optocoppler board.
![Album image #18 Album image #18](/albums/img/3/5/7/1230357-86172-81-720.jpg)
Arduino Mega 2560 and speaker.
![Album image #19 Album image #19](/albums/img/3/5/9/1230359-86172-42-720.jpg)
Lightning of the Main Hangar.
![Album image #20 Album image #20](/albums/img/3/6/1/1230361-86172-90-720.jpg)
Arduinio Mega 2560 and Soundmodul MSM2 with optocoppler board.
![Album image #21 Album image #21](/albums/img/3/6/0/1230360-86172-24-720.jpg)
![Album image #22 Album image #22](/albums/img/3/6/2/1230362-86172-51-720.jpg)
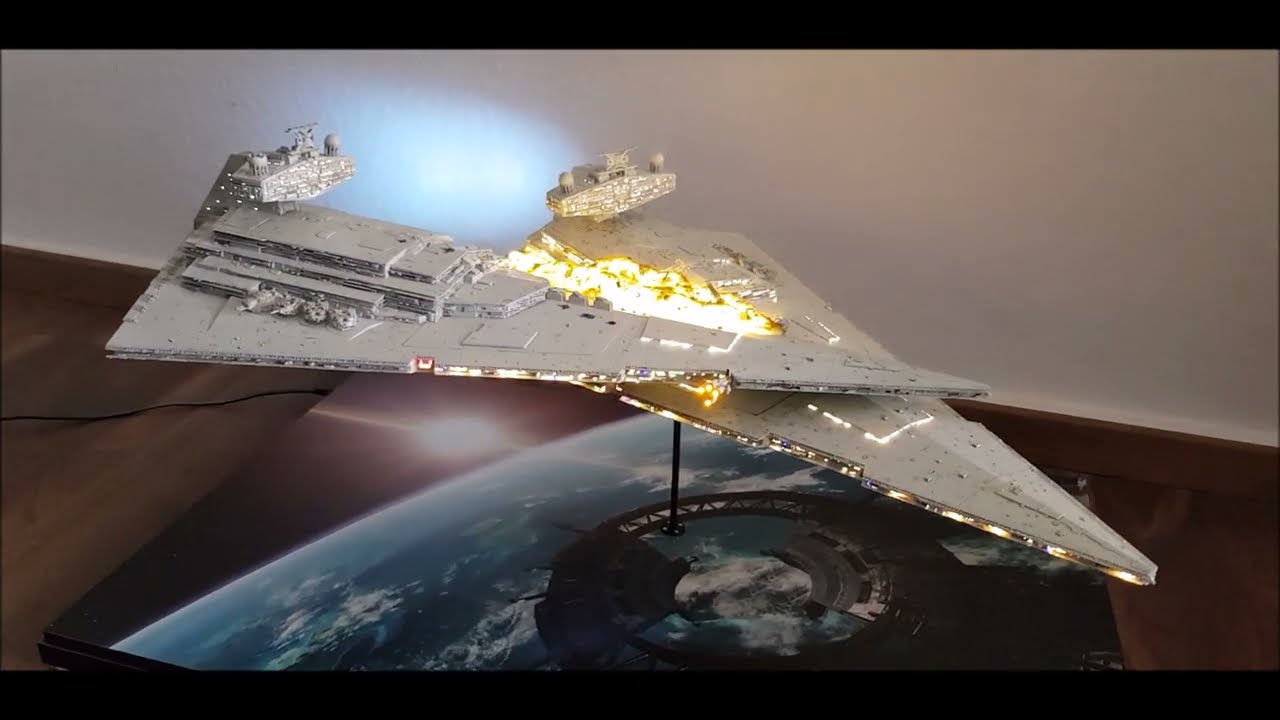
The crashed superstructure part is prepared with several LEDs to simulate the explosions.
![Album image #23 Album image #23](/albums/img/3/6/3/1230363-86172-71-720.jpg)
Last look inside before closing the first Star Destroyer.
![Album image #24 Album image #24](/albums/img/3/6/8/1230368-86172-80-720.jpg)
![Album image #25 Album image #25](/albums/img/3/6/4/1230364-86172-14-720.jpg)
Test of the LEDs for fire and explosions.
![Album image #26 Album image #26](/albums/img/3/6/5/1230365-86172-64-720.jpg)
![Album image #27 Album image #27](/albums/img/3/6/6/1230366-86172-81-720.jpg)
![Album image #28 Album image #28](/albums/img/3/6/7/1230367-86172-52-720.jpg)
![Album image #29 Album image #29](/albums/img/3/6/9/1230369-86172-48-720.jpg)
ISP-Programmer cable to update the Arduino Mega 2560. The mounting panel is hold in position by two small magnets.
![Album image #30 Album image #30](/albums/img/3/7/0/1230370-86172-72-720.jpg)
Blast marks from Ion Torpedo hits. These are generic sci-fi decals, which i bought long before to use on multiple ships.
![Album image #31 Album image #31](/albums/img/3/7/1/1230371-86172-10-720.jpg)
airbrushed cotton for fire simulation.
![Album image #32 Album image #32](/albums/img/3/7/2/1230372-86172-13-720.jpg)
![Album image #33 Album image #33](/albums/img/3/7/3/1230373-86172-68-720.jpg)
Small parts to simulate pieces of debris from the crahs before painting.
![Album image #34 Album image #34](/albums/img/3/8/1/1230381-86172-62-720.jpg)
The base plate with wiring.
![Album image #35 Album image #35](/albums/img/3/8/0/1230380-86172-96-720.jpg)
HC-05 Bluetooth Board and 5V Regulator Board
![Album image #36 Album image #36](/albums/img/3/7/9/1230379-86172-17-720.jpg)
Panel with Power-Plug-In, On-Off-Swich and some Info-LEDs.
![Album image #37 Album image #37](/albums/img/3/7/6/1230376-86172-34-720.jpg)
The final result.
![Album image #38 Album image #38](/albums/img/3/7/4/1230374-86172-42-720.jpg)
![Album image #39 Album image #39](/albums/img/3/7/5/1230375-86172-12-720.jpg)
![Album image #40 Album image #40](/albums/img/3/3/9/1230339-86172-17-720.jpg)
![Album image #41 Album image #41](/albums/img/3/7/7/1230377-86172-32-720.jpg)
![Album image #42 Album image #42](/albums/img/3/7/8/1230378-86172-35-720.jpg)
Komentarzy
60 23 May 2022, 17:40
![](/profiles/img/65866-287-s.jpg)
Very cool, especially with the lighting effects. That's got to be a huge display as just one Star Destroyer by itself in 1/2700 is pretty huge let alone two! Very well done 👍
23 May 2022, 19:26
![](/profiles/img/32137-155-s.jpg)
Hard work. Especially all the fibre optic lines. Very creative presentation.
25 May 2022, 14:58
![](/profiles/img/79500-362-s.png)
Outstanding idea and realization. I am amazed.
Where did you find 0.3 mm fiberoptics, though? I'm currently assembling the parts for my own ISD and I ended up having to order 0.25 mm fiberoptics from the UK because I couldn't find a retailer with acceptable prices for them here in Germany. Not to mention that I never found any 0.3 mm fiberoptics at all.
28 December 2022, 15:42
Album info
Here is my "Star Wars - Roge One"-Diorama with two Imperial Star Destroyers in 1/2700. The Heart is an Arduino Mega 2560 Microcontroller with Bluetooth, so i can control the Diorama with my Smartphone and Tablett.
A video of this diorama can be found here: Youtube Video
![](https://img.youtube.com/vi/-dcmFgugSdU/maxresdefault.jpg)