Toyota GT-One TS020 - Le Mans 24 Hrs 1999 - WIP

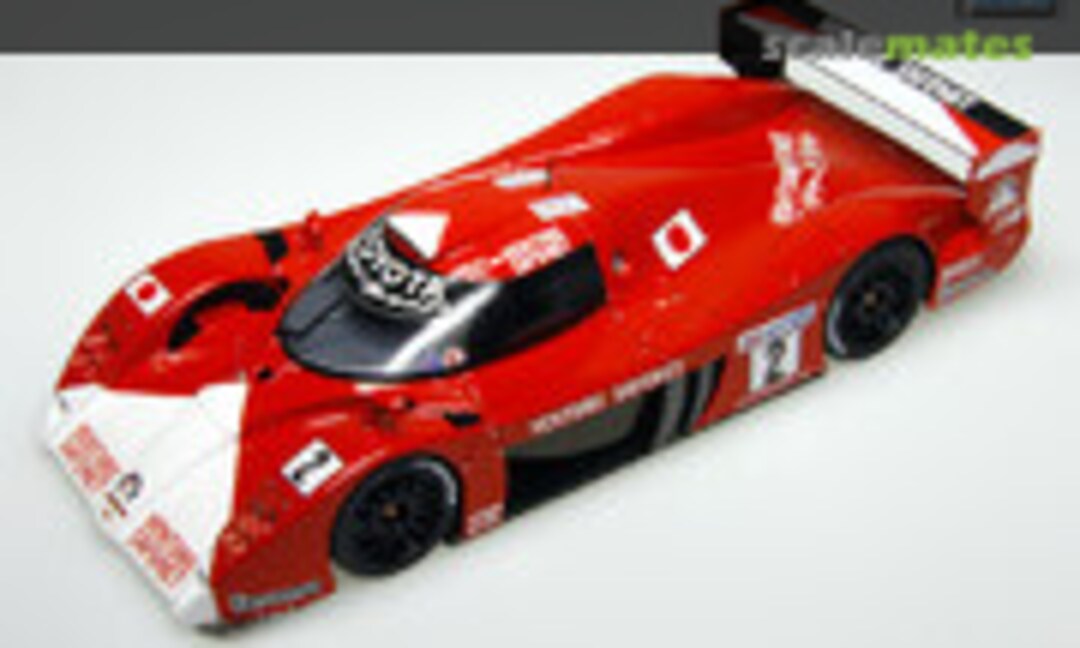
I started this build by preparing the bodyparts, and putting them in primer. Next I sprayed the front and the airscoop in Tamiya TS-26 Pure White. After masking the white areas, I sprayed the body in Tamiya TS-49 Bright Red. The masking tape was removed.

Finally the body was polished with Tamiya Compound. When removing the masking tape, the white paint detached from the body. So I had to do a spot repair at the front, but this turned out quite well.

I also started to build the chassis and cockpit parts. Here an overview picture.

Close-up of the cockpit. The seat was given a realistic look with Tenco's 'scale fabric'. Lots of details still need to be painted , this is just an idea of how it will look.

I also spray painted a lot of engine and cockpit parts. They were put on a toothpick for easy access. I also detail painted some of the parts manually.

When I have to paint parts which have a left and a right hand side, I put then on two different styrofoam blocks to separate them. Here a lot of engine and suspension parts are putting to dry.

Time to put these parts together to create a model 😉 First I installed a nut in the cockpit, which will be hidden under the seat. This will allow me to attach the model to a base plate once finished.

Next I fixed the fire extinguisher and the battery (or computer unit ?), adding some basic wiring to both parts.

The cockpit hub's exterior was covered with carbon fibre decals because these areas will be visible even with the bodywork attached. I chose to leave the interior black since it will be hardly noticeable once the model is closed.

Next the engine and the rear suspension were assembled.

The engine is now ready to be installed to the floor pan before even more parts will be added to the whole.

The dash board was painted manually, except for the grey area. In this close-up the manual dots and stripes are clearly not very readable, but once in the cockpit it will do the job, believe me.

The bucket seat was finished with a racing harness and the rear bulkhead received some detailing.

Next I fixed the bulkhead to the cockpit hub, after which the harness was attached to it. Finally the seat itself was glued to the floor and the dashboard was installed to top it off.

Here you can see the result. Notice the little dots simulating the various inscriptions on the dash board. I think they do the trick 😉

Top view of the cockpit hub. The real car has more wiring inside, but ince the doors will be closed this amount of detailing is enough to simulate a busy interior.

Close-up of the cockpit again. Once the model will be closed I won't be able to take pics of these parts...

First dry fit of the cockpit and engine on the foor pan. The body was dry fitted on top of them. Notice the carbin fibre cockpit exterior. The window frames received the same treatment.

The engine room is pretty busy already, yet it's only halfway completion...

Next I fixed all the decals in place, using a Renaissance transkit. It's a bit odd that Tamiya includes decals for the #1 and #3 car, but not for #2 car. Maybe a question of licence?

Now the decals are given time to dry, after which I will polish the bodyparts once again to get rid of the decal softener marks. Later on I will protect them by 1 or 2 clear coats.

Here is the result after 2 clear coats, a week of drying, and a day of polishing with Tamiya Compounds.

Some of the CF parts received 2 clear coats as well.

At the rear of the car a lot of different CF decals were used to simulate the different kinds of construction.

Here the rear CF part was dry fitted to the rear end of the car.

I also used clear orange over some of the CF area's to simulate the different colors seen at the reference pics.

This is very important because a lot of the CF monocoque will remain visible, even after installing the body parts. Here you see the result of the different CF patterns.

Slowly the Toyota starts to look like a real car...

And this is what it looks like with the rear cowling in place. I'll probably show it with the cowling removed, once finished 😉
Comentários
2 14 August 2016, 15:50
Wow, beautiful so far .. I'm impressed by smooth and shiny paint job.
How did you prime the model without ending up with grainy surface, also in pic #5 which paint is used to paint chrome parts ?
Thanks for mentioning names of TS paints used, useful info : )
15 August 2016, 02:51
I always use Tamiya primer from the rattle can. In this case I used grey primer, but it would have been easier if I had used white primer, of which I ran out😉 The chrome parts are painted with MrHobby Super Metallic SM07 'Plate Silver'.
15 August 2016, 07:47
You spotted that too Tim, well done!!! 😄
Glad you're paying attention, Guy's asking questions on completion to test us...
15 August 2016, 09:40
Thank you Guy : )
I dumped Tamiya primer cans because they are expensive comparing to Airbrush primers knowing that Tamiya cans are supreme. I guess I will get back to use them only for car models featuring excellent shape.
16 August 2016, 01:04
Guy, Have you ever 'decanted' the paint from a Tamiya spray can and then used the airbrush to apply the paint. ?
It is easy to do and the results are always spectacular and it dries in the blink of an eye. 🙂
I am really impressed with your gloss finish, an outstanding effort. 🙂 👍
17 August 2016, 11:35
Really like what you are doing. Some great detailing inside and out! The nut inside is thinking a head and a great idea. I am not so smart and have just drilled a hole and cemented brass tube to the model base and another tube to the display base so they telescope into one another.
17 August 2016, 16:14
Kerry, how can this decanting be done?! sounds like something I need to do : )
17 August 2016, 19:37
Cortex, I will post a video from youtube on the subject. 😉
Youtube Video
Just make sure you "Ease" the paint from the can, otherwise it can get rather messy if done too quickly.👍
The secret is to let the paint you have removed 'stand' for a while to allow the propellant de gas from the paint, otherwise, it will not spray perfectly if you try to use it straight away.
Like letting a soda drink go 'flat' after it has been open for a while. 🙂
18 August 2016, 05:44
Thank you very much Kerry, always being resourceful to anyone trying to advance their skills in this hobby 🙂
I watched it, will apply this technique.
18 August 2016, 07:43
Cortex. 🙂 Good to know mate. 👍
As I said, let the decanted paint 'de-gas' before you use it, otherwise it really screws up because of bubbles. 😉
18 August 2016, 08:09
Hi Kerry!!!
Great Video... for anyone not knowing how to do this and yes I agree with your advice, leave decanted paint to degas before use.
Best we wear a good quality breathe mask and surgical gloves too.😉
18 August 2016, 08:19
You ever got this stuff on your hand, bu66er to get off...
I had an accident with the stuff and a pot tipped all over my hand, wore out two nailbrushes trying to get the stuff off!!! (((😄 )))
18 August 2016, 08:32
LOL. OK, now I get the picture. 🙂
Yes, I have had the odd 'spill' with the spray lacquer and it is a tad messy to clean up. hehehehe.
I always have a bottle of acetone handy though. 👍
18 August 2016, 10:47
Have you had acetone get in a nick on your skin, let alone a cut???
It's a perfect way on how to learn to do the Highland Fling, Riverdance and scream your nuts off, all at the same time!!!😠 (((😄 )))
18 August 2016, 11:38
LOL. 🙂 A most vivid description of that sharp pain I try to avoid at all costs mate. 🙂
It has happened once, and it was like all the above 🙁
Try using superglue on a cut. !!
I have actually 'lanced' my thumb once, bled like a stuck pig and remembering seeing CA glue used in the emergency room at the hospital I worked at I decided that it was better than getting stitched up. :-o
It worked a treat, but OMG, ! The sting and fling was worse than the original cut. LOL
My neighbours are now talking to me again. hahahahaha
18 August 2016, 19:51
I've heard about it, but never had the balls to try it...
That's why I wear the gloves🤔... Oooo Mr Peasley, if you ever watched Hong Kong Phooey???
18 August 2016, 20:01
The decals look to have gone on trouble free Guy. 👍
Who were they made by. ?
Cartograph comes to mind for me as the ones I did on my Tamiya "Sauber" were just superb in the way they went on.🙂
Well done mate. 👍
19 August 2016, 02:21
Love the engine and it's detail Guy, the decals always make a model pop into life...
Excellent job as usual Guy!!! 😄 👍
19 August 2016, 06:37
The Toyota is finished!😉 Take a look in my 'Finished model pics' album😉
18 September 2016, 18:38