WIP Fokker D.VII Leusch
![Album image #1 Album image #1](/albums/img/1/6/3/594163-21997-92-720.jpg)
![Album image #2 Album image #2](/albums/img/1/6/4/594164-21997-25-720.jpg)
![Album image #3 Album image #3](/albums/img/1/6/7/594167-21997-34-720.jpg)
![Album image #4 Album image #4](/albums/img/1/6/5/594165-21997-69-720.jpg)
![Album image #5 Album image #5](/albums/img/1/6/6/594166-21997-94-720.jpg)
![Album image #6 Album image #6](/albums/img/1/6/9/594169-21997-75-720.jpg)
![Album image #7 Album image #7](/albums/img/1/6/8/594168-21997-43-720.jpg)
![Album image #8 Album image #8](/albums/img/1/7/0/594170-21997-34-720.jpg)
![Album image #9 Album image #9](/albums/img/1/7/1/594171-21997-63-720.jpg)
![Album image #10 Album image #10](/albums/img/3/4/4/594344-21997-22-720.jpg)
![Album image #11 Album image #11](/albums/img/3/4/2/594342-21997-84-720.jpg)
![Album image #12 Album image #12](/albums/img/3/4/3/594343-21997-91-720.jpg)
![Album image #13 Album image #13](/albums/img/3/4/5/594345-21997-43-720.jpg)
![Album image #14 Album image #14](/albums/img/3/4/6/594346-21997-54-720.jpg)
![Album image #15 Album image #15](/albums/img/3/4/7/594347-21997-67-720.jpg)
![Album image #16 Album image #16](/albums/img/3/4/8/594348-21997-74-720.jpg)
![Album image #17 Album image #17](/albums/img/3/4/9/594349-21997-53-720.jpg)
![Album image #18 Album image #18](/albums/img/3/5/0/594350-21997-29-720.jpg)
![Album image #19 Album image #19](/albums/img/1/7/6/612176-21997-52-720.jpg)
Added panel of fabric one by one on top side after underside.
![Album image #20 Album image #20](/albums/img/1/7/8/612178-21997-69-720.jpg)
Underside.
![Album image #21 Album image #21](/albums/img/1/7/7/612177-21997-45-720.jpg)
top
![Album image #22 Album image #22](/albums/img/1/7/9/612179-21997-20-720.jpg)
Added all the tiny securing tapes.
![Album image #23 Album image #23](/albums/img/1/8/0/612180-21997-16-720.jpg)
also on front side
![Album image #24 Album image #24](/albums/img/1/8/1/612181-21997-51-720.jpg)
On wing tip it was more tricky .. Sol will follow.
![Album image #25 Album image #25](/albums/img/5/0/8/612508-21997-90-720.jpg)
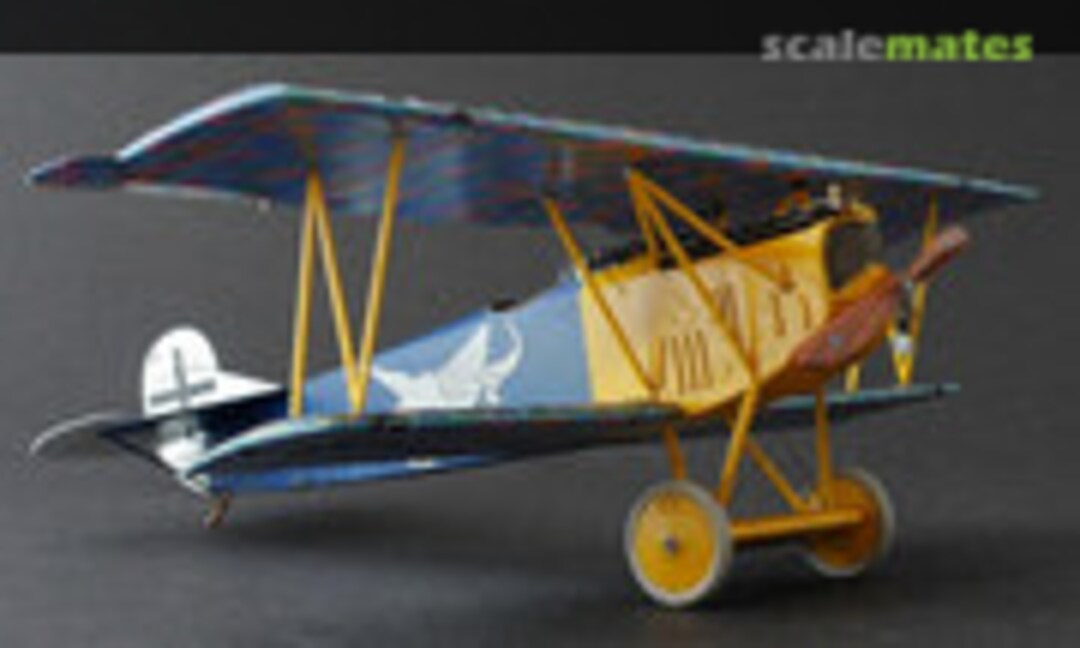
Tried the yellow today - used MRP-28 Dark Chrome Yellow, on white primer.
![Album image #26 Album image #26](/albums/img/5/0/9/612509-21997-97-720.jpg)
Metal axle and bushes in wheels - always straight.
![Album image #27 Album image #27](/albums/img/1/9/1/618191-21997-78-720.jpg)
![Album image #28 Album image #28](/albums/img/1/9/2/618192-21997-59-720.jpg)
![Album image #29 Album image #29](/albums/img/1/9/3/618193-21997-44-720.jpg)
![Album image #30 Album image #30](/albums/img/1/9/4/618194-21997-73-720.jpg)
![Album image #31 Album image #31](/albums/img/1/9/5/618195-21997-72-720.jpg)
![Album image #32 Album image #32](/albums/img/1/2/2/620122-21997-99-720.jpg)
Inside the lozenge painted with linen.
![Album image #33 Album image #33](/albums/img/1/2/4/620124-21997-77-720.jpg)
Seat and Steel-belts.
![Album image #34 Album image #34](/albums/img/1/2/3/620123-21997-99-720.jpg)
more wooden instrument panel.
![Album image #35 Album image #35](/albums/img/1/2/5/620125-21997-96-720.jpg)
Floor
![Album image #36 Album image #36](/albums/img/1/2/6/620126-21997-54-720.jpg)
Nice throttle.
![Album image #37 Album image #37](/albums/img/1/2/7/620127-21997-65-720.jpg)
![Album image #38 Album image #38](/albums/img/1/2/8/620128-21997-67-720.jpg)
Cockpit is finished.
![Album image #39 Album image #39](/albums/img/9/4/9/622949-21997-19-720.jpg)
Tamiya blue on top of kit lozenge
![Album image #40 Album image #40](/albums/img/7/8/3/623783-21997-54-720.jpg)
Some PE outside added
![Album image #41 Album image #41](/albums/img/7/8/4/623784-21997-54-720.jpg)
The stitching is a nice kit part.
![Album image #42 Album image #42](/albums/img/7/8/5/623785-21997-16-720.jpg)
Primed white and futured.
![Album image #43 Album image #43](/albums/img/7/8/6/623786-21997-34-720.jpg)
Decals added - at first at under side, the sides.
![Album image #44 Album image #44](/albums/img/7/8/7/623787-21997-90-720.jpg)
After that on top.
![Album image #45 Album image #45](/albums/img/7/8/8/623788-21997-22-720.jpg)
Tailplane too.
![Album image #46 Album image #46](/albums/img/7/8/9/623789-21997-63-720.jpg)
A lot of softener needed.
![Album image #47 Album image #47](/albums/img/7/9/1/623791-21997-38-720.jpg)
Tailplane mounted and some drying time ...
![Album image #48 Album image #48](/albums/img/7/9/0/623790-21997-94-720.jpg)
![Album image #49 Album image #49](/albums/img/7/9/2/623792-21997-68-720.jpg)
Looks nice, cross and lozenge still visible.
![Album image #50 Album image #50](/albums/img/9/6/4/625964-21997-40-720.jpg)
add decals, the crosses on the lower wing
![Album image #51 Album image #51](/albums/img/9/6/5/625965-21997-16-720.jpg)
Very fine stencisl in white, not visible on sheet!
![Album image #52 Album image #52](/albums/img/9/6/6/625966-21997-83-720.jpg)
yellow nose and dragon (historically documented side)
![Album image #53 Album image #53](/albums/img/9/6/7/625967-21997-63-720.jpg)
The other side is unknown and a guess (second dragon in same style)
![Album image #54 Album image #54](/albums/img/9/6/8/625968-21997-29-720.jpg)
It's a logo of a alu foundry in Durlach, Germany
![Album image #55 Album image #55](/albums/img/1/3/8/626138-21997-95-720.jpg)
turned on lathe.
![Album image #56 Album image #56](/albums/img/1/3/9/626139-21997-87-720.jpg)
![Album image #57 Album image #57](/albums/img/1/4/0/626140-21997-98-720.jpg)
With hubs from PE set.
![Album image #58 Album image #58](/albums/img/1/4/1/626141-21997-52-720.jpg)
bolted with 0.2mm nickel silver.
![Album image #59 Album image #59](/albums/img/1/4/2/626142-21997-58-720.jpg)
back side
![Album image #60 Album image #60](/albums/img/1/4/3/626143-21997-33-720.jpg)
Can be glued in place as last step.
![Album image #61 Album image #61](/albums/img/4/9/6/626496-21997-23-720.jpg)
Waited for a Vector engine - very nice details ...
![Album image #62 Album image #62](/albums/img/4/9/8/626498-21997-80-720.jpg)
... but to long 🙁
![Album image #63 Album image #63](/albums/img/4/9/7/626497-21997-17-720.jpg)
Painted with Alclads
![Album image #64 Album image #64](/albums/img/5/0/0/626500-21997-68-720.jpg)
Exhaust was opened.
![Album image #65 Album image #65](/albums/img/4/9/9/626499-21997-24-720.jpg)
After a oil wash mounted.
![Album image #66 Album image #66](/albums/img/5/0/1/626501-21997-96-720.jpg)
The carburettor had to be glued to engine inside!
![Album image #67 Album image #67](/albums/img/7/4/1/626741-21997-95-720.jpg)
0.8mm handles - to thick.
![Album image #68 Album image #68](/albums/img/7/4/3/626743-21997-19-720.jpg)
0.4mm tinned brass is more scale
![Album image #69 Album image #69](/albums/img/7/4/2/626742-21997-12-720.jpg)
Soldered (0.3mm/0.5mm pipe) step.
![Album image #70 Album image #70](/albums/img/7/4/4/626744-21997-59-720.jpg)
Lower wing and landing gear mounted.
![Album image #71 Album image #71](/albums/img/7/4/6/626746-21997-46-720.jpg)
PE foot steps on wing spars and step.
![Album image #72 Album image #72](/albums/img/7/4/5/626745-21997-88-720.jpg)
Pale burnt metal and liquid mask
![Album image #73 Album image #73](/albums/img/7/4/7/626747-21997-74-720.jpg)
Looks nice after unmask, even with cast flaws on edges.
![Album image #74 Album image #74](/albums/img/7/4/8/626748-21997-44-720.jpg)
High diluted flat anthrazit, and oil wash added. Mounted.
![Album image #75 Album image #75](/albums/img/7/4/9/626749-21997-32-720.jpg)
With plugged struts and primed elevator.
![Album image #76 Album image #76](/albums/img/7/5/0/626750-21997-87-720.jpg)
Looks niice!
![Album image #77 Album image #77](/albums/img/4/8/0/627480-21997-17-720.jpg)
Right the kit parts, see middle and lft for own parts.
![Album image #78 Album image #78](/albums/img/4/8/2/627482-21997-85-720.jpg)
Compared to original.
![Album image #79 Album image #79](/albums/img/4/8/1/627481-21997-16-720.jpg)
Mounted in slots.
![Album image #80 Album image #80](/albums/img/4/8/3/627483-21997-98-720.jpg)
Ailerons needs also control horns.
![Album image #81 Album image #81](/albums/img/4/8/4/627484-21997-75-720.jpg)
![Album image #82 Album image #82](/albums/img/5/9/4/627594-21997-35-720.jpg)
First rigging
![Album image #83 Album image #83](/albums/img/5/9/5/627595-21997-25-720.jpg)
Control wires
![Album image #84 Album image #84](/albums/img/5/9/6/627596-21997-42-720.jpg)
MRP White, future, decals, shadows
![Album image #85 Album image #85](/albums/img/5/9/7/627597-21997-91-720.jpg)
Control surfaces mounted.
![Album image #86 Album image #86](/albums/img/5/9/8/627598-21997-51-720.jpg)
Struts and control wires, tail skid
![Album image #87 Album image #87](/albums/img/5/9/9/627599-21997-28-720.jpg)
Tail finished, some detail painting missing.
![Album image #88 Album image #88](/albums/img/6/0/1/627601-21997-61-720.jpg)
With the mounted ailerons the last decals are the crosses
![Album image #89 Album image #89](/albums/img/6/0/0/627600-21997-27-720.jpg)
Four control wires needed fro ailerons.
![Album image #90 Album image #90](/albums/img/8/6/2/628862-21997-19-720.jpg)
Airspeed Indicator from Gaspatch
![Album image #91 Album image #91](/albums/img/8/6/3/628863-21997-71-720.jpg)
Wrong mounting position in manual!
![Album image #92 Album image #92](/albums/img/8/6/4/628864-21997-14-720.jpg)
Painted, glued and mounted on strut
![Album image #93 Album image #93](/albums/img/8/6/5/628865-21997-44-720.jpg)
metal stripes and 0.2mm micro rivets used
![Album image #94 Album image #94](/albums/img/8/6/6/628866-21997-67-720.jpg)
It could rotate
![Album image #95 Album image #95](/albums/img/8/6/7/628867-21997-34-720.jpg)
removed barrels from kits MGs, PE added
![Album image #96 Album image #96](/albums/img/8/6/8/628868-21997-10-720.jpg)
Finished with Master parts
![Album image #97 Album image #97](/albums/img/8/6/9/628869-21997-57-720.jpg)
MGs in place.
![Album image #98 Album image #98](/albums/img/8/7/0/628870-21997-48-720.jpg)
Blast channels PE are "stolen" from another Profipack.
![Album image #99 Album image #99](/albums/img/2/7/1/629271-21997-48-720.jpg)
Broken tail skid!
![Album image #100 Album image #100](/albums/img/2/7/3/629273-21997-97-720.jpg)
Made a new wooden one, with metal fittings.
![Album image #101 Album image #101](/albums/img/2/7/2/629272-21997-47-720.jpg)
Mounted, hard job on the fuselage with decals and color.
![Album image #102 Album image #102](/albums/img/2/7/4/629274-21997-81-720.jpg)
Rigging added.
![Album image #103 Album image #103](/albums/img/2/7/5/629275-21997-44-720.jpg)
Biplane!
![Album image #104 Album image #104](/albums/img/2/7/6/629276-21997-50-720.jpg)
Top view
![Album image #105 Album image #105](/albums/img/2/7/7/629277-21997-42-720.jpg)
Some brass details on engine and radiator.
![Album image #106 Album image #106](/albums/img/2/7/8/629278-21997-42-720.jpg)
Black alu foil from wine bottle.
![Album image #107 Album image #107](/albums/img/2/8/0/629280-21997-99-720.jpg)
Used to created stacking pads
![Album image #108 Album image #108](/albums/img/2/7/9/629279-21997-82-720.jpg)
Windshield added
Comentários
3 5 April 2019, 20:35
![](/profiles/img/21997-347-s.jpg)
A warm welcome to all of you! I must admit, that the last action here was a month ago, but due to exhibitions, easter holiday and other things I have no time for modeling at the moment. Hope to be able to continue end of May, so it will be hard to match the deadline of the related group build.
4 May 2019, 15:10
![](/profiles/img/15497-946-s.jpg)
Building the "Weekend" edition should help you to keep the deadline 🙂
Propeller and Lozenge looks great!
4 May 2019, 15:15
![](/profiles/img/21997-347-s.jpg)
Oh Chris, I was still labeling the pics after upload - the lower wing is done - and you answered already, thanks!
19 May 2019, 20:24
![](/profiles/img/21997-347-s.jpg)
Thanks and welcome! Alec, yes. The lozenge is from Aviattic, but the tapes are from this Eudard kit. The Weekend edition is from 2016, the marking decal sheet too. But the kit lozenge and the tapes are printed already 2010, so this kit was doing stash cleaning at Eduard 🙂
20 May 2019, 14:26
![](/profiles/img/14143-361-s.jpg)
Mal wieder ein gaaaanz großes Kino!! Ich glaube bei den lozenge-Decals Stoff Struktur zu erkennen...
8 June 2019, 17:39
![](/profiles/img/21997-347-s.jpg)
Thanks! Back from a short trip, so I can continue soon. @Bernhard: yes, that is the nice thing about the Aviattic decals.
11 June 2019, 17:16
![](/profiles/img/21997-347-s.jpg)
Question: should I use the lozenge kit decals or normal grey primer below the blue paint? See picture ...
14 June 2019, 19:05
![](/profiles/img/23938-707-s.jpg)
Looks great. Not sure I understood your question: is there controversy as to what was underneath the blue paint? Or were you just asking if it's worth the effort (I am having a hard time believing the latter 😄 😄 😄)
16 June 2019, 17:07
![](/profiles/img/48665-446-s.jpg)
I somehow missed this build until now - great stuff, the propeller is a work of art & I love the blue-over-decal finish too. Taking a late seat & looking forward to see more top-class modeling tricks 🙂
16 June 2019, 18:37
![](/profiles/img/21997-347-s.jpg)
Thanks and welcome Slavo! Alec, I made a experiment (pic39) and asked the question, because I was not sure about the impression.
16 June 2019, 18:48
![](/profiles/img/21997-347-s.jpg)
For the friends of micro mechanics I added some pictures of the airscrew bearing.
23 June 2019, 19:48
![](/profiles/img/48665-446-s.jpg)
Evolving into a true beauty! Great to see all the colors & patterns coming together before the propeller assembly steals the show...
25 June 2019, 21:25
![](/profiles/img/23842-243-s.jpg)
I really like the color combinations on this build. I hope this doesn't get me going off on a WW1 tangent!
25 June 2019, 23:33
![](/profiles/img/21997-347-s.jpg)
On the PE set there are no control horns, and don't like the kit parts, so I made new ones myself.
28 June 2019, 13:40
![](/profiles/img/48665-446-s.jpg)
Some tails look better than others, and this is a particularly lovely example! Great work with the metal details and you hit the nail with the subtle shading on white... Almost home, looking good!
29 June 2019, 12:37
![](/profiles/img/21997-347-s.jpg)
Thank you Slavo, still some details on the ToDo list, but I hope to finish the Fokker soon!
29 June 2019, 17:40
![](/profiles/img/21997-347-s.jpg)
Again a model with my main method "Refining by accident"😉 All details added, the bird is finished, only the weathering with oils is missing.
Hope to be able the gallery of the finished model soon.
3 July 2019, 17:46
![](/profiles/img/21997-347-s.jpg)
Thank you David! I like the Leusch livery, but it not a rarely seen model😉
4 July 2019, 18:57
![](/profiles/img/21997-347-s.jpg)
The project is finished, thx fro watching! The final gallery is attached to the project.
5 July 2019, 19:25