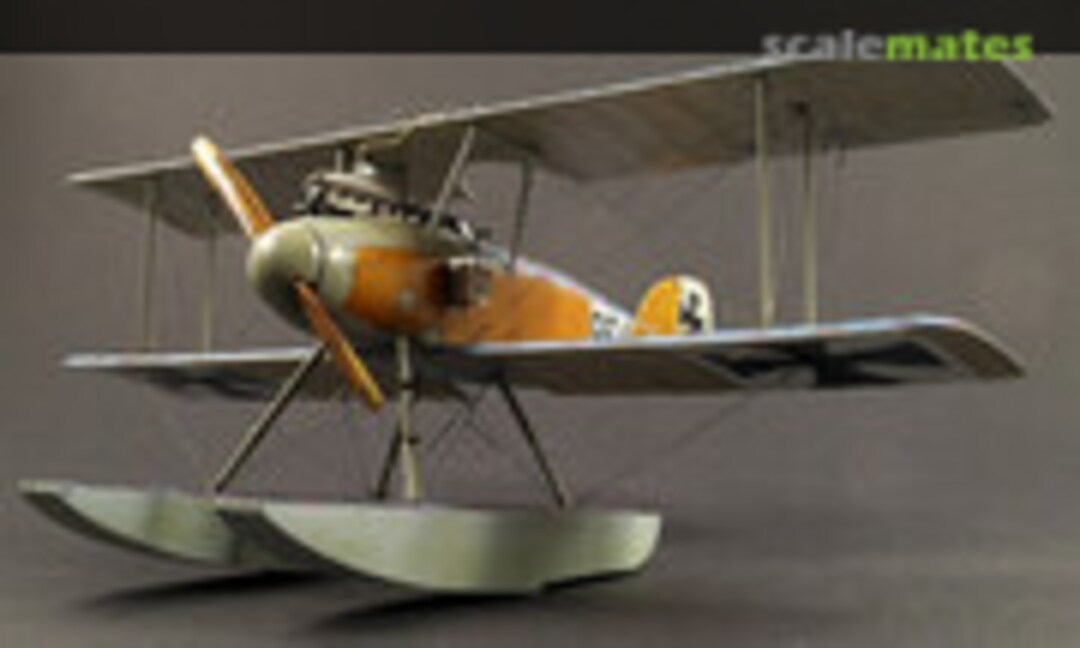
Albatros on floats

Miliput is great! gives enough time for forming.

The seat was also modified slightly.

A block of veneers.

Frontside after woodwork.

Backside

The spinner fits.

Some layers of paint.


So lets start with the floats. Here I had the first problem: the struts between the floats was bent (see the picture on top), so I decided to replace it by a scratched brass part. This had other advantages: I could correct the size (should be smaller com

Due the smaller size I need to fix the holes in the floats, done with Evergreen profiles. Here in detail, so the brass is glued with CA on a big area. The brass is only profiled between the floats.

The mounted floats are sanded, primed and sanded again.

The floats are painted Gunze H417 "Light Blue", which is a blue grey.

Then I masked the floats and painted the struts in Gunze H70 grey (green grey).

Finally I applied the kit decals with that big lozenge pattern. Haven't seen that pattern not as aftermarket decals, only the smaller sea pattern. A lot of decal softener was needed, until the decals showed the underlaying structure.

This aileron cutting I always do to bring more dynamic and reality into the model. Please not here the small hole between the strut mounting holes and the aileron. This is the control wire, but how to move them?

With new hinges, a deep cut into the wing and a brass tapering lever (the hole in it is big enough to take a Gaspatch turnbuckle later) it looks much more original.

The lower wings are one part with a part of the fuselage. Two cuts later I had 3 parts.

Two steel wires and some drilled holes allows a reunion, on the picture together with the complete upper wing.

The next step was grey primer on the top side ...

... and a white primer below.

After applying of a big amount of small masking tape the bottom side was darkened and shadowed, cloudy in stripes.

After removing of the tapes there are white ribs as a base for the next paint layer.

With MRP bleached linen and linen 2 I airbrushed the linen surfaces. The marking field was painted then with MRP bleached linen, which is a off-white, and white

After a layer Future the crosses are applied. The kit contains crosses in different layouts, great!

And again as macro.

The upper surfaces needs at first Future and then decals. I was positively surprised that the decals for the upper wing has cutouts for ailerons and the ailerons decals are individual parts - thanks, Eduard! Decal for the upper wing in one piece!

This also as macro. The second layer decals - crosses - are not yet done.

The tail plane was also cutted

With carefully drilling and some steel wires I will get a straight tailplane

I also predrilled the struts and provided them with pins. 24 pins needs a lot of concentration on this very thin struts!

The parts for the cockpit are prepared, partly glued, primed with white primer and painted with "wood base".

The axle is 1mm brass, the bearing a 2mm brass pipe (turned a bit smaller on lathe) and the securing washers are PE brass. Drilled a 1mm hole, soldered and turned again on lathe.

The wood is painted with oils on cockpit parts.

A small piece of alu was turned with my lathe to act as a tool. Ok, quick and dirty, could be done better, but it is only a tool. In the middle you see a 1mm hole.

The Eduard propeller spinner fits into the recess, and so I can drill from the backside ...

... into a small piece of sprue, which I glued inside of the spinner.

So I can plug the spinner onto the axle easily, all parts together:

With a little breeze of air, everything runs smoothly and nothing wobbles.

Seat mounted after detail painting on frame.

Added compass and correction table, upper belts ....

Fuel selector panel got some fine tuning

Finished

Soem more parts prepared

control stick also finished

All mounted into fuselage.

Real wood, PE, wires added on left side


... but after check, what can be seen from outside ...

I dropped that idea.

Kit engine - to small

Vector resin engine

seems to match better


parts from kit engine

Primed, heads alu and masked


PE rest for rockers

Mounted - good base fro further detailing

Small parts secured with brass pins

Vents and pipes for ignition wiring added.

On the other side the carburetor and the inlet pipes (multiple resin parts, had to made them fit).

I made spark plugs from 0,3mm brass pipes, added ignition wires (thin like a hair!), painted and mounted them.

On the other side I also 6 spark plugs. I wanted to wrap a heat isolation but different materials failed, so I simulated that using different paints.

The room between engine an wall looks so empty! I check the WNW manual of an Albatros and found a tank there. Soldered one from brass, because real brass look great

Turned a brass filler with cap on lathe and soldered into a hole on top

Sometime ago I changed the contour to match the drawing.

So the engine fits now! The brass tank can also be seen.


After a washing with thinned oils I consider the engine as done!


The 964 seems to use a higher volume water tank, the smaller Eduard part was nice, but due to the bigger engine also to short. So I created a new one using Evergreen according to the original picture. I forgot a picture of turned and milled brass inlet.

I modified the fuel tank with more details.

Water tank painted, mounted to the engine and glued all in place. The small brass pipe is 0.5mm, I will add to it later a 0.3mm pipe to dissipate steam over the top wing. The last view on open fuselage.

Glued the fuselage halves together and drilled the hole for the air screw mount.


The water tank was moved from the centerline on 964, I guess to improve the view.

Finally a fitting test, only plugged together.

Added steps to front struts, according to picture.

Sanded and starte to prime

Primed

Wood base color painted

Wood simulation with oil paints

ply wood in 1:48, so not much structure

Same picture, but with polarising filter screwed to the front lens.

A lot of small PE parts are primed.

Masked for grey green, or green grey? Used H70

All struts are painted too.


Under side blue grey as floats, and wood with clear colors.

Decals on top of tail plane.

Linen with ribs and shadows below

The marking number and the field around as single decal. A brighter color is also on reference photograph. Cut with scalpell in panel line.

Decals on top, front part problematic.

Wrong cut out on left side, removed and used the spare stripe (which is part of the kit).

After filtering the hexa colors all plugged together temporarily to get impression of the complete bird.


Painting accident on right float - to much paint. Was not abel to remove the paint from decal enough. A wash will fix it 🙂


May be you are noted before, removed moulded details prior painting. Added now as PE - looks much more realistic.

Crosses on upper wing, needs to be cutted. Please note shadows in the middle part.

Gaspatch anchor points and turnbuckles. A good preparation makes it easier.

Side crosses done.

Back cross.

And front. 8 turnbuckles, 16 achor points and 32 brass sleeves was needed.

Damn small PE part, but I decided for repacing by brass.

Radiators and scratched brass.

Painted in White alu and mounted

The 0.2mm copper wire needs to be shortened.

Both ear radiotors are on same position.

Back side.

Spnadaus from Master, burnished instead of painting to keep the details.

Take a Cent in your hand and compeare the size! Perfectly created parts!

Th elocking box is form the kit, with added PE.

After painting the box all mounted.

No conflict between water tank and intake.

Exhaust needs to be added below.

Pilot's view

Exhaust V1, from kit. Wrong for a (my) W.4

Scratched. V2, to short

next try V3, this one wil be used.

A little puzzle, got some decals.

The fin looks nice.

Wings drilled, covers and step plate added.

Maintenance cover could be opened over control wires due to slots.

Covers added

Covers on crosses painted black.

Exhaust paint with 4 colors, mounted

Lower wings mounted.

No conflict between exhaust and radiator.

Soldereda brass tube to the control horn


Tail plane is now controled.

Added struts by squezzed brass tube.

Control wires also below

Decals cutted, on outer area rib shading missing

Upper wing preparation finished.

After adding upper wing (biplane) I removed a lower wing (=> sesquiplane) due to alignment problems.

Wing mounted, wanted to glue the struts in place again - a ugly crackling sound! both struts broken 🙁

New ones soldered.

tinned

painted

Preparation of turnbuckles and rigging (part of it!)

Those are mounted within a hour.

Further riging and control wires fro ailerons.

Actual state, with straight struts!

Six futher rigging wires needs to be added.

The last missing lines are prepared with turnbuckles and anchor points.

Two wires from wing to floats and one from after strut to engine cover added.

Gaspatch turnbuckles of type Albatros with ball.

Here a crane could hook in and lift the Albatros out of the water. The steam goes over the roof (0.3mm brass pipe).

Masked and painted the brass tips the old way.

Clear coat, decals and clear coat for protection.

Nose cone ready, added a leftover PE plate (from OEFFAG Albatros).

Painted the fuselage front anthracite.

Axle glued in with CA gel.

Rigging wires metallized.

Hoist harness looks also better in steel color.
Comentários
4 29 September 2019, 19:02
Not missing a Bughunter build of course... Nice custom pillow & weld lines 👍 - stripes of sheet softened & cut?
30 September 2019, 08:40
Not much parts, but a great amount of interest 👍 A warm welcome to the show to all of you!
Slavo, the weld lines are simply stretched sprue, glued into the seat with Extra Thin.
30 September 2019, 16:47
The atoms fell off my workbench and were eaten by the carpet monster 🙁
30 September 2019, 19:23
Bughunter do not forget to make some real wood golf clubs for the base commander!
I guess in your builds, the models even smell like the real deal, wood, paint, oil & metal... 😉
30 September 2019, 20:02
Someone with admin rights linked my album to the project and destroyed my idea to create a little riddle 🙁 Me wanted to link it later to the project, to late - now it's public known.
Welcome Martin and Alec!
1 October 2019, 14:29
Now, especially for Martin, let's start with real parts for this seabird! Scratched parts as usual 😉
1 October 2019, 19:41
Over the last days multiple update pics are uploaded, now the cockpit is finished. The engine will be the next step.
9 October 2019, 17:28
Fresh pics with the master signature 1€ cent coin - a clear indication that some amazing work has been done in Bughunters Great War workshop 🙂 Crafting aluminum tools for propellers is definitely something new, and the results look most convincing. 👍 Watching all the different clever bits you devise during your builds is a pleasure and a great pool of ideas! 👍
9 October 2019, 18:18
Thank you Stephan, Slavo and Marc! I hope, that it will not end as shelf queen and I can finish this project without interruption. More in the next days ...
9 October 2019, 20:05
Thank you Alec - then it is ok to spend the time for writing 😉
Added a bigger amount of pictures for the Vector engine.
10 October 2019, 19:42
Sigh, The Bug strikes again. I'm *again* looking for words, and *as usual* I can't find any to do your little gem justice.
10 October 2019, 19:45
Yes, please keep writing. And extra "thank you" for doing it in English 👍 👍 👍
The engine look super, the simulated exhaust wrap is very convincing as well.
11 October 2019, 06:28
Amazing work as always Bughunter. You are a clever man! Nice to have you here 👍
11 October 2019, 06:50
So the latest pictures added before the project is going on hold, due to private reasons.
14 October 2019, 12:45
Thanks, the situation improves slowly.
Uploaded pictures from time to time, on pics 95-98 the parts are only plugged together. The impression of a model provides some motivation.
28 October 2019, 21:53
Danke Bernhard! Damit es zur Faszination kommt, erfordert es aber erstmal einige Mühe 😉
The Albatros developers used normal turnbuckles in the middle of the ropes, so I need the double amount of brass sleeves and anchor points!
1 November 2019, 18:21
Excellent work. I made my own first expierience with rigging just recently on a 1/72 scale,....man - I did not expect how painful this could become. 🙂
Contributes even more respect to all the Bi-plane builder since then.
1 November 2019, 19:04
Thank you mates! It may look easy, but behind it is the experience of threading 1000 times in brass sleeves and turnbuckles 😉
2 November 2019, 11:14
Added Windhoff radiators, with scratched brass. Later W.4 used a wing cooler in upper wing.
2 November 2019, 21:21
The copper line & valve are incredible!
I'm bowing to you like Wayne & Garth bowing to AliceCooper in Wayne's World 😉
2 November 2019, 21:38
Thank you Holger, Hans and Roland - your comments are highly appreciated!
3 November 2019, 18:53
The Spandau MGs are done and mounted. Master is really doing a perfect job here!
3 November 2019, 20:01
Thank you mates! I hope my hands and eyes are continue to work for a while!
6 November 2019, 22:09
I was concerned that I'd get repetitive strain injury of the jaw due to the number of times I said "WOW!".
Amazing stuff – as always!
7 November 2019, 16:06
The tail is finished 👍 The upper is prepared for mounting and rigging session.
11 November 2019, 17:47
Thanks for a great step by step on a number of techniques especially the turnbuckles and shading for the doped linen. I can't believe this is 48 scale.
12 November 2019, 20:34
Thx! I added some pictures of a bad accident, with an ugly cracking sound! 😭
15 November 2019, 21:42
I'm scared to look directly at it... my human brain may not be able to process what I'm seeing...
15 November 2019, 22:50
I wish I had that level of skill, dedication, and patience.... Your whole album is amazing!
16 November 2019, 00:24
Looking magnificent. Those new metal struts are much better than the OG ones 😉
17 November 2019, 03:29
as usual, staying in awe at your skills... pity about those struts breaking... but the new ones certainly will not. and they look perfect now 🙂
17 November 2019, 09:50
Sorry, have not yet commented. Here a crane could hook in and lift the Albatros out of the water. That's why I used fishing line, the rubber thread would be flat on the surface.
22 November 2019, 21:27
The journey is over now - this seabird is finished and after weathering I will create a new album with the final pictures.
23 November 2019, 23:06
Another masterpiece for your showcase. The prop is a real eyecatcher - again...
23 November 2019, 23:15
My first seabird is finished and the final album can be found here: Albatros W.4 964 at Seeflugstation Windau | Album by bughunter (1:48)
24 November 2019, 19:59
When cloth looks like cloth, metal like metal and wood like wood, it means Bughunter is again done with one of his peculiar little treasures😉 Tripple hooray for a beautiful early seaplane - I hope you pick up the topic & work yourself up to the Schneider Trophy pieces, would be real artworks in your hands!
2 December 2019, 10:54
Thank you very much! Slavo, are you a prophet? I want to build the Sopwith Schneider. I build already a Lebed Lebedev VII aka Sopwith Tabloid | Project by bughunter (1:48) , which is a Tabloid. At the end I had the idea to build the Monaco biplane, I tried the floats: Sopwith Schneider - Racer Monaco Trophy version | Album by bughunter (1:48)
I have the SH kit, the Small Stuff 100hp engine, but no decals are available: a friend made masks for it on his plotter 👍 So I will do this, not now, but soon!
3 December 2019, 20:58