
Новостная лента
Spelling should be corrected to "Constructor" in this Topic:
SCM Topic: Autocar Construcktor
SCM Topic: Autocar Construcktor
19 April, 03:26
добавил новый фотоальбом.


25 28 December 2024, 05:16
"Removing seams from roadwheels the Jakko way." Thanks for the shout-out 🙂
Though TBH, I find it takes about as long as clamping the wheel in a vice and scraping the seam down — the lathe is less effort but not really a timesaver, IMHO. Could be that's down to my lack of lathing skills, though.
15 January, 09:46
It took a long time but it's fun. Not every day I get to use a lathe.
1 15 January, 13:51

As the kit is missing many parts, l will try 3d printing / scratchbuilding the missing parts. My resin printer isn't a very good one so it can be hard to get things to print correctly.
28 January, 05:31
Quick tip: you don't need to take photos of your screen — press ⇧⌘4 instead 🙂
28 January, 09:57
There is a lot of work to do to remove the supports. I did a quick and dirty pass on one side and it fits perfectly!
I scaled running gear and tracks from a 1:56 stl by 175% to get to 1:32 and it fits properly.
28 January, 23:25

All missing parts 3d printed by upscaling from 1:56 to 1:32. Suspension and tracks won't be glued on til after painting. Same with radio antenna as I'll just break it off if I add it now.
6 March, 03:05
I see you manage to do 3d printing 😮 lucky you. The tracks and bogies look wonderful 👍
1 16 March, 22:56
Pretty soon, with 3D printing, the only limit will be our imagination.
1 17 March, 19:53
That, and the time and effort you want to put into learning how to use the software and the printer … Both of which are what's kept me from wanting to do this myself 🙂
17 March, 21:07
Got kind of an acceptable gloss pink outcome. Respect to the car builders I see on here who put down perfect gloss coats!
2 20 March, 12:32
Painting the one part track and suspension takes a lot. I have literally worn out one brush so far, scrubbing in all the nooks and crannies.
30 March, 02:24
Like it, like it. Down to the leopard print blanket. Aerosmiths Pink is now my earworm. 🤘🥸👍
17 April, 17:12
That's part of my problem with it 😛 I don't like it AND it sticks in your head …
18 April, 08:39
Welcome to my earworm along with The Bird is the Word (thank you Family Guy 😫😵😵💫) I do find playing Motorhead at extreme volume seems to help. . . . . Pardon? 🤟🥸🤘
1 18 April, 11:09
I would have better off filling the holes for mounting the tools and cutting the pins off of them.
19 April, 02:37


добавил новый фотоальбом.


20 18 April, 13:04
добавил новый фотоальбом.


6 18 April, 19:07
An Artitec brand kit with no. 10143 came up as a potential double when trying to register kit 10.143 (the correct number), but I cannot find any kit 10143 in searches. Weird. Anyway, 10143 can be removed as a double, if it exists.
19 April, 02:03
добавил новый фотоальбом.
4 изображения
1/72 Revell F-16AM "Tiger Meet 2009"
1:72
Well 87's paint has finally started...


1 3 January 2021, 12:13
добавил новый фотоальбом.


5 12 April, 21:44
добавил новый фотоальбом.


3 January 2021, 12:11
There are two brands called PECO: one "PECO" and one "Peco" (not counting "Model Scene (Peco)".
For some reason "Peco" doesn't come up in brand searches. I have moved the few items there to "PECO" so "Peco" can be removed.
For some reason "Peco" doesn't come up in brand searches. I have moved the few items there to "PECO" so "Peco" can be removed.
19 April, 01:45
добавил новый фотоальбом.
88 изображения
DeHavilland DH.88 Comet 'Grosvenor House'
1:72
That much for today. A few details and some touch ups are still missing. Maybe tomorrow I can finish it


 6+
6+ 82 4 December 2024, 11:33
Those familiar with the kit might have noticed the absence of the firewall. I simply lost it and decided that I will just omit it as it is invisible anyway.
5 December 2024, 17:42
A very interesting plane! You made a good progress with another (parallel?) project 👍
5 December 2024, 18:39
Interesting build and very promising start - I´m in for this 🙂
9 December 2024, 09:13
Interesting approach to simply sand the control surface structure in the primer. I'll keep my fingers crossed for a good result.
18 December 2024, 13:53
As a base for the red color, you need to use yellow, then the red will be bright.If you put red on white, you will get just pink.
18 December 2024, 14:08
Michael, using different primers for one top coat is my idea! The usage of my idea is geBIERenpflichtig! 🙂
18 December 2024, 15:38
Looks like you're the partial member of The Infanous Order of The Pink Primer 😋
18 December 2024, 18:19
@ Nicolas: I cross my fingers too. But looks like I have to do some homework before the final coat (see below 🙂 )
@ Denis: thanks for your input. I tested your suggestion on a scrab wing. With LP-7 I get a nice hue as well over white primer and pink base alike. Problem is that there is almost no difference between them. Over yellow (XF-3) the red receives a rather orange hue which I do not like for this project. But I am optimistic to finetune that and use lighter yellow or buff as base coat and see how that turns out. I'll keep you posted.
@Frank: So, se wollen erheben ne kleene GeBIER?!
Da trifft es sich ja gut, dass mein diesjähriger Adventskalender aus 24 Flaschen feinem fränkischen Bier aus 24 verschiedenen Brauereien besteht. Es wird mir eine Freude sein, ein-zwei-drei mit Dir zu teilen - in N?! In M?! Gruß 🙂
@Lukasz: I applied, but as PartPrimerer I am only allowed into the Entree so far. Full membetship pending. 🙂
Welcome Guy
19 December 2024, 09:52
Yes, I will be interested in what your red color will turn out to be. I recently painted small parts red, but there was a noticeable difference in color, depending on the color of the soil. Perhaps your LP-7 is better.
19 December 2024, 10:09
I tested a couple of base coat variations for LP-7. A nice combination in my eyes is achieved when using Mr. Hobbycolor H413 yellow as base for the darker areas and pink (Tamiya X-17) for the lighter ones. But that would have meant to redo the whole base paint. So I stuck to my combination and mourned the loss of contrast.
21 December 2024, 23:27
Add some white today and it will be perfect Xmas gift just in time 😋
1 24 December 2024, 09:43
Really great job. I appreciate your approach.
I didn`t test different base color. I used GS Aquarius H23 at first piece at black surfacer, and it wasn`t fine. I will use gloss yellow at 2nd piece.
How did you do such perfect wing bottom side. It looks really nice. I had relatively big gap there and some residual step although I precisely brushed big material layer out from both wing half. Maybe, the used glue did a step at the end.
I thing, that this, wings bottom, is weakest part of this model although, as you ar writing, engine nacceles also need some attention.
26 December 2024, 13:04
Welcome mates and thanks for your encouraging and funny comments. Bottomline I am quite happy with the shade of red. I just haven't made up my mind about how gloss it should appear finally. If I would have had access to a cutter I would have scanned the bigger decals and cut masks for painting the letters.
Now what's left are the tail skid and a few bits and pieces at the wings and the stabiliser.
@Jakub: wing assembly requires some scraping and dry fitting. With super thin cement I didn't encounter any issues afterwards. But there still remains a considerable gap towards the flaps and ailerons which I filled with super glue.
1 27 December 2024, 08:21
Thanks mates. Let's see whether the year is still long enough to finish the plane.
1 28 December 2024, 17:59
Nice 👍
Regarding the cutter - you know I can always help here! If you still want to do it may another mate can scan the decals ... or next project.
29 December 2024, 20:08
I agree with everyone; great job, nice result, and I like it very much.
30 December 2024, 21:10
Thank you all for sneaking in.
Couldn't finish it last year, so might be the first to be completed this year.
Wish you all a lot of happy modelling in 2025.
1 2 January, 01:27
Thanks mates for yor very nice feedback. Is a nice kit. Still pondering about a few details for a little vignette.
5 January, 12:23
The figures and other elements look great. Are they 3D printed or commercial?
13 January, 19:39
Thanks Christoph and Cuajete,
all items are commercial, some classic resin casts, some 3D-printed.
1 13 January, 22:27
The comet turned out beautifully 😊 - excited to see the finished dio my friend 👌🤞
24 January, 08:07
Thank you Thomas.
progress is a bit slow as the last figure I bought needed a decent makeover due to casting imperfections. Same with the barrels I bought. Issues I weren't used to from.Balaton and White Storck Models.
24 January, 13:47
Thanks Alec. Yesterday two figures were painted, the barrels redone and after I went full circle I am back again at the high base which I left for - first a bigger, then a smaller one with different layouts. Now I am confident with the actual concept and I am optimistic that I can still finish it for the Moson Model Show end of april.
1 4 April, 17:03
I like the red headdress; the pump on the barrel looks nice, and I'm getting excited about the completed dio.
14 April, 07:13
Thanks Nick and Jennifer for the heads up. I finished preparing the base and should be able to put things into place within the next days.
14 April, 15:15
Thanks Cuajete. Little by little I inch myself toward the finish line.
1 17 April, 07:03
добавил новый фотоальбом.


2 19 April, 01:26


")
добавил новый фотоальбом.
26 изображения
hOBBYBOSS 1/48 RAAF F/A-18C
1:48


Проект: HOBBYBOSS 1/48 RAAF F/A-18C
Scratchbuilt
1 16 April, 09:18
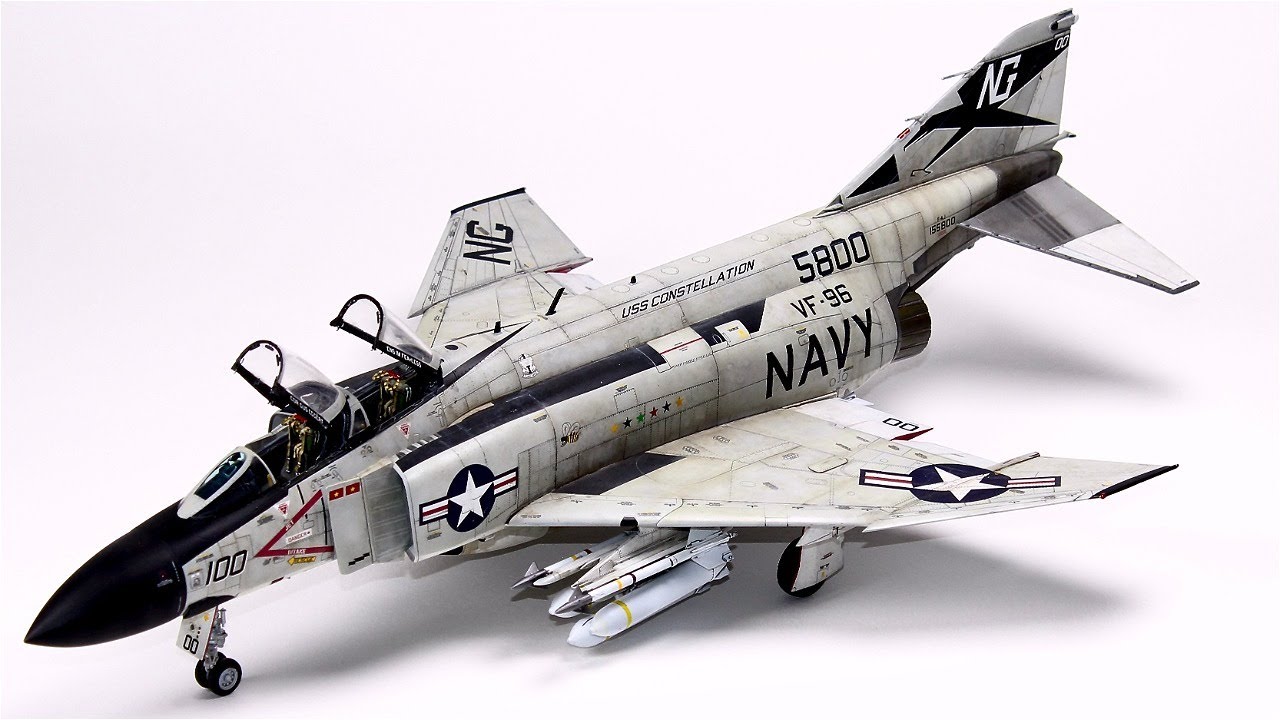
добавил новый фотоальбом.
42 изображения
MENG LS-015 1/48 F-4G 
1:48


Проект: MENG LS-015 1/48 F-4G
Scratchbuilt
2 15 April, 23:41
добавил новый фотоальбом.
18 изображения
MENG LS-014 1/48 EA-18G 
1:48


Проект: MENG LS-014 1/48 EA-18G
Scratchbuilt
15 April, 14:38
добавил новый фотоальбом.


11 17 April, 23:36
Very nice result! I like using craft paints too. Definitely more cost effective thank my beloved tamiya.
1 18 April, 02:51
Thank you Ben, yes the cost of the craft paints are pretty inexpensive.
19 April, 00:07


добавил новый фотоальбом.


13 20 January, 20:50
Air cleaners were created by cutting and stacking Evergreen sheet styrene and then sanding and painting. I came across this idea from another builder of the same kit online from a post from a few years back.
20 January, 20:56


добавил новый фотоальбом.
70 изображения
Trumpeter HMS Belfast w/ Flyhawk (Huge!) detail set
1:350
After over 2 months and more than 150h, I think ... it has finally finished! I thank everyone who has followed my projec...


Проект: HMS Belfast 1943 Trumpeter 1/350


 1+
1+ 77 23 December 2022, 17:59
Hey zach Wilson, oh yes you can say that. I'm curious how I'll deal with it 🙂
31 December 2022, 15:22
Nice to see another Belfast WIP. You made an excellent start on it 👍
I started mine in 2013 (not a joke) but had a lot of time in between not working on the model. I hope to finish her soon. Feel free to have a look to my WIP here on Scalemates:
HMS Belfast | Album by Christian Bruer (1:350)
I used the Flyhawk Set as well, but also the White Ensign Set and scratch building.
Looking forward to your progress and Happy Modelling 🙂
Christian
1 January 2023, 10:06
@Christian Bruer: lovely work, christian! I can then use your wonderful model as a reference if I don't know what to do 😛
1 January 2023, 12:05
Q: How do you deal with any annealing issues? I thought that annealing metal small might melt off the smallest parts. Haven't tried annealing yet myself, except for a large PE piece on some project.
10 January 2023, 20:54
@Treehugger: I generally don't glow PE parts. I glue all PE parts with the MXBON superglue in viscous, liquid and very liquid. Due to the capillary effect, the adhesive quickly gets into the crack, so I can press the part with a pin, two seconds and the part is fixed. If small gaps remain, use a fine pin to put a very thin layer of superglue (it has to be very liquid!) into the gap and press it down again with the needle. So far it works very well for me.
10 January 2023, 21:01
Very nice progress. The PE work on the aeroplanes are very good.
19 January 2023, 01:51
R K check the hight of the boat deck house aft of the forward funnel. I extended the hight a few milimeter, otherwise the boats on the cradles below will not fit! Check image 112 - 118 in my WIP. Add the one or other milimeter more than I did because of some layers of paint on the deck, cradles boats etc.!
Nice progress by the way 👍
Happy Modelling, Christian
19 January 2023, 19:49
@christian Bruer Thank you for the hint! I had already seen that when looking through your pictures and in fact the height doesn't match.
20 January 2023, 18:35
Height correction made on the middle deck. Thanks to christian for the tip! 🙂
21 January 2023, 12:01
Fantastic progress and my hat off to with your photoetch work.
13 February 2023, 11:30
Don't put it to water! It is gonna sink with all those metal! 😜
Kidding aside: anxious to folliw along the last meters.
13 February 2023, 17:39
The final steps to completion! Tomorrow the flags will come and then there will be the final photos when the sun is shining!
26 February 2023, 19:11
excellent work Rene. What are you using to hold the smaller pieces in place as you glue them together? Looking at image 21 I am baffled by how precise and clean that work is.
27 February 2023, 15:50
Just received a picture of the original in London. Now you complete yours. 🙂 Great job, top result
27 February 2023, 20:32
Thank you so much folks! @zach: With a magnifying glass, a calm pulse and good superglue ("VMS glue on power!"), I somehow managed to do it that way. I was amazed myself! 😉 @Michael: You were in London and saw her? I envy you!
28 February 2023, 18:35
Well unfortunately it wasn't me who was in London, but a friend of mine. He visited the Belfast.
28 February 2023, 23:22
Wow this is just amazing work!!!! I can only strive to be this good of a modeler.
1 March 2023, 05:18
Fabulous. I've just invested in AIP's re-boxed version of this kit and if I can get looking half as good as your's I'll be more than pleased!
18 April, 14:49
Wow! Some inspiration to get moving on mine that has been on the shelf since atleast 2015 standing silent vigel with conning tower and a few turrets in place while time past it by it does feel like the result will be a little underwhelming when you see one with all those extra goodies
18 April, 22:36
добавил новый фотоальбом.
23 изображения
AH-64D Apache - in loving memory of my father
1:35


Проект: Apache on the ground


4 18 April, 22:25
добавил новый фотоальбом.
25 изображения
HB A-6E 1/48 - Flight of the Intruder
1:48
Repairs and decals completed, now it’s time to focus on the armaments prior to weathering


Проект: A-6E - Flight of the Intruder

48 6 March, 17:24

Awesome work! Learning a lot from your posts and looking forward to the final result!
20 March, 14:02
Thank you everyone!
@Thomas! Looking forward so seeing your Douglas build!
@Sergej- your F-35 is looking good! I heard that was a bad kit, but didn't realize it till your post!
@Lorraine - Your builds are always amazing! Using a laser cutter to create your latest Spitfire is brilliant!
@Rich - looking forward to seeing another dual build with you and your wife!
2 23 March, 17:18
Thank you Dietmar! I plan to have the maintenance hatches open on this puppy, but not as impressive as your cut-out Millenium Falcon!
24 March, 18:08
Sloooooooow progress, the main painting is done, now onto the munitions!
1 April, 18:26
In photo 24, are you following a reference with the yellow de-icing surface? I thought they were only yellow on slats...
15 April, 08:14
Thank you Paul for the notes on the A-6!
@Rui - watching you Mariupol build with interest!
@Villers - love your cars, and watching your Maharaja edition with great interest!
Hi Sergei - I referenced it from the paint schemes in the instructions and checked the photos on the internet - and most of them have the yellow de-icing on the leading edge of the wing roots. After taking a closer look, seems like I missed the tail! 😀. Will work on that as I start the weathering. 😀
15 April, 19:00
CaptGPF,
The build is looking great. As a former A-6 pilot, the only time you'd have both sets of flaparons up and speed brakes out would be on landing roll out. Just so you know. And at times I adjust my builds just because I want to show some various capabilities that interest me. So I get it. But I thought you might be interested in that just in case you had something else in mind.
Paul
1 16 April, 00:12
@Adam - I love your Aston Martin - can't wait to see the final result!
@Desert Marlin - I loved t-your SUFA, Can't wait to see the Ra'am!
@Dave - would love to see your Falkland builds before I start working on my small armor kits
@Neil - don't know how you pulled off that Revell Tomcat, but you did it!
@Paul - I had originally planned to make this n in-flight Intruder, but the Hasegawa pilots wouldn't fit at all, so I opted to have everything flared out and open as if it was undergoing maintenance. Would these be realistic?
1 17 April, 20:27
CaptGPF,
You bring up a good question. During maintenance, there's no telling what configuration you could find! Then of course there would definitely be various panels open. In this case, probably a lot. And of course there wouldn't be any ordnance on the aircraft during heavy maintenance. It's funny for me, sometimes if I'm doing a historical aircraft on a particular mission, it's really important for me to have all the details (down to the BUNO - Bureau Number), and other times I sort of want to show the capabilities of the aircraft. For example, I'm currently doing another aircraft I flew (S-3B Viking). I'm doing it with a buddy refueling store on the left wing (we almost always flew with that) and a Harpoon on the starboard wing. I personally NEVER saw a Harpoon on a "Hoover", but it was an important capability the Hoover had. If it was going to carry a Harpoon in a conflict, it most likely would carry two Harpoons. So is my configuration "realistic"? Probably not. But I'm doing it for a reason. And of course It's my model! At the very least, it's nice to be able to tell a detractor, " yea, it's not "realistic", but I wanted to show off the capability of the aircraft and I think it looks cool". Just my opinion. And the build looks great.
1 18 April, 09:59
@Paul Moore, I roomed with a couple of Hoover crew on the USS Independence in 1990 (Desert Shield) on their way to the IO. I provided some training as a "contractor". I really like the "War Hoover" and the guys were great to be around! As a Crew Chief on KC-135's, I gotta say your descriptions are spot on! There is always that pull to show more detail but then that means the capabilities are shunted. Tough choices for sure!
18 April, 23:51
добавил новый фотоальбом.
26 изображения
Pontiac Firebird
1:24
Preparation of all needed things.


Scratchbuilt
6 18 April, 00:11
I am a bit disappointed about my images. I cannot rotate them, although I "Manage" it in the options here. *sigh*
18 April, 14:06
I have no idea why it won't work for you, I've just tried it and it worked fine. Were you able to rotate any of the photos?
1 18 April, 14:23
I also have no idea. I do it like you mentioned before (pm) and it worked at first. Then there were some another new images which are also wrong in rotation and I "managed the album" and rotate them there. It shows right, yes. But back then to the Album it's all like before. Not changing at all. Very curios. In other words: In manage modus I can rotate them, but back to the album then, no, all the old rotations are shown, not the new corrected ones. ^-^
18 April, 22:26
report the issue with a link to the album in "Feature request" it is for new features, but also to report bugs.
1 18 April, 22:48
добавил новый фотоальбом.


8 22 December 2022, 13:46


добавил новый фотоальбом.


12 23 December 2022, 15:52


/ru/search.php?q=*&page=newsfeed&fkSECTION[]=Newsfeed
search-solr.php?lang=ru
35
35
/ru/search.php?q=*&page=newsfeed&fkSECTION[]=Newsfeed
35
todo