Wight Quadruplane

The first main parts of the rotary engine. You have to take special care for the valve lifter mounts to not break them during mounting process.

Painted with Alclad Alu, Exhaust manifold on the heads, Hot metal sepia. As last step the 18 ignition wires are added here.

A light wash with oil paint, looks very prominent.

Here I used a polarising filter in front of the lens. This is more the real look, the wash is less obvious.

In comparison to the kit engine.

On the back side of the kit resin there are also the intake pipes, but ....
On the back of my engine you can see the bearing for easy rotation.
On the back of my engine you can see the bearing for easy rotation.

Now I'm a owner of a new veneer of the wood "Indischer Apfel" (German), which means "indian apple", but I think the wood is also called Tineo.
It is dark red, with nearly black lines. I thought it could be used to look like mahogany, because real mahogany has openings and a structure so it can't be used for modeling in small scale.
It is dark red, with nearly black lines. I thought it could be used to look like mahogany, because real mahogany has openings and a structure so it can't be used for modeling in small scale.

I used the new veneer for cockpit structure, because I do not like to clean up very hard and brittle resin parts.
It is totally unclear to me if this is correct or not, but there are only some pictures of this rare bird available and no cockpit pictures at all. May be the kit manufacturer had some info, so I made it at least not more wrong.
It is totally unclear to me if this is correct or not, but there are only some pictures of this rare bird available and no cockpit pictures at all. May be the kit manufacturer had some info, so I made it at least not more wrong.

Mounted into the fuselage, only the floor is not yet fixed. The instruments are from a Eduard set.

Soldered a control stick (the resin one was broken and a simple stick, which is may be wrong for that time) and a rudder control bar.

And all parts in place.

Since this was a British aircraft I don't like the simple kit seat and soldered a wicker seat from 3 parts of a Part set for the Camel.

After painting it tan I tried to show the structure with oil paint. At first with yellow ochre, it looked like a wicker seat with clear coat applied, but the structure was not noticeable.
So a second try with golden ochre, I think this is it. Only the edge will be painted leather.
So a second try with golden ochre, I think this is it. Only the edge will be painted leather.

The kit cowling in resin was big enough to put the Clerget in, but only on the back because the cowling tapers towards the front. To thin it was no help.
So I turned a new one from alu.
So I turned a new one from alu.

The new cowling is only 0,36mm thin.

I wanted also to show the very wide opening on the front, as seen on original pics. And here my interpretation, all plugged together for demo. The Clerget is able to rotate.

The four wings - I broke accidentally the second lower one. Please note the line in the middle of the wings.

In a profile view a special shaped upper surface of the wings is more obvious.

The seat is in place. A light wash was also done so the fuselage is prepared to be closed.

After the oil paint has hardened I painted a leather stripe, added struts and the prepared HGW seat belts.

The fuselage halves are glued together. I made the front thicker using Evergreen stripes.

With luck the cowling has a tight perfect fit, without sanding.

I do not like the resin struts. The long one going through completely, but I will do individual struts, with a smaller shape at the end so it matches the original pictures.
Now I need to prepare 24 wooden struts. Why don't I build a Sopwith 1 1/2 Strutter?
Now I need to prepare 24 wooden struts. Why don't I build a Sopwith 1 1/2 Strutter?

I'm not yet done with the struts ...
But I made some progress, here without glue.
But I made some progress, here without glue.

I wanted to put the struts with thinner ends and brass pins into the bigger wing holes, but this doesn't work in a controlled way.
After I checked the full resolution pictures again I noticed, that there are bolts visible on the other side of the wings and also some metal mounts can be seen on every strut.
So I drilled to the wings and glued 0.6mm nickel silver micro tubing pieces into it. Again a lot of work.
After I checked the full resolution pictures again I noticed, that there are bolts visible on the other side of the wings and also some metal mounts can be seen on every strut.
So I drilled to the wings and glued 0.6mm nickel silver micro tubing pieces into it. Again a lot of work.

I filled also the big going through the wing holes and put there also those tubes.
So now the struts are sits safely with 0.4mm brass pinned and it looks nice.
But I had to shorten the struts again!
So now the struts are sits safely with 0.4mm brass pinned and it looks nice.
But I had to shorten the struts again!

Those are the tail parts. Not bad, only the mounting is not easy because of the special position of the tailplane. And I cannot mount it now, because the lower surface of the tailplane needs linen, the other surfaces PC10.

So I used a fine resin saw and cut all in single parts. The control surfaces are now pinned (which was not easy because all parts are thin). All pictures shown the tail control surfaces down, so I can do that now.

I replaced the resin wedge with a new one and pinned all.

Now all of this crazy tail fits and can be easily mounted after painting.

I like the look!

As I have just cut off all the control surfaces at the tail (which I actually always do, as it makes a model much more realistic and lively), I then cut off the ailerons. I didn't dare at first because they are so delicate. Now they are pinned with 0.3mm brass.
Fortunately only the two upper wings have ailerons.
Fortunately only the two upper wings have ailerons.

So I made a real metal wall, with alu around and a dark part in the middle from a wine bottle foil. And I used a riveting wheel.

It will be partly hidden by the engine, and not 100% identical, but it looks interesting.

I started also to work on the airscrew, only the raw shape until now.

It will even more hide the wall.

After white primer on lower surface and gray on top I thought about shading. I decided to mask the ribs, which was a lot of work on four wings.

And light shadows applied.

I used Mr.Paint linen on lower surface.

The PC10 on upper surface is also from Mr.Paint, the early one.

Plugged together to get an impression. Looks very dark due to late afternoon light, but I like the shade.

Today in sun light it looks a bit different.
I added metal behind the cowling. The middle stripe was made from aluminium. The dark metal mounting stripes before and after are from Eduard PE frame. I graved the mounting "locks" with a drill bit broken off at an angle. The intake pipes are tinned brass.
I added metal behind the cowling. The middle stripe was made from aluminium. The dark metal mounting stripes before and after are from Eduard PE frame. I graved the mounting "locks" with a drill bit broken off at an angle. The intake pipes are tinned brass.

With the engine plugged in it looks even better.

On lower surface I just closed it with a sheet of aluminium.

The polishing rubber stick. The bad thing is, that even on aluminium the diameter at the front get bigger and bigger. I reduced it again with sanding

The cowling is also polished (I will reduce it a bit with polishing by a cloth) it is a biplane now! This required careful adjustments of the little struts.

Before I finally mounted the wing I realized I need to take care for rigging NOW!
The space is much to small to use turnbuckles, and on the pictures the rigging looks like some kind of RAF wires. But then comes Eduard "stretchers" in my mind (48915, originally for SE.5a), tinned and mounted.
The space is much to small to use turnbuckles, and on the pictures the rigging looks like some kind of RAF wires. But then comes Eduard "stretchers" in my mind (48915, originally for SE.5a), tinned and mounted.

Also for the lower cross.

I hope, that the alignment is good enough to avoid later problems.

Then I creates masks with my plotter and painted the cockades with WWI RAF blue and red paints from Drooling Bulldog, because the decals were to small to wrap around the rudder.
Rudder - perfect.
Lower wing - super.
Right side - ok
Upper wing - can live with it.
Rudder - perfect.
Lower wing - super.
Right side - ok
Upper wing - can live with it.

Left side - correction needed!

To be able to continue with the next wing I need to prepare the next rigging mounts, now also double wires! Luckily a drill template is provided on the Eduard PE set.

What has 8 legs? The lowest wing!
All are in place and the rigging is prepared.
All are in place and the rigging is prepared.

To keep the flow I added also a lot of them below the top wing, but not yet complete.

Then I added also the rigging mounts to the opposite side below the fuselage.

The other side of this wing looks now also better.

Then I take heart and mounted the lower wing.

Now it is a triplane.

I decided to continue to work in this area, because the undercarriage needs to be created.

Two struts are going to the lowest wing. I need now to invent a connection between the struts, which needs to hold also axle and suspension.

The wheels were very small. As the resin ones had a lot of holes I found some plastic wheels in the spare box.
The leather around the cockpit is also filled and painted.
The leather around the cockpit is also filled and painted.

The undercarriage seems to be already strong enough. No paint yet.

Some work on the axle is also done.

To finalize the undercarriage I checked all pictures carefully and looked also on the kit parts.
They have some bigger part at the struts connection and a tray below the axle between them, see top right beside the strut.
They have some bigger part at the struts connection and a tray below the axle between them, see top right beside the strut.

The side picture from the Australia National Library shows clearly a wider tray behind the axle. Together with all the other information this is my interpretation. The solution also makes sense in terms of the load on landing.
Before pins can be glued in a carefully adaption of strut length was needed.
Before pins can be glued in a carefully adaption of strut length was needed.

All pinned with brass wire so it can be plugged together. Need to mount it on the model otherwise I can't insert the struts.

And finally mounted in place.

All primed, varnished and prepared for mounting.


Need to paint the wheels and fix the axle with suspension.

According to the manual it should be done as two Vs. For that is some green florist wire in the kit.

After checking the high resolution pictures, also of the earlier versions, my interpretation is different. I soldered some squeezed micro brass tubing and brass wires into a tripod.

Painted black.

The skid is made from real wood and the suspension is stretched sprue, as V to hold the track.

It can hold the model and looks like the real aircraft.

On the undercarriage the axle is fixed with suspension so this crazy bird has now reached the final on ground position.

In meantime I soldered control horns from 0.2mm nickel silver and 0.4mm brass tubes.

Mounted into the control surfaces.

Control wires added.

So I'm prepared to mount the last wing!
But after this picture I noticed, that the middle of the wing sits to high, so I removed the four struts in the middle, unpinned and shortened them for another mm. Re-pinned, glued to fuselage again and next try ...
But after this picture I noticed, that the middle of the wing sits to high, so I removed the four struts in the middle, unpinned and shortened them for another mm. Re-pinned, glued to fuselage again and next try ...

... successful!


To put it on the nose will no more possible with the finished model.


The alignment is acceptable.

At the beginning I made a pump from brass. The pressure tubing is 0.2mm copper, the axle nickel silver.

My Sopwith Triplane built last year is not equipped with such pump, so I had still the Eduard PE. A bit flat, but I could use the mount frame.

I modified it a bit and added the PE parts and a real wooden prop

The blades are very thin and the whole thing is very small!

Now it is mounted on a strut.

From another angle, and without airflow.

And here with airflow.

I modified the angel of the tailplane, so that the control wire do not touch the tailplane. Then I glued the rudder in place and added the rigging of the tail.

Also on the bottom.

The rigging of the wings is complete too. Some are double wires.

To the front I added two Gaspatch turnbuckles of the type "One End" after careful drilling into the alu.

When I thought I was done I noticed the missing control cables on the ailerons, so I added a control horn and tried to find out the control wire layout.

I prepared the airscrew some postings ago, but now it is more ore less finalized. Only the decal and the prop boss are missing.

And again in a profile view.

Today I mounted the engine, cowling and bolted the airscrew to the engine. Beside a prop boss from Part I used some brass pipe pieces and nickel silver wire.

The same in front view. The wheels are also on. So that is the last picture.
Комментарии
55 5 April 2021, 20:25
After the finish of my Halberstadt I had a little motivation hole. I poked here and there in the parts of the existing projects and made some progress, but the spark didn't take. There was also nice weather and the spring started ...
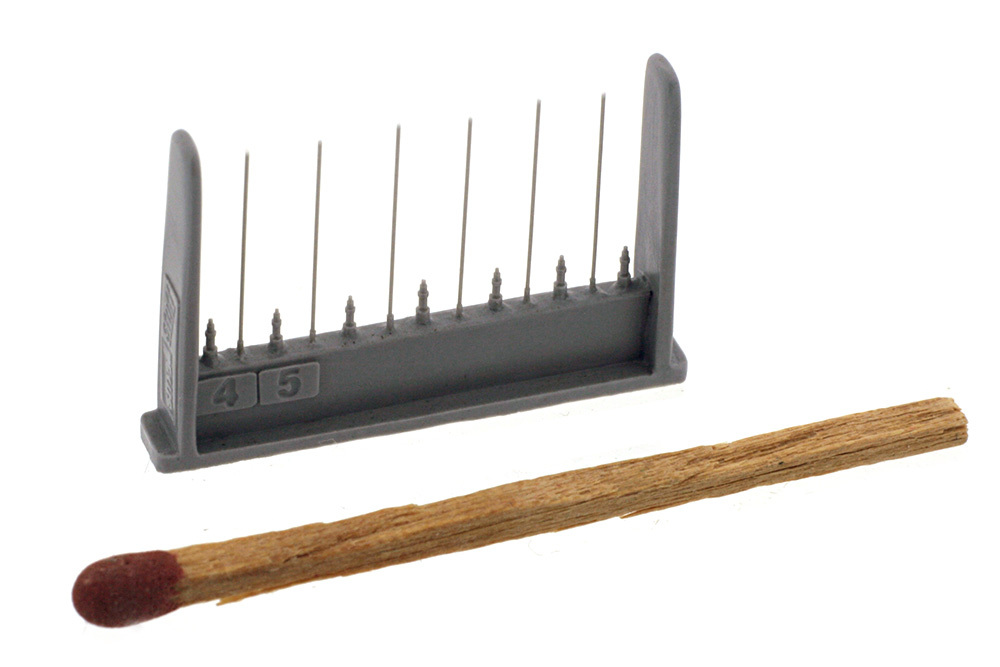
So finally I pulled a new Small Stuff package out of the stash and build a Clerget 9Z 110 hp (the kit allows a 9B 130 hp or the 9Z)
With the ignition wires you see here exact 90 parts! That's more parts than my airplane kits usually have!
Now there are certainly the wildest speculations about what type of aircraft could be behind it😉
5 April 2021, 20:30
Thank you mates!
Now I have to wait for the oil paint hardening to be able to close the fuselage!
Some of you may now guess the type, but with the next update I will unravel the mystery😉
6 April 2021, 17:48
Thank you mates! Oh no, that Bristol has only one wing. This one has much more😉 I will show more pictures soon!
7 April 2021, 19:36
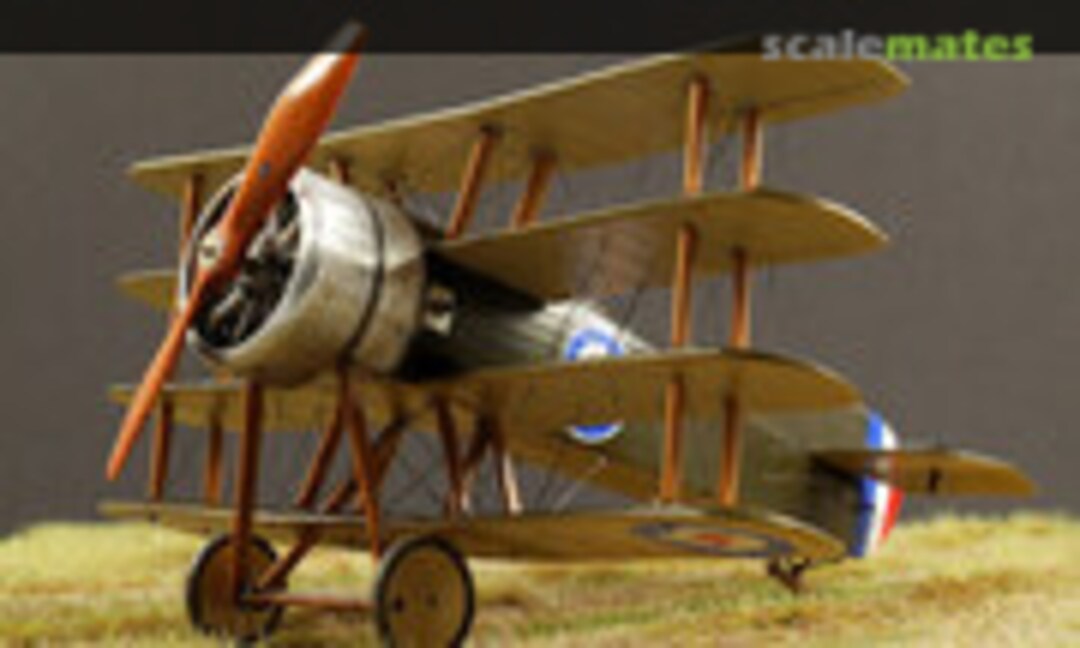
Exactly! The British Wight Quadruplane! I linked the Album to the project.
Good references are hard to find but I found some nice pictures at Imperial War Museum iwm.org.uk
I turned a new cowling from alu on my lathe, also to show the wide front opening. Here in comparison a low resolution picture of IWM:
[img1]

7 April 2021, 20:23
Hmmm? What? Oh sorry, I must have dosed off for a while. There wasn't anything from Bughunter to see...😉
7 April 2021, 20:35
Let's see, the work with this hard resin may also fail .... That would also be unique😉
8 April 2021, 13:13
Fantastic engine! Nice with such a unusual project. I for one have never even heard about this plane. So this one will be something to follow for sure!
8 April 2021, 13:38
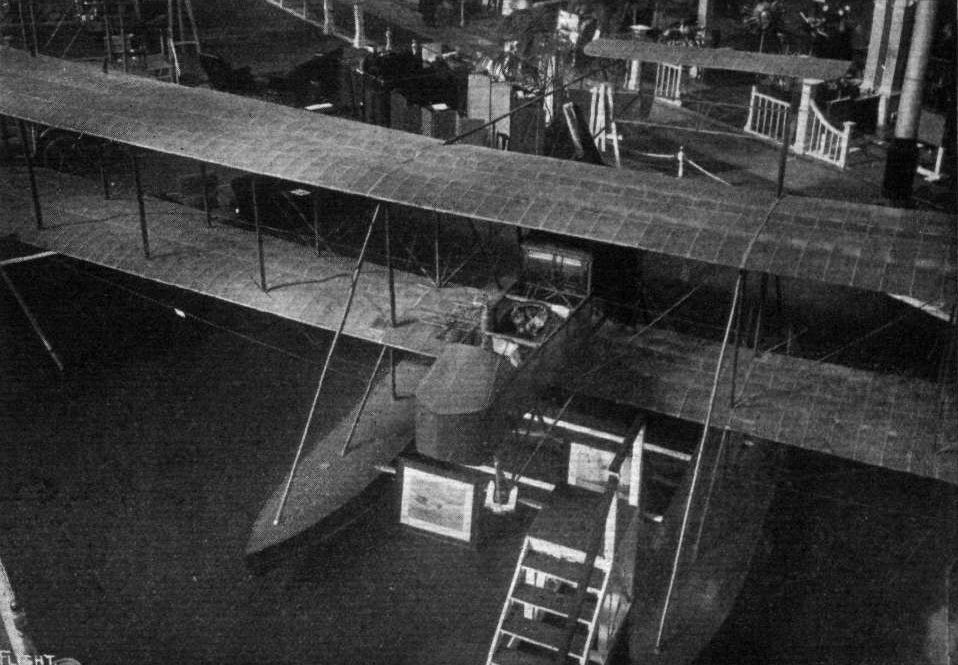
Thank you mates! Today I have a question, see also the pictures of the wings.
An article 1000aircraftphotos.c..ions/Braas/13781.htm mentions:
"All four wings had the typical Wight double-camber airfoil section."
The only picture I found showing a upper surface of a wing is this one (The pic is out of copyright, but I don't find a way to linked it here, it can only be viewed/downloaded). Please see the upper surface of the lowest wing.
nla.gov.au/nla.obj-144915317/view
So is SPIN right here? More References?
Does anyone know about this "Wight double-camber airfoil section"?
8 April 2021, 19:00
This is what I could come up with, hope it helps...
"Traditionally, airfoils with only curved upper surface and flat bottom was termed as camber airfoil. However, if both surfaces are curved then, it is called a double cambered airfoil. In now days not most people use this terms but at some places it is still in use." sanfoundry.com/aircr..20cambered%20airfoil.
8 April 2021, 20:28
This seems to be a more modern meaning of the term. I found out more with a search for the Wight seaplanes. The lower surface was nearly flat, but the upper surface looks like one profile after another. Here is a example of s Wight seaplane: [img1]
So I will use the wings as provided. This was completely new to me.
8 April 2021, 20:50
Welcome Erik! Habe aber noch (gefühlt) Tausende davon😉 Könnte jeden Tag einen neuen Bausatz anfangen.
10 April 2021, 10:15
Moin Bughunter, werde Dir wieder staunend über die Schulter luschern....?
10 April 2021, 10:37
Now I need to prepare 24 wooden struts. Why don't I build a Sopwith 1 1/2 Strutter?
If I don't show up for the next few weeks, don't worry. I'll probably still be grinding on the struts😉
10 April 2021, 17:34
To be able to prime and paint fuselage and wings I need to sort out the tail.
Only a little progress, but it was a lot of work with fine saw and drills.
17 April 2021, 17:30
Pic 14 is the definition of "pro"... 👍 you could put that on 70" 8k resolution and it would still look better than the original I guess... I now really can´t imagine what plane would do justice to this engine and the turned-alu cowling, but I am sure you will bring light into that too... 😉
20 April 2021, 18:00
Thank you mates and welcome to the show for the new visitors!
Again the front picture from the IWM [img1]
If you zoom in and look behind the engine you will see pic 33 😉
20 April 2021, 19:59
just by seeing the metal turned cowling i knew who was building it.... beautiful job as usual.
22 April 2021, 20:01
Welcome to the show Spanjaard and Bernhard! At SM, everyone has a seat in the front row 👍
23 April 2021, 10:45
That cowling plus bruhed metal panel simply looks overwhelmingly realistic. Superb work !
23 April 2021, 17:55
I'm with David Taylor on this one... And all other of Bughunter's projects. It's so sad to be jealous. 😉
23 April 2021, 18:14
Really outstanding beautiful work, but the seam on the cockpit bothers me. Will that be covered up or will you need to fill it?
23 April 2021, 18:15
Wow mates, what a great feedback!
@Krzysztof "rotary" is a good guess. I used a hard rubber polishing stick in my Proxxon drill tool, but with low revs. Will show a picture later.
@Skywalker At least I will add leather paint. This will cover it mostly, may be I fill it before with CA. The cockpit leather seems were far from perfect.
23 April 2021, 18:47
Total beeindruckend: das Aluminium gebürstet sieht absolut realistisch aus! Foto 2: sind die Zündkerzen aus Messing gedreht ?
23 April 2021, 18:51
Danke Bernhard! Ne die kleinen Scheißerle sind Resinknubbel von Small Stuff. Bei allen Motoren gleich, sitzen immer zwischen den Stößelstangen am Gußteil.
[img1]
23 April 2021, 19:20
Übrigens vielen Dank Bughunter für den Tipp mit den Small Stuff Motoren (war schon ein paar Kits heer). Ich habe letztens meinen ersten bauen können und bin echt sehr begeistert von den Dingern. Schaffe es natürlich (noch?) nicht so gut wie du, bin aber trotzdem sehr zufrieden.
23 April 2021, 20:56
Gern geschehen! Die sehen nicht nur toll aus, sondern sind auch genial designed und sauber produziert!
23 April 2021, 21:05
Finde ich auch! Super Produkte. Und es macht irgendwie auch echt Spaß sie zu bauen.
24 April 2021, 09:46
Thx Erik! At the moment I try to puzzle it together with finalizing the struts, but I need to respect the rigging NOW, before glueing .... Stay tuned!
24 April 2021, 15:10
I missed the start of this one. Will be back later. Grillseason is about to begin...
25 April 2021, 10:49
That brushed metal section behind the cowling is just plain epic... 👍
25 April 2021, 21:12
Next on the bughunter channel. How to build a working Caproni Ca.60 from scratch in 1:48 scale that flies longer than the original did...
28 April 2021, 17:38
Now it is a Triplane! But still a lot of work ...
@Skywalker Are you happy with the leather around the cockpit?
@Bilbo, only if you can show a license with a Type Rating of that type!
Now need to invent an undercarriage construction to connect the struts and hold axle and suspension.
29 April 2021, 20:22
Does my licence need to be in 1:48 scale too? Cause I 'm sure I could forge one! 😉
29 April 2021, 20:36
Love the turned metal cowling and engine combination. .36mm thickness is impressive.
2 May 2021, 03:02
Thank you! That thickness is still out of scale, but better as the thick resin kit cowling 😉
2 May 2021, 12:42
After the undercarriage I worked towards the tail, but only a small update.
One of the early tries of the Quadruplane had a very interesting tail skid. The wheels on the front are located in wing cut outs. To avoid the the trailing edge of the lowest wing hits the ground a very unusual loooong tail skid mounting was needed 😉
3 May 2021, 20:09
This was again an update after a short time, but I'm sooo happy with the result - I need to share it 😉 This was a lot of work with all the wooden struts!
Let's have a beer now 👍
4 May 2021, 19:55
Achieving wing symmetry was certainly not an easy task for you. Well done 👍
4 May 2021, 20:28
Looking great but photo #79 looks odd with the control horns situated on the elevator and not the vertical stabilisator. The line doesn't even go free from the leading edge on the stab.
4 May 2021, 20:57
Wow mates, what a great feedback! Thank you very much!
@Christoph It was a good decision to add the 0.6mm pipes to the wings at the begin. The wooden struts are very robust, so I can move a wing a bit harder in one direction to bend the brass pins and to get a good alignment.
@Urban The control horns are always on the control surface on the WWI biplanes. Some of the British aircraft designers don't trust the mounting, so they secured the control horn by a additional wire, like on this Sopwith: [img1]
But the principle is the same on german ones, here a Fokker: [img2]
That upper wire touches the surface seems to be a kit problem, but I had this also on some Eduard biplanes. May be I found a way to improve it a bit.

.jpg)
@Giannis I can recommend two articles about this bird:
en.wikipedia.org/wiki/Wight_Quadruplane
1000aircraftphotos.c..ions/Braas/13781.htm
5 May 2021, 16:30
There were even more quadruplanes:
airwar.ru/enc/fww1/fk9.html
airwar.ru/enc/fww1/fk10.html
5 May 2021, 16:56
The Caproni Ca.60 is to big for my cabinet, but what about the Fokker V.8 ? It has one wing more then the Quadruplane! But I don't know any drawing of this bird.
en.wikipedia.org/wiki/Fokker_V.8
Edith says there is a kit in 1:72
Fokker V-8 (Anigrand Craftswork AA-2091, 1:72)
")
5 May 2021, 19:37
Well it flew a couple of meters between the bounces for some hundred meters so technically it flew. But it was much better at burning than flying...
5 May 2021, 20:33
Four wings, eight wings...and what about 20...or 200(!):
aerospaceweb.org/question/history/q0232.shtml 😄
And there are some other multiplanes (and scratchbuilt models, too) - britmodeller.com/for..-scratchbuilt-172nd/
A challenge, Mates? 😉
6 May 2021, 11:35
Looks like a modern window jalousie 😉
I know a build model of the Phillips Multiplane 1:
modellversium.de/galerie/artikel.php?id=15836
6 May 2021, 11:45
If only I had more time...I simply love scratchbuilding such an exotic stuff.
6 May 2021, 11:58
Thank you very much!
No new pictures, still doing the rigging. Around 40 ropes are in, but I'm far from ready.
7 May 2021, 19:13
The last days I had other things to do, so was not able to touch the model on some days.
But most of the rigging is now installed, and I tried to add another detail: Rotherham air pump
13 May 2021, 15:36
Exactly, damn grammar "incorrector".... and me not checking what happens when i type.
I think it was the result of spanish grammatical corrections applied to English words. Having multiple languages set as available can make a total mess when you do not check which one is selected!! 😛
13 May 2021, 21:05
Do I get this right: engine and props are rotating. What about the wheels? 😉
13 May 2021, 22:18
Of course they'll roll free on their axle, it't Bughunter after all...
13 May 2021, 22:23
Thank you mates!
The problem is the standard. Once you have done that on another aircraft (in this case on my Bristol Crocodile, see pics 49 to 51 here. It shows the trick: Brisfit Crocodile WIP | Album by bughunter (1:48) ) you can't omit it on a later project.
And no, I will glue the wheels in place. There are bushes, but I have not thought about a solution for free rotation.
14 May 2021, 06:59
@Urban Gardini I was able to unmount the tailplane to modify the angle a bit. Now the control wire is free 😉
After that action the tail was rigged and completed. The rigging is complete now.
The build is nearly finished. Some final mounting, some Weathering, may be after Brathering, and the final pictures could be done. With a bit of luck may be this weekend.
14 May 2021, 19:51
Nice and good for you as it would've annoyed you on the shelf as it was!
14 May 2021, 20:30
Keep my fingers crossed - and I'm eagerly waiting for the photos of the finished model 😉
15 May 2021, 08:09
Well, my friends, this build log is finished. That means I build my first resin model in 1 month and 10 days. That is may be not my master piece, at least compared to the Bristol Fighter and the Halberstadt, but it is a nice and never seen model for the cabinet. It took some effort to make all the wood and metal parts, but it helped to create a unique subject.
The final light tent pictures will be done this evening.
I hope the build report has entertained some of you. Many thanks for the constructive comments and support!
15 May 2021, 15:49
Thank you mates - glad that you like it!
The final pictures are now done and uploaded here:
Finished Wight Quadruplane | Album by bughunter (1:48)
15 May 2021, 20:24
I "dropped out" mid build-here - it´s just so satisfying to see the world going on where one left it... sheer excellence here, everything as expected (which in this case is the highest degree of praise 😉 )
Although it needs to be said this one has more than the usual deal of awesomness, the cowling being a technological marvel and the mini-pump assembly (working propeller?! 😮 ) just outside of any scale. There is always something special in your builds, but this one brigns a christmas-load of tricks & details 👍
9 August 2021, 09:32
Thank you Slavo for digging this out of the SM stack, and for your nice comment! A complete resin kit was a new experience.
May be I will add outdoor pics. Today I mounted the bottom of an old analog camera to my airfield base for a new photo setup with two tripods, let's see how it works.
9 August 2021, 11:10