
newsfeed
pridal nový fotoalbum.
45 snímky
ГАЗель NEXT (Lenmodel) Диорама "Инкассация" 1:43
1:43


projekt: Gazelle NEXT
Scratchbuilt
4 23 June, 20:28
pridal nový fotoalbum.


8 15 August 2021, 08:26
Thanks guys! The engine bay is not worth showing on this kit IMHO, which is why I built it curbside-style.
16 September 2021, 10:23
")
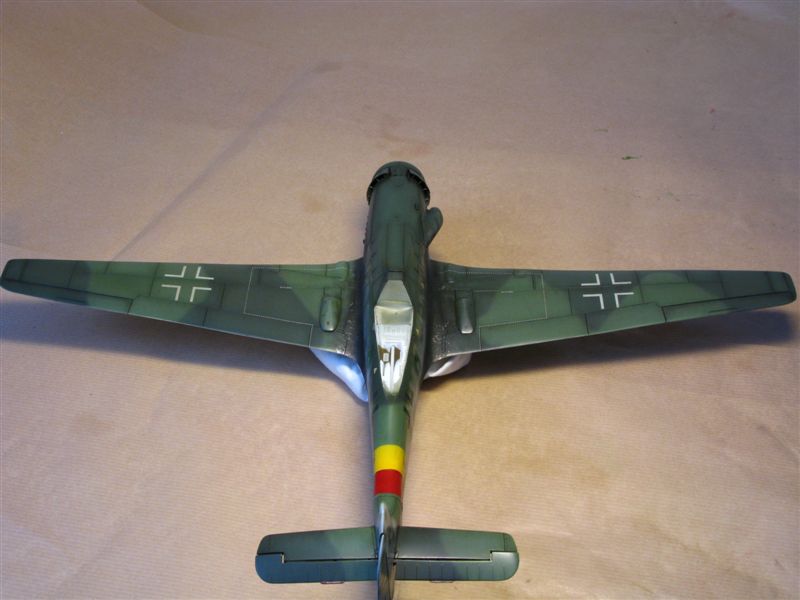
pridal nový fotoalbum.
10 snímky
F-104G Starfighter - 26+63 MFG2, 1981
1:72
One of the PE straps lookes pretty weird. Did not really notice that before painting. The PE parts really add to the kit...


20 24 August, 13:21
Since I have started the exact same kit, turning it into a Marineflieger 104 with Kormorans, I will most definitely be following 🙂
26 August, 15:02
Danke Bernd 🙂
@Michael I only have the kit without the Marineflieger decals, hence the Peddinghaus ones. I 3d printed the Kormorans with the specific pylons for the F-104G. They were designed by cults3d.com/@Sufa312 after photos I have taken at the Wehrtechnische Studiensammlung in Koblenz. I think he did a great job and the files are free 🙂
26 August, 15:22
Welcome guys and thank you for your interest 🙂
Started working on the ejection seat. Decided to add the PE to the seat from the kit and see how this will look. Alternatively I have a resin MB MK.GQ-7(A) from Aires, but this thing does not look very different from the kit's seat. And the straps, etc. are PE as well.
27 August, 20:08
Thank you Christian and Martin! Worked on the ejection seat, besides some weird curve in the PE strap I am quite happy with the result.
9 September, 20:47
")
")
")


")
")
")
")
")
")
")
")
")
")
")
")
")
pridal nový fotoalbum.
115 snímky
Focke Wulf Ta 152 H-1 (1970 tooling / Scratch)
1:72
I did a little work on the wings last night. It required a lot of additional sanding to get the PE to fit.


projekt: Focke-Wulf Ta 152 H


83 27 January, 18:23
My next big project is turning this FROG into a Prince. Wish me luck I'm going to need it.
27 January, 18:25
I'm following. In my opinion the Ta-152H is the most beautiful plane of WW II. I got the kit from Kora in my stash and hope to start the build in spring this year. Good luck and, above all, have fun building it.
27 January, 20:18
Nicolas, I agree. It's a long, lean, fighting machine as they say. Definitely one of the more elegant designs to come out of the war.
27 January, 22:10
I had to widen the fuselage today, in order to make space, before I scratch build the cockpit.
29 January, 01:47
this is going to be awsome.
I am picking kits that are near perfect so I have fun.
but there are also people who pick not-so-perfect-kits like this Ta152 and they still have loads of fun!
GL 🙂
31 January, 13:12
Well mostly I pick not-so-perfect-kits because I'm a cheap skate. I'd rather pay 6 euros than 40 for a kit. I do have some moderately priced kits and they are a lot faster and fun to make, but often I just have the need to challenge myself and see where my skill level is at.
31 January, 17:56
@Skyhiker: I totally like your approach and I think you did a great start!
31 January, 19:16
same here @Skyhiker, I really like the 6eur price point. so affordable. probably thats why I started to look into the 1/144 scale 🙂
31 January, 19:58
Excellent work on the exhausts, and the cockpit is coming along nicely.
2 February, 03:24
I did a bit more today but I can't seem to get any images to upload. Anyone else having these problems?
2 February, 19:03
Looking at photo #17 I want to give a tip:
I would be a little careful keeping the roll of masking tape on the table. I like keeping them in a holder, or placed in a bag, to avoid the side of the roll picking up all kind of dirt.
2 February, 19:10
Yes, I keep my tapes in a bag but it doesn't seem to help as well as it should. I think I need a better bag. When I photograph things at this scale there is more dust than I realize.
2 February, 19:18
I can finally upload my images again now, I was having problems too.
2 February, 20:13
Treehugger I cleaned my tape and got a new bag. Thanks for pointing that out. No need for fuzzy tape.
2 February, 20:20
I have to take a break and will be back in a week. I must say I am in love with this plane. It's really a beautiful design with those long wings. I can't wait to get back to it.
8 February, 06:54
I'm going to build this one from my stash this year, definitely following! 👍
8 February, 14:14
The canopy was totally uneven and so I decided to do the risky thing and file it from the inside. Hopefully I didn't just ruin it.
2 March, 13:17
I have built 70s Tamiya kit - but that was a least workable. The base was there even though many errors. This 'kit' just seems like a waste of time. Like trying to make a dog poop look edible by putting a cherry on top.
If I saw this kit I would stamp it into the ground. Useless
8 April, 20:15
This kit has its flaws but nothing that can't be corrected with a little bit of skill. Are there more accurate kits out there that are easier to build - yes. But the modern trend of wanting perfect kits seems counter to the art of modeling. If you have ever built a model from a block of wood you wouldn't call this kit useless. Challenging or time consuming I can agree with but it is not crap.
10 April, 08:09
I haven't given up yet. Sometimes life forces me to take breaks but I hope to get back into this one soon. I have to put a lot of tiny details in the cockpit next and I need the right head space for that. Kits like these take time and often I will start easier kits mid process to keep things flowing. I absolutely agree that reboxing old kits without a mold date is deceptive. Thankfully with this site we can look up the history and sometimes see the sprues before buying anything. I've only had one kit that I couldn't do anything with. I bought it for 20 bucks opened up and threw it directly in the trash. That was a Top Gun F/A-18 Hornet snap kit, which really was a piece of shit.
10 April, 16:03
Following. Really looking forward to the end result.
Especially since I built this kit myself last year. Although I didn't put so much effort and detail into it as you are doing.
10 April, 21:29
Worked on the canopy and tried to figure out how the scratch built cockpit will fit into the body.
2 May, 23:45
It's coming along!
From about halfway back on the underside there should be no join line - but forward of halfway you are good which makes things a little easier.
Just an idea but you can download the ZM instructions to get an idea?
6 May, 10:13
Trez your message is pretty cryptic. Are you talking about panel lines or internal wing structures? The last photo is just a dry fit. I haven't started with dealing with any panel lines yet. I've been working on the inside of the wing walls to make something that gives an impression of space for the wheels.
6 May, 11:45
Apologies - I meant the external join lines. I can see what you done - it looks good. I thought the ZM instructions would help as a guide
6 May, 12:56
Trez, thanks for your ideas. I'm using a lot of photos and the instructions from a 1:32 model to help figure out what is going on. This little model is a challenge to correct but I'm having fun pushing my skills and learning as I go.
6 May, 15:36
I worked out most of the cockpit issues today. It's not perfect but I got it in there.
15 May, 23:09
Moreno, I'm glad you're liking it. This is kinda pushing my skills a bit. We'll see what happens in the end together.
15 May, 23:11
Getting this kit to accept a cockpit was like pounding a square peg through a round hole. I had to reshape the whole damn fuselage.
16 May, 03:35
Whoah!!! Amazing what you did to that old tooling! Very cool to watch! 👍🏼
16 May, 15:20
Really liking what you're doing, Skyhiker, and learning lots too. Impressed with your skills 🙂
16 May, 19:43
Łukasz the shape of the hood is really off in the kit. The superglue is just material for me to try and sculpt into a better hood.
16 May, 20:26
No, It's just cheap super glue from a discount store that I poured right from the tube and hardened with accelerator.
16 May, 22:08
Well the fine engraving blade I just bought broke within a day of use. Very frustrating.
23 May, 14:42
Luckily I bought a .02 mm blade in addition to the .01 mm that broke. It will have to do even though I would prefer the lines to be a little bit thinner.
23 May, 15:06
Amazing progress! Once you go the route of updating such an old kit, there's no way back, is there?
24 May, 22:19
Thanks Patrick, your right there is always more to discover and do. I'm having fun with it. Of course I have no idea what it will look like in the end. I'm spending far too many hours allowing myself to be lost in process. But if that's what it takes, why not?
24 May, 23:19
It's amazing how every kit I look at of a FW Ta 152 H is different. All the photos of the original aircraft are so blurry that details are impossible to pick out, so I'm left with looking at kits and guessing which ones are correct.
26 May, 01:25
Anyone out there with a book on the TA 152? I'm trying to figure out if the top of the flaps have a vertical line down the center of them or not. From underneath there is a line there but I am getting conflicting images of the top surface. Can anyone post a decent image?
28 May, 16:28
I looked through some of my books and picture collection. But to find even a picture of the Ta152 is rare. 🙁
28 May, 17:06
Thanks Mattes. There are a few decent books out there but they go for 80 Euros and I can't afford that. I doubt the library would have anything worth while. Maybe the model shop will let me look through one of their books but usually they are sealed in foil. Hopefully someone here has something. Getting panel lines correct is not so easy. Even worse are the rivets.
28 May, 17:49
I found this image which clearly shows the flaps divide in two sections. Interestingly the sections are not even like the underside.
[img1]
29 May, 05:48
Maybe this would be helpful? flugzeugclassic.de/f..hlands-bester-jaeger
I do not have the magazine, but kind of stumbled over the link 😉
31 May, 13:34
Thanks Ben, this kit gets a bad rap. It's not as bad as people make it out to be. Of course I am putting a lot of work into it to make it better. But if its done straight out of the box it's not that bad. The backwards propeller is a stupid engineering mistake but that's an easy fix.
31 May, 23:54
Yeah, I was a little heavy handed, but it's not a problem. I just glued it back together. I prefer trenching and filling over trying to get the lines the exact depth overall and then accidentally sanding away lines. The only problem with using this method is the deep panel lines can make the model unstable in places if you are not careful. But in the end it should all work out.
7 June, 21:47
I am slowly moving forward on the panel lines behind the scenes. This is the part I have to force my way through because I don't really enjoy it. But it is coming along and I could have some photos soon.
2 July, 18:21
Thank you Moreno, re-scribing is definitely the part that's the least fun for me too. Some days I have to force myself just to do one line. If you do that once a day eventually it gets done. But yeah, re-scribing sucks.
6 July, 16:21
Big step made with attaching the wings. It makes me feel like I am moving forward after all.
7 July, 14:33
An impressive amount of work, your patience and skills are incredible, congrats!
11 July, 20:02
Wow, what an insane amount of work you put into this project! I am humbled by your perseverance and attention to detail!
12 July, 03:34
Thanks Thomas, I enjoy the process of trying to figure out how to do stuff. The model is just an added bonus in the end.
12 July, 13:20
Thanks Moreno. I'm having fun with it, mostly. The panel lines were a drag but I got through that part. Hopefully after the primer I won't have to any major touch ups. But we will see. One step at a time...
13 July, 16:13
Watching you making process is indeed great to watch. The plane is starting to look great!
16 July, 22:54
Wow! How do you filled the lines? How was you able to calculate the exact quantity?
17 July, 05:43
Moreno, I used an engraving tool to cut deep lines and then I rubbed white putty into them. By rubbing the excess off it automatically brings the lines to just below the surface of the model. As the lines dry they also shrink a bit. So, it was not too hard to do. The trick is to use enough water and a brush to apply the putty and to use enough water on a paper towel or cotton bud to remove the excess. Hard to get to areas need to be cleaned up with a wooden tooth pick.
17 July, 06:01
I never would believe that the base kit is a Revell's offering.... Awesome job!
17 July, 06:31
I worked on some details today. Tomorrow I will give it another coat of primer and hopefully start the riveting.
17 July, 21:24
I am debating with myself when the best time to do riveting is. If you do it before priming you run the risk of filling the holes. If you do it after priming it makes it harder to correct mistakes. If you do it after the final paint job you run the risk of fucking everything up. Anyone have any experience with riveting?
19 July, 13:17
Regarding riveting: I have done it before priming but I don't see why you could not do it after. You'l have to sand after as the riveter leaves 'rings' around each divot (as it pushes the plastic out). In my experience, a thin coat of primer has negligible impact on the rivet holes (if it had, this would be a problem with any factory-riveted kit).
20 July, 23:38
Alec, I tend to agree with you. My thoughts on doing the riveting after the primer was that the rivets may remain a bit better defined. But I am not convinced. I think I will have to do some tests for the future. By riveting before and after the primer on some styrene, then spraying a color coat over both should give me a better idea of which I prefer. Right now I feel like I prefer not doing it at all, because riveting is a pain. But that's just me feeling sorry for myself for wanting to do a half way decent job on this kit. I do wish I could find some reliable riveting guides for this plane. It seems like everyone is just guessing at it.
21 July, 00:00
Thanks Patrick, I haven't mastered riveting or panel lines yet but I'm learning. I am pretty limited in my tools and the scale is not the easiest. But with practice and study I hope to improve.
21 July, 22:44
I've realized that one of the benefits of doing the riveting after the primer is that you can make sure that most of the sanding is completed. However inevitably there are areas that get messed up and sanding is required after all. I just haven't found the perfect solution.
21 July, 23:33
Enjoying your progress a lot, the transformat is amazing.
I must say your plans are so clear and great reference where do you get your plans like these from, I search the tinternet but never find any as useful as your plans, any extra guidance would be appreciated
22 July, 08:12
I drew my plans on the computer by looking at various images on the internet. Unfortunately I haven't found any place to download great paneling or riveting guides. There is a Russian website that has blueprints that I sometimes use but I'm not sure if it is still available. I didn't use it for this project.
22 July, 08:31
Sy Bar, which plane will you be doing next? I can look around for blueprints and see if I can find anything useful.
22 July, 13:37
Cheers Skyhiker v kind offer and thanks for the info. Not sure what will be next and if plans will be required but I'll keep you in mind should the need arise.
Keep up the work I'm loving watching the progress 👍
23 July, 20:34
Widened the wing roots and I am continuing with the riveting today. Also I did a lot of research on the proper colors to use, which was not as easy as one would think. They certainly are not what the instructions say.
24 July, 17:51
Great work as usual! I'm curious about the colours: aren't they the late RLMs?
24 July, 18:48
The colors are late RLM colors but not exactly as the instructions say. To start with they call for the hood to be RLM83 which of course is wrong, since in actuality that was a marine color and blue. Many paint manufacturers have some type of green with that number but it was based on a typing mistake in the original RLM records. I believe the hood should be RLM73 as in the original photos it is a bit darker than 81. The fuselage is RLM81 and RLM82, but there were three variants of 81, two that were brownish and one more green. The green is the correct one for this plane. The under carriage is RLM76, but once again we have three variants to choose from; one that is greyer, one bluer and one more tan colored. The greyer one is correct. There is confusion about whether the nose is red or black. I still have to do more research on this. I believe the propeller blade was RLM70
24 July, 19:16
I hope to be finished with the riveting today. Most of my time was spent trying to figure out which of the conflicting diagrams was closest to the original. I don't know if I got it right since there are no surviving planes left.
28 July, 10:23
Great Work on this old Revell Kit and there is still one surviving aircraft.In National Air and Space museum.
airandspace.si.edu/c..11/nasm_A19600317000
29 July, 14:01
National Air and Space museum has a different version of this plane. It is very similar but there are a lot of differences.
29 July, 14:37
I redid the engine today and laid down a second layer of primer. The rivet lines came out well. There are just a few small touch ups on the engine cover and wing tips to do before I start on the wings.
30 July, 15:59
Thanks DerMattes. It's more a scratch build than a kit at this point. It's starting to come together. I still have a while to go though. How is a scratch build defined at the official contests?
31 July, 00:46
It's like you are building a vac kit with the amount of work and attention to details you are putting into this build. Impressive and inspiring!👍🏻
31 July, 08:04
I made a gunsight out of 7 scratch built parts that is only one millimeter in size.
31 July, 14:23
Next I have to try and repair or replace the front windshield. Somehow it cracked when I was sanding it down. Is it me or do the clear parts on Revell kits always have problems?
2 August, 04:51
Well I painted the propeller today but afterwards I had to clean my Iwata airbrush and change the needle. Unfortunately the needle noozle broke off in my airbrush and there is no way to fix it! Now I have to rely on a cheap Chinese knock off to finish painting until I can save an extra 150 bucks to buy a new airbrush.
8 August, 16:58
That sucks. I'd love to lend you my second airbrush, but unfortunately that's also just an old Chinese product at the moment. Probably wouldn't help much.
8 August, 18:10
I will try scratch building the canopy if that doesn't work I will have to get a vacuform machine.
20 August, 19:17
Nice to see a modeller 'working the problem' rather than splashing out on loads of AM. It's also refreshing to see a build being carried out to its fruition and not left dwelling in the eternal online shelf of oblivion. I'm also working on a 72 kit that needs much hacking and slashing although not as much as this one - I suppose the irony is that some brand will finally release this type - as it is a hole that has yet to be filled! 🫡 👍 😊
21 August, 14:38
I wish I could add another like for your vacuum machine! Man, you're really cool!
21 August, 14:43
No, I just needed to make a canopy so I first tried replacing the front windshield with a clear plastic piece from a CD cover and glueing the original side windows to it but when I finished it was too thick. So then I made the front windshield out of thin plastic sheet from some packaging I had laying around. That worked but the bubble canopy was now too thick. So I tried making a bubble canopy by heating up some of the plastic sheet over a candle and pressing it down over the original with my fingers but that didn't really work. I only got one that looked right but I burnt it so I realized I needed to use a vacuum and change my heat source. My hair dryer runs so hot it overheats and turns off, so I tried that with the vacuum and it worked. You just need to tape the plastic on a piece of cardboard with a hole cut into it and practice. You can make the vacuum screen out of anything. I just used an old sanding disc that I punched holes into and taped down on my sweeper.
21 August, 19:02
I'm not sure I can visualize that yet but I'll see if there's something on YouTube. I have a truck I need to make a windshield for.
21 August, 23:11
🤣🤣 love the vacform 😁, l split the canopy on my little mig-23 project, to heavy with the Quetip/ ear cleaner!!
I used toaster n paintbrush end 🤣, it worked...but was just a little 1/144 mig-23, it's my wall.
The homebrew job was clearer than the original 🙄,
Would love a little vacform.
Love the scale detail you go to.
👍👍👍
21 August, 23:58
Ben here is an example I found on YouTube of vacuforming. youtube.com/shorts/GFSJxs51uoY?feature=shared
2 September, 08:17
Just make sure that the plastic you are heating up is polystyrene and not PVC. You don't want to poison yourself with heavy chemicals. Polystyrene is bad enough. And don't use your oven or anything that will be in contact with food.
2 September, 21:36
I made another canopy. This time as one piece. After painting I will try to separate it.
5 September, 14:13
That canopy has come out nice n clear.👌
I think it would be nice model with closed canopy also.
I like closed as keeps the dust out n preservation on cockpit.... Little time capsule too.
Doing a good job, persistence is a good trait in this hobby 🙄😆.
I've spent more time making a missing gun turret.! Than on the rest of the build !!
5 September, 14:30
You mean you build an entirely new landing gear, right? At least this is how it looks 😉 Impressive work and dedication!
8 September, 16:44
Cannot wait to see more. Amazed at the effort expended to correct, such an old kit. Reminds me of a favorite saying of a long lost friend. "that wouldn't stop a good modeler". A good modeler you are. I thought Inwas pretty good, but am in awe of your talent and dedication. Am following
8 September, 17:45
An amazing amount of improvement and scratch work to improve the model.
Very impressive..👍👍
8 September, 19:33
Thanks guys. I'm trying. Learning a lot on this model. It certainly is a challenge, but I'm having fun.
8 September, 20:56
Can l ask what the 🕯️ candle wax was for?? I was guessing 🤔 maybe to build up higher for super glue. ? I like watching builds as you can learn new skills.
Also if you don't mind, how did you thin down the retract arms ...looked machine down.
Enjoyed watching so far being fascinating,
I built the Revell FW-190 this year ...that wasn't to bad.... Few of the engine fan blades hadn't been moulded in !! So l built them back with super glue gell, back wheel was fragile n came off. But rest ok .
Thanks 👍👍
9 September, 09:48
Mr D. The candle is used as a receptacle for the super glue. It helps to keep the super glue from setting. By putting it on wax and covering it with foil it will remain in a liquid form for a whole day. The retractable arms were made from styrene rod and stretched sprue. The thick end is the rod. The thin end is sprue and the raised area is very thin sprue wrapped around it.
9 September, 10:04
Thanks for the info 👍👍.
Have you tried super glue gel?? It's slow to dry but builds up more.well.
9 September, 13:54
No, I haven't had a need for that. I just use cheap super glue. 5 tubes for a Euro.
9 September, 18:51
")
 (Tamiya 61016)")
")
pridal nový fotoalbum.
25 snímky
Yak-52 Ukraine - Drone Hunter
1:48
Build complete.


projekt: Yak-52 Ukraine “Drone Hunter”

38 22 July, 21:16
Welcome Torsten & Robert!
I've started the fuselage assembly and clamps were needed.
27 July, 15:43
Nathan, I am following along as well. I have friends in eastern Ukraine, so very interested in this one. Kind regards, Dutch
31 July, 20:47
Welcome Dutch! This build is turning into a slog. Clamps and super-glue "force-holds" galore. Luckily it is a tiny plane so I'm nearly done already, just completing all the seam sanding.
1 August, 18:44
Working on the cowl. I had to use 2-part epoxy clay to fill a large gap on the bottom of the cowl that was created by making the cowl fit straight & level.
8 August, 20:53
Looking good. Keep up the progress. The splinter pattern will be stupendous when done.
13 August, 16:03
Thanks Dutch! Man I just realized looking at pictures that the wing camo is a mirror image for the other wing. It won't be perfect… 😁
13 August, 20:47
Welcome to the show Ben! I've applied the first color today. Now off to cut masks for the next color. I've been spoiled by those pre-cut masks…
16 August, 17:41
Nathan, quick question. Why not just spray the first color overall, then mask only the subsequent colors? Saves at least one step, I should think. Carry on. I am enjoying the show.
16 August, 17:47
In this case I just got a little too happy masking. I even decided against my usual preshade since this plane's paint looks really new in all the pictures.
17 August, 17:20
Nathan, are you going to put kill markings on it?
google.com/url?sa=t&..e2eYFcXbT_ewibuKmesM
18 August, 20:13
Well my printer is dead, but my dad has a similar one so I'm going to try… Wish me luck.
19 August, 17:35
The second color has been applied. Slow going here as my workbench time has been lacking.
25 August, 14:13
Thanks Dutch! Today I masked off the areas for the gloss black. The tan colored areas are quite small, but they're everywhere. Tamiya tape stock is going up!!
26 August, 17:32
Well my gloss black was solidified, so flat black will have to do. Hopefully it will all even out when the clear is applied
28 August, 00:20
Thanks Jennifer and Villiers!
Work continues on masking these tiny sections.
30 August, 16:13
Well that was a whole bunch of masking for some very tiny pixels… I also added a coat of Future to help with the panel lining effort to come.
3 September, 23:57
Today has seen the underside color selected and applied (Tamiya X-14 Sky Blue) along with masking/painting the cowl colors using Steel & Red.
4 September, 13:58
I'm using both AK & Mig panel wash. For the bottom I used Grey-Blue and for the top I haven't decided whether I'll use a dark brown or black wash. Of course for the black areas I'll use the Stone Grey wash which I think is Mig.
4 September, 18:28
Thanks LC & Guy!
More masking for the Ukrainian flag on the tail today.
6 September, 01:59
Thanks Robert!
Chrome Yellow has been applied for the first half of the Ukrainian flag on the tail.
6 September, 14:53
The Ukrainian flag on the tail has been completed and the landing gear legs have been painted and attached.
7 September, 23:01
Thanks Dutch! Today I completed painting the canopy framing and the wheels. Also my clear gloss arrived in the mail today, so I'll be able to apply that to the entire aircraft. After that I only need to paint the anti-glare panel on the upper cowl. Nearing the finish line.
9 September, 20:31
Ooh-la-la! Well done Nathan. Definitely a special addition to the display case.
10 September, 15:54
")
")
")
")
")
")
/sk/search.php?q=*&page=newsfeed&fkSECTION[]=Newsfeed
search-solr.php?lang=sk
35
35
/sk/search.php?q=*&page=newsfeed&fkSECTION[]=Newsfeed
35
todo