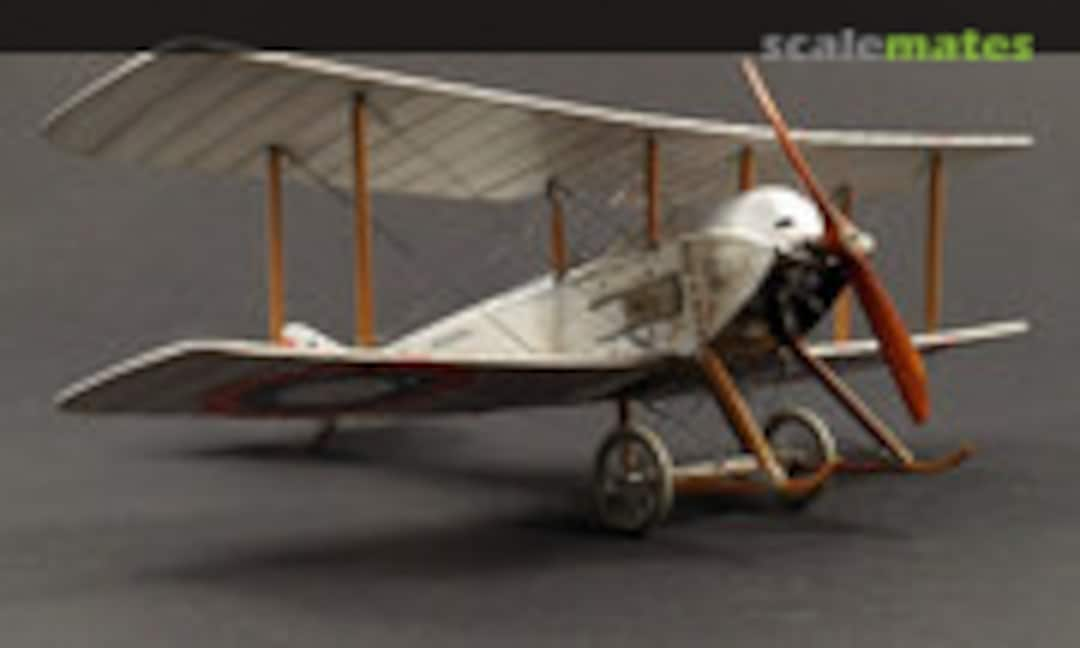
Lebed VII (Sopwith Tabloid) WIP


Komentáre
26 August 2017, 14:19
These props of your are just excellent. Do you plane/thin the wood planks yourself? Have you ever experimented with what the minimum practical thickness is? Wondering how thin the laminate layer could be.
26 August 2017, 15:55
If possible, I use veneer, because it is less work. But for boxwood I was not able to find veneer, so for the boxwood (not used in this project) and for this dark pear I have to slice my own veneer. The typical veneers you can by are 0,5 or 0,6mm, but in shops for architects you can find it down to 0,3mm. The thinnest I used was for the Fokker D.VIII Stripdown (see my projects), because it has my first and only wooden airscrew in 1:72. I sanded it down to 0,3mm.
The possible minimum really depends on kind of wood.
26 August 2017, 16:18
Thanks very much for the info. I will have to try this one day, it's just so much more realistic.
26 August 2017, 21:22
Thx mates, added the next batch of pictures. Have I mentioned, that I really love to work with wood? 🙂
28 August 2017, 19:26
The cockpit is just excellent, and that wood seat is top notch! And that brass detail... I think there is an all-wood model in your future, laser-cut from scratch 👍 😉
28 August 2017, 22:57
Thank you for sharing, very interesting, and a very beautiful subject !!
29 August 2017, 00:39
Thank you all! Alec, one day a full scratch model would be nice, but it costs a lot of time and I have so many unbuilt kits, but may be in future a Fokker Spinne. I think there is no kit in 1/48?
29 August 2017, 20:44
I am not aware of any. In any case, not sure how practical such undertaking would be (i.e. all wood model). What I really like and appreciate about your creations is that your use of different materials (be it wood, metal, or paper) in the end contribute to an awesome level of realism. That's IMHO is what scale modeling is all about 👍
30 August 2017, 02:20
Wow... I'm dragging a metal chair across a stone floor to get a front row seat on this build. Beautiful.
30 August 2017, 03:15
Greg, I hope your metal chair is comfortable enough - welcome to the show!
30 August 2017, 20:14
Yesterday I was at an art supply store and happened across a bit of cherry veneer... I'm now cutting 1/72 sized propellers out of it. Teach me, Sensei. 😉
30 August 2017, 22:16
Love the wood! Great job Lebed. I have been thinking about getting this kit. Following.
30 August 2017, 22:44
Thank you mates! It is really nice to get feedback from mates with a different modeling scope 👍
9 September 2017, 11:43
That is super work boghunter. Now that propeller - is it actually made from wood ? rather than plastic painted up ? The grain is so life like.
9 September 2017, 14:11
Yes, it is real wood! See the very first picture, it was glued from the six pieces of veneer on the left.
9 September 2017, 15:14
bughunter, isn't the hull outside made of PE glued to the plastic hull parts? Would it be possible to sand from the inside of the cowling untul you reach the inside of de PE. That would give you a mm on both sides to get more room for the engine.
9 September 2017, 15:39
Seem to have missed this one so far, would have been a pity, very nice details and scratchbuilt details...
9 September 2017, 19:37
Patrick, there is only a small PE part for cooling slots, but I thought also for a solution in that direction.
Martin, no seats are left over, but it's not a big deal. Thank you for careful listening during the lesson 😄
Bart, no hurry - Scalemates have backups I guess, so nothing is lost 🙂 Thx for watching!
9 September 2017, 21:39
Never thought of incorporating real wood into a model. Thats so cool. That must need some specialist tools for shaping the wood. Great job.
9 September 2017, 22:16
Very simple wood model, just to get you started (not that you need to get started 😉 )
toemen.nl/artesania-..3hb1bn0g2kmb6gipl3i5
9 September 2017, 23:24
Hi Martin. Thanks for that. That looks like fun. Do these kits come with any tools ? This is all new to me.
9 September 2017, 23:31
Hi Mike,
The shop states glue not included. Nowhere are tools mentioned. It does say 'easy assembly'. I've heard that before.... if you're really interested I could contact the shop for you.
9 September 2017, 23:41
Thanks for that Martin. I guess im kinda interested in finding out what tools Bughunter is using to shape the wood for the propeller head. Lovely smooth curves. Thats tricky at such a relatively small scale. Im sure if I tried it with a scalpel i would end up with a load of kindling!!
9 September 2017, 23:49
I am right there with Mike. How Boghunter is doing all this woodwork is intriguing. The work is astounding.
9 September 2017, 23:51
Wouldn't it be possible to vacform the nose, or solder it from copper to get it to a scale thickness. Pity for the engine, but from the boxart, it looks hardly visible, so you could also mount the kit engine, and the aftermarket one on a stand next to the model.
10 September 2017, 05:21
Thx mates!
Mike, you don't need special tools! The aircraft in the link Martin has posted you see black edges, so it is laser cut. just glue it together. For my wood work a sharp thin saw is helpful, I use some of RB tools. The veneer is done (if I can't buy some) on a Proxxon KS230 and the rest is mostly sanding! Some sanding sticks in different grit are useful, sanding paper with 240 is great. For the raw work a molding cutter in a hand mill tool (Proxxon or Dremmel) is good to save some time. But be careful, with simply sanding you have more control.
Bart, in opposite to a real Sopwith Tabloid in the Russian variant the engine is very good visible, because they have removed the lower half of the cowling completely.
The project was not planed with such amount of scratch work, but with not original kit parts and so much applause I can't resist 😄
10 September 2017, 11:00
The engine looks fantastic, even though it does not fit 🙂. I am sure a solution shall present itself 👍
10 September 2017, 13:00
Yes Alec, the engine is in scale, and the outside of the fuselage is in scale. Only the plastic is to thick, compared to the original thin metal cowling.
Mike, beside the wooden airscrews this is not my first model with wood. See in my projects the Phönix D.I, which has a wooden fuselage and struts, and also the D.H.2 is equipped with wooden struts.
10 September 2017, 13:30
Perhaps fashioning the cowling out of beer/soda can aluminum?
10 September 2017, 14:18
Thanks bughunter for that advice. I am certainly interested in giving this a go. Ill have a hunt round for a supplier for laminate and will definitely have a look at your other projects. Always keen to try out new techniques so thanks for keeping us all posted on yours.
Cheers.
10 September 2017, 21:29
Another option that comes to mind is thinning the fuselage inner wall, using a rotary tool and ball-point bit? I have used this technique with success in similar situations. The wall thickness need not be uniformly thinned, just enough to make the ends of the engine cylinders fit and to make it visually reasonably uniform. Just a thought...
10 September 2017, 21:32
Wow, what a lot of work to do on the wheels!! Those Eduard wheel rims really add something. Not seen this 'split' wheel assembly before. I take it they come split in the kit with the original PE spokes ? Thats a bummer with the engine. I guess 1:48 is sometimes 1:47. Refund ?
11 September 2017, 10:37
Thx mates! Yes, it was a bit of work, but I like the result. Mike, the kit parts are shown in picture 43. And regarding the engine: it is completely in scale 1/48 and correct, the very thin metal cowling is modeled here in thick plastic, that's the problem. So I will go with the "original" solution.
11 September 2017, 17:49
Looking forward to the 'original solution'. Id go with Donalds beer cans. Maybe too flimsy ?
11 September 2017, 20:26
In meantime I have created a wooden undercarriage, see the new pictures.
11 September 2017, 20:58
With steam - rotate the wood on the outlet of a water boiler, then it' easy to bend. After that it should be fixated until it is dry again.
12 September 2017, 13:24
Thank you Alexander, no software tester. So hunting for bugs in software, that's the background for my nickname.
17 September 2017, 21:09
Love the skis. What material do you use for your home made 'PE' parts ? They look really good - now you must need special tools for this ?? Cant wait to see what you are gonna do with that 'string'. Do you use like a mini-vice to work up the parts ? Often thought one of those would be very useful.
17 September 2017, 23:17
Thx mates, really nice that you like my fiddly work 🙂
Mike, you will need brass foil (0,05 or 0,08mm), small drills and small needle files. And patience 😉
18 September 2017, 17:51
Thanks bughunter. I wondered if it was possible to make your own PE parts. So useful. Just need to track down some brass foil. Looking forward to the next installment.
18 September 2017, 20:46
actually, you can make your own PE, although it requires the use of some chemicals etc. basically the same technique and similar materials than to make your own circuit boards.
18 September 2017, 21:21
...and you have to be a little crazy to do something like that..
A fantastic work, absolutely great.
18 September 2017, 21:22
or you can print them on a sheet (scale 1/1), glue it to a sheet of copper, aluminium, ... and try to make the form with cutting, drilling, ... (BTR-80A APC | Project by Silenoz (1:72))
19 September 2017, 08:58
Wow, nice project Bart 👍. I think it needs to be completed 🙂
It is my understanding that when it comes to custom PE parts, the work is really in the design. The actual production is a fairly toxic process (lots of chemicals). I heard there are companies that will produce a custom PE parts based on supplied drawings.
19 September 2017, 12:26
Thank you for your support, mates! Regarding PEs, yes it would be possible to design it on PC a find a company for etching, but it cost also time, hard to get it right in the first shot ... Bart, to print it out is a good idea, but the parts are very, very tiny, so I look at pictures and do it by guess and by gosh.
19 September 2017, 19:26
Yes, I would go for something simple that you can do at home for minimal cost. A good mini coping saw, a few needle files, a big magnifying glass, a hand vice, mini-clamps maybe - pegs might work. £25.00 the lot ?
19 September 2017, 20:25
Thank you Mike and Erik. The build continues now, new pics of alu plating uploaded.
14 November 2017, 16:10
There are many many very good modelers showing off their work here but only a handful is truly exceptional, you are one of them.
14 November 2017, 17:21
Wow Alex, really great words! Thank you very much! I need a red-face smiley now 😳
14 November 2017, 20:04
I follow this build somewhere else and already ran out of superlatives but I really want that little red "+1" on top of the page whenever you do an update here. 👍
14 November 2017, 21:25
Agree with Alexander and Spanjaard. And yes ice, the addition of a 'like' button would be great. Also a 'Save to my favorites' button. There is so much great work on this site but finding it again is not that easy.
And by the way - where have you been all this time? Really looking forward to the end result. Your skill and technique are inspiring.
15 November 2017, 00:31
I was wondering how this was coming along! Great progress 👍, the cowling in aluminum is super. How thick is the aluminum? Any specific reason you chose it over brass or other material?
15 November 2017, 12:10
I am serious, starting with the multi layered wooden propeller and using real wood on interiour, the turned metal parts and "self made PE", real rivets. That is all truly inspiring stuff man 👍
15 November 2017, 12:34
Great project.....looks so real I imagine test flights will take place shortly
15 November 2017, 12:48
@all: Thank you mates for your feedback, highly appreciated!
@Mike, to allow better finding I maintain my project list. So it is sometime helpful to click on a users profile.
Regarding the last time: I was a bit out of ideas here how to solve issues, so I have started another small project (finished already), with a full scratched brass trailer: Taurus KEPD 350 Long-Range Air-to-Surface Missile (1 pcs) | Project by bughunter (1:48)
Yes, from time to time I build also modern stuff. I also had private things, a short holiday, ...
@Alec, I used alu because it has some specific look. For weight the original uses alu, and many pictures of the Tabloid in Hendon show a cool looking alu biplane 🙂 Even a tinned brass looks different. Additionally I had enough alu for experiments form one grill plate. The thickness is around 0,06mm, hard to measure. It is more rigid than kitchen foil.
@Wim 😄 👍
15 November 2017, 18:51
Do you use some kind of a mini lathe to turn the parts or are you doing it with a Proxxon/Dremel drill somehow?
15 November 2017, 20:26
I own a real lathe, a Paulimot PM190-V. That is the smallest of that company and was offering more compared to others in that price range, e.g. Proxxon. May be it is a bit oversized now, but at that time I wanted to use it for RC flying.
15 November 2017, 20:55
Hi bughunter. Thanks for the tip on project lists. That works ok but it would be great to have a means of saving others projects into a sort of scrapbook. Not sure if you can create such a thing but I think it would be a useful addition to SM?
Sorry, didnt mean to pry. Your right, its good to go of and do something else for a while. You come back refreshed and see things differently.
16 November 2017, 01:03
Admirable! This metalwork looks so convincing- I am deeply impressed by your skills!
18 November 2017, 20:05
This is such a curious plane. Now how did the Russians get hold of the plans ?
19 November 2017, 16:59
Remind me never to put one of my builds next to yours! LOL Amazed at every update.
19 November 2017, 17:34
Thx mates!
@Roland, it was not really skill. After trouble with the engine fitting only thin plates could solve it in scale, so I tried it out.
@Es-haq Khosravi It is a nice project, but I think my Masterpiece is still the D.H.2 Stripdown (see my projects).
@Mike It is only clear, that the Russians ordered one Tabloid. It is not clear, if it was delivered or not, I guess it was. Then they copied it in a small series, because it is known, that Mr. Lebedev ordered later 16 tachometers at Sopwith 🙂 And some pictures of different machines are known too.
19 November 2017, 17:57
Thanks Bughunter. Ahh - so a collaboration then ? I have been trying to dig up up some info on-line but failing.
And by the way - that beaten metalwork looks great. Dont think you could achieve that through painting alone. You must have a very tiny hammer.
19 November 2017, 18:03
No Mike, not with a hammer! Please see picture 91, that is a rubber polishing tool. It is not running round, so at small rpm it creates such nice marks 🙂 Just found it out by accident.
19 November 2017, 18:12
Well thats really cool. Very effective. You really should write a book of your amazing techniques!
19 November 2017, 23:51
Added the next pictures - not sure about redoing the last step of painting. The stringers are covered with to much color ....
20 November 2017, 19:57
the more i look at all those details. more i like it. i have a question... where do you get the micro rivets of picture 77?
20 November 2017, 20:04
No problem, they are brass ones, turned on a lathe! So they are really not cheap. Here you can select of six types
fohrmann.com/de/mini..dellbau-40-stk..html
And be warned: the 0,2mm ones are really small!
20 November 2017, 20:49
Oh, I forgot to upload of the pictures of what I have done before my X-mas holiday, done now.
30 December 2017, 18:07
Thanks my friends! ice, this should be my mantra 🙂
For all of you the next set of pictures with the work of the last days. No chance to finish it this year.
30 December 2017, 21:54
with your skill, you could as well build those planes from scratch completely - wooden skeleton coated with fabric.
31 December 2017, 11:23
Thank you Markus, but this will need much more time, and I have so many nice kits in stash. But yes, my stripdown and AJP models are near to your idea.
1 January 2018, 20:02
That is such a masterpiece! Let me confess: I am deeply impressed and delighted by your skills!
2 January 2018, 07:19
Splendid work, can you elaborate a bit more how you made the louvres?
2 January 2018, 09:51
Thanks you very much mates! Bart, I added more text to pics 84 and 85, hope it explains it better.
2 January 2018, 10:49
Fantastic job! The interior and all the other little details look great!
2 January 2018, 11:40
Thank you so much! I added a new gallery of the finished model and looking forward to your feedback😉
2 January 2018, 20:55
Album info
Started as often with the airscrew, since I really like wood.
For cockpit new wooden parts added, new wooden gear created.
The front is plated with real alumunium.