
Стрічка новин
додав новий фотоальбом.


226 11 July 2017, 18:11
good to see you got out of work mode! count me in for this project.....
11 July 2017, 18:43
Hi My Friend, yes I'm out of it (unfortunately).
So Welcome aboard😉
I'm hopping to start this one now.
11 July 2017, 19:25
Yup, that definitely looks like a Mirage repack. Be careful, those track links can be really brittle.
12 July 2017, 13:54
Hi EnsignExpendabl.
I know Mirage have a lot of T26 and Vickers models. I don't know if this are the same moulds.
Thank you for the Heads up.
Normally I use a new blade and a lot of careful for cutting those. I hope that they resist.
12 July 2017, 17:00
I have photos of a Mirage T-26 here, you can compare the sprues: earlesspierre.livejournal.com/27349.html
12 July 2017, 18:27
Some sprues LIKE THE under hull and SIDES, FENDER, springs and road wheels, ETC seem the same, but other sprues look different
12 July 2017, 21:14
Looks like a nice kit, and interesting to see it in Finnish colors. When looking for references I can recommend the movies Tali Ihantala and Talvisotta about the winter war
13 July 2017, 10:48
Hello Bart.
Thank you for the advise. I will try to find those videos in the net.
I think its a nice kit a little bit of flash in some pieces, so some clean up to do.
I've been researching in my library and I see that I will have to do some alterations to the kits config.
The Plan is not to do it in finish colours but to depict what was the first part of the Winter war at the invasion (end of 1939).
And I thought the best way to interpreted that invasion is to do a destroyed/immobilized soviet tank because I don't have any figures to put with it.
I've upload some plates with the intended model. It will be the T26 - 1935.
So for example piece B2 will not be fitted because it existed only in later models.
13 July 2017, 13:56
There 's a nice scene in which they stop a T-26 by putting a log between the track and the driving wheel... Maybe a bit of inspiration for the haphazard way of fighting in the beginning of that war in a war...
13 July 2017, 14:15
Yap I've seen that seen in a History Chanel movie about that war. I've also a photo with a followed tree used as guerrilla warfare by the Fins. I'm posting it...
13 July 2017, 14:34
As usual, some more colour plates and external details.
I hope that you find them interesting😢
Next I will start the build😎
13 July 2017, 20:21
First build progress and fit impressions😎
Bad engineered and lousy instructions 👎
16 July 2017, 00:59
Wow, those gaps are enormous! I hope you are making a welded hull T-26 so you don't have to remake the rivets.
19 July 2017, 04:30
splendid work... need to make work of my Maquette Zis-30... it's somewhere in the same league....
19 July 2017, 06:33
Hello, mates,
Thank you for stopping by and for your nice comments. Much Appreciated 🙂
@ EnsignExpendabl, again thank you for Yes, the gaps are gigantic if you don't sand and cut a lot, but I've deal with it and many of the photos are still just dry fittings. I think I'm not going to do it entirely welded, as in reality some T-26 had mixed versions of welded and riveted parts.
I've now done the turret and I was positively surprised with the fit. I was expecting again huge gaps but it was ok with the roof top. Nevertheless not the same with the gun mount, that needed a lot of study and precision cutting and sanding in small but important areas to achieve the correct spacing. I will post some photos later.
I'm now sure that the lower hull in this kit was for a Polish 7TP and not for a Russian T26.
@ Markus, coming for such a talented modeller as you are your comment is very important to me. Thanks again🙂
@ Bart, Thank you a lot for your nice compliment.
I have some Maquette kits in stash and I just hope that they will be a lot better than this one, both in the instructions and in the provided plastic pieces. 🤔
I can hardly believe in what TOM Modellbau did in this kit, for me its a no winning situation, and I will think thoroughly before buying another kit from them. 👍
What you really need in this leagues is to have a lot of reference material and study the info with attention.
19 July 2017, 10:09
Yeah, RPM shares sprues between their Vickers family kits. I built a few Maquette kits and have a few in my stash, don't expect miracles. It was the only way to get a Valentine for under $70 for me, though, so I will grit my teeth and deal with it though.
19 July 2017, 13:46
@ EnsignExpendabl, That's the way to deal with this kind of kits. "Grab the bull by the horns" hehehe 😄
I'm not expecting nothing major, but long sessions of enhancing bad plastic with Maquette kits.😉
That's one way to deal with this hobby, buy cheap and expect a lot of work. I like it. I think $70 for a RPM/Maquette Valentine is way to expensive I bought a MiniArt one much cheaper.
@ Hi Urban, I'm glad to see you aboard following with interest. Thank you Mate.
At the moment I'm struggling with turret detailing. Very interesting...😎
Later on, I will upload some more progress photos, I hope you find the time to see and comment.
Cheers
1 19 July 2017, 17:21
My local store had the MiniArt and Bronco for $70+ and the Maquette for $35, so I had to settle. Later I bought the Bronco anyway, but I think I was too inexperienced to handle it. I recently bought a Bronco Cruiser Mk.III on the cheap, so let's see if my skills are up for it now.
19 July 2017, 18:33
Interesting. I had similar problems. The photo-etch parts are very nice, do they come with the kit?
19 July 2017, 22:37
OK, as said I've uploaded some more photos. Mainly the work in the turret.
I still have to cut and glue the antenna holders and a little piece of PE under the gun.
Then glue the hull accessories and put some weight to it.
To finish I must tackle the tracks😉
19 July 2017, 22:43
@ C Marques de Sá, Olá Mate. Sim o frete PE, vem com o kit como podes ver na foto 6.
No entanto as peças G8 (puxadores PE - foto 4) estão mal dimensionadas para o fim a que se destinam (acabei por utilizar as peças de plástico), por isso utilizei as de PE, para outros fins.😉
20 July 2017, 14:19
Now, while the glue is drying, just some more detail work.
Next steps, more accessories and the tracks😎
21 July 2017, 18:49
Thank you for your nice words, Mate. Much appreciated. 🙂
I'm "praying" not to have the same problems that you had with your Trumpeter tracks, on my tracks, and also that they can be cut without breaking (like the antenna holders). 🤔
22 July 2017, 11:27
Ready for paint.
I closed it with some weight inside, tackled all the gaps, added some extra tools, the starter and chain - I had to make the hooks to fix it.
Also added some bullet chips on the turret and a penetration on the left side.
Still cleaning the 112 individual tracks links attached in 3 places to the sprues (it will take a while). Careful use of a new cutter blade here is mandatory😎
28 July 2017, 08:43
The turret looks a lot darker than in your previous photos, did you get a new one?
28 July 2017, 14:29
Hi EnsignExpendabl,
Nop. it must be because of the contrasting white hull and light grey.
In the previous photos it was just the turret.
28 July 2017, 17:14
Hello Bart,
Thank you for your interest. Very kind of you.
Currently I'm in Holidays in Sagres (Algarve) also gathering some nice natural stuff to bring back to Lisbon. and pick up my airbrush (finally). I have a lot of painting to do, in several unfinished projects. 🤔
5 September 2017, 16:19
I just looked at the date this was posted and I must say, I missed a great build while you were happily putting it all together. As always. Great work mate. 👍
21 September 2017, 21:27
Hi Mate,
Thank you for your kind words. Much appreciated.
I've to pick my airbrush once for all... and finish this vignette and some other dios like the Marder II D one Marder II D_16 Inf Mot Div_Rasputitsa_Kalmykiya | Album by mig (1:35)
21 September 2017, 23:25
The brand you have chosen is what.? I use an Iwata SP. Had it 5 years and the key to it being so good all the time is good but careful maintainance.
22 September 2017, 02:20
My parents offered me a Badger 200 (single action) ages ago, and I've bought another Badger (2nd hand) 150 (double actin) not long ago, (I've just used it once or twice).
The 200 eats everything and spit it all hehehe without cleaning it all the time.
IMHO, It's a good airbrush but with a compressor without pressure regulator it limits a lot when you want to go soft.
I don't even know the pressure it is doing, but any way, with care you can make some thin lines also.
I've yet to study and practice with the (second hand) 150. I suspect that the Teflon ring or the needle point are wasted. But still have to confirm that 🙁
22 September 2017, 10:23
Happy to say that I've finally put my Badger 150 to work.
Black "primer" done.😎
23 September 2017, 22:15
Hi Rui, is that 200 gravity fed or does it have a side cup? Looking for a simple unit to lay down primer coats.....my Harder & Steenbeck has a .20mm nozzle, better suited for fine work...need a workhorse too
24 September 2017, 17:54
Hi Wim,
No Gravity feed. Both the 200 and the 150 have small bottle or cap that are fixed under, and both are reliable airbrush and easy to work with.
25 September 2017, 02:21
I've done some Pré-shading using Tamiya XF-49.
I've never painted a 1/35 Russian tank, and I don't have any green acrylics to paint it, but I've a lot of Humbrol enamel greens.
I planed to use them as washes and filters to get a convincing Russian green. I hope I can achive it 🤔
First layer of Humbrol enamel (76 - Matt Uniform Green + a bit of synthetic diluent) layed...
29 September 2017, 23:37
@ Bart, Kim, Thx for your support, much appreciated.
I'm going to add some more enamel green shades to it before I start detail painting and weathering.
I think the M76 is to bright??? So I will try next, a more darker greyish green??
I know I'm going to struggle with this, because when it gets to the oils application, the turpentine/white spirit will attack this green layers... 🤔
Anyway I'm hopping not to mess it to a point of no return...
30 September 2017, 08:49
seal the enamel with a acrylic gloss varnish and then apply oils....works for me...washes flow very smoothly on a gloss coat
30 September 2017, 08:54
Hi Wim,
Yes you are right, Mate, That's what I intend to do, but I think I must go soft on the turpentine/white spirit, otherwise it also messes with the clear acrylic gloss.
It has happen to me before with the Elephant Outono / Autumn 1944 | Album by mig (1:35)
and the 1Ton Sd.Kfz.10/4 half-track Esci sdkfz 10/4. On Hold | Album by mig (1:35)
And I think in the latter I put a lot of it, to seal it conveniently, but...
Maybe the brand, is not the best for this kind of job?
30 September 2017, 09:02
A splash & dash of a heavily thinned enamel Humbrol Matt 80 Grass Green applied.
followed by another one, but yes, this time a more darker greyish tone. Humbrol enamel Matt 114, applied.😎
I think it's ok now (the green it's not so vivid) to go back with a soft application of acrylic Tamiya XF-49, for high light again, and it will be ready for the clear seal coat of acrylic varnish, and starting weathering process, oils, etc.
At least, this is the plan hehehe 😄
2 October 2017, 17:31
Que verniz acrilico utilizas? e como o utilizas? Onde arranjas humbrol 114? foi descontinuada, eu ainda tenho um pote antigo com um restinho mas nunca mais encontrei à venda. Aplicaste o enamel com aerografo? Obrigado
3 October 2017, 00:59
Olá, C Marques de Sá.
Tenho usado um verniz brilhante da Winsor & Newton, com aérografo directamente do frasco, imediatamente antes de aplicar os decalques e os óleos para o envelhecimento.
Quanto à Humbrol tenho n guardadas algumas à milénios. A 114, não é mt antiga mas infelizmente não sei precisar onde a arranjei. Talvez no Clube do Colecionador perto do Zoo de Lisboa comprei lá muitas ,mas este também já fechou.
Normalmente vai tudo a aérografo, menos a pintura de alguns detalhes, a aplicação de óleos e pasteis e as técnicas de desgaste.
1 3 October 2017, 10:28
Olá Rui S.,
Obrigado pela sua resposta. Desculpe ter disparado as perguntas, mas vernizes é uma das coisas que me traz alguma frustração. Eu tenho humbrol satin e gloss. Já consegui bons resultados mas também já tive verdadeiros desastres. Mais ou menos 50-50. O satin já apliquei com sucesso com aerografo uma ou duas vezes, mas das outras fica branco. O gloss só dá para brilho, e para verniz de brilho muitas vezes uso uma marca de produto de por no chão. Também tenho vallejo, mas ainda não usei muito. Parece um pouco melhor. Um dos problemas é aplicar com aerografo ou com pincel. Ambos os métodos têm desvantagens (para mim). Há muitos anos atrás experimentei vernizes para enamel da humbrol e da revell - não gostei de nenhum deles - não usei mais, tive péssimos resultados. Também tenho x-22 da tamiya, mas como li que não era propriamente um verniz tenho receio de utilizar, e além disso as tintas tamiya geralmente só funcionam bem com outras tintas tamiya e não misturam bem com outras. Vou experimentar Winsor & Newton quando tiver oportunidade. Recomenda? Qual o preço médio? Acho que a maior dificuldade é com vernizes mate. Humbrol 114 já foi descontinuada há mais de dez anos (assim como outras cores) e é uma pena porque não encontro na gama deles outra tinta igual (nem de nenhuma outra marca). Ás vezes usava para pintar tanques escala 1:72. É pena as lojas físicas fecharem porque não é a mesma coisa comprar na internet. Sou do Porto e não conheci esse Clube do colecionador. Embora geralmente use o aerografo, por vezes ainda gosto de voltar ao pincel, porque acho que tem mais controle.
1 4 October 2017, 14:03
Olá C Marques de Sá,
Desde já não há por que pedir desculpa por fazer perguntas, o scalemates tb serve mesmo para isso.
Até hoje os únicos vernizes que me lembro ter utilizado foram: o enamel Matt da Humbrol e o referido acrílico gloss da Winsor & Newton. Posso recomendar ambos pois nunca tive o problema de esbranquiçarem e o Winsor & Newton nem é caro, custou-me 3,59€ (75ml) no corte ingles, mas há que o deixar secar bem, pois demora bastante mais que o excelente enamel Matt da Humbrol.
Qual é a marca do produto de por no chão que usa?
Tenho ainda enamal satin e gloss da Humbrol mas não me lembro se já os utilizei.
Há pouco tempo comprei o acrilico Matt quer da Winsor & Newton quer da Humbrol para testar, mas tb ainda não arrisquei usar. Só de olhar para a cor branca do da Winsor & Newton me faz recuar.
Quanto às tinta tamiya utilizo-as sempre em conjunto com as enamel da Humbrol sem problemas qd aplicadas a airbrush. Com pincel já a história é diferente. têm comportamentos destintos mediante a sequência da aplicação. Há que as deixar secar muito bem e mesmo assim...
A unica vantagem de comprar na internet é que normalmente conseguem-se melhores preços, sendo a oferta exponencial, há mais concorrência mas é preciso tempo para procurar ou esperar pelas melhores oportunidades.
Hoje em dia há aerografos que fazem linhas tão finas como um pincel. è preciso ter um bom aerografo com ponta fina e um regulador de pressão no compressor. Infelizmente não tenho nenhum dos dois 😄 mas estão muito mais baratos hoje do que antes.
1 4 October 2017, 15:07
Moro no Brasil e o produto que uso chama-se brilho fácil. Deve haver similar da johnson ou outro aí em Portugal. É uma questão de procurar no supermercado. Na embalagem vai dizer cera (ou verniz) acrílica para chão, é isso que se quer. No fundo é quase o mesmo que o material para modelismo, apenas leva um componente extra para dar cheiro. Procure o que tenha composição mais simples e faça experiências. Uma garrafa grande custa o mesmo que uma garrafinha pequena de modelismo. O contra é que apenas vai encontrar verniz "gloss" brilhante, nunca satin ou matt. O brilho fácil é branco mas quando seca fica completamente transparente. Os ingleses e americanos usam produtos semelhantes chamados klear ou pledge (da johnson). Vou experimentar comprar o da winsor e newton quando for aí no natal. Já os vernizes satin e matt tanto os da humbrol como os da vallejo são esbranquiçados e se a aplicação for ligeiramente exagerada secam dando uma névoa (efeito horrível). A dificuldade do aerografo para mim não é o tamanho da linha, mas a pressão. O meu compressor é muito simples e não permite grande controlo, além do mais as condições climatéricas aqui tornam difícil obter a consistência correcta da tinta. E depois, como já disse a outro "mate" aqui, penso que algumas pessoas são mais artísticas que outras e têm mais naturalidade a manejar os instrumentos. A minha fase preferida é a construção. Neste momento estou a pintar dois a aerografo e um a pincel. Pincel é bom para enamel. Acho que hoje em dia há demasiado preconceito contra o pincel, a não ser que claro queiramos ser "profissionais" do modelismo, mas eu identifico-me mais com o rob basic modelling.
Já agora qual o melhor branco mate e qual o melhor branco gloss? Já experimentei tamiya, revell, humbrol, vallejo. Ainda não estou satisfeito...
1 5 October 2017, 01:32
Olá C Marques de Sá,
Sim, por aqui há várias ceras acrilicas brilhantes de limpeza, mas nunca arrisquei utilizá-las. Axo porque têm todas um aspecto leitoso de várias cores, mt diferente da Future ou Pledge.
Os Winsor & Newton deverá encontrar por aí nas lojas de artigos para artistas e pintores.
Eu uso o branco matt enamel da humbrol e um acrilico de pintura tipo Robbialac ou Barbot normal das lojas de tintas que são bem mais baratos e com maior quantidade.
1 5 October 2017, 22:40
Boa ideia robbialac... mas não danifica o plástico? Das ceras não se preocupe com a cor branca, veja se tem composiçao simples, depois experimente num pedaço de plástico transparente, ao secar o branco desaparece. A minha é branca e acontece isso, eu uso para dar brilho a canopies. Aqui não deve ter o winsor e se tiver é muito mais caro que em Portugal.
1 6 October 2017, 13:39
Hey Rui,
how the hell have i missed this superb build? Nice to see how much Patience and ellbow grease you invested. Even the kit does not seem to be bad! Hang in there, it will be a stunning model right from your bench!👍 😄
6 October 2017, 14:41
@ C Marques de Sá, até hoje não tive problemas. Utilizei esmalte da Gama Advance 100% acrílicos, numa embalagem de 250ml.
@ Hi Holger. hehehe,😄
Thank you for stopping by, nice comment and support.
I've done a little more on it: some detail painting and a bit of dry brushing.
I will post some more photos later on.😉
6 October 2017, 15:26
@ C Marques de Sá, Viva.
Verifiquei agora que no " OLX ", estão à venda várias latas Humbrol já descontinuadas, incluíndo a Humbrol 114.
Julgo mesmo, tratar-se do propriétario do ex Clube do Colecionador. Se está mesmo interessado em adquirir essa tinta será concerteza possivel encomendar.
Deixo o Link:
olx.pt/anuncio/tinta..DOka.html#5a28045059
21 October 2017, 16:31
Fine paint job on your T26 ! I like how rich are the shades of green.
28 January 2018, 17:11
Excellent build and paintjob so far. And an excellent documentation of your project! Keep it up! 🙂
28 January 2018, 17:24
Hello Michel and David,
Thank you for your nice comments, much appreciated.
I had to stop this project, when my Badger compressor started a rattling, horrible sound.
I had to buy a new one and lost the mojo, but I'm starting to recover it, and your messages sure helps.
So, thanks a lot again, mates.
28 January 2018, 18:33
@ Kim, I hope so hehehe. Well come back, Mate. 🙂
@ Urban, Thank you for your encouraging words, Mate.
Much appreciated.
11 February 2018, 00:30
Cleaning and assembling the single track links is the best work around. 😄
Keep fighting mate. 🙂
7 March 2021, 07:44
@Ingo, thx for your support. That work it's so good that made me defenitly decide that the next kit Will be for sure with wheels or even a plane 😄
@ Dietmar, Thank you, I apreciate. I'm glad you like it, but there is still a lot of work to do on the tank and figure/s?. The black and white photo was an inspiration. I like it very much and I think it was taken at night with flash???🤔 IMHO it has a great definition for that time.
7 March 2021, 12:16
After tackle 2x112 track links (puff ... 😠 ), This is now about, the all important adaptation to the terrain.
7 March 2021, 21:27
Thx a Lot My friend, Ainda falta muita coisa (e tenho de ganhar coragem para o cobrir com alguma neve). Mas o mais importante é que está a evoluir.
Tudo bem? Mantém-te em segurança😉
8 March 2021, 14:35
Thank you for your kind comment, gorbygould. Yes, this is some kind of reboxing with lousy instructions and some updates???
But the smal PE fret, alternative road wheels and individual track links where a very nice surprise😉
8 March 2021, 19:41
I will be keeping an eye on your efforts here Rui. 😉
No doubt, you will make a silk purse out of a pig's ear mate. 😉
9 March 2021, 02:53
Amazing work with a challenging kit. I agree the prototype pic is really cool
9 March 2021, 03:07
@Kezza, thx for your encouraging words.(Nice expression, btw. I'm always learning) I'm Counting on you for some honest opinions, so please use your magnifying lens 😄
Ben, thx a lot for your Nice comments. I'm really glad you like what you see. Much appreciated.
9 March 2021, 18:24
Concordo com a opinião de muitos, a tua evolução é fantástica! Que bom poder acompanhar-te neste nosso mui amado hobby. Cheers mate
Hope to see you soon
11 March 2021, 19:46
Mate, obrigado por partilhares a tua opinião. Faz-se os possíveis e a experiencia vai ajudando 🙂
Espero que quando o caçula crescer, tenhas tempo para partilhar aqui alguns trabalhos😉
Esperemos que esta trampa de virus desapareça o mais depressa possível, para conheceres a cave.
Abraço
11 March 2021, 20:59
Bem sobre o caçula crescer... outro vêm a caminho! 😄 Vou ter que arranjar tempo para tudo. Anseio por essa visita! 😄
Abraço mate
Fica bem
11 March 2021, 21:09
Hehehe grande notícia, Mate. Família a crescer. Parabéns e Felicidades, aquele abraço 👍
11 March 2021, 21:18
Hi Rui, I like the subtle streaking you did on the surface of the tank. How did you accomplish this?
16 March 2021, 12:34
Thank you mates, realy glad you like and comment it.
@Spanjaard, I sure hope so 😄
@ gorbygould, I apreciate your kind words. But I'm not done yet😎
@Tim, well I'm always trying to improve with new experiences 🙂
17 March 2021, 20:05
Rui, that's how we get better! Keep up the good work and keep on trying mate!
18 March 2021, 04:38
@Ben M, Sorry for missing a reply on your comment. I apologise. Thank you for your kind words. I achieve the streaking with well diluted acrylic Paint. I Will upload some photos of the brand I used ASP.
@Tim,, thx again mate. I Will do my best, as usual.
@Pawel, I use sodium bicarbonate and two other specific produts. I Will post some photos ASP.
@ To others mates that liked the work, but I can't see who the are, I Thank you all.
18 March 2021, 15:24
Thank you Rui! Your tank in the snow is great. You just thin your acrylics to a wash and paint streaks with a brush? The weathering work you did is so good.
21 March 2021, 00:57
Thank you Ben. Yes, I heavly dilute it with water (wash/filter) and aplied over the Humbrol enamel green with a fine brush with a small amount of paint for each stroke.
The problem I encounter was, once you aplied it, you have very litle time or almost none to correct anything. (If you apply water to soon, you take all the paint away if you take to long, you can't correct it).
This time I didn't use gloss varnish because for the first time I didn't apply any decals and also no oils.
I'm very glad you like it. Thx.
21 March 2021, 01:04
Yes I normally weather with oil washes as you have a lot longer to work with them. When I've done acrylic panel line washes for instance over enamel paint I have observed that it is very hard to make a correction
21 March 2021, 01:21
Yap, that's it. But this time I wanted to try something diferent. The last time I used my oils dots, it didn't work as usual, so acrilics it was 😄 and I was quite happy with the result, that I think I've over done it in some spots. But as they say, I can live with it 😉
21 March 2021, 01:26
What I liked about it was that it was pretty subtle and realistic, not overdone at all!
21 March 2021, 01:35
Well I think on the turret I could have stoped earlier, but it you like it, thx mate I'm happy.
I've also noted that the original tank has a Shine that I could'nt replicate. Normaly I like my tanks completly matte, but in this case... I don't know.
21 March 2021, 01:49
Nice work again, Rui ang good to see on the Photos how you build up the Dio 👍
21 March 2021, 08:59
Amazing project👍
Could you maybe go a little into detail how you combine the three products to make the snow? Looks very realistic!
Asking for a friend....😛
21 March 2021, 09:16
That looks amazing Rui - the snow looks very natural.
I wonder if the gloss shine in the original photo is from a flash when they took the photo?
21 March 2021, 10:09
@ Dietmar, Thank you very much. I'm glad you like it Mate. for this build I had lot's of time and I wanted to share all the info & details about the kit.
@ Alexander, Your work is Exceptional, so I'm very flattered that you find this work worthy of those nice comments.
As to the snow aplication: The 2 specific snow products are water based and the bicarbonate can be mixed with white wood glue directly from the container or diluted.
However, I only mixed the materials during their application.
I spread white glue and baking soda by brush in certain areas where the snow is thicker. Where I wanted little accumulation I applied the white glue very diluted with a sprinkler / sparger and sprinkled the bicarbonate with a small bottle with a thin cone cap.
In other areas I applied by brush, the foam snow (it is a very thick paint, but easy to spread).
The kristall schnee paste, is a paste that I applied with a brush (not easy to spread convincingly), and that has a lot of very bright "dots". (if you do not add water it dry's white and shiny, but if you put water on top with a brush, it will have a more milky and dull finish).
Before it dries in places, I wet and sprinkle it again with baking soda to hide the excess of sparkles.
I hope I managed to explain in an understandable way.
@ gorbygould, Thank you for your supporting words Mate, much apreciated as you know. Yes, it might shine more because of the flash but my black and white photo was also taken with flash on my phone😉 😄
I also want to thank two new mattes that liked the album, but I can't find out who did it 👍
Time to start the figure😉
21 March 2021, 13:35
Thx a lot Rui, going to do a few test runs I guess to get the result I want
21 March 2021, 14:10
Np. Glad that I could help... your friend?😄
I'm sure you will achieve the result you are looking for.
21 March 2021, 14:12
What I worry about using Sodium Bicarbonate is that it is prone to discoloration over the years and even attracting bugs! You want to have a lively diorama I suppose but not like that, lol. Heared and read that many times, even if you google it it comes up.
21 March 2021, 19:40
Thank you very much Jean-Michel, I'm glad you like it. Apreciated.
I am sure that the Finnish figure, will be prepared for that temperature 😄😉
21 March 2021, 19:40
@ Alexander, sorry for the late reply.
Yap, I've also heard that it can turn "yellowish"? That's why I bought one that says "Purissimo" (very pure), so I'm hoping that with the diluted white glue and that, may keep both problems away.😉
In my first base for the dio "My very first - project", I've used peper to simulate sand and in my dio "9 SS Panzerdivision" and again in the dio "Outono / Autumn 1944" I've used coffe grounds, without any problems to this day (except the respective smell that took some time to disappear 😄) so, I'm hopeful that this one will be ok too. 😄
But hey, thx for the heads up 👍
22 March 2021, 22:12
Beautiful, beautiful work! A labor of love, to be sure. Anyone who can model snow convincingly as you have has my respect. Thanks for sharing your techniques with us.
23 March 2021, 04:53
@ John, those are very kind words, Thank you very much, and yes I always enjoy the modelling work. I Guess this time I was more lucky with the Snow. My first atempt in the panther dio wasn't so good.
@ Mate, obrigado, agora falta o figurino e mais um ou outro detalhe.
24 March 2021, 20:48
Thank you very much for your kind comments mates, I apreciate them.
@Ingo, not finished yet, I planing to start the figures and some more details this weekend.
@ James, I'm glad you like it, as you know I like your great work and collection too.
@ Tini, Well, In Portugal we seldom see snow, so I also like it real 😉 and I'm more glad that you like this imitation.
@ Jim, I was lucky this time 😉
@ Paulo, My pleasure Mate.
26 March 2021, 20:11
My first ICM kit ever. Nice mould, very very thin seam lines almost nonexistent, nice fit. The plastic is for the soft side, like Italeri.
28 March 2021, 22:38
Oh Look ! It's Aimo Koivvnen with out his head ! LOL ! Love the subject, a commonly forgotten bit of history !
28 March 2021, 23:12
😄😄😄, Thank You Bob. I apreciate your ironic and true coment and I'm glad you like the subject.
It's the first time I'm using this technique to paint a face. Many medelers use it, so this time I'm going to try it.😎
28 March 2021, 23:54
Very nice work so far.. a well fought kit to assemble, but looks like you've beat it into submission. Kuddo's for that
4 April 2021, 08:36
Thnak you for your nice comment Bart, I apreciate it. Yap, not the best quality kit, but I've done my best to get a decent finish, and I'm happy.
Now I'm doing some work, in the final details of the dio.
4 April 2021, 15:29
Could be Bart, but I've too find a scope to put in his rifle 😉
I don't use real primer, I use the paint in the photo 129. It was a bit pasty so unadvisedly I throw isopropanol alchool in it. Dumb 🙁
I'm also worried with the figure. I've to see how I'm going to solve this issue.
5 April 2021, 19:46
The figure is way too big for Simo as he was quite short. But if you want it to be Simo you won't need a scope for his rifle as Simo only used iron sights.
5 April 2021, 21:45
m91/30 scopes are dirt simple - you just need a bit of tubing, Rui: m9130.info/pu-sniper-scopes
5 April 2021, 23:35
Not sure yet, but I've airbrush it with the some paint mixture, so it may be like the Maxim? 🤔
7 April 2021, 09:31
FINALY DONE.
I'VE UPLOADED THE FINAL DIO PHOTOS IN COLOR; CLOSE-UPS AND B/W.
HOPE YOU ENJOY THEM, AND THANK YOU FOR ALL YOUR SUPORT 🙂
9 May 2021, 22:41
Thank you for your words, Spanjaard. As you said in your previous comment "lots of work, but it will pay off at the end", you where right, I guess, at least I'm quite happy with the outcome.
9 May 2021, 22:49
Thank you very much Ben, glad you like it. The problem with the "primer"/base paint I used, shows more on the figure than in the maxim, Machine gun, but I can live with it. Lesson learned, I hope.
Time to think about the next One.
9 May 2021, 23:12
If your not hunted down by some war museum in Europe to replicate the history of these wars for the world to see, then shame on them, as you truly are the master of your 'hobby'. 👍
Sorry I failed to comment earlier Rui, but wow!. Just stunning from all angles. 🙂 🙂
10 May 2021, 01:08
Makes my teeth chatter with the cold.
Rui, very excellent work. I've thumbed through this album a couple times. A new favorite.
10 May 2021, 03:25
Darkness falls in Northern winters ......were it not for the white snow shining in the twilight. The photos reflect this atmosphere in a perfect way. Great little diorama! 👍
10 May 2021, 09:08
woh, I'm radiant Mates.
Opening scalemates in expectation of matte analysis and receiving sympathetic comments is always good, but receiving them from masters and experts in this hobby, feels even better.
Your comments make up for all the work and effort put into this kit and small diorama.
Thank you all. I already won my day.
@ James, Thank you, one day you will try a dio ok? You should Mate. The litle ones don't need much space 😉
@ Kezza, As always, your kind comments melt me. You no I'm ages / centuries, from your skils and yet, you always succeed in using the nicest words. Thank you YODA 😄
@ Dave, Well that realy is a great comment. In this case I can say that I'm glad you feel like that 😉 It's a loonnngggg álbum I'm very happy to know that you managed to go through it in full. You've gain my respect too 😄
and last but sure not the least:
@ Neuling, The dio master that always surprises us with your excelente Dioramas is here and again with wise words. Thank you again. Yes Mate, the real Photo 2, that triggered this dio, was taken at night and I am pretty sure that much of the Winter War was practiced in the dead of night. This time, I also like the scenery photos.
10 May 2021, 09:44
Looking great mate but you forgot a small detail, the top part of the rifle sling over the shoulder.
10 May 2021, 11:00
Thank you for your comments David and Lenny. I apreciate it and I'm really glad you like it.
@ Urban, Thank you. But no, I didn't forget it. The top part of the sling that you mention is over the backpack betwen it and the back of the figure. It cames Over the left shoulder looking from the back and ends up in the rifle. You can have a glance of it in photo 226; 227 or 230 🙂
10 May 2021, 19:25
Dare I say with a bit of shame I'm catching up late on this one. But after having enjoyed the 255 pictures I am happy to have found it at last.
I really liked your toothpick system to get the tracks looking so right.
The snowy environment made me feel cold watching them. That's terrific.
Winter war is not my area but I'd like to dig a bit more into it. Thanks for that.
With much respect.
Mathieu
10 May 2021, 20:12
Hi Mathieu, Thank you for your interest and stamina to scroll all this long album. I Respect that and your kind words.
If you felt cold, I've achieved the goal 😉
Winter war is a very interesting period, and you will find some diferent planes to replicate with your excellent skills 😄
10 May 2021, 20:21
Patience and application pay off, it seems! Nice work again Rui!
11 May 2021, 17:17
That's some great diorama, Rui.
Love the small details and the snow 👍.
11 May 2021, 19:04
Thank you very much for your kind words mates. I'm really pleased that you like and comment my work.
@ Jean-Michel, judging by your excellent dios, I'm sure your wise words are aplied in their execution 🙂
@ David, you can't imagine how I would like that your words were true. I would LOOVVVEEEE to know how to work with Photoshop, but unfortunatly I don't 🙁
@ WhiteGlint, the details take their time, but I think they are always important in a dio. You can alaways had some more interest with them 😉
12 May 2021, 19:16
Thank you very much for your kind comment, Vytautas.
Very much apreciated, as you know how much I Respect your skill and work.
2 July 2021, 14:55
Thank you very much for stopping by and for the kind comments, mates. Apreciated a lot.
@ Simon, the Fin soldier has an almost white face, so it must be under 0° 😉
7 September 2021, 19:10
Thank you Viacheslav, coming from such a talented modeler as you are, its a great praise.
13 September 2021, 19:50
Very nice dio of the David vs Goliath war. The dio also speaks to me on a personal note since my granfather served on the finnish frontline. Thanks for sharing 🙂
26 December 2021, 12:50
Thank you Very much, mates and Sorry for the late reply.
@Markus, Yap, a lesson to us all. I'm really glad to read your comment, it makes me fell happy, Thank you.
@Guy, I'm glad you like this One.
@Dominik, you are to kind mate.
@John, just like the season, yes? 😄
@Andrew, I always thought about a winter Dio, so I had to do it and I hope to do some more 😉 always trying and learning.
4 January 2022, 17:20
Very impressive snowy scene.
When I used the snow effect, it turned yellow after a few days of time.
30 January 2022, 16:00
Thank you MS K, I'm glad you like it, stoped by and comment this one.
Mine is in the living room in a IKEA shelf and stay's pure white until now.
P.S. I explain above in this thread, what i've used to do it.
I also want to thank all the mates that liked this one. Much Apreciated, thank you all.
30 January 2022, 18:44
Definitely a masterpiece, Rui 👏👏
Also, plenty of good tips for my future dios!! 👍
1 February 2022, 10:35
Thank you my friends, your comments are sincerally apreciated.
@Richard, I'm glad you like it that much and that you can also see some use in my álbum. I'm always glad to share what I manage to do.
@Michael, Nice of you to stop by. There are so many great álbuns in scalemates newsfeed, that it's easy to miss some that we like. It also happens too me.
7 February 2022, 17:02
Here, here! Calm after the storm... Superb in all respects, and inspiring too 🙂👍
6 August 2022, 09:22
@ Finn, thank you for your comment, I'm very glad you like my David against golias.
@ Holger, I mate, long time no see. Hope your Ok. Thanks for your kind comment and for stoping by.
@ Bruce, your right mate. And storm is back, unfortunately. Thank you for your kind comment. Apreciated.
6 August 2022, 22:05
Thank you a lot Phil, for stopping by and comment, apreciated.
Unfortunately I don't know how to work with Photoshop so I found an alternative way with a big monitor with selected images on the background 😉
Also thank you all mates for the new likes.
22 August 2022, 20:40
Hehehe. Hi my friend, hope everything is ok with you.
Well unfortunately, with the global warming, even there everything will melt sooner or later 🙁
23 August 2022, 01:11
Thank you Tom Harris (MHBeergeek) for the 124 like in my album
Much Apreciated
10 September 2022, 20:50
Great work, you've got plenty of snow on the vehicle but it isn't hidden. Abundance with moderation, well done
23 December 2022, 20:46
@ R K, Thank you for your kind comment and like. Apreciated.
@ Dominik, Thanks for stoping by and for the nice comment. Yap, I liked a lot doing it 😉
@John, Thank you, I'm glad you like it.
@ Scott, comming from a master, I realy apreciate you stoping by and comment. Thank´s a lot for your comment.
@ Kyle, Thank you for your words. Apreciated.
And also thx for all the new likes. I wish you Mates, a Great & Happy New Year 👍
29 December 2022, 22:48
Lovely project about a forgotten part of the WW2 conflict. Very well executed and nice atmosphere creation. Congratulations!
Hope you'll like my version when I finnish my project on this subject.
11 March 2023, 23:30
@ Mathias Sorry for the late reply and thank you for your kind comment.
I'm following your album with great curiosity and see the great progress your getting.
28 May 2023, 11:04
Amazing job with the snow effect, Its beautifully done. I'm going to use a winter dio for my Tiger I'm building. I have bought the precision ice and snow kit. I hope it looks have as a good as this.
28 May 2023, 11:15
No problem Rui, thank you for your curiosity, I must admit I'm using your work as inspiration 😉. Thinking also to put a log between the wheels after seeiing the movie I mentioned in my album and your diorama.
28 May 2023, 11:25
Hi Mr James, Thank you for your kind comment. I'm glad you like this one and I'm sure that with what I see from your albums and talent, you will make a better work than this.
@ Mathias, yah those brave Fins would do everything to stop the clay-footed giant 😉, a bit like the brave Ukrainians today.
28 May 2023, 11:27
Like it a lot! the winter in your black&white photography looks real. thats great!
2 June 2023, 08:45
Thank you very much for stopping by and comment this one Dominik. I'm really glad you like it, but I hope you noticed that one Black & white photo it's the reall deal that inspired this work 😄
2 June 2023, 23:32
Indeed very inspiring: the snow, the vegetation, the cold ... winter war! Very finnish 👍👍👍
2 July 2024, 04:07
Sorry for the late reply mates, but as I have been away from the hobby, I preferred not to respond right away and wait until I returned.
@Thomas E. Thank you very much for yourkind comment. I'm really glad you find it inspiring. Makes me proud.
@ Doubtingmango, Thank you Mate, Apreciated and yes, it was and oldie all warped but as I like the T-26, it ended up being a pleasure to build it and learn a bit more.
@J35J Thank you, for Comment, i'm glad you like this one.
@ Randy, Thank you for stoping bye and comment, the feedback is really Apreciated.
29 October 2024, 22:30
The snow looks so real it must be cold.👍
I used Tamiya texture effects before but when it dried it turned ivory so I ended up having to paint it white and then put pearl on top. Does powder not change color?
24 November 2024, 13:48
Hi MS K, thank you for your kind comment. Much appreciated.
I'm happy to say that the products I used, after almost 3 years, are still completely white.
24 November 2024, 21:48
@ Lebloge, Thank you for stoping by and comment. Makes me very happy. The snow was made with the materials shown in photo 184 (@ MS K).
@ Andy. Thank you very much Mate. I´m glad you comment it & like this one. Appreciated.
Also, I take the opportunity for a big Thx to All mates for the new Likes.
27 November 2024, 12:06
Thank you a lot for your words. Alec K. I'm glad you comment this one. Apreciated.
30 November 2024, 18:08
Good to see that older builds submerge from time to time. Well done dio!! 👍
1 December 2024, 11:20
Thank you Juergen, I'm glad you think so and that you like this one.
3 December 2024, 14:24
Thank you for your kind comment Mr D. Very apreciated. I'm really glad you enjoy this one too. It felt great making it and the building log too.
10 December 2024, 22:32
Winter scenes are my favorite! There's something incredibly mesmerizing about them, and you've captured everything perfectly in this diorama.
7 January, 21:02
Thank you very much for your nice comment. Apreciated a lot.
Yap, I also like snow scenes, but again, I also like desert scenes 🙂
7 January, 22:29
I have looked and looked for your build in all the recent comp videos on Etube, as I imagine you have attended one or two of them. ! GOLD. !!!
8 January, 19:36
And here's me, living in northern Sweden at the latitude 64 (Yes the discgolf discs with the same name is made here in town). I'm more or less buried in snow at the moment, I hate showeling it, I hate the cold as my injured body aches more during autumn/winter. Well in short, I know it all about winter and my favourite modelling subjects is as far as possible from my life situation as I prefer desert subjects when I build...
8 January, 23:12
@ Kezza, sorry but I'm not in Etube. Thank you anyway Mate.
@ Urban, I'm hoping that you can manage your snowstorms without any damage. In autumn/winter, you should make vacations in Portugal, we had 22º in last few december days of 2024 😉
My first attempt (Giloy-Tikich album) wasn't so well done. I feel very tempted to go back and change it a bit, but usually I've the policy to don't touch my older Dios.
9 January, 16:05
I'll manage but one or quite possibly many more words will be said that express my inner feelings for this white hell. It's only -16C at the moment so I'll manage but I promise that I won't like it when I must venture outside again tomorrow.
No, let old dioramas rest in pieces (pun intended) and strive to make each build better than the last one.
9 January, 21:51
@ Urban Gardini, Yap Mate. That's my policy too, and I will stick to it. I've so many other kits/dios to do that I must not wast time in older ones.
@Desert Marlin, never to late my friend and better late then ever 😄 Thank you a lote for your kind comment. It's most apreciatted.
13 January, 14:42
@ Spitfire 14, Thank you for your nice comment. The idea come from that great photo and so it was my second winter Dio and the snow much got better on this one.
@ Finn, Thank you very much for your words. You are to kind but very much apreciated.
2 19 February, 21:21
Great attention to detail, if I come around building a T-26 I will come back here for reference material 😉
27 February, 12:23

What a brilliantly detailed build album mate! Soooo much work in there. LIke others, I suddenly feel (very cold) the need to put the heating on! your dio is so realistic. Stunning work as always Rui. 👍
12 March, 16:46
How is the quality on this one? Especially the Revell 2008 Version? Thanks
")
12 March, 16:45
додав новий фотоальбом.


7 10 March, 05:19
The cockpit is very complete in the kit. I have therefore added very few parts such as 2x 3 operating levers under the instrument panel as well as a few parts on the cockpit floor before the stick. The cushions are not yet mounted, as they are painted separately (leather).
10 March, 05:42
Den Bausatz hab ich auch. Toll gemacht, aber irgendwie bin ich mit den gespritzten Kühlergrillen am Rumpf nicht ganz happy. Lässt Du die so, oder machst Du die weg und neu aus Fotoätzteilen?
12 March, 15:56
додав новий фотоальбом.
190 зображення
Baubericht
1:200
A few boxes are still missing.


Проект: IJN Mikasa


 2+
2+ 70 31 October 2022, 06:18
Let's hope so. The conditions are particularly good this time. Not only do I have a Pontos set for this model, I also have an MK 1 set on top. So let's see what I can conjure up from it
1 November 2022, 10:35
Zur Entspannung jetzt was bodenständigeres?
Ich bin auf jeden Fall dabei!
1 14 February 2024, 16:16
Schön Sven.
Ja, der Ausflug ins Star Wars Universum war nett, aber ich baue doch am liebsten Schiffchen. 😉
Sehen wir uns auf der EME?
14 February 2024, 16:19
Leider nicht. An dem Wochenende kann ich nicht und ich muss dieses Jahr etwas Urlaub sparen. Ich habe für Hamburg im September gebucht.
1 14 February 2024, 16:24
Sehr Schade.
Und Hamburg im September kann ich leider nicht.
14 February 2024, 16:25
Schön zu sehen, das japanisch Bügeleisen ist im Bau. Bin schon gespannt auf das Ergebnis!😳
1 17 February 2024, 13:55
Ganz neu für mich, schiffe. Gespannt wo's hingeht. Hals & Beinbruch 💪🏼
1 17 February 2024, 15:08
Fein, das freut mich euch dabei zu haben.
Glaubt mir, bin auch gespannt wo ich lande. 😄😉
18 February 2024, 05:17
I forgot that you came on board, Dietmar. Nice to have you there. 😀
2 March 2024, 07:18
Nice workbench. And how on earth do you keep your cutting mat that clean?
Das Modell? Ja das Modell wird halt wieder super. Eh klar! 😉
1 5 March 2024, 17:23
Thanks Michael.
That's easy. Before I started building the Mikasa, I rotated it 180 degrees. If you look at the picture with the bow view, you will notice the paint and glue residue in the back corner. 😁
6 March 2024, 12:22
Fantastisch was du mit dem Rumpf gezaubert hast, Jörg und das in der kurzen Zeit 👍
1 15 March 2024, 07:04
Looking great! Steady hand! I would think hullred but I had to look up the word "antifouling" 🤔🦐🦞🐙🦑
1 15 March 2024, 07:38
Thank you both.
It's unbelievable what was mixed into the antifouling paint back then, Tini. 😲
15 March 2024, 10:04
Great work so far 🍿
Slight off topic I'm interested in the storage you have behind it. Particularly the one between the brush storage and the three tall draws. My question is de you convert another storage to give the racks for your tray things and if so how/what did you convert? I have the same storage system but have not found anything like that rack and it's a great idea I'd like to use.
Cheers and keep the good work going as it's going to be a great model. 👍
1 16 March 2024, 10:36
Hello Sy Bar.
Thank you.
Do you mean this rack?!
hobbyzone.pl/en/modu..niversal-drawer.html
It is very modular and can be adapted to the respective use. I use them to store the organizer drawers for my etched parts.
16 March 2024, 13:54
Alter! Hier sieht man erst, welch gigantische Arbeit du jetzt schon wieder investiert hast. Namensvetter, das wird wieder was richtig feines von dir, da bin ich mir zu 100% sicher.
Bin auf jeden Fall wieder dabei und staune und staune.
gruss
Jörg
1 16 March 2024, 22:57
Das freut mich, Jörg.
Schön dich an Bord begrüßen zu dürfen. 😄
17 March 2024, 06:29
Showed up because I heard there was a grinding orgy of chiseling, but now i'm staying for this incredible build!
1 21 April 2024, 14:51
Es wächst und gedeiht! Schön mit anzusehen. Der dunkle Anstrich sieht wirklich super aus, gefällt mir ! Weiter so Jörg 👍👍👍
1 27 April 2024, 15:51
Jörg - you always have the most interesting, detailed and fascinating builds! I love how you convey your thought process as you build your masterpieces! Definitely watching to see this new masterpiece!
1 27 April 2024, 16:46
Danke Hans-Jürgen. 😉
I'm very pleased, CaptGPF, that you like my little construction reports so much. 😁
28 April 2024, 05:02
This weathering is outstanding! Also, you're giving me severe desk envy for your workshop setup!
1 27 May 2024, 10:55
Many thanks to you both.
Yes my workbench turned out really cool, NLAWScametovisit.
3 June 2024, 08:34
Sorry for your los, Jörg, but it's good to see you're getting back to our wonderfull hobby.
1 28 October 2024, 11:00
Rough seas you had to steer through lately. My condolences. Hope future waters will be much calmer and this build helps navigate them Looking for more progress here. 🙂
1 28 October 2024, 16:57
Thank you for the kind words Michael.
Yes, I hope that things are going well again now.
29 October 2024, 06:08
Looks like you are doing amazing work! Definitely following this build. 🙂
1 30 October 2024, 18:36
Wow, how did I miss out on this awesome project? Very involved detailing going on! I love the paint finish so far!
1 16 November 2024, 11:31
Thank you, everyone. Yes, the Pontos guns are truly phenomenal.
Thanks for asking Dietmar, everything is fine again.
1 8 January, 06:36
Fantastic detail on a beautiful ship! You make it hard to resist getting converted to the 1:200 scale 🙂
1 23 February, 09:01
Thank you Chrisswe.
Yes, you can really conjure up some great details at this scale. But from what I see in your scale, you rock it too. 👍
1 23 February, 10:44
Thank you very much Tini.
But at the moment I'm taking a little break. Let's see if it continues again next week.
1 24 February, 11:56
додав новий фотоальбом.
3 зображення
Fieseler Fi103 A/B (V-1) as seen in the Royal Military Museum in Brussels
1:32
Inspiration 1: V1 hanging from the ceiling of the Royal Military Museum in Brussels


Проект: Fieseler Fi103 A/B (V-1)

12 March, 16:10
додав новий фотоальбом.


7 1 June 2015, 09:47
Looks good Hanno but why is the swastika background on so early? Did you paint it?
3 June 2015, 22:28
easier to paint it first, white first mask the circle then the red, mask the band and spray the dark colours last 🙂
Seems the sensible thing to do to me at least, less masking and no chance of the dark colours showing through the white and red.
Hanno, I take it that's about right ? 🙂
Really interesting subject btw and what a great colour !!
3 June 2015, 22:40
Yeh I guessed that was the process Choppa, also I doubt a red decal would go very well over dark blue which was probably more my question but poorly worded.
Sometimes the decision of what to paint and mask first can be a hard one, I know it took me a while to decide a plan of action for the Macchi MC72 I did recently.
4 June 2015, 00:08
well worth thinking it through though 🙂
Yeah you did a sweet job on that MC72 !!!
for me I have to try and paint everything before assembly, well as much as possible anyhow.
I don't how some people manage to get away with assembling everything first then paint it all in one hit and yet still get crisp detail in all those awkward to reach places..
4 June 2015, 00:15
Agree Choppa. It's especially the case with float planes and the fitting of struts etc. Makes it almost impossible to get good coverage of paint, sanding and polishing or glueing struts after painting and partly ruining the paint job. A happy medium is a fine line.
4 June 2015, 00:40
"Blau blau blau blüht der Enzian... 🙂" schönes und selten gesehenes Modell, ich liebe dieses knallige Blau.
-beautiful and rarely seen model, I love this flashy blue.
4 June 2015, 04:47
Thanks mates !
@Ben: Yes, I painted it, as there was no decal furnished in the the decal sheet.
@ Choppa : Actually it was done the exact other way round, first one coat of aluminum, then a few thin coats of blue, then I masked the red band and last the white circle. Future is on, next are the decals.
@ Christian, das Blau hat es mir auch angetan, mit einer der Gründe das Modell zu bauen .
4 June 2015, 06:46
ah well there we go !! not that I mind being completely wrong, haha 😄
4 June 2015, 16:46
Just my simple way of thinking : one step after the other......😳 I always did it like that since I started painig my models as a boy. The way you suggested has a lot to it, so Im going to give it a try next time 😄
4 June 2015, 17:07
yeah it seems the easier way to me having said that I have done it your way to but ended up going through the relative expensive masking tape a lot quicker. If I can think of a more economical way of doing things that's what I generally go for, not that I am expert or anything, which is probably why I strive for the simplest way of doing. If I was an expert I might be more cavalier 🙂
4 June 2015, 18:06
Gabba Gabba Hey! Das Ding wird super! Schön das man hier bei SM auch mal ein Huma Modell sieht.... 😉 Welches Blau hast du denn genommen ?
4 June 2015, 18:56
Thanks Christian !
@ Christian Meyerhoff : Humamania, dank Dir ! Ich hab Vallejo Air RAL 5002 über Revell Aqua Aluminium gesprüht, sieht im grellen Licht fast zu violett aus, aber in anderer Beleuchtung find ichs gut. Das Ding macht echt Spaß !
@ Choppa : You're absolutely right, I used quite a lot of the stuff. So next time I will try it your way. 🙂
4 June 2015, 19:40
So kann man auch mit kleinen Sachen Menschen eine Freude machen ... 🙂 Schön das Dir der Bausatz gefällt.
4 June 2015, 19:44
did someone mention sausages ???
also one of my little pleasures too Christian 😉
Hanno, ok then, it's mine all mine! until you do it of course then it's yours all yours 😄
4 June 2015, 20:09
You surprise me every time you post a build Hanno, and this is no exception mate.
I can only endorse all the wonderful comments I see here Hanno, just great to see, and this is an aircraft I never knew existed, and all the more interesting mate.
Cheers. 🙂
7 June 2015, 20:03
Applaus, Applaus! Das ist die schönste HUMA 209 die ich bis lang gesehen habe ! Das hast Du prima gemacht!
7 June 2015, 20:10
Thank you so much Kerry, I am really into the unusual and a bit odd looking birds at the moment.... 🙂
@ Christian : Danke Dir ! Hat echt Spaß gemacht, die Kleine !
@ Choppa : Thanks mate, no Mudak needed on this little plane......
7 June 2015, 20:15
Completely agree with Kerry, Hanno, 👍 just the white circle in the tail...🤔 but that's just my opinion.
8 June 2015, 01:06
Thanks Ben, thanks Rui !
@Rui : Maybe you're right,I wil have a look through my spare decal box, maybe I can find at least something to add some black to the white circle.
But personally I dont' really miss the swastica, just some colour missing. 🙂
8 June 2015, 04:33
Put a black number 4 in the white circle, that way it looks like a crooked cross with bits missing, or chop up a swastika to look like a number 4 as a number on a race plane would still look just right 🙂
8 June 2015, 08:08
Thank you Holger, fertiggemunstert ! 😉
That is a great idea, thanks Choppa ! 🙂
8 June 2015, 08:37
Very subtle Hanno, and it will make people look twice when they see it. 🙂 👍
8 June 2015, 11:20
Very nice build plane... but base"BIG WOW! its look very realistic."
16 June 2015, 14:57
Thank you Marko, looking at your top notch dios and bases, this is a big compliment . 🙂
16 June 2015, 15:03
Lovely one! Some times the small models are the most interesting ones!
15 August 2015, 10:52
Lange nichts gesehen von Dir. Ein interessanter Exot, etwas eigenwillig in der Form, aber wenn Du das gebaut hast, dann war es auch so. 🙂
12 March, 16:08


додав новий фотоальбом.
13 зображення
Ka-226 construction
1:72
Looking for chairs


Проект: Kamov Ka-226 Ambulance


4 5 March, 14:57
додав новий фотоальбом.


15 26 January, 19:34
This is the first of two Hawks that I will be building, this is the 81-A-2 as flown by the Flying Tigers by US volunteers in China. 🙂
1 26 January, 19:37
Made a start on this aircraft, the interior colour is Vallejo Model Air US Interior Yellow. 🙂
Welcome CaptGPF & Thomas, great to have you along. 👍
Many thanks mates for your interest and likes J35J, Jean, Duster_d & Jun Chung. 👍
16 February, 16:30
Main part of the fuselage put together and wing tops added to the bottom. 🙂
Many thanks mate for your interest and like Franck G. 👍
18 February, 15:58
Wings and cockpit added to fuselage. 🙂
Welcome Dave & J35J, you're both extremely welcome. 👍
Many thanks mate for your interest and like Franck G. 👍
19 February, 15:23
Tail, engine covering etc. added. Next will be primer and pre-shading. 🙂
Many thanks mates for your interest and likes Matti T & 2 other mates. 👍
20 February, 16:22
Looks great 👍 Which colour have you used for the interior? Looks remarkably spot-on for what I've read/seen described as „Curtiss Interior Green".
1 20 February, 19:56
Light grey primer added and then a bit of pre-shading. 🙂
Thanks for the kind comment Kenneth, the colour used is Vallejo Model Air US Interior Yellow. 👍
Many thanks mate for your interest and like Kenneth. 👍
1 22 February, 16:20
Underside painted with Vallejo Model Air Light Gull Gray ANA 620. 👍
23 February, 17:33
Upper side first camouflage colour painted Vallejo Model Air USAF Brown ANA 628. 🙂
Many thanks mate for your interest and like Zbynek H. 👍
26 February, 16:43
I am in, have started yesterday the same plane but from Trumpeter. 😉 Have a look!
27 February, 15:59
Camouflage green added, 2:1 Vallejo Model Air USAF Green ANA 612 & Vallejo Model Air US Forest Green ANA 631. 🙂
Thanks for the kind comment Thomas. 👍
Welcome along for the ride Edward. 👍
Many thanks mates for your interest and likes Edward Mc & 1 other mate. 👍
1 2 March, 16:02
Decals now on. Panel lines to be done with a wash and then matt varnish to be applied. 🙂
Many thanks mate for your interest and like Rui R. 👍
3 March, 16:06
Now completed, thanks for watching. 🙂
Many thanks mates for your interest and likes Bozo, Mark K & Alexander R. 👍
12 March, 16:01
додав новий фотоальбом.


14 26 January, 19:38
This is the second of 2 Hawks that I will be building, this is a P-40B flown during the Pearl Harbour (Hawaii) attack by the Japanese. 🙂
26 January, 19:41
Made a start on the aircraft. The internal colour is Vallejo Model Air US Light Green. 🙂
Many thanks mates for your interest and likes Martin W & Lukasz G. 👍
16 February, 16:35
Main part of the fuselage put together and wing tops added to the bottom. 🙂
Welcome J35J, and thanks for your comment! 👍
Many thanks mates for your interest and likes J35J, Tibor S, Franck G & 1 other mate. 👍
18 February, 15:55
Wings added to fuselage, next will be the tail plane. 🙂
Welcome Dave and thanks for your interest. 👍
Many thanks mate for your interest and like Robert B. 👍
19 February, 15:19
Tail, engine covering etc. added. Next will be primer and pre-shading. 🙂
Many thanks mates for your interest and likes Darin S, Matti T & 1 other mate. 👍
20 February, 16:17
Upper side painted Vallejo Model Air US Olive Drab. 🙂
Many thanks mate for your interest and like Zbynek H. 👍
26 February, 16:40
Decals now on. Panel lines to be done and then matt varnish. 🙂
Many thanks mate for your interest and like Patryk S. 👍
3 March, 16:02
Now completed. 👍
Many thanks mates for your interest and likes Bozo & Mark K. 👍
12 March, 15:58
додав новий фотоальбом.
17 зображення
MyAlbum
1:72
corrections at the tail after hints from a mate


Проект: MiG-21PFM

24 9 March, 13:40
That's a lovely Mig, well done!
Could you take some family photos with the rest of your fishbed builds?
12 March, 10:55
додав новий фотоальбом.
15 зображення
Munition für den Stützpunkt
1:35


Проект: Munition für den Stützpunkt


 7+
7+ 17 25 September 2023, 09:07
Started working on the armoured doors for in the of the bunker. Making them of plastic sheet.
26 September 2023, 19:56
Working on the bunker parts goes pretty well. First adding filler, then sanding to create smooth concrete. Repeating that process just as much as needed to get all of the concrete looking smooth. After that I'm gonna add the lines of the woodwork that stayed behind in the concrete after it had dried.
11 October 2023, 08:14
Started adding the lines of the woodwork on the inside parts of the bunker. Really satisfied with the result so far.
16 October 2023, 19:50
Thanks Mathias. I hope so too. 🙂 Besides that everything is going well so far it's also alot of fun working on this project. Let's see where I can take this.
17 October 2023, 18:41
Also started adding lines of the woodwork on the other wall of the other inside part of the bunker. Sanded the rounded part of the bunker smooth enough to add the lines of the woodwork there too. Work on one of the two armored doors is nearly finished.
23 October 2023, 18:55
Finished and placed the armored doors. Added pics of 3 of 4 figures of the MiniArt set. I replaced one MiniArt head with a Tamiya head (the already painted one)
29 October 2023, 18:56
All four MiniArt figures are build. Next step is to paint them. Work on the Tamiya figures had begun. I've added a number inside the bunker. I tried 3 times but it's not getting better than this I guess. Still not satisfied with the result though.
12 November 2023, 19:51
Glued the separate parts of the bunker together. Glued alot of ammo boxes the last couple of weeks. Put them in front of the bunker in a sort of test set up together with 2 of the figures.
26 November 2023, 18:59
After quite a while working again also on this project. Drawing the lines of the woodwork with a pencil and then creating them by using Vallejo putty.
11 March, 20:42
I was thinking about trying a model battle ship/ navy ships just wondering what’s a good kit and scale to start with?
11 March, 22:48
I keep having that thought as well and I'd be tempted to start with one of the old Airfix 1/600 kits. There is quite a large range, not too detailed and usually quite cheap.
SCM Search: airfix
12 March, 15:41
додав новий фотоальбом.
27 зображення
de Havilland DH.88 Comet
1:72
Cover art pose of final state. Canopy masking removed, nose light and undercarriage added. It was a bit of a struggle to...


Проект: de Havilland DH.88 Comet

9 18 February, 20:07
додав новий фотоальбом.
23 зображення
Sukhoi Su-30 Flanker-C
1:72
Blue has been adjusted.


Проект: Sukhoi Su-30 Flanker-C

30 27 February, 13:23
Lol, well I must admit Zvezda is not my favorite brand, but it wanted to be made.
28 February, 15:41
I've decided with this model not to get caught up in Advanced Modelling Syndrome by correcting the design but rather try to work with the kit. This presents it's own challenges seeing as I have to adjust and connect misaligned parts without damaging the raised panel lines. But I hope that even with this extra work it will still be faster to build than correcting the design.
1 March, 12:39
I have a sneaking suspicion that Zvezda mixed resins or other poisonous chemicals in with their styrene. I got a reaction in my sinuses, from sanding the plastic, which I've never had before. I really need to get better at taking more precautions with this hobby.
1 1 March, 20:39
It is good to know that I have to watch with any Zvezda kits I may buy. That is a terrible practice on their part.
1 March, 21:48
Maybe it was from the debonder or maybe it's just a coincidence. I don't know. Zvezda is based in Russia, I'm not sure how controlled the plastics are there or how bad the black market is for chemicals. I doubt Zvezda would intentionally use toxic chemicals. If there is an issue I would imagine it to be with their supplier.
1 2 March, 00:33
Zvezda (Star) from Russia is next to Amodel and Modelsvit from Ukraine my preffered choice for Russian jet fighter, i have, let me think, 100 kits from Zvezda bought in Russia and never experienced any problems on their polystyrenes. The usual wet decals got better recently, but still sub-standard (always auf Begemont on standby), but most importantly i get model variation that nobody else has, and some of their scales are pretty accurate. You also find their makes back in Revell or Italerie cartons. Amodel is horror and real sanding nightmare in terms of fit and accuracy. On this SU-30 i gonna watch and with excitment.
3 3 March, 12:48
Nice Aircraft, l really like a Zvezda kit 👍
It's a sanction's issue with Zvezda supply! It's the government's that war with each other! the people suffer.
The SU-30 is a great looking aircraft, l really enjoyed the paint job on the little 1:144 l just finished.
Got the 1:144 Berkut in now Skyhiker 👍
1 3 March, 22:03
Mr D, It's unfortunate the crazy times we are living in. l bought my Zvezda kit on Kleinanzeigen when I bought someone's entire stash so it only cost me 5 euros. Sometimes you can still find good deals online.
3 March, 22:25
The Flankers really have very elegant and sleek designs. For jets they're beautiful.
1 5 March, 12:14
Lol, well the kit engines were just so wrong they need some adjustments.
1 5 March, 15:37
After priming the model and improving the engine details I spent most of the day mixing colors trying to find the correct tones for this plane. Eventually I figured it out.
1 5 March, 19:02
What colour scheme are you going for ?
The tricolour blue's and Gray?
Like the extra exhaust details.....will be much better now.👍👍
1 5 March, 20:20
Mr D, yes I am re-creating one of the first Su-30s delivered, so it has blues and grey. It is not as vibrant as the later planes. I had to mix a few colors to get an accurate color tone. I posted a photo of the paint test. Good Russian colors are hard to find and I don't use laquers anymore for health reasons. If it doesn't clean up with water or alcohol I prefer not to use it.
1 5 March, 20:45
You going for the Vallejo Model Air 71.334, 71.335 and 71.337 or similar blues and grey?
5 March, 20:49
I'm not sure. I don't normally use Vallejo because they're too rubbery, tough to spray and tend not to sand well. They do brush on quite nicely though. I posted an image of the color test. I generally use AK 3rd generation because of their accurate colors or Aquaous because they are just great paints that sand well. I do have a decent amount of laquers and enamels but I try not to use them to avoid the chemicals.
5 March, 21:03
Yeah, those colors are pretty close. Nice job on the 27. How did the paint work out for you? Like I said I pretty much gave up on Vallejo.
1 5 March, 21:12
Melf Boyens, it's good to hear you haven't had any issues with Zvezda kits since I have an awful lot of Russian planes to build and most of the kits are from Russia or Ukraine. I assume the problem I was experiencing was a reaction to the debonder. I just have to remember to wear a mask and gloves more often.
5 March, 21:31
I hear that a lot about Vallejo and they work for me. The mecha primer is awful, but the colors are different. I think most of the problems come from differences in humidity and temperature, they seem to be sensitive on that or people overthin them because everywhere are the laquer thinning ratios mentioned, wthout context. I go for unthinned Model Air or only a drop of thinner and slightly under 25psi. But most of my tip dry and clogging problems went away after I switched to the H&S Evolution '24 and shaking the paint with a vortex mixer for ~30 - 40s.
5 March, 21:54
A vortex mixer is a good idea. I hadn't thought of that. I got a H&S Infinity Two in One this Christmas. With the biggest needle it might work but the 0.15 would probably be too small for Vallejo. I might try them out again with my cheap GANZTON airbrush first beforehand.
1 6 March, 00:29
Hi Skyhiker, I've recently been using lCM water based paints, l mixed some decent Su-30 colours for my latest build from ICM, they dry nice and hard too, need alot of thinning as they are very thick.
Your right.... Health first 😃👍
6 March, 17:22
I didn't know ICM made paints. Aren't they from Ukraine? I'll have to keep my eyes open for them. Ok I see they have a whole range:
3004 Palette of 80 colors, ICM , Acrylic, 80x 12ml
6 March, 21:01
Some nice progress 👍👍 can see some nice shading there,
Yes they are from Ukrainia, they have definitely helped me out with colour matching, l first used them on my Yak3 as they did a soviet aviation pack.
Good luck on next paint stage 😀👍
8 March, 17:52
Mr. D, I did add panel shading on this one, although I always try to layer over it enough to make it as subtle as possible. You would never find a real plane that has anything that looks like panel shading. Most people overdo this technique, but I think if you blend it in enough it can add some depth to the model without looking too strange.
1 8 March, 21:23
A bit more painting done in between my wife walking in every 10 minutes.
1 9 March, 16:53
Looks great 👍. good job on paint 👏
I'm really glad l added a SU-30 to my collection as they look fantastic on Display.
Good luck on the next steps 👍
11 March, 11:11
Well I'm not convinced with the colors, the hue of the dark blue is too cyan colored. I may need to go buy some other paint.
11 March, 13:03
I went and bought a bunch of paint only to come home to find out they are all colors that don't look like the real thing. I tried Vallejo air and Hataka acrylics. I even bought a few 3rd generation general colors to see if I could get close since they don't make Russian colors. But all to no avail. I guess I will have to mix my own. At least I know I can mix a decent color if I have the proper primary base.
11 March, 20:19
I'm not sure if you can see the difference but I adjusted the blue to a more accurate hue. I hate mixing my own colors because it takes time that I'd rather spend building. When you have to mix the same color later, even if you write down the formula the colors are always a little bit different and you have to spend time adjusting them. This is because the drops from the bottle aren't exactly the same amount every time and the paint isn't always mixed well enough inside the bottle. But sometimes there just isn't any choice. I was surprised how off some of the colors I bought as Flanker sets were. They worked together as a set but they didn't look anything like the real jets and simply weren't realistic.
12 March, 12:18
The decals are pretty yellowed and not accurate. I'm going to have to paint parts to make it presentable.
12 March, 15:11
додав новий фотоальбом.
20 зображення
The Goblin as it might look in a museum
1:48


Проект: McDonnell XF-85 Goblin

63 11 March, 09:32
WOW, WOW and a couple of extra WOW's!
Amazing result Frank. Without doubt the best Golblin model I've ever seen.
I bet Halberd Models would love to use your photos for their marketing.
1 11 March, 09:44
It looks so weird but very nicely done - superb craftmanship 😆
1 11 March, 10:21
Love the photography as well...please post a wide shot of your setup so the lights are shown etc....I am trying to get this look....very dramatic...
11 March, 10:45
Very well built and finished. I wonder how they ever thought this would be a viable fighter.
1 11 March, 11:42

Thank you very much mates!
I added two new pictures with the protection bow and securing fabric belt. I added also dust pigments to the wheels what I forgot before.
11 March, 18:26
Outstanding work in traditional Bughunter style! And done, in what I find, an unbelievable time frame 👍
2 11 March, 18:31
Alec K said it for me. There's nothing to add. 👏👏👏👏👏👏👏👏👏
Actually I have something to add - great photos! 👍
1 11 March, 19:04
What a wonderful feedback - Thank you very much to each of you 👍
gorby - your guess was right! It will appear on the Facebook page of Halberd Models 🙂
Yes Alec, I've been working on it all day - 24 hours a day! And because there wasn't enough time, I added the night. 😎 Joking aside, yes I spend a lot of time. And this winter was very warm here without snow/ice, so my airbrush sessions was not blocked by the iced roof window.
2 11 March, 21:43
Of course I had to come over and check out the glamour photos. Beautiful build and wonderful photography, as always. Such a cool build of a really unique subject
1 12 March, 01:15
The photos are well done to show off this stunning and unique build.
1 12 March, 01:38
Frank, you did a great job! I have no choice but to agree with the previous posts. And frankly, when your name appears on a project, we know in advance what kind of result we can expect 😉
Congratulations on the successful completion of this interesting model!
1 12 March, 10:47
Oh boy... I hope I can get my special hobby somewhere near this... a real stunner
1 12 March, 11:34
Excellent work as usual. I still think this is an ugly plane though. Whoever designed it must have been on a bad trip.
2 12 March, 13:34
Another big Thank you all for your kind words!
@Skyhiker The design was made under strict requirements: it had to fit into the bomb bay of the B-36! Therefore folded wings were a must, the multiple control surfaces at the tail as well and of course the hook is the visible area of the pilot. It also needs actuators for the wing and hook, four guns with ammunition and fuel, all of which need space in the short fuselage - so there was no other way than this egg design. The design was good enough to achieve good performance figures - the "only" problem was the strong turbulence from the mother plane, so it was assumed that a normal pilot would not be able to hook on back.
3 12 March, 14:05
That's one of the reasons it's one of my favourite aircraft. It's remarkable they managed to fit so much into such a small aircraft. I think it's an amazing design.
1 12 March, 15:08
додав новий фотоальбом.


2 11 March, 22:11
Is it the camera or is that Tornado too short? I think something may be off with that kit. Or perhaps it's just the design on the tail that is so dominant. Congratulations on adding to your collection.
12 March, 15:05
додав новий фотоальбом.
31 зображення
Dutch submarine HrMS Tonijn 
1:350
Finally added the flag, now it's officially done :-)


18 22 January, 11:47
HMS Tonijn is currently on display at the excellent Dutch Navy museum in Den Helder.
The museum is well worth a visit, one day is not nearly enough to see everything on display.
1 22 January, 11:55
Made a start on this one.
This is my first 1/350 scale model, being relatively simple, I thought it would be an ideal kit to get a feel for the scale.
25 January, 16:13
Welcome Spanjaard!
@ Ben, that's something to be proud of. Have you ever build his ship too?
26 January, 04:24
More work done, added the dive planes and the scratch build drive shafts/ screws
28 January, 10:51
Cheers Gorby, its nowhere near your wizard like scratch building.
1 28 January, 11:57
Weathering in progress.
Black on black is very hard to catch on camera
22 February, 11:11
Looks good, although the black and the lighting make it difficult to make out the details.
1 22 February, 15:23
You're right Gorby, I have tried many different ways to get it on camera, but I always get the same result. It is like a black hole, sucking in all the light.
1 22 February, 15:53
I just found out I forgot to add the flag, so it is neeeeaarly done 👍🏻
22 February, 16:03
додав новий фотоальбом.
26 зображення
G-kazemat mei 1940
1:72
Added the gun to the turret and fixed it in place.


Проект: Dutch G-Kazemat


13 24 February, 13:07
As I wanted to do a simple project for a change, I made a start on this one.
24 February, 13:26
Welcome mates 😄
Ben, it is a fascinating subject, imagine being cramped inside this with two men and a big machine gun.
1 March, 15:02
It was fixed in the concrete plinth, but the machine gun could move a couple of degrees.
1 1 March, 15:28
The camo looks very good and the plaster base really makes it look like concrete.
1 3 March, 08:04
Cheers Gorby 🙏🏻
A large portion of the base will be embedded in the groundwork though.
1 3 March, 08:38
Your doing a better job than the 1/72 figure I'm currently trying to make look vaguely like a human (and failing). 😄
1 7 March, 16:02
no job will look good under microscope 😉 figureslook great . snd if put the phone far enough to resemble 1/72 scale, they look awesome!
2 7 March, 20:31
Weathering in progress. Will need to sort out a simple base for this.
9 March, 10:44
That guy looks great, more like 1/35 to me 👍 Cool bunker you've got there too
1 12 March, 14:01
Thanks Lukasz and Dave 🙏🏻
I want to finish it soon, yet ran into a problem with the supplied clay that is supposed to be used to fill the gap between the concrete an the cast iron turret. It is rock hard. I've contacted Helmuths strongholds to ask what to do.
12 March, 14:54
додав новий фотоальбом.


15 25 February, 04:09
Thanks guys. You two always have reserved seats in the VIP section.
@Nils - I've only ever found one, relatively obscure, full-colour picture of McCoy's C-130. All the available decals seem to get the colour scheme wrong (mainly the gold/yellow coloured dollar sign), so I'm looking to correct that.
25 February, 18:31
Got some of the insides painted. Given that you won't see all that much of it, I'm skimping on some of the details I might otherwise have attempted. I must be getting lazy. Don't tell Spanjaard.
26 February, 17:30
After having painted the interior and assembled the fuselage, I think my choice to skip some details was justified. Trying to fish the wires through the small hole I made in the bottom, I had my workbench spotlight shining right down the back cargo door... and I still could barely see anything. Getting the motors wired up was a bit of a challenge, but I think I might need to add some more resistance to the circuit under the base. Sometimes, especially when dealing with multiple motors, the individual resistors will create a rotation speed that perfectly vibrates the plastic that it will buzz. The more motors, the greater the chance. I added a small (10 ohm) resistor to the circuit and they all seemed to calm down nicely.
27 February, 16:24
Thanks Alec. Now comes everyone's favourite part... putty and sanding!
1 28 February, 15:44
Hello, Greg!
I'm watching your work with interest.
The question about electric motors: which ones and where to buy?
1 March, 11:13
Good to see you hanging around, Peter!
Dennis - Thanks. I don't have a specific motor that I use, but I usually get them off eBay or AliExpress. What you want to look for is the size. The best ones I've found are 4mm wide by 8mm long and run on power between DC 1.5V to 3V. One thing to consider is the length of the shaft as well. I buy some that have a short (2-3mm) shaft, and some with a longer shaft. This gives you a bit of flexibility in where you can put them inside the model. For example. If you stick a motor into a P-51 Mustang, there's lots of room for the motor to hid in the engine area. It's nice and round. But I built a 1/144 scale Cessna and the short triangular shaped engine cowl meant I needed to push the motor back into the cockpit area. I didn't have a motor with a long enough shaft that time, but it sure would've been handy. 🙂
1 March, 17:30
If you find any that are smaller than 4mm wide... let me know. I've got a project idea that needs an even smaller motor than that!
1 March, 17:31
So far so good on the decals.you can't even tell that I screwed up while inverting the money bag marking for the other side. The bag needed to be flipped… but not the dollar sign. Luckily I had a backup decal and a very sharp knife. 😉
5 March, 14:38
Some CAREFUL masking of the decals. Hopefully this is going to work. 🙂
6 March, 17:00
Masked off the grey undercarriage coat and got some desert yellow on. It's starting to look like a thing.
7 March, 16:22
Nice progress. I am FREAKIN' about that tape lifting those awesome decals up… 😅
7 March, 19:40
Yeah, me too... but I put a significant coat of Future both under AND over them. They seem pretty sturdy. We shall see though...
1 7 March, 20:24
im kinda nervous, im afraid that the tape migth tear those decals off.
keeping my fingers crossed for this.
7 March, 21:20
It was a bit dicey removing some of the camouflage tape, but so far so good, I think.
1 8 March, 14:42
Not 100% happy with my job on the camouflage, but I'm super glad the decals seemed to have survived... and worked even better than I expected. Might just quit while I'm ahead on this one. 🙂
1 10 March, 16:34
Thanks Alec. I was a bit worried that she was a tail sitter, but the open cargo bay seems to have mostly remedied that. She'll be glued down on the base, so it shouldn't really matter, but less stress on the glue is probably helpful.
12 March, 13:59
додав новий фотоальбом.


14 29 January, 08:57
Thanks to Bozo and all the others. Now the tram is waiting for a scene.
Maybe there will be an article on Modellversium ...
10 March, 10:03
Nice idea but diappointing for various reasons.
First, I usually paint the main camouflage and add details later. I assume that most modellers proceed in a similar way. But that's not how these masks work. Here it is required that the details the masks cover are painted first and then be covered for the main job. I tried to use the surroundings of the respective masks but they are so crammed on the sheet that this was pretty challenging.
Second issue I have with this set is that the cuts are not precice and the masks do not separate without resistance from the sheet. Tears and frays are the result. Due to the tiny nature of the masks some are quite difficult to trim afterwards.
My suggestions to Clearprop:
- assure clean cuts in the future
- redesign the set so that the outer borders can be used as masks. I am sure this will serve the majority of modellers better than the current design.
")
12 March, 14:20
додав новий фотоальбом.
87 зображення
The most demanding build I have ever done!
1:48
After painting I added fabric belts from HGW Models.
This part is only plugged in and can be removed ea


Проект: McDonnell XF-85 Goblin
84 20 February, 21:14
I was so crazy to start another build while waiting for now decals to arrive (for this other project).
That is the most demanding beast I ever tried! Not because it is bad - no, the opposite! A full resin build, cast and 3D printed parts, PE and more.
Some guess work regarding type and kit is allowed - so I do not link a project yet 😉
I hope this will generate some interest ...
1 20 February, 21:32
Another project! YES!! But careful, don't let the shelf queens get restless…. Hmmmm, what the heck is this?! Something US, judging by the cockpit color. And it looks like an ejection seat maybe, so something with a turbine engine??
1 20 February, 23:02
- US: check 👍
- ejection seat: check 👍
- turbine engine: check 👍
That is still a big list. US jets are 244 topics here. Ok, not all have an ejection seat.
20 February, 23:15
Hm, that looks a lot like the cockpit of the XB-85 Goblin and could therefore be the very good resin kit from Halberd Models 😉
1 21 February, 07:50
I'm about to start working on a kit with lots of 3D printed resin so it's nice to be able to follow a project by someone experienced 😊
1 21 February, 09:43
Welcome to all!
Oh yes gorby, I can't resist! I have already x started projects, x+1 one doesn't make a big difference 🙂
And Bingo: yes, you are all right about the Goblin 👍 That is the mother of all egg planes 😎
It is a great kit, but I think not an easy one!
- You should think twice (or better more often) where to cut the resin parts from the cast! I may have done it wrong in some areas.
- sometimes it is hard to see, where the part starts or the cast ends which brings you in trouble later with fit issues
- some 3D printed parts are very very filigree, you don't know how to hold or handle. I'm not a 1:700 ship builder!
- at some points the manual do not show clearly the correct place of a part. After checking reference pics (a must!) I realized my guess was wrong. If you add it to the wrong place you will get in trouble later for sure.
- there are some very tight fits, especially with cast parts. Best is again to check reference pictures if you really reached the final position or a part is not yet deep enough in its place and you need more cleaning of seams.
I will finish the Vega before this beast when the new decals arrive.
2 21 February, 10:45
Some more pics are added showing the prepared cockpit walls. The first inner part is also prepared, the front of the jet engine.
I forgot to mention that there are nearly no color information regarding cockpit and so on in the instructions. There is a colorful 4 side view showing decal and stencil places.
21 February, 19:03
" I have already x started projects, x+1 one doesn't make a big difference "
BWAHAHAHAHAHAHAHA... spoken like a true model builder~!
1 21 February, 19:16
Thanks mates!
Now some progress on the carriage, which is part of the kit (but I had to modify it).
24 February, 18:55
As preparation for the fuselage the jet engine parts are prepared now.
1 March, 14:44
The exhaust and intake look remarkable. Getting all those PE blades in the correct place can't have been easy.
1 1 March, 15:13
Following. I like the 3D-printed foot holders. The metal pins are also a nice detail. That exhaust and intake look like they were a challenge to put together. Where did you get this model?
1 1 March, 15:25
Thx mates!
Yeah gorby, that was challenging! See also pic 17.
Jennifer, those food holders was unbelievable filigree, as most of the 3D parts! You really don't know how to touch for cleaning and handling.
For exhaust and intake I followed the manual to cut parts, but made some wrong decisions. This makes it later even more complicated 🙁
I ordered this directly at Halberd, but they sell it also on ebay. But they seems to have some production issues with power outages etc due to Russian invasion.
But I recommend to think twice about it: it is not cheap; it provides nice details, but it is on the other hand some kind of "short run technology". So I had to do a lot of dry fitting and surgery to get things right - but all on resin parts! As I said, that is the most demanding build I have ever done! I will show more soon.
3 1 March, 15:39
Very nice work! I love the bizarre stubby shape of the Goblin. A real life egg plane.
2 March, 07:01
I least expected this flying egg with wings on your workbench 🙂 I haven't seen it built yet and I'm looking forward to a master piece from your hand.
2 March, 07:16
Thank you for your time to leave a comment mates!
@Alec It was? It is! Two aircraft were built, 6023 and 6024, and both are in museums.
The kit provides decals for the 6024. Regarding the details this is more complex. Both looks different today, the kit is different compared to both as they are shown today. And even the b/w photos shows many different things: with or without winglets, with one skid, (kit option), with two skids below the wings, the kit has two pitots on the wings - the one in the museum not. And much more!
Yes gorby, me too! That's why I called the project "The mother of all egg planes." 🙂
@Bernhard I looked around and also have not found it built yet, also not in the bigger scale. And I think I know now why as it is definitely not an easy walk!
Your interest is fuel for motivation 👍 so I will add more pics.
2 2 March, 09:27
Welcome Erik!
On evil bay even more: https://ebay.de/itm/167316587705 but I think this includes import taxes. The 1:32 kit was even more, but is not available now.
When I ordered mine it was no more available within two days - all sold.
The offers on evil bay in Asia are going crazy already: https://ebay.de/itm/156691540922
But as I said, it is not the price tag which makes me nervous .... I hope I'm able to finish a kit this time!
2 March, 10:00
Welcome David! Nice to know you are watching.
Now with teaser of the whole bird 😉
1 2 March, 12:13
Love the teaser, wasn't sure what to expect but that does indeed look like an eggplane.
1 2 March, 12:40
I'm a little late, but I will definitely watch this talent show diligently! (and the topic is fantastic!)
1 2 March, 15:12
You could always do the canopy when it smashed into the arrestor hook and belly landed on the desert.
1 2 March, 21:09
David, I added a picture of the emergency landing skid for you. I will not mount it, but the empty mounting brackets as PE. So no landing in desert, but into a museum.
Welcome Ben, nice to see you here!
2 March, 22:10
Fantastic job! No doubt you are an artist, bughunter!
I'm following with close attention and anticipation of your next progress.
1 2 March, 22:21
Wow, Thank you both! Now I need a red face smiley .
There is not much difference between pic 26 and 46. I masked the rims and primed/painted the wheels. Some black paint in deep holes and on the food step. The big boost comes form a simple wash with oil paints as this brings up the nice rivets and other details on the cart.
And since you asked so kindly I added more progress pictures.
I stepped on the gas as we have our next club meeting in about a week and our annual show soon after that. It would be great to have the model ready by then!
1 2 March, 22:50
Ben, I collected a lot of pictures from walkarounds, museum pages, Flickr and so on.
I must say (even I have only decals for the 6024) the 6023 in the "National Museum of the United States Air Force" in Dayton, Ohio is in a much better, more original state. It uses a original cart. See the gallery with 21 photos on the official museum page: nationalmuseum.af.mi..onnell-xf-85-goblin/
The 6024 in Nebraska is on a simple steel frame, no winglets, the hook looks strange. Seems to be polished, without all the nice stenciling. Seems to be trimmed for a nice look, but not very original.
2 3 March, 00:27
Oh the National Museum of the United States Air Force is so good. I try to go at least once a year. It's just a couple hour drive from me. Beyond worth the price of entry too…which is $0. Beautiful work on that cart Frank. It looks the part.
2 3 March, 03:21
After the "Flying Flea" another interesting dwarf has appeared on your modelling table. 🙂 👍
I am particularly interested in this project of yours. Firstly because of the choice of model, but mainly because it is a resin kit with 3D printed parts. As I have several resin kits in my stash and have recently added two 3D printed models, this project is a great inspiration to me.
1 3 March, 09:54
Thank you mates and welcome Ludvík!
Here Halberd made a mix of cast and 3D printed parts. Only the very small ones are 3D printed. I checked both kits (it is also offered in 1:32):
- my small 1:48 one has 38 resin parts and 16 3D print detail parts
- the 1:32 kit 48 resin parts and only 6 3D print detail parts
That is not my first resin kit as I build e.g. kits from LukGraph (also combination of cast and 3D printed, but they move to completely 3D printed kits) and old resin cast kits from "SPIN Model" and "Alliance Models". Here I replaced small parts often with metal and wood. You will find those in my Projects, more to come.
I have not build a jet yet and that is somehow a different story (compared to my usual biplanes) with clear parts, surface details and more.
The most important thing with resin kits is a useless Tamiya Extra thin glue - you have to use CA or epoxy but it brings us many interesting kits which will never made it into a plastic kit.
1 3 March, 10:49
I was hoping for a bit more interest at least from the mates who have the kit in their wishlist or stash. But it is what it is.
More pictures ...
Has anyone ever polished such cast resin canopies? It might have been a possibility, but without a backup I didn't dare.
3 March, 16:42
Worst come to the worst, if you damaged the canopy you could always do it as the Goblin which smashed the canopy trying to reattach to the bomber. 😄
Well you certainly have the attention of one member with it in their wishlist. 🙂
1 3 March, 16:48
I am watching with interest, although I don't currently have anything in my wishlist that is resin.
1 3 March, 20:10
Jennifer, I think it is a good way to start with resin aftermarket accessories for your models to get a feeling for this material. There are big sets for replacing all in the cockpit or a engine with cowlings and parts around it for example from Eduard or CMK. If you can handle that than there is no more a big step to tackle a full resin model. Due to the 3D printing we see more and more accessories and kits in resin.
1 3 March, 20:25
gorby I know, you are always a big supporter 👍 And I hope that this particular wish on your wish list will be fulfilled one day, by whatever means.
1 3 March, 20:30
Even though I don't have Goblin on my wishlist, you still have my attention too. 😉
1 3 March, 22:08
I assembled a MPM Goblin long time ago and I have Special Hobby one in my stash. Surely, I am watching this build with utmost interest, Frank 😉
1 4 March, 06:29
You're always following me, my friends! 👍
Robert, the MPM is 1:72, the SH 1:48, right? If you prefer 1:144 there is a add-on in this Hobbycraft kit: Convair GRB-36 "FICON" (Hobbycraft HC1273, 1:144)
Please ee also: modellversium.de/gal..blin-hobbycraft.html
")
1 4 March, 09:05
Halberd announced a Limited Edition (100-120 kits) of the Goblin kit in 1:24 later this year 🙂
1 4 March, 11:06
Exactly - MPM is 1:72; SH is 1:48. It will be instructive to compare the latter with your build, I presume.
4 March, 11:51
I downloaded the manual of both kits at the very beginning of the project since Halberd do not provide color infos, just for checking beside the reference photos.
4 March, 12:16
I certainly would not miss bughunter build! Those that do are doing so at their own loss 😉
On that canopy: did you apply Future? That should help with clarity.
4 March, 13:51
Thank Alec 👍
No, I have not applied, because I heard some bad things (and read warnings on commercial cut masking sheets) about masking on a canopy with Future. And now it is painted so too late.
But on this model this is no problem: the front shield is mostly covered by the hook and not very visible. As I will show the main canopy in open state and it is open to the side, it is not very prominent too, additionally covered by the black ventilation pipes. And hey, the thing has been in the museum for more than 70 years, so the canopy is no longer clear! 🙂
And hopefully I can show some metal scratch work later that my build logs are known for!
2 4 March, 14:17
There are a lot of possible variants regarding the pitot pipes, if you look on reference pictures and the museum planes. Below the nose, only on left wing, on both wings ... The museum planes do not carry those.
The kit provides two wing probes. As they are made from resin I should mount them now to be able to prime and paint but I fear to break this thin parts during handling. After looking on original b/w photos I noticed a different metal shine so I had an idea!
1 4 March, 17:54

Wonderful work on this unique project, my friend. The detailing in that intake is stunning. These resin kits sure can pack in the detail.
5 March, 03:27
Now I see that there is no such a fantastic detail in the intake in the SH offering - it would be great to get it as a separate aftermarket set...
5 March, 06:21
Thank you very much for your comments and Welcome to the new visitors!
@Robert You will end up replacing the whole kit, due to better details on every part. It may be too late now, but after the first rumours about the new kit, some have sold their SH kits on ebay for 70€ (which is the cheapest offer at the moment) or more and bought the new kit.
@Skyhiker It was the smallest fighter jet ever built, as it had to fit into the real "aircraft carrier" (not the ones on water today). The full story is very interesting. The performance wasn't bad, but it was very difficult to hook back onto the carrier because of the turbulence. It was assumed that an average pilot would not be able to do this - so the project was cancelled.
5 March, 18:57
I know people will ask to see this model in Ergolding next week (I hope to finish it before) or the EME in Lingen end of march I need a robust model! At the moment I have a Pfalz Triplane with a broken plastic undercarriage in the cabinet - crying for a metal fix.
After the replaced tail holder (see pic 20) what about the front struts? I tried the kit ones - very flexible! After a single brass wire is much more stable you may guess now what are the next steps ...
5 March, 20:32
Wow, this is spectacular! I have the Special Hobby kit, but after seeing the details on this one, I might need to swap it out for the Halberd one!
5 March, 20:47
Thank you Mike! Yes, the great details and the unusual subject invited me to leave my comfort zone and try something different.
1 5 March, 22:43
If you feel like building something like this that is a biplane, Frank you could try a F9C
6 March, 02:41
Thank you!
Ben, there is no kit for the F9C in 1:48? Nobod seems to the the LSM kit in shash? No year announced, long gone I guess. But the F3F-2 from Academy looks nice ...
6 March, 08:57
I have the 1:32 kit. I'd like to built it as the version without landing gear but will need more 3d printing skills to do that - which I'm working on acquiring. I built the 1:520 Macon and had some 3d printed F9C biplanes to go with it.
1 6 March, 13:24
A display with the sparrowhawk hooked to a part of the mothership would look amazing!
On this model here it would need a new, more robust hook due the weight of the model.
6 March, 14:29
Damn, this was more work and much more complex than expected (it was not easy to get all wires in right angle), but I'm happy that the metal work in done now and like the look.
3 6 March, 20:45
This is so good. Those new parts look great.
To one of your other points. I have that F3F-2 in its original Accurate Miniatures form and the kit does indeed look very nice. I shall attempt to build it someday.
2 7 March, 01:48
The new parts look perfect. Also the Goblin on the transport cart looks very good. Great job! 👍
A B-36 assembly with the Goblin hanging on would be impressive. A 1/48 scale model of the B-36 exists and is currently available. However, there are several reasons why I would think twice about buying a B-36:
- I have only found one 1/48th scale model. It is produced by HpH in a limited edition. It is a really nice model with elaborate details. But basically it is a custom production and the delivery time is 10 months and the price of 575 Euro is not exactly negligible.
- A 1/48 scale B-36 with a wingspan of 1.5m and a fuselage length of just over 1m is not small. You would probably have to solve the problem of where to put it.
- And third, although the B-36 was intended as a Goblin carrier, at the time of the tests the B-36 was not yet available, so landing tests were conducted on a trapeze carried under a B-29B Superfortress.
2 7 March, 10:20
Hmm, if the kit was not so expensive, tempting, would go well with my X-1 carrying B-29..
2 7 March, 10:49
I was away for a long hike in warm spring weather in sunshine so no progress here - but a lot of nice comments! Thank you very much mates, those are highly appreciated!
No way that I would build such huge carrier like B-29 or B-36. If someone buys me a bigger flat or a house, I promise to think about it 🙂
I like the new parts too and no Wobblin' anymore! But today in daylight the paint was not yellow enough (painted those yesterday evening in artificial light). So I painted the yellow again today and think it looks better now (no new pictures).
Yes Augie, that was expensive - but maybe I could help Ukraine a little. The kit was created 40km away from the front! 😮 How can they develop and manufacture such great products under such conditions?
5 7 March, 20:06
In meantime I found an explanation for the open tube pieces on the struts (see pic 76 for example): here a protection bow during towing could be plugged in.
See this picture sandboxx.us/wp-conte..227-F-1234S-048.jpeg
3 7 March, 23:19
Are you considering building the protection bow? It wouldn't be too hard to make with sprue or brass rod. I think it adds something, but it might cover up all that work with the open pipe too much.
1 8 March, 11:16
Skyhiker, you mean something like picture 71? I'm will check later if it is long enough.
Regarding soldering I showed often the tools in the build logs - all you need is practice and exercise. And practice and exercise again.
And again one step forward, two steps back 🙁
I hate to mask resin models! Painted dark metal areas and want to mask them to paint the rest. A mask was not sitting in right place and I want to remove it to reapply - pulled up paint and primer together .... And again ....
2 8 March, 17:56
Sorry gorby, I have not seen your post as we typed in parallel.
It seems as if you can estimate my behavior quite well.
2 8 March, 18:09
The protective arch is a small but interesting accessory on the transport trolley.
While surfing the internet I found this photo. It shows more details about the protective arch. It might come in handy. cdn.prod.website-fil..39a6e44b102b6_5.webp
2 8 March, 21:11
Thank you Ludvík!
I know this picture. Yours is a part of the original, which can be found in very high resolution on Wikipedia:
[img1]
I wanted to show this picture anyway later as it shows (if you go to full resolution) that they used decals for the stencils instead of masks. And some of the decals shows a silvering! So I have later an excuse if my decals shows that too 🙂

2 8 March, 21:36
I thought you knew the picture. 😉, ... I sent it just in case. Wikipedia also has nice close-up pictures of the trapeze design with the Goblin suspended, but I'm sure you know that too.
2 8 March, 22:01
To replicate the trapeze would be not easy and more info would be helpful. No, I will resist and show it on the nice yellow carrier as today in museum.
2 8 March, 22:25
Something seems very wrong with the design of the Goblin... The turbine warning strip seems to run coincident with the pilot's seat... A design that seems very sympathetic to the Citroen and SMART cars...
8 March, 23:12
It is looking terrific. I love that yellow carrier, and you did such an amazing job on it, bringing all the detail out with the weathering.
9 March, 01:50
Thx!
Yes, the design looks like an egg-plane, but the turbine red stripe is definitely behind the seat and the headrest.
That reminds me of a few morons on YouTube. The manufacturer of model turbine engines prescribes a lateral distance of several metres during operation because they run at 120000 revolutions and more. And then these idiots screwed the turbines onto "Bobby Cars", sat on them and raced through a park. As the inlet is close to the ground, there is a high probability that dirt will be sucked in. If the turbine blades then come apart, the crown jewels a few centimetres above are also ruined. That would even be enough for the Darwin Award 🙂
4 9 March, 12:15
At the moment I'm applying around 100 decals o:
The numbers go up to 58, but the bigger ones don't have a number, many are doubled and some even 6 times. So I guess it sums up to 100. A little flying manual 🙂
2 9 March, 18:15
A huge step towards the finish: the Goblin is painted and ALL decals are applied! 🙂
2 9 March, 22:10
Picture 58... no doubt that the resin work is far superior in this case!!!
1 9 March, 22:44
You've picked up rocket speed. Looks like you're getting closer to your goal. The Goblin with the decals looks fantastic!
1 9 March, 22:45
congratulations, the 100 decals look good (or at least those shown in the photos)
1 10 March, 02:49
Thank you very much mates! Your comments are highly appreciated!
@Desert Marlin It looks like you went slowly through the whole album - I hope you had fun. p17/18 there were little recesses for the PE parts. p55 I really like to do some scratch work in metal.
@Ludvík After spending the whole Sunday for the decals I mounted all today and it looks like I will meet my deadline: the Goblin is finished for the club meeting this evening, only the washing will not be dry 😉
Jennifer and gorby I really like if decals are bringing some colorful life into a model.
No time to show new pictures today but I will add some tomorrow. Stay tuned!
3 10 March, 14:04
I trust your club friends will admire your Goblin as much as your friends here on SCM.
10 March, 19:11
Yes, it was a surprise 🙂
Thanks Kenneth, I used my beloved trusty Alclads. Hard to find now.
11 March, 08:49
Great painting job! I will be here waiting for the moment when you peel off the mask.
[img1]

2 11 March, 12:41
Thank you mates!
@Lorraine Lin All masks are gone, no bis accident below 🙂
I just added some additional pictures and my fresh work on the front protection bar which I created according to the picture shown already. As all parts in aviation even the belt has its part number plate 🙂 The protection is only plugged to the model so it can be shown with or without it.
This build log is finished now. Thanks for watching and commenting! Don't miss the final pictures in a new album here:
The Goblin as it might look in a museum | Album by bughunter (1:48)
3 11 March, 17:59
I found also a colorful Goblin of a PC game, in case you want to to a What-If:
[img1]
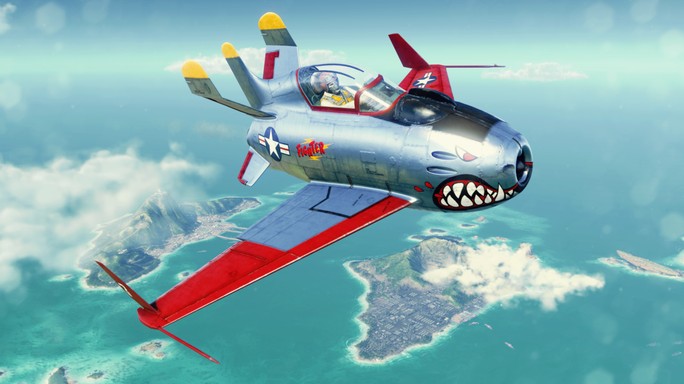
2 11 March, 18:30
Wow!! Incredible paint and decal work. The Goblin turned out awesome!! Love it.
1 12 March, 01:14
Very nicely detailed set. Be careful where to cut the exhaust parts as you might be left without a rim to fit into the grove of the fuselage. Clearprop doesn't indicate that.
")
MiG-23ML, MLD, P, MLAE Exhaust and air scoops for CP kits  Clear Prop! 1:72CPA72080 2023 Нова прес-форма
12 March, 14:09


додав новий фотоальбом.
20 зображення
Mig-23 Gate Guard at Technikmuseum Sinsheim
1:72
A former GDR Mig-23 as gate guard of the Technikmuseum Sinsheim. That´s what I am aiming at.


 2+
2+ 22 28 February, 17:35
Ooh! This is a cool idea! Very curious how this will turn out. Definitely joining in! 🙂
28 February, 19:44
Nice project! I remember that bird from our visit (that triggers me to start plastic models) years ago too. I was impressed that you could see the bolts of the pivoting wings from the outside - and that they looked like new, unlike the rest. Titanium?
I hope you have enough pictures, a picture search found some.
1 March, 00:42
I'm in. I grew up between Sinsheim and the partnermuseum in Speyer. So we visited one of the museums about every second month.
1 1 March, 09:55
Hi mates. Nice to have you on board.
Jep Frank, I think I do have enough pics as I shot a series with this project already in my mind.
It is indeed a very nice museum tour to visit Sinsheim and Speyer together.
1 1 March, 12:41
додав новий фотоальбом.
166 зображення
Esci sdkfz 10/4.
1:35
After 4 paint schemes & pigments, I think that I managed to match its appearance with that of the halftrack made ages ag...


Проект: Sd.Kfz.10/4


 4+
4+ 52 16 March 2015, 20:55
Nice! This was the first ESCI kit I ever built..apart from the high flash level it builds into an acceptable little kit...😢
17 March 2015, 05:57
Hi, M.Julian. Thanks'. I'm Leaving the Dragon ones to the end hehehe. My first ESCI was the 7.5 cm. Light Infantry Gun German Artillery Unit 1:35 (I will also make a photoalbum from it). That's true, but dealing with flash and seams it's part of the hobby and it's ok for me (and sometimes even relaxing)...
17 March 2015, 13:07
Be aware M.Julian, because the italeri instructions also have some errors...
19 March 2015, 12:59
Cool project dude, trailer is looking cool, you need to jump back on this one 🙂
24 July 2015, 01:42
There's a certain satisfaction to getting a terrible old kit into a presentable state that you just don't get with modern high quality kits. Good job!
22 June 2016, 15:56
Thank you mates, comments much appreciated.
@EnsignExpendabl, You are absolutely right mate, as I prefer to save instead really spend lots of money in after market or very expensive new models.
I really enjoy improving the old hobby stuff with some improvisation😉
@John, Finally I think now I'm getting near the end of it.😎
22 June 2016, 16:56
The fight with too stiff and hard tracks and a broken one. Simultaneously trying to simulate track Sag.
24 June 2016, 14:16
Thank you, mates, appreciated.
@Roy I agree and it was very easy to do it with that small saw😉
25 June 2016, 00:30
Nice work improving this ancient Esci kit! I recently built an equally terrbile Esci Sdkfz 10, and it is indeed quite satisfying to improve the old kit yourself, instead of buying loads of aftermarket.
25 June 2016, 17:38
Hi Tomska,
Thx for your nice comment, much appreciated.
I fully agree with you, mate. It's quite rewarding to get your best from an old kit.
You should post some albums of your work...🙂
26 June 2016, 12:08
Started figure painting, base paint, some kind of colour modulation, detail painting and gloss varnish for future wash's, filters and chipping.
Some more detail added😎
5 July 2016, 00:12
Hi Mate,
Thank you very much for your really nice comment Choppa. Coming from you has a special taste.
Ok, if you say so, I will change the Teaser, but it is still a work in progress 🙂
7 July 2016, 22:39
Not to salty I hope haha 😄
anyhow, doesn't matter that it is a work in progress, we all wanna see at a glance progress is being made😉 😄
Seriously though, nice work, one thing though, better lights and a contrasting background, a sheet of warm light blue or something just to help the model pop out the photos a bit more make your good work easier to see 🙂
7 July 2016, 22:48
@Choppa, Of course you are right Mate.
Normally I take photos with a white background and different lights or natural light. I will do it later on the process.
This ones are from my working place just to memorize the progress.
@Dave, Thank you for your GREAT comment. much appreciated.
I think, next phase will be:
Adding more details and gear, apply dry pastels and mate varnish. Also detail painting and washes in the figurines.😉
7 July 2016, 23:29
sorry don't mean to be picky but you're doing nice work here and it is worth getting that white sheet out to present it well 😄
Anyhow, looking forward to seeing it to completion 🙂
7 July 2016, 23:45
Me too, my my friend, me too.
I will do it slowly and meanwhile I will try to take better photos😎
I've got the MOJO to end this one and the other two also.
Let's see how long it will take hehehe
7 July 2016, 23:50
Este é o meu País.
Não precisamos de electricidade na torre Eiffel.......👍 👍 👍 👍 👍
Parabéns PORTUGAL
11 July 2016, 03:08
Looks great. It goes to show that very old and supposed outdated kits can look great with a nice paint job. I also like how you've reworked old figures into something new😄 as for football I guess the Welsh had a pretty good run!😉
11 July 2016, 05:29
Thank you for the nice comment, M.Julian. much appreciated.
I'm glad you liked the paint job and the cannibalized old figures, (some older than others).
Yesterday I gave some talcum powder and pigments to simulate dried sand on the 10/4, and matte varnish on all.
I will post some new photos later😉
11 July 2016, 13:18
Some great effects you have achieved Rui.👍
The ware and tare of desert life has been well represented.🙂
I do like the road tyres on the front having the dust but a well blackened area from some hard miles. 🙂
Well done mate. 👍
11 July 2016, 14:13
Hi Kezza,
Thanks for your nice comment Mate.
I'm glad, really glad, you like the work so far. I hope I don't over do that effects.😉
11 July 2016, 14:16
Rui, the big thing about desert trucks, and your research images will show too is the grease that streaks outward from the hub caps/covers and the sand that gets stuck to it. 👍
And you have done that 'faded/bleached' upper surface paint well.
But as I say, the whole look is most convincing. 🙂 🙂
11 July 2016, 14:22
kezza, Thank s Mate.
Yes, you are right and I tried yesterday to do just that with the talcum powder and pigments as said and previously applied black satin oils.
It is just that, what I also hope I didn't over do it.
You will see it in the next photos.😉
11 July 2016, 15:54
I just add some photos, (not the best but quick ones) just to show that.
The matte varnish removed the satin look that I will add later on with satin varnish.
Also a photo with some more detail work on the windshield.
11 July 2016, 16:14
Excellent work & no I don't think you have overdone the weathering.
11 July 2016, 17:23
Respect Rui, this is shaping up nicely ! 👍 🙂
looking forward to some photos in daylight, hint hint😉 😄
11 July 2016, 17:25
@ Dave, Mate you have been most supporting. Thank you very much. 😄
@ Choppa, hehehe I hear you Mate...😉 Thanks
11 July 2016, 18:09
Esci is for those real modellers that go for it!Love the small details on that canonfloor
And i angree with Choppa,you truck needs some sunlight 🙂
21 September 2016, 08:10
Oh, ! Es ist so heiß hier draußen Klaus, ! Ja! Sie könnten Spiegeleier in der frnder machen !!. 🙂 👍.
Did I get that right. ?🙂
A most convincing heat of the day scene. Well done Rui. 👍 🙂
21 September 2016, 09:51
Looking at your work a little closer Rui, I have noted how much alteration to the figures positions you have done, and it's NOT easy to do. Exceptional mate, 👍
21 September 2016, 11:34
Hi Mates,
@Michaël, this is still a work in progress and this photos where just a dry test fit. from there, I've glued some more items and details in the cannon floor and all the figures (after some more detail painting). I hope to manage some new and better photos of the model prior to start the dio base. Hopping....
@Kezza, I think your German is worst then mine Mate hehehe, but I caught the idea😉 It's going to be another long hot day for those guys on a betted up half track. At least is that I'm trying to depict. As to the cannibalization I enjoy to alter all those well known Tamiya, Esci, Italeri figures. I have lots of them so I don't waste my money buying from better brands.
@Wesley, THX a LOT, but I've to say that I'm still struggling a lot with figures painting mainly faces so with so much flesh showing on some of the figures, this was a well come challenge to improve my skills. Still learning. Has we all know practice, is the key.
So Mates, I got speechless for a while with all your very nice comments. THANK YOU VERY MUCH, greatly appreciated. 🙂
21 September 2016, 13:35
Painting figures is a very time consuming job en not easy in 1/35 scale. Like you say, we learn allong the way!! And curse a lot! 😉
21 September 2016, 14:51
@ Kerry: Not bad, my friend! Not bad! Had you German at school?
21 September 2016, 20:52
Oh Thomas. I cheated mate. :-/
I put it through that 'Google translator and I posted it, but it was more fun trying to say it LOL 🙂
I remember seeing a film of the Germans in North Africa, cooking eggs on the hot steel of their panzers that was baked by the sun. 🙂
And Rui 's work is so good, it just bought it to mind. hehehe 🙂
21 September 2016, 22:38
Well Thomas, not with a good German accent. LOL
But I do remember my German father in law and the things he encouraged me to learn, and in my mind, I did OK. 🙂
22 September 2016, 14:17
@Wesley & Dave I agree. Lots of small scale test and experiment work and LOTS of cursing, that's for sure. I'm don't know if I will nail it but I will try.
@Kezza, if Thomas is saying "not bad" is because your German is much better than mine.
Now I know that. The Google translation to Portuguese was not 100% correct that's why I said that. But to pronounce or even try to learm the language is way behound my skills, hehehe. I wil keep wih my bad English and Spanish😉.
As to the film you mention, I've seen it (it's on a panzer II mudguard) but some say that it was a fake for propaganda proposes... Anyway, thank you all for your complements, they sure help me a lot.
22 September 2016, 17:10
As always Rui, your so humble in your replies. 🙂 👍
We all love your work, and especially all your research material you post. 🙂
22 September 2016, 23:22
I hope you are right Kezza 🙂, but when I'm into modelling the research goes to a 2ª plan unless is something related with the subject I'm doing at the moment or thinking to do next, or if a mate asks for help. Especially about German WWII afv affairs. 👍
23 September 2016, 01:15
I am still in awe Rui. Just ONE suggestion. The boots of the guy with his feet on the wind shield. Dusty with souls almost white. 👍
8 April 2018, 19:52
Thank you very much for your words, James. Coming from a Master it makes me feel great, but hard to believe. 🙂
@ Kezza, how are you my friend? You know that in my case a work in progress will last forever, hehehe. 😄
It is waiting for the trailer and a final puff of dust all over the horizontal parts and undercarriage. But thanks for your suggestion.😉
Also one day... I need to take some better photos, has Choppa advise.😎
9 April 2018, 19:21
Thank you for your nice words, again Kezza. I've not done yet what you sugested, because i've not touched this one since, but today i took some new photos of the all crew in position.
7 June 2020, 13:19
Fantastic detailing Rui. The assorted stowage items and crewmen look amazing. 👍
8 June 2020, 19:39
Great work. I see poor kits as a great opportunity to put in some very satisfying correction work.. The results of the efforts you put in really show.
8 June 2020, 22:59
I'm very happy that so many great modelers, like this still in progress kit. Thank you all very Much mates. Much apreciated.
@Neuling, Nice of you to stop by.
@James, i never had so much canibalized figures has this ones.
@Kezza, I've still to had some dust on .
@ Chaz, I'm still learning, so i still use older kits on my stash. I realy like to improve "bad" kits to a satisfying level. It gives me a lot of pleasure and not to use aftermarket itens to achive it, mor so.
9 June 2020, 20:23
I think today, any sizable stash will be mostly Old kits. I'd estimate mine at about 80% with the tool being from the 60s, 70s or 80s, another 15% from the 90s, the remainder tooled since 2000. To be fair, a chunk of the 60s & 70s kits are Tamiya, and may as well have been tooled in the 2000s for the quality, but there are as many 70s MPC kits which leave a lot of work to be done.
9 June 2020, 20:50
@Dave, thank you for your Nice words. It is not so much the surprise, it is more the happiness that the work and the effort is beeing recognized and deserved the comment of modelers with a high level talent, if you get my drift.
@Olivier, yes i agree, maybee he is drinking shnnaps from the canten to ease the pain??? I've tried to replicate the guy on the project photo (n. 28). Bythway a very interesting photo with an intrigging unit sign.
@Chás, you are probably right. That's my case for sure, but has i've said multiple times in sacalemates i never underestimate old Tamyias Italeris, Airfix, Esci and others, i like them all, not to say i love them. And i praised very much that older brands because they started all this. And yes many of those early and much cheeper kits leave a lot to improve, That's why i've been working with some of them.
10 June 2020, 12:22
Well said Rui. 👍
You covered all the bases on why we do what we do with what is available. 😉
You have excelled and have us all talking about it. 👍 🙂
10 June 2020, 18:29
Well Kezza, you are beeing to kind, my friend. THX.
I've just post some new photos of this old project because I didn't have any with all the crew in. But you are right about us and the hobby. Still I've yet to use some aftermarket pieces that came with some of my evilbay buys and the Dragons; Miniart; and newer brands that i've in my stash😉
10 June 2020, 22:46
Queria dizer "unusual"! 🙂 Refiro-me ao half track com a peça em cima, não conhecia.
11 June 2020, 11:16
Very nicely done. The crew, weathering and all the small details tell a story.
11 June 2020, 11:40
@Ricardo, Ah, ok. Os alemães colocavam canhões antiaéreos (as vezes quádruplos) em tudo o que mexia. Halftracks; camionetes; blindados; jipes. Era o que houvesse. Neste chassi até há um modelo com um PAK antitanque de 50mm. Neste caso a Esci, foi a primeira a lançar este kit, (primeiro na versão de transporte e depois este modelo, nos idos anos 70). Hoje em dia já há vários Italeri e Dragon, entre outros.
@Daniel, Thank you for your Nice comments, I realy apreciate it and I'm glad you liked it.
11 June 2020, 12:04
@Olivier, I can't be 100% sure, but i found it on a book dedicated exclusively to the Afrika korps. Anyway, in my research I never found this "camel" sign anywhere.
11 June 2020, 12:15
OK. Because the unit sign I cannot link to any DAK unit. Still an interesting image in particular for the trailer.
11 June 2020, 12:18
Sorry, it was on a site dedicated to A.K. not a book. And yes, that's the intriging aspect of it.
11 June 2020, 12:23
Thank you Roy, Nice to know that you like. Much apreciatted.
Since I start cuting hands, I never stoped again and start cuting legs, arms, boots and everything else.😉
23 June 2020, 19:34
:-D it's the same reasons that said Fredy Krueger to the police when he was catched!
24 June 2020, 08:52
@Oscar, hehehe. Yap, I'm the Hooby Fredy, since.
Glad that there is not a scalepolice 😄
@ Peter, Hey Mate don't need that. We need you and your talent here😉
24 June 2020, 20:06
@Peter, I wrote "TEST" because I reactivated this thread to do a test with Tim, about the photos rotation feature.
Two photos in this album had been rotated and the thumbnails were missing. A old existing & anoying bug, fixed by Tim right away that day.
Didn't reply to you before because I didn't want to pull up the thread again.
@ Cesare, Thank you for your kind comment. I'm glad you like this one. Always apreciated.
11 July 2020, 11:35
I've got the older version of this kit molded in the dark gray and it's a tough one to work with; congrats for doing a stellar job, especially with those rather difficult and sometimes strangely posed figures of theirs. (I'm thinking of the Italeri Schwimmwagen with the officer holding his elbow up over his head LOL).
18 July 2020, 12:15
Thx a lot Al, much apreciatted and I'm really glad you like it.
I really liked all the work needed to make the kit and figures something decente. the result always serves as an incentive.
I'm leaving my best kits for when I have more experience.😉
18 July 2020, 15:43
Thank you for your nice comments, David Pearson and David Taylor. I'm realy glad you like it. Much apreciated.
15 March 2021, 00:09
Very nice achievement, excellent result, when we know the mediocre quality of the model, beautiful work. I have one to assemble, but I will put Tamiya or ADV tracks on it, those of the kit are much too fragile. I hope to arrive at a result as good as yours.
8 January, 10:13
@ Jean-Daniel, Thank you very much for your kind comment. Yap I've to agree with you about the kit, so I'll try to enhance the model a bit more with a decent dynamic diorama.
After the Elephant and before the Mariupol Dio, it was time to remove this one from the shelf of doom, waiting for ages.
It will be my version of the dunes. Still a lot of work to do, but I'm determined not to start a new diorama before finishing the two I have on hold.
1 18 February, 23:13
Wow Rui! You outdone yourself with that build - the figures are well done, and the work you put into the half-track is nothing short of transformative! ❤️❤️❤️
27 February, 15:05
@ Randy, Thank you, for your praise. Apreciated
@ CaptGPF Thx very much, for your unconditional support
@ Dave, I've to thank you. This batch of photos was inspired by your words. P.S. I did tell that I would like to do a dyinamic Diorama with it, But I don't intend to do more figures for it, so maybee a nice vignett...
@ Clifford, Always glad to see you here Thx a Lot.
For those more initiated in bases, or others more/less interested, this is my way doing a sand dune system, using current materials.
Some photos showing where it is progressing, this is the state in which it is currently.
1 March, 21:36
Very nice work on EVERYTHING! The figure modifications the painting, weathering and landscape. BRAVO!!!!!
2 March, 01:58
Great work. Love how you have the figures set as one who is looking at the ride, one who looks like he wants off the ride and the third one has no idea as to what's about to happen.
7 March, 16:11
@ Jeff C., wow. Thank you very much for your most kind comment, it makes me very motivated and proud.
@ Dave, glad that you like my work and comment it. Very much apreciated. Yah, glad and interesting you mention that, becouse the angle at which I decided to place the half-track on a sloping sand dune also came from the balanced positioning of some of the figures (if you notice the guy sitting on the left is leaning forward and the one with his SAS legs, he's already watching the film and holding his helmet). Little do they know what will happen on the other side after the jump... a leap into the unknown. 😄
@ David Taylor, for a long time, only Esci had this halftrack in 1/35. I've done also the 7.5 cm Light Infantry Gun. German Artillery Unit. ESCI | No. 5011 | 1:35. Another must before other brands launch the same kit later.
The damn sand dune took way too long. I went back and forth with the application and gluing of the powder and paint, but finally it seems acceptable to me and it already allows me to take some interesting photos. I hope you like them too.
Now all that's left is to finish painting the trailer convincingly and the base frame.
1 7 March, 16:26
Fantastic masterpiece of vintage craftsmanship,
in this sector Rui you are unmatched!
8 March, 15:28
I have to agree with everyone - all that work paid off in a cracking Dio! Thank you for sharing your build journey, and for the eye-candy, Rui!
11 March, 14:55
@ @ Pietro De Angelis, thank you very much for your support and kind comment, very much appreciated and important to me. Nevertheless I think your statement is a bit exaggerated, there are more mates here who also get good results with not so good kits and no aftermarket stuf, but thx again for you praise.
@ Gary Curling, Thx mate, not finished yet. Glad you liked and comment.
@ CaptGPF, Thank you so much for your comment and great support ,always very much apreciated. Glad you like this long build journey, now finelly near the end.
@ Mark Sherwood, thank you for stoping by (you know the remedy, one or more cool bears and all it's good). Glad you like it so far, I'm on the final stretch with the base and wrap this one.
The trailer is now painted in accordance (or almost) with the Half Track. Just the final touches on the base and it's done.
12 March, 12:47
The tailer looks incredible. Sitting here trying to figure out how you made that cover look so good.
12 March, 13:55
додав новий фотоальбом.
15 зображення
Panzerbefehlswagen III Ausf K - WIP
1:35


Проект: Panzerbefehlswagen III Ausf K

2 8 February, 07:00


додав новий фотоальбом.
10 зображення
SAS Landrover Pink Panther 
1:35
Got everything to get going


Проект: S.A.S. Land Rover Pink Panther

1 9 March, 14:08
This will be build straight from the box, for an old school Tamiya Group build over on twenot forums.
I will share my ventures here too 😉
9 March, 14:14
Alex, pls check private message> The kit you are interested is still available.
12 March, 13:15
додав новий фотоальбом.


5 1 March, 02:20
It was a rowdy start with the left part of the frame warped. I removed the warp with a thread tended between the wheelbays. Some changes were done to the interior to place the PE parts. A lot of parts are still dry-fit until after painting everything black. A strange thing is the gauge decal that has to be reversed from the sheet.
8 March, 22:59


/uk/search.php?q=*&page=newsfeed&fkSECTION[]=Newsfeed
search-solr.php?lang=uk
35
35
/uk/search.php?q=*&page=newsfeed&fkSECTION[]=Newsfeed
35
todo