
News Feed
")
")
想要这件
")
SMB-2 Super Mystère 'Sa'ar - Israeli Storm in the Sky' Hi-Tech Kit
Special Hobby 1:48
SH48238 2024 新零件 13 October, 15:09
")
")
添加了一个新相册


54 28 March, 16:26
Build completed so far. Still waiting for the metal barrel. Quite challenging to attach the Zimmerit- PE parts. Was annoying when it comes to round shapes on the turret front armor. Treating those metal parts with some heat, made them much more handy to shape. First time using Friul tracks, very time consuming, but the best track result I´ve seen so far 🙂
1 April, 13:59
Lower part of the tank was painted and received weathering. Tracks were mounted and connected. Rear fenders were the installed. Next is masking lower section and painting the upper parts.
2 June, 10:18
Nice job. I'm taking a seat.
Is it going to be some "Magdeburg-stuff" again?
2 June, 11:03
The tank received several rounds of paint. Starting with red brown primer, followed by dark yellow as base color and finally the camo pattern. Next is detail painting, and weathering.
9 June, 15:30
Initial weathering steps were conducted; chipping the Zimmerit and the metal surfaces.
16 June, 09:20
Thanks, Nick!
The exhaust was painted in a medium grey first. The parts having armor plates underneath were left in the original painting, as these area is less affected by heat and corrosion. Then a warm white followed by a reddish brown was applied using the sponge technique. Next was rust tones painted and blended with enamels. Colors of the original camo scheme where then applied with a sponge in the areas with less corrosion, to turn out the different stages of heat impact. Finally the upper parts received a slightly black shade to simulate the exhaust fume grime.
23 June, 08:21
Kick off for the base. Styrofoam is the desired material for house, road and pavement. As the road and pavement is covered with lots of dirt and debris, I added cobblestone only randomly. For the road thin sheets of styrofoam were shaped using a 3D printed rolling pin. In order to create more texture the stones were carved with a pencil. For the pavement an old brush was used to shape the small stones. Everything was painted in several greyish, brownish, sandy tones with acrylics.
The shape of house was cut with the Proxxon hot wire. To make the facade more interesting I added some "decoration" around the upper windows. A border seperates the upper and lower floor. Next is closing the gaps between the decoration elements at the upper windows and cover the lower floor with wood.
28 July, 07:18
Slowly taking shape. Lower floor fassade updated with some wooden panels. Dirt and debris was added to the road and pavement and painted with the airbrush. I used the same colors I used for weathering the tank tracks. Next is windows and door installation and of course detailing the interior.
18 August, 12:32
Lower and upper floor and walls were detailed using Balsa wood and wallpaper. Added windows using Balsa and lasercut as well as some transparent plastic for the glas parts. Also the infantry miniatures arrived meanwhile.
31 August, 13:17
Scratch built some interior from balsa wood and plastic residues. The attic floor was installed. Next is finally building the lower floor entrance and preparing the roof.
9 September, 12:26
As an important detail, I added the sign with the shop name where the Tiger was abandoned in Villers Bocage in 1944. Also the advertising was printed in a suitable font and prepared for installation.
13 October, 15:09
")
")
 'early version' (Hasegawa 08175)")
")
")
")
")
")
")
")
拥有此物
")
(Stash holders may need to relocate kits)
Pinta 1492 Caravella di Cristoforo Colombo Amati 1:65
1410 (Art. 1410) 13 October, 15:07
添加了一个新相册


3 13 October, 13:25
we are in the presence of a man of taste… Leffe blonde… triple Westmalle « que du bon »😄
13 October, 15:05
")
The swastika on the box art is censored, but by what is still visible, it's the wrong way around, LOL
Keen to see what the actual decals look like...
")
13 October, 15:04
 (Revell 06684)")
")
")
")
")
")
")
 (Eduard R0002)")
添加了一个新项目

2 12 October, 12:52
There's always been a spot in the new cave, for the Mrs, Nigel. But, it's getting tighter, with all the kits I've got.
13 October, 12:28
If you're in need of space, I'm more than willing to offer a ridiculously low price for some of your gorgeous kits. 😁
13 October, 14:58
")
拥有此物
")
Mitsubishi Ki-51 Sonia Japanese Army Type 99 Assault (Reconnaissance) Plane
Nichimo 1:48
S-4818 1975 新模具 13 October, 14:58
")
")
")
添加了一个新相册
39 图片
Weimar T174-2 + PZL M-18 Dromader - East Germany, 1989
1:72
Paint job should be done now. Next steps are weathering effects.


51 22 January 2023, 10:20
This is the first time for me to tackle a complete resin kit. And when I look at the individual parts, it will be a real challenge. There is an extreme amount of rework needed on each part. Hope I can get it to work.
22 January 2023, 10:29
A 3D-printed PZL Dromader???!!! Following for sure!! (The Grand Models cast-resin kit is perhaps above my skills - and I still wait for the Karaya injection one...). Your ag-aircraft & ground equipment dio will turn... monumental! 👍
13 February 2023, 19:12
Thank you all for watching. Alex, I also saw the Grand Models kit for the M18, but I was frightened from some build reviews, there is a lot of rework to do on that kits. I have now the same or a bit more work, but I got the 3D file for free from Thingiverse.
I am really not a Pro in sratch building but I will try to engrave some panel lines and add some more greeblies to the plane. The 3D file is very poor in details.
14 February 2023, 09:34
Fantastic Dromader! (I wish I had one... I have no access to 3d printing, alas...😭 )
21 February 2023, 18:06
Robert, you can have a look to the Grand Models resin kits. I am much more disappointed that there is no kit in 1:72 and no 3D file of a PZL 106 Kruk. I would spend some money on that because it would fit perfect to the Dromader and Cmelák.
21 February 2023, 18:10
Actually, that is something that makes me angry too - I would love to see (and buy) decent kits of "Wilga" and "Kruk" (not mentioning PZL M-15 "Belphegor" 😉 )... but apparently no Polish manufacturers are interested in preparing these.
21 February 2023, 18:52
Guys... let's look a bit at the bright side: who would have thought a few years ago that one day (today!) there would be kits of the Cmelak, the Dromader, the Grumman AgCat (in both 1:72 & 1:48!!!), the Piper Pawnee?! Some are short-run, some are cast-resin, some are 3D-files-to print - nevertheless, something is slowly moving towards that direction! So, yes, I do hope too there will be someday a Kruk available in 1:72 or a Belphegor! And your buys of such kits and your modelling work proves that there's some interest in such topics! Keep it up! 👍
21 February 2023, 19:06
You're right, Alex 🙂 "Always look on the bright side of life..." 😉
21 February 2023, 22:00
I am afraid there is a spelling error on the decals, Chris... I see "Dromedar" instead of "Dromader"... The plane looks awesome!
24 February 2023, 15:43
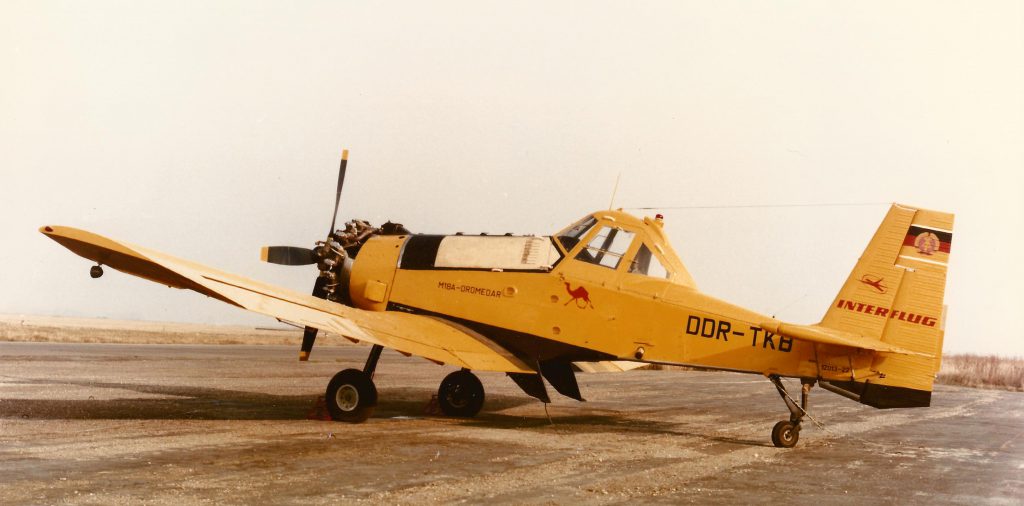
Robert, I can understand that it is confusing, but in the GDR, "Dromedar" was actually used. This is the German translation of the word. Feel free to search for pictures of it, here would be an example: [img1]
24 February 2023, 17:01
I have not known about that, sorry Chris... That's really interesting.
24 February 2023, 17:17
Everything top notch here! But what about the excavator? May a combined diorama?
29 June, 10:21
The excavator is still coming. I haven't dared to go any further yet. Let's see, maybe I'll get motivated again in the fall/winter. 😉
9 July, 13:19
It is not easy to find out with which lettering the excavator was delivered in the color used in the respective year of construction. I'll have to see which decals I print out.
7 October, 18:21
/zh/search.php?q=*&page=newsfeed&fkSECTION[]=Newsfeed
search-solr.php?lang=zh
35
35
/zh/search.php?q=*&page=newsfeed&fkSECTION[]=Newsfeed
35
todo