

News Feed
")
")
添加了一个新相册


38 28 April, 01:47
Thanks guys, I appreciate the feedback. Any feedback, please. Does anything look strange? Just let me know. I am still very much a learner with 1:48th scale aircraft. I usually do 1:35th scale armour.
29 April, 09:13
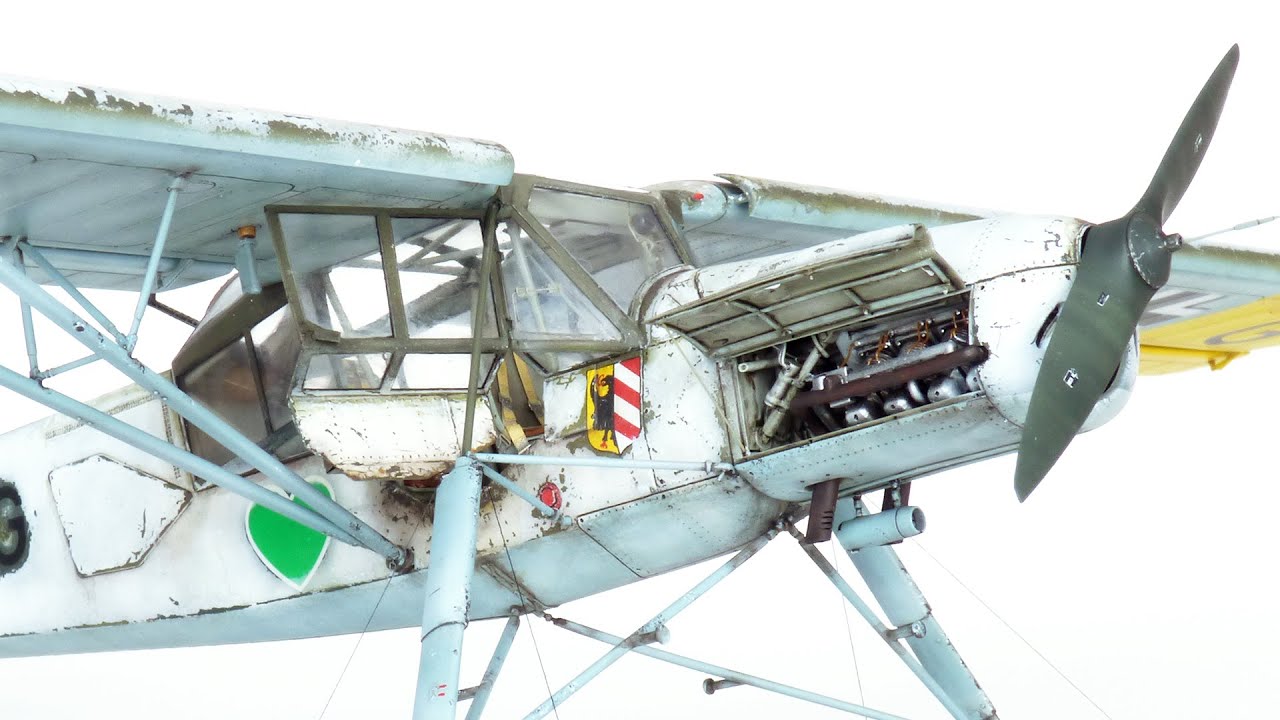
The radio antenna is made from AK Interactive 1/48 rigging, very thin copper wire wound up to look like a spring (a bit too thick I think, but I could not get thinner copper wire), then a 2 mm hole punch on thin copper sheet (moulded into a cone over a rounded tooth pick) and finally super glue dabbed on rigging (4-5 times top and bottom) until it was big enough (painted in AK cremeweiss colour). The entry into fuselage was made from spare ABER M50 Super Sherman 35034 brass metal set - small part just look like the right shape ... LOL pure guess 🙂
29 April, 09:30
I thought the weathering was done right - especially around the cockpit area where it would see a lot of it from the opening and closing.
22 June, 16:44
Thank you CaptGPF, Vincent and J35J for your kind words of encouragement. Very much appreciated ☺️
22 June, 22:45
about the weathering, it is at the end a personal choice, some people like models like new, some like they have been years under harsh conditions.... yours look really good to me. but at the end, it is your own opinion what counts 😉
the antenna is fantastic, i need to copy that when i do my 109
26 September, 12:19
Thank you Spanjaard for your kind words. The small cone on the antenna I made from copper sheet that I molded over a tooth pick was a little hard to control. I've seen another modeller use a small rod which he sharpened into a cone then drilled a hole thru it, I thank that may be easier and I'll try that next time.
28 September, 23:18
")
")
添加了一个新相册


25 22 September, 05:02
Beautiful build - love the subtle shading and the color modulation within the camo
22 September, 05:15
Thanks CaptGPF. Still very much learning and trying things out. I think that I
I mainly learn from making mistakes😩. For example the soft edges between the camo colours were not strictly airbrushed at 90 degrees to surface. It's noticeable in a couple of places.
25 September, 10:30
")
添加了一个新相册


15 13 September, 21:35
Hi Henry,
What was your process after clear coat ??
I want to give my current build a bit of paint detail....as I've just straight painted my models up to now.
And like how yours is done
😃👍👍
26 September, 13:06
Hi Mr D. Before clear coat, I did a little post shading with slightly lighter colours in middle of the panels, just a small amount with low pressure air brush and more thinned paint. After clear coat I used Flory Models.co.uk weathering wash for panel lines. You can also use AK Interactive or Tamiya panel line washes they too work great. Flory is clay based and allows me to control the level of wash I leave on the panel themselves, not just in the panel lines. Once dry, model gets a Matt coat. Then I use some oils to add weathering in highly used areas of upper surfaces and dirt/mud/ dust near wheels on lower surfaces. I use thinner just damp brush to blend in. I find Matt "grips" the blended oils better. Hope that is of some help Mr D. Note, I'm still very much learning each new model that I tackle.
28 September, 23:51
")
")

")
")
")
")
")
")
")
")
")
")
")
 (Fujimi 04767)")
")
")
")
")
")
")
")
")


添加了一个新相册


50 16 June, 03:01
Amazing painting and weathering ! I would like to do it as well as you.
16 June, 18:19
Thank you for all your kind comments. Very much appreciated. I am still learning as I'm going along. It's a great hobby! I was thinking for a long time about how I would do the white wash winter camo and then got my inspiration from DSM (Josef Choren) of his Hasegawa 1:32 Storch in winter camp ... refer to 28 minutes into his YouTube video Youtube Video. Recommend if you have not seen it to watch his whole video, awesome!
18 June, 07:11
Thank you Mr James for your kind words.I think I must've watched that YouTube video like 20 times or more before I tackled my model. You never know how you will go until you try. Lucky I did not mess it up 😊
28 September, 23:24
/zh/search.php?q=*&page=newsfeed&fkSECTION[]=Newsfeed
search-solr.php?lang=zh
35
35
/zh/search.php?q=*&page=newsfeed&fkSECTION[]=Newsfeed
35
todo