
News Feed


添加了一个新相册


3 18 April, 21:00
My very much long awaited build of Boba Fett's Starship from the Empire Strikes Back, Slave 1.
18 April, 21:05


添加了一个新相册


65 1 December 2024, 19:43
Some of the detail work I see on 1:72 kits on this site is unbelievable - this is another one - fantastic work Davy 👍
4 December 2024, 20:25
I like your serious approach.
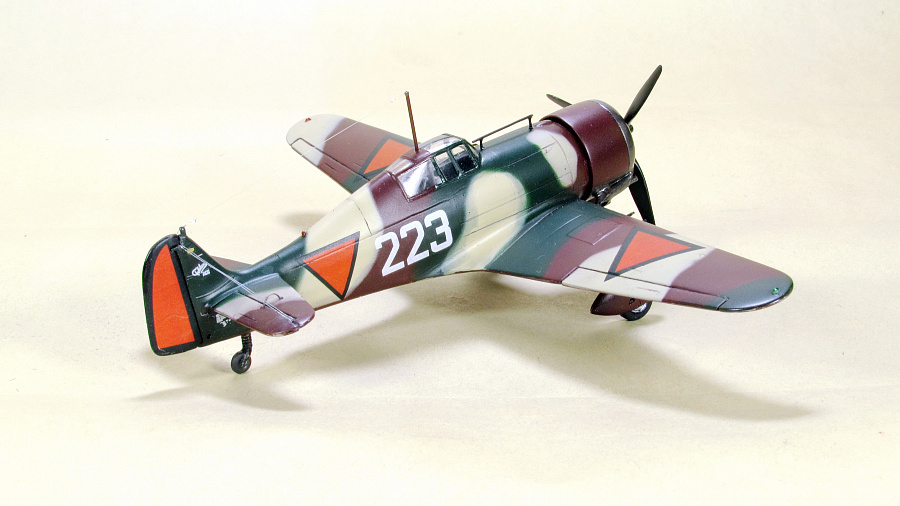
I have assembled two Fokker D.XXI 1/72. One of them was converted from the Novo set. The second one is from Special Hobby
[img1]
[img2]

4 December 2024, 20:50
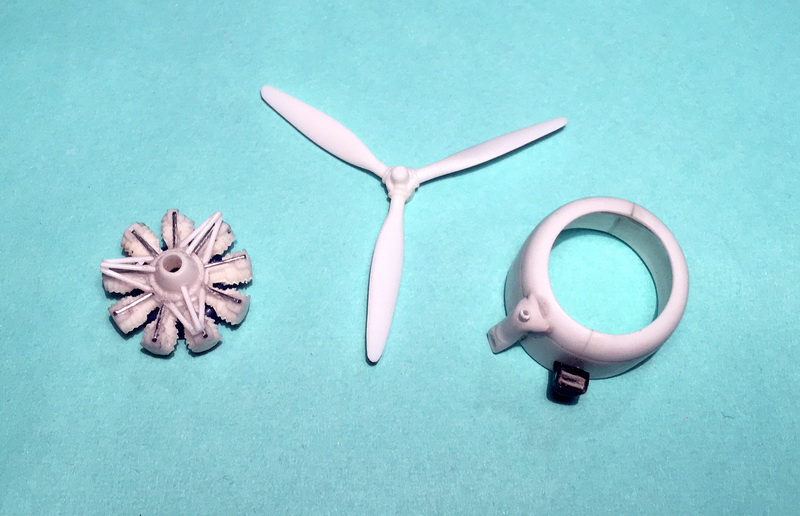
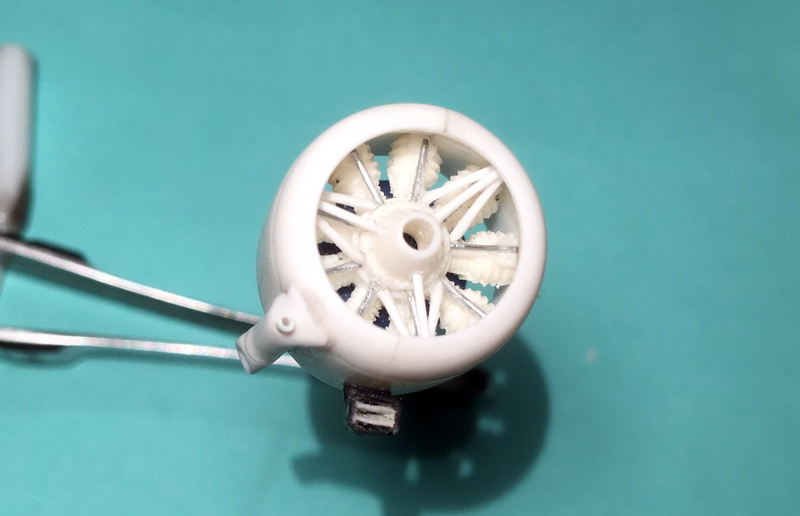
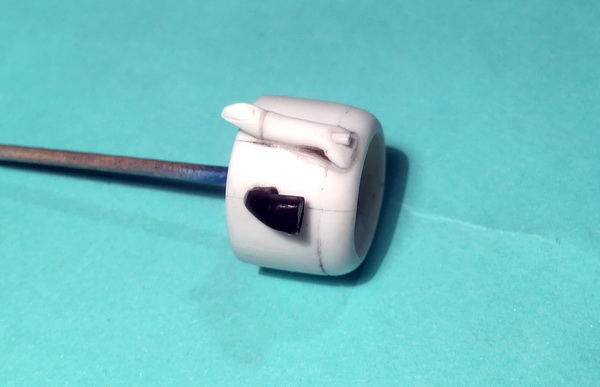
My version of the engine and hood. I took the details for revision from the Blenheim model Novo.
[img1]
[img2]
[img3]
4 December 2024, 21:04
Fantastic work on the interior. The exterior paint work is also very good.
14 April, 20:12
Your seatbelts really came out nice for this scale. Kind of amazing. You're a wizard.
15 April, 15:02
It looks really good, congrats for this amazing result 🤗
Love this airplane, built my version 2 years ago but in 1/48 scale
1 15 April, 20:08
添加了一个新相册


20 18 April, 19:07
@Rui S - Thanks! I hadn't been using a PC for last 5 years, and updating all over the phone was not so user friendly...so here we are! There will be more of the same updates, but I'll for sure make some real time WIPs!
@Mark K - Thanks!
@Curatorm - Thanks! With little care it builds into an almost up to date model 🙂
@Guy Rump - Thanks! Was using the ArmaHobby one as reference. Not the most precise work as it is barely viable, but it is there! 👍
19 April, 21:08
I see. I was just trying to say that your work its much better then a box art 😉
19 April, 23:30


添加了一个新相册
182 图片
JAS-39C Czech Air Force no. 9234 - Centennial - WIP
1:48
Main landing gear covers and their pistons and other hydraulic lines were added.


 2+
2+ 93 27 November 2023, 19:59
Welcome Robert, nice to see you again at my model build. 🙂
It will again be a plane with a special paint job.
27 November 2023, 20:12
Robert, you've come at the right time. I started airing my show today. 😉
27 November 2023, 22:15
Welcome, Rando. I'm glad you're here. You're not wrong, the plane will be in Czech colors. 😄
27 November 2023, 22:19
Nice and following this build! I heard that the panellines of this Italeri kit are a bit soft or a bit deep, are they? It looks, well, acceptable.
28 November 2023, 14:25
Mark, it's true that the plastic of this kit is a bit softer than the standard kit, but it's nothing terrible. Also, the panel lines are a bit thicker (compared to Tamiya or Eduard kits), but again, not entirely bad. The kit does have a few minor shape flaws as well, but overall it's pretty good and with a little effort you can build a nice JAS-39 model from it.
I will describe the kit's faults and how to fix them, including modifications to the "C" version (the kit represents the original "A" version), as the model is built.
28 November 2023, 18:50
I'm preparing the hull for its closure. I've glued the assembled engine and cockpit to the left half of the fuselage.
3 December 2023, 11:33
Looking great! Taking a seat for sure 👍
Vloudila se ti tam čeština, pics 13-16. Jen v případě že to nebylo úmyslně 😉
3 December 2023, 14:24
Hello, Alec! There's always room for you at my place. 🙂
Thank you for letting me know. It was my fault. The texts are already in English.
3 December 2023, 15:03
I haven't put much together yet. The fuselage halves can be glued together without any problems, they fit together well and the panel lines follow each other. The glued joints are gapless, just sand them lightly. When gluing the fuselage tip, care must be taken to ensure that it is turned correctly. If the tip is glued to the fuselage with the bottom side up, it will not follow the shape of the fuselage correctly when viewed from the side.
If there are any problems during construction, I will point them out.
4 December 2023, 12:56
Work on the model continues. The first problems are appearing. It was necessary to modify the joints between the upper and lower half of the wings and also the joint between the fuselage and the wings. The use of putty and sanding is unavoidable.
5 December 2023, 22:55
Little progress today. I glued the wings to the fuselage and started prepping the other parts.
6 December 2023, 23:45
Rando, thank you for the compliments. 🙂
The technique of extending the fuselage by gluing struts from inside the fuselage is nothing new. I have been using it successfully for many years. In my opinion, this technique is better than gluing the wings to the fuselage without extending the fuselage and then repairing by filling large gaps with putty and sanding.
7 December 2023, 10:40
I'm continuing with modifications to fix some bugs in the model and rebuild it to version "C".
11 December 2023, 00:30
I sanded and puttyed the model. And I got to the point where it was hard to recognize the places that still needed to be repaired. So tomorrow (time permitting) it's surfacer's turn. I'll take some pictures tomorrow.
12 December 2023, 21:37
Hi Alec, I use Surfacer 500. After finishing minor finishing work and sanding the Surfacer, I spray Base white 1000 (both are Gunze) on top.
I then spray the camouflage paints on top of that prepared surface.
14 December 2023, 08:38
Most of the errors are already corrected after sealing. Now I will add some small details on the surface of the aircraft. I'll have to scratch most of them.
15 December 2023, 21:31
Not much time to work on the model this week. But some progress was made on the model after all.
23 December 2023, 23:44
When I looking the photos I found minor differences in the details on the underside of the rear fuselage. The model will need to be modified.
30 December 2023, 23:50
Beautiful work! Thank you for sharing all of this tremendous research detail - very fascinating. I have this same kit on my "to-do" shelf, so I'll be looking over your shoulder for tips and ideas.
6 January 2024, 13:48
Christian, welcome aboard! I'm glad you're interested in my project.
When you look over my shoulder, make sure you don't make the same mistakes I did. I've just discovered that my inattention has caused the flare hole to be too far forward. I'm working on correcting that mistake right now.
And I remind you that the modifications described are only for Czech Gripen. For other users' aircraft these details may differ.
7 January 2024, 10:48
Another one to join to the observation, as I will have to do it at some point aswell . Is it the Front Noise need to be replaced by the quick boost?
7 January 2024, 10:54
Welcome Vintagemodeler! I hope that in the course of building my model you will find inspiration for building your Gripen.
I'm very sorry, but my English skills are not perfect and I don't understand your question. Could you elaborate on your question a bit?
Thank you.
8 January 2024, 08:43
Yes mr! I cant believe how you did those amazing scratch! i just mean if front noise looks good, as few people told me that it need the QUICKBOOST upgrade part, i get it for mig 29 and Su-27, but didnt get it for JAS-39 yet, as i didnt saw that much difference.
kind regards
9 January 2024, 11:21
")
Vintagemodeler + Mark D, thanks for the explanation.
I think the QUICKBOOST nose is not necessary. According to the drawing, the nose from the kit has a good shape matching the drawing. The bad shape of the nose is elsewhere. The top of the nose needs to be corrected. The windshield in the kit rests on a raised area that is not on the real model. However, this can easily be corrected with a little putty.
A clear description of the basic modifications to the Italeri kit can be found here: kits.kitreview.com/jas39agripenreviewrw_1.htm
9 January 2024, 22:44
Moving the flare launcher to the correct position is done. I will fix minor errors after spraying the model with Surfacer.
9 January 2024, 23:06
Vintagemodeler, thanks you!
I agree, the article clearly describes the modifications of Italeri's biggest faults. But since this article was published (2005) many JAS-39s have been upgraded (some machines more than once) and the appearance of some details on Gripen aircraft has changed. When building a particular machine, it's good to have not only a drawing, but also photos of the particular machine.
12 January 2024, 23:03
I'm continuing to restore the lines between the panels. It's slow going, but the lines being restored are increasing.
12 January 2024, 23:04
Thank you Alec!
Vintagemodelerer, the quality of the Italeri kit (considering the time of release) is somewhat half-hearted. But with some effort it can be used to build a nice model. I've already made most of the modifications. Once I finish restoring the panel lines, the model building will go faster.
14 January 2024, 19:51
It's been a while since I looked at this one, Ludvik; it is progressing nicely. Your work is exceptional; the attention to detail is beyond my imagination. I love watching what you have done.
16 January 2024, 10:48
Jennifer, thank you for your kind post. I'm just trying to build my models as best I can and it's great fun for me too.
17 January 2024, 20:21
Oh, two Saab at once - no wonder that I nearly missed it! Nicely done too.
17 January 2024, 20:24
Yes, I'm building two Gripens at the same time. Both aircraft have a large number of the same parts and the same basic grey paint. It makes my job easier.
17 January 2024, 21:32
Italeri kit contains only one additional tank. But I need two tanks. That's why I decided to make them. To make both tanks the same, I made two.
18 January 2024, 09:39
Hi, Alec!
There are resin tank castings that can be purchased as separate accessories. However, their price, along with the cost of shipping, is high. It's much more than half the price of the Gripen kit I bought from Italeri. So I decided to make the additional tanks myself.
The choice of how to make the tanks was simple. Making the moulds and then casting the tanks is quite laborious. In addition, I do not have a vacuum pump, so air bubbles would form in the castings. I also don't have a 3D printer and I don't know how to model in 3D software.
Therefore, I figured that making tanks out of paper was the easiest way for me to make them at home.
I think paper is an underrated raw material in plastic modeling. With a little knowledge and skill, you can make various accessories (e.g. additional fuel tanks) out of paper. And as a bonus for the work involved, paper add-on tanks are very light and don't put unnecessary strain on the landing gear. 😄
24 January 2024, 11:21
I agree, all good points. For what it's worth, here are my few observations regarding casting from personal experience: for a small job like the tanks, you really don't need a vacuum pump (nor, and IMHO more importantly, a pressure tank). Yes, you will likely get some bubbles in the resulting cast, but those can be fixed relatively easily 👍
26 January 2024, 14:02
Alec, I also have experience with making parts from cast resin.You are right that bubbles can be fixed fairly easily with putty. But for making 2 tanks I find casting unnecessarily laborious.
29 January 2024, 10:03
I'm continuing to build the Gripen. I finished restoring the lines between the panels and added more details to the fuselage.
29 January 2024, 10:04
I'm continuing to fix the minor surface errors that surfacer showed. I've also started riveting.
31 January 2024, 12:49
Love the super detailing - as well as the extensive riveting work. Are you planning to rivet the wings as well? I will need to use your trick of using wires to pull the wings up to close the gaps on the next build. The Italeri kit is a good foundation for the Gripen, but it is sorely lacking in details - I'm glad to see you putting that into the kit.
6 February 2024, 17:07
@CaptGPF
Thank you for your comment. I'm really glad that my ideas will serve someone else.
I don't plan to rivet the wings. None of the photos (that I have) or the drawing show any rivet lines on the wing surfaces. Except for a few rivets on the leading and trailing edges of the wings. And I have already made these few rivets on the wings. If there are any rivets on the wing surfaces, they are ground in with the surface and not visible under the camouflage paint.
On the other hand, I'm considering removing the rivets from the Gripen Kitty Hawk wings (Kitty Hawk made the rivets marked all over the wing surfaces).
I will definitely do some weathering on the wings though. It's very visible on all Czech machines.
6 February 2024, 21:33
I have little time to build models lately. So at least in one short spare moment I made an experiment with tinting the transparent cockpit covers.
7 February 2024, 07:50
Hi Ludvik! This build turns out t be another "crazy" build ... your view for details is amazing. Do you spend more time on research or building? I´m not sure 😉 again something spectacular is going to come here. Keep going (❁´◡`❁)
7 February 2024, 08:05
Wow, your tinted canopies are looking great! I once used a mix with Alclad (on a egg plane) and nearly ruined the clear plastic as it was dull matt afterwards 🙁
7 February 2024, 08:55
Thomas, at the moment my lack of free time doesn't allow me to pursue modelling as much as I would like 🙁. It's just a transitional period and I hope it will end soon.
As far as research is concerned, I have a database on my computer with information, drawings and photos of aircraft, literature ..., for all the aircraft that interest me and I would like to build models of them. And I am constantly adding to this database. So the moment I start building a model, I simply open the appropriate folder in the database and draw from the information I have stored there.
In some cases, for example, when I was building the MI-24, I was lucky enough to work with a guy who works in an aircraft repair shop as a mechanic, and he would take pictures of various details of the helicopter's structural elements and email them to me, according to my instructions.
I am now using similar friendly help in building both Gripens.
7 February 2024, 22:51
Bughunter, the procedure I used, I found on the website of a Czech modeller. With long-term testing of different color types from different manufacturers, it achieved the best results with metallic Gunze paints (MC series) and Gunze Mr. Leveling Thinner. The procedure is simple. I mixed gold (MC219 - brass) and brown (H017) into about 1 ml of diluent. From each colour to just a small drop (on the tip of the brush). Metallic paint does a partial transparency effect based on your point of view. From a certain angle, the cabin appears opaque, and from a different angle, you can see right through it. And that little bit of brown puts a slight damper on it.
The original instructions recommend the metallic colour MC215 - copper, but the author used this on American machines. According to the photos, the Gripen cabins are toned to a tawny colour and this is better matched by the golden hue of brass combined with brown. The precise dilution ratio is not critical, but he wants to test it. The important thing is to spray gradually a few thin layers (just to dust lightly) and spray the next layer of paint until the previous one has dried. With a thick layer, diluted metallic paint makes irregular spots.
And if it doesn't work, just wipe off the paint with a soft cloth dipped in thinner and start over.
8 February 2024, 00:43
That is impressive, tinted canopies. Thank you for sharing the technique.
8 February 2024, 00:49
Jennifer, it was my first attempt at a tinted canopy. I found a tutorial online and decided to give tinting a try. I did a few experiments on pieces of clear plastic first so I wouldn't ruin my canopy if it didn't work out. During these experiments, I tried different shades of metallic paints and chose the best combination of colors based on the results.
8 February 2024, 21:47
Gripen got a smart white coat (primer). Once the cockpit equipment is completed, it will be the turn of spraying camouflage colours.
9 February 2024, 20:39
Have you dipped the canopy in for example Alclad Aqua Gloss? It helps for transparency.
9 February 2024, 21:53
I read on Finescale modeler that you could get a golden tint using a mix of transparent smoke + transparent yellow diluted down with thinner.
10 February 2024, 07:23
@Mark D
The canopy in the photo of the partially assembled model is not the final solution. I'm still experimenting with tinting the cockpit canopy. The goal is a canopy that will be transparent from a certain angle and partially act as a mirror from another angle. I'm well on my way, but it still needs to be fine-tuned.
@CaptGPF
There are more ways to colour the canopy, of course. Using transparent paints is probably the easiest way. But it doesn't achieve the mirror effect described above. To give you a better idea, I have included a picture of the cockpit canopy from several different angles.
10 February 2024, 10:58
I had good results with holo nail powder:
Starting Pic 24
Fat Amy WIP | Album by halohead (1:48)
10 February 2024, 16:23
@CaptGPF
A very thin layer of metallic paint takes care of the angled transparency effect.
@Daniel
Thank you for the illustrative example. Your canopy looks great.
11 February 2024, 19:57
I'm continuing work on the cockpit. I am gradually adding more details to it.
12 February 2024, 23:30
The "box" at the rear cockpit wall had to be modified. After correcting its dimensions and location, I added a few cables to the rear of the cockpit. More cables will follow shortly.
13 February 2024, 22:29
Jennifer, thank you! I hope the cockpit will look even better with the addition of more "cables" and the scope slide. 😉
14 February 2024, 08:59
I wasn't in the mood for the delicate work of adding wiring today. So I busied myself with fixing a badly shaped engine nozzle.
14 February 2024, 23:05
The cockpit cables are in place. I glued a few more PE parts to the fuselage and now I will prepare the model for spraying.
16 February 2024, 23:05
The cables look amazing, Ludvik; your attention to detail pays off.
17 February 2024, 01:18
Thank you, Daniel! My speed is only temporary. Soon I will start making smaller parts and the model building will slow down. 🙁
I have started applying decals to the painted model. So far I have only managed to apply the decals with the special anniversary coloring.
19 February 2024, 21:44
The colour scheme of the in-line machines in a combination of two grey colours with little visible markings is practical for military purposes, but somewhat boring. It's good that there are aircraft with special paint! 😄
19 February 2024, 22:47
Due to the extraordinary activities that took place during the day, I only got to the model briefly today. In those few minutes I only managed to glue a few decals. I added the national emblems and a few small labels. I will add photos later, when all decals are on the model.
21 February 2024, 17:46
Robert, from the first moment I saw the pictures of this Gripen in the attractive anniversary livery, I knew I would eventually build one. When the decals for this machine appeared on the market, I didn't hesitate a moment and bought them immediately. And now the moment has come when I am fulfilling my resolution.
21 February 2024, 18:03
I "painted" the cockpit canopy with strips cut from painted decal paper.
25 February 2024, 22:25
Jennifer, thank you for your compliment. 🙂
The work on the baldachin will continue. I've only finished the outer part. I'm still working on the inside of the canopy. The inner frame, cross brace, rear view mirrors and the "collar" in the front need to be completed.
29 February 2024, 11:13
Great idea. I have always wondered why there is not a product to just stick to canopies instead of painting them for the frames.
29 February 2024, 11:56
Thanks for the tips on the canopy - I have an AH-64D in the queue and was wondering how to achieve the same effects you just taught us! thank you, Sensei! 🙇♂️
29 February 2024, 16:12
Ludvik, your macro is merciless! I guess in real size it will look better.
29 February 2024, 19:35
I'm so glad you found my tutorial on painting canopy frames helpful. 🙂
Since masking the canopy, spraying the frame and a thin strip of gasket is laborious and the result is not always 100%, I was looking for another method that would be easier and less laborious. Using decals met my requirements. The application is simple and the results are accurate. And when layering the decals, even a very thin line of gasket can be easily created. And the use of decals also eliminates the laborious cleaning of paint that occasionally runs under the mask.
29 February 2024, 21:04
I painted the auxiliary tanks this afternoon. Like the plane, the tanks have a special paint job.
3 March 2024, 00:15
Jennifer, thank you for your kind words. 🙂
I worked on the hangers today. For the middle hanger under the fuselage I used a part from the Italeri kit, but first I modified it slightly, sanded it, made new joints and added rivets. For the underwing hangers and rocket adapters I used Kitty Hawk parts. These were left over from an earlier Gripen 9241 build where I replaced them with castings from CMK. For the wing hangers, I replaced the plastic pins with wire ones so I could accurately glue the hangers to the wing. For one thing, the plastic pins were large in diameter and would not fit into the holes in the wings, but more importantly, the wire pins served me well when spraying the hangers and then applying the decals.
The fewer stencils on the aircraft, the more there are on the hangers. I applied 54 decals on all five hangers combined (5234 did not have a forward fuselage hanger when it carried the annual livery). And I still haven't glued the decals on the rocket adapters.
4 March 2024, 22:19
Frank, I was intrigued by this machine from the first moment I saw it. The combination of the dark grey motif on the upper surfaces of the wings and fuselage with the red, blue and white accessories on the vertical tailplane and canards is (at least to me) very attractive. Although I find the special colour scheme of Czech tiger-themed machines very successful, this annual livery was a very pleasant change for me. As soon as I found out that there was a decal set for this livery, I knew I would definitely build this aircraft. 😄
This week unfortunately my work obligations did not give me free time to work on the model. I only managed to apply decals for the AIM-120 rocket adapters.
I also ordered a set of AIM-9 rockets from Eduard. The rockets in the Italeri kit are inaccurate and modifying them would basically amount to making new rockets.
10 March 2024, 11:13
After a short break, I continue working on the model. Gripen has all decals applied and repainted with clear coat. Now it's time to work on illustrating the operational wear and surface contamination.
11 March 2024, 21:56
Today I did weathering and minor surface damage to the aircraft.
... and I also glued all the racks.
13 March 2024, 23:56
Hi, Thomas.
I'm so glad you like the weathering. I did a little experiment. Instead of traditional oils, I used Agama patina powder. I was pleasantly surprised. The powders work very well. Unlike oils, using patination powders is easy, fast and accurate. And if something goes wrong, the applied patina can simply be washed off with a cloth or cotton swab dipped in clean water (with a little detergent if necessary). 😉
14 March 2024, 12:27
I'm sure I won't get to work on the Gripen today. So at least I took two photos of the Gripen in daylight with the auxiliary tanks temporarily installed. I like the result, the painted add-on tanks nicely complement the special anniversary livery of the aircraft. 🙂
14 March 2024, 14:11
Alec, Guy and Jennifer, thank you so much for your kind posts. It is a great support for me to continue working on the model. 🙂
15 March 2024, 11:16
Michael, thank you.
All decals used on this kit are from Czech manufacturer of modelling accessories JBr Decals. I think he did his job perfectly.
15 March 2024, 12:09
I'm kind of running out of free time lately. Every time I think I'm finally going to get around to building a model, something creeps in. So at least I bought a few accessories for my models, including a set of Sidewinders rockets from Eduard. The ones in the Italeri kit didn't work out so well. 🙁
22 March 2024, 10:45
Thanks for the nice look at Eduard's Sidewinders, I'm going to have to buy some for my Hasegawa jets that have none eventually. Glad to know they come with a jig too! And I hear ya on the free time thing, my Mosquito probably would have been done weeks ago
22 March 2024, 12:23
Rando, if you are concerned with the various suspension armaments, check out Eduard's site. Eduard offers quite a wide range of rockets, bombs and other armaments in various scales.
23 March 2024, 21:54
I spent time this afternoon making the main landing gear legs. I also finished the nozzle.
24 March 2024, 00:00
I have modified the appearance of the landing gear wheels and am continuing work on the landing gear legs.
27 March 2024, 07:05
Landing gear looks awesome, Ludviku! When finished, your model should stand on a mirror surface!
1 April 2024, 09:32
Thank you, Robert. I've only finished the front landing gear leg so far. I started with it because it's the most complicated. Filling the "tubes" on the main landing gear legs will go faster. Compared to the front landing gear, they are almost wiring free.
Building the finished model on a mirror base is a good idea. However, I have a slightly different solution. The model will be placed in my display case of finished models on a glass shelf that is approximately eye level (of an adult). If you lean slightly forward, you can see the bottom of the aircraft with the armament and landing gear due to the glass shelf.
1 April 2024, 10:20
After a break I resume building the model again. I'm adding hydraulic and electrical wiring to the main landing gear legs.
23 April 2024, 23:18
Was your break due to a visit of the Mosonshow?
Your lastest work on the model parts looks nice!
24 April 2024, 13:23
Bughunter, thank you for your kind contribution.
My break was due to a much less fun thing than attending the Mosonshow. A colleague and I have rented a space where we have offices. At this point, our lease is up. We had to find a new place and prepare to move. We already have the offices, now we have to move in and get everything ready to work in them. So there will be more breaks.
24 April 2024, 22:29
After this afternoon, both landing gear legs of the main landing gear are complete.
25 April 2024, 21:08
OMG this is so satisfying to watch!! Great model, you are super talented 👍🏼
25 April 2024, 21:17
The first part of the wiring and hydraulics in the main landing gear shafts is in place.
28 April 2024, 21:41
After a forced break, I'm back and resuming work on the Gripen. 🙂
17 May 2024, 20:01
In May last year, Gripen had an accident. During careless handling, the model fell off my desk. Several small parts broke off and the glued joint on the underside of the nose cracked. This accident threw me for a loop and I had to take some time to get back in the mood to continue building the Gripen.
And now it was time for me to continue building.
22 March, 22:57
Ah, bad luck. Glad you got your mojo back and bringing this beauty to the finish line 👍
23 March, 12:03
DuperScale and Alec, thank you for your support. As they say, everything takes its time. Yes, the successful repair has given me my mojo back. 🙂
The home straight is in sight, but there are still a few details to finish. I'm looking forward to finishing the colorful "bird" and putting it in the display case. In my opinion it is one of the most beautiful Czech Gripens.
23 March, 12:25
I think everyone here has had their fair share of accidents - my worst one was when my cat decided to play with my A-10 and send it "flying" into the ground!
That repair looks fantastic! I can't even tell where it was damaged! It's great to seeing you recover from this mishap, especially after the beautiful work you put into it!
23 March, 17:24
CaptGPF, thank you for your kind words.
The aftermath of the crash has been repaired, but I still need to finish highlighting the lines and shading the panels on the repaired bow.
2 23 March, 23:10
Another small piece to the "puzzle".
It's the little things that (thanks to their small size) give the most work.
1 6 April, 13:09
The wheel bay wiring and canopy detonator cord, as well as the cross brace, look amazing.
8 April, 23:25
Ooooh, yes, that would be very cool. But I'm worried there's no hydraulic pump small enough to work. 😄
1 10 April, 20:30
Thank you, Vincent!
I only had a little time today, but I still moved my project one step closer to the goal.
11 April, 21:01
Shar Dipree, thank you for your kind post.
________________________________________
After this afternoon, the Gripen has (almost) finished the front landing gear.
16 April, 18:54
添加了一个新相册


87 4 December 2024, 11:33
Those familiar with the kit might have noticed the absence of the firewall. I simply lost it and decided that I will just omit it as it is invisible anyway.
5 December 2024, 17:42
A very interesting plane! You made a good progress with another (parallel?) project 👍
5 December 2024, 18:39
Interesting build and very promising start - I´m in for this 🙂
9 December 2024, 09:13
Interesting approach to simply sand the control surface structure in the primer. I'll keep my fingers crossed for a good result.
18 December 2024, 13:53
As a base for the red color, you need to use yellow, then the red will be bright.If you put red on white, you will get just pink.
18 December 2024, 14:08
Michael, using different primers for one top coat is my idea! The usage of my idea is geBIERenpflichtig! 🙂
18 December 2024, 15:38
Looks like you're the partial member of The Infanous Order of The Pink Primer 😋
18 December 2024, 18:19
@ Nicolas: I cross my fingers too. But looks like I have to do some homework before the final coat (see below 🙂 )
@ Denis: thanks for your input. I tested your suggestion on a scrab wing. With LP-7 I get a nice hue as well over white primer and pink base alike. Problem is that there is almost no difference between them. Over yellow (XF-3) the red receives a rather orange hue which I do not like for this project. But I am optimistic to finetune that and use lighter yellow or buff as base coat and see how that turns out. I'll keep you posted.
@Frank: So, se wollen erheben ne kleene GeBIER?!
Da trifft es sich ja gut, dass mein diesjähriger Adventskalender aus 24 Flaschen feinem fränkischen Bier aus 24 verschiedenen Brauereien besteht. Es wird mir eine Freude sein, ein-zwei-drei mit Dir zu teilen - in N?! In M?! Gruß 🙂
@Lukasz: I applied, but as PartPrimerer I am only allowed into the Entree so far. Full membetship pending. 🙂
Welcome Guy
19 December 2024, 09:52
Yes, I will be interested in what your red color will turn out to be. I recently painted small parts red, but there was a noticeable difference in color, depending on the color of the soil. Perhaps your LP-7 is better.
19 December 2024, 10:09
I tested a couple of base coat variations for LP-7. A nice combination in my eyes is achieved when using Mr. Hobbycolor H413 yellow as base for the darker areas and pink (Tamiya X-17) for the lighter ones. But that would have meant to redo the whole base paint. So I stuck to my combination and mourned the loss of contrast.
21 December 2024, 23:27
Add some white today and it will be perfect Xmas gift just in time 😋
1 24 December 2024, 09:43
Really great job. I appreciate your approach.
I didn`t test different base color. I used GS Aquarius H23 at first piece at black surfacer, and it wasn`t fine. I will use gloss yellow at 2nd piece.
How did you do such perfect wing bottom side. It looks really nice. I had relatively big gap there and some residual step although I precisely brushed big material layer out from both wing half. Maybe, the used glue did a step at the end.
I thing, that this, wings bottom, is weakest part of this model although, as you ar writing, engine nacceles also need some attention.
26 December 2024, 13:04
Welcome mates and thanks for your encouraging and funny comments. Bottomline I am quite happy with the shade of red. I just haven't made up my mind about how gloss it should appear finally. If I would have had access to a cutter I would have scanned the bigger decals and cut masks for painting the letters.
Now what's left are the tail skid and a few bits and pieces at the wings and the stabiliser.
@Jakub: wing assembly requires some scraping and dry fitting. With super thin cement I didn't encounter any issues afterwards. But there still remains a considerable gap towards the flaps and ailerons which I filled with super glue.
1 27 December 2024, 08:21
Thanks mates. Let's see whether the year is still long enough to finish the plane.
1 28 December 2024, 17:59
Nice 👍
Regarding the cutter - you know I can always help here! If you still want to do it may another mate can scan the decals ... or next project.
29 December 2024, 20:08
I agree with everyone; great job, nice result, and I like it very much.
30 December 2024, 21:10
Thank you all for sneaking in.
Couldn't finish it last year, so might be the first to be completed this year.
Wish you all a lot of happy modelling in 2025.
1 2 January, 01:27
Thanks mates for yor very nice feedback. Is a nice kit. Still pondering about a few details for a little vignette.
5 January, 12:23
The figures and other elements look great. Are they 3D printed or commercial?
13 January, 19:39
Thanks Christoph and Cuajete,
all items are commercial, some classic resin casts, some 3D-printed.
1 13 January, 22:27
The comet turned out beautifully 😊 - excited to see the finished dio my friend 👌🤞
24 January, 08:07
Thank you Thomas.
progress is a bit slow as the last figure I bought needed a decent makeover due to casting imperfections. Same with the barrels I bought. Issues I weren't used to from.Balaton and White Storck Models.
24 January, 13:47
Thanks Alec. Yesterday two figures were painted, the barrels redone and after I went full circle I am back again at the high base which I left for - first a bigger, then a smaller one with different layouts. Now I am confident with the actual concept and I am optimistic that I can still finish it for the Moson Model Show end of april.
1 4 April, 17:03
I like the red headdress; the pump on the barrel looks nice, and I'm getting excited about the completed dio.
14 April, 07:13
Thanks Nick and Jennifer for the heads up. I finished preparing the base and should be able to put things into place within the next days.
14 April, 15:15
Thanks Cuajete. Little by little I inch myself toward the finish line.
1 17 April, 07:03
Excellent! I have this kit in my stash so I don't only love the pictures but your comments on the building too!
19 April, 10:51
If I don't change my mind again, then this build is completed. I shot some preliminary pictures but hope to add better ones under daylight conditions.
Thanks for joining, for your interest and your feedback.
19 April, 22:43


Question of the day!
Thinking about a mini baking oven to dry faster my painted parts.
It has a minimum of 30°/86° C/F and convection for around 80 quid.
So:
Does anyone have such a thing and does it its job? Or do the plastic parts warp a bit?
Thinking about a mini baking oven to dry faster my painted parts.
It has a minimum of 30°/86° C/F and convection for around 80 quid.
So:
Does anyone have such a thing and does it its job? Or do the plastic parts warp a bit?
19 April, 08:57
I am sure i have seen somebody posting pictures not of an over, but something used to dry food, but i can not remember who that was. but it was being used to get the paint dry quicker, i think.
1 19 April, 09:10
Got it: Found a video on YT for how to use a Dehydrator for drying paint and I am fascinated. Next I will buy a Dehydrator! ^-^
19 April, 23:11
添加了一个新相册


10 18 April, 00:11
I just ordered Vallejo Gloss Polyurethane Varnish and try to get rid of the chassis hardware store varnish fail. Oooh jeeez.... :.-( Until Tuesday I cannot finish my chassis, which I wanted to.
19 April, 09:36
添加了一个新相册
30 图片
Bell XP-77
1:72
Paint work sealed and small detail painting done. The panel lines were highlighted with tamiya panel line accent black. ...


项目: Bell XP-77


46 10 February 2022, 20:20
As I travel often between Germany and Poland and did move my workshop to DEU I decided to duplicate it in Poland as to not loose time without my hobby. This is my first pararel project in the workbench in Poland. Another short run.
10 February 2022, 20:31
Unusual model... Following!
Lucky to have duplicated your workshop 🙂 👍
10 February 2022, 20:46
Cleaned up the wing today and deepened the first wheel well. Did use pattex sos glue to fill the edges. I can not reccomend this glue enough - it works far better than any filler and is easy to sand. I use it also as glue where possible as it gives a strong join.
11 February 2022, 19:53
@Cuajete and Guy: welcome! I bought jut the tools needed to do simple kits so I do not waste my time on not modeling 🙂
11 February 2022, 19:59
Deepend the second wheel well and removed the injection stubs. The plastic is very hard to sand but very easy prone to overscraping wit a scalpel blade. This is going to be a greater challenge than the hawk.
13 February 2022, 18:54
This little gem will need a lot of TLC. I looking forward to following your progress.
14 February 2022, 01:35
Watching with interest for sure! (just a word of warning here, Patryk - I remeber from one review of this kit that the vacu canopy is too small - have you checked it already?)
22 February 2022, 20:44
Thank you for joining Robert and Daniel! @Robert: I did a search for builds of this kit - there is a problem with canopy fit but nothing not to overcome. I did actualy stumble on an open canopy picture of the XP-77 during the search - the canopy didn't slide back but went rotating downwards flush into the fuselage so only the front frame is visible after opening. If I will have to much problems with fit I might replicate it in the open position.
23 February 2022, 12:55
Open canopy surely would add more interest to this fascinating plane, Patryk 😉
23 February 2022, 13:38
Managed to cut of and sand the resin from the castings block, unfortunately breaking the rear cockpit wall in the proces. Glued it and the control stick to the tub with pattex sos glue. Additionaly i managed to prime the resin parts.
Thank you for joining and the comments Mates!
6 March 2022, 16:41
Dry fitted the resin inserts - they fit very good to the fuselage halves - no sidewall trimming needed. After that I primed the back portion of the seat and the insides of the fuselage.
13 March 2022, 17:40
First layer on the resin parts and fuselage interior painted. I prefer to brush paint small parts in this scale, saves a lot of time of paintbrush cleaning and after a clear coat and wash you don't actually see any difference. The Ranger V770 engine on 99% of pictures I have seen was pained Neutral Gray, so I went with this suggestion. The instruction states that it was black.
18 March 2022, 14:59
Second layer on. Started some detail painting in the cockpit and did clean up some of the kits parts. Thank you for joining Villiers!
19 March 2022, 17:44
Did some rought preliminary detail painting on the seat and engine - it will be corrected after the second layer. Need to get sone rust and copper colors from my workbench in Germany to finish the engine detail paintig. Did also test fit the exaust ports to the fuselage sides - much trimming was needed for both the ports and fulelage to get a good fit. You can see the difference - lower on the picture is the fuselage side which is allready corrected.
20 March 2022, 18:24
More datail painting and silver drybrushing for the seat and cockpit. Small corrections needed, the camera catches more than my eyes. Next a coat of clear flat and a dark wash awaits.
28 March 2022, 10:37
Managed to glue the cockpit together, working on parts cleanup, which is extremely difficult due to the plastic beeing extremely sanding paper resistant. Reworking the exhaust system to beter match the original.
22 May 2022, 16:30
Cleaned up all of the parts and sanded them to 2500 grit, now they are ready for priming. Assembled the propeller and glued the engine front in one of the fuselage sides.
25 December 2022, 16:44
Fingers crossed 🙂
One of special features of this plane was, that the canopy was not opening by sliding, but rotating backwards into the back fuselage. 🙂
Youtube Video

25 December 2022, 23:23
Thank You for this valuable reference Robert! It helped to solve some questions that I had, might reeork the exhaust system after seeing this.
26 December 2022, 08:28
Primed the small parts with the 1st layer of Tamiya spray matt black.
26 December 2022, 18:08
Did prime the other side of the small parts with the 1st layer of tamiya black matt. Rescribed one side of the fuselage as the original scribing was almost invisible and added a document pocket to make the cocpit a bit more busy. Did also put the first layer of Interrior green to the front wheel bay.
30 December 2022, 18:32
Glued the wheel bay and cockpit to the fuselage side today. No issues with fit.
3 January 2023, 20:39
Thanks Mates, dry fitted the fuselage halves together and no issues besides some putty will be needed in the lower part of the front fuselage. The wing will need some shimming of material where it meets the front wheel bay but nothing significant. Having more fun with this one than the P-36 or the mainstream U-2A.
3 January 2023, 21:39
Some advice needed dear Mates: what glue is best to use by vacuform canopies? This is my first attempt, do not want to mess it up.
3 January 2023, 21:41
In such cases I first glue some pieces of stretched sprue (made square-ish in section first with a knife) around the edge of the opening (in distance from the outer edge equal-ish to the canopy thickness) and then I use drops of thin cyanoacrylate glue one-by-one letting each flow under the edge of the canopy and dry for few seconds before applying the next one... But it is quite time and nerve consuming...
3 January 2023, 21:49
Well, I guess there are as many ideas as the mates who use the vacu canopies. I'm afraid of putting together transparent parts and CA glue, so I either stick to some sort of PVA/Kristal Klear (forget the sanding afterwards) or UV glue (usually Bondic, can be sanded after drying very well in UV light).
4 January 2023, 11:12
Thank You for the advice Łukasz, maybe the ye olde card modeling technique wil be also a feasible solution - butapren glue 😜
4 January 2023, 17:14
Bondic is a good idea, much less risky than CA glue - the UV setting glue was available in Germany under Revell brand too (I bought such a set few years ago while visiting Erfurt)
4 January 2023, 17:59
Ahhh, butapren, never forget 😁How did it go?
- Granma, have you seen my butapren?
- Nope, but have you seen that dragon in the kitchen?
For the non-Polish readers: this glue used to contain trichloroethylene when we were young 😄
4 January 2023, 18:42
Welcome Thomas!
@Łukasz: Thats a good one😂. I remeber in my town the nice lady that worked in the shop that had then in the 90's would sell me only one tube at a time because she was concerned about my health.😜 I was a card modeler for many years, converted to plastic only a few years ago.
4 January 2023, 21:06
In injected plastic, it usually works to protect the cockpit from the ciano by immersing it in Future (or similar) and letting it dry before gluing with ciano. In vacu I don't know, but I guess it will work too. However, I wouldn't risk it if you only have one copy of the vacu.
5 January 2023, 20:00
@Cuajete: thank you, this is an interresting method indeed. Thinking about making an opened canopy which will reduce the effort and show more detail in the cockpit.
6 January 2023, 20:17
Progress so far. Added weight to the fuselage an closed it. Managed to paint most of the small parts also. Fit was good in regards of joining the fuselage. A long sanding session awaits in order to get a smooth effect before adding black primer. Also rescribed the panel lines as they were too shalow. Also need to rework the exhaust in the closed position as depicted on the reference I got.
1 May 2023, 15:30
I will Robert! It will be done, currently working on 5 projects divided between homes in Poland and Germany, so it might take some time. Thanks for still beeing here!
1 May 2023, 15:42
Update: scribed the lover wing using photo s and the 1:48 czech model kit as references. Small corrections will be needed but under a few coats of black primer and then silver the effect will be ok. The kit had almost no detail on the underside of the wing.
19 August 2023, 19:06
The fight continues. Rescribed the right side and reworked the exhaust according to photos and the czech model kit. Painted all the small bits. Looks maybe a bit rough on the picture but pretty much ok for the normal eye - it will be refined before priming
22 December 2023, 19:15
The fight continues. Did attach the wings to the fuselage, the fit was very poor. I filled the gaps with pattex sos glue which I use as filler with very good results. Sanded one side with 800 grit sanding paper and got a flush join.
27 January 2024, 17:58
Done also with the other side with rescribing, reshaping of the exhhaust system anf filling and sanding gaps between the wing and the fuselage. The underside awaits.
31 January 2024, 12:06
The old Special Hobby kits are not for the faint of heart.
Keep going. Looks good what you achieved so far.
I like the Pattex super glue too.
31 January 2024, 19:47
Thank you for you kind comment Michael! I am satisfied with the progress so far as it is a very challenging kit to get right.
31 January 2024, 20:04
Work continues. Rescribed and scribed all the missing detail as seen on period photos. Got over the hardest part which was canopy attachment. Dipped it with a german equivalent of future clear first, then fitted it to the fuselage and carefully worked around it with super glue to good effect. Need to do this a few times in order to blend the canopy into the fuselage. There were some gaps between the canopy and fuselage but they were filled succesfully with super glue.
8 April 2024, 17:36
Great job with the canopy, Patryk! The finish line is on a horizon now 😉
8 April 2024, 18:37
Patryk, you did well to immerse the transparent part in Future to protect it from the gases produced by the cyano.
You are doing a fantastic job with this kit 👍
8 April 2024, 18:50
Thank you for your kind comment. The build will still take some time as I want to experiment with the new eduard 3d panels and see if they can withstand spray can painting. I will try to coat them with this german Future gloss equvalent as I already tested it on decals and several spray can paints and sealers and this stuff withstands everything I was able to test it on to this time.
9 April 2024, 10:37
Completed the sanding around the canopy. I am very satisfied with the result. It is maybe not visible on the picture but I managed to get a flush connection of the canopy to the fuselage.
21 April 2024, 18:21
Attached the horizontal stabilisers with pattex gel glue to have time to tweak their position as they do not have any attachment points. Had to sand both to get a similar look as one was bigger as the other. It is ready for painting, now on to test the eduard panel decals and to see how they stick to the plastic and react to tamiya spray paints.
22 May 2024, 18:32
The fight continues. Corrected the rudder and reshaped the nose a bit to more resemble the original - unfotunately the ca gel I used went into reaction with the painted resin engine and I need to repaint it after I paint the fuselage. Did prime it with the first coat but unfortunately found many areas to correct - its an old short run after all. Did rework the cooling system - it looks better live then on the picture. I think it begins to turn out ok. Time for the next coat.
1 10 March, 20:43
After 3 surface correction sessions it is finally ready for the first coat of paint.
3 10 April, 17:54
Paint work sealed and small detail painting done. The panel lines were highlighted with tamiya panel line accent black. Next another gloss coat and decalling. The model is too glossy so I decided that the final coats will be matt.
19 April, 19:14
添加了一个新相册


87 5 January, 10:30
Welcome to the first kit in my life that I can call overengineered for sure.
The white parts are scratched to take the place of PE parts or offerings to the carpet monster (did I mention I have no carpet in here?)
Cockpit solely contains 21 parts (including PE) + decals (fuselage walls not included) 😮
You have been warned.
5 January, 10:37
Woww... I like the overengineered from Łukasz 😉
I can't resist to follow it 😛
5 January, 18:57
It will be slow, I can assure you 😄
And I might need stronger magnifying glasses too 🙁
5 January, 20:30
Welcome Gents to this very frustrating project.
The designer(-s?) went full ahead towards the full compliance with the original as far as I can see.
There is maybe 1/4th of the cockpit visible now (w/o the canopy!) and they really think that a plastic mast glued to transaprent windshield can withstand the rigging.
15 January, 21:12
Łukasz, I think it would have been better to make the Amodel's kit because of the great experience you have with those hard old tools, 😛
The last part with the mast and rigging seems very complicated. It might be better to drill a little carefully into the windshield so as not to glue the mast flush and try not to make it too weak with the wire tauting.
17 January, 19:54
True señor, considering starting a Hansa Jet or sth like that next 😄
And regarding the mast - this is exactly what I did - drilled a 0.4mm hole to insert 0.3mm tube, squeezed flat on the inside part (the outer part will be made flat later).
The only problem was - I damaged the PE gunsight inside, so I had to rob one from the second kit in the twin set.
17 January, 20:42
It can be considered the very last branch of the Polish gull-wing family - the rear fuselage and tail were incorporated from P.24 licence production line.
17 January, 20:56
Welcome Jennifer & Stefan!
I finally started spraying the main colours, the first layer being the famous pink primer 🙂 and RLM04 soon after.
Warning to all future builders: watch out for the cowling, in my case the fit was appaling.
22 January, 19:53
Well, the detailing of this kit kept me frustrated more and more - so it landed on the shelf of doom.
It turned out I wanted the fuselage band to be too yellow and I flodded the damn rivets. And then when trying to wash the paint off, I took wrong bottle (Mr Hobby Tool Cleaner instead of the levelling thinner) and I melted some rivets completely.
No idea when I'll go back to it, maybe if I buy a very tiny riveter, who knows...
Thanks for watching
22 January, 20:40
That's a shame, it was looking very good.
Galaxy Tools do a good and reasonably priced riveting tool which I would recommend:
scalespot.com/review..axy-rivet/review.php
1 23 January, 10:15
Many thanks mates.
I'm looking at various riveters, but the fact I can barely see the rivets in 1/72 makes their restoration a challenge on its own.
I definitely need a break from that kit, perhaps I should switch to this one (being A-model mold actually) 😛
IAR-80A (SOVA-M SVM-72013, 1:72)
")
1 23 January, 10:30
It's a shame to read that, Łukasz 🙁
It was meant to be. Felicia is calling you 😛
Maybe you can use some parts in the Amodel/SOVA kit.
23 January, 18:59
That looks totally salvageable. I have the Galaxy tools riveter too, it is quite usable. Bought mine from eBay directly from China
23 January, 19:15
Łukasz, yes, probable salvageable, but I know the feeling when you just cannot make yourself backtrack your steps and rather start over again.
23 January, 20:00
I'll have a closer look at the riveters, I promise. Not sure my sight will follow, I might need some magnifying glass too.
Let's see if my budget can cope with both 😄
1 23 January, 20:47
I am sad to see you stop this project, it's a pity, hopefully some day.
1 24 January, 23:19
Alright, I went back to it way faster than I initially thought 😄
Bought two sets of riveters and 0,3mm turned out to be the one.
I need to correct the left side of the fuselage before applying the yellow again.
4 7 February, 20:36
Started spraying the undersides today, fingers crossed all these rivets survive that 😄
2 9 February, 20:48
Looking really Good Lukasz 😃👍 Like you put the antenna through the windscreen.. correct. I relocated my one to the side as was worried about breaking glass as was stupid thin!
You got cowling nice in the end.
Good luck with the next steps 👍👍
15 February, 16:15
Cool to see you back at this project again! The riveting looks good and the paintjob is awesome too!
15 February, 22:11
Good to see you continued this project. The restored rivets and the paintjob are looking great.
16 February, 09:04
Good to see you continued too. I agree with mates. Restored rivets and painting job looks great 👍
16 February, 19:37
Thanks everyone, I just sealed the little Romanian bugger for decalling.
Seems like most of the rivets are more-less visible, should be enough for an airplane that is not meant to boost the Exhibitionary Air Force 😄
16 February, 20:30
The rivets still look good even after your paint layers. Overall looking good Lukasz.
1 16 February, 21:54
This looks better and better, I am so glad that you didn't quit but decided to push through.
18 February, 05:44
Welcome back - this break was caused by searching a shade to darken the yellow as Techmod decals turned out to be darker than recommended RLM04.
4 22 March, 20:42
So where is the photo of the damage? The last picture looks pretty impressive if you ask me. You do know you can order a bag of 50 to 100 watch wheels online for about 15 bucks. They are used parts but you can make plenty of riveters out of them.
6 April, 00:38
Well, pics 12 to 15, but my hands were a bit shaky, I was so irritated 🙂
Meanwhile the little annoying IAR made it across the finish line.
Only 3 pics tonight, I'll take some more in the daylight tomorrow, brace yourselves, the Hangar is coming 😄
9 April, 20:49
I'm excited about the hangar and the daylight shots. Even in the artificial light, it looks good.
1 10 April, 06:16
Many thanks for your motivating comments, much appreciated. 👍
Daylight pics added, enjoy!
10 April, 20:37
Wow... I finally see this one and it looks fantastic. I really like it. I have to buy one.
Congrats!
1 11 April, 17:43
@Łukasz, I only want one. I need to see if I can scam someone with the Amodel kit so I don't throw it away to stash 😄
1 11 April, 19:10
Well done Lukasz 🍀👍👍 great job ...got it over the finish line 👏 very nice...like the extra rivets on the fuselage.
Top job.
1 11 April, 20:15
Glad you got to finish it! 👍
That cowling tho...totally unexpected from a new tool...
2 18 April, 21:23


添加了一个新相册


16 7 January, 19:54
Thanks Felix and Mark. It is now complete, just need to get some photos done.
1 1 April, 20:35
添加了一个新相册


7 12 April, 18:16
添加了一个新相册


24 5 April, 17:33
Starting a very rare bird. (I am getting bored with the other 9 builds I have still in progress).
2 5 April, 17:42
Nice project Skyhiker 👍👍 you build alot of Soviet stuff, don't see to many of these... nice choice 😃👍
14 April, 12:40
Thanks Dave. It took me a while to get the riveting done. Hopefully after priming I won't have to do it again.
17 April, 17:41


添加了一个新相册


1 19 April, 16:53
Messerschmitt Me 163 B « Komet »
Maquette Hobby 2000 au 1/72ème montée en Avril 2025.
Montage :
Le mode d'emploi est succinct, limite incompréhensible, heureusement que ce Messerschmitt est suffisamment basique à l'origine.
Il faudra toutefois ajouter dans la cuvette du pilote, un tas de câbles et tuyaux de toutes sortes, des palonniers dignes de ce nom ainsi que quelques leviers dont j'ignore l'usage.
Bien sûr, les harnais seront à trouver ailleurs puisqu'absents de la boîte.
Le tableau de bord est bien représenté, mais à la méthode ancienne. C'est-à-dire qu'il faudra peindre les compteurs en noir, peindre les aiguilles et les chiffres en blanc à l'aide d'un cure dents et enfin, déposer une goutte de vernis brillant pour figurer les cadrans. Rappelons que nous sommes au 1/72ème et non au 1/32ème.
La partie arrière derrière le pilote, demande quelques améliorations. En premier lieu, il faut rehausser la plaque de blindage du siège pilote. Ceci fait, avant de mettre en place la pièce transparente D4, il faudra supprimer sur cette pièce, ce qui est censé faire office de cloison. A cet endroit, il n'y avait pas de séparation du moins pour certains appareils. Les seules cloisons qu'il y avait étaient percées de deux trous chacune. Vous devrez (si vous le souhaitez) les confectionner dans de la carte plastique.
A ce stade vous pourriez me demander pourquoi avoir choisi la maquette Hobby 2000 alors que la maquette Gaspatch Models est quasiment complète ?
Tout simplement parce que la maquette Hobby 2000 coûte 12,20€ et que la maquette Gaspatch Models coûte 41,03€.
Le problème n'étant pas trop le prix qui toutefois reste abordable, mais pourquoi payer plus de trois fois plus cher une maquette qui nous offre une multitude de pièces visibles qu'à la condition d'ouvrir toutes les trappes, les baies et autres ouvertures. N'étant pas partisan du « tout ouvert » la maquette Hobby 2000 me suffit largement.
La roulette de queue dépendra du choix de votre avion. Elle est belle et n'appelle aucun commentaire.
Les ailes sont également belles. Le seul problème est la représentation de l'entoilage des parties mobiles. Qu'ils aient entoilé l'avion, est une certitude, mais c'est un jet de 1945, pas un coucou de 1935. Ces entoilages doivent être aussi lisses que de la tôle. Un bon ponçage (inutile d'enduire) leurs rendra cet aspect et nous permettra au passage d'affiner les bords de fuites qui étaient coupants comme un rasoir.
Seul l'entoilage du gouvernail restera plus apparent, mais pas trop.
Je ne suis pas un spécialiste des jets puisque je vous présente mon premier avion sans hélice. La tuyère n'a rien à voir avec celles des avions d'aujourd'hui, elle est beaucoup plus basique. Mais quand même, elle mérite d'être refaite dans un tube d'alu ou de cuivre que l'on aura pris soin d'affiner par l'intérieur. Les quatre ouïes ovales sur cette tuyère ont été percées pour ajouter un peu de relief.
L'assemblage du fuselage ne pose pas de problème.
Pour la peinture, comme toujours, je n'ai utilisé que de l'enamel Humbrol.
Les intérieurs ont été peint avec un vieux pot d'une trentaine d'années, soit du HB 13 Azure Blue (il n'existe plus dans le commerce depuis Belle Lurette…) mais il est facile à faire avec du gris moyen et quelques gouttes d'un bleu quelconque. Et hop voilà un Rlm 66 presque authentique.
Les intrados ainsi que tout le fuselage ont reçu une couche de Rlm 76. Là encore, j'ai utilisé un pot de Humbrol H 65 coupé de Humbrol H 80 vert pomme.
Les extrados sont en deux tons de Rlm 82 et de Rlm 81. Dans l'ordre l'un est en Humbrol H 80 vert pomme et l'autre en Humbrol H 159 Kaki.
Les taches de fuselage sont également en Rlm 82 : H 80 et Rlm 81 : H 159.
En attendant le séchage, je suis passé à la fabrication du remorqueur. Il en existait deux sortes. Un qui pouvait soulever l'avion, (celui fournit dans la boîte) et un autre qui tirait l'avion à l'aide d'une barre de traction. J'ai choisi cette deuxième version en rapport avec les photos de mon modèle. Ignorant la couleur des remorqueurs, j'ai opté pour un gris clair Humbrol H 64.
Ensuite, sur l'avion, une couche de vernis brillant pour la pose des décalques, puis une couche de vernis mat pour homogénéiser l'ensemble.
Pour la verrière, Hobby 2000 nous gratifie de masques. J'ai mis du temps à comprendre qu'il n'y avait pas de masque pour la verrière principale celle-ci étant trop bombée. Il ne nous ai fourni uniquement que les pourtours des montants de verrière. C'est-à-dire qu'une fois posé, il faut masquer la bulle avec du Maskol, du moins pour une peinture à l'aérographe. Après réflexion cela semble logique.
Après quelques détails à reprendre pour affinage tels que l'antenne, le tube pitot, les supports du parebrise ou la poignée de la verrière et son câble de retenue, le montage peut s'arrêter là.
Les séances photos peuvent commencer.
19 April, 16:57
添加了一个新相册
46 图片
F-16A Block 15 OCU Indonesian Air Force (TNI AU)
1:48
Test fitting the intake so as to ensure the paintjob is ok.


46 28 July 2016, 21:23
Italeri's F-16 is a rather modest kit, seems quite good for a beginner. For the non beginner however, it poses a challenge in order to be built correctly. At first there is a 2 mm misalignment of the top panels to the rest of the top fuselage half. Then, it seems that the fuselage is bit shorter than a Hasegawa F-16, and finally the radome is also shorter. All that translates to about 3.5 mm shorter overall length than Hasegawa's F-16.
There is also a misalignment of the instrument panel cover.
Since I am not in rescribing yet, I decided to push forward the top of the fuselage part and remove a little bit of plastic where the front of the canopy rests. I also removed the instrument panel cover. All the cockpit interior will be replaced by Hasegawa's cockpit. Italeri's cockpit resembles more a block 1-5 aircraft.
28 July 2016, 21:49
Slow progress on this one. Hasegawa instrument panel cover has been glued into place. Some dryfiting, still some issues to be sorted.
24 February 2018, 21:44
Cockpit glued in place. The instrument panel is about 1mm away from the instrument panel cover. It just wouldn't squeeze further up. But I am satisfied with the result. The HUD projector lens was constructed with some Micro Krystal Clear and aluminum foil underneath it. It looks ok I think.
Next will be the main wheel bay subassembly. Lot's of dryfitting there, there are some gaps there too.
9 March 2018, 18:45
Thank you Clifford.
One other thing that needs fixing is the engine nozzle. Well, you can't fix it actually...! The F100 engine, built by Pratt and Whitney, has 15 turkey feathers. The F110 engine, built by General Electric, has 12 turkey feathers. Both engine nozzles in Italeri's kit have 14 feathers!!! So I am going to use a nozzle from Hasegawa's kit, since they will be built as Block 40/50 machines.
13 March 2018, 20:23
Welcome Jos. I have been working on and off. Some wiring has been added to the main wheel bays, maybe I'll post a photo or two. My attention is on the Spangdahlem Viper, I have been working on the bits and pices (canopy, landing gear, seats) left. Yesterday I got her on her feet.
4 January 2019, 08:14
Can't wait for the reveal pics Maciej 😄 👍! For your reference, I build an exotic Viper two years ago:
scalemodels-jansen.j..odels/f-16c-block-25
18 January 2022, 11:53
I remember your build quite vividly Jos. The bird is a stunner!
18 January 2022, 17:30
LOL at pic #21 and #22 😄
Maybe the pilot could use his head too, somewhere 😉
Good progress, Maciej, can't wait for more 👍
21 January 2022, 06:51
Sergej 😄
Thank you Robert and welcome!
While waiting for the putty on the Eurofighter to dry, I started tackling the intake. It is the biggest hurdle in this kit.
21 January 2022, 08:24
In order to have some decent progress on the intake, I got some work done in the wheel bays. More wiring needed before I glue it in place.
27 March 2022, 12:03
I build this kit not so long ago and I know it's a rough build. You did much more than me to fix the problems. Very nice to follow this.
27 March 2022, 17:42
Yes Vincent it's a rough kit and you did yours justice. You made some nice additions behind the seat as well as the oxygen hose looks good and I will try to copy them.
27 March 2022, 18:00
Thanks Maciej. The detail on this kit really needed some scratch building. That was one of the fun parts. Good luck with the rest of your build.
27 March 2022, 18:08
Welcome Ben!
Thank you Clifford. Since I lost the mojo on the Su-57 for the time being, I grabbed the old builds. The goal on this one is to at least close up the fuselage.
28 March 2022, 11:53
Not much to brag about after all these days, the right hand side of the wheel bay got its wiring and extra detail. Some wiring will be added when the landing gear will be put in place.
9 April 2022, 07:19
After sanding the outer surfaces of the air intake I dryfitted the hand made upper part of the air duct. The kit doesn't have one so I had to make one. Lots of putty and sanding to follow and painting obviously after that. I think it is a good step forward.
14 April 2022, 18:58
Welcome Panteli!
Thank you WhiteGlint, still some work to do though.
25 April 2022, 15:00
Main gear bay done! The battery will be added when the bay will be glued to the fuselage. The rest of the wiring will be added when I attach the legs.
6 May 2022, 22:25
Thank you Clifford! Still smoothing out the filled gaps. The first try was so and so and there are a couple of holes to fill.
12 May 2022, 10:37
After spending summer with touching any piece of plastic, some progress on the intake. The photos fail to show what's happening further deep, but all in all I think it'll do. Some issues here and there, might be sorted out, or might not. I'll see.
25 September 2022, 14:13
Thank you Clifford! I think I have come to an acceptable result on the intake trunk.
Since the paintjob is a wraparound camo, I decided to paint the intake and its surroundings before glueing it in place. Much easier me thinks. I will apply some gloss varnish too so as to have it ready for decals later on.
Next big step will be closing the fuselage and masking the canopy. After that I think it will be a straightforward build.
4 October 2023, 10:03
Agree with Clifford - intakes are perfect. One question - why did you cannibalize a Hasegawa F-16 for an Italeri?
14 March 2024, 22:18
Welcome Guy!
Thank you CaptGPF. That's a good question. I have 3 Hasegawa twoseaters plus some spare tubs and I have an Aires cockpit to use in one of them. So I used a spare tub and I cut off the front instrument panel cover and used them in the Italeri. Yeah, I know it will a pain fitting the aires tub in the hasegawa, but it will be a great improvement over the hasegawa tubs.
As for cannibalizing the Hasegawa, wait until I start building one of them, it will be a carnage!
1 15 March 2024, 07:15
After a lot of back and forth, I finally got to glue the intake in place. At first I had to apply a gloss varnish in order to do some line wash. After that I used a satin varnish and then I waited a bit before I went on with the glue. In order to have a good bond, I carefully scraped the paint (kind of nervous with that). Glueing it after that was a piece of cake.
As I suspected, it would have been difficult to paint it if glued unpainted. Quite the effort but I think it was totally worth it.
Welcome Cristian A!
3 June 2024, 20:22
Thank you Seb! I have to pick it up, I've been dragging myself with another project, hoping it would be easier or faster, but it stalled too. Darn!
1 August 2024, 19:46
Oh wow Ronan, glad you like it! Sorry if I missed the other likes guys, the feed only shows the last guy who pressed the button.
12 August 2024, 11:02
添加了一个新相册


3 16 April, 17:53
Warning, I work at a glacier pace at times. Grab a pint and ease in 😄
1 18 April, 22:28
I have a well stocked fridge 😁 and I frequently nap. Thus I'm pleasantly surprised by events after forty winks. 😴😳☕🤘🥸🤟
19 April, 08:56
添加了一个新相册


5 14 April, 19:18
The minicraft B24D model sprues said it was a B24 J model. On a clear sprue was the front part of the B24 D. Instructions show that you need to remove the front parts of each side of the fuselage and attach the new parts. So far so good
15 April, 23:01
i got mine half done for ever....curious to see it finished on your bench 🙂
17 April, 22:26


/zh/search.php?q=*&page=newsfeed&fkSECTION[]=Newsfeed
search-solr.php?lang=zh
35
35
/zh/search.php?q=*&page=newsfeed&fkSECTION[]=Newsfeed
35
todo