
Newsfeed-
a adăugat un nou photoalbum.
53 imagini
The most demanding build I have ever done!
1:48
With painted wheels and some washing the cart looks much nicer. See the nice rims! No aftermarket resin wheels required :)


Proiect: McDonnell XF-85 Goblin

45 20 February, 21:14
I was so crazy to start another build while waiting for now decals to arrive (for this other project).
That is the most demanding beast I ever tried! Not because it is bad - no, the opposite! A full resin build, cast and 3D printed parts, PE and more.
Some guess work regarding type and kit is allowed - so I do not link a project yet 😉
I hope this will generate some interest ...
20 February, 21:32
Another project! YES!! But careful, don't let the shelf queens get restless…. Hmmmm, what the heck is this?! Something US, judging by the cockpit color. And it looks like an ejection seat maybe, so something with a turbine engine??
1 20 February, 23:02
- US: check 👍
- ejection seat: check 👍
- turbine engine: check 👍
That is still a big list. US jets are 244 topics here. Ok, not all have an ejection seat.
20 February, 23:15
Hm, that looks a lot like the cockpit of the XB-85 Goblin and could therefore be the very good resin kit from Halberd Models 😉
1 21 February, 07:50
I'm about to start working on a kit with lots of 3D printed resin so it's nice to be able to follow a project by someone experienced 😊
1 21 February, 09:43
Welcome to all!
Oh yes gorby, I can't resist! I have already x started projects, x+1 one doesn't make a big difference 🙂
And Bingo: yes, you are all right about the Goblin 👍 That is the mother of all egg planes 😎
It is a great kit, but I think not an easy one!
- You should think twice (or better more often) where to cut the resin parts from the cast! I may have done it wrong in some areas.
- sometimes it is hard to see, where the part starts or the cast ends which brings you in trouble later with fit issues
- some 3D printed parts are very very filigree, you don't know how to hold or handle. I'm not a 1:700 ship builder!
- at some points the manual do not show clearly the correct place of a part. After checking reference pics (a must!) I realized my guess was wrong. If you add it to the wrong place you will get in trouble later for sure.
- there are some very tight fits, especially with cast parts. Best is again to check reference pictures if you really reached the final position or a part is not yet deep enough in its place and you need more cleaning of seams.
I will finish the Vega before this beast when the new decals arrive.
2 21 February, 10:45
Some more pics are added showing the prepared cockpit walls. The first inner part is also prepared, the front of the jet engine.
I forgot to mention that there are nearly no color information regarding cockpit and so on in the instructions. There is a colorful 4 side view showing decal and stencil places.
21 February, 19:03
" I have already x started projects, x+1 one doesn't make a big difference "
BWAHAHAHAHAHAHAHA... spoken like a true model builder~!
1 21 February, 19:16
Thanks mates!
Now some progress on the carriage, which is part of the kit (but I had to modify it).
24 February, 18:55
The exhaust and intake look remarkable. Getting all those PE blades in the correct place can't have been easy.
1 1 March, 15:13
Following. I like the 3D-printed foot holders. The metal pins are also a nice detail. That exhaust and intake look like they were a challenge to put together. Where did you get this model?
1 1 March, 15:25
Thx mates!
Yeah gorby, that was challenging! See also pic 17.
Jennifer, those food holders was unbelievable filigree, as most of the 3D parts! You really don't know how to touch for cleaning and handling.
For exhaust and intake I followed the manual to cut parts, but made some wrong decisions. This makes it later even more complicated 🙁
I ordered this directly at Halberd, but they sell it also on ebay. But they seems to have some production issues with power outages etc due to Russian invasion.
But I recommend to think twice about it: it is not cheap; it provides nice details, but it is on the other hand some kind of "short run technology". So I had to do a lot of dry fitting and surgery to get things right - but all on resin parts! As I said, that is the most demanding build I have ever done! I will show more soon.
2 1 March, 15:39
Very nice work! I love the bizarre stubby shape of the Goblin. A real life egg plane.
2 March, 07:01
I least expected this flying egg with wings on your workbench 🙂 I haven't seen it built yet and I'm looking forward to a master piece from your hand.
2 March, 07:16
Thank you for your time to leave a comment mates!
@Alec It was? It is! Two aircraft were built, 6023 and 6024, and both are in museums.
The kit provides decals for the 6024. Regarding the details this is more complex. Both looks different today, the kit is different compared to both as they are shown today. And even the b/w photos shows many different things: with or without winglets, with one skid, (kit option), with two skids below the wings, the kit has two pitots on the wings - the one in the museum not. And much more!
Yes gorby, me too! That's why I called the project "The mother of all egg planes." 🙂
@Bernhard I looked around and also have not found it built yet, also not in the bigger scale. And I think I know now why as it is definitely not an easy walk!
Your interest is fuel for motivation 👍 so I will add more pics.
2 2 March, 09:27
Welcome Erik!
On evil bay even more: https://ebay.de/itm/167316587705 but I think this includes import taxes. The 1:32 kit was even more, but is not available now.
When I ordered mine it was no more available within two days - all sold.
The offers on evil bay in Asia are going crazy already: https://ebay.de/itm/156691540922
But as I said, it is not the price tag which makes me nervous .... I hope I'm able to finish a kit this time!
2 March, 10:00
Welcome David! Nice to know you are watching.
Now with teaser of the whole bird 😉
1 2 March, 12:13
Love the teaser, wasn't sure what to expect but that does indeed look like an eggplane.
1 2 March, 12:40
I'm a little late, but I will definitely watch this talent show diligently! (and the topic is fantastic!)
1 2 March, 15:12
You could always do the canopy when it smashed into the arrestor hook and belly landed on the desert.
1 2 March, 21:09
David, I added a picture of the emergency landing skid for you. I will not mount it, but the empty mounting brackets as PE. So no landing in desert, but into a museum.
Welcome Ben, nice to see you here!
2 March, 22:10
Fantastic job! No doubt you are an artist, bughunter!
I'm following with close attention and anticipation of your next progress.
1 2 March, 22:21
Wow, Thank you both! Now I need a red face smiley .
There is not much difference between pic 26 and 46. I masked the rims and primed/painted the wheels. Some black paint in deep holes and on the food step. The big boost comes form a simple wash with oil paints as this brings up the nice rivets and other details on the cart.
And since you asked so kindly I added more progress pictures.
I stepped on the gas as we have our next club meeting in about a week and our annual show soon after that. It would be great to have the model ready by then!
1 2 March, 22:50
Ben, I collected a lot of pictures from walkarounds, museum pages, Flickr and so on.
I must say (even I have only decals for the 6024) the 6023 in the "National Museum of the United States Air Force" in Dayton, Ohio is in a much better, more original state. It uses a original cart. See the gallery with 21 photos on the official museum page: nationalmuseum.af.mi..onnell-xf-85-goblin/
The 6024 in Nebraska is on a simple steel frame, no winglets, the hook looks strange. Seems to be polished, without all the nice stenciling. Seems to be trimmed for a nice look, but not very original.
2 3 March, 00:27
Oh the National Museum of the United States Air Force is so good. I try to go at least once a year. It's just a couple hour drive from me. Beyond worth the price of entry too…which is $0. Beautiful work on that cart Frank. It looks the part.
2 3 March, 03:21
After the "Flying Flea" another interesting dwarf has appeared on your modelling table. 🙂 👍
I am particularly interested in this project of yours. Firstly because of the choice of model, but mainly because it is a resin kit with 3D printed parts. As I have several resin kits in my stash and have recently added two 3D printed models, this project is a great inspiration to me.
1 3 March, 09:54
Thank you mates and welcome Ludvík!
Here Halberd made a mix of cast and 3D printed parts. Only the very small ones are 3D printed. I checked both kits (it is also offered in 1:32):
- my small 1:48 one has 38 resin parts and 16 3D print detail parts
- the 1:32 kit 48 resin parts and only 6 3D print detail parts
That is not my first resin kit as I build e.g. kits from LukGraph (also combination of cast and 3D printed, but they move to completely 3D printed kits) and old resin cast kits from "SPIN Model" and "Alliance Models". Here I replaced small parts often with metal and wood. You will find those in my Projects, more to come.
I have not build a jet yet and that is somehow a different story (compared to my usual biplanes) with clear parts, surface details and more.
The most important thing with resin kits is a useless Tamiya Extra thin glue - you have to use CA or epoxy but it brings us many interesting kits which will never made it into a plastic kit.
1 3 March, 10:49
a adăugat un nou photoalbum.
149 imagini
F-4J Phantom II Black Bunny WIP & finished pictures
1:48


Proiect: F-4J Phantom II Black Bunny


 10+
10+ 64 10 August 2016, 23:02
Give it a try! I did some research for a future F-4S and an F-4F build.
16 August 2016, 18:02
Do you mean the slats on the inboard wing? So between the foldable part and the fuselage? Or the ones on the actual foldable parts?
16 August 2016, 18:11
Another question: Are you building the Black Bunny as an F-4J or an F-4S? The J only had inboard slats, the S had both inboard and outboard slats.
16 August 2016, 18:19
I'm just browsing through your album and saw you are using the Wolfpack Hard wing flap down set; F-4J it is! The F-4J has no outboard slats. Be aware that contrary to the trailing edge flaps the slats were rarely down when the plane was on the ground. Only for maintenance and special occasions. Under the wings you'll find three hinges per side. These hinges cant the slats in a forward/upward angle as to create an opening between the slats and the wing to keep the airflow over the wing in high lift manouvres. At the moment I don't have my external hard disk with me but I'll try to link some internet sites which were/are helpfull to me. Just a moment...
16 August 2016, 18:40
forum.largescaleplan..pic=44604&page=2
arcforums.com/forums..php?showtopic=224033
These articles show you all the itty gritty details. It's a long read but worth it every page!
16 August 2016, 18:49
Hi Hagel
first of all thanks for the help. ok, i am a bit confused here, probably due to my own ignorance, but also because the instructions from Wolfpack are also not clear. let's go step by step
yes, you are right, F4J is what i was trying to do (probably taking some licenses in regards to accuracy i am afraid....).
In any case, i have the two areas encircled in color in the picture. in the yellow area, we can see what i have already cut and the leading edge flap (not slat, i hope i get it right now), this will be (since i already cut the wing) down.
now, in the foldable part, i can choose to leave it as it is, or cut the leading edge, and use the part form the wolfpack kit. that will show this part, also down
i have the following picture (thanks Rex) that shows both down, in an N version.
[img1]

the only option is to do the surgery and use the lower one, am i correct?
again, thanks for the help, it seems now that i need it even more than i thought 😉
16 August 2016, 20:29
Oops... As I read your other question over here I realised I am wrong in telling you about those three hinges... Those were also only on the F-4S. And late F-4E's, F-4F's and F-4G's for that matter. Just stick with what other members answered in your other item.
16 August 2016, 20:33
thanks Clifford. pity i am advancing very slow. and progress will probably be 0 in the next week or two....
16 August 2016, 21:10
Yep... I'm affraid some cutting is on order. 😉 Rex provided you with a very nice picture. In this picture you can see that the flaps just fold down, nothing too fancy. Good luck and I hope to see some pictures!
BTW time to update my own RF-4E album...
16 August 2016, 21:34
Alea iacta est 🙂
cutting is done. thanks a lot for all the help. next update will take some time. i will be looking forward seeing your RF-4E Hagel 🙂
16 August 2016, 23:00
by the way, i have repainted the instrument pannels... again. i think i have done it 3 times already. this time, with brushes rather than markers. even if they are suppose to contain acrylic paint, they do not seem to really be permanent. more complex with the brush, but i think it is better. no pictures of that yet, sorry.
16 August 2016, 23:02
hah, they sure end up looking all chopped up when we add improvements to them, don't they? Looking forward to seeing this when you get back to it.
17 August 2016, 02:13
finally some time to work. cockpits are almost done, a few little details, choose one, and maybe this weekend i can finally glue the fuselage from once and for all 🙂
22 September 2016, 23:38
Impressive work so far Spanjaard, that cockpit looks really good 👍
23 September 2016, 06:14
Those pits look divine, I hope your going to use the Aires forward wheel well bay or you could find yourself in a world of pain.
23 September 2016, 06:57
did have the same problem with my albums, you can add everything you want, they don't show up in the feed.
It's a pretty nice (understatement of the year) cockpit... 1 for testing and one for real... 😉 I wish I could achieve the same results...
23 September 2016, 06:57
Wow, looking great! How did you make the yellow-black on the ejection handle Loops?
23 September 2016, 07:01
Using the Aires forward wheel bay underneath the Aires cockpit makes the cockpit fall in place perfectly.
23 September 2016, 07:07
Great work on these cockpits, especially the seats look very authentic 👍 !
23 September 2016, 07:37
thanks a lot everybody 🙂
@Michael, yes, i am using the aires wheel-bay, but I had to sand everything until i could see through 😛 it is very, very tight space. i will have to sand a bit more in the sides of the cockpit for it to fit.
@Holger, y simply painted in yelow, and then make the strips with a very thin brush, 4-0 or 5-0, not sure.
23 September 2016, 17:51
@Bart, the idea was to make just one, but the carpet monster took a part of it... never to be seen again. so i ended up buying a second, to get the part i was missing... then the piece in the new set did not match the old one, so i started to paint the second one, and though about scratch building the missing part usign the one of the second as a model.
Then i realized that the film for the dials was faulty, so i contacted Aires about it.... and i must say that the support of Aires was SIMPLY EXCELLENT, they sent a replacement for the film, and they even throw in the piece that I lost (no fault of theirs), with no cost from my side. So BIG THANKS TO AIRES that is realy support. and really fast by the way.
so i ended up with too complete cockpits, both partially done... so I am finishing both. I will use the best one, and then I have two options. I can buy a second Hasegawa F-4J,. or maybe take a Phantom that I did maybe 25 years ago, remove the paint (what a horrible job i did then) and rebuild it top to bottom, adding the finished cockpit.... will see.....
23 September 2016, 20:02
Thanks KlausH, your pics on F-4E Phantom II - 57th FIS Kevlavik - | Album by KlausH (1:48) were certainly a great inspiration 🙂
24 September 2016, 16:12
Those cockpit are just breathtaking! I realise that I have a long way to go... 😄
3 October 2016, 17:26
thanks Marc, for once i am happy with those cockpits (after painting them three times each 😛) but the wings unfortunately are not going to good. Due to all the surgery it was hard to get them to join in the right way.... so I did use some pegs and some carefully heating from hair-dryer, but that created some damage that it is being complicated to repair.... it will be a pity if the outside does not match the quality of the cockpit. on the other hand, i am learning a lot with this kit.
3 October 2016, 21:23
This is looking fantastic so far... That cockpit is really awesome!
4 October 2016, 12:38
thanks Marc for your kind words and encouragement. and thanks Michael, if i could achieve just 25% of what you have done with your F3H-2 I would be a really happy modeller 🙂
4 October 2016, 19:03
Oh you are well on your way. Your cockpits look WAY better than mine. I am really looking forward to see this thing come together.
4 October 2016, 20:16
thanks Michael and Elias, I will do my best and I hope I can keep the expectations 🙂
4 October 2016, 21:57
thanks a lot. no much progress lately. wings attached, and lots of putty and sanding done to fix the damage in the wings. new pictures will be added before the primer is applied.
25 October 2016, 22:13
finally some time to work on it. mistake with primer (Mr Surfacer 1500), but i managed to remove it completely, and tried with Vallejo Surface primer. it worked exactly as i wanted it.
now, i will leave it rest for 24/48 hours. I guess i will paint it all in back X-1 from Tamiya. leave it for a couple of days, then mask it and start working on Alclad in the tail section....
14 November 2016, 00:37
I hope the vallejo primer will stick to the model when you are spraying. Is looks nice when applied, but it tends to peel off whenever you apply some tape or blutack... Mr surfacer is a lot harder to spray (try cellulose thinner), but it stick to the model whatever you do...
14 November 2016, 09:15
I agree with Bart. You can thin Mr surfacer with Gunze cellulose thinner.
The Vallejo primer looks nice, but repairing any "forgotten" spots is nearly impossible.
My primer of choice is the grey primer from Zero Paints, a car modeling brand.
14 November 2016, 17:18
Spanjaard, I just noticed you (re)scribed the Air Force Inflight Refueling Receptacle on the spine, the multiangled panel. This is only present on Air Force birds, not on the Navy F-4J and should be filled. This is a good test to see how well the Vallejo primer reacts on reapplying... 🙁
14 November 2016, 22:49
ok, this requieres a bit of investigation. I did a test, with some masking tape (straight from the roll, full power) place is in one of the pieces, pressed it hard, remove it and the primer did not present any problem. no peeling or anything.
On the other hand, when I applied Mr. surfacer 1500 it did not look good, kind of grainy, that is usually a sign the that paint is drying before hitting the surface. in fact, after maybe 12 hours, a piece of kitchen paper rubbed gently had plenty of black dust. that is not how it is supposed to work
I have been looking for reviews around, and either people love this Vallejo Primer or really hate it. In regards to Mr Surfacer, it was almost impossible to get it in ESM a few weeks ago (i think i got the very last bottle there, and i was quite lucky). it sold out everywhere. if everybody is crazy about it, must be for a reason, but for me it certainly did not work. again, I used it first for the time ever, and certainly not thinned.
It seems that temperature/humidity can have a big influence in this cases. 22 degrees at home, Amsterdam humidity is usually high. am I just being lucky that one of them work with the weather conditions at the moment?
any thoughts?
14 November 2016, 22:57
I had some problems with the zero paints primer (white) too.. you spray it.. it looks superb, you can scratch it with your nails, it sticks to the model. first layer, the same you can do what you want. After a week you put on some masking for a second layer... when removing the masking, all masked areas were back to the bare plastic, all layers came off at once... For Mr Surfacer, it can be hard for your seals in your AB, because it is thinned with cellulose thinner, and that is very corrosive for seals. it can also be a pain to find the right dilution to be able to spray it... and it smells ... but it still is my favorite
15 November 2016, 10:02
thanks Patrick i did not see your message before... i guess i will need to apply some putty and sanding there...
thanks Bart for the details about the zero paints. i may give a try to Mr Sufacer in the future. i may use my old airbrush, to avoid ruining the seals of my fairly new one.
15 November 2016, 10:57
Bart is right again🙂 The Zero paints primer is wonderful stuff for figures or single color car bodies, but I had some problems with masking too.
But.... Zero changed the formula (they even gave away free samples via Hiroboy) and I can say from experience that their new formula is as rock solid as MrSurfacer, even with masking.
I would still recommend the new formula of Zero primer, being airbrush ready is a real pro. 👍
15 November 2016, 13:18
You can order Zero paints in the Netherlands from thescalemodeler.com/.
They're from Heerhugowaard, pretty close to Amsterdam Spanjaard.... 😉
15 November 2016, 13:20
or from Domino (www.domino.be) in Belgium. @Kees, I will need to try the new formula then... time to go shopping (I hope my girlfriend doesn't read this, or I will get comments like: why aren't you so enthusiast to go shopping for clothes... )
15 November 2016, 14:17
thanks for the information Kees and Bart. and thanks for the comment gorbygould
today i have masked the area of the Air Force Inflight Refueling Receptacle on the spine, and sanded it without any trouble. i will airbrushed it later today if i can, and hopefully post pictures of the result.
15 November 2016, 16:40
thanks Erik. today i airbrushed the sanded area, and it looks good after a couple of hours. well actually it could look better, but that is not fault of the primer. it is me. somehow the panel that i needed to cover is still visible (very faint, but it is certainly still there). so tomorrow i will need to sand it again. well, let look for a positive side, i will test the endurance of the primer again 😛
what worries now is an airbrushing mistake next to the air intakes. i wanted to cover some difficult spot that was not correctly done before, and by accident I used now too much paint.
I hope i can correct it tomorrow with some very light sanding (not the easiest area for that). if i can not fix it, I may be forced to remove all the primer and do it all over again.... 🙁
16 November 2016, 00:07
a few pictures with the progress of the last days. starting to use alclad in the tail and ailerons
25 November 2016, 00:08
Really looking awesome man... Love to see what you come up with for the metal areas. A great area to get a little creative with.
25 November 2016, 03:39
Thanks Michael and Patrick. I will may be add a bit of blue transparent alclad, and certainly paint the chute cover that I mistakenly masked.
Some magnesium still have to be applied in the ailerons , and some more detail. Once covered with varnish, maybe some light wash, well see
25 November 2016, 08:38
The chute cover is painted in the fuselage color. You did it right!
25 November 2016, 17:00
thanks Kees, Mike and Christian, i am really honoured with your comments. 🙂
Patrick, in most F-4 you would be right, but for the VX-4 i have several pictures where it is also in metal color, instead of black
aviationphotocompany../h6ED6AACE#h6ed6aace for example
in this picture it looks more bluish than black, but the chute cover is certainly metallic. i have a few more actually.
25 November 2016, 19:24
actually there is something that beats good research.... it is to actually use the results 😄 with i did a late for that chute cover. although still on time. i am not so sure about some other details that i realized about yesterday....
26 November 2016, 11:49
by the way, do you know what exactly are those yelow sort of bands you see in vertically in the tail and horizontally in the sides? i see some F-4 that do not have some of them. i did not remove any (and in some picutures of "black bunnies" i see them and in some i do not) so i will paint them all in yellow. what i am uncertain is if i should simply use bright yelllow of if clear yellow over silver/aluminium is more correct.....
26 November 2016, 12:24
http://www.network54.com/Forum/47751/thread/1397996138/F-4S+%26quot%3BBlack+Bunny%26quot%3B+1-72+Fujimi
Do you mean those yellow stripes like the one next to the bunny on the tail? As you are building an F-4J you don't need them. On the F-4S the so called 'slime lights' were introduced. Those are low intensity formation lights. When those lights are off they tend to have a very pale green hue.
26 November 2016, 19:06

thanks a million for the information Patrick. Ok, so i should have removed them.... well, i think in this case i will throw the historical precision through the window and leave them.... it will not be 100% accurate but i like too much how it looks right now, so i will not risk sanding them and needing to correct such large areas 🙁
I corrected the Air Force Inflight Refueling, and the results were good but not 100% satisfactory. this areas are a lot bigger and there is a lot more complicated detail around, so i will leave them there.
26 November 2016, 21:55
After some finishing touches, everything was looking good, paint as even polished and ready fir decals and dry transfers, but the only thing I could see where those damn yellow lines....... The words "you are gonna regret this moment" came to my head a hundred times while I masked the area to start sanding away the first of those formation lights....why did I choose to ignore that part of the instructions???? Well, first one almost gone, five more to go.... Wish me luck!
2 December 2016, 11:25
removed 3 of them already, and covered them again with primer.... some marks are still visible looking closely but ... well lesson of the day, next time, read more carefully the instructions 😛
3 December 2016, 00:32
well, it look longer than expected for the update, but finally here you have a few more pictures. before any transfer was used, and after i place quite a few. still, a lot stencils to go. i have the problem that one of the sheets was not in the set received... so waiting for the manufacturer and the site where to purchased to provide a solution..... i will not be able to work on it during Christmas, so this will probably be the last update for 2016. merry Christmas and happy new year to you all 🙂
21 December 2016, 00:00
Looking fantastic. Merry Christmas to you also and a Happy New Year.
21 December 2016, 01:00
Looking great Spanjaard! Especially the exhaust area is amazing 👍
21 December 2016, 07:32
Can't wait to see the progress in the new year. But until than, happy holidays Spanjaard!
21 December 2016, 08:21
Thank Erik and Lex. I will advance on this one until I have only only weapons left, then probably start the academy F_4j and choose what weapons will go on each at the end.....
21 December 2016, 15:49
Wow this is really looking awesome. Your attention to details is so impressive.
21 December 2016, 16:33
Thanks a lot everybody, your comments mean a lot to me. specially coming from people that I consider far above my skills 🙂
21 December 2016, 19:41
you mean because I chopped some many things on this model? 😄
well, it seems the patient will survive, but I was not that sure at the beginning! (see first album)
22 December 2016, 00:11
Nice one so far. Did you use black for the paint of dark grey? Soon I want to make a black camouflage too
22 December 2016, 13:40
I tried with Mr surfacer, but for some reason it went quite bad and had to remove it completely (never used before, maybe I did something wrong). Vallejo black primer worked like a charm (first time use too). I handled it, sanded it, everything...., and no problem at all. I airbrushed Tamiya X-1 over it, and then Future, layers as thin as possible. I am really happy with performance of future, not many products can survive the amount of handling I have submitted it to....specially with the transfers. Some simply did not want to leave the support sheet regardless of the pressure exerted. I was afraid with the bigger ones (bunnies etc), but those were the easiest ones
I wanted almost shiny so that is why I did not use the gray primer. Black required very little polishing
22 December 2016, 15:04
thanks Jean and Edwin. i have to start working on it. it should be finished soon, but i still have lots of stencils to place. and there is even one sheet that was not even included in the package i got. Hopefully i will get the missing decal sheet from hobbydecal, unfortunatelly they have not answer my messages yet, and the "after sales service" form, simply does not work.....
4 January 2017, 21:11
thanks, still adding stencils. and still no answer from hobbydecal.... 🙁
9 January 2017, 18:14
thanks a lot Ricardo. i am still adding stencils, but job is progressing 🙂
12 January 2017, 00:53
a little update, all transfers i had have been placed (no answer from hobbydecal, i gave up on them). then covered with future, left to cure for a couple of days, added the water slide decals, and then covered again with more future.
i got some kind of reaction between the future and the micro sol/set, it created some kind of matt areas (hard to explain).... fortunately new layer of future seem to have resolved the problem.
slats, flaps etc are not yet glued, landing gear is on its way (temporary "crutches" in place, so the paint is not damaged)
17 January 2017, 00:22
it took forever to get them in place... it is almost a thousand of them (no kidding) in the set! although you do not use all, and i miss one sheet with around 130 yellow and red ones (a pity not to have them)
17 January 2017, 09:37
Ahh, Stencils. When I grow up, I am going to do a 1/32 Navy F-4 in "new delivery" condition,,,,,,and put every single stencil on it that was there before a jet flew it's first mission. I will probably do a "new delivery" 1/32 Skyhawk before that,,,,,,,but, the Phantom had so many more than a Scooter.
I just need to figure out which marking was painted on, which was a decal, and which was a sticker,,,,,,,and figure out how to replicate that in 1/32 scale. Contests don't like it, but, "decal silvering" was a very real thing in 1/1 aviation, as was "sticker lift",,,,,,,,the trick is to know exactly which things were painted on and not do that to those stencils. "Paint ridges" were common in real life, also, if something was painted on using tape instead of a stencil set. "Bleed under" when using a stencil set happened a lot, too. We didn't do that stuff over and over on 1/1 jets, such as a modeler does to "get it right." If we were changing the nose number on the flightline, and it turned out a "little fuzzy",,,,,,it flew that way.
17 January 2017, 16:34
I feel better now Rex, I did not know that i was adding more realism when I did not manage to get some of those stencils to stick to the model! big thanks 🙂
if you are planning to do the F-4 in 1/32, i could recommend the stencils from hobbydecal, they have some sets that you can use for the stencils, i believe you probably have every single one that was used..... Being bigger than 1:48 probably you will have less trouble than i did. some of the tiny ones simply ignored all my attempts to convince them stick to the model.....
17 January 2017, 17:03
Geez, a stenciler's dream,,,,,,,,look at this sheet from them. hobbydecal.com/detail.cgi?number=al32003v1
Thanks for the tip, I see the markings, the stencils, and the door numbers. And "only" 8 sheets of stuff to stick on the model, lol.
I will send them some money.
17 January 2017, 17:27
i must also say that i have tried to contact them several times about a missing sheet in my set. and they never answered. i also see that they have not published anything new in 2016 and that there is nothing in the section of "coming soon" of their site.... so i think they may be out of business, or almost. Their products appear as "out of stock" in most online stores. so i have been reluctant to try to buy the set complete set again from their site.... if you order and you receive it, it would be good to know.
17 January 2017, 17:53
Wow, this is awesome! And those stencils... makes my brain hurt to even think of applying all of those.
This is going to be epic when finished!
17 January 2017, 17:58
mhh, don't know why I missed this?! Very nice and clean work. I much like the effects in the exhaust area but first of all the overall look 👍
Cheers, Christian
17 January 2017, 18:31
glad you like it Michael and James. welcome to build Christian 🙂 your opinions are really appreciated.
17 January 2017, 19:27
I like this scheme. The amount of stencils ... wow, that's a lot of work.
19 January 2017, 20:49
it certainly took a while😉
and i still have a few pending, just a handful.
19 January 2017, 22:28
Well, you still have some open spots (not that much) to place them if you would receive them...
20 January 2017, 07:39
thanks Clifford and Ed. i was hopping to get it finished (or at least close to it) before the end of this month, but it is been hard finding time for it 🙁
23 January 2017, 23:40
thanks for the encouragement Michael, and thanks for the compliment Dale 🙂
24 January 2017, 22:19
I'm feeling residual pride by association in this build because "one of us young guys" is the mastermind behind it.😉
25 January 2017, 00:48
Amazing patience for all those small decals! Looks great Spanjaard!
28 January 2017, 18:09
Thanks Bart, it is finally finished and placed in the display cabinet in the living room.
14 April 2017, 13:53
Dammit well done! I love the arresting hook system most!👍 Beautiful!!!
14 April 2017, 14:01
thanks Bart, Holger and Christian, your comments are really appreciated
14 April 2017, 14:11
Wow! That is a stunning result Spanjaard it looks fantastic, I can see now why it took so long.
14 April 2017, 16:07
thanks a lot Grobygould, Erik, Augie, Patrick, Kurt and James. I really appreciate your feedback, and glad you like it. and thanks a lot for the support and help along the project. by the way, next one is again a F-4J. Academy this time. i was going to use the second cockpit, but after reading comments about how well the Eduard one fits, i will probably keep the Aires for the future, and use the Eduard one.
14 April 2017, 20:21
thanks/bedankt a lot Dan, Clifford, Jay, Martin, MrLongSir, David and Lex.
i am proud of it Lex, i think it probably is my best model so far 🙂
15 April 2017, 09:53
Wow, great build and awesome album. Your narrative is great, surely a valuable resource for anyone building the F-4J 👍 Your metalworking skills are top as well. Thanks for taking the time to record it all!
15 April 2017, 14:13
thanks Alec K, i have great help along the way in this build, so i am happy if the album helps others 🙂
15 April 2017, 14:35
This is just fantastic Spanjaard!!! An absolute beauty, you should be quite proud of this one. 🙂
15 April 2017, 19:53
Very nice build! You mention the use of future, where do you buy that? I can't find it anywhere in the Netherlands. Am i not searching hard enough?
19 April 2017, 08:32
thanks a lot for the nice comments Daan and Kees
no Daan, i believe it can not be found here in the Netherlands. I got a bottle directly from US, But it is quite expensive (but works like a charm in my opinion). then I found a seller in Amazon. they ship it directly from US, But sell only in UK France and Germany. Delivered in UK is quite a good price, in Germany and France, it goes more than double. I asked to ship here, but they said no.
I am thinking in getting a couple of bottles to UK, if i go there for work at some point, or maybe to friends in France or Germany, but it bothers me to pay double......although it still a lot cheaper than what I paid to ship directly from US.....
19 April 2017, 19:05
I can get the large bottles of it at Walmart for like $6USD. If we could figure out how much shipping costs are from the US to wherever maybe I could help out getting some to Europe for those interested.
19 April 2017, 19:44
thanks for the offer Michael, how large are those bottles? i got one of 27oz (798ml), i am sure that in US is possible to get them bigger.
problem is that shipment may cost a lot, duty import should not not be a big deal, since the value of the package would not be that high....
19 April 2017, 21:10
Eriks top tip: ebay.co.uk/itm/231144736712
Maybe a bit expensive but it's the real thing and easy and fast to get
19 April 2017, 21:19
thanks Erik but with 250ml, with shipment, it is 20EUR. it is basically the same price as getting it by yourself from US.....
19 April 2017, 21:41
thanks for the nice comment. and thanks again for the help during the project, really appreciated 🙂
20 April 2017, 17:26
Spanjaard. :-O A masterpiece and there is no other word for it. There is not one image that hasn't had my jaw on the keyboard. just beautiful work and the attention to the detail speaks volumes of your patience and talent.🙂 👍
I am seriously in awe. 👍 👍 👍 🙂 🙂 🙂
16 October 2017, 09:34
Looks good Spanjaard. Black is one of those colours that is hard to get right,
16 October 2017, 10:33
i can't believe how i missed this build, looking stunning Spanjaard big huge kudos 👍 👍 👍
16 October 2017, 11:15
The guitar string with the copper wire coms cable, and the hand painted helmets have me thinking your a wizard with a master touch. 👍.
I keep going through you album, and every time I do, I discover something else you have not mentioned. You deserve all the comments and compliments posted on your build Spanjaard. 🙂
You have left all of us in your dust. 👍
Genius. 🙂 🙂 🙂
16 October 2017, 16:39
All of that detail you got into that kit is just awesome! Great job!
/B)
16 October 2017, 17:30
wow, i am really happy with all those comments, thakns Dale, Murad, Bernd, Konrad, gorbygould, Björn and specially thanks Kerry, you make me blush 🙂 . it took a considerable amount of time and work and i am happy you all like it. i certainly do.
16 October 2017, 18:33
You have certainly got my creative juices re energised Spanjaard. Inspirational is what it is. hehehehe. ZOOM. !! :-O 👍
16 October 2017, 19:00
I think it is about time I did a spook. Can't decide between it or a Tomcat.
17 October 2017, 19:28
turkey or a rhino... hmmm I would have a hard time choosing too Clifford.
17 October 2017, 22:25
Augie. What did you say for Clifford to be have like this. :-o :-o :-o ???
17 October 2017, 23:36
well, for me, after two rhinos in a row (second almost finished), next planes will be .... two turkey 🙂 but not before I do something with wheels, for example
18 October 2017, 00:01
Spanjaard, well done sir! Not sure how I missed this. I love how you constantly say scratch built. Easy. Pfffttt.
Clifford, thats easy. Snag a 1/32 Tamiya Phantom buddy. That will keep ya busy.😉
18 October 2017, 00:42
I could only afford a Tamiya 1/32 scale F-4 in my dreams. LOL. But I do have a Revell 1/32 F-4G with all the Tamiya aftermarket goodies(Photo etch) Metal gear, resin wheels and seats. I actually took it out today and looked at it, then put it up.
18 October 2017, 01:14
OMG. :-O Decisions decisions !!! How hard you guys have got it . 🙁 hahahahaha 🙂 👍
18 October 2017, 03:44
Clifford, I managed to snag one in a trade. I came out WAAAAYYYYY ahead. The guy was an armor guy and I had the exact kits he was looking for. He did an even on swap. I could not believe he did it, but he did. So keep your eyes open.
And an aside to that. A guy I have done business with before is allowing me to make payments on the Tamiya 1/32 F-15E. So I will have that baby in a few weeks. 🙂
18 October 2017, 04:00
thanks Donald. 1/32 spook? tempting, but at my current speed, it will take me a couple of years! besides, I am thinking on going into smaller scales rather than bigger ones. they take a lot less space later, and can be as much fun, or even more, if you want to make the same details 😛
18 October 2017, 05:34
I have come to the conclusion that limiting the scale I work in is not going to work for me. Too many things I like in a variety of scales.
18 October 2017, 21:07
Augie, plus it impacts space limitations not at all. A 1/72 Herc or BUFF is still a really big model. So my motto is that is what we have ceilings and 30lb test fishing line for.😉
18 October 2017, 21:14
the main enemy of those models is not the danger of falling, or dust... is the people that live in the same house 😄
18 October 2017, 21:32
yes, cats and models can be an interesting combination... dogs are probably safer, since they less inclined to climbing....
19 October 2017, 17:06
The house I just moved into was previously occupied by a young cat. The POS owner kicked him out the door and left him. So he is a neighborhood cat now. I feed and water him. But I can not bring him in because I would have to make him into Chicken and cashews if jumped on my shelves. LOL The dogs dont even look up there.
20 October 2017, 16:40
Whoa, I really love your detail work and scratch build - very impressive! Man, I love F-4s 😄
29 November 2017, 07:40
I think we should just automatically bump Spanjaaard's F-4 builds once a month to the top of the newsfeed so we can all oooh and awe over them. I never get tired of them... I mean, the number of decals alone...😉
29 November 2017, 15:45
thanks a lot Greg and Donald, you are making me blush! 😳 🙂
i need to finish the second, and get to build something different, probably even without wings this time 🙂
and one day, i have to take proper pictures of them finished.... the "foto session" of the completed bunny was not exactly what i had in mind.....
29 November 2017, 17:18
We all expect nothing less Spanjaard. Always a stunning result. 🙂
Cheers mate. 👍
29 November 2017, 19:35
Brutal... qué pintaza tan buena tiene ese Phantom. Menudo trabajazo le has hecho y el resultado bien ha merecido la pena. Me gusta mucho ese esquema. Enhorabuena, Spanjaard!
8 December 2017, 20:34
@Cuajete Muchas gracias! creo que el black Bunny especial, vi el de monogram hace 30 años y al final me he quitado la espina 🙂
@Lode, thanks for the compliment, but i think you have that and more seeing your 1/350 Prince of Wales!! 🙂
8 December 2017, 21:42
thanks Frank and Arne. it was actually finished 8 months ago. a but surprised to see this build getting so much attention lately 🙂 (no complains about the compliments of course 🙂 )
11 December 2017, 23:49
Awesome build Spanjaard! 👍 Love the details and especially the cockpit. Very good!
12 January 2018, 20:47
thanks a lot Ingo, glad you like it. your comment means a lot to me 🙂
12 January 2018, 21:43
I've said it before and I'll say it again. You military and airplane guys, your detailing never ceases to amaze me. Great job, Spanjaard.
28 January 2018, 15:42
Black Bunny was a marvel! Beautiful and inventive build! Well done Spanjaard!
27 April 2022, 01:40
I was wondering when this build would pop up again! For me, this is almost like the "mascot" build of Scalemates. I think this was one of the first projects that made me realize what kind of community is here beyond just the database... and I've been following Spanjaard around ever since!
27 April 2022, 05:56
Thanks Peter and Greg. You make me feel really happy. I am also really happy to be back in the bench, after a extended "break"
27 April 2022, 07:51
Greg this one was posted prior to me joining Scalemates but I have long been a fan of Spanjaard's F4s. Maybe if we ask very nicely he might, you know ……. Ummmm ……. do another one? 😁
27 April 2022, 08:35
It's an honor to have the privilege of seeing this fantastic work again after a long time. Congratulations, Spanjaard!
27 April 2022, 09:53
And here we go again😬! Nice Spanjaard this reminds me to do a black bunny too😬! Someday…
27 April 2022, 11:21
Thanks Peter, Cuajete and Konrad. I am blushing now!
I have some F-4 in my stash... but not in 1/48. Actually one of them will be a Bkack Bunny (a lot less decals on 1/144 scale) But there is the second cockpit (done in this build) that should get some use....
Konrad, if you do a Black Bunny, I suggest the decals i used in this build. I think they have them also in 1/32, if you are insane enough 😄
27 April 2022, 19:36
believe me, it was a great pleasure when I finished those stencils, this set has (literally) a thousand of them. but I love to see how it looks now, so it was worth it 🙂
27 April 2022, 20:57
Hi Spanjaard - I appreciate I'm a bit late to the party here, but just spent some time in my lunch hour having a look through this album, as I saw it pop up the other day and... Wow! I know I can't add much more than others have already, but what a thoroughly fantastic (and informative) build. Just looks awesome! You must be rightly proud! 🙂 👍
3 May 2022, 13:16
Thanks a lot Neil, really appreciated.
Thanks also Jos, coming from the maker of one of the best Phantom I have seen here, your comment means a lot to me!
3 May 2022, 21:10
hi David, yes they are part of the Aires kit. You only need to paint them and place them. it is one of the things i like of Aires, nothing is pre-painted. that, and the amazing detail. and on top of that, if something is wrong their customer service is also really good. I wish only they would require less sanding to fit in the cockpit.
12 May 2022, 18:25
Why I missed this?
Overall good built, classic results.
I bet you must input a lot energy into it👍
1 October 2022, 13:16
Thanks Chang Li, yes, it took me a while and all the holes I made on it to get all that aftermarket took certainly some energy 🙂. But it was a pleasure to build it, and I love to see it in my display cabinet, so quite happy about it
1 October 2022, 21:11
Excellent work! Beautiful result sir!!!!
I really need to get the decals to do this one to go with my Vandy 1 F-14D.
2 October 2022, 02:31
Wow...this is an amazing project 👍
I spent nearly an hour enjoying and studying every photo.
2 October 2022, 03:33
Thanks Donald, this decal set certainly takes some time, but the Tomcat will certainly look great in this livery!
Thanks also Rui, that is a really great compliment, really happy you like it so much
2 October 2022, 13:43
Spanjaard, the 14 looks awesome all black. Once I get the 4 done, they will look great together. You should do a 14 to go with this one! The AMK kit comes with the markings.
F-14 Group Build F-14D Vandy Complete | Album by smokeriderdon (1:48)
2 October 2022, 16:45
Thanks Guy
I will have it in mind Donald, they will look great together!
I have a couple of cats in my stash that are waiting for far too long actually. Maybe next will be a black one!
2 October 2022, 20:25
Absolutely beautiful work. The paint job and markings are stunning.👍
6 October 2022, 03:47
Great rendition of the black bunny! Probably the most striking scheme the Phantom ever wore. Definitely an eye catcher on the shelf with "mere" camo and ADC gray birds. Great build. 👍
6 October 2022, 04:45
thanks a lot Stephen and John, really appreciated
i agree in regards to this lively being really attractive. But i also have a grey F-4J, I actually built both one after the other 😄
6 October 2022, 06:52
It is a pleasure to enjoy again the magnificent photos of this album after all this time. I love the black scheme with the bunny and those blue stripes. Congrats again, Spanjaard! 👍
6 October 2022, 17:16
Well this is truly a Phabulous Phantom😳… a black beauty, impressive build Spanjaard!
1 March, 23:53
This build is like one of the Scalemates standards. Been seeing it annually for 9 years now, and it never gets old. 🙂
Love it!
1 March, 23:57
thanks a lot Dick, Greg and Alec K. it may miss a bit of weathering, but I doubt I will ever dare to touch it again 😄
2 March, 06:42
I agree with Dick and Greg 👍
The years have not taken their toll on this black beauty. I'm glad to see it again after all this time.
2 March, 19:28
Wow, what an awesome build - lots of great detail, including all your scratch-build solutions. And a great finish too with the black surface and those white markings (especially the bunny on the tail 😄). 👍
3 March, 07:27
thanks Alexander, the markings are the fantastic set of dry transfers F-4J Phantom II (HobbyDecal AL48001V1, 1:48) , it takes quite some time and patience to place those 1000+ stencils, and the big ones like the "NAVY" and the bunny are intimidating, since they are truly make or brake, in fact I had an issue with the A of one of the "NAVY" ones but managed to get it to look decent
3 March, 08:28
thanks Martin
the issue with the transfer that I mentioned before can be seen in some of the pictures, like 136 F-4J Phantom II Black Bunny WIP & finished pictures | Album by hetspanjaard (1:48) , let's call that weathering 🙂
3 March, 09:54
Man, my finger gets tired scrolling to the bottom of this thread...
Also... you said "they are truly make or brake" which I'm going to adopt as a new phrase. Not sure if you intended it or not but usually it would be "make or break"... but as model builders there is no such thing as a broken model. We just might have to apply the brakes and slow down a bit and fix something, but it's almost never a complete loss.
Or maybe it should be "make or take a break" - that works too... 🙂
Pay no attention to me. 🙂
3 March, 16:36
a adăugat un nou photoalbum.
50 imagini
Ta 152H-0 construction
1:32
Base cockpit colour RLM66 sprayed


Proiect: Focke Wulf Ta 152H-0


 5+
5+ 10 6 September 2024, 13:09
Nice work. I'm surprised you are needing to use so much putty on what I thought was supposed to be a top quality kit.
13 November 2024, 10:43
Sören , mein Freund , super Arbeit !! Das wird wieder ein Top Modell
13 November 2024, 11:24
a adăugat un nou photoalbum.
7 imagini
Sturmpanzer A7V (Tauro)
1:35
recolouring "Totenkopf"


Proiect: WW1
Scratchbuilt
5 15 February, 10:20
a adăugat un nou photoalbum.


10 24 February, 19:18
The only upgrades are the mirrors, so I can start with the painting! 😉
26 February, 17:15


a adăugat un nou photoalbum.


11 26 February, 15:27
Thanks! I picked up a bunch of these Planet Models kits a while back as they tend to be of interesting subjects avoided by other kit manufacturers. It seems to be a fairly decent, simple kit. I needed a break from a couple of other models that I'm working on. This box kept falling off the shelf so I figured it was telling me that I should pick it to build!
26 February, 20:38
I have the Aichi H9A1 from this brand in my stash. I hope to build someday.
The good thing about your kit is that it includes most of the parts in injected plastic (I think from the MPM mold) since it is a conversion. I didn't know that Planet Models had kits like this 👍
1 27 February, 19:36
Yes, I think you're right that it's from an old MPM kit of another similar plane. As you can see, it replaces the fuselage halves, cowl, and a few other parts in resin (and I think one in clear plastic). It's actually going together fairly well. I did have a problem last night where once you join the wings to the fuselage, you have these tiny square gaps that are covered with some small square kit parts. Well I had everything all assembled and was doing the last square part, and it fell into the fuselage and got stuck at the far end of one of the wings. Let's just say a few naughty words were said. Thankfully I was able to pop off the wings fairly easily (nice thing about using CA to join the plastic wings to the resin fuselage) and dig out the part.
I have a few other Planet Models kits that I picked up for fairly inexpensive prices over the last couple of years. I might do the SNC-1 Falcon alongside this one since they both have yellow wings. The SNC-1 is an all-resin kit though.
SNC-1 Falcon (Planet Models PLT107, 1:48)
")
27 February, 20:51
Nice aircraft 👍
If you prefer it in plastic, you have the Kora model in 1/72 scale:
SCM Search: 1:72 kora SNC-1*
Or Dora Wings ones model in 1:48 scale:
Curtiss-Wright SNC-1 Falcon II (Dora Wings DW48041, 1:48)
")
1 28 February, 19:20
Thanks Cuajete, the Dora Wings kit looks very nice. I'll start with the Planet Models kit and see what happens. I tend to use a lot of aftermarket with my builds, so building with resin doesn't bother me too much.
Back to the Gamma 2J, there is very little out there on this plane. The 2J was a single production trainer, and there was a 5D model that went to Japan. Very few pictures, etc., so I looked at the A-17 which was a very similar plane. While looking at the A-17, I came across this old MPM kit of the A-17 from 2002. It's definitely the base kit that was used for the plastic parts of the Planet Models Gamma 2J/5D kit.
A-17 (MPM Production 72504, 1:72)
")
1 March, 17:02
Great, Landlubber Mike! 👍
The union of the plastic with that resin looks very good 👍
1 1 March, 18:56
Thanks Cuajete! And thank you for following Robert!
Yesterday I worked on the canopy. It's a tricky part as the back part of the canopy piece actually serves as part of the fuselage. So, it's been a little tricky figuring out how to cut it out from the clear plastic sheet. Thankfully the kit gave four canopies. Two are used for the 2J and the other two for the 5D -- but it's unclear which is used where from the instructions, and the only thing I see that's different is a little bubble near the front of the canopy. I used one that had a scratch on it as the test piece. I then used a second to get a close approximation, but the third piece seems to work the best. Unfortunately the kit doesn't give any masks, so I've been spending a lot of time masking the various window panes. Hopefully will have that done today, and will be able to start with the primer coat this evening.
1 2 March, 16:58
a adăugat un nou photoalbum.
144 imagini
The less charismatic Scammell brothers. Scarab & Mechanical horse.
1:76
I’d completely forgotten (I seem to say that a lot) to add the Scarabs windscreen wipers, so here are the windscreen wip...


Proiect: Scammell Scarab

51 1 December 2024, 15:42
Looks like a tuk tuk, anyways its really nice to see you on another project. Im excited to see the fuck ups and final result. Hope your misses doesn't mind you being in love with another woman 😄
1 December 2024, 18:21
Welcome Kesa & Robert. 🙂
Kesa Mrs Gorby is used to my plastic passion obsessions. 😄
And yes it does look a bit like a tuk tuk. Incidentally there have been a couple of screw up so far but obviously I won't be telling everyone as I want to make it look like I know what I'm doing. 🙂
2 December 2024, 07:48
Hi Gorby 👋
Another interesting one 😃👍
Nice project, they used 3wheel trucks like these at Cadburys factory as they need tighter turning circles round the plant.
2 December 2024, 22:40
Glad you're tagging along Mr D.
Their turning circle was one of the reasons they where so successful. Do you have any association with Cadburys - other than eating their products of course. 🙂
3 December 2024, 06:46
Remember these trundling down Zetland Road and Linthorpe Road from the train station. BR and their parcel/freight division use to operate them.
3 December 2024, 08:05
That will be another session of scratch modeling of famous (with 30,000 it must be famous) British cars 👍 So ugly that they begin to be beautiful.
3 December 2024, 08:10
Hi Frank, they certainly are famous in Britland...although probably only with men of a certain age. 😄
3 December 2024, 08:36
Hi Gorby...No just eating 😂 l live not far from factory n seen documentary on it too.
Like the project 😁👍
3 December 2024, 09:30
Thanks Mr D.
Been on their factory tour, as a chocoholic it was wonderful. 🙂
3 December 2024, 09:39
One interesting thing to have in mind is that Gorby set to build the ancient 1962 tool of the Scarab and scratch the Mechanical Horse precisely when there appeared recent (and immeasurably better, as for the Scarab - I guess) 3d-printed 1:72 kits of both the Scarab and the French relatives of the MH (i.e. FAR tractors)... But that's Gorby (much to our delight!) 👍
3 December 2024, 11:32
THERE'S 3D PRINTED KITS!!!??? 😄 😄
I'd be too tight to buy them anyway.
I'm about a month into the build so far and quite enjoying it....mostly.
3 December 2024, 11:44
We know you would enjoy this - and we enjoy too... Plus: if you are going to turn the Scarab into a wrecker / recovery vehicle (!!!)... extra joy. Very Gorby-esque work! 👍 👍
3 December 2024, 11:52
"Would you like some parts with that Flash sir" 😂
I know you will pull a great job out of it Gorby 😀👍
3 December 2024, 19:09
Following this masochistic exercise 😄
The tow truck you fell in love with, was it used to tow Reliant Robins?
3 December 2024, 19:19
Good grief, I appear to have attracted a crowd. 😳
I didn't realise the Robin was globally infamous. That would be a great idea Jan if I can find a cheapish 1/76 one. 😄
Thanks all for taking an interest. 🙂
4 December 2024, 08:05
Taking a seat. The nasties the kit, the more Gorby likes it… I'll forgo spelling out the logical conclusion from this. 😄 😄 😄
4 December 2024, 15:22
😄 😄 😄
Welcome to the show Alec. I have some nice kits in my mini stash, for some reason they keep being overlooked. Maybe I choose kits which make scratch-building feel like an easier option. 😄
4 December 2024, 15:29
Thanks mates....as usual I'm playing catch-up with the build report.
(I'll let you into a secret. I don't start the report until I have a very good idea that things might work out. If I'd completely screwed up - you'd never know about it.) 😳
4 December 2024, 18:45
🤣🤣 prevention better than cure 😜
Where about in the UK were they produced ?
I vaguely remember the 3 wheel electric milk floats as a kid.
4 December 2024, 19:36
I think they were built at Scammell Lorries Ltd in Watford.
In fact there is now a road in the area called Scammell Way.
Typical of Britain, close the factory and name a new road after it to remind us that we used to actually make stuff. 🙁
4 December 2024, 19:44
Your 'secret' is a good idea: start a build report lately not only shows a success, but also makes the build look quick! Must copy this idea 😉
5 December 2024, 09:30
😄
The one down side is that as I only do one project at a time it looks like I'm doing bugger all for about a month. 😄
5 December 2024, 09:35
Gorby, I follow the same strategy with build reports. Trouble is, I eventually catch up and then snail-pace it to the finish…
5 December 2024, 13:57
Nice to see this kit. Build the Scammel Scarab as a youngster from Airfix. And looking at the sprues I would say these are from the the former Airfix kit.
Have fun building it 😉
13 December 2024, 12:28
Great progress and entertaining narrative 🙂. The trailer wheels turned out nice, I can't imagine making something like that. Just curious: why not make one and cast a copy (I think you have done that in the past)? Or does this have to do with that logical thing…
13 December 2024, 13:59
Thanks for the comment mates. 🙂
Lex: Yes this is from the old Airfix kit. Quite enjoying the build so far - although that's probably because most of the build is scratch work. 😄
Alec: Typically the trailer wheels look like a different size to the other wheels in the kit which is why I had to cobble something together rather than cast them. I've been meaning to try and scratch wheels for a while so it was also a bit of an experiment. Hopefully future ones will be better.
1 13 December 2024, 15:28
Love the subject and the build. Not really knowing what I'm talking about I'd say it's as british as british can be
13 December 2024, 15:50
Thanks Michael. You're quite right, they are as quirkily British as it's possible to be and unlike most quirky British vehicles these were a actually successful. 🙂
13 December 2024, 16:00
Like what you have done so far, good thinking on utilising items , l always look at a item before l throw it away to see if it could be useful.
My fire extinguisher handle was just offcuts laying in my scrap tub., ps it finished now will photo tomorrow.
Your right...a MC Donald's or frozen pizza box would be bit out of place 🤣 Fire ash, tin cans, spud peel n bit of dog poo most likely 😄.
Quite rewarding the scratch build l imagine.
Looking good 👍👍
13 December 2024, 20:01
Looks like I'm a bit late to the party, but pulling up a chair way in the back to follow along 🤣 looks like a fun little project
13 December 2024, 21:09
Thanks mates. 🙂
I have to fight against an inherited hoarding gene, so it's a bit of a fine line I have to walk with saving odd and sods for scratching.
At the moment it's very enjoyable project. It's helping to keep my grey matter from seizing up completely, working out how to make something from a pile of bits.
1 14 December 2024, 07:43
I am pulling up a seat. I can't wait to see what you do with the scratch building of an I beam.
15 December 2024, 05:33
Really creative way to make rubbish. Im honestly surprised at how well you can DIY and scratch stuff, top notch stuff. Either way the progress is nice.
Also if you don't mind me asking, what operation did your missus go through? Having to administer blood thinners sounds pretty serious.
22 December 2024, 16:00
Thanks Kesa. 🙂
Mrs Gorby had a hip replacement op. Normally she'd just need medication for the blood thinning but fortunately for my scratch-building junk pile, they thought injections would be better.
Okay, that makes me sound like a bad person. 😄
1 22 December 2024, 16:19
Gotta agree with shadowlight. Your not a bad person 🙂. This reminds me of a quote from one of my favourite games: "I'm not an angel, but when you see Trevor your gonna swear I am one." Except It's "I'm not an angel, but when you see Kesa your gonna swear I am one." 😄
2 22 December 2024, 16:58
@ Kesa
GTA-5 by any chance Kesa ??
Interesting build this one ... good to follow.
Did you have any 3wheel vehicles in your part of the world ?
👍😄
2 23 December 2024, 00:36
I like the exhaust (yeah i know, a half assed comment) but good god I have never seen a more perfect card... ever.... Truly a masterpiece gifted to us from the scratch building god 😄
1 26 December 2024, 14:43
Progress has been slow. I have a problem with Seasonal Affective Disorder (SAD) so everything slows down including brain and enthusiasm. Particularly enthusiasm. It's the part of the year I have more difficulty working out how to make parts and usually the first or second attempts end in disaster before something passable emerges.
Perhaps I should drum into myself "Must do KITS in the winter…. Must do KITS in the winter..."
1 3 January, 15:33
Thanks Jennifer. 👍
It almost certainly isn't accurate but I won't be loosing any sleep over it. 🙂
4 January, 12:04
Luckily this dusty work in between didn't kill you (even if the mask looks like it tried hard), so now we see new marvellous scratch work 👍
15 January, 16:16
Thanks Robert and Frank. 🙂
It was quite a good mask Frank, it's now black on the outside but completely white inside. Mind you my entire workshop* is completely covered in a fine black dust which I haven't had the enthusiasm to clean up yet. Maybe tomorrow.....or the day after. 😄
* I call my workshop 'The Hutch'. I'm a veggie, which means I eat rabbit food, therefor.... 🙂
15 January, 16:28
Learning a tonne about scratch work, thanks for all the details. Everything looks amazing.
15 January, 23:05
Wow, impressive scratchbuilding. I love it. Nice to see you do something useful once in a while… 😂😂😂
1 16 January, 03:56
Thanks very much everyone for your nice comments.
I must admit that this part of the build was more irritating than enjoyable, although having said that it was certainly preferable to 'Useful work'. 🙂
1 16 January, 07:52
Thought I'd pop n see how Gorby is getting on with his scratch building 👀.
Very nice... Great job on the Jib 👏 very skillful to pull this build off the way you have.
Pleasure to follow 😀👍
1 24 January, 21:38
After the labour of love you did for your daughter, which of course isn't a chore being the loving dad you are, it's back to the salt mines to get some real hard work done 😀
That's some great scratch building on the jib, and the
Scammell is really looking the part.
1 24 January, 22:02
Thanks mates. 🙂
Hopefully there should be another update in the next couple of days.
25 January, 07:25
It's great what's being created again - the kit base seems to be a challenge.
Good succeed!
1 25 January, 09:13
Thanks Marko.
Of the two builds, I'm finding the kit conversion (the Scarab) to be more of a challenge than the full scratch-build (The Mechanical Horse & trailer) which isn't what I was expecting at all.
25 January, 09:29
Still progressing slooooowly. These tiny 1/76 bits seem to take longer to make than they do in larger scales. 1/48 feels huge in comparison and 1/35 would probably blow my mind.
This update means the Mechanical Horse is now complete, yaaaaaayyyy. 🙂
Eeeerm, except the tiresome colouring-in bit of course. 🙁
2 26 January, 11:49
I had a brush very similar to that one.Had it for twenty years,changed the head a few times and the handle thrice.LOL.
1 26 January, 13:05
gorby, your pic 73 reminds me an old joke:
A drunk man comes home and his wife is waiting for him with a broom. He asks her: "Do you want to clean or are you going to fly off again?"
Nice scratch work again 👍
1 26 January, 13:37
This is simply the master-class scratch work tutorial. Chapeau bas!
1 26 January, 13:53
True about the binmen, pick a metal bin off the floor to their back, everything was in it. No recycling back then. By the way that's a rather fetching brush ( Erm, Boom, Boom)
1 27 January, 11:52
Gets better every time 👏, the old bin wagon used to have a storage bucket on the side... remember they had brooms n couple shovels...for when the stuff fell everywhere,
I remember they used to come round the back of the house open the gate "which they never closed" and Cary the old black rubber type bin on there back, they used to hopp on the side of the wagon between streets " Before Health n safety 🤣" most bin-men were on the sick with bad backs before 50.
Remember the heavy rubber lids that said "No Hot Ashes"
No faffing getting it built 🤣 famous word's.
Great work so far 😀👍
27 January, 21:19
A funny thing happened to me the other day, this duck said. . . . . . . . . . . . .
28 January, 05:32
Thanks very much for your comments mates. 🙂
Mr D: I'm old enough to remember the predecessor to the black plastic bins, the galvanised steel ones – the ones which rusted and sometimes when they were picked up the bottom fell out. Thankfully they were replaced before I started to work nights because bin day used to be a very noisy business. 😄
Thanks to everyone again. 👍
2 28 January, 06:27
Such an interesting subject. I'm enjoying both your writing *and* watching the build. 🙂
1 28 January, 13:25
I was just about to write the same, love the humorous comments to the updates Gorby
1 28 January, 13:35
Aye aye, I think Gorby may have missed his true calling 😉
I love the garbage collection nostalgia. I got the feel for the British variety from Mr. Bean. 😄
28 January, 22:44
@Alec K. Try the Dustbinmen, you can get episode's on You Tube. A late sixties, early-ish seventies sit com. The cart was nicknamed Thunderbird 3. I think it was written by Jack Rosenthal , which I think he wrote London's Burning too.
1 29 January, 05:31
Hmmm... what iis this? Strange, unusual, I like it. Will have to check it out.
29 January, 05:36
Thanks for the nice comments mates.
Alec: When I left school in the late 70's there wasn't much call for someone who talked rubbish in Coventry. The politicians were mostly in London. 😄
Mark: I've never head of that programme.
Bas: welcome to the oddness. 🙂
1 29 January, 06:16
Gorby: Based in Manchester cast of characters included Heavy Breathing, Cheese and Egg, Winston and Eric. Cheese and egg was the gaffer of No.3 Gang, Heavy Breathing the lothario, Winston fervent Man City fan and Eric who was Welsh.
1 29 January, 08:52
😄 😄 😄
Oh, dear I'm not sure I can keep up the same standard of utter drivel. 😄
1 29 January, 16:53
Two buttons and a milk token , surely a man of affluence. Very nice scratch building Gorby.
1 2 February, 19:24
Apart from the amazing scratch building going on, i think the commentary near takes the cake, i check in every day for further updates and have a really good chuckle after work..really brightens my day, thanks @gorby!
1 3 February, 06:03
😄 😄 😄
Thanks all. I think my button business might struggle with two buttons per hour. Mind you, they're hand-made….Etsy here I come. 🙂
Michael: I can't guarantee the quality of my prattling but it's nice to hear my own flavour of odd is appreciated. Also, I like your little furry friend (No that ISN'T a euphemism 😄 ).
Although progress has been slow there was a bit of a boost yesterday and I'm hoping that something (hopefully not the kitchen) will get painted by next weekend. 😮
Now that's jinxed it hasn't it.
2 3 February, 08:07
A Wheely good job 🫣 , They would say it was a visual obstruction now days.
Keeping to the photos nicely 👍
2 3 February, 15:24
I'm slowly getting the the finish line. Someone pointed out this nice video about the Scarab which shows what a game changer it was (why does everything on YouTube have to claim it's a 'GAME CHANGER!!!!!' and when you watch it seems they've only found the cure for insomnia.).
Youtube Video

1 6 February, 16:28
These details you've made from scratch are simply unbelievably awesome... I suppose I should buy the same glasses (photo #99 😉
1 6 February, 17:25
Nice magnifiers! I have been using an optivisior in conjunction with 3+ magnification readers for years. The trick is not to let anyone see you wearing that. What magnification is that Amazon find you are sporting?
1 6 February, 17:58
Watching in awe, yet again. Really enjoying the ride Gorby 😀
Oh, and warm beer is an awful nightmare to us savage continentals 🍻
1 6 February, 18:14
It isn't the first time I've used magnifying glasses but these are a GAME CHANGER!!! 😄
Alec: I usually use the 3X magnification although these do go up to 5X – which may take some getting used to as it's like being drunk without any of the pleasure. 🙂
Jan: Obviously non Brits have to chill their beer to hide the flavour. 😉
Thanks all for taking the time to comment mates. 👍
3 6 February, 18:46
I went to Zenni optical website and got on the online chat. Told the person I wanted glasses with my short distance correction for doing close up intricate work with +2 magnification. He helped me adjust my prescription to this and they made me a set for $35 that are an amazing help.
2 6 February, 19:15
that seems a great idea Ben. gorby, those details are truly stunning.....
1 6 February, 22:52
Thanks mates. 🙂
Ben: The new eyes cost me £35. The built in LED light is a revelation as much as the better vision. The old mag glasses had a light but the extra batteries made it too heavy and very uncomfortable to wear so I didn't put batteries in it. The new one has a rechargeable battery built in which make it much more comfortable. Which is just as well as I need it for about 90% of my modelling now.
7 February, 07:48
Sorry about my tardiness in updating this album, blame my daughter. I keep telling her I've retired and should be leading a life of leisure but that apparently means nothing to daughters. I can't hold her entirely to account as I've been pruning a tree this morning. I can be a bit, errm, lets say "vigorous" when it comes to pruning. The trees probably think of it more as a near-death experience 😳 . Is attempted arborecide a thing?
Aaaannnnyyyway, the fun is over. Now it's time to suffer. Yes I've arrived at the colouring-in bit where I traditionally snatch defeat from the jaws of victory. 🙁
3 22 February, 16:24
Great job on the colouring and marking Gorby.
The captions to the pictures make it an even more enjoyable experience 😄
1 22 February, 16:42
No need to apologize, dear Gorby, the Feb 22 update was something worthy for us in the gallery to wait for... 👍 👍
22 February, 16:56
I think Mrs Gorby wouldn't be impressed if I sent our daughter to a different continent so I could spend more time playing with plastic. Might be worth considering though. 😄
Thanks very much for taking the time to comment Alex and Mark. 🙂
1 22 February, 18:04
Great scratch-conversions with this old Scammell Sacrab kit. Impressive work.👍
22 February, 22:33
You're welcome, she did it under her own volition (I think the smell of lacquer thinners drove her) a nice outcome on your Scammels too, brought back some memories of when I were a lad.
1 23 February, 10:23
Looks great.... should be very proud 👍 you put a lot of work in and created something very unique... Great model work 😁👍
1 23 February, 21:17
Fun to follow, fun to read, fun to watch. I dare say: the jaws of victory are still open...
5 24 February, 12:27
That level of MICROSCOPIC scratch building is OBSCENE! I'm always at awe of your projects (including the roller of death)!
1 26 February, 21:31

A couple of months ago Jan said something and it's taken me this long to think it though. Thinking isn't a natural state for me, when it happens the neighbours complain about the noise. The idea for the perfect extra vehicle jumped into my head in the early hours of the morning. This project is invading my dreams! 😮
I'll let you try and work out what it is as I take you though the build. A clue: Most people in Britland would have seen these on the roads, but not one of us wanted one.
1 2 March, 16:13
Great job on the car of your dreams Gorby, love the Robin, the car only the British would build.
You keep amazing me with your scratch building marvels, and I thoroughly enjoyed the comments 😄
2 March, 16:23
Thanks Jan, and thanks for the idea which I sort of took and twisted a little ( incidentally, it isn't a Robin 😉 ).
1 2 March, 16:34
Now, after reading your funny captions for a long time, I'm up to date again. For a non-native English speaker it was sometimes difficult to understand, but thanks to the great help from DeepL I was able to giggle a few times 🙂
At first I thought, and you would definitely be able to do this, that you were folding a Trabant (that iconic East German vehicle) out of cardboard true to the original!
2 March, 16:45
Ah, I just found out it is an AC invacar, never heard of outside of the British isles I think? 🤔 Still, great scratch building!!
2 March, 16:48
That Invacar of yours is a masterpiece of scratchbuilding, Gorby! I am astonished!
2 March, 17:12
Thanks all for your nice comments.
Jan: These monstrosities were very common and infamous on the roads here in Britain particularly in the 1970's.
Sorry Frank, I am prone to quite a lot of antiquated Britishisms. I like to keep them alive well beyond their expiry date. 😉 I think the Trabant would sue if it knew you were likening it to the Invacar. 😄
Thanks again mates. 🙂
1 2 March, 17:26
Unbelievable... You turn for just a bit your attention away from the Scammel brothers... and Gorby appears out of the blue with a finished scratched 1:72/1:76 Invacar...!!! You are on fire, mate! 👍 👍
1 2 March, 17:42
Thanks very much Alex.
Maybe it's just that I have difficulty focusing on one subject. 😄
2 2 March, 18:06
I can't believe you scratch built everything in this album. I have never heard of an Invacar before today, but now I feel like I know them.
2 March, 22:04
Thanks Jennifer I'm glad you like it/them. Don't forget I can't claim credit for the Scarab cab as that was the basic kit which started all this nonsense. 🙂
Incidentally there were quite a few different types of Invacar based on a similar design. This is the one I was mostly aware of in the 1970's 80's.
3 March, 08:03
Hi Gorby the Invacar looks 👍 great .....l remember them parked outside the P.O on a Monday morning.... Motorcycle handlebar,s , they did a great job holding up the traffic 🤣.
Like the gorilla glue headlights ..... good little technique 👍
Nice your keeping the memories alive 😃👍
3 March, 16:11
I want to live in an alternate universe where this actually released, there aren’t enough 1/144 raptors out there
")
3 March, 16:09
a adăugat un nou photoalbum.
10 imagini
Airfix Curtiss Hawk 81-A-2 2011 tool 
1:72


Proiect: Airfix Curtiss Hawk 81-A-2 2011 tool

13 26 January, 19:34
This is the first of two Hawks that I will be building, this is the 81-A-2 as flown by the Flying Tigers by US volunteers in China. 🙂
1 26 January, 19:37
Made a start on this aircraft, the interior colour is Vallejo Model Air US Interior Yellow. 🙂
Welcome CaptGPF & Thomas, great to have you along. 👍
Many thanks mates for your interest and likes J35J, Jean, Duster_d & Jun Chung. 👍
16 February, 16:30
Main part of the fuselage put together and wing tops added to the bottom. 🙂
Many thanks mate for your interest and like Franck G. 👍
18 February, 15:58
Wings and cockpit added to fuselage. 🙂
Welcome Dave & J35J, you're both extremely welcome. 👍
Many thanks mate for your interest and like Franck G. 👍
19 February, 15:23
Tail, engine covering etc. added. Next will be primer and pre-shading. 🙂
Many thanks mates for your interest and likes Matti T & 2 other mates. 👍
20 February, 16:22
Looks great 👍 Which colour have you used for the interior? Looks remarkably spot-on for what I've read/seen described as „Curtiss Interior Green".
1 20 February, 19:56
Light grey primer added and then a bit of pre-shading. 🙂
Thanks for the kind comment Kenneth, the colour used is Vallejo Model Air US Interior Yellow. 👍
Many thanks mate for your interest and like Kenneth. 👍
1 22 February, 16:20
Upper side first camouflage colour painted Vallejo Model Air USAF Brown ANA 628. 🙂
Many thanks mate for your interest and like Zbynek H. 👍
26 February, 16:43
I am in, have started yesterday the same plane but from Trumpeter. 😉 Have a look!
27 February, 15:59
Camouflage green added, 2:1 Vallejo Model Air USAF Green ANA 612 & Vallejo Model Air US Forest Green ANA 631. 🙂
Thanks for the kind comment Thomas. 👍
Welcome along for the ride Edward. 👍
Many thanks mates for your interest and likes Edward Mc & 1 other mate. 👍
1 2 March, 16:02
Decals now on. Panel lines to be done with a wash and then matt varnish to be applied. 🙂
Many thanks mate for your interest and like Rui R. 👍
3 March, 16:06
a adăugat un nou photoalbum.


13 26 January, 19:38
This is the second of 2 Hawks that I will be building, this is a P-40B flown during the Pearl Harbour (Hawaii) attack by the Japanese. 🙂
26 January, 19:41
Made a start on the aircraft. The internal colour is Vallejo Model Air US Light Green. 🙂
Many thanks mates for your interest and likes Martin W & Lukasz G. 👍
16 February, 16:35
Main part of the fuselage put together and wing tops added to the bottom. 🙂
Welcome J35J, and thanks for your comment! 👍
Many thanks mates for your interest and likes J35J, Tibor S, Franck G & 1 other mate. 👍
18 February, 15:55
Wings added to fuselage, next will be the tail plane. 🙂
Welcome Dave and thanks for your interest. 👍
Many thanks mate for your interest and like Robert B. 👍
19 February, 15:19
Tail, engine covering etc. added. Next will be primer and pre-shading. 🙂
Many thanks mates for your interest and likes Darin S, Matti T & 1 other mate. 👍
20 February, 16:17
Upper side painted Vallejo Model Air US Olive Drab. 🙂
Many thanks mate for your interest and like Zbynek H. 👍
26 February, 16:40
Decals now on. Panel lines to be done and then matt varnish. 🙂
Many thanks mate for your interest and like Patryk S. 👍
3 March, 16:02
a adăugat un nou photoalbum.
16 imagini
Mig-23 Gate Guard at Technikmuseum Sinsheim
1:72
A former GDR Mig-23 as gate guard of the Technikmuseum Sinsheim. That´s what I am aiming at.


16 28 February, 17:35
Ooh! This is a cool idea! Very curious how this will turn out. Definitely joining in! 🙂
28 February, 19:44
Nice project! I remember that bird from our visit (that triggers me to start plastic models) years ago too. I was impressed that you could see the bolts of the pivoting wings from the outside - and that they looked like new, unlike the rest. Titanium?
I hope you have enough pictures, a picture search found some.
1 March, 00:42
I'm in. I grew up between Sinsheim and the partnermuseum in Speyer. So we visited one of the museums about every second month.
1 March, 09:55
Hi mates. Nice to have you on board.
Jep Frank, I think I do have enough pics as I shot a series with this project already in my mind.
It is indeed a very nice museum tour to visit Sinsheim and Speyer together.
1 1 March, 12:41
a adăugat un nou photoalbum.
40 imagini
Mi-8MT build log
1:48
X-22 Clear and afterwards added all the decals on the fuselage.


Proiect: Mi-8MT


 4+
4+ 44 15 December 2024, 17:39
Welcome my friends, I'm doing my best, the kit is very complex and so far things worked well.
1 12 January, 19:12
Nice project 👍 your doing a good job, there an impressive model when built....lve watched few videos on the ....as l have the 1/72 version to build soon.
Good luck with it 😃👍
1 17 January, 19:36
Thank you, everyone, for the kind words and encouragement! 🙂
@Michael Kohl – Appreciate the support! 😊
@Mr D – Thanks a lot! The 1/72 version sounds like a great build; I'm sure it'll look fantastic when you get started, best of luck with yours as well! Please share updates, would love to see how it turns out. 👍
2 17 January, 23:23
Thanks Starfish, I'm adding magnets to them as well so I can play around with the loadout 🙂 Welcome Guy and Gerald!
2 20 January, 20:07
Great project, coming along nicely.... Now don't spray out your pre-shading like l did on my SU-30 🙄🤣.
Nice work 👍👍
1 18 February, 18:55
Thanks gents!
Mr D's comment really made me pay attention to the pre-shading on the second layer, kudos to him. That made me think of a solution to keep the pre-shading so I ended up with this solution. Will keep the build updated, my target is to finish it by Sunday 🙂
3 27 February, 18:04
That worked out 👍👍 Great, Nice build....it's really going to benefit from the shading you pulled off here.
Enjoying following as it will help when l start my 1:72 version.
😃👍
2 27 February, 19:31
I really like this phase of painting! Seeing the seams disappear and the strength of the kit being revealed!
3 27 February, 22:33
Wanted to finish the Mi-8 by today, but there are always plenty of details that pop-up and require attention. Anyway since it's close to completion, I decided to spend more time and do it in a relaxed fashion. Thanks Mr.D and Marlin. @Mr. D I want to build another Mi-8 on the Russian Blue-Gray camouflage, I think it looks awesome with the simple scheme as well: MRP-398 Gray Blue - Russian ..4,26,28,35 & Ka-52, MR.Paint Satin, Acrylic Lacquer, 30ml
2 2 March, 21:37
The double pre-shading did help indeed - looks really good already! 👍
Waiting for the wash and weathering!
3 2 March, 22:33
It's always a good idea to take a little more time and see what it can become! Cheers!
3 3 March, 04:24
Top job on the paint, Zvezda do a nice Mi8 kit, Enjoy following this build 👍👍
The blue/Grey be nice 👍 build
3 March, 15:57
a adăugat un nou photoalbum.


188 30 March 2024, 15:44
So, schnell ein Glas guten Wein holen und dann nehme ich gerne Platz.
2 April 2024, 19:48
You are welcome. As usual a lot of first rows free! Popcorn for all! 🙂
3 April 2024, 05:00
What a combination: a great new kit, nice accessories and finally a master modeller at the tools - EPIC !
10 April 2024, 16:20
Thank you JAM-SCREW.
Btw: just I saw you actual portfolio of sets for the Seaking! SCM Brand: JAM-SCREW
Absolutely remarkable!! I'm looking forward especially for the landing gear and main rotor hub. 🙂
12 April 2024, 05:52
Just look at that winchframe !!! There is absolutely no doubt that after plugging these plugs the winch will be working. As with all your builds, for the watchers the path is the destination.
Wonderful wip pics - keep'em coming…… 🙂 👍
18 April 2024, 05:02
Rapid progress sir! Very impressive attention to even very fine details for accuracy. Thank you for the updates and images.
22 April 2024, 17:06
Michael ureol is A kind of foamed plastic. It comes in different degrees of foaming. The more foamed, the softer and lighter.
29 April 2024, 09:32
Hallo sieht genial aus.
wo bekommt man sowas ? habe auch schon versucht sowas zu finden.
29 April 2024, 09:39
Ah, that explaines as well the nice texture the cushions have. Thanks for the info.
And - by the way - as always a pleasure to follow your delicate modelling.
29 April 2024, 10:43
Your are welcome.
Robert: vor paar Jahren habe ich von einem Modellbaubekannten Reste zum probieren gekriegt. Daher musste ich erst mal schauen, wo man das kriegt: eBay hier und da so wie bei Modulor in Berlin.
29 April 2024, 13:08
Great looking detail you are adding, Berhard! Those seat cushions are fantastic.
29 April 2024, 13:27
Vergiss nicht, einen Kasten Bier bereitzustellen, wenn du die bordtoilette nutzt 😉
29 April 2024, 17:47
Thanks for comments and praise.I would like to share the praise with the excellent photographers (TN and BD). Ä Only such photos as from TN and BD make it possible.🙂
2 May 2024, 16:10
It was probably difficult to wire all the little rotary switches on the back. I assume that they all work!
8 May 2024, 09:42
Just absolutely fantastic Bernhard, I dont think everyone will appreciate just how difficult all those details you have added are to do. you have achieved what I only dreamed of achieving. I am lost for words with these details. Stunningly beautiful work.
8 May 2024, 09:45
Thank you David, bughunter and Dan for you very motivating comments🙂. The Seaking is meanwhile my favorite helicopter. It was great to see one of them flying over the beach in Boltenhagen: we went on vacation there last year.🙂🙂
8 May 2024, 15:13
I am impressed not only by your skills, Bernard, but also that you are not over-whelmed by the many, many fine details that you are taking on. RESPECT 🙂
8 May 2024, 16:25
Last monday I had the chance to take a very close look on all these masterpiece subassemblies in person - an all new level of depth in detail, even by Bernhard's standards !
These oxygen bottles look as if they were very closely related to 500 pound bombs….. ? 🙂
18 May 2024, 20:01
I'm happy that you like my bottles... 🙂. In fact, I have often used bombs as a basis for various parts. 🙂 This time, however, it is a sprue with a diameter of 4 mm.
19 May 2024, 06:17
The level of detail is mad. amongst the best scratch-building I have ever seen on Scalemates.
26 May 2024, 14:27
Excellent progress. I like how in Germany, when helicopter model parts get mailed, one just has to write "Bernhard" on the box and it gets delivered to the right person… 😉 😄
27 May 2024, 12:21
I'm out of superlatives ! What can one say - you are constantly exceeding your own standards with this build, and that really says something !
Deeply stunned and impressed by your R.O. workstation !
27 May 2024, 18:33
Well, first test is passed - package arrived. Second test passed looks in good condition. 😋. Now is the real test. How does the builder feel about the parts and are they suitable for this unbelievably excellent project.... time will tell.🍻
28 May 2024, 07:02
JAM-SCREW.How big is your production facilities,you might need bigger premises as your products look great albeit in the hands of a master modeller.
28 May 2024, 14:28
Wow, again every little sub-assembly is a fine model on it's own - fantastic 👍
30 May 2024, 14:44
Thx for you feedback 🙂🙂
The entire interior is lined with upholstery, which is primarily used for noise-insulation. Until yesterday, I broke my head because I didn't know how to repicate it… After a conversation with a mate (thx Hanno), the brilliant idea came to me: Fimo clay.
The material can be processed excellently and is solid in the oven after 30 minutes at 130°. The most important thing is that it does not become bone-hard but left elastic and can even be sanded.
1 June 2024, 08:20
150 pics and you didn't even close the fuselage. And not a second of dullness. Finest modelling entertainment. 🙂
4 June 2024, 17:09
This morning I was curious and unpacked the chassis of Jam-Screw. As already written, the quality is outstanding. But everything is so filigree that you have to be very careful and not to break anything when handling. I had to improvise a bit here and there. In the end, I was finished after 2 hours. Including preparation for laying the cables.
8 June 2024, 18:37
Der Baufortschritt ist echt sehenswert und beeindruckend Bernhard. Die Bilder vom Innenraum von Dir und Thomas sind toll! Es gibt leider sehr wenig Bilder vom Original und sind eine tolle Vorlage. Vielleicht macht ihr nen extra Walkaround hier. Ich freue mich schon auf die nächsten Bilder.
9 June 2024, 15:13
Danke fürs Lob Tom. 🙂. Dank der hervorragenden Innenraum-Fotos macht es wirklich sehr viel Freude herumzupuzzeln. Mein Seaking Projekt hat, könnte man sagen, eine „kritische Masse" erreicht. Dank diversen Kontakten zu Hubschrauber-Spezialisten, und ehemaligem Wart und nunmehr der Connection zur Jam-Screw habe ich die Möglichkeit offene Fragen auch dort zu klären. Für seine CAD files hat JS / Andy und seine Leute hunderte von Fotos geschossen, zu den ein normaler Sterblicher keinen Zugang hat.
Deinen Vorschlag werde ich an Thomas weiterleiten. Deine Idee ist sehr gut.🙂
1 10 June 2024, 08:18
Wahnsinn was du da reingesteckt hast allein die Instrumente und Sitze sind schon ne Show
17 June 2024, 07:25
Thank you for the big praise. I am very happy to have such a large number of fans of this WIP.🙂🙂
Dietmar: nur dank der Unterstützung von einer Handvoll von Mk-41 Fans ist es mir möglich so tief in die Materie einzutauchen.
Übrigens: Ganz am Anfang wollte ich die Türen offen lassen und nur ein „bisschen" im Inneren tun. Aber als ich die Fotos von Thomas betrachtet habe, bin ich „getürmt und hab mich auf dem Boden versteckt". Irgendwann habe ich jedoch den „Zustand der inneren Ruhe" (die Phase wenn ich kein Problem mehr damit habe mich z.B. mit einem Rucksack aus Fimo eine halbe Stunde zu beschäftigen)🙂🙂 und betrachte es inzwischen als eine Herausforderung, wieviel ich von dem Zeug nachbauen kann.
17 June 2024, 18:24
Very exciting to see what can be achieved with even a very good kit. Commitment and patience wonderful recipe for outstanding success. A pleasure to go along for this journey.
18 June 2024, 08:41
Impressive labels! Is your "normal printer" a InkJet or a Laser printer?
18 June 2024, 17:43
Thank you for your unique and supportive comments !🙂🙂
It's a usual business copymashine/printer in tower design, Minolta serie 7.
18 June 2024, 18:03
The interior is a delight to the eye, for sure. Inspirational modelling🙂
18 June 2024, 18:28
🙂🙂.
The last big point for interior components is completed: rack for electronic equipment & foldable seat.
26 June 2024, 12:27
God God! I'm just amazed how much scratch built detail you put into this build with each passing day!
30 June 2024, 02:56
A waterproof green rubber mat is laid on the cabin floor of the SeaKings of the German Navy. However, not under the equipment rack and not in the area of the „shower cabin" (radaroperator workstation). There, the rubber mat was left out, shortened and folded upwards.
At the points of the mountingpoints and other hatches, access covers (probably also made of rubber) are incorporated into the rubber mat.
30 June 2024, 12:13
i really love the details of the rack for electronic equipment & foldable seat.
30 June 2024, 19:07
The lecture continues ! Altough it's a pity to partially hide all these wonderful details in the closing halves, I'm curious !
5 July 2024, 08:12
After completing the engine housing I begun today detailing the bottom.
Just as on the fuselage sides, the equipment on the bottom of the Mk41 is different from the british variants.
10 July 2024, 17:18
The level of detailing on this thing is simply too notch. Number of bits you have added must be in the thousands! Masterclass 👍 👍👍
14 July 2024, 12:40
Einfach nur Geil.....hast du jede Niete nachgezählt, Bernhard 👍
Liebe solche Modellbauer da komme ich nicht mit
15 July 2024, 11:19
Holy smokes, this is escalating everytime I'm checking the progress here !
The Airfix-guys must be crying for their mama by now…….😄
15 July 2024, 18:20
Sehr schöner Innenraum. Ich liebe deine medizinischen Hilfsmittel. Bin selber im Thema drin und kann keinen Unterschied zu den realen Maschinen feststellen. Echt gute Arbeit!
20 July 2024, 16:58
Thank you for the last wave of such nice comments. I have the last big hurdle to taken: installing clear parts for the cockpit without mess.
Qwertzel: freut mich, dass dir mein Medizin-Equipment gefällt. Du hast erwähnt, dass du selbst sehr dicht dran bist. Hab gesehen dass du auch einen Rettungs Quirl im Bau hast bzw. Eine ganze Menge von Feuerwehrfahrzeugen. Bist du selbst auch im Einsatz? LG B
20 July 2024, 18:26
Ja, kann man so sagen. Bin seit mehreren Jahren bei der freiwilligen Feuerwehr, bei den Maltesern und beim DRK im Sanitätsdienst und Katastrophenschutz. Ab einem gewissen Punkt ist das ganze Rettungswesen eher eine Lebenseinstellung, anstelle eines Hobbys
20 July 2024, 20:23
… and they are in place, flawlessly installed. I admire your precision, truly excellent 👍
27 July 2024, 13:22
Thank you Alec: Your comment honors me very much.
Today morning I worked on the nose, installed several parts of SeMa Models And finally the „thing" looks like a Mk41. 🙂
28 July 2024, 11:23
I look at the photos and marvel at the precision and modeling skill. Fantastic, Bernhard! 👏👏👏
30 July 2024, 09:38
Incredibly realistic look and extraterrestrial cleanliness in paintjob and especially masking the clearparts, exemplary !
30 July 2024, 20:29
Looks amazing! Beautiful results on that glass, I bet that felt good to remove and see the results. 👍
30 July 2024, 23:50
I have hardly any experience with 3D printed parts, especially concerning the flexibility. The material used by Jam-Screw is quite brittle. Therefore, I decided to disconnect the axles and insert a wire. This also has the advantage that you can align the wheels precisely afterwards, especially because they are flattened.
10 August 2024, 16:11
Thank you mates. 🙂
Result of a modeling mini task: DIY FOD covers.
I wanted to be very „smart" and install the exhaust pipes from the outside after painting. I overlooked that the opening in the fuselage is much smaller than the „hidden" end. Therefore, I had to improvise: I sawed off the outer end and inserted them obliquely from the outside.
17 August 2024, 17:33
I just can't get over the sharpness of the color separations. Absolutely straight, no ragged sections. Superb.
17 August 2024, 21:35
🙂 🙂
As usual I installed the door without glueing via 2 x piece of 0,26 mm wire. I drilled 2 holes (0,24 mm) from outside through the door into the fuselage.
Who can find the two places? 🙂
18 August 2024, 10:36
Today I finished one of the last complex parts for the fuselage. The whippers. What do you think: how many individual parts does a windscreen wiper consist of? 🙂
22 August 2024, 15:49
You missed the wiper mechanism spring 😄
Joking, I have no idea how you manage to cut and drill such microparts.
22 August 2024, 18:56
Just been looking at your wipers in awe (not a phrase I thought I'm be using this morning). Stunning work!
23 August 2024, 07:21
On going master work on a masterpiece. Fantastic in all respects mate.
23 August 2024, 07:31
Fully-functioning wipers? Too much for my brain to comprehend...... Amazing, Bernhard, amazing...!
23 August 2024, 14:38
Never before have I completed a tailrotor in this quality in such a short time! Thanks to Jam Screw!!!🙂🙂🙂 Compared to the original, all this is great: even the kink at the back edge of the blades is reproduced correctly.
25 August 2024, 11:53
Your spectacular build and pic 255 makes me wanna build one german SAR Seaking too.
1 September 2024, 05:14
I'm glad I was able to inspire you for this machine. By the way, I was lucky/opportune to see the 89 + 63 and 83 + 58 live on Friday at the very last statics display in Nordholz. Hence the photos: in bright sunshine! All spotters were really lucky!🙂🙂
1 September 2024, 08:06
Oh yes, great pictures of the original - I really like the "stressed skin effect"!
And I learned recently during my visit in Oberursel museum (reported that on SM) how the filter works, which you show in pic260.
Fantastic modeling show here 👍
1 September 2024, 11:55
WOW, all out on the details, Dont think i have ever seen a more acurately detailed model before. Think this is a price winner. Very beautifull.
1 September 2024, 12:06
This is very impressive. Can you give a tutorial on how you achieved the stressed skin effect?
1 September 2024, 15:57
Schön, dass Du noch das Vorbild in echt sehen konntest! Ein toller Moment, den man nicht so schnell vergisst. Ich hoffe, Du hast noch genug Fotos gemacht hast! Wäre cool gewesen das fertige Modell neben das Original zu stellen. Weißt Du was aus 89+63 wird?
1 September 2024, 19:08
KyMustang: the Seaking - Kit of Airfix is on of few witch offers stressed skin.
Tom: in der Tat, das war das Ereignis des Monats! Wie bereits schon geschrieben, habe ich das große Glück, Mitglied einer WhatsApp-Seaking-Taskforce 🙂 zu sein. Felix und Thomas waren gestern bei dem VIP Termin dabei und haben ihre Informationen in der Gruppe geteilt. Demnach bleibt die 63 in Nordholz. Vielleicht ergibt sich mal eine Gelegenheit, das Modell mitzunehmen und nach Nordholz zu fahren. Vielleicht hätten die Museumsmitarbeiter Interesse das Ding in klein zu sehen.
1 September 2024, 20:04
I'm just waiting for the decals (thanks DF 🙂🙂) and taking a creative break. For a change, I opened another box 🙂
2 September 2024, 18:47
Wow! This is extremly impressive!! Build already 2 Airfix Sea Kings but this is a whole other level!! 🤩 I also want to build this retro Sea King (I was also present during the spottersday and the last flight. Can you tell me witch decals you will use? Thanks in advance!
21 September 2024, 15:47
Good morning Aaron,
thank you for the praise! That was indeed a great experience for me in Nordholz to see the 89+63 live on friday. 🙂I would have liked to see the Seaking in flight on saturday🙁
The decals have been created by a modeling-friend exclusively for me and our Seaking task force 🙂.
HSQ / Mr. Fienne Schola has released a sheet exactly for the 89+63. Here are two links.
https://ebay.de/itm/186437323778
heli-scale-quality.d..iebebilder:::53.html
22 September 2024, 06:09
I got the decals on Friday. Everything except the blue elements is meanwhile in the right place: I'm thrilled! Thank you very much David!!🙂🙂🙂🙂🙂
22 September 2024, 14:25
Bernhard, es ist atemberaubend was Du hier zauberst! Erste Liga, ohne Worte 👍
22 September 2024, 14:34
Last Monday I had the opportunity to lay my eyes on this milestone in the making, even more impressive in reality. So now it's decalling time !
Finish line in sight !
23 September 2024, 19:19
The large decal has layed down nicely 👌, looks a difficult area!!
Nice job your doing 👍👍
23 September 2024, 19:24
Rotors are nice job, interesting model this one ....and very popular, lots of interest.
Best of luck with next steps 😃👍👍
25 September 2024, 18:49
I agree - one only needs to look at the antenna termination in pic 281 🤯
10 October 2024, 18:07
In the last week I actually managed to instal all the parts without mess, breakdowns and disasters on the fuselage.
Although I am not finished yet (the parts for the rotor have not yet arrived from Australia) I wanted to share some photos of the details with you. 🙂
At this point I would first like to say thank you to my 4 modeling friends, without whom this project would not be possible.
To Thomas for his great photos that left no questions unanswered.
To David for his support by creating the outstanding decals.
To Felix for his boundless knowledge of helicopters and his tireless answers to my countless questions.
Last but not least to Carsten for his efforts in the creation of the seat cushions and his communication with the former technician of the Seakings: so I had „access" to hundreds of pages of the service manual, which a normal mortal does not get to see.🙂
17 October 2024, 15:57
Again and again I am taken aback by the quality of this build when lured onto the thread by another magnificent teaser picture.
17 October 2024, 18:48
there is only one thing missing.... start the engine! holy molly.....
17 October 2024, 19:28
Very tidy 👌 like the hinge's and decals are quality, hope you have plain sailing next week too Bernhard... looking 👍 great,
17 October 2024, 20:11
Hi Mates, I'm glad to see & read your nice comments: Thank you.
Cristian: my model is not finished yet.... I supose that you mean the 89+63 built by Suem_models (one of SeMa-Models - guys).
18 October 2024, 07:45
Congratulations Bernhard, I can't imagine how a model could look more realistic than this... hats off! 👍
18 October 2024, 10:08
If someone told me that latest pictures were taken on an airfield base, I would have taken it for granted. Astonishing work and worth the perseverance you've showed during the building process
21 October 2024, 05:34
Yellowwing yes that is exactly the one I've seen in Basel and I thought it's your model!
21 October 2024, 08:47
Amazing work of art! The attention to detail and execution to the realistic build is outstanding of this world! Thank you for sharing the process with us, a large part of the fun is the process itself, and your step-by-step is much appreciated!
21 October 2024, 09:56
One of my goals in model making is to create a model that comes as close as possible to the original in the photo. Therefore, I was particularly pleased with your comments concerning the realistic appearance. Thank you!🙂
1 22 October 2024, 08:08
Bernhard... I can say without doubt, you knocked that goal out of the park.. its fantastic work from start to finish.
22 October 2024, 08:37
Your very good at making the little scratch build parts... Not to be performed over long pile carpets 🫣🤣.
Good interesting work happening.... You may need to register with the FAA at this rate 😉😁
👍
30 October 2024, 21:46
What a bad kit, almost every detail is missing 😁
Stunning work and research!
1 28 December 2024, 13:01
OK wow, thanks for posting all the details, great opportunity to learn.
29 December 2024, 06:27
Das geht ja schon so langsam in Richtung Endspurt bei Dir Bernhard. Einen Guten Rutsch wünsche ich Dir und Deiner Familie ins Neue Jahr.
1 31 December 2024, 15:55
Der Rotorkopf sieht top aus. Freu mich sehr die in Lingen zu sehen 🙂
22 February, 12:17
Sehr beeindruckend, was du hier zeigst. Der Rotorkopf schaut wirklich fantastisch aus! 👍
2 22 February, 14:51
WTF? Bernhard, your eye for detail is unseen. This is going to be another masterpiece
1 24 February, 06:54
317 is just intermediate? that is incredible now, don't know the adjective to use when finished.....
24 February, 06:56
WOW! I've built complete models with less parts than that rotor head! Stunning job.
2 24 February, 07:04
Thank you very much for your great comments. Part of the praise goes to the Jam Screw team for their masterpiece in 3-D design and 3D printing. 🙂🙂
After a productive model building day, I am now done with the detailing. Next step: the paintwork in dark gray.
2 24 February, 18:12
More original than the original 👍
I hope the remaining weeks until EME are enough to finish it!
2 24 February, 19:23
We are very grateful and fortunate to have Bernhard and his cohort helping make Sea King magic. Total SCHROCK and AWE mate.💪🥃
2 25 February, 10:02
The rotörhead is really the detail that makes or breaks an effort to make a realistic helo! I am truly impressed with this one!!!
26 February, 02:58
Nothing less than. Work of art! Congratulations on this picture perfect build!
1 1 March, 15:24
And what is now the difference between pictures 255 (and following) to the last pictures? I don't spot one, only the sky.
1 1 March, 17:01
Yesterday I finished my Seaking.
At this point I would like to say a one more thank you to my 5 modeling friends, without whom this project would not be possible.
To Thomas for his great photos that left no questions unanswered.
To David for his support by creating the outstanding decals.
To Felix for his boundless knowledge of helicopters and his tireless answers to my countless questions.
to Carsten for his efforts in the creation of the seat cushions and his communication with the former technician of the Seakings: so I had „access" to hundreds of pages of the service manual, which a normal mortal does not get to see.🙂
Last but not least to Andreas of Jam Screw for his support with the magnificent 3D printed sets and technical information.
And of course for all the mates who, with their nice comments, who constantly kept my motivation level at 110%. 🙂🙂
3 1 March, 18:02
Almost lifelike, incredible detail and awesome build process, truly inspiring! 👍👍👍
1 March, 19:58
truly breathtaking, i hope tho have the chance to see this beauty in person eventually!!!
2 March, 21:36
If I wouldn't know better, I would think that these are the fotos you took from the original King last year !
Absolutely masterly and ligtyears ahead of most of us - pulling my Hat Sir 😄 👍
3 March, 07:09
Stunning build and attention to detail Bernhard. Truly inspiring build. Well done Sir.
3 March, 07:34
a adăugat un nou photoalbum.


30 30 November 2024, 17:17
My goal here is to build a flexible rally car, using the parts provided, for road and track (desert). I purchased 4 grooved tires and I'm going to use neodymium magnets to attach the interchangeable parts.
For the sake of fidelity, I'll not apply the Monte Carlo decals.
1 4 December 2024, 17:56
I'm completly staggered about the existence and usage of the magnets 😵
1 28 December 2024, 20:09
All parts can be interchangeable successfully. Total magnets used: 31.
30 December 2024, 21:09
Thanks Guido and Rui!
Just added support for tires and rims, not sure what to do to guide them, though.
3 February, 23:08
a adăugat un nou photoalbum.
1 imagini
M4 Sherman (Early Production)
1:35
Build update: Have most of the components built for this one, working on texturing the cast texture here, first bit of t...
Proiect: M4 Sherman


3 March, 15:35
a adăugat un nou photoalbum.
33 imagini
Airbus A350-900 "Electric Light Orchestra"
1:144


Proiect: Airbus A350-900 Аэрофлот

30 30 December 2024, 22:30
I admire your skills, not only with plastic but also electronics and lighting. Following!
19 February, 19:52
Thanks!
But this is a lot of things for me for the first time. I've never made electrified models before. This is the largest airplane model I've ever made.
19 February, 20:33
Even more impressive! So, may I ask how did you learn about all the electronic stuff? I guess it also involves programming light pattern sequences in Arduino. It's on my to do list!
19 February, 21:53
Theoretically, it is possible to purchase ready-made electronics to illuminate the model, but I did not succeed. Then I turned to a fellow modeler who had already made a backlit model. He agreed to sell me a set of electronic parts. As a result, I received a package containing separate electronic elements. I didn't know what to do with all this. But I have a friend who works on a smart home system and knows what an Arduino is. He helped me a lot. But the hardest part turned out to be soldering the LEDs.
As my friend said, all these electronic parts can be bought on Aliexpress, inexpensively.
[img1]
[img2]
[img3]


1 19 February, 22:16
Thanks for sharing your experience, mate. I purchased a starter pack with an Arduino board (much bigger than the one you used) some time ago, but don't know where to begin. I was hoping my kids would teach me, but they're not that much interested...
19 February, 22:29
My friend said that I have a large Arduino board, but Aliexpress can buy a smaller one.
19 February, 22:33
I drew a plane on a piece of cardboard, and we made a fully working circuit with LEDs on it. Then I transferred this scheme to the model.
19 February, 22:42
Oooooo…. Arduino's are FUN! You need an Arduino Nano. I've done several Arduino projects. You can do all kinds of neat things with them. My two favourite projects are Ghibli: If an Ohm falls in the Forest (Nausicaa + Ohm) | Album by strobez (1:144) and Destination Moon (XFLR-6 Test Rocket) | Album by strobez (1:72).
If you want some help with Arduino projects, feel free to ask~
20 February, 07:21
Oh… I also lit up a 747 using an Arduino. So much fun! AREA 88 : "A Close Shave" | Album by strobez (1:144)
20 February, 07:23
Greg Baker I looked at your work with interest. I wish it had happened sooner, because I had so many questions...
And no one told me that the inside of the fuselage needed to be painted over with black paint.
I found this photo funny (bombs + B747)
[img1]

20 February, 07:39
Well… first off, it's not a rule that the inside has to be painted. I did it for two reasons though… a) it helps to stop the light from coming through the skin of the fuselage. It's not so bad with a large (for 1/144 scale) commercial airliner, but I lit up a Learjet in 1/144 and it looked like I was taking an X-Ray. 😉 And b) it helps diffuse the light so each LED doesn't look like a lonely lamppost at night, with only a small circle of light.
Ha. As for the bombs, well, I didn't like how the engines looked originally and I needed something rounded and pointy to stick out the back. I think those came from an Academy F4U. Always handy to keep leftover parts in the spares box. 😉
20 February, 13:29
I've also lit up a B-707 (AREA 88: "Sitting on the Tarmac" (B-707) | Album by strobez (1:144)) and a DC-10 (AREA 88: "The Upside Down Bomb" (DC-10-30) | Album by strobez (1:144)). Oh, and I also post my builds on my blog (strobez.ca) and usually talk about the main challenges (or triumphs) with each project. You might find that a bit helpful too.
I didn't start lighting up the DC-10 until after I started the project, so ai had to undo a bit first. I also used simple capacitors to make the lights blink instead of an Arduino. You only really need an Arduino if you want to do some fancy light sequence.
20 February, 13:36
These are German bombs, I was interested in the design and coloring of bombs.
I've looked at your work. Yes, you can do without Arduino.
There's a lot of my work here, if you're interested-
karopka.ru/community/user/21568/
20 February, 17:48
That's some great work! Maybe the bombs with from a Me262? I dunno... they were the right kind of pointy... I didn't ask any more questions than that. 🙂
20 February, 18:22
Greg Baker-" it helps diffuse the light so each LED doesn't look like a lonely lamppost at night, with only a small circle of light."
I have seen that it is possible to use transparent rods from the model parts to evenly distribute the light. And I even bought these rods on Aliexpress specifically for this. But I didn't like this option and I just increased the number of LEDs in the fuselage.
[img1]
[img2]


21 February, 11:06
Yeah. I've tried those acrylic rods as well. Didn't really work all that well for me either, but it does help if you sand them to make them less clear. I think I'd always put them more directly behind the windows too.. The correct plan is to increase the number of LEDs you're using, but on some builds that also impacts how much power you need. I usually keep all my builds to 5 volts (basically USB power plugs), but you can run a 9V battery or even a 12V plug in if necessary.
26 February, 22:10

a adăugat un nou photoalbum.


7 4 January, 22:09
I guess those Tracks are better than the ones that come with the kit... are those plates anti skid plates? Haven't seen them in any Book so far.
1 6 February, 06:21
Yes, these tracks are much better than the ones in the kit. I have seen the anti-slip pads on a few reference pictures and there were probably some vehicles where they were retrofitted.
11 February, 12:25
a adăugat un nou photoalbum.
15 imagini
Lukgraph Sopwith Baby - Norwegian Rescue
1:32
....Phew!...that took some doing...i thought this structure between the floats would challenge my meager skills and that...


Proiect: Sopwith Baby

49 6 March 2024, 06:21
it is comforting to know a modeler has done a far better job with this kit than i could ever do...so, the pressure is off...enjoy this ...
RNAS Sopwith Baby - Mediterranean | Album by kkarlsen (1:32)
6 March 2024, 06:45
Looks great. Sometimes it is a sin to have to cover up such great details.
30 March 2024, 22:34
Lots of tiny details. This little Baby promises to turn out a head turner.
31 March 2024, 05:38
thanks all! ...it was weird to discover the seat belts were backwards in the instructions...more reports soon.....
1 April 2024, 02:09
hopefully...i will always know what a correct WWI seatbelt looks like from now on.....
6 April 2024, 08:03
Man, it is a learning curve. I have learned so much from you all since I joined Scalemates.
6 April 2024, 19:56
not a big fan of this kit...especially for the money it costs....funky moldings, backwards instructions...blah seat with no detail....it will be finished but not with great affection....
13 April 2024, 09:31
....only one plane in the jig at a time and this will definitely be a jig job....the tail is assembled but I don't really like the rigging method.....this is a good livery of this airplane....so, some time will be taken....
11 May 2024, 06:11
...thank you everyone! ....as usual...perfection in modeling will not be found here but his one is OK, right now....the real challenge will be the wing rigging.....looking forward to tackling that...it will be eyelets/ezline and that has worked well before.......
1 3 March, 14:49


a adăugat un nou photoalbum.


19 29 January, 13:24
@Ben M, I use two hands to handle the airbrush and put the kit in a support.
1 27 February, 05:24
Those straight and true airbrush lines are impressive. I definitely need to try to improve…
1 27 February, 05:55
More details about my pre-shadding: Airbrush Fengda FE-180 with 0.2 needle, Tamiya XF-1 paint diluted with Mr. Hobby Lacquer Thinner around 80-90%, Pressure: 1 bar. The needle has been polished with Tamiya compounds.
5 27 February, 06:19
Wow polishing the needle with Tamiya compounds is quite the idea. I think I will try that! Which compound out of the three are you using for this? I'm assuming it's the finish product.
27 February, 06:58
@Cristian A, you need the 3 compounds: coarse, fine and finish. You will see how smooth will be the needle after coarse polishing. Because chinese airbrush needles are not very well finished.
2 27 February, 09:26
Polishing the needle is a great idea to avoid blotches. But I think it's more a matter of being able to move the airbrush in a perfect straight line and being able to start and stop the paint flow precisely where you want. Something you seem to have mastered.
2 27 February, 09:43
@Thomas, please try to use 2 hands and you will see how much control you gain 😉
2 27 February, 09:58
a adăugat un nou photoalbum.
8 imagini
Gothic Gabled House - Anklam, Germany 1925
1:87
Doors, windows and some details painted.


Scratchbuilt
5 28 February, 21:34
Looks nice so far 👍
Are you planning to put in some floors and ceilings, perhaps made of cardboard? This would prevent identical lighting conditions behind all the windows and perhaps make it look even more realistic.
1 2 March, 21:01
Welcome to all. @bughunter: for this pilot project (it's my first building) I won't be using any interior fittings (ceilings and walls) or lighting. It's mainly about testing whether the construction works without any problems and how something like this could look when finished. For my colleague, who drew and printed it in 3D, it's also the first time he's tried something like this and he needs feedback.
Let's see if and how I can create curtains. Because that's all you can see on a bright day when you look into a building from the outside.
2 3 March, 09:33


a adăugat un nou photoalbum.


9 16 December 2024, 18:05
Hope I can make it interesting to follow.
The kit doesn't seem very complicated and the Eduard photo etch is mild level. Just the open doors are a new thing for me. They might cause problems when painting and building modules together.
1 20 December 2024, 11:12
I think this project will pick up pace now when I have finished Schleswig-holstein. This is the first ship I build with waterline option and it was very hard to fix the hull seam. I did several cycles of filling, sanding and priming and still it is very visible.
23 February, 09:06
Thanks Villiers! My daughter asked me today if I had only built two ships and one small plane after working such a long time. She looked incredulous when I told her that was actually the case🙂
1 23 February, 20:57
The notorious "pocket battleship" Graf Spee! Taking a seat for this one!
1 27 February, 20:14
Hello, I have a suggestion for the personal stash statistics:
Is it possible to add a summary of the source (where I buy) the kit? What you think obout it?
Best regards
Adrian
Is it possible to add a summary of the source (where I buy) the kit? What you think obout it?
Best regards
Adrian
3 March, 14:15
If you click on the + and then the shopping cart icon. There are fields for Price, Currency, Postage, From and Date. Is that enough or do you need more?
3 March, 14:23


a adăugat un nou photoalbum.


2 3 March, 13:58


a adăugat un nou photoalbum.


15 10 May 2018, 14:48
very impressive.....1:48 armour isn't very large so all the more impressive for that reason alone
24 July 2018, 11:47
I can only tip my head to you....very fine work....looking forward to the weathering
1 August 2018, 19:02
a adăugat un nou photoalbum.


107 18 March 2024, 23:59
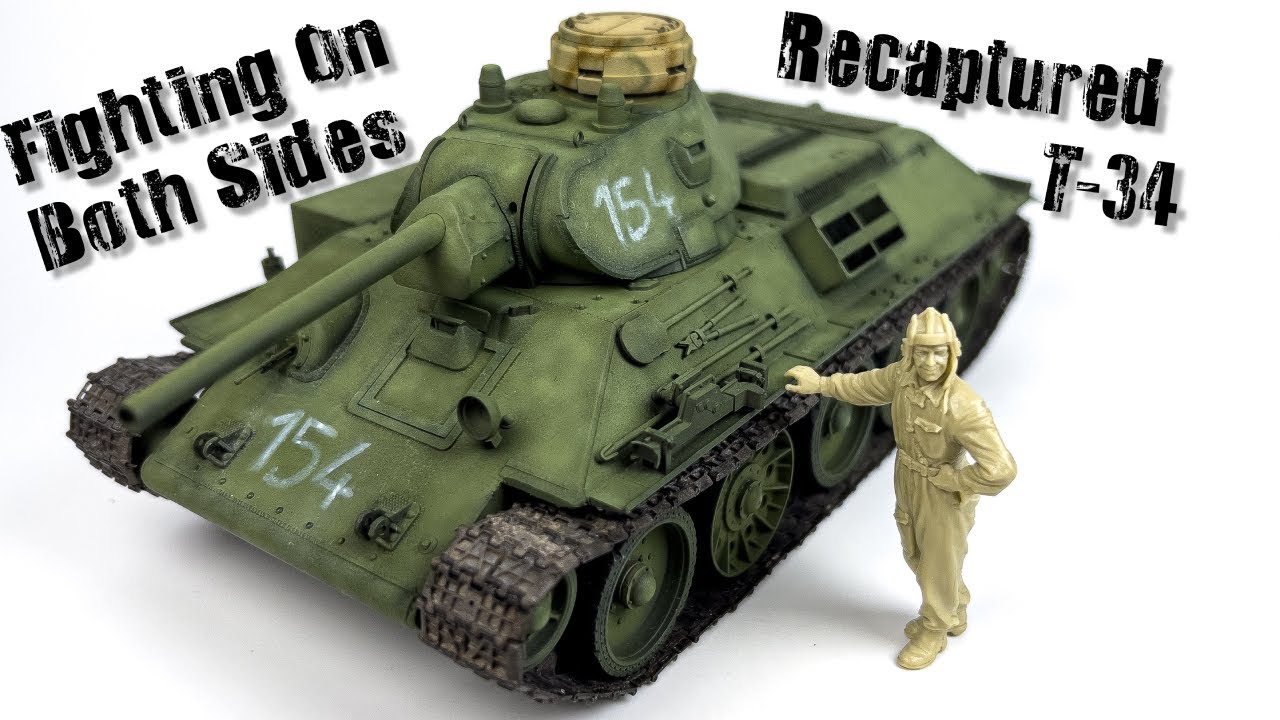


Thanks Rui, I was thinking of making one later but I haven't made a base for a couple years now
21 January, 19:10


a adăugat un nou photoalbum.
12 imagini
Sukhoi Su-30 Flanker-C
1:72
Intakes attached


Proiect: Sukhoi Su-30 Flanker-C

14 27 February, 13:23
Lol, well I must admit Zvezda is not my favorite brand, but it wanted to be made.
28 February, 15:41
I've decided with this model not to get caught up in Advanced Modelling Syndrome by correcting the design but rather try to work with the kit. This presents it's own challenges seeing as I have to adjust and connect misaligned parts without damaging the raised panel lines. But I hope that even with this extra work it will still be faster to build than correcting the design.
1 March, 12:39
I have a sneaking suspicion that Zvezda mixed resins or other poisonous chemicals in with their styrene. I got a reaction in my sinuses, from sanding the plastic, which I've never had before. I really need to get better at taking more precautions with this hobby.
1 March, 20:39
It is good to know that I have to watch with any Zvezda kits I may buy. That is a terrible practice on their part.
1 March, 21:48
Maybe it was from the debonder or maybe it's just a coincidence. I don't know. Zvezda is based in Russia, I'm not sure how controlled the plastics are there or how bad the black market is for chemicals. I doubt Zvezda would intentionally use toxic chemicals. If there is an issue I would imagine it to be with their supplier.
1 2 March, 00:33
Zvezda (Star) from Russia is next to Amodel and Modelsvit from Ukraine my preffered choice for Russian jet fighter, i have, let me think, 100 kits from Zvezda bought in Russia and never experienced any problems on their polystyrenes. The usual wet decals got better recently, but still sub-standard (always auf Begemont on standby), but most importantly i get model variation that nobody else has, and some of their scales are pretty accurate. You also find their makes back in Revell or Italerie cartons. Amodel is horror and real sanding nightmare in terms of fit and accuracy. On this SU-30 i gonna watch and with excitment.
1 3 March, 12:48
a adăugat un nou photoalbum.
6 imagini
British Motorcycle Tr.Model H
1:32


Proiect: British Motorcycle Triumph Model H

1 3 March, 12:07
/ro/search.php?q=*&page=newsfeed&fkSECTION[]=Newsfeed
search-solr.php?lang=ro
35
35
/ro/search.php?q=*&page=newsfeed&fkSECTION[]=Newsfeed
35
todo