
Newsfeed-
a adăugat un nou photoalbum.


32 16 February, 15:49
Today I made a start on the BV 141, cockpit painted with Vazllejo Model Air RLM02. Crew added. 🙂
Welcome Matti & Finn, hopefully this strange aircraft will take shape soon. 👍
Many thanks mates for your interest and likes Lukasz G & Franck G. 👍
9 March, 17:29
I hope that model doesn't cause too much trouble. I've never seen it done so I'm looking forward to it!
1 14 March, 04:28
Fuselage and wings now together. 🙂
I think the main issue will be the amount of transparencies and whether or not they fit sufficiently Djordje. I have dry fitted them and they do seem ok though. 👍
Many thanks mates for your interest and likes Matt T, Djordje N, Vincent & 1 other mate. 👍
1 16 March, 17:57
I'm in. I love the asymetrical concept of the late 30s and early 40s Blohm & Voss planes.
1 16 March, 18:11
Wings, fuselage and cupola all together now. Next will be masking the canopies and fitting them. 🙂
Welcome Nicolas & Dave! 👍
Many thanks mate for your interest and like Pietro DA. 👍
19 March, 15:47
Canopies and masks attached (quite a lot of them!). Engine nose now attached. 🙂
22 March, 16:39
Primer and pre-shading added. 🙂
Many thanks mates for your interest and likes Живко Джаков, Mark K, Bernd G, David RM & 1 other mate. 👍
29 March, 17:07
Underside painted with Vallejo Model Air RLM65 Light Blue and in the wheel wells, RLM02. 🙂
A warm welcome to you Villiers. 👍
Many thanks mates for your interest and likes Alexander R, Villiers DV & 1 other mate. 👍
31 March, 15:11
Upper side of aircraft painted with first of two colours for the splinter camouflage, Vallejo Model Air Dark Green RLM71. 🙂
Many thanks mates for your interest and likes Fritz01 & Neil. 👍
5 April, 15:17
Vallejo Model Air RLM70 Black Green splinter camouflage added. 🙂
Good to have you along Ben, welcome! 👍
Many thanks mates for your interest and likes Marcel C, Dom SAVE & 1 other mate. 👍
8 April, 15:52
Looks really good so far. I remember seeing this in an airplane book when I was a kid.
8 April, 17:18
Decals now added. The tail decal is from a after market decal source. Next will be the undercarriage etc and a coat of matt varnish. 🙂
Thanks for the kind comment Ben, greatly appreciated. 👍
Many thanks mates for your interest and likes Antoine M, Calvin G, Alberto M & Mr D. 👍
14 April, 15:34
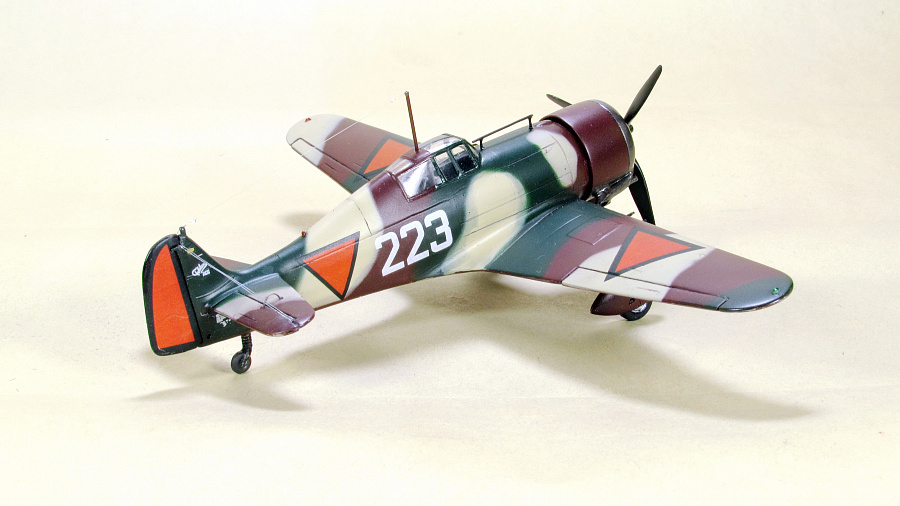
Finally completed, undercarriage attached, masks taken off transparencies, other bits added. 🙂
The BV 141 denoted in this build is BV 141B-2 or V 10 and was first flown on 1 June 1941. The BV 141B was flown with a BMW 801 engine. Although never operational, it was planned to send some BV 141s to the Eastern Front but this was cancelled in 1942. The preferred FW 189 Uhu was accepted into operational use by the RLM rather than the BV 141 due in part to the lack of availability of the BMW 801 engines. 28 were built.
Many thanks mates for your interest and likes J35J & SM. 👍
16 April, 15:31
a adăugat un nou photoalbum.
111 imagini
Iveco Hi-Way E5 Abarth - WIP
1:24
Thanks for watching everyone~


Proiect: Iveco Hi-Way E5 Abarth


34 5 March, 22:12
Maybe there is some mold release still on the plastic. Instructions often say to wash parts. I never do and never have had trouble but I guess it's possible?.
6 March, 12:19
Strange. Never had such issue with Italeri truck panels before. Don't think it is ABS - try to glue some sprue bits with Tamiya Extra Thin. I don't think this glue will work on anything that is not styrene. Never used Gaia primer - only using Mr. Surfacer and Mr. Priming Surfacer. Is the Gaia primer lacquer or acrylic? Not sure if you have already did it but try to scuff the panels with Tamiya 3000 or 2000 grit sanding sponge (or similar) before priming. Another idea worth trying is to clean the panel with IPA - maybe the release agent Italeri used don't come off easily with just water and soap.
6 March, 14:41
Oh no guys, this time it's just a straight build...
@Goldman - Yeah As you said, it doesn't seem to be ABS, and I sanded it and used a lacquer surfacer, but strangely the paint didn't stick. Washing with IPA is a good tip, thanks.
6 March, 17:44
Late to the party! Apologies, work has taken over my life 🙁
I'm definitely in for the duration, on this one!
8 March, 06:09
The paint is definitely your issue. Most of my trucks are painted with Tamiya paint. I've never had much luck with model air paint. AK doesn't work for me either. I find it best to use a primer, the lads have already pointed out the best, but I've also used Tamiya primer from a rattle can, as well as decanted. However, I've also used both Tamiya and Mr Colour, straight onto the plastic. Some colours over here, are hard to match, so I go to the automotive store and get the colour I want, and also the matching primer. Again, I decant these into a glass jar, and I leave the lid loose, to allow the gasses to fully disperse from the paint. After a day, I simply add a little cellulose thinner and then mix it up, and airbrush it.
8 March, 06:26
Custom decals - that's new. Really nice design. Looks like a huge amount of work
18 March, 19:05
Great idea scribing the part numbers. I used a POSCA marker to write them (usually the last digit is enough) but it is too easy to erase the POSCA marks by just handling the parts.
20 March, 20:24
Bummer with the fuel tank. I think all metallic paints are hard to mask. Sometimes it works most times you get these (unwanted but very realistic) "chipping" effect.
For fuel tanks I gave up "proper" metallic and just use Mr. Hobby Silver C8. It is not a metallic paint but it looks very good and very durable. Got this tip from Jan Rosecky excellent book "The Complete Guide to Truck Modelling"
7 April, 04:13
When you sand for gloss, don't you have difficulties that when sanding red areas in your instance, the dust ruins the white surfaces?
8 April, 18:10
I guess he used a top layer of clear gloss which was sanded and then polished. So, effectively the colors are protected by the clear coat
8 April, 19:09
@Andre - Yeah, that's correct. I had clear coated twice before sanding. 🙂
@Michael - And in that case, you can erase it by gently wiping it with a compound.
9 April, 02:41
Ah. Thanks for the inside. I understood that you sanded the colors to prepare them for a clear coat. Hence my question. Now it's clear to me.
9 April, 09:17
Italeri do have this kinds of stupid random errors in its kits. Annoying, but since Italeri is the only company that still offers European plastic moulded kits of trucks I guess beggars can't be choosers.
I *think* that there is no clear decal film between the lettering for the tyres to improve appearance. It will be almost impossible to hide the clear film on the rubber tyres. Not sure that having separate letters is the best solution. If you want I think MBM sells PE templates to airbrush the words on tyres.
13 April, 15:57
@Goldman - I'm ok without it. I don't care anymore. hahaha!!! Thanks bro~ 😄
13 April, 19:29
if the decals are still in the sheet (misaligned but there) its easy to scan, convert to vectors, align, make masks in vinyl and try to paint them with mask 😉 and if decals are gone, well, MS K knows how to vector them, and has the cutter already available 😉
13 April, 19:34
@Spanjaard - I thought about making my own decals, but I was too lazy to change the toner to print white. LOL
And since the base color of the self-made decal shows through a lot, it is better to avoid attaching it on top of a dark color. 😉
13 April, 19:51
i did not say anything about making decals, but masking to airbrush the missing decals 😉
13 April, 20:59
I'm loving what I'm seeing.
Honestly, my expectations were high, but you've done this "stock build" with the right amount of cheeky adaptations. It's not a clever, "this is what you do", it's more of a, "this is the correct way, to make it better"
And like all your other builds I've followed, the MS touch, is fully endorsed 🙂
15 April, 20:39
Super build so far! Attention and hopefully you can fix it: your licensplate at the front belongs to the rear. At the front you only have one round sticker after the letters UL (it's the city of Ulm in Baden Württemberg). The upper *round* sticker is from the TÜV (Technical Inspection Association), which means a road safety inspection. It's attached to the back.
If there were a hexagonal sticker (AU - emission test), the license plate would be for the front. But since 2010, hexagonal stickers have no longer been used.
15 April, 21:04
@Bozzer - Your compliments made me feel good. 😉
@Christian W - Really? I didn't know license plates had that kind of meaning.
I just picked a pretty one and stuck it on without thinking much about it.
I guess I'll have to change the front and back later or cover it with another decal, thanks for the clarification.
1 16 April, 02:37
a adăugat un nou photoalbum.
180 imagini
JAS-39C Czech Air Force no. 9234 - Centennial - WIP
1:48
I added hydraulic hoses (made of thin wire) to the main chassis pistons and glued the complete pistons and hoses in place.


Proiect: JAS-39C Czech Air Force


 2+
2+ 90 27 November 2023, 19:59
Welcome Robert, nice to see you again at my model build. 🙂
It will again be a plane with a special paint job.
27 November 2023, 20:12
Robert, you've come at the right time. I started airing my show today. 😉
27 November 2023, 22:15
Welcome, Rando. I'm glad you're here. You're not wrong, the plane will be in Czech colors. 😄
27 November 2023, 22:19
Nice and following this build! I heard that the panellines of this Italeri kit are a bit soft or a bit deep, are they? It looks, well, acceptable.
28 November 2023, 14:25
Mark, it's true that the plastic of this kit is a bit softer than the standard kit, but it's nothing terrible. Also, the panel lines are a bit thicker (compared to Tamiya or Eduard kits), but again, not entirely bad. The kit does have a few minor shape flaws as well, but overall it's pretty good and with a little effort you can build a nice JAS-39 model from it.
I will describe the kit's faults and how to fix them, including modifications to the "C" version (the kit represents the original "A" version), as the model is built.
28 November 2023, 18:50
I'm preparing the hull for its closure. I've glued the assembled engine and cockpit to the left half of the fuselage.
3 December 2023, 11:33
Looking great! Taking a seat for sure 👍
Vloudila se ti tam čeština, pics 13-16. Jen v případě že to nebylo úmyslně 😉
3 December 2023, 14:24
Hello, Alec! There's always room for you at my place. 🙂
Thank you for letting me know. It was my fault. The texts are already in English.
3 December 2023, 15:03
I haven't put much together yet. The fuselage halves can be glued together without any problems, they fit together well and the panel lines follow each other. The glued joints are gapless, just sand them lightly. When gluing the fuselage tip, care must be taken to ensure that it is turned correctly. If the tip is glued to the fuselage with the bottom side up, it will not follow the shape of the fuselage correctly when viewed from the side.
If there are any problems during construction, I will point them out.
4 December 2023, 12:56
Work on the model continues. The first problems are appearing. It was necessary to modify the joints between the upper and lower half of the wings and also the joint between the fuselage and the wings. The use of putty and sanding is unavoidable.
5 December 2023, 22:55
Little progress today. I glued the wings to the fuselage and started prepping the other parts.
6 December 2023, 23:45
Rando, thank you for the compliments. 🙂
The technique of extending the fuselage by gluing struts from inside the fuselage is nothing new. I have been using it successfully for many years. In my opinion, this technique is better than gluing the wings to the fuselage without extending the fuselage and then repairing by filling large gaps with putty and sanding.
7 December 2023, 10:40
I'm continuing with modifications to fix some bugs in the model and rebuild it to version "C".
11 December 2023, 00:30
I sanded and puttyed the model. And I got to the point where it was hard to recognize the places that still needed to be repaired. So tomorrow (time permitting) it's surfacer's turn. I'll take some pictures tomorrow.
12 December 2023, 21:37
Hi Alec, I use Surfacer 500. After finishing minor finishing work and sanding the Surfacer, I spray Base white 1000 (both are Gunze) on top.
I then spray the camouflage paints on top of that prepared surface.
14 December 2023, 08:38
Most of the errors are already corrected after sealing. Now I will add some small details on the surface of the aircraft. I'll have to scratch most of them.
15 December 2023, 21:31
Not much time to work on the model this week. But some progress was made on the model after all.
23 December 2023, 23:44
When I looking the photos I found minor differences in the details on the underside of the rear fuselage. The model will need to be modified.
30 December 2023, 23:50
Beautiful work! Thank you for sharing all of this tremendous research detail - very fascinating. I have this same kit on my "to-do" shelf, so I'll be looking over your shoulder for tips and ideas.
6 January 2024, 13:48
Christian, welcome aboard! I'm glad you're interested in my project.
When you look over my shoulder, make sure you don't make the same mistakes I did. I've just discovered that my inattention has caused the flare hole to be too far forward. I'm working on correcting that mistake right now.
And I remind you that the modifications described are only for Czech Gripen. For other users' aircraft these details may differ.
7 January 2024, 10:48
Another one to join to the observation, as I will have to do it at some point aswell . Is it the Front Noise need to be replaced by the quick boost?
7 January 2024, 10:54
Welcome Vintagemodeler! I hope that in the course of building my model you will find inspiration for building your Gripen.
I'm very sorry, but my English skills are not perfect and I don't understand your question. Could you elaborate on your question a bit?
Thank you.
8 January 2024, 08:43
Yes mr! I cant believe how you did those amazing scratch! i just mean if front noise looks good, as few people told me that it need the QUICKBOOST upgrade part, i get it for mig 29 and Su-27, but didnt get it for JAS-39 yet, as i didnt saw that much difference.
kind regards
9 January 2024, 11:21
")
Vintagemodeler + Mark D, thanks for the explanation.
I think the QUICKBOOST nose is not necessary. According to the drawing, the nose from the kit has a good shape matching the drawing. The bad shape of the nose is elsewhere. The top of the nose needs to be corrected. The windshield in the kit rests on a raised area that is not on the real model. However, this can easily be corrected with a little putty.
A clear description of the basic modifications to the Italeri kit can be found here: kits.kitreview.com/jas39agripenreviewrw_1.htm
9 January 2024, 22:44
Moving the flare launcher to the correct position is done. I will fix minor errors after spraying the model with Surfacer.
9 January 2024, 23:06
Vintagemodeler, thanks you!
I agree, the article clearly describes the modifications of Italeri's biggest faults. But since this article was published (2005) many JAS-39s have been upgraded (some machines more than once) and the appearance of some details on Gripen aircraft has changed. When building a particular machine, it's good to have not only a drawing, but also photos of the particular machine.
12 January 2024, 23:03
I'm continuing to restore the lines between the panels. It's slow going, but the lines being restored are increasing.
12 January 2024, 23:04
Thank you Alec!
Vintagemodelerer, the quality of the Italeri kit (considering the time of release) is somewhat half-hearted. But with some effort it can be used to build a nice model. I've already made most of the modifications. Once I finish restoring the panel lines, the model building will go faster.
14 January 2024, 19:51
It's been a while since I looked at this one, Ludvik; it is progressing nicely. Your work is exceptional; the attention to detail is beyond my imagination. I love watching what you have done.
16 January 2024, 10:48
Jennifer, thank you for your kind post. I'm just trying to build my models as best I can and it's great fun for me too.
17 January 2024, 20:21
Oh, two Saab at once - no wonder that I nearly missed it! Nicely done too.
17 January 2024, 20:24
Yes, I'm building two Gripens at the same time. Both aircraft have a large number of the same parts and the same basic grey paint. It makes my job easier.
17 January 2024, 21:32
Italeri kit contains only one additional tank. But I need two tanks. That's why I decided to make them. To make both tanks the same, I made two.
18 January 2024, 09:39
Hi, Alec!
There are resin tank castings that can be purchased as separate accessories. However, their price, along with the cost of shipping, is high. It's much more than half the price of the Gripen kit I bought from Italeri. So I decided to make the additional tanks myself.
The choice of how to make the tanks was simple. Making the moulds and then casting the tanks is quite laborious. In addition, I do not have a vacuum pump, so air bubbles would form in the castings. I also don't have a 3D printer and I don't know how to model in 3D software.
Therefore, I figured that making tanks out of paper was the easiest way for me to make them at home.
I think paper is an underrated raw material in plastic modeling. With a little knowledge and skill, you can make various accessories (e.g. additional fuel tanks) out of paper. And as a bonus for the work involved, paper add-on tanks are very light and don't put unnecessary strain on the landing gear. 😄
24 January 2024, 11:21
I agree, all good points. For what it's worth, here are my few observations regarding casting from personal experience: for a small job like the tanks, you really don't need a vacuum pump (nor, and IMHO more importantly, a pressure tank). Yes, you will likely get some bubbles in the resulting cast, but those can be fixed relatively easily 👍
26 January 2024, 14:02
Alec, I also have experience with making parts from cast resin.You are right that bubbles can be fixed fairly easily with putty. But for making 2 tanks I find casting unnecessarily laborious.
29 January 2024, 10:03
I'm continuing to build the Gripen. I finished restoring the lines between the panels and added more details to the fuselage.
29 January 2024, 10:04
I'm continuing to fix the minor surface errors that surfacer showed. I've also started riveting.
31 January 2024, 12:49
Love the super detailing - as well as the extensive riveting work. Are you planning to rivet the wings as well? I will need to use your trick of using wires to pull the wings up to close the gaps on the next build. The Italeri kit is a good foundation for the Gripen, but it is sorely lacking in details - I'm glad to see you putting that into the kit.
6 February 2024, 17:07
@CaptGPF
Thank you for your comment. I'm really glad that my ideas will serve someone else.
I don't plan to rivet the wings. None of the photos (that I have) or the drawing show any rivet lines on the wing surfaces. Except for a few rivets on the leading and trailing edges of the wings. And I have already made these few rivets on the wings. If there are any rivets on the wing surfaces, they are ground in with the surface and not visible under the camouflage paint.
On the other hand, I'm considering removing the rivets from the Gripen Kitty Hawk wings (Kitty Hawk made the rivets marked all over the wing surfaces).
I will definitely do some weathering on the wings though. It's very visible on all Czech machines.
6 February 2024, 21:33
I have little time to build models lately. So at least in one short spare moment I made an experiment with tinting the transparent cockpit covers.
7 February 2024, 07:50
Hi Ludvik! This build turns out t be another "crazy" build ... your view for details is amazing. Do you spend more time on research or building? I´m not sure 😉 again something spectacular is going to come here. Keep going (❁´◡`❁)
7 February 2024, 08:05
Wow, your tinted canopies are looking great! I once used a mix with Alclad (on a egg plane) and nearly ruined the clear plastic as it was dull matt afterwards 🙁
7 February 2024, 08:55
Thomas, at the moment my lack of free time doesn't allow me to pursue modelling as much as I would like 🙁. It's just a transitional period and I hope it will end soon.
As far as research is concerned, I have a database on my computer with information, drawings and photos of aircraft, literature ..., for all the aircraft that interest me and I would like to build models of them. And I am constantly adding to this database. So the moment I start building a model, I simply open the appropriate folder in the database and draw from the information I have stored there.
In some cases, for example, when I was building the MI-24, I was lucky enough to work with a guy who works in an aircraft repair shop as a mechanic, and he would take pictures of various details of the helicopter's structural elements and email them to me, according to my instructions.
I am now using similar friendly help in building both Gripens.
7 February 2024, 22:51
Bughunter, the procedure I used, I found on the website of a Czech modeller. With long-term testing of different color types from different manufacturers, it achieved the best results with metallic Gunze paints (MC series) and Gunze Mr. Leveling Thinner. The procedure is simple. I mixed gold (MC219 - brass) and brown (H017) into about 1 ml of diluent. From each colour to just a small drop (on the tip of the brush). Metallic paint does a partial transparency effect based on your point of view. From a certain angle, the cabin appears opaque, and from a different angle, you can see right through it. And that little bit of brown puts a slight damper on it.
The original instructions recommend the metallic colour MC215 - copper, but the author used this on American machines. According to the photos, the Gripen cabins are toned to a tawny colour and this is better matched by the golden hue of brass combined with brown. The precise dilution ratio is not critical, but he wants to test it. The important thing is to spray gradually a few thin layers (just to dust lightly) and spray the next layer of paint until the previous one has dried. With a thick layer, diluted metallic paint makes irregular spots.
And if it doesn't work, just wipe off the paint with a soft cloth dipped in thinner and start over.
8 February 2024, 00:43
That is impressive, tinted canopies. Thank you for sharing the technique.
8 February 2024, 00:49
Jennifer, it was my first attempt at a tinted canopy. I found a tutorial online and decided to give tinting a try. I did a few experiments on pieces of clear plastic first so I wouldn't ruin my canopy if it didn't work out. During these experiments, I tried different shades of metallic paints and chose the best combination of colors based on the results.
8 February 2024, 21:47
Gripen got a smart white coat (primer). Once the cockpit equipment is completed, it will be the turn of spraying camouflage colours.
9 February 2024, 20:39
Have you dipped the canopy in for example Alclad Aqua Gloss? It helps for transparency.
9 February 2024, 21:53
I read on Finescale modeler that you could get a golden tint using a mix of transparent smoke + transparent yellow diluted down with thinner.
10 February 2024, 07:23
@Mark D
The canopy in the photo of the partially assembled model is not the final solution. I'm still experimenting with tinting the cockpit canopy. The goal is a canopy that will be transparent from a certain angle and partially act as a mirror from another angle. I'm well on my way, but it still needs to be fine-tuned.
@CaptGPF
There are more ways to colour the canopy, of course. Using transparent paints is probably the easiest way. But it doesn't achieve the mirror effect described above. To give you a better idea, I have included a picture of the cockpit canopy from several different angles.
10 February 2024, 10:58
I had good results with holo nail powder:
Starting Pic 24
Fat Amy WIP | Album by halohead (1:48)
10 February 2024, 16:23
@CaptGPF
A very thin layer of metallic paint takes care of the angled transparency effect.
@Daniel
Thank you for the illustrative example. Your canopy looks great.
11 February 2024, 19:57
I'm continuing work on the cockpit. I am gradually adding more details to it.
12 February 2024, 23:30
The "box" at the rear cockpit wall had to be modified. After correcting its dimensions and location, I added a few cables to the rear of the cockpit. More cables will follow shortly.
13 February 2024, 22:29
Jennifer, thank you! I hope the cockpit will look even better with the addition of more "cables" and the scope slide. 😉
14 February 2024, 08:59
I wasn't in the mood for the delicate work of adding wiring today. So I busied myself with fixing a badly shaped engine nozzle.
14 February 2024, 23:05
The cockpit cables are in place. I glued a few more PE parts to the fuselage and now I will prepare the model for spraying.
16 February 2024, 23:05
The cables look amazing, Ludvik; your attention to detail pays off.
17 February 2024, 01:18
Jennifer, thank you for the compliments. 🙂 I appreciate it.
17 February 2024, 08:53
I prepared the model for spraying with camouflage paints.
17 February 2024, 22:33
Thank you, Daniel! My speed is only temporary. Soon I will start making smaller parts and the model building will slow down. 🙁
I have started applying decals to the painted model. So far I have only managed to apply the decals with the special anniversary coloring.
19 February 2024, 21:44
The colour scheme of the in-line machines in a combination of two grey colours with little visible markings is practical for military purposes, but somewhat boring. It's good that there are aircraft with special paint! 😄
19 February 2024, 22:47
Due to the extraordinary activities that took place during the day, I only got to the model briefly today. In those few minutes I only managed to glue a few decals. I added the national emblems and a few small labels. I will add photos later, when all decals are on the model.
21 February 2024, 17:46
Robert, from the first moment I saw the pictures of this Gripen in the attractive anniversary livery, I knew I would eventually build one. When the decals for this machine appeared on the market, I didn't hesitate a moment and bought them immediately. And now the moment has come when I am fulfilling my resolution.
21 February 2024, 18:03
I "painted" the cockpit canopy with strips cut from painted decal paper.
25 February 2024, 22:25
Jennifer, thank you for your compliment. 🙂
The work on the baldachin will continue. I've only finished the outer part. I'm still working on the inside of the canopy. The inner frame, cross brace, rear view mirrors and the "collar" in the front need to be completed.
29 February 2024, 11:13
Great idea. I have always wondered why there is not a product to just stick to canopies instead of painting them for the frames.
29 February 2024, 11:56
Thanks for the tips on the canopy - I have an AH-64D in the queue and was wondering how to achieve the same effects you just taught us! thank you, Sensei! 🙇♂️
29 February 2024, 16:12
Ludvik, your macro is merciless! I guess in real size it will look better.
29 February 2024, 19:35
I'm so glad you found my tutorial on painting canopy frames helpful. 🙂
Since masking the canopy, spraying the frame and a thin strip of gasket is laborious and the result is not always 100%, I was looking for another method that would be easier and less laborious. Using decals met my requirements. The application is simple and the results are accurate. And when layering the decals, even a very thin line of gasket can be easily created. And the use of decals also eliminates the laborious cleaning of paint that occasionally runs under the mask.
29 February 2024, 21:04
I painted the auxiliary tanks this afternoon. Like the plane, the tanks have a special paint job.
3 March 2024, 00:15
Jennifer, thank you for your kind words. 🙂
I worked on the hangers today. For the middle hanger under the fuselage I used a part from the Italeri kit, but first I modified it slightly, sanded it, made new joints and added rivets. For the underwing hangers and rocket adapters I used Kitty Hawk parts. These were left over from an earlier Gripen 9241 build where I replaced them with castings from CMK. For the wing hangers, I replaced the plastic pins with wire ones so I could accurately glue the hangers to the wing. For one thing, the plastic pins were large in diameter and would not fit into the holes in the wings, but more importantly, the wire pins served me well when spraying the hangers and then applying the decals.
The fewer stencils on the aircraft, the more there are on the hangers. I applied 54 decals on all five hangers combined (5234 did not have a forward fuselage hanger when it carried the annual livery). And I still haven't glued the decals on the rocket adapters.
4 March 2024, 22:19
Frank, I was intrigued by this machine from the first moment I saw it. The combination of the dark grey motif on the upper surfaces of the wings and fuselage with the red, blue and white accessories on the vertical tailplane and canards is (at least to me) very attractive. Although I find the special colour scheme of Czech tiger-themed machines very successful, this annual livery was a very pleasant change for me. As soon as I found out that there was a decal set for this livery, I knew I would definitely build this aircraft. 😄
This week unfortunately my work obligations did not give me free time to work on the model. I only managed to apply decals for the AIM-120 rocket adapters.
I also ordered a set of AIM-9 rockets from Eduard. The rockets in the Italeri kit are inaccurate and modifying them would basically amount to making new rockets.
10 March 2024, 11:13
After a short break, I continue working on the model. Gripen has all decals applied and repainted with clear coat. Now it's time to work on illustrating the operational wear and surface contamination.
11 March 2024, 21:56
Today I did weathering and minor surface damage to the aircraft.
... and I also glued all the racks.
13 March 2024, 23:56
Hi, Thomas.
I'm so glad you like the weathering. I did a little experiment. Instead of traditional oils, I used Agama patina powder. I was pleasantly surprised. The powders work very well. Unlike oils, using patination powders is easy, fast and accurate. And if something goes wrong, the applied patina can simply be washed off with a cloth or cotton swab dipped in clean water (with a little detergent if necessary). 😉
14 March 2024, 12:27
I'm sure I won't get to work on the Gripen today. So at least I took two photos of the Gripen in daylight with the auxiliary tanks temporarily installed. I like the result, the painted add-on tanks nicely complement the special anniversary livery of the aircraft. 🙂
14 March 2024, 14:11
Alec, Guy and Jennifer, thank you so much for your kind posts. It is a great support for me to continue working on the model. 🙂
15 March 2024, 11:16
Michael, thank you.
All decals used on this kit are from Czech manufacturer of modelling accessories JBr Decals. I think he did his job perfectly.
15 March 2024, 12:09
I'm kind of running out of free time lately. Every time I think I'm finally going to get around to building a model, something creeps in. So at least I bought a few accessories for my models, including a set of Sidewinders rockets from Eduard. The ones in the Italeri kit didn't work out so well. 🙁
22 March 2024, 10:45
Thanks for the nice look at Eduard's Sidewinders, I'm going to have to buy some for my Hasegawa jets that have none eventually. Glad to know they come with a jig too! And I hear ya on the free time thing, my Mosquito probably would have been done weeks ago
22 March 2024, 12:23
Rando, if you are concerned with the various suspension armaments, check out Eduard's site. Eduard offers quite a wide range of rockets, bombs and other armaments in various scales.
23 March 2024, 21:54
I spent time this afternoon making the main landing gear legs. I also finished the nozzle.
24 March 2024, 00:00
I have modified the appearance of the landing gear wheels and am continuing work on the landing gear legs.
27 March 2024, 07:05
Landing gear looks awesome, Ludviku! When finished, your model should stand on a mirror surface!
1 April 2024, 09:32
Thank you, Robert. I've only finished the front landing gear leg so far. I started with it because it's the most complicated. Filling the "tubes" on the main landing gear legs will go faster. Compared to the front landing gear, they are almost wiring free.
Building the finished model on a mirror base is a good idea. However, I have a slightly different solution. The model will be placed in my display case of finished models on a glass shelf that is approximately eye level (of an adult). If you lean slightly forward, you can see the bottom of the aircraft with the armament and landing gear due to the glass shelf.
1 April 2024, 10:20
After a break I resume building the model again. I'm adding hydraulic and electrical wiring to the main landing gear legs.
23 April 2024, 23:18
Was your break due to a visit of the Mosonshow?
Your lastest work on the model parts looks nice!
24 April 2024, 13:23
Bughunter, thank you for your kind contribution.
My break was due to a much less fun thing than attending the Mosonshow. A colleague and I have rented a space where we have offices. At this point, our lease is up. We had to find a new place and prepare to move. We already have the offices, now we have to move in and get everything ready to work in them. So there will be more breaks.
24 April 2024, 22:29
After this afternoon, both landing gear legs of the main landing gear are complete.
25 April 2024, 21:08
OMG this is so satisfying to watch!! Great model, you are super talented 👍🏼
25 April 2024, 21:17
The first part of the wiring and hydraulics in the main landing gear shafts is in place.
28 April 2024, 21:41
After a forced break, I'm back and resuming work on the Gripen. 🙂
17 May 2024, 20:01
In May last year, Gripen had an accident. During careless handling, the model fell off my desk. Several small parts broke off and the glued joint on the underside of the nose cracked. This accident threw me for a loop and I had to take some time to get back in the mood to continue building the Gripen.
And now it was time for me to continue building.
22 March, 22:57
Ah, bad luck. Glad you got your mojo back and bringing this beauty to the finish line 👍
23 March, 12:03
DuperScale and Alec, thank you for your support. As they say, everything takes its time. Yes, the successful repair has given me my mojo back. 🙂
The home straight is in sight, but there are still a few details to finish. I'm looking forward to finishing the colorful "bird" and putting it in the display case. In my opinion it is one of the most beautiful Czech Gripens.
23 March, 12:25
I think everyone here has had their fair share of accidents - my worst one was when my cat decided to play with my A-10 and send it "flying" into the ground!
That repair looks fantastic! I can't even tell where it was damaged! It's great to seeing you recover from this mishap, especially after the beautiful work you put into it!
23 March, 17:24
CaptGPF, thank you for your kind words.
The aftermath of the crash has been repaired, but I still need to finish highlighting the lines and shading the panels on the repaired bow.
2 23 March, 23:10
Another small piece to the "puzzle".
It's the little things that (thanks to their small size) give the most work.
1 6 April, 13:09
The wheel bay wiring and canopy detonator cord, as well as the cross brace, look amazing.
8 April, 23:25
Ooooh, yes, that would be very cool. But I'm worried there's no hydraulic pump small enough to work. 😄
1 10 April, 20:30
Thank you, Vincent!
I only had a little time today, but I still moved my project one step closer to the goal.
11 April, 21:01
a adăugat un nou photoalbum.
2 imagini
PZL P.23 A Karaś
1:72
Lots of PE parts is going to be added inside.
Proiect: PZL 23 Karaś


6 15 April, 21:41
a adăugat un nou photoalbum.


60 1 December 2024, 19:43
Some of the detail work I see on 1:72 kits on this site is unbelievable - this is another one - fantastic work Davy 👍
4 December 2024, 20:25
I like your serious approach.
I have assembled two Fokker D.XXI 1/72. One of them was converted from the Novo set. The second one is from Special Hobby
[img1]
[img2]

4 December 2024, 20:50
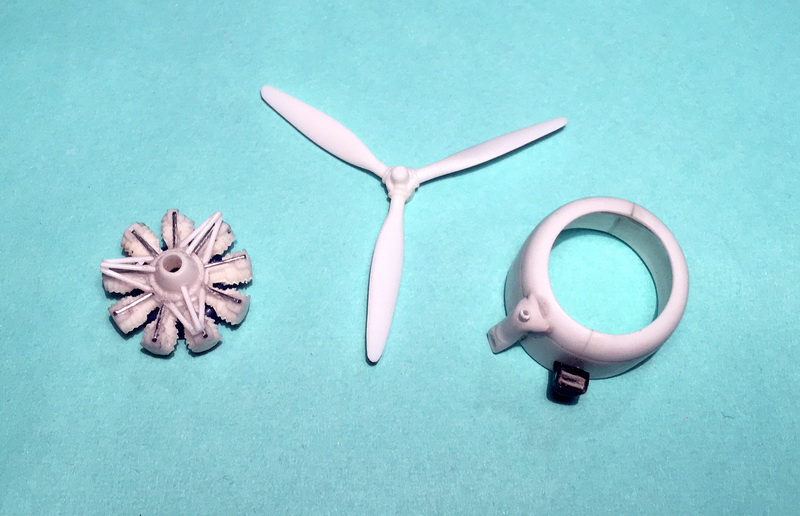
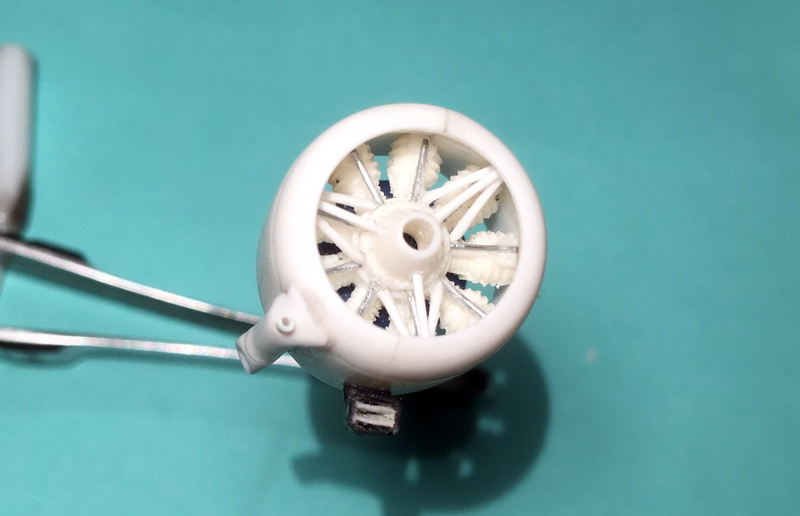
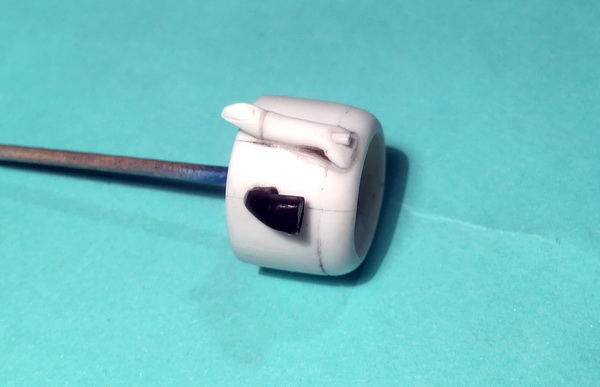
My version of the engine and hood. I took the details for revision from the Blenheim model Novo.
[img1]
[img2]
[img3]
4 December 2024, 21:04
Thank you very much every one! And looks really great Denis! 👍🏻👍🏻
6 December 2024, 21:49
Fantastic work on the interior. The exterior paint work is also very good.
14 April, 20:12
Your seatbelts really came out nice for this scale. Kind of amazing. You're a wizard.
15 April, 15:02
It looks really good, congrats for this amazing result 🤗
Love this airplane, built my version 2 years ago but in 1/48 scale
1 15 April, 20:08


a adăugat un nou photoalbum.


20 17 March, 03:26
I suppose it will be a week or two before all the parts are here...
2 18 March, 16:56
I'm still waiting on the correct seats and cockpit details... Looks like I have to scratch build details for the wheel wells!
1 23 March, 21:17
Just got the IAF F-15I Ra'am decals from Cartograph!!! Things are coming together!!!
1 24 March, 00:16
Мне пришлось купить декали, катапультные кресла и антенные конвертеры F-15I. Детали F-15I были куплены в IsraDecal.
26 March, 20:18
Well... It's time to begin. I believe I have all the parts now!!!
1 2 April, 00:04
Okay, I have to wait as it's time for my wedding anniversary with my wife this weekend! But in a few days, I will actually be able to start!
1 2 April, 23:36
Guys, save me a seat. Popcorns are on me!
Oh, and happy anniversary! 🙂
2 4 April, 11:09
I'm kinda bummed about the ResKit wheels. ResKit tires are Good Year which is a fine guess but the F-15I uses Michelin tires. Oddly, the Tamiya kit (from Japan) uses rubber tires for the kit that are in fact Michelin. Sooo... It looks like I am relegated to using the kit wheels instead of the ResKit. This does simplify mounting of course. But the flattened surface of the ResKit tires gets left out. Man, I never thought this was going to be a complicated addition to the build. Sadly, here we are!
16 April, 17:28

a adăugat un nou photoalbum.
13 imagini
Vautour II N Normandie Niemen
1:48


Proiect: Vautour II N Normandie Niemen

16 April, 17:47
a adăugat un nou photoalbum.


2 16 April, 15:43
This will be the next model to be built, another Japanese Air Force aircraft to add to my growing collection. This will be the first RS model that I will build so I will see what I think of it. 🙂
16 April, 15:46
Looking forward to the build, but like Neil (DJ Ferris Bueller) I can't keep up with you, you are so prolific. 👍🥸🤘
16 April, 17:30


a adăugat un nou photoalbum.
4 imagini
Alpha Jet A/E GE 314 BA 
1:48
First coat of base color for the cockpit, the blue and bright green of the seats will fade a little with subsequent coat...


Proiect: Alpha Jet A/E GE 314 BA


5 14 April, 16:11


a adăugat un nou photoalbum.
25 imagini
Not again, haven't we had enough watching him struggle with Eduardarrrgghh 
1:48


29 4 March, 22:01
Cheers Gary, Gorby as I mentioned to Robert it could be painful and a meandering journey of bitter tears, but you are welcome. 🤘🥸🤟
1 13 March, 08:43
Its all practise,and a sign of a good modeler if they can turn a kit around,Good luck with it.
13 March, 11:13
Cheers Gary, but you may see a phenomenon over at M'bro me turning 360 in frustration. 👍🤣🤘
13 March, 12:33
Hello Mark, it looks good to me 👍 The cockpit is really nice. Keep the good work going on! For example, on picture 11, i can´t find any imperfection 😄
1 22 March, 10:51
Hi Jakub, I hold up my hands I copied/referenced the cockpit from your current excellent build of the aerial police car. I must admit too that Pic' 11 was one of my better projects 😜and the subsequent six that followed. 🥴👍🤣🤘🥸🤟😜
1 22 March, 11:01
Thank you John for the like and everyone else too who pushed the button. 🤟🥸🤘
22 March, 11:04
Sand, pint, sand, pint, sand, nah! Pint! 🍺 Pint! 🍺 Pint! 🍺 Good work so far mate.
1 22 March, 19:53
Like the sound of that Neil👍 Going forward that shall be my working practice 😅 Cheers for the compliment too. 🤟🥸🤘
1 23 March, 12:19
pic No. 6, the real a/c has this offset of the "centerline" at this part. Please check references.
23 March, 13:24
Thanks neo for the pointer. But I'm building it O.O.B. And to be honest I really don't care, if it looks fairly like a 109 then it looks like a 109.
1 23 March, 15:38
neo sent me a PM, explaining the misunderstanding. So, if you're going to like my reply I would hesitate to hit the button. Many thanks Mates.
23 March, 16:15
Keep fighting Mark! Love the Eduard kits, but I always laugh at the "Weekend Edition" title. I mean you still need to eat, sleep, use the bathroom…
2 29 March, 22:55
True. Doubtingmango (Fuck, I'm exhausted typing that out) can we shorten it to Dou, or go? Besides the Loo and Fries, Yer gotta ave' a Beer. I'll werk' the Heavy Bag termerrow ' at the gym 🙄😅 Ave' A Good Un' Mate 🤟🥸🤘
1 29 March, 23:32
Thank you John, for the like and everyone else too who liked the album. 👍🥸👍
5 April, 04:25
Nice start and I feel your pain. I just finished a Hasagawa/Dragon FW190 from 1992. At the time of purchase this was state of the art. I finished it and posted the results on my page if you care to look, but I couldn't wait for it to be done. It came very close to a life on the Shelf of Doom but escaped that fate. 😀
1 8 April, 16:31
😄😄agreed ! Eduard had great box art but nothing beats a Tamiya build. Beautiful work on this one. Can't wait until the final pictures.
1 16 April, 01:24
Nick, Eduard. Nice box art, enticing, beguiling and alluring. Detail Mhmmm! Construction infuriating, decals frustrating. Still like them however. I think I have just described Marriage 😳 😅
1 16 April, 10:18
Still looks fantastic! Fortunately, it looks like the black is the most effected in the decals. I would sand with high grit (2500 or higher) paper and then paint the black... Looks great so far!
1 16 April, 15:54
Desert Marlin thanks yes she's kept her looks. You are right about the black, there was some indication on the other crosses in that grey blooms were appearing. I used a cotton bud to press them out, but unfortunately when applying solution to that cross it broke. I agree way to go high grit and paint, but I'll let them settle a bit longer. 🤘🥸👍
1 16 April, 16:49
a adăugat un nou photoalbum.


30 4 April, 02:50
I spent the last week working on this one. Still needs a little more weathering, a little touch up and antenna added. Pretty close to complete...
4 April, 02:54
The Tamiya kit is amazing. The features of having the cowling open (or closed) just by taking the prop off and then removing the closed cowling and replacing it with the open cowling is awesome. I was fretting which way to make the kit, but this is not a choice I had to make. It's made with both options simultaneously and configured as needed for display!
4 April, 03:03
Thanks!The mottling is really kinda unpredictable depending on the paint I use. Right now, I am running out of the Model Master Luftwaffe colors so I am switching over to the Mr. Hobby Aqueous colors. They are really fine for sure!
1 4 April, 04:00
a adăugat un nou photoalbum.
12 imagini
Bendix Model J
1:48
I wanted to finish the fuselage halves as much as possible before building the interior and closing it up. Masking would...


Proiect: Bendix Model J

11 28 February 2024, 20:01


a adăugat un nou photoalbum.
20 imagini
Sukhoi Su-12
1:72
Looks like a speeder on Tatooine like this.


Proiect: Su-12

21 5 April, 17:33


a adăugat un nou photoalbum.
69 imagini
Going Downtown
1:48
Still not 100% correct regarding panellines but looking more like the real thing.


Proiect: Going Downtown


 19+
19+ 19 1 April, 16:18
count me in - I see this is going to be a great reference for my Intruder 👍
1 2 April, 18:51
Nice, this is why my kit is still in the stash, it needs a lot to make it a realistic A model. Great work.
1 9 April, 15:23
Interesting to watch, and to hear/see what you're doing on this kit. I'd always heard that Hobby Boss' A-6 were the best in 1:48, and much preferable to Kinetic's. Seems it still needs a bit of work!
1 9 April, 19:18
It looks way better than the Kinetic kit. Revell/Monogram are outdated. So Hobby Boss is IMHO the only way to go. And so far I am happy with the progress of things. It's not the perfect kit, but quite doable.
12 April, 06:33
a adăugat un nou photoalbum.


11 19 March, 16:15
This will be one of two PR.XIXs that I will be building, one WW2 and one post war. 🙂
1 19 March, 16:17
Have made a start on the Swedish PR Spitfire. Cockpit and internal of fuselage painted. Main difference between this version and the Club Ltd Edition is that the decals are more detailed in the Ltd Edition. Note this version not even a control panel decal. 🙂
Welcome along for the ride Robert & Lukasz, you're both very welcome. 👍
Many thanks mates for your interest and likes Robert P, Moreno B, Lukasz G, Patryk S, Martin W, Neil & Villiers DV. 👍
1 30 March, 16:05
Fuselage together and wings prepared with Vallejo Model Air interior green. 🙂
Many thanks mate for your interest and like Duster_d. 👍
31 March, 15:18
Wings and tail plane now attached. The wings required masking tape to hold them to the required angle. 🙂
7 April, 16:18
Primer and pre-shading added and then Vallejo Model Air Faded PR Blue airbrushed on to upper and lower side. 🙂
Many thanks mates for your interest and likes Живко Джаков, Bozo & Tibor S. 👍
16 April, 15:41
a adăugat un nou photoalbum.
92 imagini
ERA-3B "Whale" Skywarrior
1:48
Wash on main surface areas is done. I will continue with darker one in slots and wing folding areas.


Proiect: ERA-3B “Whale” Skywarrior


 2+
2+ 56 8 October 2024, 16:31
How did I miss the start of this one? Looks sweet so far! Pulling up a chair 💺
1 25 November 2024, 08:28
Large airplane. Nicknamed "The Whale" because it was one of the largest aircraft to ever trap on an aircraft carrier! This is a great one to watch!
19 December 2024, 01:14
Not sure if you have seen what Trumpeter did with the RA-5C... it's kinda rough too!
14 February, 03:17
Hi Desert, I haven't checked Vigilante yet, but I believe that Trumpeter did their best to challenge us😁😁 After this one, I will take a break from big planes and enjoy some fighters from Eduard😉
1 14 February, 16:01
Thanks Petr! Yes, I do the same. I have built a couple of fighters from Eduard and Tamiya lately! My Vigilante came out good, but it was a ton of work to keep the spine straight on it.
14 February, 23:17
Thank you Jakube, it is not perfect, there are some places they need final touches. I struggle with sharpness of the masks, maybe the plotter I have is not that precise. I need to find the proper setting and better way to construct masks.
1 9 March, 17:16
That surprises me. It looks great in the photos. So, good luck with setting up and constructing masks
1 11 March, 20:15
Great work 👍
Depending on the size of the elements wo be cut the drag knife of the cutting plotter has its limits. But yes, such a "jump" inside a line (the D in pic74) should not happen. A vector graphic program is a must (I use Inkscape). But it depends also on the masking material, each one has its own (dis-)advantages. For example "Oramask 810" allows fine details, but has problems with surface details.
14 April, 20:50
Hi bughunter, thanks for comments and I fully agree. I struggled with precision of cutting. I need to invest my time and find optimal graphic program and setting of the plotter. I actually have Inkspace installed but I didn't use it this time. Regarding the material I use Oramask 810, which I like to work with. In the end I gave up trying and wanted to progress in built ignoring mentioned issues with mask.
1 15 April, 20:37
a adăugat un nou photoalbum.
30 imagini
Special Hobby | No. SH48017 | 1:48 | Gloster E.28/39 Pioneer (Squirt) (WIP)
1:48
WORK IN PROGRESS. UPDATED: 18/3/24...


Proiect: Gloster E.28/39

34 27 August 2024, 11:16
Hi Mr D 👋 yeah it's a cute airframe! Especially when you sit it next to a same scale F-14! Hahaha. Thanks for your compliment and interest 👍
8 October 2024, 15:40
I built this kit not long after I returned to modelling. It was a bit of a painful experience and I haven't gone near Special Hobby since. 😄
No doubt you'll make a much better job of yours.
12 November 2024, 10:40
Hi Gorby and Denis 🙂 Thanks for stopping by with comments and info. @gorby, yes this is the first Special Hobby kit I've attempted. I'm not confident I will accomplish what you kindly say. Nevertheless (with your talent) it's very kind of you to even suggest - I'm chuffed! @Denis, I'll definitely follow your advice, metal finish (not yellow) it is for the wheel wells. Thanks also to those who've liked 🙂 👍
13 November 2024, 11:27
Going through your photos and noticed you had do, a lot of repair work before moving forward. However your end result is outstanding.
1 18 March, 18:57
That will be an important piece of history for your collection 👍 And you managed a crude kit. I would never have thought of using cable ties 🙂
1 18 March, 19:21
Can really see the crossover from I.C to Jet power on this model, Great build Neil.....a very important historical aircraft 👍👍👍
1 22 March, 21:41
Welcome mates! Thank you for your interest, your kind comments and observations. Yes, I'm not sure I'm a fan of Special Hobby kits! But I'm giving it my best shot. Thanks also to those who've liked, I'm nearing the finish line on this one now 🙂 👍
1 4 April, 08:20
a adăugat un nou photoalbum.
7 imagini
ESCI | No. 4071 | 1:48 | F-86E Frecce Tricolori (WIP)
1:48


Proiect: North American F-86 Sabre

1 16 April, 11:27
a adăugat un nou photoalbum.
50 imagini
MAN TGM GW-L 2
1:24
Nearly everything painted and almost ready to assemble


Proiect: MAN TGM GW-L 2 KatS


 2+
2+ 20 28 January, 14:06
")
")
Thanks Boozer. But I think I will build my Unimog first before building this truck. So I won't run out of kits. I always wanted to buy the recovery truck and convert it to a German one, simply changing the cab to a Mercedes Benz Actros or MAN TGM.
1 10 February, 07:55
I also got that kit recently! Looking forward to your modifications. My one will be probably just out of the box
1 11 February, 18:59
I seem to remember KFS used to offer a off-road conversion kit for MAN trucks. I'm pretty sure it at least included the bumper which might be hard to scratch build if you can't print it. Can't find the kit anymore tho
2 28 February, 11:11
I searched on the internet for this kit but I couldn't find it either. We will see how this trick turns out
28 February, 12:25
Just realized the bumper out of the box is accurate for offroad already since it's a 4x4, and the same as in your pictures. I had started working on a similar project but with the older MAN TGA kit from Revell as a basis and that required heavy modifications all around. I'm glad you're moving towards more custom projects because they are a lot of fun to get into, and watch other people get into...
1 1 March, 15:25
Nice stocking up and scratch building... Should be a very interesting build.
Actually, I never saw this concept of fire truck with a rear lift and wheeled equipment carts. Can see the benefits of this when a lot of equipment needed to be moved fast (at least until hitting the first step...).
1 6 March, 17:59
Thanks Goldman. There is another reason why these trucks make sense: You can carry different stuff which is normally loaded by special vehicles. So you don't need different vehicles just this one and the equipment carts and you are ready for nearly everything
7 March, 07:04
The headlights guard looks very good to me. Did you use plastic or metal rods? I don't think you can get any thinner with plastic
1 17 March, 05:10
Thank you Goldman! I used cables. I bended them to the right shape. The outer and inner parts are from the same cable just with and without isolation
1 17 March, 06:14
The tires looks great. Much better than those in the kit. Well worth the investment
20 March, 20:25
I have had some success printing thin parts for the kind of headlight detail you are working on. They are very fragile and I've never tried painting them but I think there's a lot of potential for this kind of application. I uploaded a picture here: FDM 3D Printer experiments | Album by Ecko
21 March, 11:25
Currently I don't have a 3D printer but I think of buying a resin printer for such purposes. It would help me a lot with scratch building. Lets see wat the future brings
1 21 March, 11:50
Just make sure that you are aware of potential hazards that come along with resin printing.
1 21 March, 20:45
Yes handling resin and post processing it takes a lot of extra work to do properly. And space too. I can't do it at home because I live in a flat with my cat and I have found a filament 3d printer can unlock many possibilities to enhance scratch builds without the hassle and hazards of resin.
21 March, 21:28
I've gotta admit, I had fun with my entry level filament printer, but I now own 3 resin printers too, and they're never turned off. Yes, they do have to be taken care of, especially with regards to the resin, but it's worth it.
At this point I'd better add, all mine are in my purpose built mancave, however I did run them in the house kitchen, for a while.
Each one has it's own personality, kinda like a cat or a car? But once you hone into it, you can create almost anything? The details are immense and your own imagination, is your limit!
I've literally just printed a 1/14 truck, with all the bells and whistles, and I'm happy with the results. It's taken me around 2 weeks, but I did use 6 bottles of High Speed Resin, which without, probably would've taken me another 3-4 weeks?
For you guys in the know, Standard resin prints at roughly 4 layers a minute. High Speed Resin is around 12 layers a minute.
My love for the printers, is because I can print models, that we can't buy?
I love scratchbuilding, but now I can flick my finger and the cab, hood and sleeper are printing, while I'm building the chassis? It's definitely been a game changer in my life, without a doubt.
You definitely need to be aware of the dangers though. Plenty of ventilation, gloves, mask and goggles. I also have mini air purifiers in each printer, and heaters.
And whatever you do, don't smoke near the 99% alcohol!
And most importantly, don't drink it!
2 25 March, 17:26
Thank you Bozzer for your information and opinion. I will see what the future brings and if it's time to by a printer, I will definitely research and inform myself about it a little more and maybe come back to you guys, because you know the terms of 3D printers definitely better than I.
And don't worry, I do not smoke or drink alcohol. So this won't be a problem 🙂
1 25 March, 18:22
SCM: I accidentally entered the new topic "Scammell" without a capital S. Could you adjust that? Thanks!
16 April, 12:21
It seems you can remove the topic entirely: somebody moved away all the entries.
16 April, 15:15


a adăugat un nou photoalbum.


91 9 February 2023, 21:57
For future memory, since it will suffer weathering for the diorama.
Thx Danny_Aviation.
9 February 2023, 22:46
@ James C, thank you for your kind comment. It was born for the Dio so it will end up in it. But I must confess that your words pass my mind 🙂
@ Mathias thx mate, yap I definitely go for it, not sure about the results but that comes with every project, so...
@ Alec K, thx. No need for that. Yap, I built it. You can see the "build log"? in my Mariupol album.
@ Michael, thx, well, this are the photos of the exhibition hall side. The other sides are already a bit damaged for the Dio, so 4 will have to do. If I had a bit more detail in the lower part on this side before weathering, I may change the side ones.
11 February 2023, 00:05
"He always likes to keep his fire engine clean ... it´s a clean machine ...... " (Penny Lane - The Beatles) 👍
11 February 2023, 11:20
Glorious. Dumb me found the build album 😉 👍
Mariupol 1941 | Album by MIG (1:35)
13 February 2023, 12:20
Hello mates. Sorry for the late reply. Didn't notice so many nice comments. Thank you all very much. Apreciated.
@ Alec K, np mate with so many great works in here it's easy to lose it. Thx for your appreciation anyways
@ Victor Ivlev, thx glad you like it, the saloon version it's finished. Can't show the left side because I've already shot the window 😉
@ Benoit, my pleasure mate, glad you stop by and comment. Thx.
@ Vagabond, glad you liked it. Coming from a professional it feels great. When I was a small boy I liked everything about firefighting trucks. I I remember opening a Christmas present Before Christmas, playing with the remotely controlled semi trailer truck until the truck's steering broke. wrap it up again and wait for better days crying my heart out 😄
@ Jean-Michel Tilquin, thx for your kind words and recognition. Coming from such a talented modeler feels even better.
@ Robert Podkoński, thank you. Really glad you liked it, and comment.
@ Neil, you are to kind mate thx a lot.
@ Mark Sherwood, thank you for stopping by and such nice comment on this different and unique subject indeed.
@ Sergio Ordonez, thx my friend I'm very glad you like the wood work, apreciated.
@ Kurt Shepard, thx I hope you are right.
@ gvizbi, I really admire your work too my friend. I'm glad you comment a different kind of tea 😄. Also not my comfort zone subject but I'm really happy that I've got the courage to embark on such endeavor. It was a great experience for me and enjoy it a lot.
7 July 2023, 23:16
I think this big project that required a lot of patience.
Congratulations on a great finish. 👏
9 July 2023, 13:18
Hi MS K, Sorry for the late reply. Yap I enjoyed the lot of scratch to be done.
Thank you for your kind comment. Apreciated
8 September 2023, 10:49
Thank you Neuling, a comment from such talented modeler is always very welcome. Appreciated.
The Challenge now, is to weather it and take her to Mariupol 1941 😉
I take the opportunity to upload some photos of the real deal. I Hope the firefighters mates like them.
24 March 2024, 13:21
Salut Rui S , c'est encore une fois du superbe travail , félicitation 🙂
25 March, 16:23
@ GuyW, Thank you for commenting. Some of it it's realy wood;
@ Randy Kriegel, Thx for stoping by. It's now a little bit uglier because I've already started the weathering process to put it in my "Mariupol, October 8, 1941" dio;
@ Mathieu CACAULT, Thank you so much for your kind words, it was a very interesting scratch build project, to put in my above named dio.
1 2 April, 11:08
@ Arnold Mertens, Thank you so much for stoping by. Glad you like this one.
2 6 April, 14:50
Thank you for your kind comment Evan H. Much apreciated.
The full scratch building process of this Fire Engine can be seen in My Mariupol album.
16 April, 14:11


a adăugat un nou photoalbum.
71 imagini
1936 Mercedes 540K Maharaja Sport Roadster
1:16
Hand painted each wheel cap. After the acrylic paint dried, a very fine-grained sandpaper was used to expose the silver ...


51 20 October 2024, 09:57
The kit shows its age. I hope, with a bit of work will turnout alright.
20 October 2024, 17:00
Will be keeping eye out for updates.
The messy glue tubes, the Beriev lm building came with a little pot of glue that you Peirce with pin on one side 🤣
Long dried up.... I did use it back when l was a kid....lots of sticky thumb prints.
Nice project 👍
23 October 2024, 18:23
Gentlemen, thank you all for your kind remarks. I have been chipping away slowly. The part count of the kit is not that high, but the version I chose as well as the paint scheme results in a lot of challenges to my skill level which I thoroughly enjoy.
6 November 2024, 18:55
Hi Villiers 👋
Your doing a good job...it looking really good 👍
Nice kit... who is the manufacturer??
6 November 2024, 21:14
👍 Thanks Villiers ...l like to look different manufacturers up n see there range 👍
7 November 2024, 13:53
Heading towards being a nice model this one, like the engine and interior work.
Good little kit 👌👍
8 November 2024, 16:59
Thank you Mr. D for your comments. The kit certainly shows its age. I remain a sucker for the larger scale classic cars.
12 November 2024, 03:02
Oh, This manufacturer I've never heard before.
I don't think it will be easy. 👍
24 November 2024, 11:32
I have experienced several paint disasters. Enamel paint kept on forming scales. In the end I had to strip the paint back several times to the primer level. Progress should be quicker from here on.
21 December 2024, 14:48
Hi Villiers 👋
Glad your getting on track a bit now, do you think the plastic reached with the paint ?
Nice to see it taking shape 👍👍
21 December 2024, 19:45
Hello Mr D
I started off with a primer, Mr. Surfacer 1500 thinned down with Mr. Color Leveling Thinner which came out just fine.
I believe that the paint layers were perhaps too thick working with enamels. I believe that I should do thin layers (well thinned) stretched over more than one day.
22 December 2024, 19:41
Annoying when the hard work is undone! ... Just have to pull it back ....and you done that, hopefully be good going forward 👍
I only use water based acrylics, Humbrol and Deluxe gloss dried nice n hard after few days, some of the other brands are bits soft!!
I've had to many dramas with Enamel 🤣 but l expected it's a better option for a car ?
I mainly use Vallejo, AK and recently been using the new ICM paints (very impressed 👍)
Did you have to do some Chrome n conducive paint striping on this one ?
👍👍
23 December 2024, 00:30
@Lorraine ...yes and the glue had a habit of going everywhere but on the model 🫣🤣
Looking nice Villiers 👍 taking shape now,l ike the leather tone of the leather seats 👌
1 19 January, 13:01
Your car is really taking shape, love colors you have chosen. As for the tube glue, i remember as kid thinking that getting a model kit with supplied glue was great until you open it. (That was the first mistake)
2 19 January, 14:23
Getting Leather to look right is not easy " But you more than succeed on the door cards"
Doing some nice work 👍👍
1 25 February, 16:41
The Mercedes is on its own wheels at last. I am now tackling the light clusters.
15 March, 16:32
Thanks for documenting the surfacer process. Looking very nice too!
1 15 March, 16:35
Looking great Villiers 👍
The Tire's look very original and radiator grill turned out very good.
How do you get on for the Hood/bonnet hinge??
Nice work 👏
15 March, 18:47
Thank you Jennifer and Mr D.
Mr D, it is a real hinge supplied with the model. See photo 36.
1 15 March, 19:20
I love the egg carton idea! Absolutely ingeniously!
Great work on the model too.
1 2 April, 12:24
Gentlemen, thank you for your kind comments.
I hope to stick a fork in this project by the end of this weekend.
2 April, 13:47
Amazing step by step process! I love your technique for painting / reducing the fine detailed caps - absolutely brilliant!
15 April, 18:56
/ro/search.php?q=*&page=newsfeed&fkSECTION[]=Newsfeed
search-solr.php?lang=ro
35
35
/ro/search.php?q=*&page=newsfeed&fkSECTION[]=Newsfeed
35
todo