

AFV's Australian Viet-Nam Mk-V "Centurion" tank.

The box art is a little short on factual detail, but there are many imaged to be found by looking in "Google images" for this particular Mark, being the Mk-V.

Vung-Tau beach, South Viet-Nam, and AV1356 is off loading the centurions that were then based at Nui-Dat

Note the extra armour on the turet too and the lack of the two road wheels on the front hull.

Opening the box reveals a very well detailed instruction booklet.

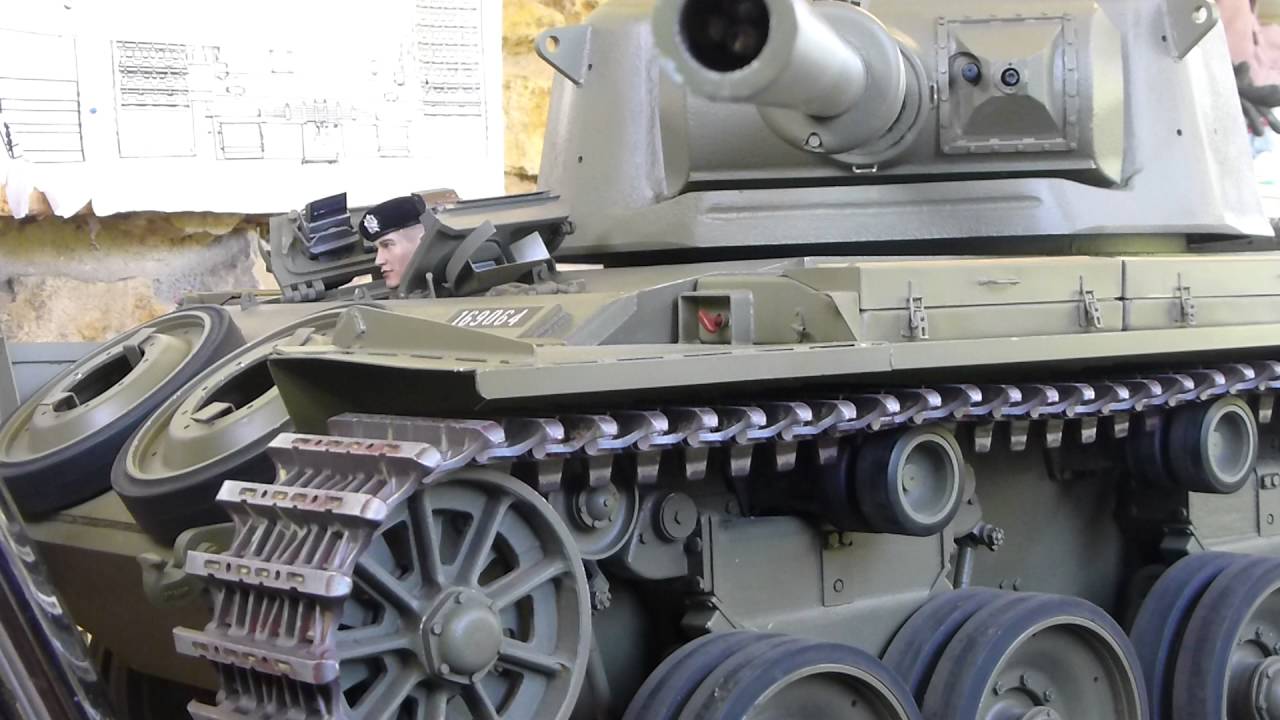
The amount of etched metal is minimal and, the mesh for the equipment baskets is exactly as it was.

A noticable extra for better detai are the "Rubber" road wheel additions, and these could be 'chipped' and marked up like it has been used in rough terraine, like all centurions of the day before they are added at a later stage of the build.

The tracks are vinyl and the gun barrel is turned metal, including a metal barrel for the machine gun that is mounted beside the main gun on the turet. There are metal links that will be added to the turet too.

The clear parts are for the main glass of the night spot light, the perriscopes for the commanders hatch and driver, plus the 'running lights'.

The detail looks promising, and once I remove the runners from their bags, I will have a clearer idea, but so far, I am happy.

The metal springs for the rolling suspension system looks well made and the parts look crisp and clean.

The turet looks to have that characteristic "cent' look and there seems to be some surface texture there of the casting.

There are quite a few number of the flow tube for the excess plastic all over the inside of these parts and no doubt, there will be a lot of 'clean up'.

The storage basket frames look to be in scale and all other parts seem to be of good tool quality.

There looks to be many small parts and I will be taking great care with their removal and clean up, and I am NOT feeding the floor any more parts as I have bought a "Drop sheet" that all smart house painters se, and from now on, I don't plan on losing any

This is the 'flip' side of the previous image. So all in all, I think this will be a most interesting build indeed. 🙂

The instructions are explicit in the assembly process and the warning symbols are obvious too.

Now I have looked at the detail of the wheels, every nut and bolt head is an exact copy of the genuine beast.

You can almost see the threads on the studs. !!


These are the springs for the suspension units, six in all and soft enough to let the suspension 'travel'.

Pivot arms.

Ready for the first step of the assembly.


completed .

from the other side

The suspension is quite complex in it's operation and according to the instructions, all parts work just like the real machine, but I found some correctable issues.


I still have three more of these units to assemble yet. !!! But I have made preparation of the parts that needed altering.


There are two lots of plates yet to be added here, replicating the series of bolts

And here

These are the Grab Handles for lifting the engine cover plates, and all the excess will be trimmed away.

Starting with one, and the rest soon follow.

Complete.

The strap loops are all molded in place, but, I am wanting to have the straps in place with their buckles, so I am making the loops from thin silver wire, but I will first remove what you see here.

The same is being done to all the strap loops I see, and it is not hard to do.

My production line of loops, all ready to be placed in the holes I need to drill.

When I removed the kit "Loops", I left the very ends in tact for that finish to be in scale.

These can be snipped off, but as they will not be seen, I will leave them as they are.

The reflector mirror of the night light I will be doing with alclad "Chrome", much better than plain silver.

The drivers hatches and periscopes, internal colour was white with leather bound cushions and black rubber gasket seals.

The periscopes were white with bare metal clasps.

The exhaust pipes before this.................>


Once it is in place, deep in the casing, it will look like the REAL thing, much much better than just plain silver paint.

Alclad is simply the best paint for replicating chrome, and just plain silver will never be enough.

All the tie loops are finished and it looks 1000% on the original.


Preparing for the Testors buffing metalizer paint, "Steel".

The luggage rack, with etched metal part. Very fickle with the assembly, but all went well.

This space is for stowage of the search light when not in use.

There is a hell of a lot of preperation I go to to get all I want just right, as I have a fair bit of exposed and polished metal to show and I have to mask off a fair bit.

The mesh goes on the inside of the cage, but in the instructions, it says it goes on the outside..................WRONG !!!!!

The actual metal mesh was spot welded in place, from the inside.

Maskol is the purple stuff and being rubber latex based, it is easy to use and covers well.

The tracks I have sprayed testors "Steel" buffing metalizer and high lighted the areas silver that have a hugh contact rate with other moving parts like drive sprockets and ideler wheels.

Drab olive is the colour called for, but the Australian tanks had a deeper green and was semi gloss.

Now the assembly of all these sub assemblies begins

These track support runners were always as shiney as can be, from contantly being in contact with the track while the tank was in motion. NO MUD !!!

Every surface that has contact with an other surface will become highly polished, free of any dirt or soft earth it may have transitioned through, like ALL tank tracks.

The drive sprocket was the hardest working part of the drive train, and as the dirt, dust, mud. and anything else it moved through, it all helped to polish these parts because of the high ware rate, NO RUST. !!!

The only 'weathering I will be doing will be the red dust Viet-Nam was famous for, as the mechanics were constantly cleaning their tanks with high pressure water cleaners, so you will NOT see any mud on this build, but the red dust got into every spot itd

I keep harping on how shiney all the track steel is, well it's true. Just ask any tanker how polished the tracks became from the use and abuse they went through.

Testors "Burnt Iron" buffung metalizer for the exhaust system.

The search light 'mirror' looks just right to me, being alclad 'Chrome" instead of just silver paint.
Comentarii
17 December 2015, 08:24
I kezza, welcome back.
This AFV kit looks great and it's nice to see that it needs just a minimal PE fret. Looks promising indeed.
I'm in 👍
17 December 2015, 12:36
Jonns, Can you suggest where I could add some wings please mate, (🙂)as I know your imagination is as diverse as one could wish for, and I will try anything once. LOL 🙂 👍
17 December 2015, 13:17
oh I thought, because you have built lately many things with wings ...😉
17 December 2015, 14:00
I try to build all kinds of things Jonns, as I would get bored very quickly if I just built "wingy things". 🙂
17 December 2015, 14:07
I am looking forward to it! 🙂 This will be an eye-catcher again! 🙂
17 December 2015, 14:39
Great expectations eh. ? 🙂
Well, I know I will have a lot of fun, as I do have a personal 'connection' to the Centurion, having spent some time at Puckapunyal in Victoria when I first joined the army, (@ 17), and visiting the Kapyong barracks area from time to time where they were based. 👍
17 December 2015, 21:45
A personal connection is always good for a modeler! Count me in, Kerry😢
18 December 2015, 09:46
Holger, Good to know your watching mate. 🙂
I do have a soft spot for these tanks, and watching them coming back from the firing range, smothered in the super fine dust of country Victoria, and the noise of their tracks on the concrete apron roads was just awesome. 🙂 🙂
18 December 2015, 10:17
Thank you Bart, I am really impressed with the fact that it is as detailed as it is, and the tooling to get that result must have been done by CAD. Just so well produced. 🙂
18 December 2015, 11:43
Detail increased much since I build my last AVF in that scale – welding seams, casting surfaces etc. and you have had a very good start on this Kerry!
Cheers, Christian
20 December 2015, 14:17
Christian, your spot on about the detail in the kit, and AFV has really developed into the kits one 'must have'. and I am really enjoying this. 🙂 👍
20 December 2015, 15:10
Hey Kerry, decided to stay on the ground now? Or just a short terms switch away from airplanes to ground vehicles?
That´s a nice one, looking forward to see what you make out of it. 👍
20 December 2015, 15:17
I had my wings clipped Matthias, and I am quite enjoying the change. hehehehe. 🙂 👍
20 December 2015, 19:31
Was just thinking about getting a centurion myself, or a hellcat (also AFV) - hope to see some great pics of this project in future 🙂
21 December 2015, 01:46
Steven, AFV is just so good now, and the detail is all there, but always, there is room for that extra fine detailing.
I keep putting the bar higher and higher for myself, but it is really quite easy when the detail is already there, as it just needs a little enhancing, that's all. 🙂 👍
21 December 2015, 01:50
I have just received a Bussing Nag L4500S from AFV Club (haven't built it yet, but the kit looks very nice - looking forward to do this one. Its only my 3rd kit so I can't say who is better than who though 🙂
21 December 2015, 02:19
Kerry Cox It was the earlier models that were questionable, but what is on offer now is great right across the range. 🙂
Have fun anyway Steve. 🙂
21 December 2015, 13:54
Kerry says they are good, just above.
I've just yesterday started an AFV kit (Bussing Nag L4500S) but right from the start I am having a couple fit issues. Maybe just unlucky with a few bits at the beginning though.
22 December 2015, 23:35
really wanting info on - flash, number of sprues per say £30 1:35 kit, how are the details and scribing compared to trumpeter, are there any PE parts, stuff like that, am totally unfamiliar with AFV kits so any links to reviews etc welcome, thanks
22 December 2015, 23:45
Hello Kerry. Nice cent. I have looked at this kit a few times on line but had no idea it was that nice. Thanks for sharing. travis
22 December 2015, 23:57
Terry, If you go through the images I have posted so far, ther will be some images of the sprus, photo etched and a bit of a 'blurb' on each image.
I hope they help .
Mine cos t $60.00 Au, ABOUT 35 QUID YOUR MONEY
google.com.au/url?sa..m=bv.110151844,d.dGY
Cheers. 🙂
23 December 2015, 01:13
looks a good kit but i think Trumpeter are just a tad better quality
23 December 2015, 01:34
Kerry Cox Thanks James, I did have some spare time and it was a great time.
And Terry, As for the comparison between the AFV and Trumpeter. I have never built a Trumpy so I have to take your word. ;-/
23 December 2015, 13:35
I am actually on my second one James, as I was planning a diorama of a pair of them in tall grass in Viet Nam in a camp out situation with hoochies up and engine hatches open, :-/
But I am looking for the engine compartment internals that will help some what.
There are some good images I have come across of a perimeter patrol in company with some APC's that could look quite busy if I can get the right looking vegetation. 🙂
8 August 2016, 21:35
OK. 🙂 I can do that, and this time, I have really made an effort to get all the periscopes the right colour both inside and out and especially the viewing block prism's. Tamiya acrylic clear green. Just enough to 'discolour' the glass.
Here is an awsome link for the Cent. google.com.au/url?sa..cCWdQlmtwc1Apu7oNVFg
9 August 2016, 05:51
Just had a look at this Centurion. I have one in my stash, too, but I am afraid I would go nuts to redo all the tie-down straps...
Modelling at a high quality, just as I learned to know from you!
9 August 2016, 13:24
Thomas. Thanks mate. 👍
I just get too fussy for my own good at times and I have a tendency to tackle things that should be left well alone, as I do spend far to much time and energy on stuff that will never see the light of day. :-/
With the second Mk-V I have under construction now, I am looking at an open engine compartment, but I am yet to find any on line. 🙁
The 'tie down' straps I am making will be from masking tape I have, and I put some body powder on the tape to reduce the 'tac' qualities making them easier to pass through the 'loops'. 🙂
9 August 2016, 19:42
I bought this tank years ago on a model exhibition very cheap from a private person. Checking it after coming home the bottom was completely warped. I replaced it with a thick sheet of styreen. Pity, details lost. But then, it's only the underside. The Mouse House edition about Australien Centurions supplied lots of details.
On this moment it's one of my kits resting, half build, in store waiting to see the daylight again.
So I will follow your built with interest.
9 August 2016, 21:20
Lex. Have you tried getting the 'warp' out of the lower section by holding it in hot water and twisting it back to something like it was. ? 👍
How much have you actually done with the build. ?🙂
It is a very well detailed and at times complex build, as there are just so many small but vital parts that all have a place and role. 🙂
Get it out and see what you can do with it now mate. 👍
9 August 2016, 22:11
It was not only the bottom but also the sides who where badly warped (explaining the low price?). A new bottom plus some reinforcement ribs did the trick. I can remember that the kit built very nice without any problems. Only the fit of the tires was a bit sloppy.
I will look for some foto's I have from the built. This moment I'm busy with Hobby Boss M4 High speed tractor, AFV's Long Tom, Mirror's Diamont T and Bronco's Bailey bridge. Planning to put them thogether in a diorama. So finishing the Centurion have to wait a little longer ;P.
10 August 2016, 07:50
Ive really no clue about tanks, but it looks interesting - so count me in😉
10 August 2016, 08:45
Lex. I used to build Bailey bridging when I was a young soldier in the Engineers (Aus army), and it is so good, that some that were built during WW2 are still in use in India and Nepal. 🙂
10 August 2016, 08:54
I found some pictures of my Centurion and will try to get these on SCM. I have these pictures where the mesh from the stowage basket sits at the outside. Then I have found a source for the Meteor engine used in the Centurion. It's from Resicast; item 352330. I have some stuff for my Churchill tank of this Belgium firm and they make beautifull stuff. So you can take a look at their site. resicast.com/contact/index.php
10 August 2016, 15:05
An ENGINE. ???? Fantastic. Just the news I need mate. 🙂
I will be posting som images of the second build just as soon as I have done some work with the engine compartment.
The periscopes were a lot more of a challenge this time, as I wanted to get that pale green effect that looks real. 🙂
11 August 2016, 01:57
Hope you can lay hands on the engine. Yesterday I placed some pictures of my Centurion on SCM. So if you like you can, in my albums, take a look at my brew. So you have worked on Bailey bridges. Heavy work I suppose? I can imagine that building the real bridge goes quicker than the Bronco kit (I don't like the repetitive work very much)
11 August 2016, 07:25
Beautiful workmanship there mate, looking forward to seeing more.👍 Way down the road I plan on building AFV's Gun Truck in a Vietnam dio.
11 August 2016, 12:34
Lex, the genuine bridging really is heavy work, as it's done section by section and gradually pushed out to reach the other side by building more counterweight lengths than the distance to be reached, all being pushed out on rollers. Yes, quite fascinating. 🙂
Have a look at this. 🙂 Youtube Video

11 August 2016, 18:12
Mike, I was looking at an other Centurion build here by lexjassies and I noticed the use of brass for the small strap loops with flattened ends like the real thing and if I would have known that they were available, it would have saved me so much work. 🙁
Your Gun Truck dio is something I would really like to see Mike, as it was a strange place to have tanks and all the support they needed, as the terrain was just so 'unfriendly' for them, and there were a lot of rescues of bogged and snapped track situations there from what I have been able to find out.
11 August 2016, 18:19
Thanks Kerry. The pictures of the nam centurion are great. Next month I will get one or two to play with. Thanks again. Travis
11 August 2016, 19:08
Kerry, the tie down cleats are from Aber "35A50". The casting numbers up front of the turret are also from Aber "35A59". For the tie down cleats I made a simple jig from scrap plastic to form them. About the Bailey Construction Video; impressive work!
11 August 2016, 19:26
Lex. I am most impressed by your brass work, and I am pleased that it is something I can buy. !!! LOL 🙂
Would you be so kind and pass on the way you made the jig for making these TD cleats PLEASE. ????
They look so bloody cool mate. 🙂 🙂 👍
Travis, there are some really good vids on the Australian centurions in Nam.
Youtube Video
11 August 2016, 21:04
I placed a picture of the jig in my album. The demensions are depending of the width of the cleats. It's a bit trial and error. I think it took me about 15 to 20 minutes to make.
11 August 2016, 22:04
I think I might start the Gun Truck sooner rather than later, I'm always changing my mind on what to build next so I'll see what happens when I finish the Gainful / dio build. I do have the wrecked Fw 190 dio I want to do too. 🤔
11 August 2016, 22:06
Yeah I keep 99% of my stash in moving boxes ( last count was 25 ) so I can't see everything I've got otherwise nothing would ever get finished. 😄
11 August 2016, 22:32
Michael. I have just ordered (Back ordered) from BNA, the cleat sheet and the number LEX posted is not quite right(34A50) as it is actually Aber 35A059. 👍
The look "Universal" to me. 🙂
12 August 2016, 01:30
Cool... I've decided when the time comes I will build my Gun Truck and have my AFV Bulldog on the same base. Even though it won't be 100% correct because I don't think the Yanks used it, they let the Sth Vietnamese have the fun of blowing things up with it.😢
12 August 2016, 04:06
I see that I mixed the numbers 50 and 59 up : (
About the jig; I rounded the shoulders of the bottom part but think if you keep them square the Tie Down Cleats will be straight and more prototypical. Hope you know what I mean?
12 August 2016, 11:14
Lex, All is good mate, and I did notice very carefully the way you had it all stepped and sized for the best effect mate. I am so pleased you passed on that info . 🙂
12 August 2016, 12:00
Thanks for all the banter lads. 🙂
Every day, something new.👍
I love it. 🙂
12 August 2016, 19:25
Augie. !!! :-O 🙂
G'day my friend. 🙂
And how is the settling in going. ?
Worked out your work space and all your equipment. ?
I have lost track of how many times I have moved house over the years.
It's not my favourite thing really. :-/
At the moment I am really looking at thinning out my stuff as I am getting crowded out. And being a hoarder is no help either . Grrrrr 🙂
Have you got anything on the go yet. ?
Cheers. 👍
13 August 2016, 12:57
Album info
In 1966, 32 Small Ships Sqn, Royal Australian Engineers, took the first lot of armour to Viet-Nam on the LSM. AV-1354 "Brudenell White" and off loaded them on the beach at Vung-Tau.
This was the first of many Centurions to be deployed there, and proved most valuable in the support of the Australian armed forces stationed there.
Also, I have included a photo of Centurion tanks en route to Vung Tau in 1969 on Army vessel 1356
"Clive Steele". Photograph courtesy of David Perham, veteran of 32 Small Ship
Squadron.